Butter Mochi: The Perfectly Chewy Hawaiian Treat

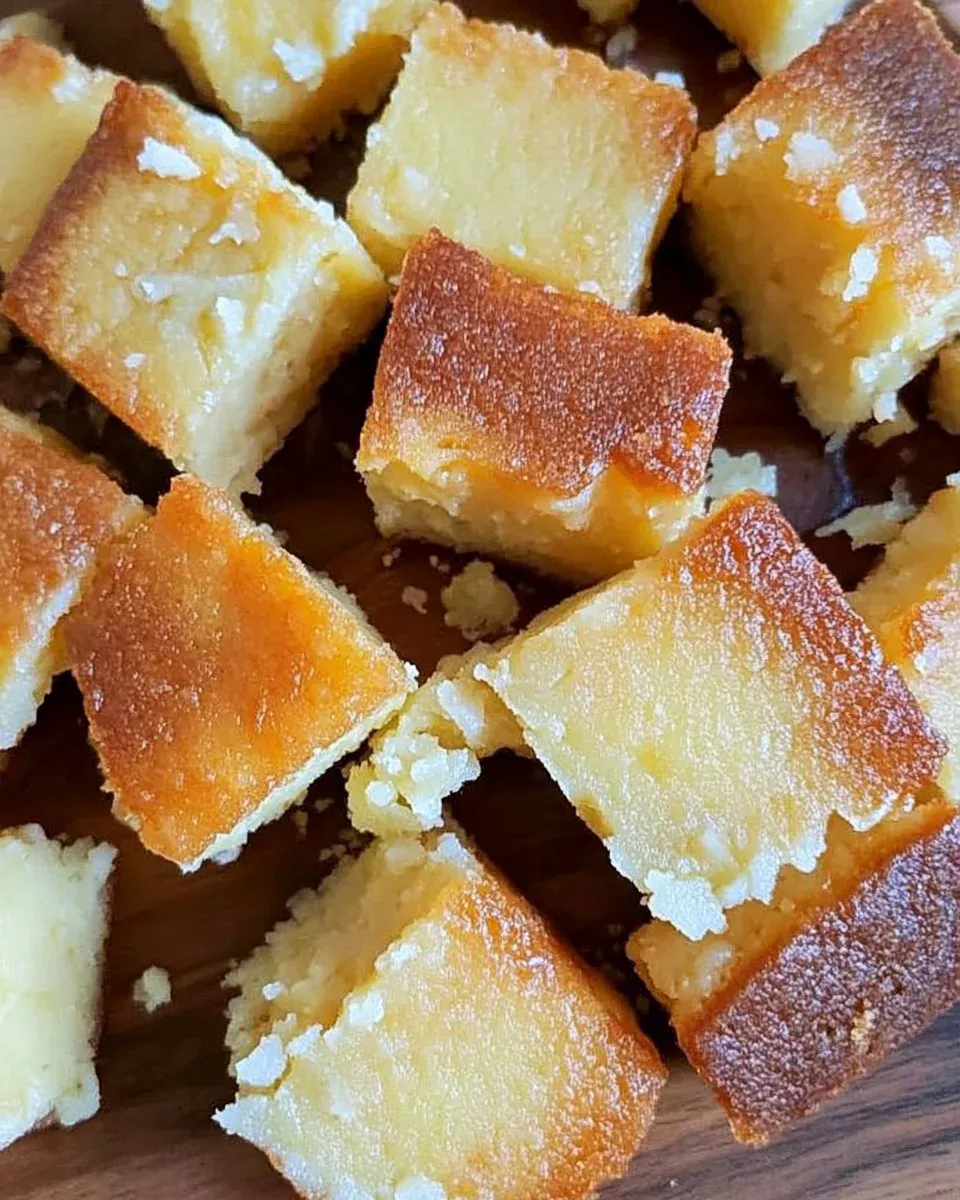
Butter mochi is a beloved Hawaiian dessert that combines the chewy texture of Japanese mochi with the rich, buttery flavors of Western cakes. With its golden, crisp edges and soft, custard-like center, this treat offers a unique balance of chewiness, sweetness, and creaminess, making it irresistible to anyone who takes a bite.

Unlike traditional mochi, which is often shaped into small, round pieces, butter mochi is baked in a pan and cut into squares, much like brownies or blondies. The main ingredient, glutinous rice flour (Mochiko), gives it that signature chew, while coconut milk and butter add depth and richness.

Whether you’ve tried butter mochi before or are making it for the first time, this easy-to-follow recipe is sure to become a favorite. With just a few simple ingredients and minimal effort, you can create a delicious, tropical-inspired dessert that is naturally gluten-free and perfect for sharing.

What Makes Butter Mochi So Special?

1. The Perfect Combination of Chewy and Buttery

One of the most distinct features of butter mochi is its unique texture. Unlike traditional cakes, which are light and fluffy, butter mochi has a slightly crisp exterior with an incredibly chewy and dense center.

The glutinous rice flour (Mochiko) is what gives it this signature chewiness, while the butter and coconut milk add a smooth, creamy richness that makes each bite satisfying.

2. Naturally Gluten-Free

Since Mochiko flour is naturally gluten-free, butter mochi is a great alternative for those who have gluten sensitivities. Unlike many gluten-free cakes that rely on complex flour blends, this recipe doesn’t require any modifications—it’s naturally perfect just the way it is.

3. A Taste of Hawaii at Home

Butter mochi is a staple in Hawaiian bakeries, potlucks, and celebrations. If you’ve ever been to Hawaii, chances are you’ve seen or tasted this treat. By making it at home, you can bring a little piece of island culture into your own kitchen and enjoy the rich flavors of coconut and butter in a dessert that’s both simple and indulgent.

4. Easy to Make with Simple Ingredients

Unlike some desserts that require precise measuring and complex techniques, butter mochi is incredibly forgiving and easy to prepare. You don’t need a mixer, and everything can be combined with just a whisk or spoon.

With only one bowl and minimal effort, you can create a decadent, chewy treat that’s perfect for any occasion.

Ingredients

The Essential Dry Mix:
  • Mochiko glutinous rice flour
  • Sugar
  • Baking powder
  • Salt
The Creamy, Buttery Base:
  • Coconut milk
  • Evaporated milk
  • Melted butter
  • Eggs
  • Vanilla extract

Directions

  1. Prepare the Pan: Preheat the oven to 350°F and grease a 9×13-inch baking dish.
  2. Mix Dry & Wet Ingredients: In separate bowls, combine the dry ingredients and whisk together the wet ingredients.
  3. Blend the Batter: Gradually mix the wet ingredients into the dry mixture until fully combined.
  4. Bake to Perfection: Pour the batter into the prepared pan, tap to release air bubbles, and bake for about an hour until golden.
  5. Cool & Slice: Let it cool completely before cutting into squares. Serve and enjoy!

Nutritional Breakdown (Per Serving Estimate)

  • Calories: ~220 kcal
  • Carbohydrates: ~40g
  • Protein: ~3g
  • Fat: ~7g
  • Sugar: ~25g
  • Sodium: ~150mg

Ways to Customize Butter Mochi

Butter mochi is delicious on its own, but there are plenty of ways to enhance and personalize the recipe to suit your taste. Here are a few variations to try:

1. Add a Tropical Twist

If you love fruity flavors, try mixing in:

  • Shredded coconut for extra texture and sweetness.
  • Pineapple chunks for a tangy contrast to the richness.
  • Mango puree swirled into the batter for a tropical touch.

2. Make It Extra Buttery

For those who love an even richer, buttery taste, try:

  • Using browned butter instead of regular melted butter for a nutty, caramelized flavor.
  • Brushing extra melted butter on top after baking for added moisture and shine.

3. Give It a Chocolatey Touch

If you’re a chocolate lover, try these variations:

  • Swirl in melted chocolate for a marbled effect.
  • Add cocoa powder to the batter for a rich chocolate mochi.
  • Sprinkle chocolate chips into the mix for gooey chocolate pockets.

4. Spice It Up

For a more warm and aromatic twist, try adding:

  • Cinnamon and nutmeg for a slightly spiced version.
  • A pinch of matcha powder for an earthy, slightly bitter contrast to the sweetness.
  • Vanilla bean paste instead of vanilla extract for a more intense flavor.

Best Ways to Enjoy Butter Mochi

Butter mochi is incredibly versatile, making it a great dessert or snack for various occasions. Here are some of the best ways to serve and enjoy it:

1. Warm and Fresh Out of the Oven

Nothing beats the warm, slightly crisp edges and soft, chewy center of butter mochi straight from the oven. Let it cool slightly, then slice and serve while still warm for an extra gooey texture.

2. Chilled for a Firmer Bite

If you prefer a denser, chewier texture, store butter mochi in the fridge and serve it chilled. The flavors develop even more, and the texture becomes extra satisfying.

3. Topped with Ice Cream

Pairing butter mochi with a scoop of vanilla or coconut ice cream takes it to the next level. The contrast between warm, buttery mochi and cold, creamy ice cream is pure bliss.

4. With a Cup of Tea or Coffee

Butter mochi is the perfect afternoon snack to enjoy with a cup of green tea, black tea, or coffee. The slight sweetness and chewiness make it an ideal pairing with bold, bitter drinks.

5. Dusted with Powdered Sugar

For a simple, elegant touch, lightly dust butter mochi with powdered sugar before serving. This adds a little extra sweetness and a beautiful finish.

Frequently Asked Questions

1. Can I Use Regular Rice Flour Instead of Mochiko?

No. Mochiko (glutinous rice flour) is essential for achieving the signature chewy texture of butter mochi. Regular rice flour won’t provide the same consistency and will make the cake too dry and crumbly.

2. How Long Does Butter Mochi Stay Fresh?

  • Room Temperature: 3–4 days in an airtight container.
  • Refrigerated: Up to a week for a firmer texture.
  • Frozen: Up to 3 months. Simply thaw and warm slightly before serving.

3. Can I Make Butter Mochi Dairy-Free?

Yes! You can substitute:

  • Coconut oil or vegan butter for regular butter.
  • Dairy-free condensed milk or extra coconut milk for evaporated milk.

4. What’s the Best Way to Cut Butter Mochi?

For clean slices, use a sharp knife and grease it slightly with butter or oil before cutting. This prevents the sticky texture from pulling and tearing.

5. Can I Freeze Butter Mochi?

Absolutely! Wrap individual slices in plastic wrap, place them in an airtight container, and freeze for up to 3 months. When ready to eat, let it thaw at room temperature or microwave for a few seconds to bring back its chewy texture.

Final Thoughts: Why You Need to Try Butter Mochi

Butter mochi is a true celebration of texture and flavor. Its chewy bite, rich buttery taste, and subtle coconut undertones make it a one-of-a-kind dessert that’s both comforting and indulgent.

Whether you’re making it for a Hawaiian-themed party, a family gathering, or just because you’re craving something sweet, this recipe is a foolproof, crowd-pleasing treat.

With endless variations and customizations, butter mochi can be as simple or as creative as you want it to be. Once you take your first bite, you’ll understand why this Hawaiian classic has stood the test of time—and why it deserves a permanent spot in your recipe collection.

So, grab a box of Mochiko, preheat your oven, and get ready to experience the magic of butter mochi!

Pistachio Raspberry Cake: A Showstopping Blend of Nutty and Fruity Perfection

There’s something truly magical about the combination of rich, nutty pistachios and tart, juicy raspberries. This Pistachio Raspberry Cake is a beautifully balanced dessert that brings together the earthy depth of pistachios, the brightness of fresh raspberries, and the smooth decadence of a creamy pistachio buttercream.

Not only does this cake taste incredible, but its striking green sponge layered with vibrant red raspberry jam makes it an eye-catching centerpiece for any celebration. Whether you’re baking for a birthday, afternoon tea, or a festive gathering, this cake is sure to impress.

What Makes This Cake Special?

1. The Perfect Balance of Sweet and Nutty Flavors

Pistachios lend a delicate, slightly sweet nuttiness to this cake, giving it a richer and more sophisticated taste than traditional sponge cakes. The raspberries provide a bright contrast, cutting through the richness and adding a burst of tart freshness to every bite.

The addition of pistachio cream in the buttercream enhances the overall nuttiness, making the flavor profile both bold and refined.

2. A Stunning Visual Appeal

Beyond its delicious taste, this cake is a feast for the eyes. The naturally green-hued sponge (thanks to finely ground pistachios) contrasts beautifully with the deep red raspberry jam and fresh raspberries on top. The final touch of chopped pistachios and sprigs of mint creates a rustic yet elegant look that’s perfect for special occasions.

3. A Wonderfully Moist Texture

Pistachios bring more than just flavor—they also contribute to the tender, moist crumb of the cake. Unlike traditional nut cakes, which can sometimes be dense, this sponge is light yet rich, thanks to the careful balance of butter, sugar, and ground pistachios.

The silky pistachio buttercream adds another layer of softness, ensuring that each bite melts in your mouth.

4. A Versatile and Adaptable Recipe

This cake is highly customizable, allowing you to tweak it to suit different tastes and occasions. Whether you switch up the fruit, use a different nut base, or add an extra layer of indulgence, this cake remains a deliciously reliable choice.

Ingredients

For the Cake:
  • Unsalted butter, softened
  • Golden caster sugar
  • Vanilla extract
  • Large eggs
  • Plain flour
  • Baking powder
  • Fine sea salt
  • Ground pistachios
For the Buttercream:
  • Unsalted butter, softened
  • Icing sugar, sifted
  • Smooth pistachio cream
  • Fine sea salt
  • Lemon juice
For Decoration:
  • Raspberry jam
  • Fresh raspberries
  • Chopped pistachios
  • Fresh mint sprigs

Directions

  1. Prepare the Batter: Cream butter and sugar until light and fluffy, then add vanilla and eggs. Sift in flour, baking powder, salt, and ground pistachios, folding until just combined.
  2. Bake the Cakes: Divide batter between two cake tins and bake at 160°C (fan) until golden and risen. Cool completely before assembling.
  3. Make the Buttercream: Beat butter and icing sugar until fluffy, then mix in pistachio cream, salt, and lemon juice.
  4. Assemble the Cake: Spread buttercream over one cake, followed by raspberry jam. Place the second cake on top and frost with the remaining buttercream.
  5. Decorate & Serve: Top with fresh raspberries, chopped pistachios, and mint sprigs. Slice and enjoy!

Nutritional Breakdown (Per Serving Estimate)

  • Calories: ~450 kcal
  • Carbohydrates: ~55g
  • Protein: ~6g
  • Fat: ~22g
  • Sodium: ~180mg
  • Sugar: ~35g

How to Customize This Cake

1. Swap the Fruit

While raspberries pair beautifully with pistachios, you can experiment with other fruits for different flavor profiles:

  • Strawberries for a sweeter, more classic combination.
  • Cherries for a rich, slightly tart contrast.
  • Blackberries for an intense berry flavor.
  • Apricots for a unique, slightly caramelized taste.

Make sure to adjust the jam flavor accordingly to match the fruit you choose.

2. Try a Different Nut Base

Pistachios give this cake its signature flavor, but if you want to switch things up, try replacing them with:

  • Almonds for a softer, marzipan-like taste.
  • Hazelnuts for a deeper, slightly bitter nuttiness.
  • Walnuts for a rich, earthy profile.

If using a different nut, substitute both the ground pistachios in the sponge and the pistachio cream in the buttercream with the corresponding nut alternatives.

3. Add an Extra Layer of Indulgence

  • Drizzle melted white chocolate over the top for a creamy, elegant finish.
  • Fold finely chopped pistachios into the buttercream for added texture.
  • Infuse the buttercream with citrus zest (like orange or lemon) for an extra layer of brightness.

Serving Ideas for Pistachio Raspberry Cake

1. Afternoon Tea Treat

Serve this cake alongside a pot of Earl Grey or jasmine tea for an elegant afternoon tea experience. The floral notes of the tea complement the nuttiness of the pistachios beautifully.

2. A Showstopping Celebration Cake

This cake is perfect for birthdays, anniversaries, and special gatherings. Decorate with edible flowers, gold leaf, or extra whole raspberries for a truly luxurious finish.

3. Paired with Ice Cream or Whipped Cream

A scoop of vanilla or raspberry sorbet makes this cake even more decadent, while a dollop of whipped cream adds a light, airy contrast.

4. Enjoy It as a Breakfast Cake

It might sound indulgent, but this cake’s nutty base and fruit-forward flavors make it a great brunch or coffee companion. Pair it with Greek yogurt and honey for a more balanced morning treat.

Frequently Asked Questions

1. Can I Make This Cake Ahead of Time?

Yes! The cake can be baked up to 3 days in advance and stored in an airtight container in the fridge. If making the buttercream ahead of time, keep it refrigerated and let it come to room temperature before assembling the cake.

2. How Should I Store Leftovers?

  • Store the cake in an airtight container in the refrigerator for up to 3 days.
  • If freezing, wrap individual slices in plastic wrap and aluminum foil, then freeze for up to 3 months. Thaw at room temperature before serving.

3. Can I Use Store-Bought Pistachio Cream?

Absolutely! While homemade pistachio cream gives a fresher flavor, a high-quality store-bought version works just as well. If unavailable, try using pistachio butter or finely ground pistachios mixed with a little honey.

4. Can I Make This Cake Gluten-Free?

Yes! Simply substitute the all-purpose flour with a gluten-free flour blend that contains xanthan gum for structure. You can also increase the amount of ground pistachios slightly for a more naturally gluten-free texture.

5. What’s the Best Way to Get a Vibrant Green Cake?

Pistachios naturally have a muted green color, but you can enhance it by:

  • Using Persian pistachios, which are naturally more vibrant.
  • Adding a tiny pinch of matcha powder (for color, not flavor).
  • Avoiding overbaking, as high heat can dull the green hue.

Final Thoughts: Why This Cake Deserves a Spot in Your Recipe Collection

The Pistachio Raspberry Cake is more than just a dessert—it’s a celebration of flavors, textures, and colors. With its moist nutty sponge, luscious pistachio buttercream, and bright raspberry contrast, this cake is as delicious as it is visually stunning.

Whether you’re making it for a special event or just treating yourself to an afternoon delight, this cake brings a touch of elegance and indulgence to any occasion. Plus, with its versatility and easy customizations, it’s a recipe you’ll find yourself returning to time and time again.

So, if you’re looking for a cake that’s both sophisticated and deeply satisfying, look no further—this pistachio and raspberry masterpiece is sure to be a hit!

Blackberry, Pineapple, and Coconut Swirl Italian Ice Pops: A Tropical Frozen Delight

There’s something about the combination of tropical fruits, creamy coconut, and vibrant berries that makes for the perfect frozen treat. These Blackberry, Pineapple, and Coconut Swirl Italian Ice Pops are not only visually stunning but also bursting with natural sweetness and a creamy, refreshing texture.

Unlike store-bought ice pops loaded with artificial flavors and sweeteners, this homemade version uses real fruit, coconut milk, and a touch of condensed milk to create a perfectly balanced frozen dessert. The tart blackberries contrast beautifully with the sweet pineapple and rich coconut, while a hint of lime adds just the right amount of brightness.

Whether you’re looking for a healthier summer treat, a fun dessert for kids, or a tropical twist on a classic Italian ice, these frozen pops are the answer.

What Makes These Ice Pops Special?

1. A Perfect Balance of Sweet and Tart

The key to a great ice pop is harmony between flavors, and this recipe delivers:

  • Pineapple brings a natural sweetness and a juicy, tropical essence.
  • Blackberries add a tart, slightly floral contrast that keeps the pops from being overly sweet.
  • Coconut cream and condensed milk create a rich and silky texture, making these ice pops feel indulgent while still being refreshing.

2. Swirled for a Beautiful Presentation

These ice pops aren’t just delicious—they’re visually striking. The deep purple-black of the blackberries swirled with the golden pineapple and creamy coconut base creates a stunning marbled effect. They’re as much a feast for the eyes as they are for the taste buds.

3. Naturally Dairy-Free Friendly

While the recipe includes condensed milk for added sweetness and creaminess, it can easily be made dairy-free and vegan. Simply substitute condensed milk with coconut condensed milk or a sweetener of your choice to keep it plant-based.

4. Customizable to Your Preference

These ice pops offer endless possibilities for customization. Want a bolder pineapple flavor? Add extra pineapple juice. Prefer a tarter pop? Increase the blackberry portion. Love a bit of crunch? Stir in some toasted coconut flakes before freezing.

5. A Healthier Alternative to Store-Bought Popsicles

Unlike commercial popsicles that often contain artificial flavors, high-fructose corn syrup, and preservatives, these homemade Italian ice pops are made with wholesome, real ingredients. You get the freshness of fruit, the richness of coconut, and the natural sweetness of condensed milk or an alternative sweetener.

Ingredients

For the Creamy Pineapple-Coconut Base:
  • 2 pounds pineapple spears, diced
  • 1 (15-ounce) can unsweetened coconut milk
  • ½ (15-ounce) can unsweetened coconut cream
  • 1 (14-ounce) can sweetened condensed milk
  • Juice and zest from 2 limes
For the Blackberry Swirl:
  • 1 pound blackberries

Directions

  1. Blend the Base: Combine pineapple, coconut milk, coconut cream, condensed milk, and lime juice/zest in a blender. Blend until smooth.
  2. Separate Mixture: Pour ¼ of the blended mixture into a measuring cup and set aside. Refrigerate the remaining ¾.
  3. Prepare the Blackberry Swirl: Blend blackberries until smooth, then strain through a fine mesh sieve. Mix the strained blackberry puree with the reserved pineapple mixture.
  4. Fill the Popsicle Sleeves: Using a funnel, partially fill each sleeve with the pineapple-coconut mixture. Add a few tablespoons of the blackberry mixture, then top off with more pineapple-coconut mix, leaving ½ inch at the top.
  5. Create the Swirl: Insert a thin skewer and gently swirl the layers together for a marbled effect.
  6. Freeze: Seal the sleeves, place them on a baking sheet in a single layer, and freeze for at least 6 hours.
  7. Enjoy: Once fully frozen, serve and savor the tropical flavors!

Nutritional Breakdown (Per Ice Pop Estimate)

  • Calories: ~180 kcal
  • Carbohydrates: ~30g
  • Protein: ~3g
  • Fat: ~6g
  • Fiber: ~3g
  • Sugar: ~25g

How to Get the Perfect Swirl Effect

The signature look of these ice pops comes from the marbled blending of the blackberry puree and the pineapple-coconut mixture. Here’s how to achieve it:

  • Layer the mixtures: Pour a portion of the pineapple-coconut base into the molds, then add a spoonful of the blackberry puree before topping with more of the pineapple mixture.
  • Use a skewer or knife: Gently swirl the blackberry mixture into the coconut base using a thin skewer or knife. Be careful not to over-mix—you want distinct streaks of color, not a fully blended mixture.
  • Leave space at the top: The mixture will expand slightly as it freezes, so be sure to leave about ½ inch at the top of the mold to prevent overflow.

Best Ways to Enjoy These Ice Pops

1. As a Summer Refreshment

Nothing beats a cold, fruity ice pop on a hot summer day. Keep a batch in the freezer for an instant cool-down whenever you need it.

2. A Fun Dessert for Kids

Kids love the bright colors and fruity flavors of these ice pops, and parents love that they’re made with real ingredients. Let them help swirl the mixtures for a fun kitchen activity.

3. A Light Dessert for Dinner Parties

If you’re hosting a dinner party or a backyard gathering, these ice pops make an elegant, palate-cleansing dessert that isn’t too heavy. Serve them with a drizzle of honey or a sprinkle of toasted coconut for an extra special touch.

4. A Post-Workout Treat

Because these ice pops contain real fruit and natural sweeteners, they’re a great way to replenish energy after a workout. The pineapple also contains bromelain, an enzyme known for its anti-inflammatory properties, making these pops both delicious and beneficial.

Frequently Asked Questions

1. Can I Use Frozen Fruit Instead of Fresh?

Yes! Frozen pineapple and blackberries work just as well. Just make sure to thaw them slightly before blending for a smoother texture.

2. How Long Do These Ice Pops Take to Freeze?

For best results, freeze the pops for at least 6 hours or overnight to ensure they are fully solidified before serving.

3. Can I Make These Without a Popsicle Mold?

Absolutely! If you don’t have a traditional popsicle mold, you can use:

  • Small paper cups
  • Ice cube trays for mini pops
  • Silicone muffin tins

Simply cover with foil and insert popsicle sticks through the foil to hold them in place while freezing.

4. How Do I Remove the Ice Pops from the Mold?

To easily remove the ice pops, run warm water over the outside of the mold for 10-15 seconds, then gently pull the stick until the pop releases.

5. Can I Add Extra Sweetener?

Yes! If you prefer a sweeter pop, add a little honey, agave, or maple syrup to the pineapple mixture before blending. Taste and adjust as needed.

6. Can I Store These for a Long Time?

Homemade ice pops can be stored in an airtight container or wrapped individually in plastic wrap for up to 3 months in the freezer.

Final Thoughts: A Frozen Treat Worth Making

These Blackberry, Pineapple, and Coconut Swirl Italian Ice Pops are more than just a frozen dessert—they’re a taste of the tropics, a refreshing summer indulgence, and a healthy alternative to store-bought popsicles.

With a creamy coconut base, a vibrant blackberry swirl, and the natural sweetness of pineapple, these ice pops are easy to make, fun to customize, and perfect for any occasion. Whether you enjoy them on a hot afternoon, as a post-workout refreshment, or as a light dessert, these Italian ice pops will quickly become a household favorite.

So grab your ingredients, blend up some tropical goodness, and get ready to enjoy a refreshing, homemade frozen treat that tastes like summer in every bite!

Roasted Potato Salad: A Flavorful Twist on a Classic Dish

When you think of potato salad, the first image that comes to mind might be a creamy, mayo-heavy dish served at summer barbecues. But this Roasted Potato Salad takes a fresh and exciting approach. Instead of boiled potatoes, this version features crispy, golden-brown roasted potatoes tossed with a vibrant dressing, fresh herbs, crunchy pistachios, and crisp cucumbers. The result is a salad that is hearty, refreshing, and packed with layers of texture and flavor.

Whether you serve it warm or cold, this salad is versatile enough to be a side dish, a light lunch, or even a filling main course. It’s naturally gluten-free, vegetarian, and can be easily adapted to vegan and dairy-free diets.

Why This Roasted Potato Salad Stands Out

1. A Crispy Upgrade to Traditional Potato Salad

One of the biggest differences between this recipe and a classic potato salad is the texture of the potatoes. Roasting the potatoes instead of boiling them adds depth and richness, giving them a crispy exterior with a soft, fluffy interior. This method also brings out natural sweetness and caramelized notes that make the dish even more satisfying.

2. A Bright, Herby Dressing

Instead of the heavy, mayonnaise-based dressings typically found in traditional potato salads, this recipe uses a lighter, zesty homemade dressing with:

  • A touch of tangy mustard
  • Fresh lemon juice for brightness
  • Garlic for a punch of flavor
  • A drizzle of maple syrup or agave to balance the acidity

This combination creates a perfect harmony of bold and refreshing flavors that coat the crispy potatoes beautifully.

3. The Perfect Balance of Crunch and Creaminess

This potato salad isn’t just about tender, roasted potatoes—it’s packed with textural contrasts that make each bite interesting. You get:

  • Crunchy pistachios for nuttiness
  • Crisp cucumbers for a cool, refreshing bite
  • Fresh green onions and herbs for a touch of brightness

All of these elements come together to create a well-balanced dish that is both hearty and refreshing.

4. A Salad That Works for Any Occasion

This dish is versatile and easy to customize depending on the season and occasion. You can serve it:

  • Warm, straight out of the oven for a cozy winter meal
  • Chilled for a refreshing summer side dish
  • As a main course with added protein like chickpeas, tofu, or grilled chicken

It’s the perfect side dish for barbecues, picnics, potlucks, or everyday meals.

Ingredients

For the Roasted Potatoes:
  • Yukon gold potatoes (or any variety), quartered with skin on
Fresh & Crunchy Additions:
  • Green onions, chopped
  • Cucumber, chopped
  • Salted pistachios, chopped
  • Fresh dill, chopped
  • Fresh parsley, chopped
Zesty Homemade Dressing:
  • Mayonnaise (regular or vegan)
  • Brown or Dijon mustard
  • Garlic, minced or grated
  • Fresh lemon juice
  • Maple syrup or agave syrup
  • Salt & black pepper
  • Red chili flakes (optional)

Directions

  1. Roast the Potatoes: Bake quartered potatoes until golden brown and crispy.
  2. Prepare the Dressing: Whisk together mayo, mustard, garlic, lemon juice, sweetener, salt, pepper, and chili flakes.
  3. Chop the Veggies: Dice green onions, cucumber, parsley, dill, and pistachios.
  4. Assemble the Salad: Toss roasted potatoes in the dressing, then add the chopped veggies. Mix until evenly combined.
  5. Serve Warm or Cold: Enjoy immediately for a warm salad or refrigerate for a chilled version.

Nutritional Breakdown (Per Serving Estimate)

  • Calories: ~319 kcal
  • Carbohydrates: ~40g
  • Protein: ~7g
  • Fat: ~16g
  • Sodium: ~395mg
  • Fiber: ~6g
  • Vitamin C: ~43mg

How to Customize Your Roasted Potato Salad

One of the best things about this recipe is its flexibility. You can easily switch up ingredients to suit your tastes or dietary needs.

1. Switch Up the Nuts

Pistachios add a delicious crunch and a hint of sweetness, but if you don’t have them on hand, try:

  • Almonds for a mild, nutty crunch
  • Walnuts for a slightly more bitter contrast
  • Sunflower or pumpkin seeds for a nut-free option

2. Add Extra Vegetables

Want to make this salad even more vibrant? Try adding:

  • Cherry tomatoes for a burst of juiciness
  • Roasted red bell peppers for a smoky sweetness
  • Radishes for an extra crisp texture

3. Make It Vegan or Dairy-Free

This recipe is already easy to adapt to plant-based diets:

  • Use vegan mayo instead of regular mayo
  • Swap out honey for maple syrup or agave
  • Add avocado for an extra layer of creaminess

4. Boost the Protein

Want to turn this into a complete meal? Add a protein source like:

  • Grilled tofu or tempeh for a plant-based option
  • Hard-boiled eggs for extra richness
  • Grilled chicken or salmon for a heartier dish

Best Ways to Serve This Salad

1. As a Side Dish

This potato salad is the perfect complement to grilled proteins and vegetable dishes. Serve it alongside:

  • Veggie burgers or grilled chicken
  • Roasted vegetables for a balanced plate
  • Grain bowls with quinoa or farro

2. In a Wrap or Sandwich

Use the salad as a filling for wraps, sandwiches, or pitas. Add some hummus or feta for extra creaminess.

3. On a Bed of Greens

Transform it into a bigger salad by serving it over mixed greens or arugula. Drizzle with extra dressing and add more fresh herbs.

4. As a Hearty Breakfast Addition

Yes, you read that right! This salad makes a great base for a brunch plate—serve it with fried or poached eggs and a side of toast.

Frequently Asked Questions

1. Can I Make This Salad Ahead of Time?

Yes! In fact, the flavors get even better as they sit. You can:

  • Roast the potatoes ahead of time and store them in the fridge.
  • Assemble the salad a few hours before serving to let the flavors meld together.

2. Should I Serve This Salad Warm or Cold?

It works both ways! If you want crispy potatoes, serve it warm. If you prefer a cooler, refreshing salad, let it chill in the fridge before serving.

3. Can I Use a Different Type of Potato?

Absolutely! Yukon gold potatoes work best, but you can also use:

  • Red potatoes for a waxier texture
  • Russet potatoes for extra fluffiness inside
  • Baby potatoes for a bite-sized version

4. How Long Will Leftovers Last?

This salad keeps well in the fridge for up to 3 days. Store it in an airtight container, and if serving cold, give it a quick toss before serving.

5. What If I Don’t Have Fresh Herbs?

While fresh parsley and dill add brightness, you can use dried herbs in a pinch. Use about half the amount of dried herbs compared to fresh.

Final Thoughts: Why You Need to Try This Roasted Potato Salad

This Roasted Potato Salad is a refreshing, flavorful, and exciting take on a classic dish. With crispy, golden potatoes, fresh herbs, crunchy pistachios, and a creamy yet light dressing, it offers a perfect balance of textures and flavors.

It’s a dish that works year-round, whether you’re serving it at a summer picnic, a holiday gathering, or a cozy winter dinner. Plus, its versatility means you can customize it to fit your preferences, making it a go-to recipe for any occasion.

So, whether you’re looking for a better version of potato salad or simply want to add a new favorite to your meal rotation, this roasted potato salad is one recipe you won’t regret trying!

Cheesy Root Vegetable Gratin: A Rich and Elegant Side Dish

When it comes to comfort food that is both elegant and indulgent, few dishes rival the Cheesy Root Vegetable Gratin. This dish takes simple root vegetables—sweet potatoes, parsnips, and beets—and transforms them into a creamy, cheesy, and beautifully layered masterpiece.

Perfect for holiday gatherings, cozy winter dinners, or an upscale side dish for any meal, this gratin offers a balance of sweet, earthy, and savory flavors. The addition of rich cream, nutty Parmesan, and melty Gruyère creates a luxurious texture, while fresh thyme and garlic enhance the depth of flavor.

Beyond its deliciousness, this gratin is a showstopper. The layered vegetables create a striking visual effect, making it as stunning on the table as it is satisfying on the palate. Whether you’re serving this for a festive occasion or a casual family dinner, this gratin is bound to become a favorite.

What Makes This Gratin Special?

1. A Beautiful Layered Presentation

Unlike traditional casseroles, this gratin is artfully arranged. The alternating layers of sweet potatoes, parsnips, and beets create a gorgeous mosaic of colors, making it a standout dish. Whether you’re cooking for guests or simply treating yourself to a gourmet home-cooked meal, this gratin is as impressive to look at as it is to eat.

2. A Perfect Balance of Sweet, Earthy, and Savory

Each vegetable in this gratin contributes its own distinct flavor profile:

  • Sweet potatoes bring a natural sweetness and creamy texture.
  • Parsnips add a mild nuttiness and depth that balances the dish.
  • Beets provide a slightly earthy, rich contrast that complements the other ingredients.

Combined with savory cheeses, garlic, and thyme, these flavors blend together for a bite that is both comforting and complex.

3. A Rich, Creamy Sauce Without Being Overwhelming

One of the key components of any gratin is the sauce that binds everything together. This recipe uses heavy cream (or whole milk for a lighter version), Parmesan, and Gruyère to create a silky, indulgent texture without making the dish overly heavy. The result is a gratin that feels rich and luxurious yet balanced and satisfying.

4. A Versatile Dish for Any Occasion

  • Perfect for the holidays – This gratin is an excellent side dish for Thanksgiving, Christmas, or any festive gathering.
  • Ideal for a cozy dinner – Serve it alongside roast chicken, steak, or a vegetarian main course.
  • Great for meal prep – The dish can be prepared ahead of time, making it perfect for stress-free entertaining.

Ingredients

A Medley of Root Vegetables:
  • Sweet potatoes, peeled
  • Parsnips, trimmed and peeled
  • Beets, peeled
Creamy & Cheesy Bliss:
  • Heavy cream (or whole milk for a lighter version)
  • Grated Parmesan
  • Shredded Gruyère
  • Fresh thyme, minced
  • Garlic, minced
  • Salt and black pepper

Directions

  1. Prep the Oven & Dish: Preheat to 400°F and grease a baking dish with butter.
  2. Thinly Slice Vegetables: Use a mandoline or sharp knife to cut sweet potatoes, parsnips, and beets into uniform rounds.
  3. Coat with Cream & Cheese: Toss each vegetable separately with cream, Parmesan, thyme, salt, and pepper.
  4. Layer with Precision: Stack vegetables upright in alternating rows within the dish.
  5. Bake in Stages: Cover with foil and bake until tender, then uncover, add Gruyère, and bake until golden and bubbling.
  6. Finish & Serve: Garnish with fresh thyme and enjoy warm.

Nutritional Breakdown (Per Serving Estimate)

  • Calories: ~265 kcal
  • Carbohydrates: ~22g
  • Protein: ~9g
  • Fat: ~17g
  • Sodium: ~292mg
  • Fiber: ~5g
  • Vitamin A: ~4607 IU
  • Calcium: ~246mg

Tips for the Best Cheesy Root Vegetable Gratin

1. Use a Mandoline for Even Slices

For the best results, slice the vegetables as thinly and evenly as possible. A mandoline slicer is ideal for this, as it ensures uniform thickness, which helps the vegetables cook evenly. If you don’t have a mandoline, a sharp knife will work—just take your time to ensure consistent slices.

2. Keep the Beets from Bleeding into the Dish

Beets are naturally vibrant, but their color can easily spread, turning the entire gratin pink. To prevent this:

  • Coat the beets lightly in cream—just enough to keep them moist, but not so much that they release excess liquid.
  • Layer the beets strategically—place them in separate rows instead of mixing them throughout the dish.
  • Pat the beets dry before layering to reduce excess moisture.

3. Don’t Skimp on the Cheese

The combination of Parmesan and Gruyère gives this gratin a perfect balance of nuttiness, saltiness, and creaminess. If you want to experiment, try adding Fontina, Comté, or Swiss cheese for a slightly different twist.

4. Cover First, Then Uncover for a Crispy Top

Baking the gratin covered for the first portion of the cooking time allows the vegetables to soften without drying out. Then, uncovering it for the last 15-20 minutes helps the top develop a golden, slightly crispy crust, making it beautifully caramelized and flavorful.

Variations and Substitutions

One of the great things about this gratin is how adaptable it is. Whether you want to switch up the vegetables, make it dairy-free, or add extra flavors, here are some great modifications:

1. Swap the Vegetables

  • Use turnips or rutabaga instead of parsnips for a slightly peppery flavor.
  • Add Yukon Gold potatoes for a more classic gratin texture.
  • Try carrots for a sweeter, more vibrant layer.

2. Change Up the Cheese

  • Smoked gouda adds a deep, smoky flavor.
  • Aged cheddar provides a sharper bite.
  • Mozzarella will make the gratin extra gooey.

3. Make It Dairy-Free

  • Use full-fat coconut milk or cashew cream in place of heavy cream.
  • Replace the cheese with a dairy-free alternative or nutritional yeast.

4. Add Extra Herbs and Spices

  • Rosemary, sage, or oregano can be used instead of thyme.
  • A pinch of nutmeg or smoked paprika adds warmth and depth.

Frequently Asked Questions

1. Can This Gratin Be Made Ahead of Time?

Yes! You can assemble the dish up to a day in advance, cover it tightly, and refrigerate. When you’re ready to bake, simply add 5-7 extra minutes to the covered baking time to ensure everything is heated through.

2. Can I Use Pre-Sliced Vegetables?

If you’re short on time, you can use pre-sliced root vegetables from the grocery store. However, freshly sliced vegetables will have better texture and flavor.

3. What Should I Serve with This Dish?

This gratin pairs well with a variety of main courses, including:

  • Roast chicken or turkey for a classic pairing.
  • Grilled steak or pork chops for a hearty meal.
  • A simple green salad for a lighter contrast.

4. Can I Freeze Leftovers?

While gratins are best enjoyed fresh, you can freeze leftovers. To reheat, place the gratin in a 375°F oven for about 20 minutes until warmed through. Avoid microwaving, as it may make the texture watery.

5. Can I Use a Different Baking Dish?

A 3-quart oval or rectangular baking dish works best, but you can use any similar-sized dish. If using a deeper dish, you may need to adjust the baking time slightly.

Final Thoughts: Why You’ll Love This Cheesy Root Vegetable Gratin

The Cheesy Root Vegetable Gratin is more than just a side dish—it’s a celebration of seasonal flavors, rich textures, and beautiful presentation. Whether you’re making it for a holiday feast or a cozy family dinner, this dish brings warmth and comfort to the table.

With buttery layers of tender root vegetables, a rich and creamy sauce, and a golden cheesy topping, this gratin is bound to become a favorite in your recipe collection.

So, grab your ingredients, preheat the oven, and get ready to enjoy a dish that’s as beautiful as it is delicious!

The Ultimate Picnic Sandwich with Artichoke Pepper Spread

There’s something undeniably special about a well-crafted sandwich, especially one that is layered with bold flavors, fresh ingredients, and a touch of homemade magic. The Picnic Sandwich with Artichoke Pepper Spread is exactly that—a perfectly balanced, flavor-packed sandwich that’s ideal for picnics, road trips, or casual gatherings.

This sandwich is more than just a combination of ingredients; it’s an experience of textures and flavors that come together beautifully. The savory, slightly spicy artichoke pepper spread, the mellow crunch of fennel, the silky provolone, and the rich saltiness of coppa all nestled between homemade pizza dough bread create a meal that is both sophisticated and easy to prepare.

Whether you’re planning a picnic, hosting a brunch, or looking for a make-ahead meal, this sandwich is a must-try.

Why This Picnic Sandwich is a Must-Try

1. The Game-Changing Artichoke Pepper Spread

Every great sandwich has a defining element that makes it stand out, and for this one, it’s the homemade artichoke pepper spread. Made with tender artichoke hearts, sweet piquanté peppers, garlic, Calabrian chilis, fresh basil, and lemon juice, this spread delivers a perfect balance of sweet, tangy, and mildly spicy flavors.

Not only does it serve as the foundation of flavor in this sandwich, but it also keeps the bread from drying out while enhancing every bite.

2. Fresh-Baked Pizza Dough Bread

Instead of using store-bought bread, this sandwich elevates things with freshly baked pizza dough. The result is a light, chewy, and slightly crispy bread that absorbs just the right amount of spread while maintaining its structure. This unique bread choice makes the sandwich feel more rustic and homemade, perfect for a leisurely picnic.

3. A Balance of Creamy, Crunchy, and Savory

  • Provolone cheese adds a creamy, slightly sharp contrast to the rich coppa and artichoke spread.
  • Thinly sliced fennel gives the sandwich a delicate crunch and mild anise flavor, cutting through the richness.
  • Fresh parsley brings a herbaceous brightness that keeps every bite fresh and flavorful.

4. Perfect for Make-Ahead Meals

One of the best things about this sandwich is that it actually gets better over time. After assembling, the sandwich is wrapped tightly in plastic wrap and pressed under a heavy object (such as a Dutch oven). This technique allows the flavors to meld together, creating a sandwich that holds together beautifully and is easy to transport.

If you need a make-ahead sandwich for a picnic, lunch, or gathering, this one is ideal because it stays fresh and doesn’t get soggy.

Ingredients

For the Artichoke Pepper Spread:
  • Artichoke hearts, drained and patted dry
  • Piquanté peppers, quartered
  • Garlic cloves
  • Chopped Calabrian chilis
  • Lemon juice
  • Fresh basil leaves
  • Extra virgin olive oil
  • Kosher salt to taste
For the Sandwich:
  • Prepared pizza dough (for fresh-baked bread)
  • Provolone cheese, sliced thin
  • Coppa, thinly sliced
  • Fresh parsley leaves
  • Fennel bulb, thinly sliced (core and stalks removed)

Directions

  1. Prepare the Bread: Allow pizza dough to sit at room temperature, then shape it into a square. Brush with olive oil, sprinkle with salt, and bake until golden. Let cool completely.
  2. Make the Artichoke Pepper Spread: Blend artichoke hearts, peppers, garlic, chilis, lemon juice, and basil until finely chopped. Stir in olive oil and season with salt.
  3. Assemble the Sandwich: Slice the cooled bread in half. Spread the artichoke mixture evenly on both halves. Layer provolone, coppa, fresh parsley, and fennel.
  4. Press the Sandwich: Wrap tightly in plastic wrap and press with a heavy object (like a Dutch oven) for one hour.
  5. Slice & Serve: Unwrap, slice into portions, and enjoy!

Nutritional Breakdown (Per Serving Estimate)

  • Calories: ~500 kcal
  • Protein: ~25g
  • Carbohydrates: ~50g
  • Fat: ~22g
  • Fiber: ~5g
  • Sodium: ~900mg

Customizing Your Picnic Sandwich

One of the best things about this sandwich is how versatile it is. If you don’t have certain ingredients on hand, there are plenty of ways to switch things up while keeping the flavors balanced.

1. Swap the Meat

While coppa adds a rich, cured meat flavor, you can substitute it with other meats:

  • Salami for a slightly spicier kick
  • Prosciutto for a delicate, salty bite
  • Smoked turkey for a lighter option

2. Try a Different Cheese

Provolone is mild and creamy, but there are plenty of other cheeses that work well:

  • Fontina for a slightly earthier, nuttier taste
  • Smoked gouda for a deeper, smoky flavor
  • Aged cheddar for a sharper bite

3. Add More Fresh Elements

Want to enhance the freshness? Try these:

  • Arugula for a peppery contrast
  • Thinly sliced cucumbers for extra crunch
  • Sun-dried tomatoes for a hint of sweetness

4. Make it Vegetarian

If you’d like to omit the meat, simply add grilled zucchini or roasted red peppers for a hearty, meat-free alternative.

Best Ways to Serve This Sandwich

1. Slice It for Easy Sharing

Because this sandwich is pressed and compacted, it’s easy to slice into smaller portions. Whether you’re cutting it into quarters for a group or into individual servings, it’s a great option for picnic spreads or party platters.

2. Pair It with Simple, Complementary Sides

This sandwich is already packed with flavors, so pair it with simple, fresh sides to keep the meal balanced. Here are some great options:

  • Marinated Olives – Their briny, salty taste pairs well with the richness of the sandwich.
  • Crisp White Wine or Sparkling Lemonade – A refreshing drink that cuts through the richness.
  • Potato Chips or Simple Mixed Greens – Add a bit of crunch or freshness to the meal.
  • Roasted Almonds or Cashews – A nutty addition to enhance the flavors of the artichoke spread.

3. Serve it Warm or Cold

One of the best things about this sandwich is its versatility in temperature.

  • Cold: Let it sit in the fridge overnight for a refreshing, make-ahead option.
  • Warm: Lightly toast it in a panini press or oven for a slightly crispy exterior.

Frequently Asked Questions

1. How Long Does This Sandwich Last?

This sandwich stays fresh for up to 24 hours when tightly wrapped and refrigerated. In fact, letting it sit for a few hours enhances the flavors, making it even better the next day.

2. Can I Make the Artichoke Pepper Spread in Advance?

Yes! The spread can be made up to 3 days ahead and stored in an airtight container in the fridge. This makes the sandwich quick to assemble when you’re ready.

3. Do I Need a Dutch Oven to Press the Sandwich?

If you don’t have a Dutch oven, use a heavy skillet with canned goods on top to press the sandwich. The goal is to compact the ingredients, allowing the flavors to meld together.

4. What’s the Best Way to Transport This for a Picnic?

  • Keep the sandwich wrapped in plastic wrap until you’re ready to eat.
  • Store it in a cooler bag if traveling for long periods.
  • Slice it just before serving for the best texture.

5. Can I Freeze This Sandwich?

While this sandwich is best enjoyed fresh, you can freeze the artichoke pepper spread separately for later use. Freezing the fully assembled sandwich is not recommended as the fresh ingredients may become watery.

Final Thoughts: A Sandwich Worth Savoring

The Picnic Sandwich with Artichoke Pepper Spread is more than just a sandwich—it’s a perfect balance of textures and flavors designed to be enjoyed at home, at picnics, or on the go. The creamy provolone, rich coppa, crunchy fennel, and bold artichoke spread make every bite an experience.

Whether you’re preparing it for a picnic, slicing it up for a gathering, or simply making yourself an indulgent lunch, this sandwich is one that’s worth adding to your go-to recipe collection.

Make it, press it, slice it—then enjoy a sandwich that’s as delicious as it is memorable!

Vodka Sauce Chicken Parmesan Sandwich: A Bold Twist on a Classic Favorite

Few things in life are as comforting as a perfectly crisp chicken parmesan, but when you take that same crispy, cheesy goodness and sandwich it between toasted baguette halves with rich vodka sauce, you create something truly special.

This Vodka Sauce Chicken Parmesan Sandwich is a perfect fusion of crispy, creamy, and savory flavors, making it an unforgettable meal. Whether you’re looking for a hearty lunch, a cozy dinner, or an indulgent weekend treat, this sandwich delivers restaurant-quality flavor right in your own kitchen.

What Makes This Sandwich Stand Out?

1. The Ultimate Crispy Chicken

At the heart of this sandwich is perfectly breaded and fried chicken, offering an irresistible crunch. Unlike traditional grilled chicken sandwiches, this version is coated in panko breadcrumbs, ensuring a golden-brown exterior that holds up against the rich sauce and gooey cheese.

2. The Magic of Vodka Sauce

What sets this sandwich apart from a standard chicken parm sub is the creamy, tangy vodka sauce. Unlike marinara, vodka sauce has a silky, velvety texture with a subtle richness from cream and olive oil. The touch of acidity from tomatoes balances the richness, creating a perfect complement to crispy chicken and melted mozzarella.

3. A Bread Upgrade: Toasted Baguette

Instead of soft hoagie rolls, this sandwich features a lightly toasted baguette. The crispy edges and chewy texture provide a sturdy base that holds up against the sauce without getting soggy. Plus, the olive oil drizzle before toasting adds a subtle depth of flavor.

4. Melty, Gooey Cheese

Mozzarella and parmesan work together in this sandwich to create the ultimate cheese pull. The fresh mozzarella melts beautifully, while grated parmesan adds sharp, nutty undertones, balancing the richness of the dish.

Why You Should Try This Recipe

  • It’s a crowd-pleaser. Whether you’re making it for family dinner or a casual get-together, this sandwich is a guaranteed hit.
  • Great for meal prep. The crispy chicken can be made in advance, making it easy to assemble later.
  • Better than takeout. While chicken parmesan sandwiches are a staple at many Italian-American restaurants, making your own at home means you control the quality and ingredients.
  • Rich but balanced. The crispiness of the chicken, the creamy sauce, and the fresh parsley topping all work together to create a perfectly layered bite.

What is Vodka Sauce and Why is it Special?

A Brief History of Vodka Sauce

Vodka sauce is believed to have originated in Italy in the mid-20th century, though its exact origins remain debated. Some say it was created by Italian chefs looking to incorporate vodka into pasta sauces, while others believe it was developed in Italian-American kitchens to cater to evolving palates.

What Makes Vodka Sauce Unique?

Vodka sauce combines tomatoes, olive oil, cream, garlic, and of course, vodka. The alcohol in vodka helps to release additional flavors in the tomatoes that wouldn’t be as prominent otherwise. This creates a sauce that is both tangy and creamy, with a rich depth of flavor.

Unlike classic marinara, vodka sauce has a silkier, smoother consistency, making it an excellent pairing for crispy fried chicken in this sandwich.

How to Customize This Sandwich

One of the best things about this Vodka Sauce Chicken Parmesan Sandwich is its versatility. Whether you have dietary restrictions or just want to experiment with flavors, here are some great ways to customize the recipe.

Make It Healthier

  • Swap the fried chicken for baked or air-fried chicken to cut down on oil.
  • Use whole wheat or multigrain baguette for added fiber.
  • Reduce the cheese amount or opt for a lighter version of mozzarella.

Vegetarian Twist

  • Replace the chicken with breaded and baked eggplant slices for a delicious Eggplant Parmesan Sandwich.
  • Try crispy tofu as a protein-packed alternative.

Extra Flavor Enhancements

  • Add a spicy kick by mixing red pepper flakes into the vodka sauce.
  • Layer on pesto or basil leaves for an herby twist.
  • Use garlic butter on the baguette before toasting for extra richness.

Ingredients

For the Crispy Chicken:
  • 2 large chicken breasts, sliced in half lengthwise
  • ½ cup flour
  • 1 tsp garlic powder
  • 1 tsp black pepper
  • 1 tsp salt
  • 1 cup panko breadcrumbs
  • 2 large eggs, beaten
  • 2 cups cooking olive oil (for frying)
For the Sandwich:
  • 1-2 baguettes
  • 2 tbsp olive oil
  • 1 cup vodka pasta sauce
  • ⅓ cup fresh parsley, chopped
  • 2 balls fresh mozzarella, thinly sliced
  • ⅓ cup grated parmesan

Directions

  1. Prepare the Chicken: Pound the chicken breasts until thin. Dredge them in flour, egg wash, and panko breadcrumbs.
  2. Fry to Perfection: Heat oil to 350°F and fry the chicken for 3-5 minutes per side until golden brown and crispy. Drain on a paper towel-lined rack.
  3. Toast the Bread: Slice the baguettes in half, drizzle with olive oil, and broil for 2-4 minutes until golden.
  4. Assemble the Sandwich: Top the crispy chicken with vodka sauce and mozzarella slices. Bake at 400°F for 5-8 minutes until the cheese melts.
  5. Finish and Serve: Layer the toasted baguettes with the chicken, sprinkle with parmesan and fresh parsley, and enjoy warm.

Nutritional Breakdown (Per Serving Estimate)

  • Calories: ~850 kcal
  • Protein: ~50g
  • Carbohydrates: ~65g
  • Fat: ~40g
  • Sodium: ~1200mg
  • Fiber: ~4g
  • Sugar: ~5g

Best Side Dishes for a Complete Meal

While this sandwich is filling on its own, pairing it with a great side dish elevates the experience. Here are some ideas:

1. Garlic Parmesan Fries

Crispy fries tossed in garlic, parmesan, and fresh herbs make a perfect side to complement the flavors of the sandwich.

2. Classic Caesar Salad

A light Caesar salad with crunchy croutons and parmesan balances out the richness of the sandwich.

3. Roasted Vegetables

For a healthier option, pair the sandwich with roasted zucchini, bell peppers, and cherry tomatoes drizzled with olive oil.

4. Tomato Basil Soup

A warm bowl of creamy tomato soup makes for a classic pairing, allowing you to dip the sandwich for extra flavor.

Frequently Asked Questions

1. Can I Make This Sandwich Ahead of Time?

Yes! To keep it fresh:

  • Prepare the crispy chicken in advance and store it in the fridge for up to 3 days.
  • When ready to serve, reheat in the oven at 400°F for 8-10 minutes before assembling.

2. How Can I Keep the Chicken Crispy?

To maintain crispiness:

  • Avoid stacking the fried chicken immediately after cooking—place it on a wire rack instead of paper towels.
  • If reheating, always use the oven instead of the microwave.

3. Can I Use Store-Bought Vodka Sauce?

Yes! While homemade vodka sauce offers the best flavor, a high-quality store-bought version works in a pinch. Look for brands with minimal preservatives and fresh ingredients.

4. What Other Breads Work for This Sandwich?

If baguette isn’t available, try:

  • Ciabatta for a chewy, airy bite
  • Focaccia for a soft, herby alternative
  • Sourdough for a tangy, crispy option

5. Is There a Non-Alcoholic Version of Vodka Sauce?

Yes! You can substitute vodka with chicken broth or pasta water for a similar depth of flavor.

Final Thoughts: Why You Need to Try This Sandwich

The Vodka Sauce Chicken Parmesan Sandwich is more than just a sandwich—it’s a full culinary experience. From the crispy, golden-brown chicken to the luxurious vodka sauce, gooey melted mozzarella, and toasted baguette, every bite is packed with flavor and texture.

Whether you’re making it for a special occasion or just craving a satisfying, restaurant-quality sandwich, this recipe is one you’ll want to return to again and again.

So grab your ingredients, fire up your oven, and get ready to take your chicken parmesan game to the next level!

The Ultimate Mortadella & Burrata Focaccia Sandwich: A Gourmet Delight

Some sandwiches are good, some are great, and then there are those that are truly unforgettable. The Mortadella & Burrata Focaccia Sandwich with Garlic Confit Aioli falls into the latter category—a luxurious combination of creamy burrata, savory mortadella, vibrant basil pesto, and peppery rocket, all encased in fluffy, golden focaccia. If you’ve been searching for the perfect sandwich, one that balances textures and flavors in every bite, this is the one to try.

This recipe brings together high-quality Italian ingredients with a homemade garlic confit aioli, elevating a simple sandwich into a gourmet experience. Whether you’re making it for a quick lunch, an indulgent dinner, or to impress guests, this sandwich delivers a mouthwatering bite every time.

Why This Sandwich Stands Out

A Symphony of Flavors

This sandwich is more than just bread and fillings—it’s a carefully curated blend of flavors and textures:

  • Creamy & Rich: The burrata adds an indulgent, creamy texture that perfectly complements the crisp focaccia.
  • Savory & Salty: Mortadella, a classic Italian cured meat, brings a rich, slightly nutty flavor.
  • Herbaceous & Fresh: Basil pesto adds an aromatic touch that brightens the sandwich.
  • Peppery & Crisp: Fresh rocket (arugula) cuts through the richness with its peppery bite.
  • Umami Depth: The garlic confit aioli ties everything together with its silky, slightly sweet, roasted garlic essence.

Perfectly Balanced Texture

One of the key elements of an outstanding sandwich is contrast in texture. Here, the crispy, golden focaccia meets soft, creamy burrata, while the light chewiness of mortadella complements the fresh crunch of rocket. Every bite delivers a satisfying balance of crunch, softness, and silkiness.

Simple Yet Sophisticated

Despite its gourmet appeal, this sandwich is surprisingly easy to prepare. The garlic confit aioli is the only component that requires extra effort, but it’s well worth it. However, if you’re short on time, you can substitute it with high-quality mayonnaise for a quicker alternative.

What Makes Mortadella Special?

Mortadella is often overshadowed by its more famous Italian cousins like prosciutto and salami, but it’s truly a hidden gem. Originating from Bologna, Italy, mortadella is a large, smooth-textured sausage made from finely ground pork, seasoned with spices, and often speckled with pistachios or black peppercorns.

Unlike standard deli ham, mortadella has a much more refined, buttery texture and a deeper, more complex flavor. It’s rich but not overpowering, and when combined with creamy burrata, it creates a harmonious and indulgent experience.

If you haven’t cooked with mortadella before, this sandwich is the perfect introduction to its delicious versatility.

A Closer Look at Burrata: The Star of the Show

If mozzarella is good, burrata is exceptional. This Italian cheese is a delicate pouch of mozzarella filled with stracciatella and cream, resulting in an unbelievably creamy and decadent texture. When sliced open, the soft center oozes out, making it a perfect complement to the slightly firmer mortadella and crisp focaccia.

Can You Substitute Burrata?

If you can’t find burrata, fresh mozzarella is the best substitute. It has a similar milky, fresh flavor, though without the creamy interior. To mimic burrata’s texture, try mixing shredded mozzarella with a little crème fraîche or heavy cream—a quick hack that works beautifully.

What Is Garlic Confit Aioli and Why Does It Elevate the Sandwich?

Garlic confit is a French cooking technique where garlic cloves are slowly cooked in oil at a low temperature until they become golden, soft, and incredibly sweet. Blending these softened cloves with oil, egg, and lemon juice results in an ultra-smooth, flavorful aioli that adds a silky richness to the sandwich.

Can You Make a Shortcut Version?

If you’re in a hurry, you can make a simple cheat’s aioli by mixing high-quality mayonnaise with finely grated raw garlic, a squeeze of lemon juice, and a pinch of salt. While it won’t have the same mellow sweetness as garlic confit, it’s still a delicious option.

Ingredients

For the Garlic Confit Aioli:
  • 10 garlic cloves
  • 1 cup olive oil
  • 1 tbsp lemon juice
  • 1 egg
  • Pinch of flaky sea salt
For the Sandwich:
  • 2 slices focaccia (pesto focaccia recommended)
  • 1 ball of burrata
  • 4 tbsp green basil pesto
  • 75g Italian mortadella, thinly sliced
  • 25g wild rocket (arugula)
  • 2 tbsp garlic aioli (or substitute with good-quality mayo)

Directions

Garlic Confit Aioli Magic:
  1. Preheat the oven to 120°C (250°F).
  2. Place peeled garlic cloves in a small ovenproof dish and submerge them in olive oil.
  3. Bake for about 2 hours until soft and golden.
  4. Transfer 10 garlic confit cloves, 1 cup of the infused oil, lemon juice, egg, and salt into a jar or container suitable for an immersion blender.
  5. Blend until smooth and thick. Store in the fridge for up to 5 days.
Assembling the Ultimate Sandwich:
  1. Cut the focaccia into two slices. Drizzle the cut side with olive oil and toast in a pan until golden, about 5 minutes.
  2. Spread a generous layer of garlic aioli on one side of the focaccia.
  3. Add a spoonful of basil pesto, followed by the thinly curled slices of mortadella.
  4. Tear the burrata and spread it evenly over the sandwich. Season with salt and pepper.
  5. Top with fresh rocket and close the sandwich.
  6. Slice in half and enjoy this indulgent creation.

Nutritional Breakdown (Per Serving Estimate)

  • Calories: ~550 kcal
  • Protein: ~22g
  • Carbohydrates: ~45g
  • Fat: ~32g
  • Saturated Fat: ~12g
  • Fiber: ~3g
  • Sugar: ~2g
  • Sodium: ~900mg

Serving Suggestions: How to Enjoy This Sandwich to the Fullest

Best Side Dishes to Pair With It

This sandwich is satisfying on its own, but if you’re looking to round out your meal, here are some great pairings:

  • Crispy Parmesan Truffle Fries – The salty, umami-packed fries complement the creamy burrata beautifully.
  • Tomato & Basil Salad – A fresh, tangy salad balances out the richness.
  • Marinated Olives & Pickles – Their briny flavor cuts through the fat and adds an extra punch.
  • Chilled White Wine or Sparkling Water – A crisp white wine (such as Pinot Grigio or Sauvignon Blanc) enhances the flavors, or for a non-alcoholic option, sparkling water with lemon works well.

Frequently Asked Questions

1. Can I Make This Sandwich Ahead of Time?

While it’s best enjoyed fresh, you can prepare components in advance. The garlic confit aioli lasts up to 5 days in the fridge, and you can toast the focaccia ahead of time. However, it’s best to assemble the sandwich just before serving to maintain its texture.

2. What Other Breads Work Besides Focaccia?

If focaccia isn’t available, here are some great alternatives:

  • Ciabatta – Light and airy with a great crust.
  • Baguette – Offers a satisfying crunch.
  • Sourdough – Adds a tangy complexity.
  • Brioche – If you prefer a softer, slightly sweet contrast.

3. Can I Make It Vegetarian?

Yes! Simply replace the mortadella with grilled zucchini, roasted red peppers, or marinated eggplant for a delicious vegetarian version.

4. What’s the Best Way to Store Leftovers?

If you somehow have leftovers, wrap the sandwich tightly in parchment paper and store it in the fridge. However, be aware that burrata is best enjoyed fresh, so the texture may change if stored overnight.

5. Can I Use Store-Bought Pesto?

Absolutely. While homemade basil pesto offers the freshest flavor, a good-quality store-bought pesto works perfectly for convenience. If using a jarred pesto, opt for the fresh refrigerated versions rather than shelf-stable ones for the best taste.

Final Thoughts: Why This Sandwich Deserves a Spot in Your Recipe Rotation

There’s something incredibly satisfying about a well-made sandwich, and this Mortadella & Burrata Focaccia Sandwich proves that simple ingredients can create a restaurant-quality meal. From the luxurious burrata and the salty mortadella to the herbaceous pesto and silky garlic confit aioli, every bite is packed with richness, freshness, and depth of flavor.

Whether you’re making it for yourself, serving it at a gathering, or simply treating yourself to a gourmet lunch, this sandwich delivers a next-level eating experience. Give it a try, and it just might become your new favorite sandwich!

Italian Grinder Salad: The Ultimate Chopped Sub in a Bowl

The Italian Grinder Salad is a fresh and flavorful twist on the beloved grinder sandwich, packed with all the classic deli flavors—minus the bread. This chopped sub in a bowl is loaded with savory meats, crisp lettuce, zesty dressing, and creamy cheese, making it a low-carb, high-protein meal that doesn’t skimp on taste.

This salad became a social media sensation, with countless food lovers raving about its bold, tangy flavors and satisfying crunch. Inspired by the viral grinder sandwich trend, this dish delivers everything you love about a sub in one refreshing, hearty, and customizable bowl.

But what makes this salad truly special? In this article, we’ll explore:

  • Why the Italian Grinder Salad is so popular
  • How you can customize it to fit your dietary preferences
  • The best ways to store and serve it
  • Frequently asked questions to help you master this dish

What Makes This Grinder Salad So Special?

A Sandwich Without the Bread

Traditional grinder sandwiches (sometimes called hoagies or subs) are known for their layers of deli meats, cheese, crisp lettuce, onions, and zesty dressing, all served on a crusty roll. While delicious, the sandwich can be heavy on carbs.

This salad keeps all the best parts of the sandwich but ditches the bread, making it a lighter, fresher, and lower-carb alternative. It’s perfect for anyone following a keto or gluten-free lifestyle or just looking for a healthier way to enjoy a classic sub.

Bold, Zesty Dressing That Elevates Every Bite

One of the key elements of a great grinder sandwich is the creamy, tangy dressing, and this salad version does not disappoint. Made with mayonnaise, red wine vinegar, garlic, Parmesan, and oregano, the dressing clings to every bite, infusing the salad with rich, bold flavor.

Packed with Protein and Flavor

This salad is not just about lettuce—it’s packed with savory meats like salami, turkey, and provolone cheese, making it incredibly satisfying and protein-rich. Whether you’re looking for a hearty lunch, a light dinner, or a flavorful meal prep option, this dish checks all the boxes.

What You’ll Need: The Key Ingredients

For the Dressing: The Zesty Secret

  • 3/4 cup mayonnaise
  • 1 tablespoon red wine vinegar
  • 1 teaspoon minced garlic
  • 1/8 cup grated Parmesan cheese
  • 1 teaspoon dried oregano
  • 1/2 teaspoon salt
  • 1/4 teaspoon ground black pepper
  • 1/8 teaspoon red pepper flakes (optional, for a spicy kick)

For the Salad: The Hearty Base

  • 1 head iceberg lettuce, chopped
  • 1/4 cup sliced red onion
  • 1 cup diced tomatoes
  • 1/2 cup chopped pepperoncini
  • 1/2 cup diced provolone cheese
  • 1/2 cup chopped salami
  • 1/2 cup chopped deli turkey

How to Make It: From Bowl to Table

Step 1: Whisk Up the Dressing

In a large bowl, combine the mayonnaise, red wine vinegar, minced garlic, Parmesan cheese, oregano, salt, black pepper, and red pepper flakes. Stir well until everything is smooth and well blended.

Step 2: Toss in the Goodies

Add the sliced red onions, pepperoncini, tomatoes, provolone cheese, salami, and turkey to the bowl.

Step 3: Bring It All Together

Top everything with the chopped iceberg lettuce and toss well to evenly coat the salad with the dressing.

Step 4: Serve and Enjoy

Enjoy immediately for the freshest crunch, or refrigerate for a short time to let the flavors meld together.

Nutritional Breakdown: Guilt-Free Indulgence

  • Calories: 383 kcal
  • Carbohydrates: 20g
  • Protein: 30g
  • Fat: 22g
  • Saturated Fat: 10g
  • Polyunsaturated Fat: 2g
  • Monounsaturated Fat: 8g
  • Cholesterol: 70mg
  • Sodium: 2323mg
  • Potassium: 998mg
  • Fiber: 6g
  • Sugar: 10g
  • Vitamin A: 1999 IU
  • Vitamin C: 45mg
  • Calcium: 426mg
  • Iron: 4mg

How to Customize Your Grinder Salad

The beauty of this chopped sub salad is that it’s easy to customize. Whether you want to adjust the protein, cheese, or vegetables, you can make it exactly how you like.

1. Choose Your Protein

The recipe traditionally includes salami and turkey, but you can mix and match with:

  • Ham – For a sweeter, milder flavor.
  • Pepperoni – Adds a spicier kick.
  • Roast Beef – For a heartier, richer taste.
  • Capicola – A classic Italian deli meat with bold seasoning.
  • Grilled Chicken – A leaner option that still delivers great flavor.

2. Pick Your Cheese

Provolone is the go-to cheese for this salad, but you can experiment with:

  • Mozzarella – For a mild, creamy touch.
  • Swiss – A nutty, slightly sweet option.
  • Colby Jack or Monterey Jack – For a hint of sharpness.
  • Cheddar – If you want a bold, tangy twist.

3. Amp Up the Vegetables

While lettuce, onions, tomatoes, and pepperoncini are the classic picks, you can add:

  • Cucumbers – For extra crunch.
  • Carrots – A touch of sweetness and color.
  • Bell Peppers – For a pop of freshness.
  • Olives – If you love briny flavors.

4. Spice It Up or Tone It Down

  • If you love spice, add extra red pepper flakes or diced jalapeños.
  • If you prefer a milder salad, leave out the red pepper flakes and pepperoncini.

How to Store and Serve Your Grinder Salad

Make-Ahead Tips

If you’re meal prepping or making this salad ahead of time, follow these storage tips to keep it fresh:

  • Store the dressing separately – This prevents the lettuce from getting soggy.
  • Keep the ingredients chilled – This salad tastes best when served cold and crisp.
  • Use an airtight container – This helps lock in freshness.

How Long Does It Last?

  • Without dressing: 3-4 days in the refrigerator.
  • With dressing mixed in: Best eaten within 1-2 days.

Best Ways to Serve It

  • As a salad – The classic way to enjoy it!
  • As a sandwich filling – Scoop it onto a toasted hoagie roll for a more traditional grinder experience.
  • In a wrap – Roll it up in a low-carb or whole wheat tortilla for a portable meal.

Frequently Asked Questions (FAQs)

1. Why Is It Called a “Grinder” Salad?

The term “grinder” comes from New England, where sub sandwiches are often called grinders. This salad takes everything you love about a grinder sandwich and transforms it into a chopped salad version.

2. Can I Make This Dairy-Free?

Yes! Just omit the cheese or replace it with dairy-free cheese alternatives. The dressing can be made with dairy-free mayonnaise for a fully dairy-free version.

3. Is This Salad Keto-Friendly?

Absolutely! Since it’s low in carbs and high in protein and fats, it fits well into a keto or low-carb lifestyle. Just make sure to check the sugar content of your deli meats and mayonnaise.

4. Can I Use a Different Dressing?

Yes! While the creamy grinder dressing is a key part of the dish, you can switch things up with:

  • Italian dressing – For a lighter, tangier option.
  • Caesar dressing – If you love bold, garlicky flavors.
  • Balsamic vinaigrette – For a touch of sweetness.

5. Can I Add Croutons for Extra Crunch?

Definitely! If you aren’t watching your carbs, adding croutons or crushed toasted bread can bring back some of the crunch you’d get from a traditional grinder sandwich bun.

6. Can I Make It Vegetarian?

Yes! Simply omit the meats and replace them with chickpeas, tofu, or extra veggies for a delicious vegetarian version.

Final Thoughts: The Salad That Satisfies Like a Sandwich

The Italian Grinder Salad is a flavor-packed, protein-rich, and incredibly satisfying dish that delivers everything you love about a classic grinder sandwich—without the bread.

With its bold dressing, crunchy lettuce, savory meats, and creamy cheese, this salad is:

  • Low-carb and keto-friendly
  • Perfect for meal prep and quick lunches
  • Customizable to your taste preferences
  • Great as a main dish or side

So whether you’re looking for a lighter take on your favorite sub, a hearty meal prep idea, or simply a new way to enjoy deli meats, this Grinder Salad is a must-try.

Next time you’re in the mood for a sandwich, skip the bread and dig into this delicious, chopped creation instead!

Chicken and Rice Taco Skillet: A One-Pan Wonder for Busy Nights

If you’re looking for a quick, flavorful, and satisfying meal, this Chicken and Rice Taco Skillet is the perfect solution. It brings together the bold flavors of a taco night favorite while keeping everything conveniently cooked in one pan. With tender chicken, fragrant jasmine rice, vibrant bell peppers, and zesty lime, every bite is packed with Tex-Mex goodness.

This recipe isn’t just about delicious flavors; it’s also about simplicity. By using pantry staples like taco seasoning and chicken broth, you can create a restaurant-quality dish without any complicated techniques. Plus, because everything cooks in one skillet, cleanup is a breeze.

In this article, we’ll explore why this dish is a must-have for your meal rotation, how to customize it, serving ideas, storage tips, and frequently asked questions to help you make the most of this one-pan wonder.

Why You’ll Love This Recipe

There’s no shortage of reasons why this Chicken and Rice Taco Skillet deserves a spot in your weeknight lineup. Here’s why it stands out:

1. One-Pan Convenience

Cooking everything in one skillet means less cleanup and fewer dishes. The chicken, rice, and vegetables all come together seamlessly in a single pan, making this the ultimate hassle-free meal.

2. Bursting with Flavor

The combination of taco-seasoned chicken, smoky sautéed vegetables, and tangy lime juice creates layers of rich, savory goodness. The rice absorbs all the flavorful broth, ensuring that every bite is as delicious as the last.

3. A Balanced, Hearty Meal

This dish has it all:

  • Protein from the chicken
  • Healthy carbs from jasmine rice
  • Nutrients and fiber from bell peppers and onions
    It’s a well-rounded meal that will keep you full and energized.

4. Customizable to Your Tastes

Whether you prefer extra spice, a vegetarian twist, or a different type of protein, this dish is incredibly versatile. With a few simple tweaks, you can make it your own (more on that later!).

5. Perfect for Meal Prep

Since the flavors continue to develop overnight, this dish tastes even better the next day. You can prepare a big batch and enjoy it throughout the week without sacrificing taste or texture.

Flavor-Packed Ingredients

For the Chicken:

  • 2 lbs boneless, skinless chicken thighs
  • 1 tsp kosher salt
  • 2 tbsp taco seasoning
  • 3 tbsp avocado oil

For the Rice and Veggies:

  • 1 small red bell pepper, thinly sliced
  • 1 small green bell pepper, thinly sliced
  • ½ yellow onion, thinly sliced
  • 2 cloves garlic, minced
  • 1 cup white jasmine rice (rinsed and drained)
  • ¼ tsp kosher salt
  • 1 tbsp taco seasoning
  • Zest of ½ lime
  • 2 tbsp lime juice
  • 1 ½ cups chicken broth
  • ¼ cup finely chopped cilantro (plus extra for garnish)

Optional Garnishes:

  • Guacamole
  • Sour cream
  • Corn tortilla chips
  • Sliced jalapeños

Simple Steps to a Satisfying Meal

1. Preheat the Oven

  • Set your oven to 350°F.

2. Season and Brown the Chicken

  • Trim excess fat from the chicken thighs and pat dry.
  • Season thoroughly with salt and taco seasoning.
  • Heat avocado oil in a large oven-safe skillet over medium-high heat.
  • Sear chicken for 3 minutes per side until golden brown (it will finish cooking in the oven).
  • Transfer chicken to a plate and set aside.

3. Cook the Vegetables

  • Reduce heat to medium, then sauté bell peppers, onion, and garlic for 4 minutes until softened.

4. Toast the Rice

  • Add the jasmine rice, salt, and taco seasoning to the skillet.
  • Stir and toast the rice until lightly golden and fragrant (about 2 minutes).

5. Build the Base

  • Stir in lime zest, lime juice, chicken broth, and cilantro.
  • Bring to a gentle simmer.

6. Bake to Perfection

  • Nestle the browned chicken back into the skillet.
  • Cover and transfer to the oven. Bake for 25 minutes.
  • Uncover and continue baking for 8-10 minutes, until the rice is tender and the chicken is fully cooked.

7. Finish and Serve

  • Remove from the oven and fluff the rice with a fork.
  • Garnish with fresh cilantro and your favorite toppings.
  • Serve with guacamole, sour cream, and tortilla chips for added texture and flavor.

Nutritional Breakdown (Per Serving)

  • Calories: Approx. 450
  • Protein: 38g
  • Carbohydrates: 45g
  • Fats: 15g
  • Fiber: 4g
  • Sodium: Varies based on taco seasoning choice

How to Customize Your Chicken and Rice Taco Skillet

One of the best things about this recipe is its flexibility. Here are some easy ways to switch things up based on your preferences or dietary needs:

1. Make It Spicier

If you love heat, add:

  • Diced jalapeños when cooking the vegetables
  • Extra chili powder or cayenne to the taco seasoning
  • A few dashes of hot sauce before serving

2. Use a Different Protein

While boneless, skinless chicken thighs are ideal for their tenderness, you can substitute:

  • Chicken breast (for a leaner option)
  • Ground turkey or beef (for a heartier variation)
  • Shrimp (add it towards the end of cooking for a seafood twist)

3. Go Vegetarian

Skip the chicken and instead:

  • Add an extra can of black beans or pinto beans
  • Use vegetable broth instead of chicken broth
  • Include extra zucchini, mushrooms, or corn for added texture

4. Swap the Rice

Jasmine rice is delicious, but you can experiment with:

  • Brown rice (increase the cooking time and liquid slightly)
  • Quinoa (for extra protein and fiber)
  • Cauliflower rice (for a low-carb option; reduce the broth amount)

5. Cheese Lover’s Edition

To make this dish even more indulgent, stir in a handful of shredded cheddar, Monterey Jack, or pepper jack cheese before serving.

Best Ways to Serve Chicken and Rice Taco Skillet

While this dish is a complete meal on its own, you can enhance it with a few extra touches:

1. With a Side of Guacamole

A dollop of fresh guacamole brings a creamy, rich contrast to the bold spices of the dish.

2. Topped with Sour Cream

If you love a bit of tang, a spoonful of sour cream or Greek yogurt adds a cooling balance to the heat.

3. Wrapped in Tortillas

Scoop the chicken and rice into warm flour or corn tortillas for a delicious taco-style meal.

4. Served with a Salad

A simple avocado and tomato salad with a lime vinaigrette pairs beautifully with the dish.

5. With Crunchy Tortilla Chips

For a fun texture contrast, serve with crispy tortilla chips—perfect for scooping up bites of rice and chicken.

Storage and Reheating Tips

This dish is great for leftovers, and proper storage ensures it stays fresh:

Refrigeration:

  • Store leftovers in an airtight container in the fridge for up to 4 days.
  • The flavors deepen over time, making it even better the next day.

Freezing:

  • Allow the dish to cool completely before transferring it to a freezer-safe container.
  • It can be stored for up to 3 months.
  • When reheating, add a splash of chicken broth to revive the texture.

Reheating:

  • Stovetop: Heat in a skillet over medium heat with a bit of broth or water, stirring occasionally.
  • Microwave: Place in a microwave-safe bowl, cover with a damp paper towel, and heat in 30-second intervals, stirring in between.

Frequently Asked Questions (FAQs)

1. Can I make this ahead of time?

Yes! You can cook the entire dish in advance and store it in the fridge. Reheat before serving, adding a little broth if necessary to keep it moist.

2. Do I have to use jasmine rice?

No, but jasmine rice works best for its light, fluffy texture. If substituting, adjust the liquid and cooking time accordingly.

3. Can I make this in a slow cooker?

Yes! To adapt this for a slow cooker:

  • Brown the chicken and sauté the veggies before adding everything to the slow cooker.
  • Cook on LOW for 4-5 hours or HIGH for 2-3 hours, until the rice is tender and chicken is cooked through.

4. Can I use pre-cooked chicken?

Yes, if using rotisserie or leftover shredded chicken, skip the browning step and add it in with the rice and broth to heat through.

5. How can I keep the rice from getting mushy?

To prevent mushy rice:

  • Rinse it thoroughly before cooking to remove excess starch.
  • Use the right amount of liquid—too much broth can overcook the rice.
  • Let the rice rest for a few minutes after baking before fluffing with a fork.

Conclusion: A Must-Try Recipe for Any Occasion

This Chicken and Rice Taco Skillet is a game-changer for weeknight dinners. It’s easy to make, loaded with flavor, and completely customizable to suit any taste. Whether you’re cooking for your family, meal-prepping for the week, or entertaining guests, this dish is sure to be a crowd-pleaser.

The one-pan convenience, combined with bold taco flavors and a satisfying mix of chicken and rice, makes it a go-to recipe you’ll want to make again and again. Plus, with so many ways to customize it, you’ll never get bored!

Give this recipe a try, and don’t forget to pair it with your favorite toppings and sides. Whether you serve it as-is, in tacos, or with crunchy tortilla chips, one thing’s for sure—it’s bound to be a new favorite on your dinner table!