Hot Honey Baked Chicken Breasts: A Perfect Balance of Sweet and Heat

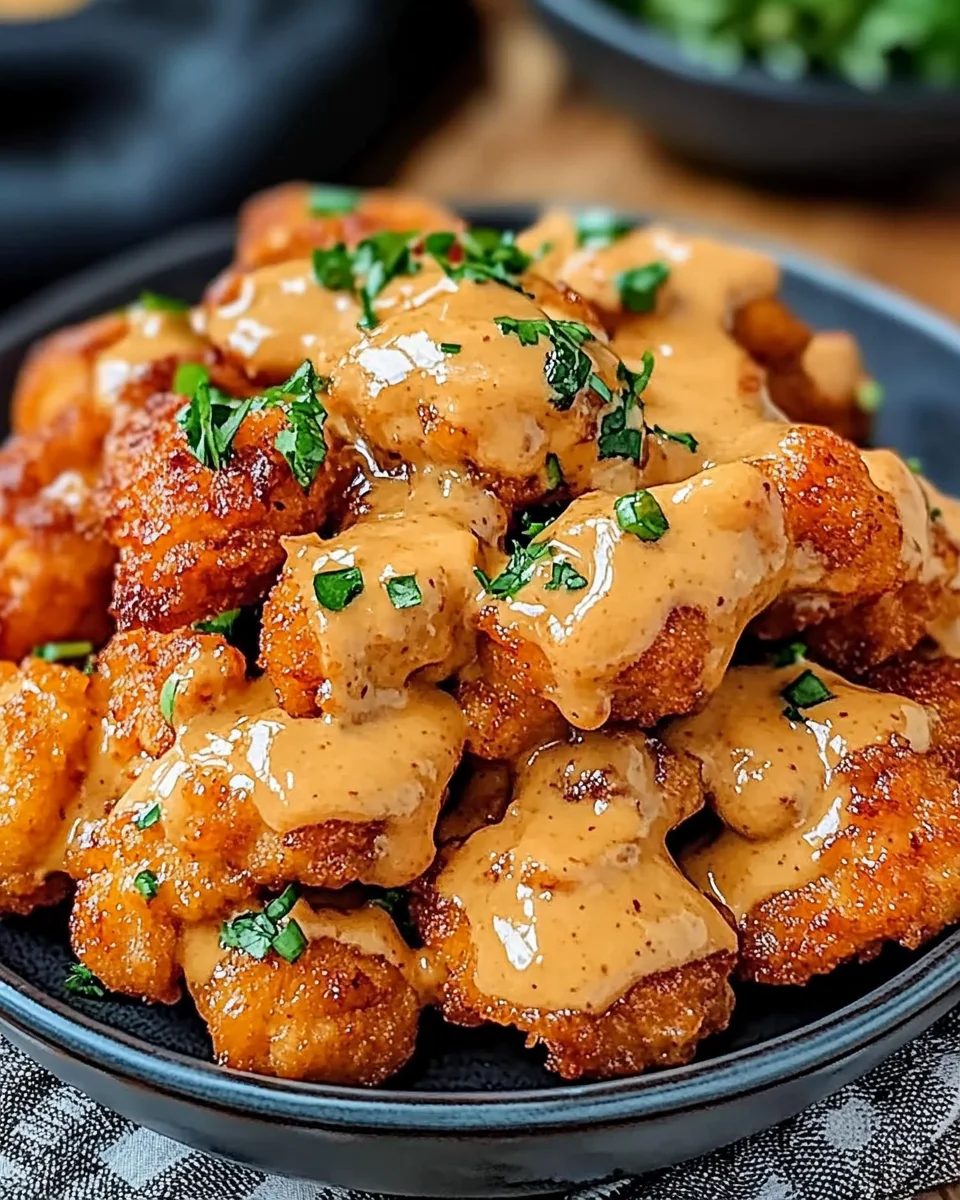
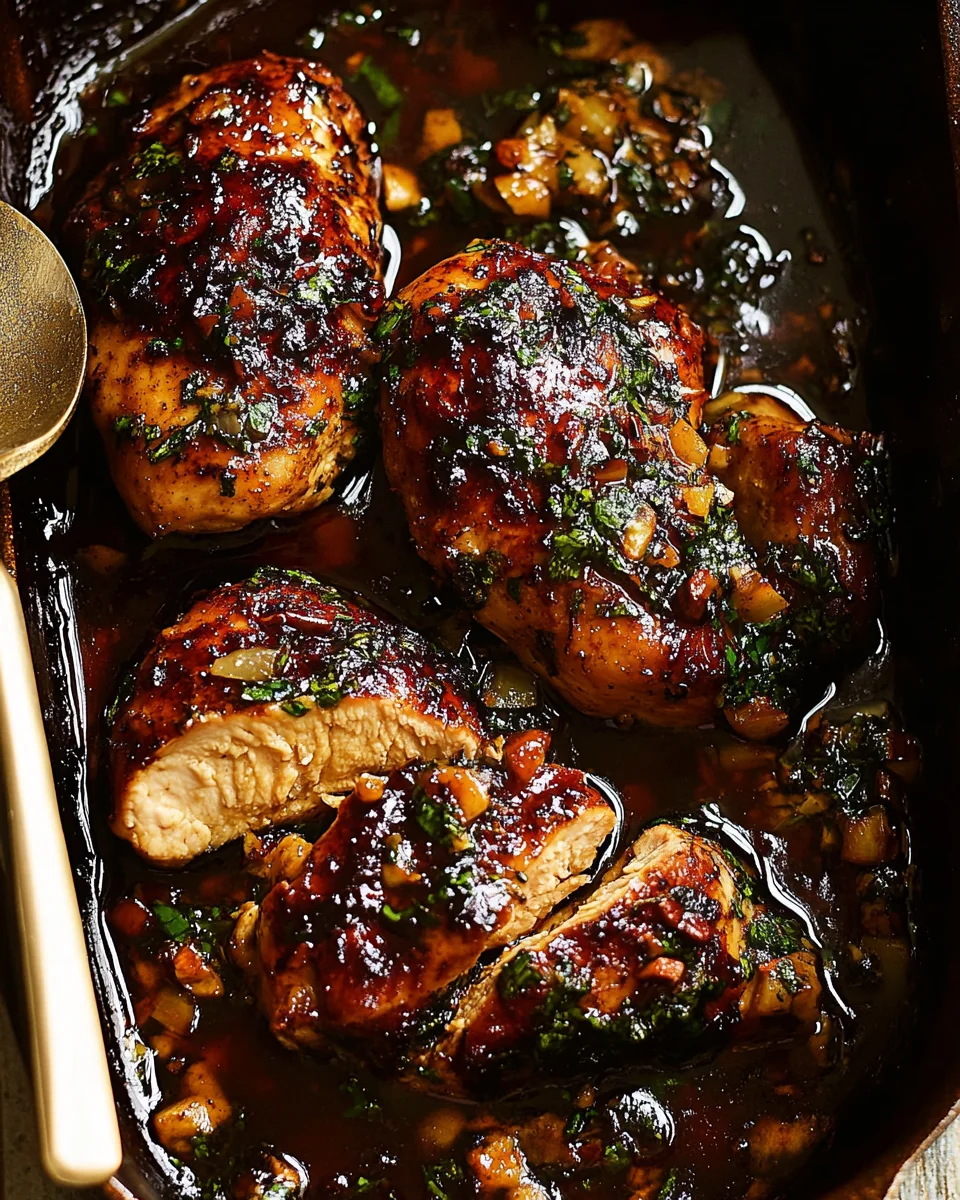
Few dishes strike the perfect balance between spicy, sweet, smoky, and savory quite like Hot Honey Baked Chicken Breasts. This dish transforms simple chicken breasts into a bold, flavor-packed masterpiece with the magic of a homemade hot honey sauce.

If you’re looking for a meal that’s quick, easy, and versatile, this recipe is a winner. The sticky, caramelized glaze combined with tender, juicy chicken makes it a standout dish for weeknight dinners, meal prep, or even a centerpiece for special occasions.

Let’s dive into why this sweet-heat combination works so well, how you can customize the dish to fit your preferences, and the best ways to store, reheat, and serve it.

Why This Hot Honey Chicken Stands Out

1. The Ultimate Flavor Explosion

This dish is a sensory experience from the first bite. The rich sweetness of honey meets the slow-building heat of cayenne and red pepper flakes, while garlic and butter round out the flavors with depth and richness. The smoked paprika and chili powder enhance the complexity of the sauce, adding just the right amount of warmth and smokiness.

2. Easy to Prepare, Hard to Forget

You don’t need fancy ingredients or complicated techniques to make this dish. With just a handful of pantry staples, you can create a restaurant-worthy meal in under an hour. Whether you’re an experienced cook or a beginner, this straightforward recipe will impress with minimal effort.

3. Baked, Not Fried – A Healthier Alternative

Unlike deep-fried hot honey chicken, this version keeps things lighter by baking the chicken instead of frying it. You still get a crispy, golden exterior thanks to the caramelization of the hot honey glaze, but without the excess oil.

4. A Meal Prep Dream

This dish stores beautifully, making it perfect for meal prep. The flavors intensify overnight, and the sticky sauce clings to the chicken, ensuring that every reheated bite is just as delicious as the first.

Ingredients: A Perfect Blend of Heat and Sweetness

For the Chicken

  • 2 lbs organic chicken breasts
  • 1 tbsp extra virgin olive oil
  • 2 tsp On Everything All-Purpose Blend (or homemade seasoning blend)
  • 1 tsp smoked paprika (optional)
  • 1 tsp sea salt

For the Homemade Hot Honey Sauce

  • 6 tbsp unsalted butter
  • 4 garlic cloves, minced
  • 1 cup organic raw honey
  • 1 tsp cayenne pepper
  • 1 tsp smoked paprika
  • 1 tsp red pepper flakes
  • ½ tsp garlic powder
  • ½ tsp chili powder
  • Pinch of sea salt

Directions: How to Achieve Sticky, Spicy Perfection

1. Prepare and Season the Chicken

  • Clean and rinse the chicken, then coat with olive oil and seasonings.
  • Make small slits on each chicken breast to allow flavors to penetrate.
  • For best results, marinate for at least 3 hours (overnight for maximum flavor).

2. Make the Hot Honey Sauce

  • Melt butter in a skillet over medium heat, then sauté garlic until fragrant.
  • Stir in honey, cayenne, paprika, red pepper flakes, garlic powder, chili powder, and salt.
  • Let the sauce thicken and remove from heat.

3. Bake to Perfection

  • Preheat oven to 400°F and line a baking sheet with parchment paper.
  • Arrange the chicken on the sheet and drizzle half of the hot honey sauce on top.
  • Bake for 30-35 minutes, flipping halfway, until golden brown and fully cooked.
  • Drizzle remaining hot honey sauce over the baked chicken before serving.

Nutritional Breakdown: A Balanced Bite

(Per Serving, Approximate Values)

  • Calories: 458 kcal
  • Protein: 49g
  • Carbohydrates: 4g
  • Fat: 27g
  • Sodium: 870mg
  • Vitamin A: 1677 IU

Creative Ways to Customize This Dish

One of the best things about Hot Honey Baked Chicken is its versatility. Whether you like more heat, less sweetness, or a different protein, there are endless ways to customize it.

1. Adjusting the Spice Level

  • Milder Version: Reduce or omit the cayenne pepper and red pepper flakes for a gentler heat.
  • Spicier Kick: Add extra cayenne, hot sauce, or a drizzle of sriracha for an even bolder flavor.

2. Trying Different Cuts of Chicken

  • Chicken Thighs: Juicier and richer in flavor, thighs work beautifully with the sticky glaze.
  • Drumsticks: Great for finger food at parties or gatherings.
  • Chicken Tenders: A family-friendly option that cooks faster.

3. Exploring Different Sweeteners

  • Maple Syrup: A richer, deeper sweetness with a hint of earthiness.
  • Brown Sugar: Thickens the glaze and adds a molasses-like depth to the sauce.

4. Adding More Layers of Flavor

  • A Splash of Vinegar: Apple cider vinegar or balsamic vinegar adds a tangy contrast to the sweetness.
  • A Hint of Mustard: A touch of Dijon or whole grain mustard adds sharpness and complexity.
  • Fresh Herbs: Finish with chopped parsley, thyme, or cilantro for added freshness.

How to Serve Hot Honey Chicken

This dish pairs well with a variety of sides, making it incredibly versatile for different meals. Here are a few serving ideas:

1. Classic Comfort Pairings

  • Mashed Potatoes: The creamy, buttery texture balances the bold flavors.
  • Rice: White, brown, or coconut rice soaks up the delicious sauce.
  • Cornbread: A slightly sweet and crumbly side that complements the honey glaze.

2. Fresh and Light Options

  • Salads: Serve sliced chicken over a crisp green salad with vinaigrette.
  • Grilled Vegetables: Roasted broccoli, Brussels sprouts, or asparagus add a healthy contrast.
  • Coleslaw: A tangy slaw provides a refreshing crunch.

3. Fun and Creative Ideas

  • Tacos: Shred the chicken and stuff it into warm tortillas with pickled onions and avocado.
  • Sandwiches: Stack it on a toasted bun with coleslaw and aioli for a spicy chicken sandwich.
  • Pizza Topping: Slice it and add it to a homemade pizza with mozzarella and red onions.

FAQs: Everything You Need to Know

1. Can I Make This Dish Less Spicy?

Yes! Simply reduce or omit the cayenne pepper and red pepper flakes. You’ll still get a sweet and smoky flavor without the heat.

2. What’s the Best Way to Store Leftovers?

Store any leftover chicken in an airtight container in the refrigerator for up to 3-4 days. The sauce thickens as it sits, making it even more flavorful.

3. How Do I Reheat Without Drying It Out?

  • Oven: Place in a 350°F oven for 10-12 minutes, covering with foil to retain moisture.
  • Stovetop: Reheat in a skillet over low heat with a splash of broth or extra hot honey sauce.
  • Microwave: Heat in short intervals, covering with a damp paper towel to keep the moisture.

4. Can I Freeze Hot Honey Chicken?

Yes! Once cooled, store the chicken in a freezer-safe container for up to 1 month. Thaw overnight in the fridge before reheating.

5. Can I Use a Store-Bought Hot Honey Sauce?

Absolutely. Mike’s Hot Honey is a great option if you want to skip making your own sauce. However, the homemade version allows for better control over spice and sweetness levels.

6. Can I Cook This in an Air Fryer?

Yes! Air-fry at 360°F for 10-15 minutes, flipping halfway. Brush with extra hot honey sauce before serving for maximum flavor.

7. Can I Make This Ahead of Time?

Yes! You can marinate the chicken overnight, and prepare the sauce ahead of time. Assemble and bake when ready for a quick and effortless meal.

Conclusion: A Dish That Checks Every Box

Hot Honey Baked Chicken Breasts are the perfect combination of sweet, smoky, spicy, and savory, making them a must-try for any chicken lover.

This dish is:
Easy to make – With simple ingredients and minimal effort.
Versatile – Great for salads, sandwiches, tacos, and more.
Meal prep-friendly – Flavors deepen over time, making leftovers delicious.
Customizable – Adjust the heat level, swap sweeteners, or try different cuts of chicken.

Whether you’re cooking for a weeknight dinner, prepping meals for the week, or looking to impress guests with a bold, flavorful dish, this recipe is a guaranteed crowd-pleaser.

So fire up the oven, grab your ingredients, and get ready to enjoy a dish that delivers the perfect balance of heat, sweetness, and pure comfort food satisfaction.

Garlic Chicken Gnocchi Skillet: A One-Pan Masterpiece

Few dishes can deliver the perfect balance of comfort, flavor, and convenience like a Garlic Chicken Gnocchi Skillet. This creamy, garlicky dish brings together tender chicken, pillowy gnocchi, and a rich sauce infused with Parmesan and Italian herbs—all cooked in a single pan.

For those looking for a restaurant-quality meal at home, this recipe is an excellent choice. Not only is it quick and easy to prepare (ready in just 30 minutes), but it also offers plenty of room for customization, making it a versatile dish for weeknights, special occasions, or meal prep.

Let’s dive into what makes this dish so special, the best ways to customize it, and how to store and reheat it properly for the best experience.

Why This Garlic Chicken Gnocchi Skillet Stands Out

1. A One-Pan Meal for Ultimate Convenience

Nobody likes spending extra time washing dishes. That’s why one-pan recipes like this one are so valuable. From searing the chicken to simmering the gnocchi, everything happens in a single skillet, ensuring minimal cleanup without sacrificing flavor.

2. A Rich, Creamy Sauce with Bold Flavor

This dish is all about the sauce. A blend of heavy cream, chicken broth, and Parmesan cheese creates a velvety texture, while the garlic and Italian herbs add depth and warmth. The sauce clings perfectly to the gnocchi, ensuring every bite is creamy, savory, and satisfying.

3. The Perfect Balance of Protein and Carbs

The juicy chicken provides a lean source of protein, while the gnocchi brings soft, pillowy texture and satisfying carbohydrates. This makes for a well-balanced dish that keeps you full and energized.

4. Easy to Customize to Your Taste

From spicing it up with red pepper flakes to adding vegetables like spinach or mushrooms, this dish is easily adaptable. Whether you prefer a richer sauce, a lighter version, or a vegetarian alternative, it’s simple to adjust the ingredients to fit your preferences.

Ingredients: A Perfect Harmony of Flavors

The Protein Powerhouse

  • 1 lb boneless, skinless chicken breasts, cut into bite-sized pieces

The Creamy Base

  • 6 cloves garlic, minced
  • 1 cup heavy cream
  • 1 cup chicken broth

The Star of the Dish

  • 1 lb potato gnocchi

Flavor Enhancers

  • 2 tbsp olive oil
  • ½ cup grated Parmesan cheese
  • 1 tsp dried Italian herbs
  • Salt and freshly ground black pepper to taste

The Finishing Touch

  • Fresh basil leaves for garnish

Directions: From Skillet to Table in 30 Minutes

1. Sear the Chicken

  • Heat olive oil in a large skillet over medium-high heat.
  • Add the chicken, season with salt, pepper, and Italian herbs, and cook until golden brown and fully cooked (about 6-8 minutes).
  • Remove the chicken from the skillet and set aside.

2. Build the Flavorful Sauce

  • In the same skillet, sauté the minced garlic for about 30 seconds until fragrant.
  • Pour in the chicken broth and scrape up any browned bits from the pan to enhance the flavor.

3. Cook the Gnocchi

  • Add the gnocchi to the skillet and bring the mixture to a gentle simmer.
  • Cook for 3-4 minutes, stirring occasionally, until the gnocchi becomes tender.

4. Create the Creamy Magic

  • Reduce the heat to medium-low and pour in the heavy cream.
  • Stir to combine and let simmer for another 2-3 minutes until the sauce thickens.

5. Bring It All Together

  • Return the cooked chicken to the skillet.
  • Stir in the grated Parmesan cheese until melted and well combined.

6. Serve and Enjoy

  • Taste and adjust seasoning if needed.
  • Garnish with fresh basil and serve hot.

Nutritional Breakdown: Comfort Food with Benefits

(Per Serving, Approximate Values)

  • Calories: 650 kcal
  • Protein: 40g
  • Carbohydrates: 50g
  • Fat: 30g
  • Calcium: 20% Daily Value

Tips to Make This Dish Even Better

  • Choose the Right Skillet: A large, heavy-bottomed skillet or cast-iron pan helps with even cooking.
  • Control the Sauce Thickness: If it’s too thick, add a splash of chicken broth. If it’s too thin, let it simmer a little longer.
  • Spice It Up: Add red pepper flakes or cayenne for a kick.
  • Customize the Cheese: Try Gorgonzola or Asiago for a unique twist.
  • Make It Lighter: Use half-and-half or milk instead of heavy cream.

Creative Ways to Customize This Dish

One of the best things about this Garlic Chicken Gnocchi Skillet is its flexibility. Here are some creative ways to tweak the recipe to make it your own:

1. Change Up the Protein

  • Swap Chicken for Shrimp: For a seafood-inspired twist, use shrimp instead of chicken. Simply sauté the shrimp until pink and opaque before adding it back to the sauce.
  • Use Italian Sausage: If you love a bolder flavor, try using crumbled Italian sausage in place of chicken. Spicy or mild sausage both work well.
  • Make It Vegetarian: Skip the meat altogether and add more veggies like mushrooms, zucchini, or bell peppers.

2. Experiment with the Sauce

  • Make It Spicier: If you enjoy heat, add a pinch of cayenne pepper or red pepper flakes to bring extra warmth to the dish.
  • Add a Touch of Wine: Deglaze the pan with a splash of white wine before adding the broth to enhance the depth of flavor.
  • Make It Lighter: Replace the heavy cream with half-and-half or evaporated milk for a less rich but still creamy result.

3. Play with Different Cheese Varieties

  • Gorgonzola or Blue Cheese: If you love bold cheese flavors, try adding crumbles of Gorgonzola or blue cheese for a tangy kick.
  • Mozzarella or Fontina: For extra gooeyness, stir in some shredded mozzarella or fontina cheese before serving.

4. Boost the Nutrition with More Vegetables

  • Spinach or Kale: A handful of fresh spinach or kale wilts beautifully into the sauce.
  • Mushrooms: Sautéed mushrooms add a deep, umami flavor.
  • Cherry Tomatoes: Toss in halved cherry tomatoes for a burst of freshness and color.

FAQs: Everything You Need to Know About This Dish

1. Can I Use Store-Bought Gnocchi?

Absolutely! Shelf-stable gnocchi from the grocery store works perfectly in this dish. Just be sure to cook it directly in the sauce to absorb the flavors. If you have time, homemade gnocchi is an excellent option for an even more authentic taste.

2. How Do I Store Leftovers?

Store any leftovers in an airtight container in the refrigerator for up to 3 days. Since the gnocchi absorbs liquid over time, the sauce may thicken when refrigerated.

3. How Do I Reheat This Dish Without Drying It Out?

Reheat gently on the stovetop over low heat, adding a splash of chicken broth or milk to loosen the sauce. If using a microwave, heat in short intervals, stirring in between to prevent drying.

4. Can I Freeze This Dish?

While you can freeze it for up to 1 month, the texture of the gnocchi may change slightly upon thawing. If freezing, store it in an airtight container and thaw overnight in the refrigerator before reheating.

5. What Side Dishes Pair Well with This Pasta?

  • Garlic Bread: The perfect companion to soak up the creamy sauce.
  • Simple Green Salad: A crisp, refreshing contrast to the richness of the dish.
  • Roasted Vegetables: Broccoli, asparagus, or Brussels sprouts add extra nutrients.

6. Can I Make This Dish Dairy-Free?

Yes! Use coconut cream or a plant-based heavy cream alternative, and replace Parmesan with a dairy-free cheese or nutritional yeast for a similar savory depth.

7. Is There a Gluten-Free Version?

Yes! Many grocery stores sell gluten-free gnocchi made from alternative flours like cauliflower or chickpeas. Be sure to check the label for certification.

Conclusion: A Comforting Meal That Delivers Every Time

The Garlic Chicken Gnocchi Skillet is the ultimate weeknight dinner hero. With its creamy, garlicky sauce, tender chicken, and soft gnocchi, it’s the kind of meal that brings warmth and satisfaction in every bite.

Best of all, it’s:

  • Quick and easy – Ready in just 30 minutes
  • Customizable – Adapt it to your dietary preferences
  • Comforting and satisfying – A perfect balance of creamy, savory, and hearty flavors

Whether you’re cooking for family, meal prepping, or hosting guests, this dish is sure to impress. It’s proof that simple ingredients, when combined thoughtfully, can create something truly special.

So grab your skillet, let the garlic sizzle, and enjoy a meal that’s as delicious as it is effortless!

Philly Cheesesteak Pasta: A Comfort Classic with a Twist

Philly Cheesesteak Pasta is a bold, indulgent take on the classic Philadelphia cheesesteak sandwich. It takes all the rich, savory elements of the famous hoagie—tender beef, sautéed onions and bell peppers, and gooey melted cheese—and transforms them into a creamy, comforting pasta dish. With a luscious cheese sauce coating every bite, this dish is guaranteed to satisfy both pasta lovers and cheesesteak purists alike.

Whether you’re looking for an easy weeknight meal, a cozy weekend indulgence, or a dish that will impress your guests, Philly Cheesesteak Pasta delivers on all fronts. Let’s explore the origins of this dish, why it’s so irresistibly good, and how you can customize it to your taste.

From Hoagie to Pasta: The Inspiration Behind the Dish

The Birth of the Philly Cheesesteak

The original Philly cheesesteak dates back to the early 20th century in Philadelphia, where it was created by brothers Pat and Harry Olivieri. They started by selling grilled beef sandwiches from a hot dog stand before adding cheese to create what is now an iconic American dish. Traditionally served on a hoagie roll with thinly sliced ribeye steak, melted cheese (Provolone, American, or Cheez Whiz), and caramelized onions, the Philly cheesesteak quickly became a beloved comfort food.

The Pasta Adaptation

Philly Cheesesteak Pasta takes those same classic flavors and reinvents them in a new, more versatile form. Instead of a hoagie roll, pasta serves as the perfect vessel to hold the savory beef, sautéed vegetables, and creamy cheese sauce. The result is a dish that retains the essence of the cheesesteak while offering the comfort of a pasta bake.

What Makes This Dish So Special?

1. A Perfect Balance of Flavors

This dish is a harmony of textures and flavors—tender beef, slightly crisp bell peppers, and sweet, caramelized onions come together under a creamy, cheesy sauce. The richness of the provolone and cream cheese is balanced by the savory beef broth, creating a sauce that clings beautifully to the pasta.

2. Easy and Convenient

Unlike a traditional cheesesteak, which requires careful assembly and the right kind of bread, this pasta version is much easier to prepare. Everything cooks in a single skillet (aside from boiling the pasta), making cleanup a breeze.

3. Great for Families and Meal Prep

This dish is a hit with both kids and adults. It’s hearty, filling, and can easily be made in large batches. Plus, it reheats well, making it perfect for leftovers.

Ingredients: A Flavorful Symphony

  • Meat Options:
    • 1 lb ground beef or steak strips (ribeye or sirloin recommended)
  • Veggie Power:
    • 1 green bell pepper, diced
    • 1 onion, diced
    • 2 cloves garlic, minced
  • The Creamy Base:
    • 8 oz cream cheese, softened
    • 1 cup beef broth
  • Cheesy Goodness:
    • 1 cup shredded provolone cheese (or mozzarella/cheddar as substitutes)
  • Pasta Pick:
    • 12 oz penne or rigatoni (for the perfect sauce hold)
  • Flavor Enhancers:
    • 1 tbsp olive oil
    • Salt and pepper to taste

Directions: From Skillet to Table

1. Perfecting the Pasta

  • Bring a large pot of salted water to a boil.
  • Add pasta and cook until al dente according to package instructions.
  • Drain and set aside (no rinsing to help sauce stick!).

2. Sautéing the Aromatics

  • Heat olive oil in a large skillet over medium heat.
  • Add diced green bell pepper, onion, and garlic.
  • Sauté for 4-5 minutes until soft and fragrant.

3. Cooking the Meat

  • Add ground beef or steak strips to the skillet.
  • Cook until fully browned, breaking up the beef as necessary.
  • Season with salt and pepper to taste.

4. Crafting the Creamy Sauce

  • Stir in softened cream cheese and beef broth.
  • Stir constantly until cream cheese melts and sauce turns smooth and velvety.

5. Bringing it All Together

  • Add the cooked pasta to the skillet.
  • Toss everything together until pasta is well-coated in sauce.

6. The Grand Finale: Cheese & Broil

  • Sprinkle shredded provolone cheese over the top.
  • Broil in the oven for 3-5 minutes until cheese is melted, bubbly, and golden brown.

7. Serve & Savor

  • Remove from the oven and let it sit for a minute.
  • Garnish with fresh parsley or parmesan if desired.
  • Serve hot and enjoy!

Nutritional Breakdown (Per Serving)

(Estimates based on 4 servings)

  • Calories: 600-700 kcal
  • Protein: 30-35g
  • Carbohydrates: 50-60g
  • Fat: 30-40g

Customizing Your Philly Cheesesteak Pasta

One of the best things about this dish is its flexibility. Here are some creative ways to make it your own:

1. Experimenting with Different Meats

  • Classic Ribeye Strips: For a more authentic cheesesteak flavor, use thinly sliced ribeye steak instead of ground beef. Sear it quickly to maintain tenderness.
  • Ground Turkey or Chicken: A lighter option that still delivers on flavor.
  • Plant-Based Alternatives: Mushrooms or a meat substitute work well for a vegetarian version.

2. Playing with Cheese Varieties

  • Traditional Provolone: Offers a mild, slightly tangy flavor that melts beautifully.
  • Mozzarella: A great alternative for a milder, gooier experience.
  • Cheddar: Adds a sharper, bolder taste.
  • Cheez Whiz: If you want to stick to the true Philly cheesesteak experience, melt some Cheez Whiz into the sauce.

3. Adding a Kick of Spice

  • Stir in red pepper flakes or a dash of hot sauce.
  • Use pepper jack cheese instead of provolone.
  • Add sautéed jalapeños for an extra layer of heat.

4. Healthier Alternatives

  • Whole Wheat or Gluten-Free Pasta: A fiber-rich, nutritious alternative.
  • Light Cream Cheese: Cuts down on fat while keeping the sauce creamy.
  • Extra Vegetables: Mushrooms, spinach, or zucchini can add more nutrients to the dish.

FAQs: Everything You Need to Know

1. Can I Make This Dish Ahead of Time?

Absolutely! You can prepare Philly Cheesesteak Pasta in advance by assembling the dish, then refrigerating it before baking. When ready to serve, simply reheat it in the oven at 350°F until warmed through.

2. What’s the Best Type of Pasta to Use?

Short, sturdy pasta works best—penne, rigatoni, or ziti are great choices. Their ridges and hollow centers help trap the sauce, ensuring every bite is packed with flavor.

3. How Can I Store and Reheat Leftovers?

Store leftovers in an airtight container in the refrigerator for up to 3 days. When reheating:

  • Stovetop: Add a splash of beef broth or water and heat over low-medium heat, stirring occasionally.
  • Microwave: Heat in 30-second intervals, stirring in between, to prevent the pasta from drying out.

4. Can I Freeze Philly Cheesesteak Pasta?

Yes! Allow the pasta to cool completely, then transfer it to a freezer-safe container. Freeze for up to 2 months. To reheat, thaw overnight in the fridge and warm it up in the oven or on the stovetop with a bit of broth.

5. Can I Make This a One-Pot Meal?

If you want to minimize dishes, cook the pasta in the same skillet by adding additional beef broth. Let it simmer until tender, then proceed with the recipe as usual.

6. Is There a Dairy-Free Version?

Yes! Substitute dairy-free cream cheese and a plant-based cheese alternative. Many brands offer excellent dairy-free cheeses that melt well, keeping the dish creamy and flavorful.

Conclusion: A Dish Worth Adding to Your Recipe Collection

Philly Cheesesteak Pasta is the ultimate fusion of two beloved comfort foods. It takes the best aspects of the classic cheesesteak—juicy beef, caramelized onions, melted cheese—and transforms them into a creamy, rich pasta dish that’s easy to make and endlessly customizable.

Whether you’re feeding a family, looking for a make-ahead meal, or simply craving something indulgent, this dish delivers. With its rich flavors, creamy texture, and hearty ingredients, it’s bound to become a favorite in your household.

So the next time you’re in the mood for something warm, cheesy, and satisfying, give this Philly Cheesesteak Pasta a try. Your taste buds will thank you!

Hobo Casserole with Ground Beef: A Hearty, Homestyle Favorite

Nothing beats a warm, comforting meal that brings people together, and Hobo Casserole with Ground Beef does exactly that. With layers of savory ground beef, tender potatoes, and melted cheese, this dish is the perfect solution for busy weeknights, potlucks, or when you’re simply craving something cozy and satisfying.

This casserole is a one-pan wonder—easy to prepare, affordable, and customizable to suit different tastes. Whether you enjoy classic flavors or want to experiment with different ingredients, this dish provides the perfect foundation for a delicious and filling meal.

Why Hobo Casserole is a Must-Try Dish

1. Quick & Easy Preparation

This casserole requires minimal prep and cleanup, making it an excellent choice for busy schedules. With just a few simple steps—browning the beef, slicing the potatoes, layering, and baking—you can have a delicious homemade meal in under an hour.

2. Budget-Friendly Ingredients

One of the best things about Hobo Casserole is that it uses pantry staples that are both affordable and easy to find. With just ground beef, potatoes, onions, cheese, and a few seasonings, you can create a hearty meal without stretching your budget.

3. A One-Dish Meal with Balanced Nutrition

This dish combines protein, carbohydrates, and dairy, making it a complete meal in one dish. The beef provides protein, the potatoes add filling carbohydrates, and the cheese brings richness and calcium. You can also add vegetables for extra nutrients, making it a well-rounded meal.

4. Family-Friendly Comfort Food

If you’re looking for a kid-approved dinner that the whole family will enjoy, this casserole is a winner. The cheesy, savory layers appeal to even the pickiest eaters, and the mild flavors make it an excellent choice for all ages.

The Story Behind Hobo Casserole

The name “Hobo Casserole” might sound unusual, but its origins come from the idea of using simple, readily available ingredients to create a delicious, nourishing meal. Inspired by classic American comfort food, this dish reflects practical cooking—taking basic ingredients and transforming them into something flavorful and satisfying.

Historically, casseroles became popular in American households during the Great Depression and wartime periods, when stretching ingredients and minimizing waste was essential. Over the years, casseroles have remained a go-to meal for families, and Hobo Casserole has become a staple in many kitchens for its simplicity, versatility, and comforting taste.

Ingredients: A Simple Symphony of Flavors

  • 1 lb ground beef
  • 1 tablespoon olive oil
  • 1 medium onion, chopped
  • 2 cloves garlic, minced
  • 4-5 medium potatoes, thinly sliced
  • 1 ½ cups shredded cheddar cheese
  • ½ cup grated Parmesan cheese
  • 1 teaspoon dried Italian seasoning
  • ½ teaspoon paprika
  • Salt and pepper to taste
  • ½ cup beef broth or water
  • ¼ cup milk (optional, for creaminess)
  • Fresh parsley for garnish (optional)

Directions: From Skillet to Table

Step 1: Set the Stage

Preheat your oven to 375°F (190°C). Grease a 9×13-inch baking dish with cooking spray or olive oil.

Step 2: Sizzle & Brown

Heat olive oil in a large skillet over medium heat. Add the ground beef and cook, breaking it apart with a spoon, until fully browned (about 5-7 minutes). Drain excess fat if necessary.

Step 3: Aromatic Addition

Add the chopped onion and minced garlic to the skillet with the beef. Cook for 3-4 minutes until the onion turns soft and translucent.

Step 4: Layer the Goodness

In the prepared baking dish, spread the cooked beef mixture evenly. Arrange thinly sliced potatoes on top, seasoning with salt, pepper, Italian seasoning, and paprika.

Step 5: The Cheesy Touch

Sprinkle shredded cheddar and Parmesan cheese over the beef and potatoes. Pour beef broth (or water) around the edges to keep the potatoes moist. If desired, drizzle milk for added creaminess.

Step 6: Bake to Perfection

Cover the dish with aluminum foil and bake for 30 minutes. Remove the foil and bake for an additional 15-20 minutes, or until the potatoes are tender and the cheese is golden and bubbly.

Step 7: Finishing Touch

Garnish with fresh parsley and serve hot for the ultimate comfort meal.

Nutritional Perks: A Balanced Bite

(Estimated per serving, based on standard ingredients)

  • Calories: ~400-450
  • Protein: ~25g
  • Carbohydrates: ~35g
  • Fat: ~20g
  • Fiber: ~4g
  • Calcium: ~15% DV

Customizing Your Hobo Casserole

One of the best things about this recipe is its versatility. You can easily swap out ingredients or add extra elements to make the dish your own.

1. Swap the Protein

  • Ground turkey or chicken – A leaner alternative to beef.
  • Ground sausage – Adds a richer, more savory flavor.
  • Vegetarian meat substitutes – Perfect for a meat-free version.

2. Add More Vegetables

Adding veggies not only boosts nutrition but also adds more flavor and texture:

  • Bell peppers and mushrooms – Enhance the depth of flavor.
  • Carrots and peas – Add natural sweetness and color.
  • Spinach or kale – Provides extra greens and nutrients.

3. Experiment with Different Cheeses

Cheese is a key element in this dish, and changing the type of cheese can alter the flavor profile:

  • Mozzarella – Mild and gooey, great for a stretchy cheese pull.
  • Pepper Jack – Adds a hint of spice.
  • Smoked Gouda – Introduces a smoky, complex flavor.

4. Make it Extra Creamy

For an extra rich and creamy texture, you can stir in:

  • Sour cream or heavy cream before baking.
  • A can of cream of mushroom or cream of chicken soup to create a smoother texture.

Serving Suggestions: Perfect Pairings for Hobo Casserole

While this casserole is satisfying on its own, pairing it with the right side dishes can elevate the meal even further.

1. A Crisp, Fresh Salad

A light, refreshing salad balances out the richness of the casserole. Try:

  • A simple garden salad with lettuce, tomatoes, cucumbers, and a vinaigrette.
  • A coleslaw with a tangy dressing for a crunchy contrast.

2. Steamed or Roasted Vegetables

Adding vegetables on the side makes the meal feel more complete. Try:

  • Steamed broccoli, green beans, or asparagus for a healthy addition.
  • Roasted Brussels sprouts or carrots for a caramelized, slightly sweet contrast.

3. Crusty Bread or Garlic Rolls

A slice of crusty bread or garlic bread is perfect for soaking up the cheesy, flavorful juices from the casserole.


Storage and Reheating Tips

One of the best things about casseroles is that they taste even better the next day as the flavors meld together. Here’s how to store and reheat leftovers:

Storing:

  • Refrigerator: Store in an airtight container for up to 4 days.
  • Freezer: Wrap tightly and freeze for up to 3 months.

Reheating:

  • Oven: Reheat at 350°F (175°C) for 15-20 minutes until heated through.
  • Microwave: Heat in 1-minute intervals, stirring in between to ensure even heating.

Pro tip: Add a splash of beef broth or milk when reheating to keep the casserole moist.

Frequently Asked Questions (FAQs)

1. Can I make this casserole ahead of time?

Yes! You can assemble the casserole, cover it, and refrigerate it for up to 24 hours before baking. This makes it perfect for meal prep.

2. Can I use frozen potatoes instead of fresh ones?

Yes, frozen hash browns or potato slices can be used, but make sure to thaw and drain them first to prevent excess moisture in the casserole.

3. How do I know when the casserole is fully cooked?

The casserole is done when:

  • The cheese is melted and bubbly.
  • The potatoes are tender when pierced with a fork.

4. Can I make this casserole without cheese?

Yes, you can omit the cheese, or use a dairy-free cheese alternative for a lighter version.

5. What type of potatoes work best for this dish?

  • Russet potatoes break down slightly, making the dish softer.
  • Yukon Gold potatoes hold their shape better and provide a creamy texture.

6. Can I add beans for extra protein?

Yes! Adding kidney beans, black beans, or chickpeas can boost the protein and fiber content.

7. Can I use ground sausage instead of beef?

Yes, ground sausage adds extra flavor and a touch of spice.

8. How do I keep the potatoes from getting mushy?

Slice them evenly and avoid overcooking. Covering the casserole while baking ensures they stay moist and cook through without becoming too soft.

Final Thoughts: A Classic Casserole for Every Occasion

Hobo Casserole with Ground Beef is a timeless dish that never goes out of style. Its simple ingredients, rich flavors, and comforting texture make it a favorite for families, busy individuals, and anyone looking for a delicious, hassle-free meal.

Whether you’re making it for a weeknight dinner, meal prepping, or bringing it to a potluck, this casserole is always a hit. Plus, with so many ways to customize it, you can make it different every time while keeping the same satisfying base.

So, next time you need a go-to comfort meal, give this Hobo Casserole a try—you won’t be disappointed!

Sizzling Chinese Chicken & Cabbage Stir-Fry: A Flavorful Fusion of Simplicity and Taste

Stir-frying is one of the fastest and most effective ways to bring out the best in ingredients, and this Chinese Chicken & Cabbage Stir-Fry is no exception. A symphony of bold flavors and crisp textures, this dish takes humble cabbage and transforms it into a star ingredient, pairing it with tender chicken and a savory sauce that brings everything together beautifully.

Whether you’re looking for a quick weeknight meal or a dish to impress at a gathering, this recipe delivers both ease and depth of flavor. Packed with protein, fiber, and essential nutrients, it’s a healthy, well-balanced meal that can be customized to suit any palate. Let’s dive into what makes this dish truly special.

The Magic Behind Stir-Frying: Why This Dish Works

1. The Perfect Balance of Flavors

The secret to a great stir-fry lies in balancing flavors. This recipe combines umami-rich oyster sauce, savory soy sauce, and the natural sweetness of bell peppers to create a depth of taste that keeps every bite interesting. The jalapeño adds just a touch of heat, which can be adjusted to your preference.

2. A Textural Masterpiece

Great stir-fries aren’t just about flavor—they’re also about texture. The crisp-tender cabbage, juicy chicken, and crunchy bell peppers create a dynamic mouthfeel, ensuring that each bite is satisfying. Stir-frying allows vegetables to retain their structure while absorbing the delicious sauce, making for an incredibly fresh-tasting dish.

3. Fast and Easy Cooking

One of the best things about this dish is how quick and effortless it is to prepare. With everything prepped and ready to go, cooking takes less than 15 minutes. That’s the beauty of a good stir-fry—it delivers incredible flavor in minimal time, making it perfect for busy schedules.

Why Cabbage Deserves the Spotlight

Cabbage is often overlooked, but it’s one of the most versatile and nutritious vegetables available. Here’s why it’s a must-have ingredient in this dish:

1. Nutrient-Dense & Low-Calorie

Cabbage is packed with vitamins C and K, antioxidants, and fiber, making it a powerhouse for boosting immunity and digestion while keeping the dish light and healthy.

2. Perfect for Absorbing Flavors

Unlike some vegetables that overpower a dish, cabbage soaks up sauces beautifully without becoming mushy. It retains a slight crunch, making it a great textural component.

3. Budget-Friendly & Accessible

Cabbage is affordable, widely available year-round, and lasts a long time in the fridge, making it a great staple for meal planning.

Gather Your Ingredients

Proteins & Fats

  • 2 chicken breasts, thinly sliced
  • 1 tablespoon butter

Vegetables

  • 1 medium onion, sliced
  • 2 cloves garlic, minced
  • ½ head green cabbage, shredded
  • ½ jalapeño pepper, finely diced
  • 1 orange bell pepper, diced

Sauces & Seasoning

  • ½ cup chicken stock
  • 2 tablespoons oyster sauce
  • 1 tablespoon soy sauce
  • Pinch of salt and pepper, to taste

Cooking Up the Magic

Step 1: Chop & Prep

  • Slice the chicken into thin strips.
  • Prepare all vegetables: slice the onion, mince the garlic, dice the jalapeño and bell pepper, and shred the cabbage.

Step 2: Sear the Chicken

  • Heat a large skillet or wok over medium-high heat.
  • Melt the butter, then add the sliced chicken.
  • Season with salt and pepper.
  • Stir-fry for about 5-7 minutes until golden and cooked through.
  • Remove and set aside.

Step 3: Sauté the Veggies

  • In the same pan, cook sliced onions until soft (about 3 minutes).
  • Add garlic and jalapeño, stirring for 1 minute.
  • Toss in the cabbage and bell pepper, stirring frequently.

Step 4: Build the Sauce

  • Pour in the chicken stock, oyster sauce, and soy sauce.
  • Stir well, ensuring all vegetables are evenly coated.
  • Let it cook for 5-7 minutes until the cabbage is tender but still crisp.

Step 5: Bring it All Together

  • Return the cooked chicken to the pan and mix with the veggies.
  • Cook for another 2-3 minutes, letting the flavors meld together.
  • Adjust seasoning if needed.

Power-Packed Nutrition (Per Serving)

  • Calories: 250
  • Total Fat: 8g
  • Carbohydrates: 18g
  • Protein: 25g

Serving Suggestions

  • Serve over steamed rice or noodles for a heartier meal.
  • For a low-carb option, wrap in lettuce leaves.

Serving Suggestions: Elevate Your Dish

1. Serve Over Rice or Noodles

While this stir-fry is satisfying on its own, serving it over steamed jasmine rice or stir-fried noodles takes it to another level. The sauce coats the grains beautifully, creating a well-rounded meal.

2. Go Low-Carb with Lettuce Wraps

For a lighter, low-carb option, use lettuce leaves as a wrap for the stir-fry. The crisp lettuce contrasts beautifully with the warm, savory filling.

3. Add a Crunchy Topping

Sprinkle some toasted sesame seeds, chopped peanuts, or crispy fried shallots on top for an added layer of texture and flavor.

4. Pair with a Refreshing Side

A side of cool cucumber salad, miso soup, or a light Asian slaw complements the warmth of this dish and rounds out the meal.

Ways to Customize This Stir-Fry

1. Adjust the Spice Level

If you prefer a milder version, simply omit the jalapeño or replace it with a milder pepper. For those who love heat, try adding red chili flakes or Szechuan peppercorns for an extra kick.

2. Swap the Protein

While chicken works beautifully in this dish, you can easily substitute it with:

  • Beef: Thinly sliced flank steak for a richer flavor
  • Shrimp: Quick-cooking and perfect for seafood lovers
  • Tofu: A great vegetarian alternative that soaks up the sauce well

3. Experiment with Additional Vegetables

This recipe is highly adaptable. Try adding:

  • Carrots: For extra sweetness and crunch
  • Snow Peas: A vibrant, slightly crisp addition
  • Mushrooms: For an earthy, umami boost
  • Water Chestnuts: For a unique, satisfying crunch

4. Make It Extra Saucy

If you prefer a dish with more sauce, increase the chicken stock and soy sauce, and add a teaspoon of cornstarch mixed with water to thicken the sauce slightly.

Storage & Meal Prep Tips

1. How to Store Leftovers

This dish actually tastes even better the next day as the flavors meld together. Store leftovers in an airtight container in the refrigerator for up to 3 days.

2. The Best Way to Reheat

Reheat in a hot pan for the best texture. Microwaving can make the vegetables soggy, so using a skillet ensures everything stays crisp and fresh.

3. Meal Prep Like a Pro

  • Chop your vegetables ahead of time and store them in airtight containers.
  • Pre-mix your sauce so you can simply pour it in when cooking.
  • Slice your chicken and store it with a light marinade to make cooking even faster.

Frequently Asked Questions (FAQs)

1. Can I make this dish less spicy?

Absolutely! Simply leave out the jalapeño or reduce the amount to your preference.

2. What can I substitute for oyster sauce?

You can use hoisin sauce or a mix of soy sauce with a dash of sugar for a similar sweet-savory depth.

3. Can I use pre-shredded cabbage?

Yes! Bagged coleslaw mix works as a convenient alternative to shredding cabbage from scratch.

4. Is this dish gluten-free?

To make it gluten-free, use tamari instead of soy sauce and check the oyster sauce label for gluten-free certification.

5. How do I prevent my stir-fry from becoming soggy?

Make sure your wok or pan is very hot before adding ingredients, and avoid overcrowding the pan, which causes steaming instead of stir-frying.

6. Can I freeze this dish?

While the chicken can freeze well, the cabbage may lose its texture, so it’s best enjoyed fresh.

Final Thoughts: A Stir-Fry for Every Occasion

This Chinese Chicken & Cabbage Stir-Fry is proof that simple ingredients, when treated with the right techniques, can create something truly extraordinary. Whether you’re making it for a quick weeknight dinner, meal prepping for the week, or looking to impress guests with a homemade Asian-inspired dish, this stir-fry delivers in every way.

The combination of savory sauce, crisp vegetables, and juicy chicken makes it a dish that’s as delicious as it is nutritious. Plus, with so many ways to customize it, you can make it your own every time.

So, grab your wok, turn up the heat, and enjoy this flavorful, satisfying meal that comes together in just minutes!

Bang Bang Chicken: The Crispy, Spicy, and Addictive Delight

Bang Bang Chicken is a dish that effortlessly blends crunch, spice, and creaminess into one irresistible bite. While the name might sound playful, the flavors in this dish are serious business. This Westernized version takes inspiration from traditional Sichuan Bang Bang Chicken but gives it a crispy, golden-fried twist. The real magic happens when these crunchy chicken tenders are tossed in the signature Bang Bang Sauce—a perfect balance of creamy, spicy, tangy, and slightly sweet flavors.

Whether you’re serving it as an appetizer, game-day snack, or a main dish, Bang Bang Chicken never fails to impress. In this guide, we’ll dive deep into what makes this dish special, tips for getting it just right, side dishes to serve with it, and common questions to help you master this recipe.

The History Behind Bang Bang Chicken

The original Bang Bang Chicken (Bàng Bàng Jī, 棒棒鸡) comes from Sichuan cuisine, where it is traditionally prepared using poached chicken that is shredded and coated in a spicy sesame sauce. The name “Bang Bang” originates from the wooden batons (棒, “bàng”) used to tenderize the chicken before shredding it.

However, the version we know today is a modern American fusion dish that swaps poached chicken for crispy, breaded tenders and replaces the traditional Sichuan sauce with a mayonnaise-based, spicy-sweet Bang Bang Sauce. This transformation has made Bang Bang Chicken a favorite in Western restaurants, particularly in Asian fusion and seafood chains.

Why Bang Bang Chicken is So Popular

1. The Ultimate Texture Combination

One of the biggest reasons for Bang Bang Chicken’s popularity is the perfect contrast of textures:

  • Crispy, golden-brown breading on the outside
  • Juicy, tender chicken on the inside
  • Creamy, spicy sauce that clings to every bite

2. A Sauce That Steals the Show

The Bang Bang Sauce is what makes this dish unforgettable. The balance of creamy mayo, sweet Thai chili sauce, fiery Sriracha, and honey creates a sauce that is both comforting and exciting.

3. A Crowd-Pleaser for Every Occasion

Bang Bang Chicken works for any setting:

  • As an appetizer – Serve with toothpicks at a party.
  • As a main course – Pair with rice, noodles, or vegetables.
  • As a game-day snack – A fun alternative to wings.

4. Versatile and Customizable

This dish is highly adaptable, making it perfect for home cooks who like to experiment. You can:

  • Adjust the spice level – Add more or less Sriracha or cayenne.
  • Make it healthier – Air fry or bake instead of deep frying.
  • Swap the protein – Try shrimp, tofu, or cauliflower instead of chicken.

For the Bang Bang Sauce:

  • 1 cup mayonnaise
  • ½ cup Thai sweet chili sauce
  • 1 teaspoon Sriracha sauce
  • 2 tablespoons honey

For the Crispy Chicken:

  • 1 ½ pounds boneless, skinless chicken tenderloins
  • 1 cup buttermilk
  • ¾ cup all-purpose flour
  • ½ cup cornstarch
  • 1 large egg
  • 1 tablespoon Sriracha sauce
  • ½ teaspoon garlic powder
  • ½ teaspoon salt
  • ¼ teaspoon black pepper
  • ⅛ teaspoon cayenne pepper (optional)
  • 2 cups plain panko breadcrumbs
  • Canola oil (for frying)
  • Chopped parsley (for garnish)

How to Make Bang Bang Chicken

Step 1: Whisk Up the Bang Bang Sauce

  • In a small bowl, mix mayonnaise, Thai sweet chili sauce, Sriracha, and honey until smooth.
  • Cover and set aside.

Step 2: Prepare the Chicken Marinade

  • In a medium bowl, whisk together buttermilk, flour, cornstarch, egg, Sriracha, garlic powder, salt, black pepper, and optional cayenne until smooth.
  • Add chicken tenderloins, ensuring they are fully coated.
  • Let marinate for 10 minutes.

Step 3: Coat the Chicken for Maximum Crunch

  • Place panko breadcrumbs on a plate.
  • Remove each chicken tender from the marinade and coat evenly with breadcrumbs, pressing gently to ensure adhesion.

Step 4: Fry to Golden Perfection

  • Heat canola oil in a skillet over medium-high heat to 365°F.
  • Fry chicken tenders in batches for 2-3 minutes per side or until golden brown and cooked through.
  • Use a meat thermometer to confirm an internal temperature of 165°F.

Step 5: Sauce It Up!

  • Transfer fried chicken to a paper towel-lined plate to drain excess oil.
  • Toss the crispy chicken tenders in the Bang Bang Sauce until evenly coated.

Step 6: Garnish & Serve

  • Sprinkle with chopped parsley and serve warm.

Nutritional Breakdown

  • Calories: ~350 per serving
  • Protein: 28g
  • Fat: 22g
  • Carbohydrates: 12g
  • Fiber: 1g
  • Sodium: 400mg

Secrets to the Crispiest Chicken

The key to perfect Bang Bang Chicken is achieving a crispy, golden crust that stays crunchy even after tossing in the sauce. Here’s how to do it:

1. Use Buttermilk for Tenderness

Marinating the chicken in buttermilk not only adds flavor but also helps break down proteins, making the chicken incredibly juicy and tender.

2. The Right Coating for Maximum Crunch

A combination of flour, cornstarch, and panko breadcrumbs creates the crispiest coating. The cornstarch helps absorb moisture and adds lightness, while panko provides extra crunch.

3. Maintain the Perfect Oil Temperature

For deep frying, keep the oil at 365°F (185°C). If the oil is too cold, the breading will absorb excess oil and become soggy. Too hot, and the outside burns before the inside cooks.

4. Let the Chicken Rest Before Frying

After coating the chicken, let it rest for 5-10 minutes. This helps the breading set and prevents it from falling off during frying.

5. Drain Properly for Crispiness

Instead of placing fried chicken on paper towels, use a wire rack to drain excess oil while keeping the crust intact.

6. Toss in Sauce Just Before Serving

If you toss the chicken in the sauce too early, it will become soggy. Coat it right before serving to maintain the crunch.

What to Serve with Bang Bang Chicken

Bang Bang Chicken is incredibly versatile, so the right side dishes can complement its bold flavors while making it a more complete meal.

1. Jasmine Rice

The subtle aroma and fluffy texture of steamed jasmine rice provide a neutral base to balance the rich flavors of Bang Bang Chicken.

2. Asian-Style Cucumber Salad

A cool, refreshing cucumber salad with sesame-soy dressing cuts through the richness of the fried chicken and adds a crisp contrast.

3. Garlic Butter Noodles

A simple but delicious side dish—buttery, garlicky noodles pair perfectly with the spicy Bang Bang sauce.

4. Sweet Potato Fries

The sweetness of crispy sweet potato fries complements the spicy, tangy sauce beautifully.

5. Sesame Green Beans

Quickly stir-fried with sesame oil and garlic, these green beans add color, crunch, and a touch of umami.

6. Pickled Vegetables

Tangy pickled carrots, radishes, and onions help balance the heat and richness of Bang Bang Chicken.

7. Fried Rice

A classic choice—fried rice with peas, carrots, and scrambled eggs makes Bang Bang Chicken a hearty meal.

8. Spicy Asian Slaw

A mix of shredded cabbage, carrots, and a spicy peanut dressing pairs well with the creamy Bang Bang sauce.

Frequently Asked Questions (FAQs)

1. Is Bang Bang Chicken Spicy?

It has a mild to medium heat level from the Sriracha and cayenne. If you prefer a spicier dish, add extra Sriracha or red pepper flakes.

2. Can I Make Bang Bang Chicken in an Air Fryer?

Yes! To air fry:

  • Preheat the air fryer to 375°F (190°C).
  • Spray the breaded chicken lightly with oil.
  • Air fry for 10-12 minutes, flipping halfway through.

3. Can I Bake Instead of Fry?

Yes! Bake at 400°F (200°C) for 20-25 minutes, flipping halfway through.

4. How Do I Store Leftovers?

  • Refrigerate in an airtight container for up to 3 days.
  • Freeze uncooked breaded chicken for up to 3 months.

5. How Should I Reheat Bang Bang Chicken?

  • Oven: Bake at 375°F for 10-12 minutes.
  • Air Fryer: Heat at 350°F for 5-6 minutes.
  • Avoid microwaving to prevent sogginess.

6. What’s the Best Protein Substitute?

You can replace the chicken with shrimp, tofu, cauliflower, or even mushrooms for a vegetarian-friendly version.

7. Can I Make the Sauce in Advance?

Yes! Store Bang Bang Sauce in the refrigerator for up to 5 days in an airtight container.

Final Thoughts: Why You Need to Try This Recipe

Bang Bang Chicken is a dish that delivers everything you want in a single bitecrispy, juicy, spicy, creamy, and slightly sweet. Whether you’re making it for family dinner, game day, or meal prep, this dish is always a hit.

By following the tips and techniques outlined in this guide, you’ll be able to achieve restaurant-quality Bang Bang Chicken at home. So grab your apron, heat up the oil (or air fryer), and get ready to enjoy one of the most irresistible crispy chicken dishes ever!

Steak with Creamy Cajun Shrimp Sauce: A Bold Fusion of Flavors

When it comes to indulgent, restaurant-quality meals that can be made at home, Steak with Creamy Cajun Shrimp Sauce stands out as a true showstopper. This dish combines the rich, juicy essence of a perfectly seared steak with the bold, spicy allure of Cajun shrimp in a velvety cream sauce. Whether you’re planning a special dinner or simply looking to elevate your culinary skills, this recipe is guaranteed to impress.

This dish is not just about luxury—it’s about harmonizing flavors and textures in a way that creates an unforgettable dining experience. The steak provides a hearty, savory base, while the creamy shrimp sauce brings in a luscious, spicy contrast that keeps you coming back for more.

In this article, we’ll explore what makes this dish special, the origins of Cajun seasoning, expert tips to perfect your cooking, and frequently asked questions that will help you master this recipe.

Why This Recipe Stands Out

Steak and shrimp may seem like an unusual pairing, but this dish is a testament to culinary balance. Here’s why it works so well:

  1. A Perfect Contrast of Textures – The steak’s firm, juicy bite contrasts beautifully with the tenderness of shrimp bathed in a creamy sauce.
  2. A Bold Flavor Explosion – The Cajun seasoning adds a fiery kick that is softened by the richness of the cream sauce.
  3. Versatile & Customizable – This recipe works with different cuts of steak and can be adjusted for spice levels to suit all palates.
  4. Impressive Yet Simple – Despite its gourmet appeal, the dish comes together quickly, making it ideal for both weeknight dinners and special occasions.

Ingredients: The Power Players

  • Steak (2 ribeye or sirloin, about 1 inch thick)
  • Shrimp (1 pound, peeled and deveined)
  • Cajun Seasoning (2 tablespoons)
  • Heavy Cream (1 cup)
  • Garlic (3 cloves, minced)
  • Parmesan Cheese (½ cup, grated)
  • Butter (2 tablespoons)
  • Fresh Parsley (for garnish)

Directions: The Flavor-Building Steps

  1. Prep the Steak – Season generously with salt, pepper, and 1 tablespoon of Cajun seasoning per side.
  2. Sear to Perfection – Melt 1 tablespoon of butter in a skillet over high heat. Cook steaks for 4-5 minutes per side (adjust for preferred doneness). Remove and let them rest.
  3. Sauté the Shrimp – In the same skillet, add remaining butter and garlic. Cook until fragrant (30 seconds). Toss in shrimp with remaining Cajun seasoning, cooking until pink and opaque (3-4 minutes).
  4. Create the Sauce – Reduce heat, pour in heavy cream, and stir. Add Parmesan cheese and let simmer until thickened (about 3 minutes).
  5. Assemble & Serve – Slice steak, plate it up, and smother with the luscious Cajun shrimp sauce. Garnish with fresh parsley and enjoy!

Nutritional Spotlight: Indulgence with Benefits

  • Steak – High in protein, iron, and B12 for energy and muscle support.
  • Shrimp – Low in calories but packed with protein and omega-3s.
  • Cajun Spices – A metabolism booster with a spicy kick!
  • Heavy Cream & Butter – Adds richness but should be enjoyed in moderation.

The Origins of Cajun Seasoning: A Culinary Legacy

Cajun seasoning is at the heart of this dish, bringing its signature smoky, spicy, and slightly earthy notes. But where does it come from?

Cajun cuisine originates from Louisiana, deeply rooted in French, Spanish, and West African culinary traditions. The seasoning blend typically consists of:

  • Paprika – Adds a smoky depth and vibrant color.
  • Cayenne Pepper – Delivers that signature heat.
  • Garlic Powder & Onion Powder – Enhances the umami factor.
  • Oregano & Thyme – Brings in earthy, herbal notes.

The beauty of Cajun seasoning is that it doesn’t just add heat—it enhances the dish with layers of complexity, making every bite more exciting than the last.

Expert Tips for Perfecting This Dish

Choosing the Best Cut of Steak

The cut of steak you use can make or break the dish. While ribeye and sirloin are popular choices due to their balance of flavor and tenderness, here’s how other cuts compare:

  • Filet Mignon – Extremely tender but milder in flavor.
  • New York Strip – A leaner option with a robust taste.
  • T-Bone/Porterhouse – Ideal for those who want both tenderloin and strip steak in one cut.

For the best results, bring the steak to room temperature before cooking and season it generously to enhance its natural flavors.

The Secret to Juicy Shrimp

Shrimp cooks incredibly fast, which means it can go from tender to rubbery in seconds. To avoid this:

  • Use medium to large shrimp to maintain a meaty texture.
  • Cook over medium-high heat just until pink and opaque.
  • Remove immediately from the pan to prevent overcooking.

Getting the Sauce Just Right

The creamy Cajun sauce is what ties the dish together. For a silky-smooth consistency:

  • Simmer, don’t boil – High heat can cause the cream to separate.
  • Use freshly grated Parmesan – Pre-grated cheese often contains anti-caking agents that prevent it from melting smoothly.
  • Adjust the spice – If you prefer a milder flavor, reduce the Cajun seasoning and add a touch of honey to balance the heat.

Serving Suggestions: Elevate Your Dining Experience

While this dish is already a star on its own, thoughtful pairings can take it to the next level.

Best Side Dishes

  • Garlic Mashed Potatoes – The creamy texture complements the rich sauce.
  • Grilled Asparagus – Adds a fresh, slightly smoky contrast.
  • Cajun Butter Rice – Enhances the dish’s Louisiana roots.

Wine Pairing

Pairing the right wine can enhance the experience. Consider:

  • Cabernet Sauvignon – Its bold tannins complement the richness of the steak.
  • Chardonnay – A creamy, oaked version balances the Cajun spice.

FAQs: Mastering the Dish

1. Can I Use a Different Type of Seafood?

Absolutely! If shrimp isn’t your favorite, scallops or lobster work beautifully with the creamy Cajun sauce.

2. What If I Don’t Have Cajun Seasoning?

You can create your own blend using paprika, cayenne, garlic powder, onion powder, oregano, thyme, and salt. Adjust the spice level to taste.

3. Can I Make This Dish Lighter?

Yes! Swap heavy cream for half-and-half or even coconut milk for a dairy-free alternative. The sauce will be slightly thinner but still flavorful.

4. How Do I Reheat Leftovers?

For best results, reheat the steak gently in a covered skillet over low heat. The sauce can be warmed separately with a splash of cream to maintain its texture.

5. Can I Grill the Steak Instead?

Yes! A grilled steak adds a wonderful smoky flavor. Just be sure to let it rest before slicing to retain its juices.

Conclusion: A Dish Worth Savoring

Steak with Creamy Cajun Shrimp Sauce is more than just a meal—it’s an experience of bold flavors, indulgent textures, and culinary balance. Whether you’re cooking to impress or simply treating yourself, this dish delivers on every level.

By choosing the right steak, perfecting the shrimp, and mastering the sauce, you can recreate this restaurant-quality dish with ease. Don’t be afraid to experiment with spices and side dishes to make it your own.

Now, grab your apron, fire up the skillet, and get ready to enjoy a plate of unforgettable decadence!

Elegant White Chocolate Raspberry Swirl Cheesecake: A Decadent Dessert for Every Occasion

White chocolate and raspberries are a match made in dessert heaven. When combined in a creamy cheesecake, the result is an indulgent, velvety treat that perfectly balances rich sweetness with a touch of tartness. This Elegant White Chocolate Raspberry Swirl Cheesecake is a masterpiece, featuring a buttery graham cracker crust, a luscious white chocolate-infused filling, and a stunning raspberry swirl.

Whether you’re preparing this for a special occasion, a dinner party, or simply to satisfy a sweet craving, this cheesecake is guaranteed to impress. In this article, we’ll explore the history of cheesecake, the magic behind this particular flavor combination, expert tips, storage recommendations, creative variations, and answers to frequently asked questions.

The Timeless Appeal of Cheesecake

Cheesecake has been a beloved dessert for centuries, dating back to ancient Greece, where it was served during the first Olympic Games in 776 BC. The modern cheesecake as we know it evolved in the 19th and 20th centuries with the advent of cream cheese, creating the dense and creamy texture we adore today.

What makes cheesecake unique is its versatility. It can be flavored with anything from citrus and caramel to nuts and chocolate. The white chocolate raspberry variation is particularly popular because it offers a perfect contrast of flavors—white chocolate adds a smooth, sweet creaminess, while raspberries bring a bright, slightly tangy note.

Why You’ll Love This Cheesecake

A Stunning Dessert with Minimal Effort

Although cheesecakes may seem intimidating, this recipe is quite simple. With a few essential techniques, even novice bakers can achieve a flawless, bakery-quality result. The marbled raspberry swirl gives it an elegant look with little extra effort.

Rich and Creamy Texture

This cheesecake is ultra-creamy thanks to a blend of cream cheese, sour cream, and melted white chocolate. The sour cream adds a slight tang, which balances the sweetness and enhances the velvety smooth texture.

A Perfectly Balanced Flavor Combination

White chocolate, known for its buttery sweetness, pairs beautifully with raspberries, which add a tart, fruity contrast. The raspberry swirl isn’t just for aesthetics—it brings a burst of fresh flavor in every bite.

Ideal for Any Celebration

This cheesecake is an excellent choice for holidays, birthdays, Valentine’s Day, or any special event. It also makes a thoughtful homemade gift for loved ones who appreciate gourmet desserts.

Ingredients: The Symphony of Flavors

For the Crust:

  • 1 ½ cups graham cracker crumbs – The crunchy, buttery foundation
  • ¼ cup granulated sugar – Adds just the right touch of sweetness
  • ⅓ cup unsalted butter, melted – Binds the crust for a perfect texture

For the Cheesecake Filling:

  • 3 (8 oz) packages cream cheese, softened – The rich, creamy base
  • 1 cup granulated sugar – Balances the tanginess of the cream cheese
  • 1 cup sour cream – Ensures a velvety, smooth texture
  • 3 large eggs – Creates the perfect structure and richness
  • 1 teaspoon vanilla extract – Enhances the depth of flavor
  • ½ cup white chocolate chips, melted – Adds a luxurious, silky sweetness

For the Raspberry Swirl:

  • ½ cup raspberry preserves – The tart contrast to the sweet white chocolate

Directions: Crafting a Culinary Masterpiece

  1. Prepare the Oven & Pan
    • Preheat your oven to 325°F (165°C) and grease a 9-inch springform pan to prevent sticking.
  2. Build the Buttery Crust
    • In a medium bowl, mix graham cracker crumbs, sugar, and melted butter until combined.
    • Press the mixture firmly into the bottom of the pan to form an even layer.
  3. Whip Up the Cheesecake Filling
    • In a large bowl, beat the cream cheese and sugar until smooth and fluffy.
    • Add sour cream, then mix in eggs one at a time, ensuring each is fully incorporated.
    • Stir in vanilla extract and melted white chocolate, blending until the batter is silky.
  4. Create the Raspberry Swirl
    • Pour the cheesecake batter over the crust, spreading evenly.
    • Drop spoonfuls of raspberry preserves onto the batter.
    • Use a knife to gently swirl the preserves, creating a marbled effect.
  5. Bake to Perfection
    • Bake for 50-60 minutes, or until the center is just set with a slight jiggle.
    • Turn off the oven and leave the cheesecake inside with the door slightly open for 1 hour to cool gradually.
  6. Chill & Serve
    • Let the cheesecake cool completely at room temperature, then refrigerate for at least 4 hours or overnight for the perfect texture.
    • Slice and serve, optionally garnishing with extra white chocolate shavings or fresh raspberries.

Nutritional Breakdown: The Sweet Facts (Per Slice, Approximate)

  • Calories: 420 kcal
  • Carbohydrates: 42g
  • Protein: 7g
  • Fat: 26g
  • Saturated Fat: 15g
  • Sugar: 33g
  • Sodium: 280mg

Expert Tips for a Perfect Cheesecake

1. Use High-Quality Ingredients

  • Always use full-fat cream cheese and sour cream for the best texture.
  • Opt for real white chocolate, not white chocolate-flavored chips, for superior taste.
  • Fresh raspberries can be used instead of preserves for a more intense fruity flavor.

2. Prevent Cracks in Your Cheesecake

  • Bake at a low temperature to avoid overcooking.
  • Do not overmix the batter—incorporating too much air can cause the cheesecake to puff up and then collapse.
  • Cool gradually by turning off the oven and leaving the cheesecake inside with the door slightly open for an hour.

3. Achieve the Perfect Raspberry Swirl

  • Drop small spoonfuls of raspberry preserves onto the batter rather than large dollops.
  • Use a skewer or knife to gently swirl, creating a marbled effect without overmixing.
  • If you want a bolder fruit flavor, mix in some raspberry puree with the preserves.

4. Chilling is Key

  • Refrigerate for at least 4 hours, preferably overnight to allow the flavors to develop fully.
  • Cheesecake tastes even better the next day when the texture has fully set.

Creative Variations

Dark Chocolate Raspberry Cheesecake

Substitute half of the white chocolate with dark chocolate for a more intense cocoa flavor. The bitterness of dark chocolate pairs exceptionally well with raspberries.

Lemon White Chocolate Cheesecake

Add zest of one lemon to the batter for a refreshing citrus twist that complements the raspberry swirl.

Berry Medley Swirl Cheesecake

Instead of just raspberries, use a combination of blueberries, blackberries, and strawberries for a mixed berry swirl.

Oreo White Chocolate Cheesecake

Swap the graham cracker crust for a crushed Oreo cookie crust for a richer, chocolatey base.

Nutty Elegance

Stir in finely chopped toasted almonds or hazelnuts into the crust for added crunch and a nutty depth of flavor.

Storage and Make-Ahead Tips

Refrigeration

This cheesecake stays fresh for up to 5 days in the refrigerator. Keep it covered with plastic wrap or stored in an airtight container to prevent it from drying out.

Freezing for Long-Term Storage

  • To freeze the entire cheesecake, wrap it tightly in plastic wrap followed by aluminum foil.
  • To freeze individual slices, place parchment paper between them and store in an airtight container.
  • Thaw in the refrigerator overnight before serving.

Serving After Storage

Cheesecake is best served chilled. If you prefer a softer texture, let it sit at room temperature for about 10 minutes before slicing.

Frequently Asked Questions

1. Can I use frozen raspberries instead of preserves?

Yes! Simply cook frozen raspberries with a tablespoon of sugar over low heat until they break down into a thick sauce. Strain out the seeds if desired before swirling into the cheesecake batter.

2. What if my cheesecake cracks?

Cracks in cheesecake are usually caused by overbaking or sudden temperature changes. If your cheesecake cracks, you can cover the top with whipped cream, white chocolate shavings, or extra raspberry sauce to make it look beautiful.

3. Can I make this cheesecake in advance?

Yes! This cheesecake is actually better when made a day in advance, as it allows the flavors to meld together. It can be refrigerated for up to 3 days before serving.

4. Do I need a water bath for this recipe?

While a water bath (bain-marie) can help create a smoother texture, it’s not necessary for this cheesecake. If you want an ultra-creamy result, place a pan of hot water on the rack below the cheesecake while baking.

5. Can I make this recipe gluten-free?

Yes! Substitute the graham cracker crumbs with gluten-free cookies or almond flour mixed with butter for a gluten-free crust.

6. How do I get clean slices when cutting the cheesecake?

Use a sharp knife, and wipe it clean between each cut with a damp towel. For ultra-clean slices, dip the knife in warm water before slicing.

7. Can I use white chocolate chips instead of a white chocolate bar?

White chocolate chips often contain stabilizers that prevent them from melting smoothly. If using chips, melt them carefully over a double boiler to ensure a smooth consistency.

8. What can I use instead of sour cream?

You can substitute sour cream with Greek yogurt for a slightly tangier cheesecake.

9. How do I prevent my crust from getting soggy?

Pre-baking the crust for 10 minutes before adding the cheesecake filling helps keep it firm and crisp.

10. Can I add extra white chocolate to the batter?

Yes! If you want a richer white chocolate flavor, increase the amount of melted white chocolate to ¾ cup.

Final Thoughts: A Cheesecake Worth Every Bite

The Elegant White Chocolate Raspberry Swirl Cheesecake is a show-stopping dessert that combines rich, creamy textures with vibrant, fruity flavors. Whether you’re baking for a special occasion or simply indulging in a homemade treat, this cheesecake is sure to impress.

With its silky white chocolate filling, tangy raspberry swirl, and crisp graham cracker crust, every bite is pure bliss. Follow the tips, experiment with variations, and don’t forget to let it chill for the perfect texture.

Serve it as is or elevate it with fresh berries, whipped cream, or an extra drizzle of white chocolate for a truly unforgettable dessert. However you enjoy it, this cheesecake is bound to become a favorite in your kitchen.

Cookie Butter Icebox Cake: A No-Bake Indulgence

Cookie Butter Icebox Cake is the ultimate dessert for those who love rich, creamy, and spiced flavors without the hassle of baking. Made with layers of Biscoff cookies and a luscious cookie butter-infused whipped cream, this cake transforms into a soft, melt-in-your-mouth treat as it chills. It’s the perfect make-ahead dessert for gatherings, special occasions, or whenever you crave something indulgent but effortless.

This cake is inspired by the classic icebox cake, a nostalgic treat that dates back decades. The concept is simple yet magical—crisp cookies are layered with a creamy filling, then left to set in the refrigerator overnight. The result? A cake-like texture without ever turning on the oven. The addition of cookie butter takes this traditional dessert to new heights, infusing it with warm spiced notes and a rich, velvety taste.

Let’s explore what makes this dessert irresistible, its origins, serving suggestions, variations, storage tips, and answers to some frequently asked questions.

Why This Cookie Butter Icebox Cake is a Must-Try

No-Bake Convenience

One of the biggest advantages of this recipe is that there’s no need to bake. Whether it’s the middle of summer and you’re avoiding the oven or you’re short on time, this cake comes together effortlessly. A quick 15-minute prep followed by an overnight chill, and you’re rewarded with a gourmet-quality dessert.

Luxuriously Creamy with a Hint of Spice

Cookie butter, made from crushed Biscoff cookies, brings a unique, caramelized, and slightly spiced flavor to this cake. When blended into whipped cream and mascarpone, it creates an ultra-smooth and velvety texture. The cookies soften over time, absorbing moisture from the cream and creating layers that are both light and decadent.

Perfect for Entertaining

Because it needs to be made ahead, this dessert is ideal for hosting. Simply assemble the cake the night before your event, let it set in the fridge, and when it’s time to serve, just slice and enjoy. It’s stress-free, impressive, and sure to be a crowd-pleaser.

Endless Customization Options

This recipe is delicious as is, but there are so many ways to personalize it. Whether you swap the cookies, add mix-ins, or experiment with different toppings, this cake is adaptable to your taste. More on variations later!

Origins of Icebox Cakes: A Sweet Tradition

Icebox cakes have been a staple dessert for decades. They were popularized in the early 20th century when refrigeration became more common in households. The idea was simple—layer cookies with whipped cream or pudding, let it chill, and watch the magic happen as the cookies soften into a cake-like texture.

Traditional versions often used graham crackers or chocolate wafers, but this modern take with Biscoff cookies and cookie butter elevates the classic into something extraordinary. The warm, spiced flavor of Speculoos cookies (the European name for Biscoff) brings a unique twist, making this dessert even more irresistible.

Ingredients: The Dream Team

  • 2 cups (1 pint) heavy cream – The foundation for luscious whipped cream
  • ½ cup (150g) Lotus Biscoff spread – Infuses the cream with rich, spiced sweetness
  • ⅓ cup (80g) mascarpone cheese – Adds a slight tang for balance
  • 1 tsp pure vanilla extract – A warm, aromatic depth enhancer
  • Pinch of Kosher salt – To bring out the flavors
  • 2 Tbsp confectioner’s sugar – Just the right touch of sweetness
  • 2 packages Lotus Biscoff cookies (32 cookies per package) – The crisp layers that soften to perfection
  • ⅓ cup warmed Biscoff spread – For drizzling on top before serving

Directions: Your Path to Dessert Bliss

  1. Whip the Creamy Magic
    • In a stand mixer fitted with a whisk attachment, whip heavy cream until medium peaks form.
  2. Blend the Cookie Butter Symphony
    • Add ½ cup Biscoff spread, mascarpone cheese, vanilla extract, salt, and confectioner’s sugar. Whisk until fully combined.
  3. Assemble the Layered Delight
    • Line a 9×5-inch loaf pan with plastic wrap, ensuring some overhang for easy removal.
    • Start with a single layer of Biscoff cookies at the bottom.
    • Spread a generous layer of the cookie butter whipped cream on top.
    • Continue layering, alternating cookies and cream, finishing with a final cookie layer.
  4. Let the Magic Happen
    • Cover with plastic wrap and refrigerate for 24 hours. This allows the cookies to soften, melding into a cake-like texture.
  5. Serving Perfection
    • Unmold the cake onto a plate or tray.
    • Drizzle warmed Biscoff spread over the top.
    • Crush extra Biscoff cookies for a finishing crunch.

Nutritional Breakdown: The Sweet Stats (Per Serving)

  • Calories: 370 kcal
  • Carbohydrates: 16g
  • Protein: 4g
  • Fat: 33g
  • Saturated Fat: 18g
  • Sugar: 10g

Serving Suggestions: How to Elevate Your Icebox Cake Experience

The Classic Approach

Serve the cake chilled, straight from the fridge, with a drizzle of warm cookie butter and a sprinkle of crushed Biscoff cookies on top. This enhances both the texture and flavor, giving you a combination of creamy, crunchy, and buttery sweetness.

Pairing with Fruits

For a refreshing contrast, serve slices with fresh fruit. Strawberries, raspberries, or caramelized bananas pair beautifully with the rich, spiced flavors of the cake. The tartness of berries cuts through the sweetness, creating a well-balanced bite.

A Scoop of Ice Cream on the Side

For an extra indulgent treat, pair this cake with a scoop of vanilla bean or cinnamon ice cream. The cold, creamy addition makes each bite even more luxurious.

Adding a Crunch Factor

If you enjoy extra texture, consider adding chopped nuts like toasted almonds or pecans on top. The nuttiness enhances the depth of flavor and provides a satisfying crunch.

Creative Variations to Try

Chocolate Lover’s Twist

Add a layer of melted dark chocolate or chocolate ganache between the cookie and cream layers. The slight bitterness of dark chocolate balances out the sweetness of the cookie butter.

Nutty Indulgence

Mix finely chopped hazelnuts, almonds, or pecans into the whipped cream for added texture and a nutty depth of flavor.

Coffee Infusion

For a sophisticated twist, dip the Biscoff cookies in espresso before layering them. This adds a subtle coffee flavor and makes the dessert similar to a tiramisu with a cookie butter spin.

Holiday Spice Version

Incorporate a dash of cinnamon, nutmeg, or ginger into the whipped cream for a more spiced flavor—perfect for fall and winter gatherings.

Lighter Option

Substitute the heavy cream with Greek yogurt or coconut whipped cream for a slightly tangier, lighter version of the cake.

Storage Tips: Making the Most of Your Dessert

Refrigeration

Since this is an icebox cake, refrigeration is key. Store it in an airtight container or cover it tightly with plastic wrap. It will stay fresh for up to 3 days in the fridge.

Freezing for Later

If you want to prepare this cake even further in advance, it freezes well. Wrap the entire cake tightly in plastic wrap and store it in an airtight freezer-safe container. When ready to serve, let it thaw overnight in the fridge.

Handling Leftovers

Leftovers can be stored in individual slices for easy access. If you plan to freeze slices, place parchment paper between each slice before storing them in a container to prevent sticking.

Frequently Asked Questions

Can I use a different type of cookie?

Absolutely! While Biscoff cookies bring a unique caramelized spice, you can substitute them with graham crackers, vanilla wafers, chocolate wafers, or even Oreo cookies for a different flavor profile.

What if I can’t find mascarpone cheese?

Mascarpone adds richness, but if it’s unavailable, you can substitute it with full-fat cream cheese. Make sure it’s at room temperature for easy blending, and consider adding a bit more sugar since cream cheese is tangier than mascarpone.

How long does it take for the cookies to soften?

The magic happens after at least 12 hours of refrigeration, but for the best texture, allow the cake to set for 24 hours. This gives the cookies enough time to absorb moisture from the cream, turning them into a soft, cake-like consistency.

Can I make this dessert gluten-free?

Yes! Simply swap the Biscoff cookies with a gluten-free cookie alternative. Many brands offer gluten-free Speculoos-style cookies that work just as well.

What’s the best way to slice this cake?

For clean slices, use a sharp knife and wipe it clean between each cut. If the cake is too firm from refrigeration, let it sit at room temperature for about 10 minutes before slicing.

Can I reduce the sweetness?

Yes! You can reduce the confectioner’s sugar in the whipped cream or use an unsweetened whipped cream alternative. You can also opt for dark chocolate toppings instead of extra cookie butter drizzle.

Can I add extra layers to make the cake taller?

Definitely! Just keep in mind that the higher the layers, the longer it will take for the cookies to soften. If adding more layers, consider refrigerating for an extra 6-12 hours.

Final Thoughts: A Dessert Worth the Wait

Cookie Butter Icebox Cake is more than just a simple no-bake dessert; it’s an indulgence that feels both luxurious and comforting. The combination of spiced cookie butter, airy whipped cream, and softened cookies creates a texture that is both light and satisfying.

Whether you’re making this for a holiday table, a special occasion, or simply as a weekend treat, it’s guaranteed to impress. With minimal effort and maximum flavor, this dessert proves that sometimes, the easiest recipes are the most rewarding.

Give this Cookie Butter Icebox Cake a try, and prepare to fall in love with every creamy, spiced bite.

The Ultimate Guide to Strawberry Cinnamon Rolls: A Sweet Fusion of Comfort and Freshness

Cinnamon rolls have long been a beloved treat, known for their warm, gooey centers and comforting aroma. But what if you could take this classic delight and infuse it with the fresh, fruity essence of strawberries? Enter Strawberry Cinnamon Rolls—a delectable twist on the traditional pastry that brings together the spiced richness of cinnamon with the bright, tangy sweetness of strawberries.

Whether you’re a seasoned baker or a first-time dough maker, this recipe is sure to become a household favorite. In this guide, we’ll explore everything you need to know about these irresistible rolls, from their history and flavor profile to expert tips, storage suggestions, and frequently asked questions.

A Brief History of Cinnamon Rolls and Their Evolution

Cinnamon rolls trace their origins back to Sweden, where they are known as “kanelbullar.” This Scandinavian classic, typically enjoyed with coffee, features a yeasted dough filled with butter, sugar, and cinnamon. Over time, the recipe made its way to different parts of the world, with each culture adding its own twist. In North America, cinnamon rolls became larger, sweeter, and often topped with cream cheese icing, while European variations remained more subtly sweet and spiced.

Adding fruit to cinnamon rolls is a modern innovation, inspired by the desire to blend seasonal flavors into classic baked goods. Strawberries, with their natural sweetness and slight tartness, complement the warm, earthy tones of cinnamon beautifully, creating a pastry that is both nostalgic and refreshingly unique.

Why You’ll Love Strawberry Cinnamon Rolls

  1. A Perfect Balance of Flavors – The warmth of cinnamon pairs wonderfully with the bright, juicy flavor of fresh strawberries.
  2. Soft and Fluffy Dough – This recipe uses a yeasted dough that bakes up light and airy, making every bite irresistibly soft.
  3. A Unique Twist on a Classic – Traditional cinnamon rolls are delicious, but adding strawberries takes them to the next level.
  4. Homemade Icing with Real Strawberries – Unlike traditional icing that relies on powdered sugar and cream, this version includes real strawberries for a fresh and fruity finish.
  5. Perfect for Any Occasion – Whether it’s breakfast, brunch, dessert, or a special celebration, these rolls are always a hit.

Wholesome Ingredients for a Delightful Treat

Dough:

  • 1 cup warm milk
  • 2 1/4 teaspoons active dry yeast (1 packet)
  • 1/2 cup granulated sugar
  • 1/4 cup unsalted butter, melted
  • 2 large eggs, room temperature
  • 1/2 teaspoon salt
  • 4 cups all-purpose flour

Luscious Strawberry Filling:

  • 1 cup fresh strawberries, finely chopped
  • 1/4 cup granulated sugar
  • 1 teaspoon cinnamon
  • 2 tablespoons cornstarch

Sweet & Tangy Strawberry Icing:

  • 1 cup powdered sugar
  • 1/4 cup fresh strawberries, pureed
  • 1 tablespoon cream or milk (adjust for desired consistency)
  • 1/2 teaspoon vanilla extract

Step-by-Step Directions to Sweet Perfection

  1. Prepare the Dough: Dissolve yeast in warm milk in a large bowl. Add sugar, melted butter, eggs, and salt. Gradually mix in the flour to form a soft dough. Knead until smooth and elastic.
  2. Let it Rise: Place the dough in a greased bowl, cover, and let it rise in a warm place until doubled in size (about 1 hour).
  3. Make the Filling: In a bowl, mix chopped strawberries, sugar, cinnamon, and cornstarch. Set aside.
  4. Roll and Fill: Roll out the dough on a floured surface into a large rectangle. Spread the strawberry filling evenly over the dough.
  5. Shape the Rolls: Roll up the dough tightly and cut it into 12 equal slices. Place slices in a greased 9×13-inch baking pan. Cover and let rise again until doubled in size (about 30 minutes).
  6. Bake to Golden Perfection: Preheat oven to 350°F (175°C). Bake rolls for 25 minutes or until golden brown.
  7. Prepare the Icing: Whisk together powdered sugar, strawberry puree, cream (or milk), and vanilla until smooth. Adjust consistency if needed with more cream or powdered sugar.
  8. Drizzle & Enjoy: Drizzle icing over warm rolls before serving.

Nutritional Breakdown Per Serving (1 Roll):

  • Calories: 320
  • Total Fat: 6g
  • Saturated Fat: 4g
  • Trans Fat: 0g
  • Unsaturated Fat: 2g
  • Cholesterol: 46mg
  • Sodium: 122mg
  • Carbohydrates: 59g
  • Fiber: 2g
  • Sugar: 25g
  • Protein: 7g

Expert Tips for the Best Strawberry Cinnamon Rolls

1. Use Fresh, Ripe Strawberries

For the best flavor, choose ripe, juicy strawberries that are naturally sweet. Avoid overly soft or mushy berries, as they release too much moisture when baked.

2. Dry Your Strawberries Before Using

Excess moisture can make the filling too runny and prevent the dough from baking evenly. Pat your chopped strawberries dry with a paper towel before mixing them with sugar and cinnamon.

3. Don’t Skip the Second Rise

Letting the rolls rise a second time before baking is crucial for achieving a light, fluffy texture. If skipped, the dough may turn out dense and heavy.

4. Slice the Rolls Evenly

For even baking, use dental floss or a sharp knife to slice the dough into uniform rolls. This prevents uneven cooking and ensures a consistent texture.

5. Add a Touch of Strawberry Extract to the Icing

If you want an extra boost of strawberry flavor, add a drop or two of strawberry extract to the icing. This enhances the fruitiness without overpowering the natural flavors.

6. Bake Until Golden Brown

Oven temperatures can vary, so keep an eye on your rolls as they bake. They should be light golden brown on top and fully cooked in the center.

7. Apply the Icing at the Right Time

For a thick, creamy icing, let the rolls cool slightly before drizzling. If you prefer a more melted glaze effect, spread the icing while the rolls are still warm.

How to Store and Reheat Strawberry Cinnamon Rolls

Storing:

  • At Room Temperature: Store in an airtight container for up to 2 days.
  • Refrigerating: Keep in the fridge for up to 5 days.
  • Freezing: Wrap individual rolls in plastic wrap, place them in an airtight container, and freeze for up to 2 months.

Reheating:

  • Microwave: Warm individual rolls for 20-30 seconds to restore their soft texture.
  • Oven: Reheat at 300°F (150°C) for 10 minutes for a freshly baked taste.

FAQs About Strawberry Cinnamon Rolls

1. Can I use frozen strawberries instead of fresh ones?

Yes, but it’s best to thaw and drain them well before use. Frozen strawberries contain more moisture, which can make the filling too wet if not properly drained.

2. Can I make the dough ahead of time?

Absolutely! Prepare the dough and let it rise in the refrigerator overnight. When ready to bake, let it sit at room temperature for 30 minutes before rolling it out.

3. Can I use store-bought dough?

Yes! If you’re short on time, you can use pre-made dough, such as crescent roll or pizza dough. However, homemade dough provides the best texture and flavor.

4. What other fruits can I use in this recipe?

While strawberries are the star, you can experiment with raspberries, blueberries, or peaches for different variations. Just make sure to adjust the sugar levels accordingly.

5. How can I make these rolls dairy-free?

Swap out the milk for almond or oat milk and use vegan butter instead of regular butter. You can also make a simple powdered sugar and lemon juice glaze instead of cream-based icing.

6. Why did my rolls turn out dense instead of fluffy?

Dense rolls can be caused by:

  • Not kneading the dough enough (it needs to develop elasticity)
  • Skipping the second rise (always allow the dough to double in size)
  • Overloading the filling (too much moisture can weigh down the dough)

7. Can I add nuts for extra crunch?

Yes! Chopped pecans or walnuts can be added to the filling for a delicious crunch that pairs beautifully with the cinnamon and strawberries.

Conclusion: A Must-Try Sweet Treat

Strawberry Cinnamon Rolls are a delightful combination of warm, spiced flavors and fruity freshness, making them a perfect treat for any occasion. Whether you’re baking them for a cozy weekend breakfast, a family brunch, or a special celebration, they are sure to impress.

By following the tips and tricks in this guide, you can create soft, fluffy rolls with a vibrant strawberry filling and a luscious homemade icing. Best of all, this recipe is versatile—allowing you to experiment with different fruits, spices, and toppings to make it uniquely your own.

So, roll up your sleeves, gather your ingredients, and get ready to bake a batch of these irresistible Strawberry Cinnamon Rolls. They’re bound to become a new favorite in your kitchen!