Slow Cooker Pasta Fagioli: A Comforting Olive Garden-Inspired Delight

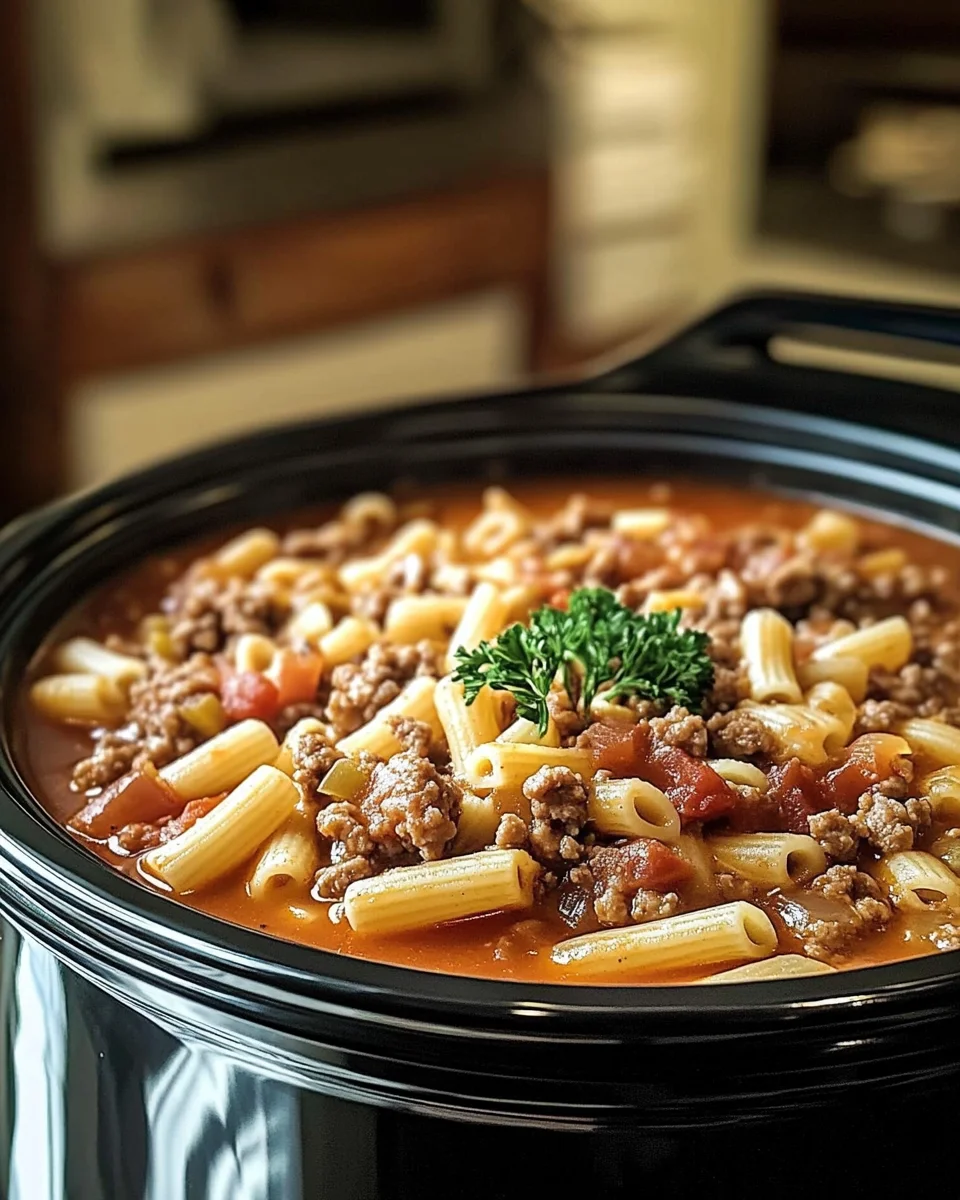
There’s nothing quite like a warm, hearty bowl of soup on a chilly evening, and Pasta Fagioli is the ultimate comfort food. This classic Italian-American dish has been made famous by Olive Garden, but did you know it has deep-rooted origins in Italian cuisine? By making it in a slow cooker, you can enjoy all the rich, savory flavors with minimal effort. Whether you’re feeding a crowd, meal-prepping for the week, or simply craving a cozy homemade meal, this Slow Cooker Pasta Fagioli is the perfect choice.

In this article, we’ll explore the history of this beloved dish, why it’s perfect for a slow cooker, variations to suit different dietary needs, expert tips, serving suggestions, and frequently asked questions to help you master this recipe.

The Origins of Pasta Fagioli: From Italy to Your Kitchen

Pasta Fagioli (pronounced “pasta fazool” in some Italian-American communities) translates to “pasta and beans” in Italian. This humble dish has its roots in Italian peasant cooking, where home cooks made the most of pantry staples like beans, pasta, tomatoes, and simple herbs.

Originally, this soup was more of a thick, rustic stew rather than the broth-based version that is common in Italian-American cuisine today. Different regions of Italy have their own take on Pasta Fagioli, with variations in ingredients and consistency. Some areas use pancetta or ham for added depth, while others rely solely on beans and vegetables for a meatless approach.

Olive Garden’s version of Pasta Fagioli has popularized a heartier, meat-based version, which is what this slow cooker recipe replicates. It’s a perfect balance of protein, fiber, and rich tomato flavor, making it a nourishing meal that satisfies with every spoonful.

Why Make Pasta Fagioli in a Slow Cooker?

While traditional stovetop versions of Pasta Fagioli are fantastic, using a slow cooker offers several advantages:

1. Minimal Hands-On Cooking

The slow cooker does most of the work, allowing you to set it and forget it. There’s no need for constant stirring or monitoring—just let the flavors develop over time.

2. Enhanced Flavor Development

Slow-cooking allows the ingredients to meld beautifully, creating a richer, deeper taste. The tomatoes break down, the beans absorb the broth’s flavors, and the beef becomes incredibly tender.

3. Perfect for Meal Prep and Leftovers

Since this soup stores and reheats well, you can make a big batch and enjoy it for several days. It’s also freezer-friendly, making it an excellent option for make-ahead meals.

4. Great for Feeding a Crowd

Whether you’re serving family dinner or hosting guests, this recipe makes six generous servings. Pair it with bread and a salad, and you’ve got an easy yet satisfying meal for everyone.

Wholesome Ingredients for a Hearty Delight

  • 1 pound extra lean ground beef (browned and drained)
  • 1 cup chopped onion
  • 1 cup chopped carrots
  • ½ cup chopped celery
  • 1 can (14-16 oz) diced tomatoes (with juice)
  • 1 can (14-15 oz) kidney beans (rinsed and drained)
  • 1 can (14-15 oz) white beans (rinsed and drained)
  • 4 cups beef broth
  • 1 jar (24-26 oz) tomato-basil marinara sauce
  • 1 ½ tsp oregano
  • ¾ tsp hot pepper sauce (optional)
  • ½ tsp salt
  • ½ tsp black pepper
  • 1 ¼ cups dry pasta (fusilli, shells, or ditalini, cooked separately)
  • ¼ cup chopped fresh parsley (optional)
  • Grated Parmesan (optional, for garnish)

Step-by-Step Guide to Cozy Perfection

1. Brown the Beef:

  • Heat a skillet over medium heat.
  • Cook the ground beef until browned, then drain excess fat.
  • Transfer to a 6-7 quart slow cooker.

2. Prep the Vegetables:

  • Finely chop onions, carrots, and celery.
  • Add them to the slow cooker.

3. Build the Flavor:

  • Pour in diced tomatoes with juice, kidney beans, white beans, beef broth, and marinara sauce.
  • Stir in oregano, hot pepper sauce (if using), salt, and black pepper.

4. Slow Cook to Perfection:

  • Cover and cook on LOW for 5-7 hours, or until vegetables are tender.

5. Prepare the Pasta:

  • About 15-20 minutes before serving, cook the pasta according to package instructions.
  • Drain and set aside.

6. Bring It All Together:

  • Stir cooked pasta into the soup.
  • Adjust seasoning with extra salt, pepper, or hot sauce if needed.

7. Serve and Enjoy:

  • Ladle into bowls and top with grated Parmesan and chopped parsley.
  • Pair with crusty bread or a fresh salad for a complete meal.

Nutritional Snapshot

  • Calories: 320 kcal per serving
  • Servings: 6 bowls

Ways to Customize Your Pasta Fagioli

One of the best things about this soup is its versatility. Here are some creative ways to adapt the recipe to your preferences:

1. Make It Vegetarian or Vegan

Skip the ground beef and use vegetable broth instead of beef broth for a completely meat-free version. Adding extra beans or diced zucchini can provide more texture and nutrition.

2. Swap the Protein

If you prefer a leaner alternative to beef, try ground turkey or chicken. For an extra protein boost, some people like to add Italian sausage, which brings a bolder flavor to the dish.

3. Adjust the Spice Level

For a spicier version, increase the hot pepper sauce, or add a dash of red pepper flakes or diced jalapeños. On the other hand, if you prefer a milder soup, simply omit the spice.

4. Change Up the Pasta

While ditalini, small shells, and fusilli are popular choices, you can use any small pasta shape. If you’re looking for a gluten-free version, swap regular pasta for a gluten-free alternative.

5. Make It Even More Hearty

If you want a thicker consistency, blend a portion of the soup and stir it back in before serving. Another option is adding a handful of baby spinach or kale toward the end of cooking for extra nutrients.

Serving Suggestions: The Perfect Pairings

This slow cooker Pasta Fagioli is a complete meal on its own, but pairing it with a few complementary dishes can elevate the experience:

1. Crusty Bread or Garlic Bread

A slice of warm, crusty Italian bread or garlic bread is perfect for soaking up the flavorful broth.

2. Fresh Salad

A crisp Caesar salad or a simple mixed greens salad with balsamic dressing balances the heartiness of the soup.

3. Antipasto Platter

For a more authentic Italian dining experience, serve the soup with a platter of olives, marinated artichokes, salami, and cheese.

4. A Glass of Wine

If you enjoy wine with your meal, pair this dish with a medium-bodied red wine like Chianti or Sangiovese.

FAQs: Everything You Need to Know About Pasta Fagioli

1. Can I Freeze Pasta Fagioli?

Yes! However, it’s best to freeze the soup without the pasta, as pasta can become mushy when thawed. Simply add freshly cooked pasta when reheating.

2. How Long Does It Last in the Refrigerator?

Stored in an airtight container, Pasta Fagioli lasts up to 4 days in the fridge. The flavors continue to develop, making leftovers even better.

3. Can I Use Canned Beans Instead of Dried?

Absolutely! Canned beans are a convenient option and save time. Just be sure to rinse and drain them before adding them to the slow cooker.

4. Can I Make This in an Instant Pot?

Yes! To make Pasta Fagioli in an Instant Pot, use the sauté function to brown the beef, then pressure cook everything (except the pasta) for about 10 minutes. Stir in the cooked pasta after releasing the pressure.

5. Why Cook the Pasta Separately?

Cooking the pasta separately prevents it from absorbing too much broth and becoming mushy. It also allows for better storage, as leftover soup won’t turn into a thick stew overnight.

6. Can I Add More Vegetables?

Definitely! Feel free to add zucchini, bell peppers, spinach, or kale for extra color and nutrition.

7. How Can I Make This Soup Thicker?

For a thicker consistency, mash some of the beans before adding them to the slow cooker, or stir in a bit of tomato paste.

Conclusion: The Ultimate Comfort in a Bowl

Slow Cooker Pasta Fagioli is the perfect blend of hearty, flavorful, and effortless cooking. With rich tomato-basil broth, protein-packed beans, tender beef, and comforting pasta, this dish is a family favorite that delivers big on both taste and nutrition.

By using a slow cooker, you allow the ingredients to slowly develop deep, savory flavors, making each spoonful warm, satisfying, and nostalgic. Whether you enjoy it on a cozy winter night, prepare it ahead for a busy week, or serve it to guests, this soup never disappoints.

Try it once, and it just might become a staple in your meal rotation!

Southern Delight Country Fried Pork Chops with Bacon Gravy: A Flavorful Recipe to Savor!

Southern Delight Country Fried Pork Chops with Bacon Gravy

Introduction to Southern Delight Country Fried Pork Chops with Bacon Gravy

Welcome to a culinary adventure that will warm your heart and fill your belly! Today, I’m excited to share my recipe for Southern Delight Country Fried Pork Chops with Bacon Gravy. This dish is not just a meal; it’s a comforting hug on a plate. Perfect for busy weeknights or a special family gathering, these pork chops are crispy, juicy, and topped with a rich, savory gravy that will have everyone asking for seconds. Trust me, this recipe is a delightful way to impress your loved ones without spending hours in the kitchen!

Why You’ll Love This Southern Delight Country Fried Pork Chops with Bacon Gravy

This recipe is a true lifesaver for busy moms and professionals alike. It’s quick to prepare, taking just 35 minutes from start to finish. The combination of crispy pork chops and creamy bacon gravy creates a flavor explosion that will make your taste buds dance. Plus, it’s a crowd-pleaser, ensuring that even the pickiest eaters at your table will be asking for more. What’s not to love?

Ingredients for Southern Delight Country Fried Pork Chops with Bacon Gravy

Gathering the right ingredients is the first step to creating this mouthwatering dish. Here’s what you’ll need:

  • Bone-in pork chops: These are the stars of the show! Their thickness ensures juicy, tender meat.
  • Salt and black pepper: Essential for seasoning, they enhance the natural flavors of the pork.
  • Garlic powder and onion powder: These add depth and a savory kick to the seasoning mix.
  • All-purpose flour: This is crucial for that crispy coating. It creates a delightful crunch when fried.
  • Eggs and buttermilk: This duo forms a rich batter that helps the flour adhere to the pork chops.
  • Vegetable oil: Used for frying, it gives the chops that golden-brown color and crispy texture.
  • Bacon: Chopped and cooked to crispy perfection, it adds a smoky flavor to the gravy.
  • Milk: This is the base for the gravy, making it creamy and delicious.
  • Additional salt and pepper: For seasoning the gravy to your taste.

For those looking to elevate the flavor, consider marinating the pork chops in buttermilk for a few hours or overnight. You can also add a pinch of cayenne pepper to the flour for a spicy twist!

Exact measurements for these ingredients can be found at the bottom of the article, ready for you to print and take to the kitchen.

How to Make Southern Delight Country Fried Pork Chops with Bacon Gravy

Step 1: Season the Pork Chops

Start by seasoning the pork chops generously with salt, black pepper, garlic powder, and onion powder. This blend of spices will elevate the flavor of the meat. Let the seasoned chops sit at room temperature for about 15 minutes. This resting time allows the flavors to penetrate the meat, ensuring every bite is deliciously seasoned. Trust me, this step is key to achieving that mouthwatering taste!

Step 2: Prepare the Breading Station

Next, set up your breading station. In one shallow dish, pour in the all-purpose flour. In another dish, whisk together the eggs and buttermilk until smooth. This two-step process is essential for creating that crispy coating. Having everything ready will make the dredging process quick and efficient, so you can focus on frying those pork chops to perfection!

Step 3: Dredge the Pork Chops

Now it’s time to dredge the pork chops! First, coat each chop in the flour, shaking off any excess. Then, dip it into the egg mixture, allowing any extra to drip off. Finally, return the chop to the flour for a second coating. This double-dipping technique is what gives the pork chops that irresistible crunch. Make sure to press the flour onto the meat for an even coating!

Step 4: Fry the Pork Chops

Heat the vegetable oil in a large skillet over medium-high heat. Once the oil is hot, carefully add the pork chops. Fry them for about 5-7 minutes on each side, or until they turn a beautiful golden brown. The internal temperature should reach 145°F for perfectly cooked pork. After frying, place the chops on a paper towel-lined plate to drain any excess oil. This step keeps them crispy!

Step 5: Make the Bacon Gravy

In the same skillet, reduce the heat to medium and add the chopped bacon. Cook until crispy, about 5 minutes. Remove the bacon with a slotted spoon, leaving the drippings behind. Sprinkle 2 tablespoons of flour into the drippings and whisk to combine. Gradually add the milk, stirring constantly until the gravy thickens. Season with salt and pepper to taste. This rich gravy is the perfect finishing touch!

Step 6: Serve and Enjoy

To serve, place the fried pork chops on a plate and generously drizzle the bacon gravy over the top. Don’t forget to sprinkle the crispy bacon bits on as a garnish! This dish is best enjoyed hot, so gather your loved ones and dig in. The combination of flavors will have everyone raving about your Southern Delight Country Fried Pork Chops!

Tips for Success

  • Let the pork chops rest after seasoning for maximum flavor absorption.
  • Use a thermometer to check the internal temperature for perfect doneness.
  • Keep the oil hot to ensure a crispy coating; too cool will make them soggy.
  • For extra crunch, consider using panko breadcrumbs in the breading.
  • Don’t rush the gravy; whisk continuously for a smooth texture.

Equipment Needed

  • Large skillet: A cast-iron skillet works wonders for even frying.
  • Shallow dishes: Use pie plates or any flat dishes for breading.
  • Slotted spoon: Perfect for removing bacon and draining excess oil.
  • Meat thermometer: Ensures your pork chops are cooked to perfection.
  • Paper towels: Essential for draining fried pork chops.

Variations

  • Spicy Southern Delight: Add a pinch of cayenne pepper or hot sauce to the flour for a spicy kick that will awaken your taste buds.
  • Herb-Infused: Mix in dried herbs like thyme or rosemary into the flour for an aromatic twist that complements the pork beautifully.
  • Gluten-Free Option: Substitute all-purpose flour with a gluten-free flour blend to make this dish suitable for gluten-sensitive diners.
  • Vegetarian Version: Replace pork chops with thick slices of eggplant or portobello mushrooms, following the same breading and frying process.
  • Cheesy Gravy: Stir in shredded cheddar cheese to the bacon gravy for a rich, cheesy flavor that takes it to the next level.

Serving Suggestions

  • Classic Sides: Pair with creamy mashed potatoes or buttery corn on the cob for a true Southern feast.
  • Fresh Greens: A simple side salad with vinaigrette adds a refreshing contrast to the rich flavors.
  • Drink Pairing: Sweet tea or a light lager complements the savory pork chops perfectly.
  • Presentation: Serve on a rustic wooden platter for a charming, homey feel.

FAQs about Southern Delight Country Fried Pork Chops with Bacon Gravy

Can I use boneless pork chops for this recipe?
Absolutely! While bone-in pork chops add extra flavor and juiciness, boneless chops will work just as well. Just be mindful of the cooking time, as they may cook faster.

How can I make the bacon gravy thicker?
If you prefer a thicker gravy, simply add a bit more flour to the bacon drippings. Whisk it in well before adding the milk, and allow it to simmer until it reaches your desired consistency.

Can I prepare the pork chops in advance?
Yes! You can season the pork chops and even bread them ahead of time. Just cover and refrigerate until you’re ready to fry. This can save you time on busy nights!

What sides pair well with Southern Delight Country Fried Pork Chops?
Classic sides like creamy mashed potatoes, collard greens, or cornbread complement this dish beautifully. They enhance the Southern experience and balance the richness of the gravy.

Is this recipe suitable for meal prep?
Definitely! You can make a batch of these pork chops and gravy, then store them in the fridge for up to three days. Just reheat gently before serving for a quick, hearty meal.

Final Thoughts

Cooking Southern Delight Country Fried Pork Chops with Bacon Gravy is more than just preparing a meal; it’s about creating memories around the dinner table. The crispy, juicy pork chops paired with that rich, savory gravy bring a taste of comfort that feels like home. Whether you’re serving it on a busy weeknight or for a special occasion, this dish is sure to impress. I love how it brings everyone together, sparking laughter and conversation. So roll up your sleeves, embrace the joy of cooking, and let this delightful recipe become a cherished part of your family’s culinary tradition!

“`

Print
clock clock iconcutlery cutlery iconflag flag iconfolder folder iconinstagram instagram iconpinterest pinterest iconfacebook facebook iconprint print iconsquares squares iconheart heart iconheart solid heart solid icon
Southern Delight Country Fried Pork Chops with Bacon Gravy

Southern Delight Country Fried Pork Chops with Bacon Gravy: A Flavorful Recipe to Savor!


5 Stars 4 Stars 3 Stars 2 Stars 1 Star

No reviews

  • Author: Isabella
  • Total Time: 35 minutes
  • Yield: 2 servings 1x

Description

A flavorful recipe for Southern Delight Country Fried Pork Chops with Bacon Gravy, perfect for a hearty meal.


Ingredients

Scale
  • 2 large bone-in pork chops (about 1 inch thick)
  • 1 teaspoon salt
  • 1 teaspoon black pepper
  • 1 teaspoon garlic powder
  • 1 teaspoon onion powder
  • 1 cup all-purpose flour
  • 2 large eggs
  • 1 cup buttermilk
  • 1 cup vegetable oil (for frying)
  • 4 slices bacon, chopped
  • 2 tablespoons all-purpose flour (for gravy)
  • 1 cup milk
  • Salt and pepper to taste

Instructions

  1. Start by seasoning the pork chops with salt, black pepper, garlic powder, and onion powder on both sides. Let them sit at room temperature for about 15 minutes to absorb the flavors.
  2. In a shallow dish, place the flour. In another dish, whisk together the eggs and buttermilk until well combined.
  3. Dredge each pork chop in the flour, shaking off any excess. Then dip them into the egg mixture, allowing any excess to drip off, and finally coat them again in the flour. Set aside on a plate.
  4. In a large skillet, heat the vegetable oil over medium-high heat. Once hot, carefully add the pork chops and fry for about 5-7 minutes on each side, or until golden brown and cooked through (internal temperature should reach 145°F). Remove the chops and place them on a paper towel-lined plate to drain excess oil.
  5. In the same skillet, reduce the heat to medium and add the chopped bacon. Cook until crispy, about 5 minutes. Remove the bacon with a slotted spoon and set aside, leaving the drippings in the skillet.
  6. Sprinkle 2 tablespoons of flour into the bacon drippings and whisk to combine, cooking for about 1 minute until lightly browned. Gradually whisk in the milk, stirring constantly until the gravy thickens. Season with salt and pepper to taste.
  7. Serve the fried pork chops topped with the bacon gravy and the reserved crispy bacon.

Notes

  • For extra flavor, marinate the pork chops in buttermilk for a few hours or overnight before cooking.
  • Try adding a pinch of cayenne pepper to the flour for a spicy kick in the breading.
  • Prep Time: 15 minutes
  • Cook Time: 20 minutes
  • Category: Main Course
  • Method: Frying
  • Cuisine: Southern

Nutrition

  • Serving Size: 1 pork chop with gravy
  • Calories: 680
  • Sugar: 3g
  • Sodium: 800mg
  • Fat: 45g
  • Saturated Fat: 15g
  • Unsaturated Fat: 20g
  • Trans Fat: 0g
  • Carbohydrates: 30g
  • Fiber: 1g
  • Protein: 40g
  • Cholesterol: 150mg

Sweet and Tangy Cottage Cheese Blueberry Bake delights with a twist!

Sweet and Tangy Cottage Cheese Blueberry Bake

Introduction to Sweet and Tangy Cottage Cheese Blueberry Bake

Sweet and Tangy Cottage Cheese Blueberry Bake is a delightful twist on your usual dessert or breakfast! This dish combines creamy cottage cheese with sweet, juicy blueberries and a touch of tangy lemon, all baked to golden perfection. The result is a warm, comforting treat that’s both light and indulgent, offering a perfect balance of flavors. Whether you enjoy it as a wholesome breakfast or a sweet snack, this blueberry bake is sure to surprise and satisfy your taste buds. Ready to try something new and delicious? Let’s get baking!

Why You’ll Love This Sweet and Tangy Cottage Cheese Blueberry Bake

This Sweet and Tangy Cottage Cheese Blueberry Bake is a game-changer for busy days. It’s incredibly easy to prepare, taking just 10 minutes of your time. The combination of creamy cottage cheese and juicy blueberries creates a flavor explosion that’s both satisfying and nutritious. Plus, it’s a versatile dish that can be enjoyed warm or cold, making it perfect for any occasion. You’ll love how it brings smiles to the table!

Ingredients for Sweet and Tangy Cottage Cheese Blueberry Bake

Gathering the right ingredients is the first step to creating this delightful Sweet and Tangy Cottage Cheese Blueberry Bake. Here’s what you’ll need:

  • Cottage cheese: The star of the show! It adds creaminess and protein, making this bake both satisfying and nutritious.
  • Fresh blueberries: These little gems bring sweetness and a burst of flavor. If fresh isn’t available, frozen blueberries work just as well—just be sure to thaw them first!
  • Rolled oats: They provide a hearty texture and help bind the ingredients together. Plus, they add a lovely chewiness.
  • Honey or maple syrup: A touch of natural sweetness to balance the tanginess of the cottage cheese. Feel free to adjust based on your taste!
  • Eggs: They act as a binding agent, giving the bake structure and richness.
  • Vanilla extract: A splash of this adds warmth and depth to the flavor profile.
  • Baking powder: This is essential for helping the bake rise and achieve that perfect fluffy texture.
  • Cinnamon: A sprinkle of this spice adds warmth and a hint of sweetness, enhancing the overall flavor.
  • Salt: Just a pinch helps to balance the sweetness and elevate the flavors.
  • Chopped walnuts (optional): For those who enjoy a bit of crunch, walnuts add a delightful texture and nutty flavor.
  • Cooking spray or butter: Use this to grease your baking dish, ensuring your bake comes out easily.

For exact measurements, check the bottom of the article where you can find everything listed for easy printing. Enjoy the process of gathering these ingredients, as each one plays a vital role in creating this delicious dish!

How to Make Sweet and Tangy Cottage Cheese Blueberry Bake

Now that you have all your ingredients ready, let’s dive into the fun part—making this Sweet and Tangy Cottage Cheese Blueberry Bake! Follow these simple steps, and you’ll have a delicious dish that’s sure to impress.

Step 1: Preheat the Oven

First things first, preheat your oven to 350°F (175°C). This is crucial for achieving that perfect bake. While the oven warms up, grab your 8×8-inch baking dish and grease it with cooking spray or butter. This ensures your bake comes out easily and doesn’t stick!

Step 2: Mix the Base Ingredients

In a large mixing bowl, combine the cottage cheese, rolled oats, honey or maple syrup, eggs, vanilla extract, baking powder, cinnamon, and salt. Mix everything together until it’s well combined. You want a smooth, creamy mixture that’s bursting with flavor. This base is the heart of your Sweet and Tangy Cottage Cheese Blueberry Bake!

Step 3: Add Blueberries and Walnuts

Now, it’s time to add the blueberries and walnuts. Gently fold them into the mixture, being careful not to break the berries. This step is where the magic happens! The blueberries will create little pockets of sweetness throughout the bake, while the walnuts add a delightful crunch.

Step 4: Pour and Spread

Pour the mixture into your prepared baking dish, spreading it evenly. This ensures that every bite bakes consistently. You want that golden-brown top, so make sure it’s level. It’s like giving your bake a cozy little home!

Step 5: Bake

Place your dish in the preheated oven and bake for 30-35 minutes. Keep an eye on it! You’ll know it’s ready when the top is golden brown and a toothpick inserted in the center comes out clean. The aroma wafting through your kitchen will be irresistible!

Step 6: Cool and Serve

Once it’s done baking, allow the Sweet and Tangy Cottage Cheese Blueberry Bake to cool for about 10 minutes. This cooling time enhances the flavors and makes it easier to slice. After that, cut it into squares and serve. Enjoy the smiles as your family digs in!

Tips for Success

  • Use room temperature ingredients for a smoother batter.
  • Don’t overmix the batter; gentle folding keeps the blueberries intact.
  • For a sweeter bake, adjust the honey or maple syrup to your taste.
  • Let the bake cool completely for easier slicing.
  • Experiment with different fruits for a unique twist each time!

Equipment Needed

  • 8×8-inch baking dish: A square dish is ideal, but a round one works too!
  • Mixing bowl: Any large bowl will do; just make sure it’s big enough to hold all the ingredients.
  • Measuring cups and spoons: Essential for accurate ingredient measurements.
  • Spatula: Perfect for mixing and folding in those blueberries.
  • Oven mitts: Safety first! Protect your hands when handling hot dishes.

Variations

  • Fruit Swap: Try using raspberries, strawberries, or chopped apples instead of blueberries for a different flavor profile.
  • Nut-Free Option: Omit the walnuts or substitute with sunflower seeds for a nut-free version that still adds crunch.
  • Dairy-Free Alternative: Use a dairy-free cottage cheese made from almond or soy for a lactose-free treat.
  • Gluten-Free Version: Substitute rolled oats with gluten-free oats to make this bake suitable for gluten-sensitive diets.
  • Spice It Up: Add a pinch of nutmeg or ginger for an extra layer of warmth and flavor.

Serving Suggestions

  • Pair with a dollop of Greek yogurt for added creaminess and protein.
  • Serve alongside a fresh fruit salad for a colorful, nutritious breakfast.
  • Drizzle with extra honey or maple syrup for a touch of sweetness.
  • Enjoy with a cup of herbal tea or coffee for a cozy afternoon treat.
  • Garnish with mint leaves for a pop of color and freshness.

FAQs about Sweet and Tangy Cottage Cheese Blueberry Bake

Can I use frozen blueberries in this recipe?

Absolutely! Frozen blueberries work perfectly in this Sweet and Tangy Cottage Cheese Blueberry Bake. Just make sure to thaw them first and gently fold them into the mixture to avoid breaking them.

How do I store leftovers?

Store any leftovers in an airtight container in the refrigerator for up to 3 days. You can enjoy it cold or reheat it in the microwave for a warm treat!

Can I make this bake ahead of time?

Yes! You can prepare the mixture the night before and store it in the fridge. Just pour it into the baking dish and bake it in the morning for a fresh, warm breakfast.

Is this recipe suitable for a gluten-free diet?

Yes! Simply substitute the rolled oats with gluten-free oats to make this Sweet and Tangy Cottage Cheese Blueberry Bake suitable for gluten-sensitive diets.

What can I serve with this bake?

This bake pairs wonderfully with a dollop of Greek yogurt or a side of fresh fruit salad. It’s also delightful with a cup of herbal tea or coffee for a cozy afternoon snack!

Final Thoughts

Creating this Sweet and Tangy Cottage Cheese Blueberry Bake is more than just a cooking experience; it’s a joyful journey that brings the family together. The delightful aroma wafting through your kitchen will have everyone eagerly waiting for a slice. Each bite is a perfect blend of creamy, sweet, and tangy flavors that will leave you smiling. Whether it’s a busy morning or a cozy afternoon snack, this bake is a versatile treat that fits any occasion. I hope it brings as much joy to your table as it has to mine!

“`

Print
clock clock iconcutlery cutlery iconflag flag iconfolder folder iconinstagram instagram iconpinterest pinterest iconfacebook facebook iconprint print iconsquares squares iconheart heart iconheart solid heart solid icon
Sweet and Tangy Cottage Cheese Blueberry Bake

Sweet and Tangy Cottage Cheese Blueberry Bake delights with a twist!


5 Stars 4 Stars 3 Stars 2 Stars 1 Star

No reviews

  • Author: Isabella
  • Total Time: 45 minutes
  • Yield: 6 servings 1x

Description

A delightful and healthy Sweet and Tangy Cottage Cheese Blueberry Bake that combines the creaminess of cottage cheese with the sweetness of blueberries.


Ingredients

Scale
  • 2 cups cottage cheese
  • 1 cup fresh blueberries (or frozen, thawed)
  • 1/2 cup rolled oats
  • 1/4 cup honey or maple syrup
  • 2 large eggs
  • 1 teaspoon vanilla extract
  • 1 teaspoon baking powder
  • 1/2 teaspoon cinnamon
  • 1/4 teaspoon salt
  • 1/4 cup chopped walnuts (optional)
  • Cooking spray or butter for greasing

Instructions

  1. Preheat your oven to 350°F (175°C). Grease an 8×8-inch baking dish with cooking spray or butter.
  2. In a large mixing bowl, combine the cottage cheese, rolled oats, honey or maple syrup, eggs, vanilla extract, baking powder, cinnamon, and salt. Mix well until all ingredients are fully incorporated.
  3. Gently fold in the blueberries and walnuts if using, being careful not to break the berries.
  4. Pour the mixture into the prepared baking dish, spreading it evenly.
  5. Bake in the preheated oven for 30-35 minutes, or until the top is golden brown and a toothpick inserted in the center comes out clean.
  6. Allow the bake to cool for about 10 minutes before slicing into squares and serving.

Notes

  • For added flavor, mix in a teaspoon of lemon zest or a splash of almond extract.
  • Substitute the blueberries with other fruits like raspberries, strawberries, or chopped apples for a different twist.
  • Prep Time: 10 minutes
  • Cook Time: 35 minutes
  • Category: Dessert
  • Method: Baking
  • Cuisine: American

Nutrition

  • Serving Size: 1 square
  • Calories: 180
  • Sugar: 8g
  • Sodium: 200mg
  • Fat: 6g
  • Saturated Fat: 1g
  • Unsaturated Fat: 5g
  • Trans Fat: 0g
  • Carbohydrates: 15g
  • Fiber: 2g
  • Protein: 12g
  • Cholesterol: 70mg

Honey Chipotle Chicken Rice Bowls: A Perfect Balance of Sweet and Smoky

The Honey Chipotle Chicken Rice Bowl is a flavorful, vibrant dish that combines sweet, smoky, and slightly spicy elements in one satisfying meal. Tender, juicy chicken is coated in a rich honey-chipotle sauce, creating a perfect harmony of heat and sweetness. Paired with fluffy rice, colorful bell peppers, black beans, corn, creamy avocado, and a hint of lime, this dish offers a balanced mix of textures and flavors.

Whether you’re making a quick weeknight dinner or prepping meals for the week, this recipe is a great choice. It’s nutrient-packed, customizable, and easy to make in under 30 minutes.

This guide will take you through everything you need to know about this dish, including its origins, cooking tips, variations, serving suggestions, and frequently asked questions.

The Inspiration Behind the Dish

The Honey Chipotle Chicken Rice Bowl is inspired by Mexican and Tex-Mex cuisine, which often combines smoky chipotle peppers with sweet and savory elements. Chipotle peppers in adobo sauce bring depth and spice, while honey balances the heat with a subtle sweetness.

Mexican cuisine is known for its bold flavors and vibrant ingredients, and this dish brings together many of the elements found in traditional Mexican cooking—beans, rice, peppers, and fresh cilantro—in an easy-to-make modern bowl format.

This recipe is also reminiscent of fast-casual restaurant bowls like those from Chipotle or Qdoba, but it can be made fresh at home with wholesome ingredients and no preservatives.

Why You’ll Love This Recipe

1. Bold Flavors in Every Bite

The honey-chipotle glaze perfectly coats the chicken, giving each bite a delicious combination of smoky, spicy, and sweet flavors. The freshness of lime juice and cilantro ties everything together.

2. Perfect for Meal Prep

This dish is great for make-ahead lunches or dinners. The chicken and rice store well, and you can quickly assemble the bowls throughout the week.

3. Quick and Easy

With a total cook time of 25 minutes, this dish is perfect for busy nights when you want something homemade but don’t have hours to spend in the kitchen.

4. Highly Customizable

Swap out ingredients based on dietary preferences or available ingredients. You can easily make this vegetarian, low-carb, or gluten-free.

5. Packed with Nutrients

This dish isn’t just delicious—it’s also a balanced meal with lean protein, healthy fats, fiber-rich beans, and a variety of vitamins from fresh vegetables.

Flavor-Packed Ingredients

  • 2 chicken breasts (diced)
  • ¼ cup honey
  • 2 tbsp chipotle peppers in adobo sauce (minced)
  • 2 tbsp olive oil
  • 3 cups cooked rice (white, brown, or jasmine)
  • 1 red bell pepper (diced)
  • 1 cup corn kernels (fresh, frozen, or canned)
  • 1 cup black beans (rinsed and drained)
  • 1 avocado (diced)
  • ¼ cup fresh cilantro (chopped)
  • Juice of 1 lime
  • Salt and pepper to taste

Easy Step-by-Step Directions

  1. Cook the Chicken
    • Heat 1 tbsp olive oil in a skillet over medium heat.
    • Add diced chicken, season with salt and pepper, and cook until golden brown and fully cooked (6-8 minutes). Remove from the skillet.
  2. Prepare the Sauce
    • In the same skillet, add the remaining olive oil, honey, and chipotle peppers.
    • Stir and let the mixture simmer for 2-3 minutes until slightly thickened.
  3. Coat the Chicken
    • Return the cooked chicken to the skillet and toss in the sauce.
    • Cook for 2 more minutes to allow the flavors to meld.
  4. Assemble the Bowls
    • Divide the cooked rice among four bowls.
    • Top with chicken, bell peppers, corn, black beans, avocado, and fresh cilantro.
    • Squeeze lime juice over each bowl and serve immediately.

Nutritional Benefits (Per Serving)

  • Calories: 430 kcal
  • Protein: 30g
  • Carbohydrates: 50g
  • Fats: 12g
  • Fiber: 6g

How to Customize Your Bowl

One of the best things about this recipe is its versatility. Here are a few ways to tweak it to fit different tastes and dietary needs.

1. Make It Vegetarian

  • Replace the chicken with tofu, tempeh, or chickpeas.
  • Roast sweet potatoes or mushrooms for a hearty, plant-based protein alternative.

2. Adjust the Spice Level

  • Milder Option: Use fewer chipotle peppers or swap them for smoked paprika.
  • Spicier Option: Add extra chipotle peppers, diced jalapeños, or a pinch of cayenne.

3. Switch Up the Protein

  • Use shrimp, steak, or ground turkey instead of chicken.
  • If using shrimp, reduce cooking time to just a few minutes per side.

4. Try a Different Base

  • Swap rice for quinoa, cauliflower rice, farro, or even shredded lettuce for a lighter option.

5. Add Extra Toppings

  • Salsa: Fresh pico de gallo or mango salsa adds extra flavor.
  • Cheese: Sprinkle some cotija or shredded cheddar for creaminess.
  • Crunch: Crushed tortilla chips or pepitas add a satisfying crunch.

Pro Cooking Tips for the Best Results

1. Use Leftover Rice for the Best Texture

Freshly cooked rice can be too soft and sticky for bowls. Using day-old rice helps keep the grains separate and gives a better texture. If using fresh rice, spread it on a baking sheet and let it cool slightly before assembling the bowl.

2. Marinate the Chicken for Maximum Flavor

For a deeper, richer taste, marinate the chicken in the honey-chipotle mixture for at least 30 minutes before cooking.

3. Simmer the Sauce for a Glossy Finish

Let the honey and chipotle sauce simmer for a few minutes before adding the chicken. This thickens the sauce and allows the flavors to develop fully.

4. Use a Cast-Iron Skillet for the Best Sear

A cast-iron skillet helps create a beautiful golden-brown crust on the chicken while sealing in the juices.

Best Ways to Serve Honey Chipotle Chicken Rice Bowls

1. As a Classic Rice Bowl

Serve as originally intended, with steamed rice, vegetables, and toppings in a bowl.

2. As a Burrito or Wrap

Use a large tortilla and wrap all the ingredients into a burrito for an on-the-go meal.

3. In a Salad Bowl

Skip the rice and serve the honey chipotle chicken over a bed of fresh greens with avocado, black beans, and crunchy tortilla strips.

4. As Tacos

Stuff the honey chipotle chicken into warm corn tortillas and top with lime crema, shredded cabbage, and cheese for a delicious taco night.

Frequently Asked Questions (FAQs)

1. How Spicy is This Dish?

It has a moderate level of heat from the chipotle peppers, but the honey balances it out. If you prefer a milder version, use less chipotle or add more honey.

2. Can I Make This Dish Ahead of Time?

Yes! Store each component separately in the fridge and assemble fresh when ready to eat. The chicken stays fresh for up to 3 days in an airtight container.

3. Can I Freeze the Honey Chipotle Chicken?

Yes. The chicken can be frozen for up to 2 months in an airtight container. When ready to eat, thaw overnight in the fridge and reheat in a pan.

4. What’s the Best Way to Store Leftovers?

  • Refrigerator: Store in an airtight container for up to 3 days.
  • Reheating: Microwave for 1-2 minutes, or warm in a skillet over medium heat.

5. Is This Recipe Gluten-Free?

Yes! As long as you use gluten-free rice and check that your chipotle peppers in adobo sauce are gluten-free, this dish is naturally gluten-free.

Conclusion: A Must-Try Bowl for Any Occasion

The Honey Chipotle Chicken Rice Bowl is a delicious, well-balanced meal that brings together sweet, smoky, and spicy flavors in just 25 minutes. Whether you enjoy it as a traditional rice bowl, taco filling, or salad topper, this dish is versatile, easy to make, and packed with nutrients.

With endless customization options, it’s a recipe that fits into a variety of diets and preferences. From busy weeknights to meal prepping for the week, this bowl is a go-to favorite for anyone craving a bold and satisfying dish.

Try it today, and enjoy a homemade meal that tastes just as good—if not better—than takeout!

Creamy Pepperoncini Chicken Skillet: A Bold and Comforting Delight

Creamy Pepperoncini Chicken Skillet is a dish that perfectly balances richness and tanginess. This recipe brings together juicy, golden-browned chicken with a luxurious cream sauce infused with the mildly spicy, slightly tangy flavor of pepperoncini peppers. It’s a one-pan meal that’s quick to prepare, yet elegant enough to impress guests at dinner parties.

Whether you’re looking for a comforting weeknight meal or something special for a gathering, this dish offers restaurant-quality flavors with minimal effort. The combination of creamy textures, savory chicken, and zesty peppers makes every bite incredibly satisfying.

In this guide, we’ll explore the origins of the dish, the benefits of pepperoncini peppers, best serving ideas, pro cooking tips, and frequently asked questions to ensure you achieve the perfect skillet every time.

The Origin of Creamy Pepperoncini Chicken Skillet

While this dish doesn’t originate from one specific cuisine, it takes inspiration from classic Italian and Mediterranean flavors. Pepperoncini peppers are widely used in Italian cooking, often added to antipasto platters, salads, and sandwiches. Their mild heat and tangy bite make them an excellent ingredient to enhance creamy dishes.

By combining the velvety texture of heavy cream with the acidity of pepperoncini peppers, this dish achieves a beautiful contrast that keeps it from feeling too heavy. The skillet-cooked chicken absorbs all the flavors of the sauce, making each bite juicy and well-seasoned.

Why This Dish Stands Out

  1. One-Pan Wonder – Minimal cleanup makes this an easy go-to for busy weeknights.
  2. Perfectly Balanced Flavors – The creamy richness is offset by the bright tang of pepperoncini peppers.
  3. Quick and Easy – This dish comes together in about 30 minutes, making it ideal for last-minute meals.
  4. Customizable – You can adjust the spice level, swap out ingredients, or add extra veggies to make it your own.
  5. Restaurant-Worthy – Despite being simple to prepare, this dish has the depth of flavor you’d expect from a fine-dining menu.

Rich and Flavorful Ingredients

  • 4 boneless, skinless chicken breasts
  • 1 tablespoon olive oil
  • 1 onion (thinly sliced)
  • 4 cloves garlic (minced)
  • 1 cup sliced pepperoncini peppers
  • 1 cup chicken broth
  • 1 cup heavy cream
  • Salt and pepper to taste
  • Chopped fresh parsley (for garnish)

Step-by-Step Cooking Directions

  1. Sear the Chicken
    Heat olive oil in a large skillet over medium-high heat. Season the chicken breasts with salt and pepper, then cook until golden brown, about 5 minutes per side. Remove and set aside.
  2. Sauté the Aromatics
    In the same skillet, add the sliced onions and minced garlic. Sauté until the onions are soft and translucent, about 3 minutes.
  3. Add the Pepperoncini Peppers
    Stir in the sliced pepperoncini peppers and cook for another 2 minutes, allowing their tangy flavor to infuse the dish.
  4. Build the Creamy Sauce
    Pour in the chicken broth, scraping the pan to deglaze it. Stir in the heavy cream and bring the mixture to a simmer.
  5. Finish Cooking the Chicken
    Return the chicken breasts to the skillet and let them simmer in the sauce for about 10 minutes until fully cooked and the sauce thickens.
  6. Garnish and Serve
    Sprinkle with fresh parsley and serve warm with your choice of sides.

Nutritional Information (Per Serving)

  • Calories: 320 kcal
  • Protein: 25g
  • Fat: 20g
  • Carbohydrates: 8g
  • Fiber: 2g

Health Benefits of Pepperoncini Peppers

Pepperoncini peppers are more than just a flavorful addition—they also come with a variety of health benefits.

1. Low in Calories, High in Nutrients

Pepperoncini peppers are naturally low in calories but packed with essential vitamins and minerals. They contain high levels of vitamin C, which boosts the immune system and promotes healthy skin.

2. Rich in Antioxidants

Like other peppers, they are loaded with antioxidants that help fight inflammation and protect cells from damage. This makes them a great addition to a balanced diet.

3. Boosts Metabolism

Pepperoncini contains capsaicin, a compound found in chili peppers that has been shown to aid metabolism and promote fat burning. While they are not as spicy as other chili varieties, they still contribute to overall metabolic health.

4. Supports Digestive Health

The mild heat in pepperoncini peppers can stimulate digestion, making them beneficial for gut health. They also provide dietary fiber, which helps with digestion and promotes a healthy gut microbiome.

Best Ways to Serve Creamy Pepperoncini Chicken

This dish is incredibly versatile and can be paired with various sides to complete the meal. Here are some great serving ideas:

1. Over Pasta

A bed of linguine, fettuccine, or even penne pasta makes the perfect base for this creamy dish. The sauce coats the noodles beautifully, creating a rich, indulgent meal.

2. With Mashed Potatoes

Creamy mashed potatoes complement the sauce’s texture while adding a hearty element to the dish. Garlic mashed potatoes, in particular, pair exceptionally well.

3. Alongside Roasted Vegetables

To lighten the meal, serve it with roasted Brussels sprouts, asparagus, or zucchini. The caramelization of the vegetables adds an extra depth of flavor.

4. With Crusty Bread

A warm baguette or rustic sourdough bread is perfect for soaking up every last bit of the creamy sauce.

5. Served Over Rice

A simple side of white or brown rice works well if you’re looking for a more filling option.

Pro Tips for Cooking Success

Achieving the perfect Creamy Pepperoncini Chicken Skillet requires attention to a few key details. Here are some expert tips to ensure your dish turns out flawlessly every time:

1. Use a Heavy Skillet

A cast-iron or stainless-steel skillet helps achieve a nice sear on the chicken while evenly distributing heat for the sauce.

2. Adjust the Heat Level

If you prefer a milder flavor, use fewer pepperoncini peppers. For more spice, add extra peppers or a dash of crushed red pepper flakes.

3. Don’t Overcook the Chicken

Chicken breasts can dry out quickly if overcooked. Make sure to cook them just until they reach an internal temperature of 165°F (75°C) for the juiciest results.

4. Let the Sauce Thicken

Simmering the sauce for a few extra minutes allows it to reduce and develop a richer texture. If it gets too thick, a splash of chicken broth can help loosen it.

5. Add Cheese for Extra Creaminess

For an even richer sauce, stir in grated Parmesan or cream cheese at the end of cooking.

Frequently Asked Questions (FAQs)

1. Can I Use Chicken Thighs Instead of Breasts?

Yes! Chicken thighs will add more juiciness and flavor to the dish. They also hold up well in creamy sauces.

2. What Can I Use Instead of Heavy Cream?

For a lighter version, you can substitute coconut milk, half-and-half, or Greek yogurt. Keep in mind that the texture may change slightly.

3. Can I Make This Dish Ahead of Time?

Absolutely. You can prepare the dish in advance and store it in the refrigerator for up to 3 days. Simply reheat on the stovetop over low heat, adding a bit of chicken broth if needed to loosen the sauce.

4. Is This Dish Spicy?

Pepperoncini peppers have a mild heat level. If you want a spicier dish, consider adding red pepper flakes, diced jalapeños, or a splash of hot sauce.

5. Can I Freeze Leftovers?

While it is possible to freeze this dish, the sauce may separate upon reheating due to the dairy content. If freezing, store in an airtight container for up to 2 months, and reheat gently over low heat while stirring frequently.

6. What Are Some Good Vegetable Additions?

Spinach, mushrooms, or sun-dried tomatoes can be added to the dish for extra depth and nutrition.

Conclusion: A Must-Try Comfort Food with a Tangy Twist

Creamy Pepperoncini Chicken Skillet is a dish that delivers bold flavors, creamy textures, and just the right amount of tang. It’s quick enough for a weeknight meal but impressive enough for special occasions.

By following a few simple techniques and customizing the recipe to suit your taste, you can create a dish that’s guaranteed to become a staple in your kitchen. Serve it over pasta, rice, or mashed potatoes, and enjoy a comforting, restaurant-quality meal right at home.

So, the next time you’re looking for an easy yet flavor-packed dinner, give this skillet dish a try. It’s a surefire way to bring excitement to your dinner table with minimal effort!

Southwest Chicken Rolls: A Crispy, Flavor-Packed Delight

Southwest Chicken Rolls are the perfect fusion of bold flavors and satisfying textures. Inspired by Tex-Mex cuisine, these crispy, cheesy rolls are packed with shredded chicken, black beans, corn, and bell peppers, all seasoned with a smoky blend of cumin and chili powder. Whether served as an appetizer, party snack, or even a main course, these rolls deliver a satisfying crunch with every bite.

What makes these Southwest Chicken Rolls so special? It’s the combination of fresh ingredients and a crispy shell that can be either baked or fried to perfection. Plus, their versatility allows them to be customized with your favorite fillings and served with a variety of dipping sauces.

In this guide, we’ll explore everything you need to know about Southwest Chicken Rolls, from their origins to cooking tips, storage solutions, and frequently asked questions.

The Inspiration Behind Southwest Chicken Rolls

The flavors in these crispy delights are inspired by the classic Southwest Egg Rolls made famous by restaurant chains like Chili’s. Southwest cuisine, known for its vibrant blend of Mexican and American flavors, often features ingredients like corn, beans, chili peppers, and cheese. This dish takes those elements and wraps them in a crunchy egg roll wrapper, creating an irresistible bite-sized treat.

Traditionally, Tex-Mex cuisine incorporates elements from Mexican, Native American, and cowboy cooking. The smoky spices, fresh vegetables, and cheese blend in this recipe make it a standout dish that fits perfectly into any gathering.

Why You’ll Love These Rolls

  1. Crispy Perfection – Whether fried or baked, these rolls develop a golden-brown, crunchy exterior while keeping the inside flavorful and moist.
  2. Bold Southwest Flavors – A delicious mix of chicken, beans, corn, peppers, and spices gives each roll a dynamic taste.
  3. Easy to Customize – Add extra veggies, swap out the protein, or adjust the spice level to suit your preferences.
  4. Perfect for Any Occasion – Serve them as a snack, appetizer, or even a main course with a side of rice or salad.
  5. Dippable and Delicious – Pair with avocado ranch, sour cream, salsa, or guacamole for an extra burst of flavor.

Flavor-Packed Ingredients

  • 2 cups cooked chicken (shredded or chopped)
  • 1 cup corn (drained and rinsed)
  • 1 cup black beans (drained and rinsed)
  • 1 cup spinach (chopped)
  • 1 cup diced red bell pepper
  • 1/4 cup diced jalapeno (de-seeded)
  • 1/2 tbsp cumin
  • 1/2 tbsp chili powder
  • 1 tsp salt
  • 1/4 tsp black pepper
  • 2 cups Monterey Jack cheese (shredded)
  • 1 package egg roll wrappers (about 20 wrappers)
  • Oil (for frying, or brushing if baking)

Step-by-Step Directions

  1. Mix the Filling
    In a large mixing bowl, combine the chicken, corn, black beans, spinach, red bell pepper, and jalapeno. Add cumin, chili powder, salt, and black pepper, then stir in the shredded cheese.
  2. Assemble the Rolls
    Lay an egg roll wrapper on a clean surface, one corner pointing toward you. Spoon 2-3 tablespoons of the filling into the center. Fold the bottom corner over the filling, tuck in the sides tightly, and continue rolling. Wet the edges with water and press to seal.
  3. Choose Your Cooking Method
    • For Frying:
      Heat about 1 inch of oil in a large skillet to 350°F. Fry the egg rolls for 2-3 minutes per side until golden brown. Transfer to paper towels to remove excess oil.
    • For Baking:
      Preheat oven to 425°F. Line a baking sheet with parchment paper. Brush egg rolls lightly with oil and place them seam-side down. Bake for 15-20 minutes, flipping halfway through, until golden and crispy.
  4. Serve and Enjoy!
    Serve hot with your favorite dipping sauces like avocado ranch, sour cream, or guacamole.

Nutritional Breakdown (Per Roll)

  • Calories: 126 kcal
  • Carbohydrates: 12g
  • Protein: 9g
  • Fat: 5g
  • Saturated Fat: 2g
  • Cholesterol: 22mg
  • Sodium: 274mg
  • Fiber: 1g
  • Vitamin C: 12mg
  • Calcium: 99mg

Best Dipping Sauces for Southwest Chicken Rolls

A good dipping sauce can take these rolls from delicious to downright addictive. Here are a few options to try:

  • Avocado Ranch Dressing – A creamy and tangy blend of ranch dressing, avocado, and fresh cilantro.
  • Classic Sour Cream – A simple, cooling contrast to the warm and spicy filling.
  • Spicy Chipotle Mayo – A smoky, spicy option made with mayo and chipotle peppers in adobo sauce.
  • Homemade Guacamole – Fresh avocados mashed with lime juice, tomatoes, and onions for a refreshing balance.
  • Salsa Verde – A tangy tomatillo-based salsa that adds a zesty kick.

Baking vs. Frying: Which is Better?

One of the best things about this recipe is the flexibility in cooking methods.

  • Frying: Creates a crunchier, golden-brown exterior in just a few minutes. The high heat locks in moisture, keeping the filling juicy. However, it does require oil and can be a bit messy.
  • Baking: A healthier alternative that still delivers a crispy texture, though slightly less crunchy than frying. Brushing or spraying the rolls with oil before baking helps achieve a golden color.

Which method should you choose? If you love extra crispiness, go for frying. If you prefer a lighter, less oily option, baking is a great choice.

How to Store and Reheat Southwest Chicken Rolls

If you have leftovers or want to make a batch ahead of time, proper storage is key to keeping them fresh and delicious.

Storing in the Refrigerator

  • Allow the cooked rolls to cool completely.
  • Place them in an airtight container or resealable plastic bag.
  • Store in the fridge for up to 4 days.

Freezing for Longer Storage

  • Wrap each roll individually in foil or plastic wrap to prevent freezer burn.
  • Place them in a freezer-safe bag or container.
  • Store for up to 3 months.

Reheating for the Best Texture

  • Oven: Bake at 350°F for 10-15 minutes or until heated through.
  • Air Fryer: Heat at 350°F for about 8-10 minutes, flipping halfway.
  • Stovetop: Lightly pan-fry in a skillet for a few minutes on each side.
  • Microwave: Not recommended, as it can make the wrapper soggy.

Frequently Asked Questions (FAQs)

1. Can I Make These Vegetarian?

Absolutely! You can replace the chicken with additional black beans, sautéed mushrooms, or even tofu for a plant-based version.

2. What Other Meats Can I Use?

If you don’t have chicken on hand, try using shredded beef, ground turkey, or even shrimp. Each protein brings a unique twist to the rolls.

3. Can I Use Flour Tortillas Instead of Egg Roll Wrappers?

Yes! If you prefer a softer texture similar to restaurant-style Southwest egg rolls, use 6-inch flour tortillas instead. Simply roll them the same way and bake or fry as usual.

4. How Can I Make These Extra Spicy?

To turn up the heat, add diced serrano peppers, extra jalapeños, or a dash of cayenne pepper to the filling. Serving them with a spicy salsa or chipotle mayo will also add a fiery kick.

5. Can I Prep These in Advance?

Yes! You can assemble the rolls ahead of time and store them in the fridge for up to 24 hours before cooking. If freezing, do so before cooking and fry or bake directly from frozen.

6. Why Are My Rolls Soggy Instead of Crispy?

If your rolls aren’t crisping up properly, try the following:

  • Avoid overstuffing them, as too much filling can lead to excess moisture.
  • Make sure your oil is hot enough (350°F) before frying.
  • If baking, spray the rolls generously with oil for a crispier texture.

Creative Serving Ideas

Southwest Chicken Rolls are incredibly versatile. Here are a few ways to serve them:

  • As an Appetizer: Cut them in half for easy sharing and serve with multiple dipping sauces.
  • Game Day Snack: Pair with other party favorites like nachos, quesadillas, or loaded fries.
  • Main Course: Serve with Spanish rice, a fresh salad, or roasted vegetables for a full meal.
  • Breakfast Twist: Scramble some eggs and mix them into the filling for a morning version of these rolls.

Conclusion: A Must-Try Recipe for Any Occasion

Southwest Chicken Rolls are more than just an appetizer; they are a flavorful, crunchy, and satisfying dish that brings the best of Tex-Mex cuisine to your table. Whether you bake or fry them, they are guaranteed to be a hit at any gathering. Their customizable nature makes them suitable for different dietary preferences, and their crispy texture paired with creamy dips is simply irresistible.

So, the next time you’re looking for a crowd-pleasing snack or an easy dinner idea, give these Southwest Chicken Rolls a try. With just a few ingredients and simple steps, you can enjoy restaurant-quality flavors right in your own kitchen!

Grilled Chicken Burrito Bowls: A Flavorful and Customizable Meal

Burrito bowls have become a staple in many households due to their simplicity, versatility, and bold flavors. This Grilled Chicken Burrito Bowl is the perfect combination of smoky, marinated chicken, hearty rice, protein-packed beans, and a variety of fresh toppings. Whether you’re looking for a healthy meal prep option, a satisfying family dinner, or a customizable dish for picky eaters, this recipe checks all the boxes.

Unlike traditional burritos wrapped in tortillas, burrito bowls allow you to enjoy all the classic flavors without the extra carbs, making them a great choice for those following a gluten-free or lower-carb diet. Plus, the ability to mix and match ingredients means you can cater to different dietary needs with ease.

In this article, we’ll dive into what makes this burrito bowl stand out, explore some expert tips to enhance its flavor, discuss common mistakes to avoid, and answer frequently asked questions about the dish.

Why This Grilled Chicken Burrito Bowl Stands Out

1. The Perfectly Grilled Chicken

The star of this dish is the grilled chicken, marinated in a blend of lime juice, oil, and Mexican spices. Using chicken thighs ensures the meat remains juicy and flavorful, even after grilling. The marinade infuses each bite with a smoky, tangy depth that enhances the entire bowl.

2. A Balanced and Nutritious Meal

This burrito bowl offers a well-rounded meal packed with essential nutrients:

  • Protein: Lean grilled chicken and black beans provide a satisfying protein boost.
  • Healthy Carbohydrates: Rice (or a low-carb alternative like cauliflower rice) keeps you energized.
  • Fiber and Vitamins: Beans, tomatoes, avocado, and fresh cilantro add fiber, antioxidants, and healthy fats.

3. Completely Customizable

One of the best things about a burrito bowl is that you can tailor it to fit your preferences. Whether you prefer mild or spicy, cheesy or dairy-free, carb-heavy or low-carb, this dish is endlessly adaptable.

4. Great for Meal Prep

This recipe is meal-prep friendly, making it ideal for those who like to prepare their meals in advance. The components store well in the fridge, allowing you to assemble fresh, delicious burrito bowls throughout the week.

Ingredients

For the Grilled Chicken:
  • 1.5 lbs boneless, skinless chicken thighs
  • 1 tbsp Kosher salt
  • 2 tsp dried oregano
  • 2 tsp chili powder
  • 1.5 tsp ground cumin
  • 1 tsp garlic powder
  • 1 tsp smoked paprika
  • ½ tsp ground coriander
  • ½ tsp onion powder
  • ½ tsp ground black pepper
  • 2.5 tsp oil
  • 1 tsp lime juice (from 1 lime)
For the Burrito Bowls:
  • 4 cups cooked rice (white, brown, or cauliflower rice)
  • 4 to 6 cooked chicken thighs
  • 1 cup canned black beans (rinsed and drained)
  • 1 cup pico de gallo (or chopped tomatoes or salsa)
  • ½ cup shredded cheese (Mexican blend, cotija, queso fresco, etc.)
  • ¼ to ½ cup guacamole (or sliced avocado)
  • Chopped fresh cilantro (optional)
Optional Toppings:
  • Diced onion
  • Chopped lettuce
  • Sliced jalapeños
  • Sour cream
  • Taco sauce

Directions

1. Marinate the Chicken:

In a small bowl, combine all the dry spices. In a separate measuring cup, mix the oil and lime juice, then add the spices and whisk until fully combined. Place the chicken thighs in a large resealable bag, pour in the marinade, and mix to coat evenly. Refrigerate for 45 minutes, flipping halfway through. Let it sit at room temperature for 15 minutes before grilling.

2. Grill the Chicken:

Preheat a grill to 375°F. Place the marinated chicken on the grill grates and close the lid. Cook for 5 minutes, then flip and cook for another 3 minutes. Check for doneness with a meat thermometer (internal temperature should be 165°F). Let the chicken rest for 5 minutes before chopping into bite-sized pieces.

3. Assemble the Burrito Bowls:

Divide the cooked rice into four bowls. Add grilled chicken, black beans, pico de gallo, shredded cheese, and guacamole. Garnish with cilantro and any additional toppings. Serve immediately and enjoy!

Nutritional Breakdown (Per Serving – Serves 4)

  • Calories: ~450 kcal
  • Protein: High in lean protein from chicken
  • Carbohydrates: Balanced with fiber-rich beans and rice
  • Fats: Healthy fats from avocado and cheese
  • Sodium: Moderate, depending on seasoning and toppings

Tips for Making the Best Burrito Bowl

1. Marinate the Chicken for Maximum Flavor

For the juiciest, most flavorful chicken, let it marinate for at least 45 minutes, or up to 24 hours if you have the time. The longer it sits, the deeper the flavors will penetrate.

2. Use the Right Cut of Chicken

Chicken thighs are recommended because they retain moisture better than chicken breasts. If you prefer a leaner option, chicken breasts will work, but be sure not to overcook them, as they can dry out faster.

3. Don’t Skip the Resting Time

Once the chicken is done grilling, let it rest for at least 5 minutes before cutting. This allows the juices to redistribute, keeping the meat tender.

4. Try Different Rice Options

While white rice is traditional, consider switching it up with:

  • Brown rice for more fiber
  • Cilantro lime rice for extra flavor
  • Cauliflower rice for a low-carb alternative

5. Heat the Beans for Better Texture

If using canned black beans, warm them up with a little seasoning before adding them to the bowl. This enhances their texture and makes them more flavorful.

6. Add Fresh Toppings for Extra Crunch

For the best contrast of textures, top your bowl with fresh ingredients like shredded lettuce, sliced jalapeños, diced onions, and a squeeze of lime juice.

7. Make It Spicy or Mild

Adjust the spice level to your liking:

  • For more heat, add jalapeños, hot sauce, or cayenne pepper.
  • For a milder flavor, use mild salsa or skip the extra spices in the marinade.

Common Mistakes to Avoid

1. Not Letting the Chicken Marinate Long Enough

A quick 10-minute marinade won’t allow the flavors to penetrate deeply. Try to marinate for at least 45 minutes, and if possible, overnight for the best results.

2. Overcooking the Chicken

Chicken thighs are forgiving, but if you’re using chicken breasts, be extra careful not to overcook them. Use a meat thermometer and remove the chicken from the grill once it reaches 165°F.

3. Using Plain Rice Without Seasoning

A burrito bowl is only as good as its base. Adding a little lime juice, salt, and chopped cilantro to your rice can elevate the entire dish.

4. Forgetting to Drain and Rinse the Beans

Canned black beans often come in a thick liquid. Draining and rinsing them before use removes excess sodium and improves the taste.

5. Adding Cheese Too Early

If using shredded cheese, wait until serving to add it. Melting it too early can result in a greasy texture rather than a fresh, cheesy topping.

6. Overloading the Bowl

While it’s tempting to pile on every ingredient, adding too many toppings can overwhelm the dish. Stick to a balance of protein, carbs, veggies, and a few flavorful garnishes.

Frequently Asked Questions (FAQs)

1. Can I Make This Burrito Bowl Ahead of Time?

Yes! You can grill the chicken, cook the rice, and prepare the beans ahead of time. Store the ingredients separately in the fridge and assemble the bowls fresh when you’re ready to eat.

2. What’s the Best Way to Store Leftovers?

Store leftovers in airtight containers in the refrigerator for up to 4 days. Keep the fresh toppings separate to prevent them from getting soggy.

3. Can I Freeze the Chicken?

Absolutely! Grilled chicken freezes well. Slice or chop it first, then freeze in portions for easy meal prep. Thaw in the refrigerator overnight before reheating.

4. How Do I Reheat This Dish?

  • Chicken: Warm in a skillet over medium heat or in the microwave.
  • Rice and Beans: Reheat in the microwave with a splash of water to keep them from drying out.
  • Toppings: Keep fresh ingredients cold and add them after reheating.

5. Can I Make This Recipe Dairy-Free?

Yes! Simply omit the cheese or use a dairy-free alternative like nutritional yeast or vegan cheese.

6. What Other Proteins Can I Use?

If you’re not a fan of chicken, try:

  • Steak or ground beef for a heartier option
  • Shrimp for a lighter, seafood twist
  • Tofu or tempeh for a plant-based version

7. How Can I Make This Burrito Bowl Low-Carb?

Swap out white rice for cauliflower rice, and skip the beans to reduce carbs while keeping the dish filling.

8. What Sauces Go Well with This Bowl?

Some great options include:

  • Chipotle mayo for a smoky heat
  • Taco sauce for classic Mexican flavors
  • Greek yogurt or sour cream for a creamy balance

9. Can I Use Store-Bought Marinade?

While homemade marinade is best for controlling flavors, you can use a pre-made taco or fajita marinade if you’re short on time.

10. Is This Recipe Kid-Friendly?

Yes! If cooking for kids, reduce the spice level and allow them to build their own bowls with their favorite toppings.

Conclusion: A Meal That Everyone Will Love

Grilled Chicken Burrito Bowls are the perfect combination of flavor, nutrition, and convenience. Whether you’re meal prepping for the week, making a quick dinner for the family, or hosting a casual gathering, this dish offers endless customization options to suit any dietary preference.

With juicy marinated chicken, seasoned rice, hearty beans, and fresh toppings, every bite is packed with bold, satisfying flavors. Plus, it’s a one-bowl meal that requires minimal cleanup while delivering restaurant-quality taste right at home.

Give this recipe a try and enjoy the perfect balance of smoky, tangy, and fresh flavors in every bite!

One-Pan Wonder: Ground Beef and Sweet Potatoes Skillet

The Ground Beef and Sweet Potatoes Skillet is a perfect balance of savory, sweet, and slightly smoky flavors. This hearty one-pan meal is not only packed with protein and fiber but also rich in essential vitamins and minerals. Whether you’re looking for a quick weeknight dinner or a satisfying meal prep option, this dish is a go-to solution for busy households.

Beyond its delicious taste, this skillet dish is a highly adaptable recipe, allowing for different proteins, vegetables, and seasoning variations. It’s also naturally gluten-free, with options to make it dairy-free or low-carb. Let’s dive deeper into what makes this dish special, along with some expert tips, common mistakes to avoid, serving suggestions, and frequently asked questions.

Why This Skillet Dish Stands Out

1. A Perfect Balance of Flavors

The beauty of this recipe lies in the combination of ingredients. The rich, savory ground beef provides a bold contrast to the naturally sweet and tender cubes of sweet potatoes. Poblano peppers add a mild smokiness, while taco seasoning brings a depth of spice that ties everything together.

2. One-Pan Efficiency

Cooking everything in a single skillet means fewer dishes and less cleanup, making it an ideal choice for those with busy schedules. The layering of ingredients ensures that each component absorbs the flavors of the dish, creating a harmonious blend of textures and tastes.

3. Nutrient-Dense and Filling

This dish is packed with protein from ground beef, complex carbohydrates from sweet potatoes, and fiber from the addition of corn and peppers. It’s a balanced meal that keeps you full longer while providing essential nutrients such as vitamin A, potassium, and iron.

4. Easily Customizable

Whether you want to make it spicier, swap out the protein, or add extra vegetables, this skillet meal allows for endless creativity. It’s also a great way to use up pantry staples and fresh produce before they go to waste.

Ingredients

Main Ingredients:
  • 1 pound ground beef
  • ½ cup onion, diced
  • 2 cloves garlic, minced
  • 3 cups sweet potatoes, cubed (about 2 medium-sized potatoes)
  • 2 tablespoons homemade taco seasoning (or 1 packet store-bought)
  • 1 cup water
  • 1 cup frozen corn
  • 1 poblano pepper, seeded and diced
  • 1 cup shredded cheese (optional)
For Garnishing:
  • Fresh cilantro
  • Slices of avocado
  • Sour cream

Cooking Directions

1. Prep the Ingredients:

Dice the onion, mince the garlic, cube the sweet potatoes, and dice the poblano pepper.

2. Brown the Beef and Onions:

In a large skillet, cook the ground beef and diced onions over medium heat until the beef is browned and the onions are translucent (about 10 minutes). Drain excess fat.

3. Season the Dish:

Add the minced garlic and stir for about 1 minute until fragrant. Sprinkle in the taco seasoning and mix well to coat the beef and onions evenly.

4. Cook the Sweet Potatoes:

Stir in the cubed sweet potatoes and 1 cup of water. Mix thoroughly and cover the skillet. Let it cook on medium heat for about 12-15 minutes, stirring occasionally, until the sweet potatoes are tender.

5. Add Corn and Peppers:

Mix in the frozen corn and diced poblano peppers. Continue cooking for another 5 minutes.

6. Reduce Excess Liquid:

Remove the lid and let the dish cook for an additional 3 minutes, allowing excess moisture to evaporate.

7. Melt the Cheese (Optional):

Sprinkle shredded cheese over the skillet, cover, and let it melt for about 2-3 minutes.

8. Garnish and Serve:

Remove from heat and garnish with fresh cilantro, avocado slices, and a dollop of sour cream.

Nutritional Breakdown (Per Serving – Serves 4)

  • Calories: 350 kcal
  • Protein: High in lean protein from beef
  • Healthy Carbs: Nutrient-dense sweet potatoes provide fiber and natural sweetness
  • Fats: Balanced with healthy fats from avocado and optional cheese
  • Sodium: 700mg (varies based on seasoning choice)

Tips for Perfecting Your Skillet Meal

1. Choose the Right Cut of Beef

Using lean ground beef (85/15 or 90/10) helps strike a balance between flavor and texture. If using fattier ground beef, be sure to drain excess grease to avoid an overly greasy dish.

2. Cube Sweet Potatoes Evenly

To ensure even cooking, cut the sweet potatoes into uniform cubes. Smaller pieces will cook faster, while larger chunks may require extra time.

3. Allow Proper Simmering Time

Covering the skillet while cooking the sweet potatoes allows them to steam and soften faster. Removing the lid toward the end helps excess moisture evaporate, creating a slightly crisp texture.

4. Don’t Overcrowd the Pan

Cooking in a large skillet allows each ingredient to brown properly. If your skillet is too small, consider cooking the beef separately and adding it back in later.

5. Adjust Spice Levels to Taste

If you prefer a spicier dish, swap poblano peppers for jalapeños or add a pinch of red pepper flakes. On the other hand, if you like a milder flavor, reduce the taco seasoning or use a mild spice blend.

Common Mistakes to Avoid

1. Skipping the Drain Step

Failing to drain the fat after browning the ground beef can result in an oily dish. This step is crucial, especially when using ground beef with higher fat content.

2. Overcooking the Sweet Potatoes

Sweet potatoes cook relatively quickly, and overcooking them can lead to a mushy texture. Test doneness with a fork—they should be tender but not falling apart.

3. Using Too Much Liquid

While adding water helps steam the sweet potatoes, too much can make the dish overly soupy. If excess liquid remains after cooking, allow it to cook uncovered for a few minutes to evaporate.

4. Adding Cheese Too Early

If using cheese, wait until the end to sprinkle it over the dish. Adding it too soon can cause it to burn or become overly greasy.

5. Forgetting to Stir Occasionally

While the skillet dish cooks, stirring occasionally helps prevent sticking and ensures even distribution of flavors.

Serving Suggestions

1. Pair It with a Side

  • Rice or Quinoa: Serve the beef and sweet potato mixture over steamed rice or quinoa for a hearty bowl.
  • Cornbread: A warm slice of cornbread pairs wonderfully with the sweet and savory flavors of this dish.
  • Tortillas: Use it as a taco filling or serve alongside warm tortillas for a fun, interactive meal.

2. Toppings for Extra Flavor

  • Fresh Herbs: A sprinkle of chopped cilantro adds a fresh contrast to the dish.
  • Avocado Slices: Creamy avocado balances the spice and enhances the richness.
  • Sour Cream or Greek Yogurt: A dollop of sour cream adds a cooling effect.
  • Lime Wedges: A squeeze of lime juice brightens up the flavors.

3. Meal Prep and Storage

  • Refrigeration: Store leftovers in an airtight container for up to 4 days.
  • Freezing: This dish freezes well for up to 3 months. Portion into meal prep containers and thaw overnight before reheating.
  • Reheating: Warm on the stovetop over medium heat or microwave in short intervals, adding a splash of water if needed to retain moisture.

Frequently Asked Questions (FAQs)

1. Can I Use Another Type of Meat?

Yes! This recipe works well with ground turkey, chicken, pork, or plant-based meat substitutes for a lighter or vegetarian-friendly option.

2. What Can I Substitute for Sweet Potatoes?

If you’re not a fan of sweet potatoes, try using regular potatoes, butternut squash, or carrots for a similar texture with a different flavor profile.

3. How Can I Make It Spicier?

For extra heat, add chopped jalapeños, cayenne pepper, or hot sauce to the dish.

4. Is This Recipe Gluten-Free?

Yes, as long as your taco seasoning and other ingredients are gluten-free, this dish naturally fits a gluten-free diet.

5. Can I Make This Dairy-Free?

Absolutely! Simply omit the cheese and sour cream, or use dairy-free alternatives.

6. How Do I Prevent the Sweet Potatoes from Becoming Too Soft?

Cut them into even cubes and cook just until tender. If they begin to break down, remove them from the heat immediately.

7. Can I Add More Vegetables?

Definitely! Bell peppers, zucchini, spinach, or black beans make great additions to enhance the nutritional value.

8. What’s the Best Way to Store Leftovers?

Store in an airtight container in the refrigerator for up to 4 days, or freeze for longer storage.

9. Can I Cook This in a Slow Cooker?

Yes! Brown the beef first, then transfer all ingredients to a slow cooker and cook on low for 4-6 hours until the sweet potatoes are tender.

10. What Can I Serve This With for a More Complete Meal?

It pairs well with a side salad, roasted vegetables, or a simple coleslaw.

Conclusion: A Meal That Checks All the Boxes

The Ground Beef and Sweet Potatoes Skillet is more than just a quick and easy meal—it’s a flavorful, nutritious, and adaptable dish that fits into any lifestyle. Whether you’re cooking for a family dinner, meal prepping for the week, or looking for a new twist on classic comfort food, this recipe delivers on taste and convenience.

With a perfect blend of sweet and savory elements, a one-pan cooking method, and the flexibility to customize it to your taste, this dish is bound to become a staple in your kitchen. Try it today, experiment with different toppings and sides, and enjoy a wholesome meal that satisfies every craving.

Spinach Artichoke Chicken with Cottage Cheese: A High-Protein, Low-Carb Delight

Spinach artichoke dip is a beloved appetizer, often served warm and bubbling with cheese. But what if you could take that same rich, creamy flavor and turn it into a protein-packed, low-carb dinner? That’s exactly what this Spinach Artichoke Chicken with Cottage Cheese delivers—a dish that brings together savory artichokes, tender chicken, and creamy cottage cheese for a meal that is both indulgent and nutritious.

This recipe is perfect for busy weeknights, meal prepping, or when you’re craving something hearty without the guilt. Whether you’re following a keto, low-carb, or high-protein diet, this dish checks all the boxes while delivering restaurant-quality flavor. In this article, we’ll explore why this recipe works, ways to customize it, and answer some frequently asked questions.

Why This Dish Stands Out

A Lighter Take on a Classic Flavor

Many spinach artichoke chicken recipes rely on heavy cream or cream cheese for richness. While delicious, those ingredients can make the dish overly heavy. Cottage cheese provides a lighter, protein-rich alternative that creates a creamy texture without the extra fat. The result? A meal that satisfies without weighing you down.

Packed with Protein, Low in Carbs

This dish is naturally high in protein thanks to chicken and cottage cheese, making it an excellent choice for anyone looking to support muscle growth or stay full longer. Plus, it keeps carbs to a minimum, making it a great fit for ketogenic or low-carb lifestyles.

Quick and Easy Preparation

With minimal prep time and a straightforward baking process, this dish is incredibly simple to make. Unlike stuffed chicken recipes that require delicate slicing and careful filling, this version lets you mix everything together and bake it to perfection—ideal for those who want maximum flavor with minimal effort.

A Flavorful Fusion of Comfort and Nutrition

This Spinach Artichoke Chicken with Cottage Cheese takes a classic appetizer—spinach artichoke dip—and transforms it into a protein-packed, low-carb main dish. The combination of chicken, cottage cheese, and parmesan creates a creamy, indulgent texture while keeping it lighter than traditional recipes that use heavy cream or cream cheese.

Ingredients: What You’ll Need for This Dish

  • Chicken Breasts – 2 large, boneless, skinless
  • Cottage Cheese – ½ cup
  • Fresh Spinach – ¼ cup, chopped
  • Artichoke Hearts – ½ cup, drained and chopped
  • Garlic – 2 cloves, minced
  • Parmesan Cheese – ¼ cup, grated
  • Olive Oil – ¼ cup
  • Salt and Pepper – To taste

Directions: Bringing the Dish to Life

Step 1: Prep and Preheat

  • Preheat the oven to 400°F (200°C).
  • Cut the chicken breasts into 1-inch pieces and place them in a large mixing bowl.

Step 2: Mix the Filling

  • Add cottage cheese, spinach, artichokes, garlic, and parmesan cheese to the bowl with the chicken.
  • Mix thoroughly to coat the chicken evenly.

Step 3: Prepare the Baking Dish

  • Pour olive oil into a 9×13-inch baking pan, ensuring the bottom is well-coated.
  • Spread the chicken mixture evenly across the pan.

Step 4: Bake to Perfection

  • Place the dish in the preheated oven and bake for 25-30 minutes, or until the chicken is fully cooked and reaches a safe internal temperature.

Step 5: Serve and Enjoy

  • Remove from the oven and serve warm.
  • Garnish with fresh spinach or additional parmesan cheese for a final touch.

Nutritional Breakdown: A Healthy and Satisfying Meal

(Nutritional values are approximate and may vary based on ingredient brands and portion sizes.)

  • Calories: 800-900 (for the entire dish)
  • Protein: 70-80g
  • Fat: 60-70g
  • Carbohydrates: 15-20g

How to Customize This Recipe

One of the best things about this recipe is its versatility. You can tweak the ingredients based on what you have on hand or your dietary preferences. Here are some creative variations to try:

Change Up the Protein

  • Chicken Thighs – Want an even juicier dish? Swap out the chicken breasts for boneless, skinless chicken thighs. They’re naturally more flavorful and forgiving when it comes to cooking time.
  • Ground Chicken or Turkey – Instead of whole chicken pieces, try using ground chicken or turkey for a casserole-style dish. Simply brown the meat before mixing in the remaining ingredients.
  • Vegetarian Option – If you’d like to make this dish meatless, swap the chicken for mushrooms, tofu, or chickpeas while keeping the same creamy, cheesy flavor.

Experiment with Cheese Options

  • Ricotta Cheese – If cottage cheese isn’t your favorite, ricotta provides a similar texture with a slightly milder taste.
  • Mozzarella or Cheddar – For a meltier consistency, consider adding a handful of shredded mozzarella or sharp cheddar to the mix.

Boost the Flavor with Extra Ingredients

  • Sun-Dried Tomatoes – These add a slightly tangy, sweet contrast to the richness of the dish.
  • Mushrooms – Sautéed mushrooms enhance the umami flavor.
  • Bacon Crumbles – A sprinkle of crispy bacon on top adds crunch and an extra punch of flavor.

Make It Extra Creamy

If you prefer an even richer texture, mix in a spoonful of Greek yogurt or heavy cream before baking. This will create a silkier consistency while still keeping the dish balanced.

How to Serve Spinach Artichoke Chicken

This dish pairs well with a variety of sides, depending on your dietary preferences. Here are some great serving ideas:

Low-Carb Options:

  • Cauliflower Rice – A fantastic way to keep the dish low in carbs while adding a rice-like texture.
  • Zucchini Noodles (Zoodles) – The creaminess of the sauce coats spiralized zucchini beautifully.
  • Steamed Broccoli or Roasted Asparagus – Both make excellent veggie companions.

Comfort Food Pairings:

  • Garlic Bread – If carbs aren’t a concern, a warm slice of garlic bread is the perfect complement.
  • Mashed Potatoes – Creamy potatoes soak up the delicious sauce for an indulgent meal.
  • Pasta – Serve over cooked pasta for a spinach artichoke-inspired pasta dish.

FAQs: Everything You Need to Know

1. Can I Make This Recipe Ahead of Time?

Yes! This dish is great for meal prepping. You can prepare everything in advance and store it covered in the refrigerator for up to 24 hours before baking. If you’re freezing it, store it in an airtight container and bake within three months for the best texture.

2. How Do I Store and Reheat Leftovers?

  • Refrigeration – Store leftovers in an airtight container in the fridge for up to 3 days.
  • Reheating – Warm leftovers in the oven at 350°F (175°C) for 10-15 minutes, or microwave in short intervals to avoid drying out the chicken.

3. Can I Use Frozen Spinach Instead of Fresh?

Absolutely! If using frozen spinach, thaw and squeeze out excess water before mixing it into the dish. Otherwise, the added moisture can make the texture watery.

4. Can I Use Canned Artichokes?

Yes, but drain them well before chopping. Canned artichokes often have excess liquid, which can water down the dish if not properly dried.

5. How Can I Make This Dish Dairy-Free?

To make a dairy-free version:

  • Swap cottage cheese for dairy-free ricotta or cashew-based cream cheese.
  • Use nutritional yeast instead of parmesan for a cheesy flavor.
  • Replace butter with olive oil or coconut oil if needed.

6. What’s the Best Way to Ensure the Chicken Stays Juicy?

  • Don’t overcook—use a meat thermometer and remove the chicken once it reaches 165°F (75°C).
  • If using chicken breasts, pound them to an even thickness to ensure even cooking.
  • If using chicken thighs, they are naturally juicier and can handle a little extra cooking time without drying out.

Final Thoughts: A Recipe Worth Adding to Your Rotation

Spinach Artichoke Chicken with Cottage Cheese is a perfect blend of comfort, nutrition, and convenience. With its creamy texture, rich flavor, and simple preparation, it’s a dish that delivers on every level—whether you’re looking for a high-protein meal, a low-carb option, or simply something delicious to make for dinner.

With so many ways to customize it, from cheese choices to additional ingredients, this recipe can be tailored to fit any dietary preference or craving. Whether you serve it over cauliflower rice for a low-carb meal or pair it with garlic bread for ultimate comfort food indulgence, you’re sure to fall in love with this easy, satisfying dish.

So the next time you’re searching for a quick and healthy dinner, give this Spinach Artichoke Chicken a try—you won’t be disappointed!

Slow Cooker Chicken and Gravy: A Comfort Food Classic Made Easy

Slow cooker meals have become a staple in many households, offering convenience without sacrificing flavor. One dish that truly embodies the magic of slow cooking is Slow Cooker Chicken and Gravy—a creamy, savory, and comforting meal that’s incredibly easy to prepare. With just a handful of ingredients, this dish transforms simple chicken breasts into a rich, flavorful masterpiece, making it a go-to for busy families, meal preppers, and comfort food lovers alike.

In this article, we will explore everything you need to know about this classic recipe, from why it’s a favorite among home cooks to tips for enhancing its flavor and frequently asked questions.

Why This Recipe Is a Must-Try

Unmatched Convenience

One of the biggest advantages of this recipe is how effortless it is to prepare. With minimal prep work, all you have to do is place the ingredients in the slow cooker and let time do the rest. This makes it perfect for those busy days when you don’t have the time or energy to stand over a stove.

Family-Friendly and Crowd-Pleasing

Not only is this dish easy to make, but it’s also universally loved. The creamy texture and mild, savory flavor appeal to both kids and adults. If you have picky eaters in your family, this meal is a great option, as it pairs well with various sides like rice, mashed potatoes, or even buttered noodles.

A Versatile Comfort Meal

While this dish is delicious as-is, it is also highly adaptable. Whether you want to add extra ingredients, adjust the seasoning, or make it healthier, there are plenty of ways to modify this recipe to suit your taste.

Perfect for Meal Prep

Since this dish reheats beautifully, it’s ideal for making ahead and storing for future meals. Whether you freeze leftovers or portion them for the week, this recipe ensures you’ll have a warm, satisfying meal ready whenever you need it.

Ways to Elevate This Recipe

While the classic version of slow cooker chicken and gravy is already delicious, there are several ways to take it to the next level.

Boost the Flavor with Extra Seasonings

If you want a bolder taste, consider adding spices like garlic powder, onion powder, smoked paprika, or Italian seasoning. A dash of Worcestershire sauce or a splash of soy sauce can also deepen the umami flavor.

Incorporate Vegetables for Extra Nutrition

Adding vegetables not only makes the dish more nutritious but also enhances its overall flavor. Some great options include:

  • Carrots – Add a subtle sweetness
  • Mushrooms – Complement the creamy texture
  • Peas – Provide a pop of color and freshness
  • Celery and Onion – Give it a homestyle taste

Make It Richer and Creamier

If you prefer an even creamier consistency, you can mix in some cream cheese, heavy cream, or Greek yogurt towards the end of the cooking process. This adds an extra layer of richness that makes the gravy even more indulgent.

Switch Up the Protein

Although chicken breasts are the traditional choice, you can easily swap them out for boneless, skinless chicken thighs for a juicier, more flavorful result. If you’re feeling adventurous, try using shredded turkey or even pork for a different take on this dish.

Serve It in Different Ways

While rice and mashed potatoes are the most common pairings, don’t be afraid to get creative with your serving options. Some unique ways to enjoy this dish include:

  • Over buttered egg noodles for a stroganoff-like twist
  • Stuffed inside a baked potato for a hearty meal
  • On a toasted bun as a warm, open-faced sandwich
  • With biscuits for a Southern-inspired comfort meal

Storage and Reheating Tips

Storing Leftovers

To keep your slow cooker chicken and gravy fresh, store it in an airtight container in the refrigerator. It will last for up to three days when properly stored.

If you want to extend its shelf life, you can freeze it for up to two months. To do this, let the dish cool completely before transferring it to a freezer-safe container or zip-top bag.

Reheating the Dish

To reheat, place the chicken and gravy in a saucepan over low heat and stir occasionally until warmed through. You can also microwave it in 30-second intervals, stirring in between to prevent uneven heating. If the gravy becomes too thick, add a splash of broth or milk to restore its creamy consistency.

Frequently Asked Questions

Can I Cook This Recipe on High Instead of Low?

Yes, if you’re short on time, you can cook the chicken on high for 2 to 3 hours instead of low for 4 hours. However, cooking it on low allows the flavors to develop more fully and results in more tender chicken.

How Do I Prevent My Chicken from Drying Out?

Since chicken breasts are lean, they can dry out if overcooked. To ensure juicy and tender chicken, avoid cooking it for too long and check for an internal temperature of 165°F (74°C). Using chicken thighs instead of breasts can also help keep the dish moist.

Can I Make This Recipe in an Instant Pot?

Absolutely. To make this in an Instant Pot, cook the chicken on high pressure for 10 minutes, then allow a natural release for 5 minutes before manually releasing the remaining pressure. Shred the chicken and stir in the sour cream as usual.

What Can I Use Instead of Cream of Chicken Soup?

If you prefer a homemade version, you can make a quick cream of chicken soup substitute by whisking together:

  • 1 cup chicken broth
  • ½ cup milk
  • 3 tablespoons flour
  • 2 tablespoons butter

Heat the mixture over medium heat until thickened, then use it in place of the canned soup.

Is This Recipe Gluten-Free?

The standard version is not gluten-free, as gravy mix and canned soup typically contain gluten. However, you can easily make it gluten-free by using:

  • A gluten-free gravy mix
  • A homemade gluten-free cream of chicken soup substitute

Can I Add Cheese to This Dish?

Yes. If you love cheesy comfort foods, try stirring in shredded cheddar, mozzarella, or parmesan at the end of cooking for a richer, more indulgent dish.

Can I Use Frozen Chicken?

While some people cook frozen chicken in a slow cooker, it’s best to thaw it first to ensure even cooking and food safety. Frozen chicken can take longer to reach a safe temperature, increasing the risk of bacterial growth.

Final Thoughts: A Meal That Never Disappoints

Slow Cooker Chicken and Gravy is the definition of comfort food made easy. Whether you’re preparing it for a busy weeknight, a family gathering, or simply craving something warm and hearty, this dish is guaranteed to deliver flavor and satisfaction.

Its simple preparation, rich and creamy texture, and flexibility make it a recipe worth keeping in your collection. Plus, with so many ways to customize and serve it, you’ll never get tired of making it.

Give it a try, and you’ll quickly see why this slow cooker classic remains a favorite in kitchens everywhere.