Hoisin Beef Noodles: A Sweet and Savory Stir-Fry Sensation

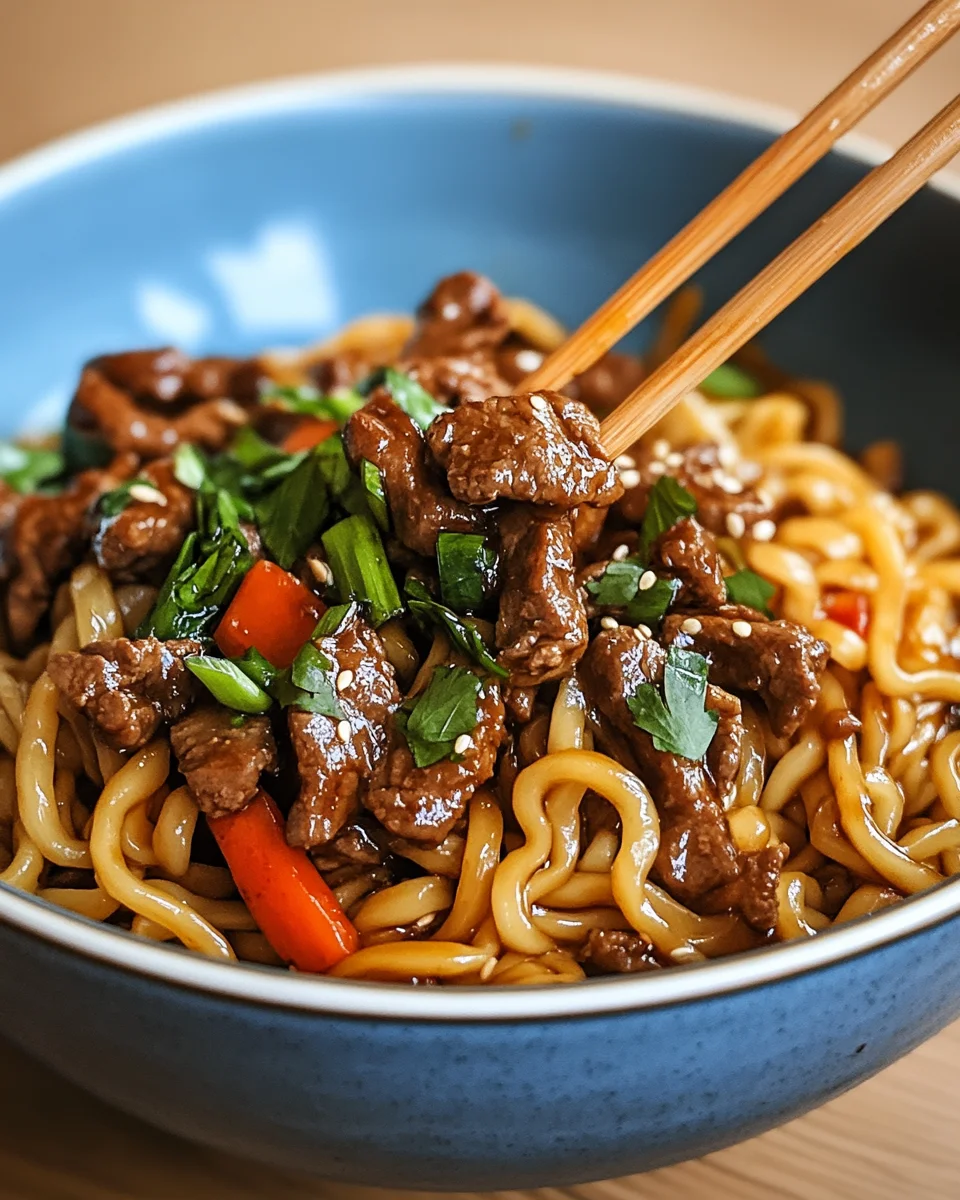
There’s nothing quite like a quick and flavorful stir-fry when you need a meal that’s both satisfying and simple to prepare. Hoisin Beef Noodles combines the rich, umami-packed flavor of hoisin sauce with tender strips of beef, vibrant vegetables, and chewy noodles, creating a dish that’s not only delicious but also effortless to make in under 30 minutes.

Perfect for a weeknight dinner, meal prep, or a cozy night in, this dish is a fantastic way to bring the bold and balanced flavors of Asian-inspired cuisine right to your kitchen. Whether you’re a seasoned cook or a beginner looking for an easy go-to recipe, Hoisin Beef Noodles is a must-try!

What Makes Hoisin Beef Noodles Special?

1. A Perfect Balance of Sweet and Savory

Hoisin sauce is the star of the show in this dish. Known as Chinese barbecue sauce, hoisin is a thick, fragrant blend of soybeans, garlic, vinegar, chili, and spices, offering a perfect combination of sweet, savory, and slightly tangy flavors. When paired with tender beef and stir-fried noodles, it creates an irresistible umami experience.

2. A One-Pan Wonder

This dish requires minimal cleanup, as everything is cooked in just one wok or skillet. The process is simple:

  • Marinate the beef for maximum flavor.
  • Stir-fry the vegetables for crunch and freshness.
  • Cook the beef and toss in the noodles with a rich hoisin sauce.

3. Ready in Under 30 Minutes

Unlike slow-cooked dishes, Hoisin Beef Noodles is a fast, high-heat stir-fry. This means you can have a restaurant-quality meal on the table in under half an hour, making it ideal for busy weeknights.

4. Easily Customizable

One of the best things about this dish is its versatility. You can easily swap out ingredients to fit your dietary preferences:

  • Use chicken, shrimp, or tofu instead of beef.
  • Choose different noodles like rice noodles, udon, or soba.
  • Add your favorite vegetables for extra nutrients and color.

The Secret to Perfect Stir-Fried Noodles

Stir-frying might seem simple, but there’s an art to getting it just right. Follow these tips to make sure your noodles are flavorful, springy, and never soggy.

1. Cook Noodles Properly

  • Undercook slightly: Since the noodles will be stir-fried, cook them 1 minute less than the package directions to prevent them from becoming mushy.
  • Rinse with cold water: This stops the cooking process and keeps the noodles from sticking together.

2. Use High Heat

  • Stir-frying works best over high heat to achieve the perfect char and caramelization on the beef and vegetables.
  • Cooking on low heat will steam the ingredients instead, resulting in soggy vegetables and chewy beef.

3. Don’t Overcrowd the Pan

  • Cook in small batches to ensure each ingredient gets evenly seared.
  • Too many ingredients in the pan at once will lower the heat and cause steaming instead of frying.

4. Let the Beef Brown Properly

  • Once the beef hits the pan, don’t stir immediately—let it sear for a minute to develop a golden-brown crust before flipping.

How to Serve Hoisin Beef Noodles

This dish is incredibly versatile and can be served in many ways depending on the occasion:

1. Classic Bowl Style

Serve the Hoisin Beef Noodles in deep bowls, garnished with toasted sesame seeds, fresh cilantro, and a squeeze of lime for extra brightness.

2. Lettuce Wraps

For a low-carb option, skip the noodles and use crisp lettuce cups to scoop up the hoisin beef and vegetables.

3. Asian-Inspired Meal Prep

Divide the noodles, beef, and vegetables into meal prep containers for a grab-and-go lunch that reheats beautifully.

4. Paired with a Side Dish

For a complete meal, serve with:

  • Egg rolls or dumplings for an extra crunch.
  • Miso soup or hot and sour soup for a warm, comforting side.
  • A simple cucumber salad to balance out the richness.

Creative Variations to Try

If you want to experiment with flavors, here are some fun ways to change up this dish:

1. Spicy Hoisin Beef Noodles

  • Add chili flakes, Sriracha, or sliced Thai chilies to give the dish a spicy kick.

2. Hoisin Peanut Beef Noodles

  • Stir in a spoonful of peanut butter to create a nutty, creamy sauce with a Thai-inspired twist.

3. Teriyaki Hoisin Beef Noodles

  • Mix hoisin sauce with teriyaki sauce for a slightly sweeter, glazed-style stir-fry.

4. Garlic Butter Hoisin Noodles

  • Add a small amount of butter and extra garlic for a richer, more indulgent flavor.

5. Vegetarian Hoisin Noodles

  • Swap beef for tofu or tempeh and use a vegetarian hoisin sauce for a meat-free version.

Storage and Reheating Tips

How to Store Leftovers

  • Refrigerator: Store leftovers in an airtight container for up to 4 days.
  • Freezer: Freeze in portioned containers for up to 2 months (best without the noodles).

How to Reheat Without Drying Out

  • Stovetop: Add a splash of water or soy sauce and stir-fry over medium heat.
  • Microwave: Cover with a damp paper towel and reheat in 30-second intervals, stirring in between.

Frequently Asked Questions (FAQs)

1. Can I Make This Dish Ahead of Time?

Yes! Cook the beef and vegetables ahead, then store them separately. When ready to eat, quickly stir-fry everything together with freshly cooked noodles.

2. What Noodles Work Best for This Recipe?

The best options include:

  • Rice noodles – Light and chewy (great for gluten-free).
  • Egg noodles – Richer, with a firmer texture.
  • Soba or udon noodles – A fun alternative with a slightly different flavor.

3. Can I Make This Dish Gluten-Free?

Yes! Use gluten-free hoisin sauce, tamari instead of soy sauce, and rice noodles for a gluten-free version.

4. What’s the Best Cut of Beef to Use?

Thin cuts of beef that cook quickly work best, such as:
Sirloin – Lean and tender.
Flank steak – Slightly chewy but packed with flavor.
Ribeye – Rich and marbled.

5. Can I Add More Vegetables?

Absolutely! Some great add-ins include:

  • Broccoli or snap peas for crunch.
  • Baby corn or bok choy for variety.
  • Mushrooms for an earthy depth of flavor.

Conclusion: A Must-Try Stir-Fry for Any Occasion

Hoisin Beef Noodles is the perfect balance of sweet, savory, and satisfying, making it a staple meal for any kitchen. Whether you’re making it for a quick dinner, a flavorful meal prep, or a weekend treat, this dish delivers restaurant-quality taste in just 30 minutes.

With endless customization options, you can make it your own by adjusting spice levels, switching up the protein, or experimenting with different noodle varieties.

So grab your wok, heat up the pan, and enjoy the rich, saucy, and delicious flavors of Hoisin Beef Noodles!

Coconut Red Curry Drip Beef: A Fusion of Comfort and Bold Flavor

When it comes to comfort food, few things compare to a slow-braised beef dish, where the meat turns fall-apart tender and absorbs layers of rich, savory flavor. But when you take that concept and introduce the bold, aromatic spices of Thai red curry, creamy coconut milk, and umami-packed ingredients, you get something entirely unique: Coconut Red Curry Drip Beef.

This dish is a fusion of classic drip beef with Southeast Asian influences, transforming a rustic, slow-cooked beef roast into a fragrant, flavor-packed meal. Whether you’re serving it over steamed rice, noodles, or scooping it up with toasted bread, this recipe brings warmth, richness, and a hint of spice to your table.

In this article, we’ll explore the origins of drip beef, what makes this version so special, essential cooking tips, serving suggestions, variations to try, storage instructions, and FAQs to ensure your dish turns out perfect every time.

The Origins of Drip Beef: A Slow-Cooked Classic

Drip beef is a comfort food classic that has been around for decades, traditionally made by slow-cooking beef with broth, garlic, and seasonings until it becomes fork-tender and juicy. The name “drip beef” comes from the way the beef soaks up the flavorful cooking juices, making it perfect for sandwiches, rice bowls, or pasta dishes.

A Global Twist on a Classic

While traditional drip beef is often made with Italian flavors (garlic, oregano, and pickled peppers), this recipe takes a bold detour into Southeast Asia, incorporating ingredients like:

  • Thai red curry paste for spice and depth
  • Coconut milk for richness
  • Fresh ginger and garlic for aromatic complexity
  • Soy sauce and fish sauce for umami balance

This combination elevates the familiar slow-cooked beef experience, making it feel exotic yet deeply comforting at the same time.

What Makes This Coconut Red Curry Drip Beef Unique?

1. Slow-Cooked for Maximum Tenderness

By cooking the chuck roast low and slow, the connective tissues break down, resulting in succulent, fall-apart beef that practically melts in your mouth.

2. A Perfectly Balanced Flavor Profile

This dish is a masterpiece of balanced flavors:

  • Savory (beef, soy sauce, fish sauce)
  • Sweet (coconut milk, a touch of sugar)
  • Spicy (red curry paste, optional jalapeños)
  • Aromatic (garlic, ginger, onion)

Each ingredient plays a role in creating a deeply flavorful, restaurant-quality dish.

3. A One-Pot, Minimal Effort Meal

All the magic happens in one Dutch oven or slow cooker, making this recipe perfect for busy weeknights, meal prep, or hosting a dinner party.

4. Versatile Serving Options

Unlike traditional drip beef, which is often piled onto crusty rolls, this curry-infused version works beautifully with rice, noodles, or even as a stew.

Ingredients

For the Beef: “The Savory Foundation”

  • Olive oil
  • Chuck roast
  • Salt and black pepper
  • All-purpose flour
  • Beef broth

For the Curry Sauce: “A Fusion of Richness and Spice”

  • Coconut milk
  • Soy sauce (or tamari for gluten-free)
  • Thai red curry paste
  • Fresh ginger, minced
  • Garlic, minced
  • Sugar
  • Fish sauce
  • Onion, sliced

Optional Additions: “Customize Your Heat and Texture”

  • Sliced jalapeños (for extra spice)
  • Sweet peppers
  • Lemongrass paste

Serving Suggestions: “The Perfect Base”

  • Steamed rice
  • Long noodles

Directions

Step 1: Sear the Beef for Maximum Flavor

  1. Preheat oven to 350°F (175°C).
  2. Heat olive oil in a Dutch oven over medium-high heat.
  3. Season both sides of the chuck roast with salt, pepper, and a light dusting of flour.
  4. Sear the beef until golden brown on both sides (about 5 minutes per side). Remove and set aside.

Step 2: Build the Bold Red Curry Sauce

  1. Lower the heat and add beef broth, coconut milk, soy sauce, curry paste, ginger, garlic, sugar, and fish sauce to the pot. Stir well.
  2. Return the seared beef to the pot, cover, and transfer to the oven.

Step 3: Slow Braise Until Fork-Tender

  1. Cook for 2 hours, allowing the beef to become tender and infused with flavor.
  2. Remove the beef from the pot and shred it into bite-sized pieces with two forks.
  3. Add the sliced onion and optional peppers to the pot, then return the shredded beef.
  4. Let it rest for 5 minutes, allowing the onions to slightly soften before serving.

Step 4: Serve with Your Favorite Base

  1. Spoon the beef over steamed rice or noodles.
  2. Drizzle extra curry sauce over the top for added richness.

Nutritional Information (Per Serving Approximate)

  • Calories: 450 kcal
  • Carbohydrates: 12g
  • Protein: 40g
  • Fat: 28g
  • Sugar: 6g

Expert Tips for Making the Best Coconut Red Curry Drip Beef

1. Brown the Beef for Extra Depth

A good sear locks in flavor and creates a rich, caramelized crust that enhances the overall taste of the dish.

2. Use Full-Fat Coconut Milk

For the creamiest texture and richest flavor, always opt for full-fat coconut milk rather than low-fat versions.

3. Don’t Skip the Fish Sauce

Fish sauce might sound intimidating, but it adds an umami depth that rounds out the flavors without making the dish taste “fishy.”

4. Adjust the Spice Level to Your Taste

If you love heat, add sliced jalapeños or extra curry paste. For a milder version, reduce the curry paste slightly and balance it with more coconut milk.

5. Let the Beef Rest Before Serving

After shredding the beef, let it rest in the curry sauce for a few minutes—this allows the flavors to deepen and absorb fully.

Serving Suggestions: How to Enjoy Coconut Red Curry Drip Beef

This dish is incredibly versatile and pairs beautifully with a variety of sides. Here are some of the best ways to serve it:

1. Over Steamed Rice

The classic pairing—fluffy jasmine or basmati rice soaks up the rich, coconut curry broth beautifully.

2. With Noodles

Serve it over egg noodles, rice noodles, or udon for a comforting, slurp-worthy dish.

3. As a Sandwich

Pile the juicy, saucy beef onto toasted bread or a soft brioche bun for an unexpected twist on a classic beef sandwich.

4. With Roasted Vegetables

Pair it with roasted sweet potatoes, Brussels sprouts, or bok choy for a balanced, hearty meal.

5. Topped with Fresh Herbs

Finish with fresh basil, cilantro, scallions, or a squeeze of lime to brighten up the flavors.

Recipe Variations to Try

1. Coconut Green Curry Drip Beef

Swap the red curry paste for green curry paste for a herbaceous, slightly tangier version.

2. Thai-Inspired Drip Beef with Peanut Sauce

Add a spoonful of peanut butter to the sauce for a creamy, nutty depth of flavor.

3. Spicy Sichuan Drip Beef

For extra heat, stir in Sichuan chili oil or crushed red pepper flakes.

4. Lemongrass and Kaffir Lime Version

Add lemongrass paste or kaffir lime leaves for an extra layer of citrusy freshness.

5. Low-Carb/Keto Version

Skip the rice or noodles and serve with cauliflower rice or roasted vegetables for a lower-carb option.

How to Store and Reheat Leftovers

Storing Leftovers

  • Refrigerator: Store in an airtight container for up to 4 days.
  • Freezer: Freeze in portioned containers for up to 2 months.

Reheating Instructions

  • Stovetop: Simmer on low heat until warmed through.
  • Microwave: Heat in 30-second intervals, stirring in between.

Frequently Asked Questions (FAQs)

1. Can I Make This in a Slow Cooker?

Yes! Sear the beef first, then transfer everything to a slow cooker and cook on low for 6-7 hours or high for 3-4 hours.

2. What’s the Best Cut of Beef for This Recipe?

Chuck roast is the best choice due to its marbling and tenderness after slow cooking. Brisket or short ribs can also work.

3. Can I Use a Different Type of Curry Paste?

Absolutely! If you can’t find red curry paste, green or yellow curry paste can be used instead, with slightly different flavor profiles.

4. Can I Make This Dish Spicier?

Yes! Increase the red curry paste, add sliced jalapeños, or stir in chili flakes or hot sauce.

5. What Can I Use Instead of Fish Sauce?

If you don’t have fish sauce, substitute with soy sauce or Worcestershire sauce for a similar umami effect.

Conclusion: A Must-Try Dish for Bold Flavor Lovers

Coconut Red Curry Drip Beef is a fusion of slow-cooked tenderness and vibrant Southeast Asian flavors, making it a perfect meal for both weeknight dinners and special occasions. The combination of rich coconut milk, aromatic red curry, and melt-in-your-mouth beef creates a dish that is deeply comforting yet excitingly different.

Whether you serve it over rice, noodles, or as a sandwich, this recipe is sure to become a favorite in your home. Try it once, and you’ll find yourself coming back to it again and again—each time, discovering new ways to enjoy its bold and delicious flavors.

Soft Cardamom Rolls with Berries: A Sweet, Fragrant, and Buttery Indulgence

There’s something truly special about freshly baked sweet rolls—the soft, pillowy texture, the delicate sweetness, and the irresistible aroma that fills the kitchen. These Soft Cardamom Rolls with Berries take the classic cinnamon roll concept and elevate it with the warmth of cardamom, the brightness of citrus zest, and the burst of juicy berries.

Topped with a luscious cream cheese glaze, these rolls are a perfect treat for breakfast, brunch, dessert, or even an afternoon pick-me-up with a cup of tea. If you’re a fan of richly spiced pastries with a fruity twist, this recipe is bound to become a favorite in your baking repertoire.

In this article, we’ll explore the origins of cardamom in baking, what makes these rolls unique, essential baking tips, serving ideas, variations, storage instructions, and FAQs to help you master this delightful treat.

The Magic of Cardamom in Baking

Cardamom is one of the most aromatic and versatile spices in the world, commonly used in both savory and sweet dishes. It has a warm, citrusy, and slightly herbal flavor that complements baked goods beautifully.

A Spice with a Story

Cardamom has been used in Scandinavian, Middle Eastern, and Indian cuisines for centuries. In Sweden and Finland, cardamom buns and pastries are a staple, often enjoyed with coffee during “fika” (a Swedish coffee break tradition). This spice brings a level of sophistication to baked goods, giving them a distinctive, fragrant quality.

In this recipe, cardamom is combined with cinnamon, brown sugar, and lemon zest, adding a complex depth of flavor to the sweet dough. The result? A delicately spiced, aromatic pastry that perfectly complements the tartness of the berries and the richness of the cream cheese glaze.

Why These Rolls Are So Special

1. A Softer, Richer Dough

The dough for these rolls is buttery, slightly sweet, and incredibly soft. Thanks to the addition of milk, butter, and a long proofing time, it has an airy texture that practically melts in your mouth.

2. The Perfect Blend of Warm Spices and Freshness

Unlike traditional cinnamon rolls, these rolls feature cardamom as the dominant spice, which pairs wonderfully with the zest of fresh lemon and the natural sweetness of berries. This combination adds an element of freshness and complexity that makes them stand out.

3. Bursting with Juicy Berries

Most sweet rolls rely on a butter-sugar-cinnamon filling, but these rolls take it a step further with fresh or frozen mixed berries. As the rolls bake, the berries release their juices, creating a jammy, slightly tangy filling that contrasts beautifully with the warm spices.

4. A Creamy, Sticky Glaze

Instead of a simple sugar glaze, these rolls are topped with a cream cheese frosting that adds extra richness and a slight tang. If you love sticky, gooey pastries, this glaze is the perfect finishing touch.

Ingredients

For the Dough: “The Fluffy Foundation”

  • Butter
  • Milk
  • Active dry yeast
  • White sugar
  • Vanilla extract
  • Salt
  • All-purpose flour
  • Lemon zest

For the Filling: “A Burst of Flavor”

  • Mixed berries (raspberries and blueberries)
  • White sugar
  • Brown sugar
  • Ground cardamom
  • Ground cinnamon
  • Butter

For the Sticky Glaze: “The Sweet Finishing Touch”

  • Cream cheese
  • Powdered sugar
  • Milk

Directions

Step 1: Prepare the Dough

  1. Heat the milk and butter until melted, then let it cool slightly.
  2. Add sugar and yeast, stirring until foamy.
  3. Mix in flour, salt, vanilla extract, and lemon zest until a sticky dough forms.
  4. Knead until smooth and let rise until doubled in size.

Step 2: Assemble the Rolls

  1. Roll out the dough into a rectangle.
  2. Sprinkle with brown sugar, white sugar, cinnamon, and cardamom.
  3. Distribute berries evenly over the surface.
  4. Roll up the dough and slice into 12 equal pieces.
  5. Arrange in a baking dish and let rise again.

Step 3: Bake to Perfection

  1. Preheat the oven to 350°F (180°C).
  2. Bake for 35–40 minutes, until golden brown.

Step 4: Prepare the Sticky Glaze

  1. Mix cream cheese, powdered sugar, and milk until smooth.
  2. Spread over warm rolls before serving.

Nutritional Information (Per Roll Approximate)

  • Calories: 333 kcal
  • Carbohydrates: 50g
  • Protein: 6g
  • Fat: 12g
  • Sugar: 25g

Expert Tips for Perfect Cardamom Rolls

1. Use Freshly Ground Cardamom for Maximum Flavor

If you’re using whole cardamom pods, toast them lightly, then grind them using a mortar and pestle for the most potent and fragrant spice. Pre-ground cardamom works too, but freshly ground will always have a stronger aroma.

2. Let the Dough Rise Slowly for the Best Texture

A good sweet roll should be light, fluffy, and airy. Allowing the dough to rise at room temperature until doubled in size gives it the best texture. If you have extra time, an overnight rise in the refrigerator will develop even more flavor.

3. Don’t Overwork the Dough

Once the dough comes together, knead it just enough to make it smooth and elastic. Over-kneading can make the rolls tough instead of soft and tender.

4. Keep the Berries Evenly Distributed

If using frozen berries, toss them lightly in a bit of flour before adding them to the dough. This prevents them from releasing too much moisture and sinking to the bottom.

5. Bake Until Just Golden Brown

Overbaking can dry out the rolls. Check for a light golden color and a slightly firm top—this ensures the inside remains soft and tender.

Serving Suggestions: How to Enjoy These Rolls

These Soft Cardamom Rolls with Berries are delicious on their own, but there are plenty of ways to elevate them even further.

1. Serve Warm with Extra Glaze

For the ultimate indulgence, reheat the rolls slightly and drizzle them with additional cream cheese glaze before serving.

2. Pair with Coffee or Tea

The warm cardamom spice pairs perfectly with a cup of strong coffee, chai tea, or a London Fog latte.

3. Add a Scoop of Ice Cream

For a dessert-style treat, serve these rolls with a scoop of vanilla or berry-flavored ice cream.

4. Top with Chopped Nuts

For extra texture, sprinkle the finished rolls with toasted almonds, walnuts, or pecans.

Recipe Variations to Try

1. Orange Cardamom Rolls

Swap the lemon zest for orange zest to give the rolls a brighter citrus flavor.

2. Chocolate and Berry Rolls

Add chopped dark chocolate or chocolate chips to the filling for a more decadent twist.

3. Nutty Cardamom Rolls

Sprinkle crushed pistachios or almonds over the berries for added crunch and nuttiness.

4. Honey-Lavender Glaze

Replace the cream cheese glaze with a light honey and lavender drizzle for a floral, fragrant alternative.

How to Store and Reheat Leftovers

Storing

  • Store leftover rolls in an airtight container at room temperature for up to 2 days.
  • For longer storage, keep them in the refrigerator for up to 5 days.

Reheating

  • Warm in the microwave for 15-20 seconds for a quick fix.
  • For a freshly baked texture, reheat in the oven at 300°F for about 5-7 minutes.

Freezing

  • Freeze unglazed rolls in a sealed container for up to 2 months.
  • Reheat in the oven and add fresh glaze before serving.

Frequently Asked Questions (FAQs)

1. Can I Make These Rolls Ahead of Time?

Yes! Prepare the dough and assemble the rolls, then refrigerate overnight. The next morning, allow them to come to room temperature for 30 minutes before baking.

2. Can I Use Fresh Berries Instead of Frozen?

Absolutely! Fresh berries work just as well, but be sure to pat them dry before using to prevent excess moisture.

3. Can I Make These Without Cardamom?

If you’re not a fan of cardamom, you can substitute it with extra cinnamon or nutmeg for a slightly different flavor.

4. What Other Glazes Can I Use?

Instead of cream cheese glaze, try a vanilla glaze, honey drizzle, or even a maple syrup topping.

5. Do These Rolls Work with Whole Wheat Flour?

Yes, but they may turn out slightly denser. If using whole wheat flour, mix half all-purpose flour and half whole wheat flour for the best texture.

Conclusion: A Must-Try Treat for Any Occasion

These Soft Cardamom Rolls with Berries offer the perfect balance of warm spice, fresh fruit, and a buttery, tender texture. Whether you’re making them for a weekend brunch, a special gathering, or just to enjoy with your morning coffee, they’re guaranteed to impress.

With their fragrant aroma, juicy berry filling, and rich glaze, these rolls are as beautiful as they are delicious. Try them once, and they might just become your new favorite baking project!

Goat Cheese and Chive Biscuits: A Savory Delight with a Sweet and Spicy Finish

Biscuits are a staple of comfort food, offering flaky layers, buttery richness, and a satisfying bite. But when you introduce tangy goat cheese, fragrant chives, and a drizzle of hot honey butter, the humble biscuit is transformed into an elevated culinary experience.

These Goat Cheese and Chive Biscuits are perfect for any occasion—whether you’re serving them at brunch with eggs, as a side for a hearty dinner, or simply enjoying one warm with a cup of tea. The sharp, creamy goat cheese adds depth of flavor, while chives bring a fresh, onion-like brightness. The final touch? A hot honey glaze that infuses each bite with a delicate balance of sweetness and heat.

In this article, we’ll explore the inspiration behind these biscuits, what makes them special, expert baking tips, variations to try, serving suggestions, and answers to common questions.

The Inspiration Behind These Biscuits

Classic buttermilk biscuits are known for their buttery, soft interiors and crisp, golden exteriors. While they’re delicious on their own, adding ingredients like goat cheese and chives takes them to another level. The idea of blending savory and slightly sweet elements isn’t new—chefs and bakers have long experimented with combinations that balance salt, fat, acid, and heat.

  • Goat cheese provides a creamy texture and tanginess that pairs beautifully with the richness of the biscuit dough.
  • Chives introduce a mild, herbaceous bite that enhances the savory flavor without overpowering the cheese.
  • Hot honey butter creates a contrast—the slight heat complements the richness of the biscuit while the honey brings a touch of sweetness that rounds out the flavors.

The result? A perfectly balanced biscuit that feels both classic and gourmet at the same time.

What Makes These Biscuits Special?

1. Perfectly Balanced Flavors

These biscuits offer a harmonious blend of savory, buttery, and slightly sweet elements. Each bite delivers:

  • The creamy tang of goat cheese
  • The subtle onion-like sharpness of fresh chives
  • The crunch of a golden exterior
  • The rich warmth of hot honey butter glaze

2. Flaky Yet Soft Texture

A good biscuit should be tender inside, crisp outside, and full of delicate layers. These biscuits achieve the perfect texture thanks to a simple yet precise technique that ensures maximum flakiness without being dry.

3. A Gourmet Upgrade to the Classic Biscuit

While traditional buttermilk biscuits are always welcome at the table, this version feels more refined—perfect for entertaining, brunches, or holiday spreads.

4. No Special Equipment Needed

Unlike other baked goods, biscuits require no fancy mixers, dough hooks, or complicated steps—just a bowl, a whisk, and a baking sheet.

5. Gluten-Free Option

This recipe was originally developed using gluten-free flour (Cup4Cup brand), but it works just as well with all-purpose flour, making it adaptable to different dietary needs.

Expert Tips for the Perfect Biscuits

Achieving flaky, tender biscuits depends on a few key techniques. Here’s how to ensure yours come out light, golden, and packed with flavor every time:

1. Keep Your Ingredients Cold

The secret to a flaky biscuit lies in keeping the butter and buttermilk as cold as possible. This ensures that the butter creates steam pockets during baking, leading to a light and airy texture.

2. Don’t Overmix the Dough

Overmixing develops too much gluten, resulting in tough biscuits. Instead, mix just until the dough comes together. It should still be slightly shaggy and sticky before shaping.

3. Use High-Quality Goat Cheese

Since goat cheese is a key ingredient, using a high-quality, creamy variety will yield the best flavor and texture. Avoid pre-crumbled goat cheese, which tends to be drier and less flavorful.

4. Shape the Dough with a Measuring Cup

To create uniform biscuits, lightly grease a 1/3 or 1/4 measuring cup and use it to scoop and shape the dough before placing it on the baking sheet.

5. Bake at High Heat for Maximum Rise

A hot oven (450°F) is crucial for getting that quick, dramatic rise, giving you a fluffy interior and golden, crispy exterior.

6. Brush with Hot Honey Butter Immediately

As soon as the biscuits come out of the oven, brushing them with hot honey butter allows them to absorb sweetness and spice while still warm, enhancing the final flavor.

Creative Variations to Try

Want to experiment with flavors? Here are some fun variations to switch things up:

1. Herb and Cheese Medley

  • Swap chives for rosemary, thyme, or parsley.
  • Use a blend of cheddar and goat cheese for a different depth of flavor.

2. Spicy Jalapeño Twist

  • Add finely diced jalapeños to the dough for a spicy kick.
  • Use spicy honey instead of regular hot honey for extra heat.

3. Sweet and Savory Maple Bacon Biscuits

  • Mix in crisp, crumbled bacon for a smoky-salty contrast.
  • Replace hot honey with maple syrup butter for a sweeter finish.

4. Lemon Zest and Honey Biscuits

  • Add lemon zest for a bright, citrusy contrast.
  • Increase the honey in the glaze for a slightly sweeter profile.

Serving Suggestions: How to Enjoy These Biscuits

These biscuits are incredibly versatile! Here are a few ways to serve them:

1. As a Breakfast Treat

  • Pair with scrambled eggs and crispy bacon for a delicious morning meal.
  • Split them open and add butter and extra hot honey for a simple yet flavorful breakfast.

2. As a Side for Dinner

  • Serve with soups or stews—they’re perfect for dipping!
  • Enjoy alongside grilled chicken, steak, or roasted vegetables.

3. For Brunch Entertaining

  • Use them as mini sandwich buns for smoked salmon, avocado, or prosciutto.
  • Serve with a charcuterie board featuring cheeses, meats, and fruit preserves.

4. As a Snack or Appetizer

  • Serve warm with a creamy spread like whipped goat cheese or herbed butter.
  • Pair with a glass of white wine or sparkling cider for an elegant snack.

Frequently Asked Questions (FAQs)

1. Can I Make These Biscuits in Advance?

Yes! You can prepare the dough ahead of time and refrigerate it for up to 24 hours before baking. You can also bake the biscuits, let them cool, and reheat them in the oven before serving.

2. How Do I Store Leftovers?

Store biscuits in an airtight container at room temperature for up to 2 days, or refrigerate for up to 4 days. Reheat in the oven at 350°F for 5 minutes before serving.

3. Can I Freeze These Biscuits?

Yes! Once baked, let them cool completely, then freeze in an airtight bag for up to 2 months. To reheat, bake at 350°F for 10 minutes.

4. What’s the Best Substitute for Buttermilk?

If you don’t have buttermilk, mix 1 cup of whole milk with 1 tablespoon of lemon juice or vinegar and let it sit for 5 minutes.

5. Can I Make These Without Goat Cheese?

Yes! Swap it for cream cheese, feta, or a mix of cheddar and parmesan.

Conclusion: A Must-Try Biscuit Recipe

These Goat Cheese and Chive Biscuits are flaky, flavorful, and unforgettable. With their savory cheese, fresh herbs, and warm honey glaze, they’re perfect for breakfast, dinner, brunch, or snacking. Whether you’re a seasoned baker or new to biscuit-making, this recipe is simple yet elegant—an instant favorite.

Give them a try, and they might just become your new go-to biscuit recipe!

Bacon and White Cabbage Gratin: A Comforting, Creamy Classic

Few dishes bring the same level of comfort and satisfaction as a well-made gratin. The combination of melted cheese, crispy bacon, and creamy sauce baked into tender layers of cabbage creates a dish that is both rustic and indulgent. This Bacon and White Cabbage Gratin takes a humble ingredient—cabbage—and transforms it into something truly special.

With its crispy, caramelized edges, smoky bacon, and luxurious Gruyere-infused sauce, this gratin is the perfect side dish for any meal, whether you’re hosting a dinner party or simply looking for a way to elevate your weeknight dinner. It’s hearty, satisfying, and incredibly easy to prepare.

In this guide, we’ll explore the origins of gratin dishes, what makes this version unique, the best tips for making it perfectly, variations you can try, storage recommendations, and frequently asked questions to help you master this dish.

The Origins of Gratin: A Timeless Culinary Tradition

The word “gratin” comes from the French term gratter, meaning “to scrape”, referring to the crispy, golden crust that forms on top of a baked dish. Gratin dishes date back centuries in French cuisine, traditionally involving layers of vegetables or potatoes, cream, cheese, and sometimes breadcrumbs, all baked until golden and bubbly.

While potato gratin (Gratin Dauphinois) is the most well-known variation, cabbage gratins have gained popularity for their balance of sweet, nutty, and slightly earthy flavors. This recipe takes the classic concept and enhances it with smoky bacon, adding richness and a depth of flavor that makes it a standout dish.

What Makes This Bacon and White Cabbage Gratin Special?

1. A Rich, Creamy Sauce with Just the Right Texture

One of the defining characteristics of a great gratin is its silky, luxurious sauce. This dish achieves the perfect balance—not too thick, not too runny—allowing the cabbage to absorb just the right amount of cream while maintaining its structure.

2. The Perfect Blend of Flavors

This gratin has multiple layers of flavor that make it unique:

  • Smoky, crispy bacon adds a salty contrast.
  • Nutty, slightly sweet Gruyere cheese melts beautifully, creating a rich, flavorful sauce.
  • White cabbage develops a caramelized, slightly crispy edge when seared before baking, giving the dish more depth.
  • Fresh thyme adds an aromatic, slightly lemony freshness to balance the richness.

3. A Simple Yet Elegant Dish

Despite its gourmet appearance and complex flavors, this gratin is surprisingly easy to prepare. It requires just a handful of ingredients and minimal prep work, yet the final result is a dish that looks and tastes like something straight out of a fine dining restaurant.

4. Versatile Enough for Any Occasion

This dish works beautifully as:

  • A holiday side dish, perfect for Thanksgiving, Christmas, or Easter.
  • A weeknight comfort food that pairs well with roasted meats or poultry.
  • A standalone vegetarian dish (simply omit the bacon).
  • A make-ahead meal that can be prepped in advance for convenience.

Ingredients

For the Gratin Base: “The Heart of the Dish”

  • Maplewood smoked bacon, chopped
  • White cabbage, cut into wedges
  • Heavy cream
  • Gruyere cheese, grated
  • Fresh thyme
  • Salt and pepper to taste

Directions

Step 1: Crisp the Bacon

  1. Preheat oven to 400°F (200°C).
  2. In a cast iron skillet, cook the chopped bacon over medium heat until the fat is rendered.
  3. Remove the bacon, leaving the drippings in the pan.

Step 2: Char the Cabbage

  1. Place cabbage wedges into the skillet and sear until golden brown and slightly charred, about 5 minutes per side.

Step 3: Assemble the Gratin

  1. Pour heavy cream evenly over the cabbage.
  2. Sprinkle the crispy bacon over the top.
  3. Season with salt, pepper, and fresh thyme.
  4. Top with Gruyere cheese, ensuring an even layer.

Step 4: Bake to Perfection

  1. Transfer the skillet to the oven and bake for 20 minutes until the cabbage is fork-tender and the cream is thick and bubbly.

Step 5: Serve and Enjoy

  1. Let cool slightly before serving for maximum flavor absorption.

Nutritional Information (Per Serving Approximate)

  • Calories: 320 kcal
  • Carbohydrates: 12g
  • Protein: 14g
  • Fat: 26g
  • Fiber: 3g

Secrets to the Best Bacon and White Cabbage Gratin

1. Don’t Skip the Searing Step

Before baking, searing the cabbage in bacon drippings enhances its flavor, creating a slightly charred, caramelized surface that makes a huge difference in the final taste.

2. Use High-Quality Cheese

Gruyere is the traditional choice for gratins, offering a perfect balance of nutty, salty, and creamy flavors. If you want a different twist, try Fontina, Jarlsberg, or sharp white cheddar.

3. Choose the Right Type of Bacon

Opt for thick-cut, high-quality smoked bacon to add the best smoky depth and crispy texture. Maplewood-smoked bacon works particularly well in this recipe.

4. Season Thoughtfully

Since bacon and Gruyere already bring salty elements to the dish, be mindful of how much additional salt you add. Taste as you go!

5. Let It Rest Before Serving

Allowing the gratin to cool for 5–10 minutes after baking helps the sauce thicken slightly and allows the flavors to fully develop.

Serving Suggestions: What to Pair with This Dish

Bacon and White Cabbage Gratin is incredibly versatile and pairs well with a variety of dishes. Here are a few ideas:

As a Side Dish for Meats

  • Roast Chicken – The creamy richness of the gratin complements crispy, roasted chicken perfectly.
  • Pork Tenderloin – A juicy, herb-crusted pork tenderloin balances the flavors beautifully.
  • Beef Roast – Serve alongside a garlic herb-crusted roast beef for an indulgent meal.

As a Vegetarian Entrée

Omit the bacon and serve with:

  • A fresh green salad with lemon vinaigrette to add some brightness.
  • Crusty bread to scoop up every last bit of the creamy sauce.

For a Holiday Spread

Pair with classic holiday sides like mashed potatoes, roasted Brussels sprouts, and cranberry sauce for a festive, comforting meal.

How to Store and Reheat Leftovers

Storing Leftovers

  • Refrigerator: Store in an airtight container for up to 3 days.
  • Freezing: While dairy-heavy dishes don’t always freeze well, this gratin can be frozen for up to 2 months. Let it thaw in the fridge overnight before reheating.

Reheating Instructions

  • Oven (Best Method): Reheat at 350°F (175°C) for 15–20 minutes until warm and bubbly.
  • Microwave: Heat in 30-second intervals, stirring between each round to prevent separation.

Frequently Asked Questions (FAQs)

1. Can I Make This Dish Ahead of Time?

Yes! You can assemble the gratin up to 24 hours in advance, cover it, and refrigerate. When ready to bake, bring it to room temperature for 30 minutes before baking as directed.

2. Can I Use a Different Cheese?

Absolutely! While Gruyere is a classic choice, you can substitute it with:

  • Fontina – Smooth and mild
  • Parmesan + Mozzarella – A mix for extra creaminess
  • Sharp Cheddar – For a bolder flavor

3. What If I Don’t Have a Cast Iron Skillet?

You can use a regular oven-safe skillet or transfer the seared cabbage to a baking dish before adding the cream and cheese.

4. Can I Make This Dish Without Bacon?

Yes! Simply omit the bacon for a vegetarian version. You can add mushrooms or caramelized onions for extra depth of flavor.

5. How Do I Prevent the Gratin from Becoming Too Runny?

Make sure to:

  • Use heavy cream instead of milk for a thicker sauce.
  • Let the dish cool slightly before serving so the sauce can set.

Conclusion: A Must-Try Comfort Food Classic

Bacon and White Cabbage Gratin is the perfect example of how simple ingredients can create an incredibly flavorful and satisfying dish. Its smoky bacon, nutty Gruyere, and creamy texture make it a standout side dish or even a main course. Whether you’re serving it for a holiday feast, a family dinner, or a cozy night in, this gratin is guaranteed to impress.

With its easy preparation, rich flavor, and irresistible cheesy goodness, it’s a dish you’ll find yourself making again and again. Try it once, and it just might become your new go-to comfort food!

Blackberry Tiramisu: A Fresh and Fruity Twist on an Italian Classic

Tiramisu is one of the most beloved Italian desserts, known for its delicate layers of coffee-soaked ladyfingers, rich mascarpone cream, and a dusting of cocoa powder. But what if we replaced the coffee with something fruitier, something that embodies the freshness of summer? That’s where Blackberry Tiramisu comes in—a no-bake, light, and refreshing variation of the classic dessert, bursting with sweet blackberry flavor.

With its juicy berry syrup-infused ladyfingers and luscious blackberry mascarpone filling, this dessert is creamy, slightly tangy, and perfectly balanced. Whether you’re making it for a summer gathering, a special occasion, or simply to satisfy a craving, this berry-infused tiramisu is guaranteed to impress.

In this guide, we’ll dive deep into the inspiration behind this dessert, what makes it unique, expert tips for perfecting it, storage and serving suggestions, variations to try, and answers to frequently asked questions.

A Fresh Take on a Timeless Dessert

Tiramisu, which translates to “pick me up” in Italian, originated in the Veneto region of Italy. Traditionally, it features layers of ladyfingers soaked in espresso, layered with mascarpone cream, and topped with cocoa powder. Its combination of bold coffee flavors and creamy richness makes it a go-to dessert for coffee lovers.

However, fruit-based tiramisus have become increasingly popular, offering a lighter and more refreshing twist on the classic. The Blackberry Tiramisu swaps out the espresso for a homemade blackberry syrup, which soaks into the ladyfingers, giving them a vibrant color and fruity taste. Instead of cocoa powder, the dessert is topped with a beautifully piped layer of mascarpone cream, enhancing its elegant presentation.

Why You’ll Love This Recipe

1. No Oven Required

One of the best things about tiramisu is that it’s a no-bake dessert, making it perfect for hot summer days when you don’t want to turn on the oven.

2. A Balance of Sweet and Tart

Blackberries naturally have a slightly tart flavor, which balances beautifully with the sweet mascarpone cream and sugar-soaked ladyfingers. The result is a dessert that’s rich but not overly sweet.

3. Elegant Yet Easy to Make

Despite looking fancy and sophisticated, Blackberry Tiramisu is incredibly simple to prepare. The hardest part is waiting for it to chill in the fridge!

4. Make-Ahead Friendly

Since tiramisu needs to be refrigerated for several hours before serving, it’s a perfect make-ahead dessert for dinner parties, holidays, or special celebrations.

5. Customizable to Your Taste

Want to switch up the berries? Prefer a different type of sweetener? Need a dairy-free option? There are plenty of ways to customize this dessert to fit your preferences.

Ingredients

For the Blackberry Syrup: “The Bold Berry Elixir”

  • Blackberries (fresh or frozen)
  • Water
  • Granulated sugar
  • Lemon juice

For the Mascarpone Filling: “The Creamy Cloud”

  • Heavy cream
  • Mascarpone cheese
  • Granulated sugar
  • Blackberry syrup (from above)
  • Vanilla extract

For Assembly: “The Layered Perfection”

  • Savoiardi ladyfingers
  • Blackberry syrup (for dipping)

Directions

Step 1: Make the Blackberry Syrup

  1. Simmer blackberries and water in a saucepan, mashing the berries as they cook.
  2. Strain the mixture to remove seeds, then return the juice to the pan.
  3. Stir in sugar and lemon juice, then simmer until slightly reduced.
  4. Chill until completely cool.

Step 2: Prepare the Mascarpone Filling

  1. Whip heavy cream until stiff peaks form, then set aside.
  2. Beat mascarpone, sugar, blackberry syrup, and vanilla until smooth.
  3. Gently fold in the whipped cream to create a light, airy texture.

Step 3: Assemble the Tiramisu

  1. Dip ladyfingers into the blackberry syrup, ensuring they are soaked but not soggy.
  2. Arrange in a single layer in an 8-inch square dish.
  3. Spread half of the mascarpone filling over the ladyfingers.
  4. Repeat with another layer of soaked ladyfingers, followed by the remaining filling.
  5. Optionally, pipe the remaining filling on top for an elegant finish.

Step 4: Chill and Serve

  1. Cover and refrigerate for at least 6 hours (preferably overnight).
  2. Slice and serve chilled for the best flavor and texture.

Nutritional Information (Per Serving Approximate)

  • Calories: 350 kcal
  • Carbohydrates: 42g
  • Protein: 6g
  • Fat: 18g
  • Sugar: 30g

Expert Tips for the Perfect Blackberry Tiramisu

1. Use Fresh or Frozen Blackberries

This recipe works well with both fresh and frozen blackberries, so you can make it year-round. If using frozen berries, allow them to thaw slightly before making the syrup.

2. Let the Syrup Cool Completely

When making the blackberry syrup, be sure to let it cool completely before dipping the ladyfingers. Using warm syrup can make the mascarpone mixture runny and affect the final texture.

3. Don’t Oversoak the Ladyfingers

Savoiardi (ladyfingers) are very delicate and absorb liquid quickly. Dip them briefly in the syrup—just enough to coat them without making them soggy. If oversoaked, they can fall apart and make the tiramisu too mushy.

4. Chill for at Least 6 Hours (Preferably Overnight)

Tiramisu needs time to set. Refrigerating it for at least 6 hours (or overnight) allows the flavors to meld together and gives the dessert its signature creamy texture.

5. Use High-Quality Mascarpone

Mascarpone cheese is one of the key ingredients in tiramisu. Choose a high-quality mascarpone for the best texture and taste. Avoid substitutes like cream cheese, which can alter the flavor.

6. Pipe the Mascarpone for a Professional Look

For a restaurant-quality finish, transfer the remaining mascarpone filling into a piping bag and pipe it onto the top layer in neat rows. This gives the tiramisu an elegant look that’s perfect for special occasions.

7. Add a Garnish for Extra Flair

Before serving, garnish with fresh blackberries, a drizzle of blackberry syrup, or a dusting of powdered sugar for an extra-special presentation.

How to Store and Serve Blackberry Tiramisu

Storing Leftovers

  • Refrigerator: Store the tiramisu in an airtight container in the fridge for up to 3 days.
  • Freezing: While traditional tiramisu freezes well, fruit-based tiramisus may become watery upon thawing. If you do freeze it, let it thaw in the fridge before serving.

Best Ways to Serve It

  • Chilled and Fresh: Serve straight from the fridge for the best texture.
  • With a Cup of Tea or Sparkling Wine: The tart blackberry flavors pair well with light teas, white wine, or champagne.
  • As a Make-Ahead Dessert for Special Occasions: Perfect for dinner parties, birthdays, anniversaries, and holidays.

Variations to Try

1. Mixed Berry Tiramisu

Use a combination of raspberries, blueberries, and strawberries instead of just blackberries for a more complex berry flavor.

2. Lemon Blackberry Tiramisu

Add a splash of lemon zest and lemon juice to the mascarpone mixture for a citrusy contrast.

3. Chocolate Blackberry Tiramisu

Incorporate layers of shaved dark chocolate between the mascarpone and ladyfingers for a chocolatey twist.

4. Almond Blackberry Tiramisu

Add a splash of amaretto to the blackberry syrup for a nutty depth of flavor.

5. Dairy-Free Version

Substitute the mascarpone with coconut cream or a dairy-free cream cheese alternative.

FAQs: Everything You Need to Know

1. Can I Make Blackberry Tiramisu Without Ladyfingers?

Yes! You can substitute pound cake, sponge cake, or even graham crackers if ladyfingers aren’t available.

2. Can I Make This Dessert Less Sweet?

If you prefer a less sweet version, reduce the sugar in the blackberry syrup and mascarpone filling slightly. The natural tartness of the blackberries will still shine through.

3. Is There an Alcoholic Version?

Yes! Traditional tiramisu often includes Marsala wine or rum. You can add a splash of Chambord (black raspberry liqueur), limoncello, or blackberry brandy to the syrup for a boozy twist.

4. How Long Does Tiramisu Need to Chill?

For the best texture, chill for at least 6 hours. Overnight is even better to allow the flavors to fully develop.

5. Can I Use Other Berries Instead of Blackberries?

Absolutely! Raspberries, strawberries, or blueberries can be used to create different variations.

Conclusion: A Must-Try Summer Dessert

Blackberry Tiramisu is a fresh, fruity, and elegant take on the classic Italian dessert. With its vibrant layers of blackberry-soaked ladyfingers and creamy mascarpone filling, this no-bake, make-ahead treat is perfect for warm-weather gatherings, holiday dinners, or special celebrations.

Whether you’re an experienced baker or a beginner looking for an easy yet impressive dessert, this recipe is guaranteed to “wow” your guests and satisfy your sweet cravings. Give it a try, and it might just become your new favorite dessert!

Salted Sage Honey Butter Brioche Rolls: A Buttery, Fluffy Indulgence

Few things are more inviting than the aroma of freshly baked bread filling the kitchen. These Salted Sage Honey Butter Brioche Rolls are the perfect blend of soft, pillowy texture and rich, savory-sweet flavor. With swirls of fragrant sage honey butter running through each roll, a delicate golden crust, and a final sprinkle of flaky sea salt, these rolls are a must-have for special occasions, holiday gatherings, or simply as an everyday treat.

If you love the idea of brioche but want something with a unique twist, these rolls offer an elevated experience. Whether you are serving them alongside a hearty Thanksgiving meal, dipping them in warm soup, or enjoying them with a pat of extra butter for breakfast, they are the kind of baked good that brings comfort and joy with every bite.

In this guide, we’ll explore the history of brioche, what makes these sage honey butter rolls so special, baking tips, variations, and frequently asked questions to ensure your rolls turn out perfect every time.

The History of Brioche: A Rich and Buttery Legacy

Brioche is a classic French bread known for its rich, eggy, and buttery texture. Unlike traditional bread, brioche contains a higher fat content, which gives it a soft crumb and tender bite. While it dates back to at least the 15th century, its true rise in popularity came during the 17th and 18th centuries in France. The word “brioche” itself is thought to come from the Old French word “brier,” meaning to knead or mix.

Although originally served as a luxury bread for the elite, brioche has since become a beloved staple across the world. It is often found in pastries, burger buns, dinner rolls, and even desserts. The addition of honey butter and sage in this particular recipe takes the traditional brioche a step further, enhancing its already luxurious flavor.

What Makes These Brioche Rolls Unique?

1. The Buttery, Pillow-Like Texture

Brioche is known for its light yet rich consistency, and these rolls are no exception. Thanks to the high butter and egg content, they turn out fluffy and tender on the inside while developing a beautiful golden crust on the outside.

2. A Perfect Balance of Sweet and Savory

Unlike typical dinner rolls, which are either plain or slightly sweet, these Salted Sage Honey Butter Brioche Rolls strike a perfect balance. The natural sweetness of honey is complemented by buttery, flaky sea salt and earthy sage, creating a multi-dimensional flavor that enhances both sweet and savory dishes.

3. Sage-Infused Honey Butter Swirl

One of the standout features of these rolls is the honey butter swirl infused with crispy sage. Sage is an herb often associated with fall and winter dishes, bringing a warm, slightly peppery, and almost pine-like flavor. When combined with butter and honey, it creates an aromatic filling that infuses every bite with richness.

4. Quick Rise with Instant Yeast

Unlike traditional brioche, which often requires multiple proofing stages and a long fermentation process, this recipe uses instant yeast, which allows the dough to rise quickly and be ready to bake in under two hours.

5. The Finishing Touch: Flaky Sea Salt

After baking, a light sprinkle of flaky sea salt enhances the flavors by adding a touch of crunch and an extra burst of contrast against the sweet honey butter.

Ingredients

For the Brioche Dough: “The Pillowy Base”

  • All-purpose flour
  • Instant yeast
  • Salt
  • Honey
  • Warm milk
  • 3 whole eggs + 1 egg yolk (for egg wash)
  • Salted butter

For the Honey Butter: “The Sweet & Savory Swirl”

  • Fresh sage leaves
  • Butter
  • Honey
  • Flaky sea salt

Directions

Step 1: Create the Brioche Dough

  1. In the bowl of a stand mixer, combine flour, yeast, and salt.
  2. Add warm milk, honey, eggs, and butter to the dry ingredients.
  3. Using the dough hook, mix until the flour is fully incorporated (about 4-5 minutes).
  4. If the dough is too sticky, add a little more flour (¼ cup at a time).
  5. Cover with plastic wrap and let it rest at room temperature for 15 minutes to 1 hour.

Step 2: Make the Sage Honey Butter

  1. In a skillet over medium heat, fry the sage leaves in a tablespoon of butter until crispy.
  2. Remove, chop finely, and mix with softened butter, honey, and a pinch of sea salt.

Step 3: Roll and Shape the Dough

  1. Divide the dough into two equal halves.
  2. Roll each half into a 12-inch square (¼-inch thick) on a lightly floured surface.
  3. Brush with the sage honey butter, saving some for later.
  4. Slice each square into 6 strips, then roll each strip into a tight coil.
  5. Arrange seam-side down in a greased 9×9-inch baking dish.

Step 4: Rest and Brush with Egg Wash

  1. Whisk together 1 egg yolk + a splash of water for an egg wash.
  2. Brush the tops of the rolls.
  3. Cover and let rise for another 30 minutes until puffy.

Step 5: Bake to Golden Perfection

  1. Preheat the oven to 350°F (175°C).
  2. Bake for 22-25 minutes until golden brown.
  3. Remove from the oven and brush with the remaining honey butter.
  4. Sprinkle with flaky sea salt and serve warm.

Nutritional Information (Per Roll Approximate)

  • Calories: 292 kcal
  • Carbohydrates: 35g
  • Protein: 6g
  • Fat: 14g
  • Sugar: 10g

Serving Ideas: How to Enjoy These Rolls

While these brioche rolls are delicious on their own, there are plenty of ways to serve them for an unforgettable meal:

1. Perfect for Holiday Feasts

These rolls are ideal for Thanksgiving, Christmas, or Easter dinners. Serve them warm with roast turkey, gravy, stuffing, or mashed potatoes, and watch them disappear from the table.

2. Paired with Soups and Stews

The buttery, slightly sweet taste pairs beautifully with savory soups and stews. Dip them into butternut squash soup, creamy tomato bisque, or a hearty beef stew for an indulgent experience.

3. Breakfast or Brunch Delight

For a morning treat, slice a roll in half, toast it lightly, and spread extra honey butter on top. You can also serve them alongside scrambled eggs, bacon, or smoked salmon for a luxurious brunch.

4. The Ultimate Sandwich Bread

These rolls can be used as a base for sliders or sandwiches. Try stuffing them with ham and brie, roasted vegetables, or even pulled pork for a gourmet twist.

Baking Tips for Perfect Brioche Rolls

1. Use Room Temperature Ingredients

Eggs, butter, and milk should be at room temperature to ensure even mixing and a smoother dough. Cold ingredients can slow down yeast activation and create a denser texture.

2. Knead Until the Dough is Smooth and Elastic

Brioche dough needs to be well-kneaded to develop gluten, which gives it structure while maintaining a soft texture. If using a stand mixer, knead with a dough hook for 5-7 minutes; if kneading by hand, work the dough for at least 10 minutes.

3. Don’t Overflour the Dough

Brioche dough is naturally soft and slightly sticky. Avoid adding too much flour, as this can result in dense, dry rolls instead of light and airy ones.

4. Let the Dough Rest Properly

Even though instant yeast speeds up the process, allowing the dough to rest properly before shaping helps develop the flavors and texture.

5. Brush with Egg Wash for a Golden Crust

A mixture of egg yolk and water brushed on top before baking gives the rolls a shiny, golden-brown crust.

FAQs: Everything You Need to Know

1. Can I Make These Rolls Ahead of Time?

Yes! To make them ahead:

  • Refrigerate the dough: Prepare the dough, shape the rolls, then cover and refrigerate overnight. Let them sit at room temperature for 30 minutes before baking.
  • Freeze unbaked rolls: Shape the rolls and freeze them before baking. When ready to bake, let them thaw for a few hours before following the baking instructions.

2. Can I Use Active Dry Yeast Instead of Instant Yeast?

Yes. If using active dry yeast, you need to bloom it first by dissolving it in warm milk and honey for about 5-10 minutes until foamy. Then, proceed with the recipe as directed.

3. Can I Make This Recipe Dairy-Free?

Absolutely! Substitute the butter with a plant-based alternative, use oat milk or almond milk instead of regular milk, and replace the honey with maple syrup for a vegan-friendly version.

4. Why Are My Rolls Dense Instead of Fluffy?

Dense rolls can result from:

  • Not kneading the dough long enough (insufficient gluten development)
  • Adding too much flour (over-drying the dough)
  • Not allowing enough rising time (the yeast needs time to create air pockets)

5. How Do I Store Leftovers?

  • At room temperature: Store in an airtight container for 2-3 days.
  • In the refrigerator: Keep for up to 5 days, but warm before serving.
  • Freezing: Store for up to 3 months in a sealed bag. Thaw and reheat before serving.

Conclusion: A Must-Try Recipe for Any Occasion

Salted Sage Honey Butter Brioche Rolls are a show-stopping addition to any meal. Their rich, buttery flavor, airy texture, and aromatic honey-sage swirl make them stand out from regular dinner rolls. Whether you’re making them for a special holiday, serving them with soup, or simply enjoying them with a cup of tea, they’re a treat worth baking.

Try them once, and they’ll become a new favorite in your kitchen. Happy baking!

Chai-Spiced Cinnamon Rolls: The Ultimate Cozy Indulgence

Nothing brings comfort quite like a warm, gooey cinnamon roll fresh out of the oven. But when you infuse this classic treat with the deep, aromatic flavors of chai spices, you take the experience to a whole new level. These Chai-Spiced Cinnamon Rolls combine the soft, pillowy texture of traditional cinnamon rolls with the rich, spiced essence of a cozy cup of chai. The result? A decadent pastry that is perfect for breakfast, brunch, or an indulgent dessert.

In this guide, we’ll explore everything you need to know about these rolls, from their origin and inspiration to baking tips, storage methods, and frequently asked questions. Whether you’re a seasoned baker or a beginner looking for a delicious weekend project, this recipe is sure to become a favorite.

The Inspiration Behind Chai-Spiced Cinnamon Rolls

Cinnamon rolls have long been a beloved baked good, originating from Northern Europe and evolving into a popular treat worldwide. Traditional cinnamon rolls are made with a rich dough, swirled with cinnamon sugar, and topped with a sweet glaze or frosting.

Chai, on the other hand, is a spiced tea blend that hails from India. The word “chai” means “tea” in Hindi, but in Western cultures, it is commonly associated with Masala Chai, a blend of black tea infused with warm spices like cinnamon, cardamom, ginger, cloves, nutmeg, and allspice. The combination of these flavors with the buttery richness of a cinnamon roll creates a unique fusion of cultures and flavors that is both comforting and exciting.

What Makes These Cinnamon Rolls Unique?

1. A Dough Infused with Warm Spices

Unlike traditional cinnamon rolls, which rely mainly on cinnamon for flavor, this recipe incorporates a full spectrum of chai spices directly into the dough. The combination of cinnamon, cardamom, nutmeg, ginger, allspice, and cloves adds layers of complexity and warmth to every bite.

2. Chai Caramel Sauce for Extra Indulgence

Instead of a standard sugar glaze, these rolls are baked in a homemade chai caramel sauce, which adds a luxurious depth of sweetness and spice. This sauce caramelizes as the rolls bake, creating a sticky, rich base that enhances their flavor and texture.

3. A Bold and Flavorful Filling

While classic cinnamon rolls focus on a simple brown sugar-cinnamon mixture, the filling in this recipe is anything but basic. It combines butter, brown sugar, and an extra dose of chai spices to create a fragrant, deeply spiced swirl in every roll.

4. Chai-Infused Cream Cheese Frosting

To complete the experience, these rolls are topped with a luscious chai-spiced cream cheese frosting. The creamy texture complements the warm spices and adds just the right amount of tanginess to balance the sweetness.

Ingredients

For the Dough: “The Fluffy Foundation”

  • 1 1/4 cups (300 ml) whole milk, warmed (110°F)
  • 2 1/4 tsp active dry yeast
  • 1 tsp granulated sugar (for blooming the yeast)
  • 4 3/4 cups (593 g) all-purpose flour, spooned and leveled
  • 1 1/2 tsp ground cinnamon
  • 3/4 tsp ground ginger
  • 1/4 tsp ground allspice
  • 1/4 tsp ground nutmeg
  • 1/2 tsp ground cardamom
  • 1/8 tsp ground cloves
  • 1 1/2 tsp salt
  • 2 tbsp (25 g) granulated sugar
  • 2 eggs, whisked
  • 1 tbsp vanilla extract
  • 1/2 cup (112 g) unsalted butter, softened

For the Chai Caramel Sauce: “Liquid Gold”

  • 1/3 cup (80 ml) heavy cream
  • 2 chai tea bags
  • 1/2 cup (112 g) unsalted butter, softened
  • 1 cup (220 g) light brown sugar, packed
  • 1 1/2 tsp ground cinnamon
  • 3/4 tsp ground ginger
  • 1/4 tsp ground allspice
  • 1/4 tsp ground nutmeg
  • 3/4 tsp ground cardamom
  • 1/8 tsp ground cloves
  • 1/3 cup (116 g) honey
  • 1 1/2 tsp vanilla extract
  • 1/4 tsp salt

For the Chai Filling: “The Spiced Swirl”

  • 1/2 cup (112 g) unsalted butter, softened
  • 1 cup (220 g) light brown sugar, packed
  • 1 tbsp ground cinnamon
  • 1 1/2 tsp ground ginger
  • 1/2 tsp ground allspice
  • 1/2 tsp ground nutmeg
  • 1 tsp ground cardamom
  • 1/4 tsp ground cloves
  • 1/4 tsp salt
  • 1/4 cup (60 ml) heavy cream (for pouring over rolls)

For the Chai Cream Cheese Frosting: “The Grand Finale”

  • 6 tbsp (84 g) unsalted butter, softened
  • 6 oz (170 g) cream cheese, softened
  • 3/4 cup (97 g) powdered sugar
  • 1 1/2 tsp vanilla extract
  • 1/2 tsp ground cinnamon
  • 1/4 tsp ground ginger
  • 1/8 tsp ground allspice
  • 1/8 tsp ground nutmeg
  • 1/4 tsp ground cardamom
  • Pinch of ground cloves

Directions

Step 1: Prepare the Dough

  1. Warm the milk to about 110°F and mix with the yeast and 1 tsp sugar. Let sit for 5-10 minutes until foamy.
  2. In a large bowl, whisk together the flour, cinnamon, ginger, allspice, nutmeg, cardamom, cloves, salt, and 2 tbsp sugar.
  3. Add the whisked eggs, vanilla extract, and softened butter to the yeast mixture.
  4. Gradually mix the wet ingredients into the dry ingredients until a dough forms.
  5. Knead the dough for about 8-10 minutes until smooth and elastic. Cover and let rise for 1-2 hours or until doubled in size.

Step 2: Make the Chai Caramel Sauce

  1. Heat the heavy cream and steep the chai tea bags for 10 minutes. Discard the tea bags.
  2. In a saucepan, melt the butter and stir in brown sugar, spices, honey, vanilla extract, and salt.
  3. Add the chai-infused cream and stir until smooth. Set aside.

Step 3: Prepare the Chai Filling

  1. Mix together the softened butter, brown sugar, and spices until well combined.

Step 4: Assemble the Rolls

  1. Roll the dough into a 12×18-inch rectangle.
  2. Spread the chai filling evenly over the dough.
  3. Roll up the dough tightly from the long side and slice into 12 rolls.
  4. Pour half of the chai caramel sauce into a greased baking dish, then place the rolls on top. Cover and let rise for another 30-45 minutes.

Step 5: Bake and Finish

  1. Preheat oven to 350°F (175°C).
  2. Pour the remaining heavy cream over the rolls.
  3. Bake for 25-30 minutes until golden brown.
  4. Drizzle the rest of the chai caramel sauce over the warm rolls.

Step 6: Make the Chai Cream Cheese Frosting

  1. Beat the softened butter and cream cheese until smooth.
  2. Add the powdered sugar, vanilla, and spices, and mix until fluffy.
  3. Spread the frosting over the warm rolls.

Nutritional Information (Per Roll Approximate)

  • Calories: 450-500
  • Carbohydrates: 65g
  • Protein: 6g
  • Fat: 20g
  • Sugar: 40g
  • Fiber: 2g

Baking Tips for Perfect Chai-Spiced Cinnamon Rolls

Achieving bakery-quality cinnamon rolls at home requires attention to detail. Here are some essential tips to help you get the best results:

1. Use Fresh Yeast for the Best Rise

Yeast is the key ingredient that gives cinnamon rolls their fluffy, airy texture. Make sure your yeast is fresh and active. If your yeast doesn’t foam when mixed with warm milk and sugar, it may be expired or inactive.

2. Knead Until Smooth and Elastic

Proper kneading develops the gluten in the dough, giving the rolls their soft yet structured texture. If kneading by hand, work the dough for at least 8-10 minutes. If using a stand mixer, knead with the dough hook for about 5-7 minutes until the dough is smooth and slightly tacky.

3. Allow Enough Time for the Dough to Rise

Patience is key when making cinnamon rolls. The dough needs at least an hour to rise properly, but letting it proof a bit longer (until doubled in size) will result in even fluffier rolls.

4. Roll the Dough Evenly

For uniform rolls, roll out your dough into an even rectangle before adding the filling. This ensures consistent baking and even layers of flavor in every bite.

5. Don’t Skip the Heavy Cream Trick

Pouring heavy cream over the rolls just before baking enhances their texture, making them extra soft and gooey. This step is especially useful when making overnight cinnamon rolls that have been chilled before baking.

6. Frost While Warm for a Melt-in-Your-Mouth Effect

For the best flavor and texture, spread the chai cream cheese frosting over the rolls while they’re still warm. This allows the frosting to melt slightly into the rolls, creating an irresistible glaze.

Storage and Reheating Instructions

Storing Leftovers

  • Room Temperature: If you plan to eat the rolls within a day, store them in an airtight container at room temperature.
  • Refrigeration: For longer storage (up to 4 days), keep them in the fridge in a covered container.
  • Freezing: To freeze, place individual rolls in an airtight container or wrap them tightly in plastic wrap. They will last for up to 3 months in the freezer.

Reheating Tips

  • Microwave: Warm individual rolls in the microwave for about 20-30 seconds to soften them up.
  • Oven: Preheat the oven to 325°F (165°C) and warm the rolls for 10-15 minutes for the best texture.
  • Air Fryer: Reheat at 300°F (150°C) for 3-5 minutes for a slightly crispy exterior.

FAQs: Everything You Need to Know

1. Can I Make These Rolls Ahead of Time?

Yes! You can prepare the rolls up to the point of slicing and arranging them in the baking dish. Cover and refrigerate overnight. When ready to bake, let them sit at room temperature for about 30 minutes before baking as directed.

2. What Type of Yeast Should I Use?

Active dry yeast is recommended for this recipe, but you can also use instant yeast. If using instant yeast, there is no need to bloom it in warm milk—just add it directly to the dry ingredients.

3. Can I Make These Rolls Without Eggs?

Yes, you can substitute the eggs with flax eggs (1 tbsp flaxseed meal + 2.5 tbsp water per egg) or use an egg replacer. Keep in mind that the texture may be slightly denser.

4. Can I Skip the Chai Spices and Just Make Classic Cinnamon Rolls?

Absolutely! If you prefer a more traditional cinnamon roll, simply omit the additional spices and use only cinnamon in the dough and filling.

5. How Do I Make These Rolls Dairy-Free?

Substitute the butter with a plant-based alternative, use almond or oat milk instead of whole milk, and replace the heavy cream with coconut cream. For the frosting, use dairy-free cream cheese and butter.

Conclusion: A Recipe Worth Every Bite

Chai-spiced cinnamon rolls are more than just a twist on a classic—they are a celebration of warmth, flavor, and indulgence. The combination of aromatic spices, caramelized chai-infused sauce, and rich frosting creates an unforgettable experience that will have you coming back for more.

Whether you’re making them for a special brunch, a holiday gathering, or just a cozy weekend treat, these rolls are guaranteed to impress. Try them once, and they might just become your new favorite baked good.

Now, go grab your mixing bowls and get baking—your kitchen is about to smell amazing!

Cottage Cheese Flatbread: Delight in a Healthy Twist!

Cottage Cheese Flatbread

Introduction to Cottage Cheese Flatbread

Cottage Cheese Flatbread offers a healthy and delicious twist on traditional flatbreads! Made with creamy cottage cheese, this flatbread is soft, slightly tangy, and packed with protein, making it both satisfying and nutritious. It’s the perfect base for your favorite toppings, whether you go for savory herbs, veggies, or even a touch of cheese. Whether you’re enjoying it as a snack, wrap, or side, this flatbread brings a delightful balance of flavor and texture. Ready to enjoy this wholesome twist on flatbread? Let’s get baking!

Why You’ll Love This Cottage Cheese Flatbread

This Cottage Cheese Flatbread is a game-changer for anyone juggling a busy schedule. It’s incredibly easy to make, taking just 30 minutes from start to finish. The taste? Oh, it’s simply divine! With a soft, chewy texture and a hint of flavor from the optional herbs, it’s a delightful treat that satisfies both cravings and nutritional needs. Plus, it’s gluten-free, making it a perfect choice for everyone at the table!

Ingredients for Cottage Cheese Flatbread

Gathering the right ingredients is the first step to creating your Cottage Cheese Flatbread. Here’s what you’ll need:

  • Cottage Cheese: This creamy base adds moisture and protein, making the flatbread both satisfying and nutritious.
  • Egg: A large egg helps bind the ingredients together, giving the flatbread a lovely structure.
  • Almond Flour: This gluten-free alternative to regular flour provides a nutty flavor and a tender texture. You can also use coconut flour if you prefer.
  • Baking Powder: This leavening agent ensures your flatbread rises slightly, creating a light and fluffy texture.
  • Salt: A pinch of salt enhances the flavors, making every bite more delicious.
  • Garlic Powder (optional): For those who love a bit of zest, garlic powder adds a savory kick to the flatbread.
  • Dried Oregano (optional): This herb brings a touch of Italian flair, perfect for pairing with your favorite toppings.
  • Olive Oil: A drizzle of olive oil adds richness and helps achieve a golden crust.

For exact measurements, check the bottom of the article where you can find everything listed for easy printing. Feel free to get creative with your ingredients; after all, cooking is all about experimenting and finding what works best for you!

How to Make Cottage Cheese Flatbread

Now that you have your ingredients ready, let’s dive into the fun part—making your Cottage Cheese Flatbread! Follow these simple steps, and you’ll have a delicious, healthy flatbread in no time.

Step 1: Preheat the Oven

First things first, preheat your oven to 400°F (200°C). This ensures that your flatbread bakes evenly and gets that lovely golden color. While the oven heats up, line a baking sheet with parchment paper. This little trick makes cleanup a breeze!

Step 2: Mix the Base

In a mixing bowl, combine the cottage cheese and egg. Use a fork or whisk to mix until smooth. This creamy base is what gives your flatbread its delightful texture. Trust me, it’s worth the effort!

Step 3: Add Dry Ingredients

Next, add the almond flour, baking powder, salt, garlic powder, and dried oregano (if you’re using it). Stir everything together until well combined. The almond flour not only adds flavor but also keeps this flatbread gluten-free, which is a win-win!

Step 4: Incorporate Olive Oil

Now, drizzle in the olive oil. Mix until the dough comes together. You want it to be slightly sticky but manageable. If it feels too dry, don’t hesitate to add a splash more olive oil!

Step 5: Shape the Flatbread

Transfer the dough to your prepared baking sheet. With your hands, shape it into a flatbread about 1/2 inch thick. Don’t worry about making it perfect; rustic is charming! Plus, it’ll taste just as good.

Step 6: Bake

Pop your flatbread into the preheated oven and bake for 15-20 minutes. Keep an eye on it! You want the edges to turn golden brown, which means it’s ready to come out.

Step 7: Cool and Slice

Once baked, remove the flatbread from the oven and let it cool for a few minutes. This step is crucial; it helps the flatbread set. After cooling, slice it into pieces and get ready to enjoy!

Tips for Success

  • Make sure your cottage cheese is well-drained for a better dough consistency.
  • Experiment with different herbs and spices to customize the flavor to your liking.
  • For a crispier flatbread, bake it a few extra minutes, but watch closely to avoid burning.
  • Let the flatbread cool completely before storing it to maintain its texture.
  • Serve warm for the best taste, but it’s also delicious at room temperature!

Equipment Needed

  • Mixing Bowl: A medium-sized bowl works best. You can also use a large measuring cup if you’re short on space.
  • Whisk or Fork: Either will do for mixing the ingredients. A hand mixer can speed things up!
  • Baking Sheet: A standard baking sheet is perfect. If you don’t have one, a pizza stone can work too.
  • Parchment Paper: This makes cleanup easy. If you’re out, greasing the baking sheet will suffice.

Variations

  • Herb-Infused Flatbread: Mix in fresh herbs like basil, chives, or parsley for a burst of flavor.
  • Cheesy Delight: Sprinkle shredded cheese on top before baking for a gooey, cheesy version.
  • Spicy Kick: Add a pinch of red pepper flakes or chopped jalapeños for a spicy twist.
  • Sweet Option: For a sweet treat, mix in a tablespoon of honey and top with cinnamon before baking.
  • Vegetable Toppings: Load it up with your favorite veggies like bell peppers, spinach, or tomatoes for a colorful, nutritious flatbread.

Serving Suggestions

  • Pair your Cottage Cheese Flatbread with a fresh garden salad for a light meal.
  • Serve it alongside hummus or tzatziki for a delightful dipping experience.
  • Top with sliced avocado and a sprinkle of chili flakes for a tasty twist.
  • Enjoy with a glass of sparkling water or herbal tea for a refreshing drink.
  • For a beautiful presentation, slice into wedges and arrange on a colorful platter.

FAQs about Cottage Cheese Flatbread

Can I use regular flour instead of almond flour?

While almond flour keeps this Cottage Cheese Flatbread gluten-free, you can use regular flour if you prefer. Just keep in mind that it will change the texture and flavor slightly.

How can I store leftover flatbread?

To store your flatbread, let it cool completely, then wrap it in plastic wrap or place it in an airtight container. It can be kept in the fridge for up to three days or frozen for longer storage.

Can I make this flatbread ahead of time?

Absolutely! You can prepare the dough ahead of time and store it in the fridge for a day. Just shape and bake it when you’re ready to enjoy!

What can I serve with Cottage Cheese Flatbread?

This flatbread pairs wonderfully with dips like hummus or tzatziki. You can also top it with fresh veggies, cheese, or even use it as a base for mini pizzas!

Is this flatbread suitable for kids?

Yes! Kids usually love the soft texture and mild flavor. You can even let them help with toppings to make it a fun family activity!

Final Thoughts

Creating this Cottage Cheese Flatbread is more than just a cooking task; it’s a delightful experience that brings joy to both the kitchen and the table. The aroma of baking flatbread fills the air, making your home feel warm and inviting. Each bite is a reminder that healthy eating can be delicious and satisfying. Whether you enjoy it as a snack or a meal, this flatbread is sure to become a cherished recipe in your home. So roll up your sleeves, gather your ingredients, and let the magic of homemade flatbread brighten your day!

“`

Print
clock clock iconcutlery cutlery iconflag flag iconfolder folder iconinstagram instagram iconpinterest pinterest iconfacebook facebook iconprint print iconsquares squares iconheart heart iconheart solid heart solid icon
Cottage Cheese Flatbread

Cottage Cheese Flatbread: Delight in a Healthy Twist!


5 Stars 4 Stars 3 Stars 2 Stars 1 Star

No reviews

  • Author: Isabella
  • Total Time: 30 minutes
  • Yield: 4 servings 1x

Description

A healthy and delicious flatbread made with cottage cheese and almond flour, perfect for a nutritious snack or meal.


Ingredients

Scale
  • 1 cup cottage cheese
  • 1 large egg
  • 1 cup almond flour
  • 1 teaspoon baking powder
  • 1/2 teaspoon salt
  • 1/2 teaspoon garlic powder (optional)
  • 1/2 teaspoon dried oregano (optional)
  • 1 tablespoon olive oil

Instructions

  1. Preheat your oven to 400°F (200°C) and line a baking sheet with parchment paper.
  2. In a mixing bowl, combine the cottage cheese and egg, mixing until smooth.
  3. Add the almond flour, baking powder, salt, garlic powder, and dried oregano (if using). Stir until well combined.
  4. Drizzle in the olive oil and mix until the dough comes together.
  5. Transfer the dough to the prepared baking sheet and shape it into a flatbread, about 1/2 inch thick.
  6. Bake in the preheated oven for 15-20 minutes, or until the edges are golden brown.
  7. Remove from the oven and let cool for a few minutes before slicing.

Notes

  • For added flavor, try mixing in chopped herbs like basil or chives into the dough.
  • You can also top the flatbread with cheese or your favorite toppings before baking for a delicious variation.
  • Prep Time: 10 minutes
  • Cook Time: 20 minutes
  • Category: Snack
  • Method: Baking
  • Cuisine: American

Nutrition

  • Serving Size: 1 flatbread
  • Calories: 130
  • Sugar: 2g
  • Sodium: 200mg
  • Fat: 8g
  • Saturated Fat: 1g
  • Unsaturated Fat: 7g
  • Trans Fat: 0g
  • Carbohydrates: 4g
  • Fiber: 1g
  • Protein: 10g
  • Cholesterol: 70mg

Creamy Tuscan Sausage Pasta: A Delicious Weeknight Delight

Creamy Tuscan Sausage Pasta

Introduction to Creamy Tuscan Sausage Pasta

Creamy Tuscan Sausage Pasta is the perfect weeknight dinner, offering a rich and comforting flavor that will have everyone asking for seconds! Savory sausage is combined with a creamy garlic sauce, sun-dried tomatoes, spinach, and Parmesan, all tossed with al dente pasta for a truly satisfying dish. The mix of hearty ingredients and indulgent creaminess makes this pasta a crowd-pleaser that’s quick and easy to whip up. Whether you’re feeding the family or enjoying a cozy night in, this dish is sure to become a favorite. Ready to savor a delicious meal? Let’s get cooking!

Why You’ll Love This Creamy Tuscan Sausage Pasta

This Creamy Tuscan Sausage Pasta is a lifesaver for busy weeknights. It’s quick to prepare, taking just 30 minutes from start to finish. The combination of savory Italian sausage, fresh spinach, and a luscious creamy sauce creates a flavor explosion that will have your family asking for seconds. Plus, it’s versatile enough to adapt to your pantry staples, making it a go-to recipe for any occasion!

Ingredients for Creamy Tuscan Sausage Pasta

Gathering the right ingredients is the first step to creating this delightful dish. Here’s what you’ll need:

  • Penne pasta: This tubular pasta holds the creamy sauce beautifully, but feel free to swap it for your favorite pasta shape.
  • Olive oil: A splash of this liquid gold adds flavor and helps cook the sausage to perfection.
  • Italian sausage: Choose between mild or spicy, depending on your family’s taste preferences. Turkey sausage is a great lighter option!
  • Garlic: Freshly minced garlic brings a fragrant aroma that elevates the dish.
  • Cherry tomatoes: These sweet little gems add a burst of color and flavor, softening beautifully in the pan.
  • Fresh spinach: Not only does it add a pop of green, but it also packs in nutrients and wilts down nicely.
  • Heavy cream: This is the secret to that rich, creamy sauce that coats every bite. For a lighter version, consider half-and-half.
  • Parmesan cheese: Grated Parmesan adds a salty, nutty flavor that complements the creaminess.
  • Italian seasoning: A blend of herbs that brings an authentic Italian flair to the dish.
  • Salt and pepper: Essential for seasoning, these staples enhance all the flavors in your pasta.
  • Fresh basil: Optional, but a sprinkle of this fragrant herb makes for a beautiful garnish and adds freshness.

For exact measurements, check the bottom of the article where you can find everything listed for easy printing. Happy cooking!

How to Make Creamy Tuscan Sausage Pasta

Now that you have all your ingredients ready, let’s dive into the cooking process! This Creamy Tuscan Sausage Pasta comes together in just a few simple steps, making it perfect for a busy weeknight. Follow along, and I promise you’ll have a delicious meal on the table in no time!

Step 1: Cook the Penne Pasta

Start by bringing a large pot of salted water to a boil. Add the penne pasta and cook according to the package instructions until it’s al dente. This usually takes about 8-10 minutes. Once done, drain the pasta and set it aside. Remember, you want it firm enough to hold up in the creamy sauce!

Step 2: Brown the Italian Sausage

In a large skillet, heat the olive oil over medium heat. Once hot, add the Italian sausage. Use a wooden spoon to break it apart as it cooks. You want it to brown nicely, which should take about 5-7 minutes. The aroma of the sausage sizzling will make your kitchen smell heavenly!

Step 3: Add Garlic and Tomatoes

Next, toss in the minced garlic and stir it into the sausage. Cook for about 1-2 minutes until it becomes fragrant. Then, add the halved cherry tomatoes. Let them cook for another 3-4 minutes until they soften and release their juices. This step adds a lovely sweetness to the dish!

Step 4: Incorporate Spinach

Now it’s time to add the fresh spinach. Stir it into the skillet and cook until it wilts down, which should take about 2 minutes. The vibrant green color will brighten up your dish and add a nutritious boost!

Step 5: Create the Creamy Sauce

Pour in the heavy cream, stirring to combine everything. Bring the mixture to a gentle simmer. This is where the magic happens! The cream will thicken slightly, creating that luscious sauce we all love.

Step 6: Combine Pasta and Sauce

Now, it’s time to bring it all together! Add the cooked penne pasta to the skillet, along with the grated Parmesan cheese, Italian seasoning, salt, and pepper. Stir everything until the pasta is well coated in the creamy sauce. This is the moment when your kitchen starts to feel like an Italian trattoria!

Step 7: Serve and Garnish

Serve your Creamy Tuscan Sausage Pasta immediately. If you like, garnish with fresh basil for an extra pop of flavor and color. Trust me, your family will be raving about this dish long after the plates are empty!

Creamy Tuscan Sausage Pasta

Tips for Success

  • Always salt your pasta water; it enhances the flavor of the pasta.
  • Don’t overcook the spinach; it should be just wilted for the best texture.
  • For a creamier sauce, let it simmer a bit longer to thicken.
  • Feel free to add more veggies like bell peppers or zucchini for extra nutrition.
  • Leftovers can be stored in the fridge for up to three days—just reheat gently!

Equipment Needed

  • Large pot: For boiling the pasta. A Dutch oven works well too!
  • Skillet: A non-stick skillet is ideal for browning the sausage.
  • Wooden spoon: Perfect for stirring and breaking up the sausage.
  • Colander: For draining the pasta.

Variations

  • Vegetarian Option: Swap the Italian sausage for plant-based sausage or sautéed mushrooms for a hearty, meat-free meal.
  • Gluten-Free: Use gluten-free penne pasta to make this dish suitable for those with gluten sensitivities.
  • Spicy Kick: Add red pepper flakes or diced jalapeños for an extra layer of heat that will tantalize your taste buds.
  • Extra Veggies: Incorporate bell peppers, zucchini, or broccoli for added nutrition and color.
  • Herb Infusion: Experiment with fresh herbs like thyme or oregano to enhance the flavor profile of the sauce.

Serving Suggestions

  • Garlic Bread: Serve with warm, buttery garlic bread for a delightful pairing.
  • Side Salad: A fresh green salad with a light vinaigrette complements the richness of the pasta.
  • Wine Pairing: Enjoy with a glass of Chardonnay or a light red wine like Pinot Noir.
  • Presentation: Serve in shallow bowls and sprinkle with extra Parmesan and fresh basil for a beautiful touch.

FAQs about Creamy Tuscan Sausage Pasta

Can I make Creamy Tuscan Sausage Pasta ahead of time?

Absolutely! You can prepare the sauce and cook the pasta in advance. Just store them separately in the fridge. When you’re ready to eat, reheat the sauce and toss in the pasta for a quick meal.

What can I substitute for heavy cream?

If you’re looking for a lighter option, half-and-half works well. You can also use coconut milk for a dairy-free alternative, though it will change the flavor slightly.

Can I use a different type of pasta?

Of course! While penne is perfect for this dish, feel free to use any pasta shape you love. Fusilli or farfalle would also work beautifully!

How do I store leftovers?

Leftovers can be stored in an airtight container in the fridge for up to three days. Just reheat gently on the stovetop or in the microwave, adding a splash of cream if it seems dry.

Is this dish suitable for kids?

Yes! The creamy sauce and flavorful sausage make it a hit with kids. You can also sneak in extra veggies to boost the nutrition without them noticing!

Final Thoughts

Cooking this Creamy Tuscan Sausage Pasta is more than just preparing a meal; it’s about creating moments of joy around the dinner table. The rich, creamy sauce and savory sausage come together to form a dish that feels both comforting and indulgent. I love how it brings my family together, sparking laughter and conversation over a shared love for good food. Whether it’s a busy weeknight or a special occasion, this recipe is sure to impress. So grab your ingredients, and let’s make some delicious memories together!

“`

Print
clock clock iconcutlery cutlery iconflag flag iconfolder folder iconinstagram instagram iconpinterest pinterest iconfacebook facebook iconprint print iconsquares squares iconheart heart iconheart solid heart solid icon
Creamy Tuscan Sausage Pasta

Creamy Tuscan Sausage Pasta: A Delicious Weeknight Delight


5 Stars 4 Stars 3 Stars 2 Stars 1 Star

No reviews

  • Author: Isabella
  • Total Time: 30 minutes
  • Yield: 4 servings 1x

Description

Creamy Tuscan Sausage Pasta is a delicious and hearty dish perfect for weeknight dinners, featuring Italian sausage, fresh spinach, and a creamy sauce.


Ingredients

Scale
  • 8 ounces penne pasta
  • 1 tablespoon olive oil
  • 1 pound Italian sausage (mild or spicy)
  • 3 cloves garlic, minced
  • 1 cup cherry tomatoes, halved
  • 1 cup fresh spinach
  • 1 cup heavy cream
  • 1/2 cup grated Parmesan cheese
  • 1 teaspoon Italian seasoning
  • Salt and pepper to taste
  • Fresh basil for garnish (optional)

Instructions

  1. Cook the penne pasta according to package instructions until al dente. Drain and set aside.
  2. In a large skillet, heat the olive oil over medium heat. Add the Italian sausage and cook until browned and cooked through, breaking it apart with a spoon, about 5-7 minutes.
  3. Add the minced garlic and cook for an additional 1-2 minutes until fragrant.
  4. Stir in the cherry tomatoes and cook for another 3-4 minutes until they start to soften.
  5. Add the fresh spinach and cook until wilted, about 2 minutes.
  6. Pour in the heavy cream and stir to combine. Bring to a gentle simmer.
  7. Add the cooked penne pasta, Parmesan cheese, Italian seasoning, salt, and pepper. Stir until everything is well coated and heated through.
  8. Serve immediately, garnished with fresh basil if desired.

Notes

  • For a lighter version, substitute half-and-half for heavy cream and use turkey sausage instead of pork.
  • Add additional vegetables like bell peppers or zucchini for extra flavor and nutrition.
  • Prep Time: 10 minutes
  • Cook Time: 20 minutes
  • Category: Main Course
  • Method: Stovetop
  • Cuisine: Italian

Nutrition

  • Serving Size: 1 serving
  • Calories: 550
  • Sugar: 3g
  • Sodium: 800mg
  • Fat: 35g
  • Saturated Fat: 15g
  • Unsaturated Fat: 10g
  • Trans Fat: 0g
  • Carbohydrates: 40g
  • Fiber: 2g
  • Protein: 25g
  • Cholesterol: 100mg