Tzatziki Chicken Salad: A Light, Refreshing Mediterranean Classic

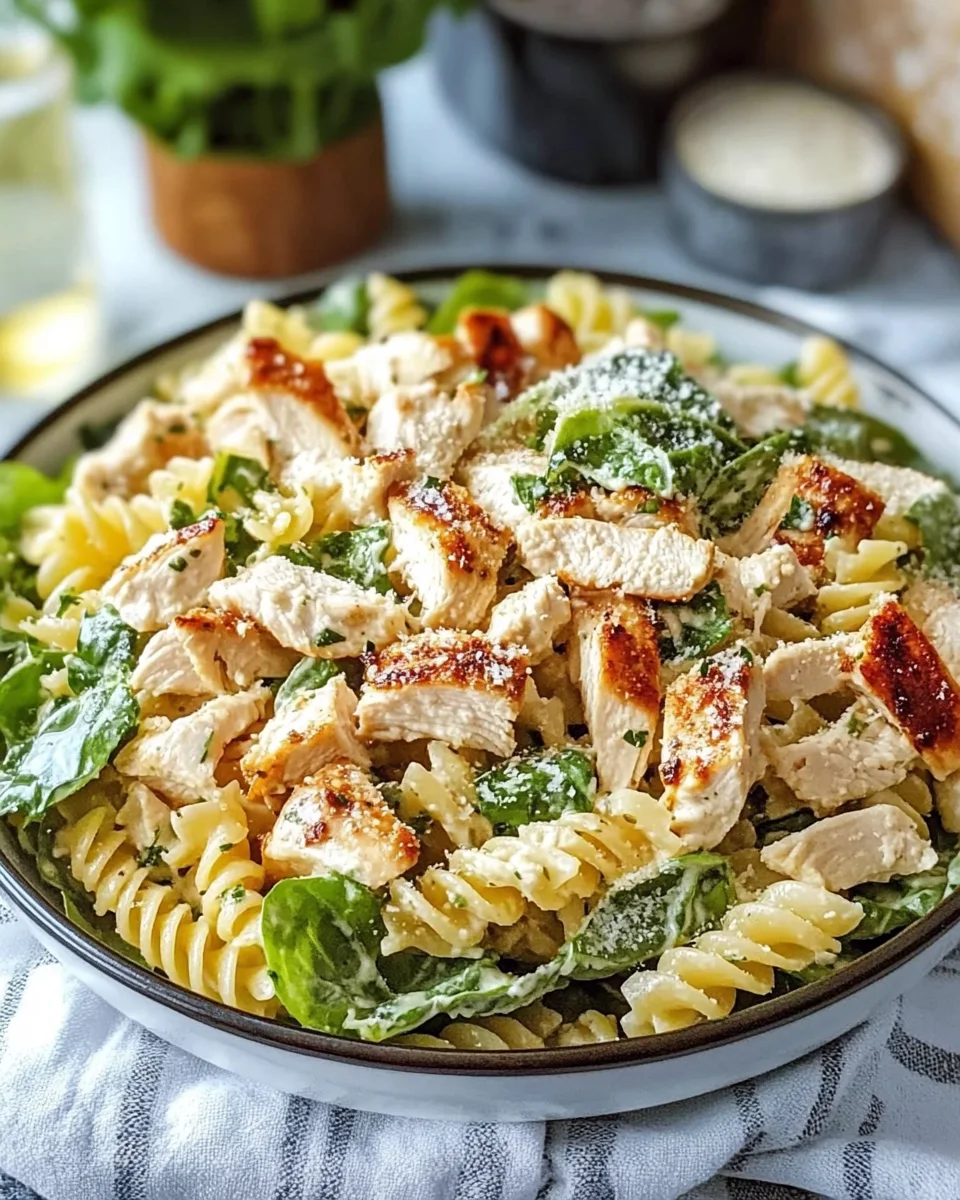
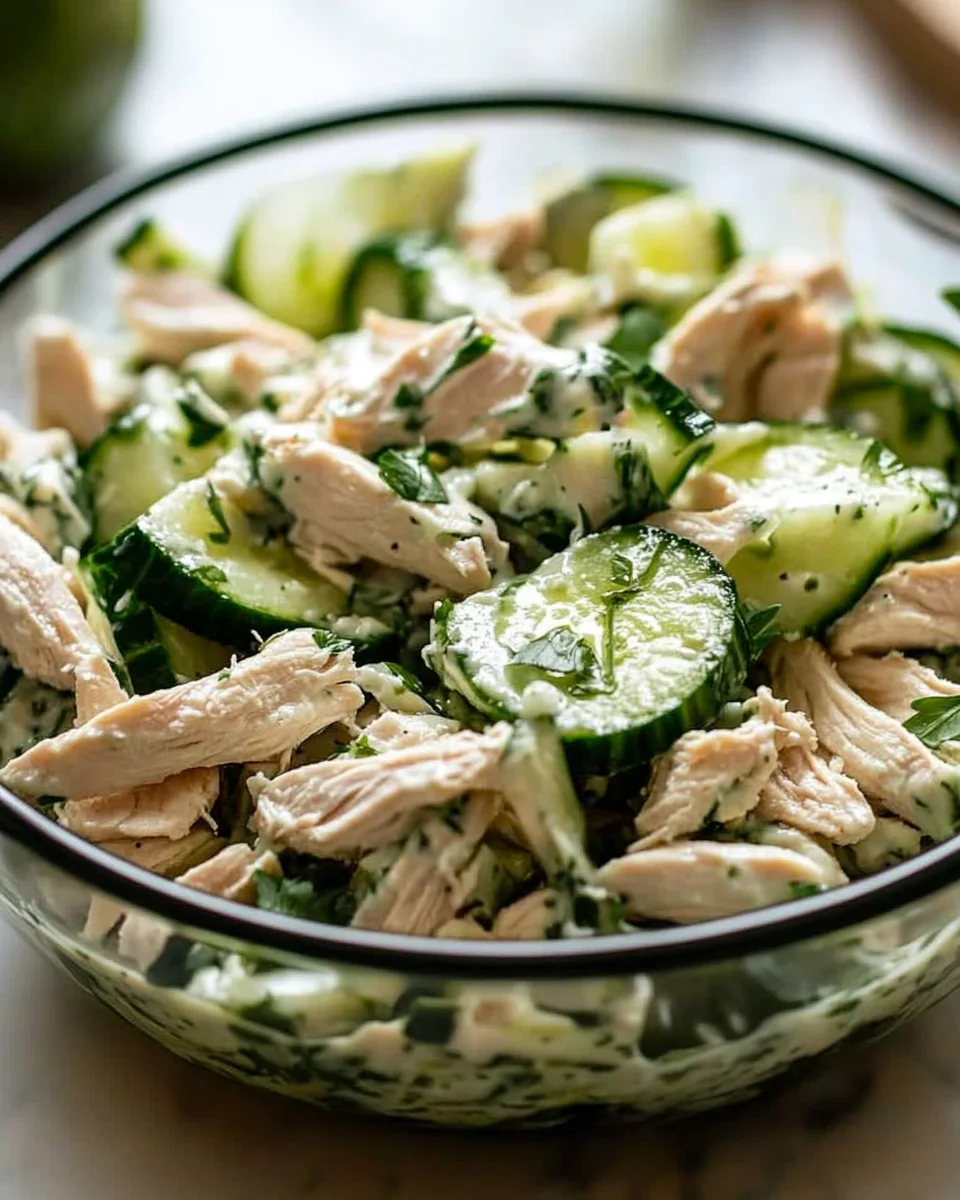
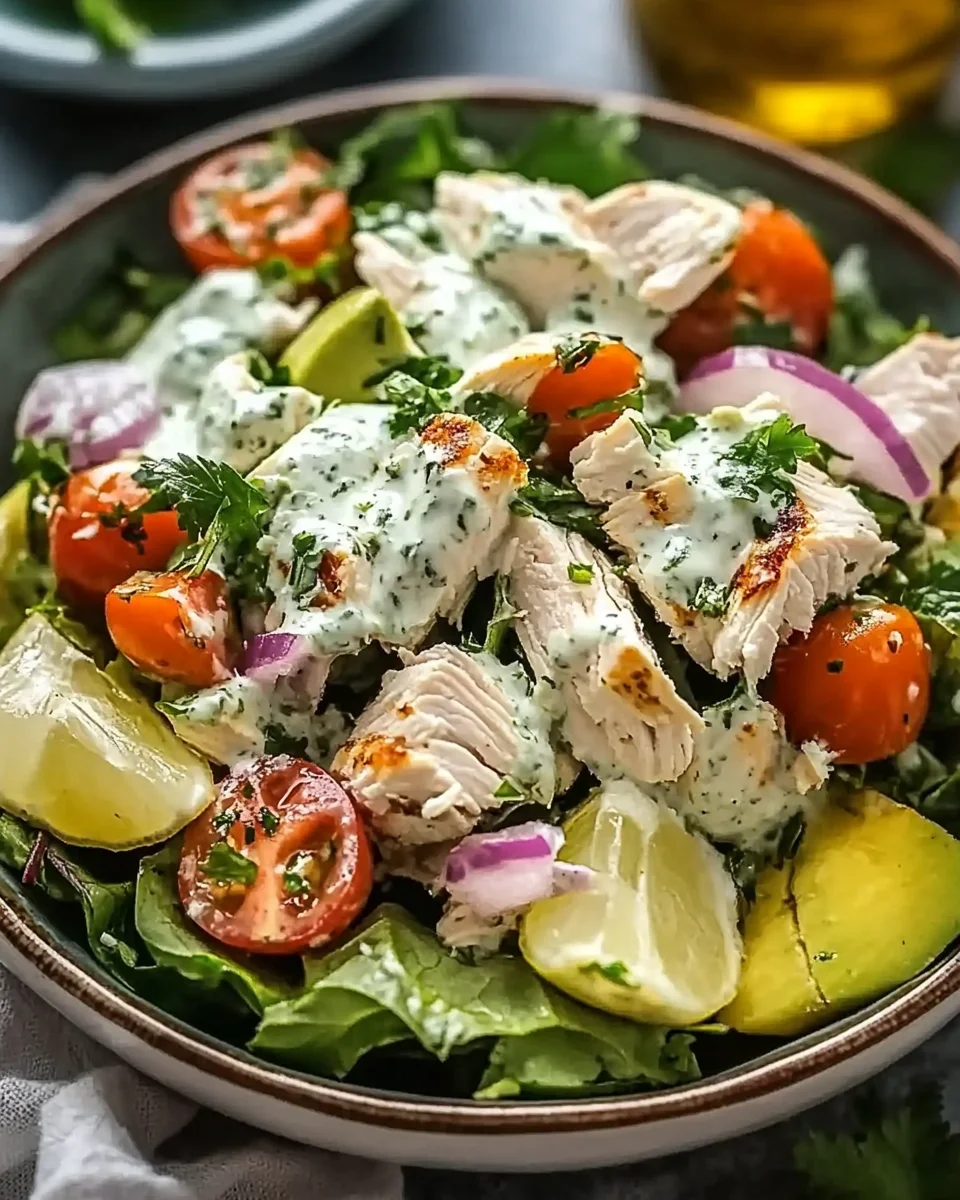
If you love fresh, creamy, and protein-packed meals, Tzatziki Chicken Salad is the perfect recipe to add to your weekly rotation. Inspired by traditional Greek flavors, this dish takes tender rotisserie chicken and combines it with a cool, garlicky tzatziki sauce, creating a light yet satisfying meal that is both healthy and full of bold Mediterranean flavors.

Whether you serve it in a warm pita, over crisp greens, or as a dip with crunchy crackers, this salad is a versatile and easy-to-make option for lunch, meal prep, or a quick dinner. With high-protein ingredients, probiotic-rich yogurt, and refreshing cucumbers, it’s a nutritious twist on a classic chicken salad.

Why You’ll Love This Tzatziki Chicken Salad

1. A Healthier Take on Traditional Chicken Salad

Unlike classic chicken salad recipes that use mayonnaise, this version swaps it out for Greek yogurt, making it:

  • Lower in fat and calories while still being creamy.
  • Packed with probiotics for gut health.
  • Full of protein to keep you full longer.

2. Refreshing Mediterranean Flavors

This salad is bursting with fresh, tangy, and herby flavors, thanks to:

  • Cool, crisp cucumbers that add texture.
  • Zesty lemon juice to brighten the dish.
  • Aromatic fresh dill and garlic for an authentic tzatziki taste.

3. Quick and Easy to Make

With minimal chopping and no cooking required, this recipe comes together in under 15 minutes, making it ideal for:

  • Busy weekdays when you need a fast meal.
  • Meal prepping lunches for the week.
  • A last-minute dish for a gathering or picnic.

4. Versatile and Customizable

Tzatziki Chicken Salad is highly adaptable, so you can:

  • Serve it in multiple ways—as a sandwich, in a lettuce wrap, or over greens.
  • Use different proteins—swap chicken for turkey, chickpeas, or tofu.
  • Adjust the flavors—add more garlic, lemon, or herbs to suit your taste.

Refreshing and Nutritious Ingredients

  • Tender rotisserie chicken for a protein-packed base
  • Greek yogurt-based tzatziki sauce for a tangy, creamy coating
  • Finely grated cucumber for a crisp, refreshing texture
  • Fresh dill and lemon juice to brighten the flavors
  • Minced garlic and red onion for a bold, savory kick
  • Salt and pepper to enhance every bite

How to Prepare This Flavorful Tzatziki Chicken Salad

  1. Make the Tzatziki Dressing – Squeeze excess moisture from the cucumber, then mix with Greek yogurt, dill, lemon juice, garlic, salt, and pepper.
  2. Shred the Chicken – Pull apart the rotisserie chicken into bite-sized pieces.
  3. Combine the Ingredients – Toss the chicken with the tzatziki dressing until well coated.
  4. Add the Red Onion – Mix in diced red onion for a sharp contrast in flavor.
  5. Serve and Enjoy – Spoon onto pita bread, over crisp lettuce, or with crackers for a versatile meal.

Nutritional Breakdown (Per Serving, Approximate)

  • Calories: 320 kcal
  • Protein: 28g
  • Carbohydrates: 7g
  • Fat: 18g
  • Fiber: 2g

Frequently Asked Questions (FAQs)

1. What Makes This Chicken Salad Different from Regular Chicken Salad?

The key difference is the use of tzatziki sauce instead of mayonnaise-based dressing. Tzatziki, a traditional Greek condiment, is made with Greek yogurt, cucumbers, garlic, lemon juice, and fresh herbs, creating a lighter, tangier, and more refreshing alternative to classic chicken salad.

2. Can I Use Store-Bought Tzatziki Instead of Making It Fresh?

Yes! If you’re short on time, you can substitute homemade tzatziki with store-bought. However, making it from scratch allows you to control the flavors and adjust the garlic, lemon, and herbs to your preference.

3. What’s the Best Type of Chicken to Use?

You can use any cooked chicken, but some of the best options include:

  • Rotisserie chicken—It’s flavorful, tender, and requires no extra cooking.
  • Grilled chicken—Adds a smoky depth to the salad.
  • Poached chicken—Mild in flavor and very moist.

4. How Long Does Tzatziki Chicken Salad Last in the Fridge?

Stored in an airtight container, this salad stays fresh for 3-4 days. The flavors develop even more after a few hours, making it a great make-ahead meal.

5. Can I Make This Recipe Dairy-Free?

Yes! To make a dairy-free version, swap Greek yogurt for:

  • Coconut yogurt—For a slightly sweeter taste.
  • Almond or cashew yogurt—For a mild, creamy alternative.

6. Can I Use Canned Chicken Instead of Fresh Chicken?

Yes! While fresh chicken offers the best texture, canned chicken is a convenient option if you need a quick, no-prep meal. Just be sure to drain and shred it well before mixing with the tzatziki sauce.

7. How Can I Add More Protein?

To increase the protein content, try:

  • Adding extra shredded chicken or using chicken breast.
  • Mixing in chickpeas or white beans for a plant-based boost.
  • Serving with a boiled egg on top for even more protein.

8. What’s the Best Way to Serve This Chicken Salad?

Tzatziki Chicken Salad is incredibly versatile and can be enjoyed in many ways:

  • In a pita or wrap—For a classic Mediterranean-inspired meal.
  • Over a bed of greens—For a refreshing, low-carb option.
  • With crackers or pita chips—As a creamy dip.
  • In lettuce cups—For a light and fresh alternative.

9. Can I Add More Vegetables?

Absolutely! Some great veggie additions include:

  • Cherry tomatoes—For a juicy burst of flavor.
  • Bell peppers—For a sweet crunch.
  • Spinach or kale—For extra greens.
  • Sliced radishes—For a peppery bite.

10. How Can I Make This Recipe Spicier?

For a little heat, try:

  • Adding a pinch of red pepper flakes.
  • Mixing in some harissa or hot sauce.
  • Chopping up a jalapeño and stirring it in.

Expert Tips for the Best Tzatziki Chicken Salad

  • Drain the cucumber well—Squeeze out as much moisture as possible to keep the salad from becoming watery.
  • Use full-fat Greek yogurt—It makes the salad creamier and richer.
  • Let the salad chill before serving—This helps the flavors meld together beautifully.
  • Balance the flavors—Taste before serving and add extra lemon juice, salt, or garlic if needed.
  • Use fresh herbs—Fresh dill and parsley enhance the Mediterranean taste.

Conclusion: A Light, Flavorful Dish for Any Occasion

Tzatziki Chicken Salad is the perfect combination of fresh, creamy, and tangy flavors that make it a go-to meal for lunch, meal prep, or a light dinner. With simple ingredients, minimal prep time, and endless serving options, this recipe fits any lifestyle and diet.

Whether you enjoy it as a sandwich, over greens, or as a dip, this salad is a deliciously satisfying way to enjoy a taste of the Mediterranean while keeping things light and nutritious.

Try this recipe today and enjoy a refreshing, protein-packed meal that’s easy, delicious, and full of bright, herby goodness!

Chicken Caesar Pasta Salad: A Bold and Satisfying Fusion

Few dishes strike the perfect balance between freshness, heartiness, and bold flavor quite like Chicken Caesar Pasta Salad. This recipe takes the timeless appeal of a classic Caesar salad—with its creamy dressing, crisp romaine, and savory Parmesan—and elevates it with tender pasta and juicy, seasoned chicken. The result? A satisfying, protein-packed meal that can be served as a main course, a side dish, or even a meal-prep favorite.

Whether you’re preparing this dish for a family dinner, a potluck, or a light but filling lunch, its versatility and deliciousness make it a recipe worth repeating.

Why This Salad is a Standout Dish

1. A Perfect Marriage of Two Favorites

Pasta salad and Caesar salad are both classic favorites, but when combined, they create a dish that’s creamy, refreshing, and satisfying all at once. The al dente pasta adds heartiness, while the romaine lettuce keeps things crisp and fresh.

2. Packed with Protein and Flavor

This dish is more than just a salad—it’s a well-balanced meal that provides:

  • Lean protein from the grilled chicken to keep you full.
  • Carbohydrates from the pasta for energy.
  • Healthy fats from the creamy Caesar dressing.
  • Crunch and fiber from romaine lettuce and croutons.

3. Ideal for Meal Prep

One of the best things about Chicken Caesar Pasta Salad is that it stores well and tastes even better the next day. You can:

  • Prepare the ingredients ahead of time and toss them together before serving.
  • Pack it for work or school lunches without worrying about it getting soggy.
  • Serve it cold or at room temperature, making it ideal for picnics and potlucks.

4. Customizable to Your Tastes

This recipe is easy to tweak to fit your preferences:

  • Use grilled, roasted, or rotisserie chicken.
  • Swap out the pasta for a whole grain or gluten-free alternative.
  • Adjust the dressing for a lighter or richer version.

No matter how you make it, this dish is guaranteed to be a hit.

Wholesome and Flavorful Ingredients

  • Juicy, seasoned chicken breasts for a protein-packed bite
  • Al dente pasta (cellentani, penne, or bowtie) for a satisfying texture
  • Crisp romaine lettuce for a refreshing crunch
  • Shredded Parmesan cheese for a tangy, nutty richness
  • Crunchy croutons or toasted breadcrumbs for extra texture
  • Homemade Caesar dressing with a creamy, tangy depth

How to Create the Ultimate Chicken Caesar Pasta Salad

  1. Cook the Pasta – Boil pasta until tender, then rinse with cold water to stop cooking.
  2. Prepare the Chicken – Season and pan-sear until golden brown, then let it rest before slicing.
  3. Make the Caesar Dressing – Mix mayonnaise, lemon juice, capers, Dijon mustard, Worcestershire sauce, salt, and pepper.
  4. Combine Everything – Toss together the pasta, chopped romaine, Parmesan, chicken, and ¾ of the dressing.
  5. Add the Crunch – Sprinkle croutons or breadcrumbs on top and toss lightly.
  6. Serve and Enjoy – Drizzle with additional dressing if needed and dig in!

Nutritional Breakdown (Per Serving, Approximate)

  • Calories: 394 kcal
  • Protein: 31g
  • Carbohydrates: 28g
  • Fat: 18g
  • Fiber: 3g

Frequently Asked Questions (FAQs)

1. What Makes Chicken Caesar Pasta Salad Different from Regular Caesar Salad?

The addition of pasta makes this salad more substantial and filling, transforming it from a light side dish into a satisfying meal. It keeps the bold flavors of a traditional Caesar salad but adds more texture and heartiness.

2. Can I Use Store-Bought Dressing Instead of Homemade?

Yes! While homemade Caesar dressing has a fresher and more authentic flavor, a high-quality store-bought version can save time and still taste delicious. Look for one that has real Parmesan, lemon, and garlic for the best flavor.

3. What’s the Best Type of Chicken to Use?

You can use any type of cooked chicken, but some great options include:

  • Grilled chicken – Adds a smoky, charred flavor.
  • Roasted chicken – Juicy and flavorful, perfect for meal prep.
  • Rotisserie chicken – A quick and easy shortcut.

4. How Long Does This Salad Last in the Fridge?

If stored properly in an airtight container, Chicken Caesar Pasta Salad will stay fresh for up to 3 days. However, if you’re making it ahead, keep the lettuce and croutons separate until serving to prevent them from getting soggy.

5. Can I Make This Dish Vegetarian?

Yes! Simply:

  • Omit the chicken and add chickpeas or tofu for plant-based protein.
  • Use a vegetarian Caesar dressing that doesn’t contain anchovies or Worcestershire sauce.

6. What’s the Best Pasta to Use for This Recipe?

For the best texture, choose short pasta shapes that hold the dressing well, such as:

  • Penne – Sturdy and perfect for creamy sauces.
  • Bowtie (Farfalle) – Adds a fun shape and catches dressing nicely.
  • Rotini or Cellentani – Twists that hold onto the sauce well.

7. How Can I Make This Salad Lighter?

To make a healthier version, try:

  • Using Greek yogurt instead of mayonnaise in the dressing.
  • Swapping out some of the pasta for extra romaine lettuce.
  • Reducing the cheese and adding more fresh vegetables.

8. Can I Add Other Ingredients for Extra Flavor?

Absolutely! Some delicious add-ins include:

  • Cherry tomatoes for sweetness.
  • Avocado slices for creaminess.
  • Crispy bacon bits for a smoky crunch.
  • Sun-dried tomatoes or roasted red peppers for a bold twist.

9. What’s the Best Way to Serve This Dish?

Chicken Caesar Pasta Salad can be enjoyed:

  • As a main course for a complete meal.
  • As a side dish at barbecues or picnics.
  • Topped with extra grilled chicken or shrimp for even more protein.

10. Can I Make This Dish Gluten-Free?

Yes! Simply use gluten-free pasta and croutons, and double-check that your Caesar dressing is gluten-free as well.

Expert Tips for the Best Chicken Caesar Pasta Salad

  • Let the salad chill before serving – This helps the flavors meld together.
  • Toss the pasta in a little dressing while it’s warm – This allows it to absorb more flavor.
  • Use high-quality Parmesan – Freshly grated Parmesan has a richer taste than pre-shredded varieties.
  • Toast the croutons for extra crunch – A few minutes in the oven makes a big difference.
  • Balance the dressing – Add more lemon for brightness, or a little extra garlic for a stronger punch.

Conclusion: A Must-Try Salad for Any Occasion

Chicken Caesar Pasta Salad is more than just a simple salad—it’s a perfect fusion of rich Caesar dressing, hearty pasta, and juicy grilled chicken. Whether you’re looking for a quick meal-prep lunch, a side for a summer barbecue, or a satisfying dinner, this dish is a guaranteed crowd-pleaser.

With endless customization options, a balance of textures, and bold, tangy flavors, it’s easy to see why this recipe is a favorite. Give it a try, and enjoy a fresh take on a timeless classic!

Greek Bowls with Halloumi: A Mediterranean Feast in Every Bite

Greek cuisine is known for its bold flavors, fresh ingredients, and balanced nutrition, and these Greek Bowls with Halloumi bring all of that together in one delicious, easy-to-make meal. Combining grilled halloumi cheese, crisp vegetables, creamy tzatziki, and a base of rice or quinoa, this dish is as satisfying as it is nourishing.

Whether you’re looking for a quick and healthy lunch, a meal-prep-friendly dinner, or a customizable dish to suit any diet, these Greek bowls are a versatile, vibrant, and flavor-packed choice.

Why You’ll Love These Greek Bowls

1. A Perfect Balance of Flavor and Texture

Each ingredient in this bowl contributes to a harmonious blend of taste and texture:

  • Crispy, golden halloumi cheese provides a rich, salty bite.
  • Fresh cucumbers, tomatoes, and red onions add crunch and brightness.
  • Kalamata olives and feta cheese bring a bold, briny contrast.
  • Creamy tzatziki sauce ties everything together with a cool, garlicky finish.
  • Fluffy rice or quinoa offers a hearty base that soaks up all the delicious flavors.

2. A High-Protein, Nutrient-Dense Meal

Greek bowls are packed with essential nutrients:

  • Halloumi cheese is high in protein and calcium, making it a great vegetarian protein option.
  • Tzatziki sauce with Greek yogurt provides probiotics and protein.
  • Vegetables like cucumbers and tomatoes offer vitamins, minerals, and fiber.
  • Olive oil and olives add healthy fats that promote heart health.

3. Quick and Easy to Prepare

This dish comes together in just 20 minutes, making it a go-to meal for busy days. With minimal cooking required, it’s perfect for warm weather, meal prep, or a fuss-free dinner.

4. Completely Customizable

Greek bowls can be tailored to suit any dietary preference:

  • Vegetarian? Stick with the halloumi as your protein.
  • Want more protein? Add grilled chicken, shrimp, or chickpeas.
  • Gluten-free? Use quinoa or cauliflower rice instead of pita.
  • Low-carb? Skip the rice and serve over greens for a Greek salad bowl.

Vibrant and Wholesome Ingredients

  • Grilled halloumi cheese for a crispy, salty bite
  • Cooked brown or white rice (or quinoa) as a hearty base
  • Cherry tomatoes, Persian cucumber, and red onion for a refreshing crunch
  • Kalamata olives and crumbled feta cheese for a bold Mediterranean touch
  • Homemade tzatziki sauce with Greek yogurt, cucumber, garlic, lemon, and dill
  • Pita bread or flatbread for dipping and extra texture
  • Dressing of olive oil, lemon juice, and oregano to enhance the flavors

How to Build the Ultimate Greek Bowl

  1. Marinate and Grill the Halloumi – Coat in olive oil, lemon juice, and oregano, then sear until golden brown.
  2. Prepare the Tzatziki – Mix Greek yogurt, grated cucumber, garlic, lemon juice, salt, and dill.
  3. Chop the Fresh Veggies – Slice cucumbers, tomatoes, and onions for the salad.
  4. Assemble the Bowl – Layer rice, veggies, grilled halloumi, tzatziki, olives, and feta.
  5. Drizzle with Dressing and Serve – Garnish with fresh herbs and pita on the side.

Nutritional Breakdown (Per Serving, Approximate)

  • Calories: 663 kcal
  • Protein: 34g
  • Carbohydrates: 34g
  • Fat: 44g
  • Fiber: 3g

Frequently Asked Questions (FAQs)

1. What Is Halloumi, and Why Is It Great for This Recipe?

Halloumi is a semi-hard cheese from Cyprus that has a unique ability to hold its shape when grilled or pan-fried. It has a salty, slightly tangy flavor and develops a crispy, golden crust when cooked. This makes it a delicious and protein-rich alternative to meat.

2. Can I Use a Different Cheese If I Don’t Have Halloumi?

Yes! While halloumi is the star of this dish, you can substitute it with:

  • Feta cheese (crumbled on top instead of grilled) for a tangy, briny twist.
  • Paneer for a similar texture without the saltiness.
  • Grilled tofu for a plant-based alternative.

3. What’s the Best Base for Greek Bowls?

You can choose from several grain and low-carb options:

  • Traditional: White or brown rice.
  • Nutritious & High-Protein: Quinoa or farro.
  • Low-Carb: Cauliflower rice or a bed of mixed greens.
  • Mediterranean-Inspired: Couscous or bulgur.

4. Can I Make These Greek Bowls Vegan?

Yes! Simply:

  • Swap halloumi for grilled tofu, chickpeas, or tempeh.
  • Use dairy-free tzatziki made with coconut or cashew yogurt.
  • Omit the feta or use a plant-based alternative.

5. What’s the Best Way to Store and Meal Prep This Dish?

Greek bowls are excellent for meal prep:

  • Store each ingredient separately in airtight containers to keep everything fresh.
  • Grilled halloumi is best enjoyed fresh but can be reheated in a pan for a few minutes.
  • Tzatziki can be made ahead and stored in the fridge for up to 3 days.
  • Assemble the bowl just before serving to keep the vegetables crisp.

6. Can I Add More Vegetables to These Bowls?

Absolutely! Some great additions include:

  • Roasted red peppers for sweetness.
  • Grilled zucchini or eggplant for a smoky depth.
  • Shredded carrots or radishes for extra crunch.
  • Artichoke hearts for a briny, tangy bite.

7. What’s the Best Way to Cook Halloumi?

For perfectly crispy, golden halloumi:

  • Use a hot non-stick pan or grill.
  • No oil is necessary—halloumi has natural fats that help it brown.
  • Cook for 2-3 minutes per side until golden and crispy.
  • Avoid overcooking, as it can become too firm and rubbery.

8. Can I Make the Dressing Ahead of Time?

Yes! The simple dressing of olive oil, lemon juice, and oregano can be made in advance and stored in the fridge for up to a week. It actually tastes better over time as the flavors meld.

9. What Are Some Tasty Toppings for Greek Bowls?

  • Fresh herbs (parsley, mint, or dill) for brightness.
  • Crumbled feta for a tangy finish.
  • Toasted nuts or seeds for crunch.
  • Avocado slices for creaminess.
  • Pita chips for extra texture.

10. How Can I Make This Dish Spicier?

For a little heat, try:

  • Adding red pepper flakes to the dressing.
  • Mixing harissa or chili paste into the tzatziki.
  • Serving with a side of spicy hummus or hot sauce.

Expert Tips for the Best Greek Bowls

  • Marinate the halloumi before cooking for extra depth of flavor.
  • Use fresh, high-quality olive oil for the best dressing.
  • Let the tzatziki chill for at least 30 minutes before serving to enhance the flavors.
  • Assemble the bowls just before serving to keep everything fresh and crisp.
  • Balance the flavors—add a little extra lemon or a pinch of salt if needed.

Conclusion: A Versatile, Flavor-Packed Meal for Any Occasion

These Greek Bowls with Halloumi are the perfect combination of fresh, tangy, creamy, and crunchy. Whether you’re looking for a quick and nutritious weeknight meal, a meal-prep-friendly lunch, or a dish that transports you straight to the Mediterranean, this recipe delivers in every way.

With endless customization options, a balance of textures, and bold, zesty flavors, these Greek bowls are a must-try for anyone who loves wholesome and delicious food.

Try them today and enjoy a taste of Greece in every bite!

Tzatziki Chicken Salad: A Cool and Creamy Mediterranean Delight

If you’re looking for a light, refreshing, and protein-packed meal, Tzatziki Chicken Salad is the perfect dish. This recipe takes tender shredded chicken and coats it in a creamy, tangy tzatziki-inspired dressing, creating a salad that is both nutritious and bursting with Mediterranean flavors.

With Greek yogurt replacing traditional mayonnaise, this dish is high in protein, low in fat, and full of fresh ingredients. Whether served in a pita, over a bed of greens, or as a high-protein snack, this versatile and easy-to-make salad is a great addition to your meal rotation.

Why You’ll Love This Tzatziki Chicken Salad

1. A Healthier Take on Traditional Chicken Salad

Classic chicken salad is often made with mayonnaise, which can be high in fat and calories. This recipe swaps mayo for Greek yogurt, making it lighter, packed with probiotics, and full of protein without sacrificing creaminess.

2. Fresh Mediterranean Flavors

Inspired by Greek tzatziki sauce, this salad features cool cucumber, zesty lemon juice, fresh dill, and garlic—a bright and tangy combination that pairs perfectly with chicken.

3. Quick and Easy to Prepare

This dish comes together in just minutes, making it ideal for busy weeknights, meal prep, or a simple lunch option. With just a bit of mixing and chilling, you’ll have a flavorful, ready-to-eat meal.

4. Versatile and Customizable

You can serve this salad in multiple ways, including:

  • Stuffed into a warm pita for a delicious handheld meal.
  • Over crisp romaine or arugula for a refreshing salad.
  • Rolled in a wrap with additional veggies for extra crunch.
  • As a dip with crackers or endive leaves for a low-carb snack.

5. Great for Meal Prep

Tzatziki Chicken Salad stores well in the refrigerator, making it perfect for meal prepping lunches for the week. The flavors meld and improve over time, making it even tastier the next day.

Bright and Tangy Ingredients

  • Shredded cooked chicken for a lean protein base
  • Creamy Greek yogurt for a tangy, probiotic-rich dressing
  • Crisp cucumber for a refreshing crunch
  • Fresh dill and lemon juice for a burst of Mediterranean flavor
  • Minced garlic to enhance the tzatziki-inspired taste
  • Red onion and Kalamata olives (optional) for depth and briny contrast

How to Create This Cool and Creamy Chicken Salad

  1. Make the Tzatziki Dressing – Mix Greek yogurt, cucumber, dill, lemon juice, garlic, salt, and pepper.
  2. Combine the Ingredients – Toss in the shredded chicken until fully coated.
  3. Add Extra Flavor – Mix in red onion and olives for added texture.
  4. Chill for Best Results – Let the salad rest in the fridge for 30 minutes to enhance the flavors.
  5. Serve Your Way – Enjoy over greens, in a warm pita, or in a wrap.

Nutritional Breakdown (Per Serving, Approximate)

  • Calories: 220 kcal
  • Protein: 28g
  • Carbohydrates: 6g
  • Fat: 9g
  • Fiber: 1g

Frequently Asked Questions (FAQs)

1. What Makes Tzatziki Chicken Salad Different from Traditional Chicken Salad?

Unlike traditional chicken salad, which is usually made with mayonnaise and sometimes mustard, Tzatziki Chicken Salad uses Greek yogurt, cucumber, lemon, and dill, giving it a Mediterranean-inspired taste with a tangy, herby kick.

2. Can I Use Rotisserie Chicken?

Absolutely! Rotisserie chicken is a great shortcut that makes this recipe even easier. Simply shred the breast meat and mix it with the tzatziki dressing.

3. How Long Does Tzatziki Chicken Salad Last in the Fridge?

Stored in an airtight container, this salad will last up to 4 days in the refrigerator. The flavors actually deepen over time, making it even more delicious the next day.

4. Can I Make This Dish Dairy-Free?

Yes! If you need a dairy-free version:

  • Use dairy-free Greek-style yogurt made from coconut or almond milk.
  • Substitute extra lemon juice or tahini for added creaminess.

5. How Can I Add More Protein?

To increase the protein content, try:

  • Adding extra shredded chicken or using chicken breast only.
  • Mixing in chickpeas or white beans for a plant-based protein boost.
  • Serving it with a boiled egg on top for even more protein.

6. Can I Make This Recipe Low-Carb or Keto-Friendly?

Yes! Tzatziki Chicken Salad is already low in carbohydrates, but to keep it keto-friendly:

  • Serve it over greens instead of in a pita or wrap.
  • Use full-fat Greek yogurt for extra richness and healthy fats.
  • Avoid adding any high-carb ingredients like crackers or bread.

7. What’s the Best Way to Serve This Salad?

Some great serving ideas include:

  • Stuffed into pita bread with cucumbers, tomatoes, and feta.
  • Rolled into a whole wheat or spinach wrap for a balanced meal.
  • Served in lettuce cups or endive leaves for a low-carb option.
  • Paired with grilled veggies for a light summer meal.

8. Can I Make This Salad Spicy?

For a spicy kick, try:

  • Adding red pepper flakes or cayenne pepper to the dressing.
  • Mixing in a diced jalapeño for some heat.
  • Drizzling with a bit of hot sauce before serving.

9. Can I Use Other Herbs Instead of Dill?

Yes! While dill adds a traditional Greek touch, you can also try:

  • Mint for a fresher, cooling flavor.
  • Parsley for a mild, earthy taste.
  • Basil for a slightly sweet Mediterranean twist.

10. Can I Make This a Vegetarian Dish?

Absolutely! Simply replace the chicken with chickpeas, lentils, or tofu for a plant-based version that still packs plenty of protein and flavor.

Expert Tips for the Best Tzatziki Chicken Salad

  • Use full-fat Greek yogurt – It creates a creamier texture and richer flavor.
  • Drain the cucumber well – Removing excess moisture prevents a watery salad.
  • Let it chill before serving – Allowing the flavors to blend enhances the taste.
  • Season generously – Salt, pepper, and fresh lemon juice bring out the best flavors.
  • Add a drizzle of olive oil – A little extra virgin olive oil makes the salad even smoother and more authentic.

Conclusion: A Light, Refreshing Meal for Any Occasion

Tzatziki Chicken Salad is a flavorful, nutritious, and satisfying dish that brings the cool, creamy essence of tzatziki sauce into a high-protein chicken salad. Whether you serve it in a pita, on a bed of greens, or as a snack with crackers, this dish is versatile, easy to make, and perfect for any meal.

With simple ingredients, fresh herbs, and a tangy yogurt base, this recipe is a healthier alternative to traditional chicken salad that doesn’t compromise on taste. Try it today and enjoy a Mediterranean-inspired meal that’s both refreshing and delicious!

Grinder Salad: A Bold, Flavorful Twist on the Viral Sandwich

If you’re a fan of the famous grinder sandwich, you’re going to love this Grinder Salad—a delicious, fresh, and low-carb alternative to the classic sub. This recipe transforms the flavors of a hearty Italian-style grinder sandwich into a crisp, creamy, and satisfying salad. Packed with deli meats, cheese, crunchy lettuce, zesty pepperoncini, and a rich, creamy dressing, this dish is perfect for those who want all the taste of a grinder without the bread.

Whether you’re looking for a keto-friendly lunch, a fresh meal-prep option, or just a new way to enjoy Italian-inspired flavors, this salad delivers bold taste with every bite. The best part? It’s quick to prepare, customizable, and great for feeding a crowd.

Why Grinder Salad Is a Must-Try

1. A Low-Carb, High-Protein Alternative to the Classic Sub

The traditional grinder sandwich is loaded with delicious ingredients, but it also comes with a hefty serving of bread. This salad version keeps all the best parts—savory meats, creamy dressing, and tangy veggies—without the extra carbs. It’s a great choice for those following a low-carb, keto, or gluten-free lifestyle, or simply for anyone looking to lighten up their meal without sacrificing flavor.

2. Packed with Flavor & Texture

One of the reasons the grinder sandwich went viral is its bold, satisfying flavors. This salad keeps all those elements intact. From the sharpness of red onions to the mild heat of pepperoncini, every ingredient is carefully chosen to create the perfect balance of creamy, tangy, and savory. The crunch of iceberg lettuce and the bite of Parmesan cheese add an irresistible texture that makes this salad stand out.

3. Quick & Easy to Make

If you’re looking for a fast, no-fuss meal, this salad is perfect. With minimal prep and no cooking required, you can have it ready in just a few minutes. It’s a great option for meal prepping, as you can chop and store the ingredients separately, then toss everything together right before serving.

4. Highly Customizable to Suit Any Taste

One of the best things about this recipe is its versatility. You can easily swap ingredients, adjust the spice level, or add extra toppings to match your preferences. Whether you want to make it vegetarian, add more protein, or experiment with different dressings, this salad can be tailored to suit any dietary needs.

Crisp & Flavorful Ingredients

For the Dressing:

  • 3/4 cup mayonnaise
  • 1 tablespoon red wine vinegar
  • 1 teaspoon minced garlic
  • 1/8 cup grated Parmesan cheese
  • 1 teaspoon dried oregano
  • 1/2 teaspoon salt
  • 1/4 teaspoon ground black pepper
  • 1/8 teaspoon red pepper flakes (optional)

For the Salad:

  • 1 head iceberg lettuce, chopped
  • 1/4 cup sliced red onion
  • 1 cup diced tomato
  • 1/2 cup pepperoncini
  • 1/2 cup diced provolone cheese
  • 1/2 cup chopped salami
  • 1/2 cup chopped deli turkey

Easy & Delicious Directions

  1. Prepare the Dressing – In a large bowl, whisk together mayonnaise, red wine vinegar, garlic, Parmesan, oregano, salt, pepper, and red pepper flakes until smooth.
  2. Assemble the Salad – Add sliced red onions, pepperoncini, tomatoes, provolone cheese, salami, and turkey into the bowl with the dressing.
  3. Toss & Serve – Add chopped iceberg lettuce on top and toss well to coat everything in the creamy dressing. Serve immediately for the best texture.

Nutritional Breakdown (Per Serving, Approximate)

  • Calories: 383 kcal
  • Carbohydrates: 20g
  • Protein: 30g
  • Fat: 22g
  • Saturated Fat: 10g
  • Cholesterol: 70mg
  • Sodium: 2323mg
  • Potassium: 998mg
  • Fiber: 6g
  • Sugar: 10g
  • Vitamin A: 1999 IU
  • Vitamin C: 45mg
  • Calcium: 426mg
  • Iron: 4mg

Frequently Asked Questions

1. What is a Grinder Salad?

A Grinder Salad is inspired by the Italian-style grinder sandwich, which is a loaded sub typically filled with deli meats, cheese, lettuce, onions, and a creamy, tangy dressing. Instead of layering these ingredients in a hoagie roll, they are chopped and tossed together in a salad form. This keeps all the flavor while making it a lighter and low-carb option.

2. Can I Make This Salad Ahead of Time?

Yes! This salad is great for meal prep, but to keep it fresh, it’s best to store the dressing separately and mix it in just before serving. You can prep the veggies and meats ahead of time and refrigerate them for up to 3 days. If the salad is already mixed with the dressing, it’s best enjoyed within 24 hours, as the lettuce may become soggy.

3. What’s the Best Type of Lettuce to Use?

Iceberg lettuce is the best choice for this recipe because of its crisp texture and mild flavor, which pairs well with the bold dressing and hearty toppings. However, if you prefer a different green, you can substitute with romaine lettuce or even a mix of greens like butter lettuce and arugula.

4. Can I Make a Vegetarian Version?

Absolutely! To make this salad vegetarian, simply omit the deli meats and replace them with chickpeas, tofu, or extra cheese for protein. You can also add ingredients like roasted bell peppers, cucumbers, or marinated artichokes to enhance the Mediterranean flavors.

5. How Can I Make It Spicier?

If you love a little heat, there are several ways to add more spice:

  • Increase the red pepper flakes in the dressing.
  • Use spicy salami or pepperoni instead of regular deli meats.
  • Add diced jalapeños or hot banana peppers for an extra kick.
  • Drizzle with a spicy Italian dressing or add a splash of hot sauce.

6. What Are the Best Cheese Options?

Provolone cheese is the classic choice for grinder sandwiches, but you can mix things up with:

  • Mozzarella – for a mild, creamy taste.
  • Sharp cheddar – for a bolder bite.
  • Pepper Jack – for a spicy twist.
  • Parmesan – adds a salty, nutty flavor that complements the dressing.

7. Can I Turn This Into a Sandwich?

Yes! If you prefer the traditional grinder experience, you can toast a hoagie roll and pile the salad mixture inside for a delicious, crunchy sandwich. This is a great way to serve it to guests who may want both options—salad for a lighter meal, sandwich for a heartier one.

8. How Do I Store Leftovers?

  • If the dressing is already mixed in, store leftovers in an airtight container and consume within 1-2 days.
  • If storing ingredients separately, they can last up to 3-4 days in the fridge.
  • This salad does not freeze well, as the lettuce and dressing will lose their texture.

Tips for Making the Best Grinder Salad

  • Use Fresh, High-Quality Ingredients – Since this salad is all about bold flavors, using fresh, crisp lettuce, ripe tomatoes, and good-quality meats and cheeses will make a big difference.
  • Chop Ingredients Into Small, Bite-Sized Pieces – This makes the salad easier to eat and ensures that every bite has a balanced mix of flavors.
  • Wait to Add Dressing Until Serving – To keep the lettuce crisp, toss the dressing in just before serving.
  • Customize the Meat & Cheese – Don’t be afraid to mix and match different deli meats and cheeses based on your preferences.
  • Add Extra Crunch – If you want even more texture, toss in crushed croutons or toasted nuts for a satisfying bite.

Conclusion: A New Favorite for Salad Lovers & Sandwich Fans

Grinder Salad is a game-changer for anyone who loves bold, Italian-inspired flavors but wants a lighter, fresher alternative to a traditional sandwich. It’s quick to make, easy to customize, and packed with texture and flavor. Whether you’re enjoying it as a low-carb lunch, a side dish for a gathering, or even stuffed into a toasted hoagie roll, this salad is a must-try.

With its creamy dressing, hearty deli meats, crisp lettuce, and tangy pepperoncini, this dish will quickly become a staple in your recipe rotation. So, the next time you’re craving a grinder sandwich, ditch the bread and enjoy this flavorful, satisfying salad instead!

Taco Stuffed Peppers: A Flavorful & Nutritious Twist on a Classic

Taco night just got a delicious upgrade! If you love the bold, savory flavors of tacos but want a healthier and more creative way to enjoy them, Taco Stuffed Peppers are the perfect dish. These vibrant bell peppers are packed with a hearty taco filling made of seasoned ground meat, black beans, corn, rice, and melted cheese. The result? A satisfying, nutrient-rich meal that’s perfect for weeknight dinners, meal prep, or even entertaining guests.

Stuffed peppers have been a staple in many cuisines for centuries, but this Mexican-inspired variation combines the best of both worlds—crave-worthy taco flavors with the wholesome goodness of fresh bell peppers. Whether you’re looking for a low-carb option, a gluten-free meal, or just a new way to enjoy tacos, this dish is incredibly versatile and easy to customize.

Why You’ll Love This Recipe

1. A Healthy Alternative to Traditional Tacos

Traditional tacos often rely on tortillas, which can be high in refined carbs. By swapping out the tortilla for a nutrient-dense bell pepper, you’re not only cutting down on carbs but also adding a dose of vitamins A and C, fiber, and antioxidants. This makes taco stuffed peppers a great option for those following low-carb, keto, or gluten-free diets.

2. A Perfect Balance of Flavor and Texture

The combination of savory, seasoned meat, hearty black beans, sweet bursts of corn, and cheesy goodness makes each bite incredibly satisfying. The bell pepper acts as a natural vessel, softening slightly as it bakes while still providing a slight crunch. It’s a perfect harmony of textures—juicy, hearty, and cheesy all in one bite!

3. Quick and Easy to Prepare

If you’re looking for a hassle-free, 30-minute meal, this recipe is for you. With minimal prep and a straightforward cooking process, you can have a nutritious and delicious dinner on the table in no time. Plus, it’s a great meal prep option, as the peppers reheat beautifully.

4. Highly Customizable to Suit Any Diet

Whether you’re looking to make it vegetarian, dairy-free, or spice it up with bold flavors, this recipe can be adapted to fit different dietary needs. Swap out the ground turkey for beans or tofu for a vegetarian version, use dairy-free cheese for a lactose-free option, or experiment with different spices to suit your taste.

Bold & Flavorful Ingredients

  • 1 tablespoon olive oil
  • 1/2 cup chopped onion
  • 1 tablespoon minced garlic
  • 1 lb ground turkey or ground beef
  • 4 large bell peppers (halved, red, orange, or yellow)
  • 1 cup tomato sauce
  • 1 tablespoon taco seasoning
  • 1 cup black beans
  • 1 cup frozen corn
  • 1 cup cooked white or brown rice
  • 1 cup shredded cheddar cheese

Step-by-Step: Crafting the Perfect Stuffed Peppers

  1. Preheat & Prep – Heat your oven to 350°F and grease a 9×13 oven-safe baking dish.
  2. Sauté the Base – Warm olive oil in a pan over medium-high heat for 3 minutes. Add chopped onions, garlic, and ground turkey (or beef). Cook for 10 minutes or until browned.
  3. Prepare the Peppers – While the meat mixture is cooking, slice the bell peppers in half from top to bottom, removing seeds and any white inner membranes. Arrange them in the baking dish.
  4. Mix the Filling – Once the meat is cooked, remove from heat. Stir in tomato sauce, taco seasoning, black beans, corn, and cooked rice until fully combined.
  5. Stuff & Sprinkle – Fill each pepper half with about ¾ cup of the mixture, pressing gently to pack it in. Top with a sprinkle of shredded cheddar cheese.
  6. Bake to Perfection – Place the dish in the oven and bake uncovered for 15-20 minutes, until the cheese melts and bubbles. The peppers should be tender enough to pierce with a fork.

Power-Packed Nutrition (Per Serving, Approximate)

  • Calories: ~300-350 kcal
  • Protein: ~25g
  • Carbohydrates: ~35g
  • Fiber: ~6g
  • Fat: ~10g

Common Questions About Taco Stuffed Peppers

1. Can I Use Different Types of Peppers?

Absolutely! While red, orange, and yellow bell peppers are preferred for their sweetness and vibrant color, green bell peppers work just as well. Green peppers have a slightly more bitter taste, but they still complement the taco filling beautifully. If you like a bit of heat, try using poblano peppers for a smoky, mildly spicy kick.

2. How Do I Make This Recipe Low-Carb?

For a low-carb version, simply replace the rice with cauliflower rice. Cauliflower rice absorbs flavors well and provides a similar texture without the added carbohydrates. You can also skip the beans if you’re following a strict keto diet.

3. What Are the Best Cheese Options?

Cheddar cheese is a classic choice, but feel free to experiment with Monterey Jack, pepper jack, or a Mexican cheese blend for extra creaminess and a more authentic taco flavor. If you’re dairy-free, opt for a plant-based cheese alternative or simply skip the cheese altogether.

4. Can I Make This Recipe Ahead of Time?

Yes! These stuffed peppers are great for meal prep. Simply prepare the taco filling in advance and store it in the refrigerator for up to 3 days. When you’re ready to eat, stuff the peppers and bake them fresh. You can also assemble the peppers ahead of time and refrigerate them, then bake just before serving.

5. Can I Freeze Taco Stuffed Peppers?

Definitely! To freeze, assemble the stuffed peppers without baking and place them in an airtight container or freezer-safe bag. They can be frozen for up to 3 months. When ready to enjoy, thaw them overnight in the refrigerator and bake as usual.

6. What Are the Best Side Dishes to Serve With This Meal?

These stuffed peppers are a complete meal on their own, but if you want to round out your dinner, here are some great sides to serve with them:

  • Mexican Street Corn Salad – A zesty, creamy corn salad with a hint of spice.
  • Guacamole & Chips – The perfect cool and creamy contrast to the warm, cheesy peppers.
  • Cilantro Lime Rice – If you’re not worried about carbs, this refreshing rice pairs beautifully with the taco flavors.
  • Black Bean Salad – A fresh and tangy salad with lime dressing and chopped vegetables.

7. How Do I Make Them Spicier?

If you love spicy food, there are several ways to add heat to these stuffed peppers:

  • Use spicy taco seasoning or add extra cayenne pepper.
  • Stir in diced jalapeños or chipotle peppers in adobo sauce into the filling.
  • Top with spicy salsa or hot sauce after baking.

8. Can I Make This Recipe in an Air Fryer?

Yes! If you prefer a faster cooking method, you can air fry taco stuffed peppers at 375°F for about 12-15 minutes. This method gives the peppers a slightly crispy texture while keeping the filling moist and flavorful.

Tips for the Best Taco Stuffed Peppers

  • Choose Large, Evenly Shaped Peppers – This ensures they hold enough filling without tipping over.
  • Don’t Overcook the Peppers – They should be tender but still hold their shape. Overbaking can make them too soft.
  • Drain Excess Liquid from the Filling – If your taco mixture is too watery, drain any excess before stuffing to prevent soggy peppers.
  • Add a Topping for Extra Flavor – A dollop of sour cream, avocado slices, or fresh chopped cilantro takes these peppers to the next level.

Conclusion: A Must-Try Meal for Any Occasion

Taco Stuffed Peppers are a fun, delicious, and wholesome way to enjoy all the flavors of a classic taco without the guilt. They are easy to make, highly customizable, and perfect for busy weeknights or meal prep. Whether you’re looking for a healthier alternative to traditional tacos, a creative way to use up bell peppers, or a dish that the whole family will love, this recipe checks all the boxes.

Give these Taco Stuffed Peppers a try and experience the perfect balance of bold flavors, satisfying textures, and nourishing ingredients. Enjoy them fresh out of the oven with your favorite toppings, and don’t forget to save some for leftovers—if there are any!

Creamy Thai Coconut Shrimp Curry: A Flavorful Journey Through Thai Cuisine

When it comes to dishes that perfectly blend comfort, spice, and exotic flavors, Thai coconut shrimp curry stands out as a true crowd-pleaser. This dish is a harmonious fusion of rich coconut milk, fragrant spices, and succulent shrimp, creating a meal that feels both indulgent and nourishing.

Whether you’re looking for a quick yet elegant weeknight dinner or an impressive dish to serve guests, this recipe delivers bold flavors with minimal effort. It brings the essence of Thai cuisine into your kitchen, combining heat, sweetness, and creaminess in every bite.

In this article, we’ll explore the origins of this dish, why it works so well, how to customize it, perfect side pairings, storage tips, and common FAQs.

The Magic Behind Thai Coconut Shrimp Curry

This dish is a perfect example of Thai cuisine’s ability to balance complex flavors. It combines sweet, savory, tangy, and spicy elements, making it deeply satisfying yet surprisingly light. Here’s why it works so well:

  • Coconut Milk: Creates a luxurious, creamy texture that soothes the heat from the spices.
  • Red Curry Paste: The heart of Thai curry, packed with chili, lemongrass, garlic, and galangal for an aromatic depth.
  • Fresh Lime Juice: Brightens the dish and balances the richness of the coconut milk.
  • Soy Sauce & Fish Sauce: Add umami, giving the dish a deeply savory taste.
  • Shrimp: A delicate protein that absorbs the flavors beautifully, adding natural sweetness.
  • Ginger & Garlic: Infuse the dish with warmth and earthiness.

These ingredients work together seamlessly, creating a dish that’s bold yet comforting, spicy yet creamy, and utterly irresistible.

The Origins of Coconut Shrimp Curry

Coconut-based curries are deeply rooted in Southeast Asian cuisine, particularly in Thailand, Indonesia, and Malaysia.

  • In Thai cuisine, curries are often a delicate balance of heat, sweetness, saltiness, and acidity. This is why coconut milk, lime juice, fish sauce, and chili paste are so commonly used together.
  • The use of red curry paste dates back centuries, with its blend of dried red chilies, garlic, shallots, galangal, and lemongrass forming the backbone of many Thai dishes.
  • Shrimp is widely consumed in coastal regions, making it a natural pairing for creamy coconut-based sauces.

While traditionally served in Thai households, this dish has gained worldwide popularity due to its rich flavor, ease of preparation, and adaptability.

Ingredients: A Symphony of Aromatic Goodness

  • 1 1/2 pounds large shrimp, peeled and deveined
  • 2 tablespoons coconut oil
  • 2 tablespoons ghee or butter
  • 1 medium onion, finely chopped
  • 4 cloves garlic, minced
  • 1 tablespoon fresh ginger, grated
  • 2 tablespoons red curry paste
  • 1 (14.5-ounce) can diced tomatoes
  • 1 (14-ounce) can full-fat coconut milk
  • 2 tablespoons soy sauce
  • 2 teaspoons fish sauce
  • 1 tablespoon brown sugar
  • 1/2 teaspoon turmeric
  • 1/2 teaspoon ground coriander
  • 1/2 teaspoon cumin
  • 1/2 teaspoon red pepper flakes
  • 1/4 teaspoon cayenne pepper (optional)
  • Juice of 1 lime
  • Salt and black pepper to taste
  • Fresh cilantro for garnish

Directions: The Road to Creamy Perfection

  1. Prepare the Shrimp: In a bowl, mix coconut oil, garam masala, garlic powder, curry powder, red pepper flakes, salt, and pepper. Coat the shrimp evenly and set aside.
  2. Sear the Shrimp: Heat coconut oil and ghee in a large skillet over medium heat. Add the shrimp and sear for 1 minute per side, then remove from the pan and set aside.
  3. Build the Flavor Base: In the same skillet, add onions and cook until soft. Stir in garlic, ginger, and red curry paste, cooking for 1-2 minutes until fragrant.
  4. Create the Curry Sauce: Add diced tomatoes, coconut milk, soy sauce, fish sauce, brown sugar, turmeric, coriander, cumin, and cayenne pepper. Stir well and let the sauce simmer for 10 minutes, allowing the flavors to meld and the sauce to thicken.
  5. Final Touches: Add lime juice, salt, and black pepper to taste. Return the shrimp to the pan and cook for another 2 minutes, just until the shrimp is fully cooked.
  6. Serve & Enjoy: Ladle the curry over steamed jasmine rice and garnish with fresh cilantro.

Nutritional Breakdown: A Healthy and Flavorful Feast

  • Calories: 400 kcal
  • Protein: High in lean protein from shrimp
  • Healthy Fats: Rich in coconut milk and ghee
  • Anti-Inflammatory Benefits: Spices like turmeric and ginger provide health benefits
  • Low-Carb Option: Can be served over cauliflower rice or zucchini noodles

Customizing Thai Coconut Shrimp Curry to Your Taste

One of the best things about this recipe is its versatility. Whether you’re looking for a spicier kick, a vegetarian option, or a lower-carb alternative, here are some custom modifications:

1. Adjusting the Spice Level

  • For more heat: Add extra red pepper flakes, fresh Thai chilies, or extra curry paste.
  • For milder flavors: Use less red curry paste or mix in a little extra coconut milk to mellow the spice.

2. Making It Vegetarian or Vegan

  • Swap the shrimp for firm tofu, chickpeas, or a mix of bell peppers and zucchini.
  • Replace fish sauce with extra soy sauce or coconut aminos.

3. Turning It Into a Low-Carb or Keto-Friendly Meal

  • Serve the curry over cauliflower rice instead of jasmine rice.
  • Omit the brown sugar or replace it with a low-carb sweetener.

4. Enhancing the Texture & Flavor

  • Add bell peppers, spinach, baby corn, or bamboo shoots for extra crunch.
  • Toss in toasted cashews or peanuts for added nuttiness.
  • Stir in a spoonful of peanut butter for a richer, nuttier taste.

No matter how you tweak it, this dish remains incredibly flavorful and satisfying.

What to Serve with Thai Coconut Shrimp Curry

To complete the meal, consider pairing the curry with sides that complement its creamy, spicy flavors.

Classic Pairings

  • Jasmine Rice or Basmati Rice – The best way to soak up the luscious curry sauce.
  • Naan or Roti – A soft, chewy option for scooping up every last drop.

Healthy Alternatives

  • Cauliflower Rice – A low-carb alternative that pairs beautifully with the curry.
  • Zucchini Noodles – A lighter, fresher twist.

Refreshing Side Dishes

  • Cucumber Salad – A cooling contrast to the warm, rich curry.
  • Mango Salsa – Adds a sweet and tangy burst of freshness.

The right side dish elevates the meal, making it even more satisfying and balanced.

Storing & Reheating: Keeping the Flavors Fresh

Coconut shrimp curry tastes just as delicious the next day, making it a great choice for meal prep.

Storage Tips

  • Refrigeration: Store leftovers in an airtight container for up to 3 days.
  • Freezing: While shrimp doesn’t freeze well once cooked, the curry sauce can be frozen separately for up to 2 months.

Reheating Methods

  • Stovetop (Best Method): Warm over low heat, stirring occasionally to prevent the coconut milk from separating.
  • Microwave: Heat in 30-second intervals, stirring in between.

By following these tips, you’ll preserve the creamy texture and bold flavors of the dish.

Frequently Asked Questions (FAQs)

1. Can I use frozen shrimp for this recipe?

Yes! Just make sure to thaw and pat dry the shrimp before cooking to prevent excess moisture.

2. What’s the best type of coconut milk to use?

Full-fat coconut milk is best for a rich, creamy texture. Light coconut milk will work, but the sauce will be thinner.

3. Can I make this curry ahead of time?

Yes! The flavors deepen over time. Simply store the curry in the fridge and reheat gently before serving.

4. Can I substitute curry paste with curry powder?

Curry paste is recommended for authentic Thai flavors, but in a pinch, you can use 2 teaspoons of curry powder mixed with a bit of chili paste or crushed red pepper.

5. How do I prevent the coconut milk from curdling?

Keep the heat on medium-low and avoid boiling the coconut milk. Stirring frequently helps maintain a smooth consistency.

Final Thoughts: A Must-Try Dish for Every Home Cook

Thai coconut shrimp curry is more than just a meal—it’s an experience of bold flavors, creamy textures, and aromatic spices. It’s:

  • Easy to prepare – Ready in 30 minutes, making it ideal for weeknights.
  • Customizable – Adapt it for different diets and spice preferences.
  • Restaurant-quality – Delivers the complex, rich flavors of authentic Thai cuisine.

Whether you’re a Thai food enthusiast or a home cook looking for a new favorite dish, this recipe is guaranteed to impress. Serve it with steamed rice, naan, or fresh herbs, and let the irresistible blend of coconut, spice, and citrus transport you to Thailand with every bite.

One-Pan Balsamic Chicken: A Flavorful, Easy, and Healthy Delight

When it comes to effortless, healthy, and flavor-packed meals, few dishes can rival the magic of One-Pan Balsamic Chicken. This recipe brings together the tangy depth of balsamic vinegar, the sweetness of honey, the richness of melted mozzarella, and the freshness of tomatoes and basil, all in a single skillet.

Not only is this dish delicious and satisfying, but it also simplifies cooking and cleanup—perfect for busy weeknights or meal prep enthusiasts. Whether you’re looking for a quick dinner, a healthy high-protein meal, or a dish that looks as impressive as it tastes, this one-pan wonder delivers.

In this article, we will explore the origins of balsamic chicken, why this recipe works so well, modifications to suit different diets, the best side dishes to pair it with, storage tips, and frequently asked questions.

Why One-Pan Balsamic Chicken Works

The beauty of this recipe lies in its simplicity and balance of flavors. Every ingredient plays a crucial role:

  • Balsamic vinegar – Provides a deep, tangy-sweet flavor that caramelizes beautifully when cooked.
  • Honey – Balances out the acidity of the vinegar with natural sweetness.
  • Garlic and Italian seasoning – Infuse the chicken with bold, aromatic flavors.
  • Mozzarella cheese – Melts into a creamy topping, adding richness to every bite.
  • Tomatoes and basil – Bring freshness and a burst of Mediterranean-inspired taste.
  • Chicken breast – A lean source of protein that absorbs the sauce beautifully.

This combination creates a perfectly balanced dish that is savory, slightly sweet, tangy, and cheesy, with a satisfying umami depth.

Ingredients: The Flavor Symphony

  • 1/3 cup balsamic vinegar
  • 2 tbsp honey
  • 2 tbsp olive oil
  • 4 cloves garlic, minced
  • 1 tsp Italian seasoning
  • 1 tsp onion powder
  • 1 tsp garlic powder
  • 1 tbsp Dijon mustard
  • 8 oz fresh mozzarella, torn into pieces
  • 2 cups grape tomatoes, halved
  • 2 tbsp fresh basil, chopped
  • 2 tbsp vegetable oil
  • 2 lb boneless, skinless chicken breasts (pounded to even thickness)
  • Sea salt & black pepper to taste

Directions: A Step-by-Step Culinary Journey

  1. Preheat & Prep – Set your oven to 400°F (200°C). In a small bowl, mix balsamic vinegar, honey, olive oil, garlic, Italian seasoning, onion powder, garlic powder, and Dijon mustard until well combined.
  2. Tomato & Cheese Bliss – In another bowl, combine torn mozzarella, halved grape tomatoes, and fresh basil. Season with salt and black pepper, then mix well.
  3. Sear the Chicken – Heat vegetable oil in an oven-safe skillet over medium-high heat. Season the chicken with salt and pepper, then place in the skillet. Sear for 2-4 minutes per side until golden brown.
  4. The Balsamic Magic – Stir the balsamic mixture once more and pour it over the chicken in the pan. Let it simmer for a minute while scraping any browned bits from the bottom of the pan.
  5. Melt & Bake – Remove the skillet from heat, top the chicken with the mozzarella mixture, and transfer to the oven. Bake uncovered for 18-23 minutes until the chicken is cooked through.
  6. Rest & Serve – Allow the chicken to rest for 3-5 minutes before serving. Enjoy your restaurant-quality meal with minimal cleanup!

Nutritional Breakdown: Health in Every Bite

  • Calories: 608 kcal
  • Carbohydrates: 19g
  • Protein: 63g
  • Fat: 30g
  • Saturated Fat: 8.8g
  • Cholesterol: 202mg
  • Sodium: 648mg
  • Potassium: 1046mg
  • Fiber: 1.5g
  • Sugar: 14g
  • Calcium: 277mg
  • Iron: 1.9mg

A Dish with Italian and Mediterranean Roots

Balsamic vinegar is a staple in Italian cuisine, particularly from the region of Modena, Italy, where traditional balsamic vinegar has been produced for centuries. It has long been used in marinades, reductions, and glazes to enhance the flavor of meats, vegetables, and salads.

Pairing balsamic vinegar with chicken, tomatoes, basil, and mozzarella naturally aligns with the flavors of Caprese salad, another Italian classic. This one-pan dish takes those traditional Mediterranean flavors and turns them into a hearty, warm, and satisfying main course.

Ways to Customize Your One-Pan Balsamic Chicken

One of the greatest things about this recipe is its versatility. Whether you have dietary restrictions or simply want to mix things up, here are a few ways to adapt and enhance the dish:

Make It Vegetarian or Vegan

  • Vegetarian Option – Substitute the chicken with firm tofu or a blend of portobello mushrooms, zucchini, and bell peppers.
  • Vegan Option – Replace mozzarella with plant-based cheese and use maple syrup instead of honey.

Turn It Into a Low-Carb Meal

  • This dish is already low in carbs, but if you want to reduce the sugar even further, swap honey for a sugar-free sweetener like monk fruit or erythritol.

Boost the Protein

  • If you want an even higher protein meal, use chicken thighs instead of breasts or mix in extra cheese.

Enhance the Flavor

  • Add sun-dried tomatoes, Kalamata olives, or capers for a briny contrast.
  • Sprinkle crushed red pepper flakes for a bit of heat.
  • Toss in pine nuts for added crunch and nutty flavor.

These modifications allow you to make the recipe your own while maintaining its core deliciousness.

Perfect Side Dishes for One-Pan Balsamic Chicken

Although this dish is packed with flavor and nutrients, pairing it with a complementary side dish can elevate your meal even further. Here are some great options:

Classic Pairings

  • Garlic Mashed Potatoes – A creamy and smooth contrast to the tangy chicken.
  • Steamed Asparagus or Broccoli – Adds freshness and crunch.
  • Quinoa Salad – A light, nutritious option that soaks up the balsamic sauce beautifully.

Low-Carb & Keto-Friendly Sides

  • Cauliflower Rice – A great alternative to regular rice.
  • Zucchini Noodles – Tossed with a little olive oil and parmesan.
  • Air-Fryer Green Beans – Crispy and flavorful with minimal effort.

Italian-Inspired Sides

  • Garlic Butter Pasta – A comforting and indulgent side.
  • Bulgur Wheat Salad – A wholesome grain-based side with a Mediterranean touch.

Choosing the right side dish depends on your personal preferences and dietary goals, but no matter what you choose, this balsamic chicken will shine as the star of the plate.

How to Store and Reheat Leftovers

If you’re lucky enough to have leftovers, you’ll want to store them properly to preserve their flavor and texture.

Storage Tips

  • Refrigeration: Store cooled chicken in an airtight container for up to 3-4 days.
  • Freezing: While you can freeze balsamic chicken, the texture of the cheese and tomatoes may change. If freezing, store without cheese and add fresh mozzarella when reheating.

Reheating Methods

  • Oven (Best Method): Preheat to 350°F, cover with foil, and bake for 15-20 minutes.
  • Stovetop: Heat in a skillet over medium-low heat with a splash of water or broth.
  • Microwave: Use a microwave-safe dish and heat in 30-second intervals to avoid drying out the chicken.

By following these steps, your leftovers will taste just as delicious as the day you made them.

Frequently Asked Questions (FAQs)

1. Can I use chicken thighs instead of chicken breasts?

Absolutely! Boneless, skinless chicken thighs work well in this recipe and provide a juicier texture. Keep in mind that they may require a few extra minutes of cooking time.

2. What can I substitute for balsamic vinegar?

If you don’t have balsamic vinegar, you can use red wine vinegar mixed with a teaspoon of sugar or honey. While the flavor won’t be identical, it will still create a delicious dish.

3. Can I make this dish ahead of time?

Yes! You can prepare the chicken and marinade ahead of time, storing them in the fridge for up to 24 hours before cooking. This allows the flavors to develop even more.

4. How do I know when the chicken is fully cooked?

Use a meat thermometer—the internal temperature should reach 165°F (75°C). If you don’t have a thermometer, slice the thickest part of the chicken to check for clear juices and no pink center.

5. Can I make this dish dairy-free?

Yes! Simply omit the mozzarella or replace it with a dairy-free cheese alternative. The dish will still be incredibly flavorful thanks to the balsamic glaze and garlic seasoning.

Final Thoughts: A Must-Try Dish for Any Occasion

One-Pan Balsamic Chicken is the perfect balance of simplicity, elegance, and bold flavors. It brings together classic Italian ingredients, making it a meal that is both nutritionally balanced and incredibly satisfying.

Whether you’re cooking for your family, meal prepping for the week, or impressing guests, this dish checks all the boxes:

  • Easy to make
  • Minimal cleanup
  • Customizable for different diets
  • Packed with bold, fresh flavors

So, next time you’re looking for a quick and delicious meal, try this One-Pan Balsamic Chicken—it might just become your new go-to recipe.

Hot Honey Chicken Bowls: A Sweet and Spicy Delight!

Hot Honey Chicken Bowls

Introduction to Hot Honey Chicken Bowls

Hot Honey Chicken Bowls offer the perfect balance of sweet, spicy, and satisfying flavors in every bite! Tender chicken is glazed with a fiery hot honey sauce that adds a delicious kick, while still maintaining a hint of sweetness. Paired with fresh veggies, rice, or quinoa, this bowl is both hearty and vibrant, making it a well-rounded meal that’s full of flavor. Whether you’re looking for a quick dinner or a meal prep option, these bowls will become a go-to for any occasion. Ready to enjoy a spicy, sweet, and satisfying meal? Let’s dive in!

Why You’ll Love This Hot Honey Chicken Bowls

These Hot Honey Chicken Bowls are a lifesaver for busy weeknights. They come together in just 35 minutes, making them a quick solution for dinner. The combination of sweet honey and spicy sauce creates a flavor explosion that will have your family asking for seconds. Plus, with colorful veggies and fluffy rice, it’s a meal that’s as pleasing to the eyes as it is to the palate. You’ll love how easy it is to make!

Ingredients for Hot Honey Chicken Bowls

Gathering the right ingredients is key to making these Hot Honey Chicken Bowls a success. Here’s what you’ll need:

  • Cooked white rice: This fluffy base soaks up all the delicious flavors. You can use brown rice for a healthier twist.
  • Boneless, skinless chicken thighs: They stay juicy and tender, making them perfect for frying. Feel free to swap with chicken breasts if you prefer.
  • All-purpose flour: This helps create a crispy coating on the chicken. For a gluten-free option, use almond flour or a gluten-free blend.
  • Garlic powder: Adds a savory depth to the dish. Fresh garlic can be used if you prefer a stronger flavor.
  • Onion powder: This enhances the overall taste without the hassle of chopping onions.
  • Paprika: It gives a subtle smokiness and a lovely color to the chicken.
  • Salt and black pepper: Essential for seasoning, they bring out the flavors of the other ingredients.
  • Vegetable oil: Used for frying the chicken, it helps achieve that golden-brown crust. Canola or peanut oil works well too.
  • Honey: The star of the show! It adds sweetness and helps create that sticky sauce.
  • Hot sauce: Adjust this to your spice preference. Sriracha or your favorite hot sauce will do the trick.
  • Soy sauce: It adds a savory umami flavor that balances the sweetness of the honey.
  • Broccoli florets: These add a pop of color and nutrition. You can substitute with any green vegetable you like.
  • Shredded carrots: They provide a nice crunch and sweetness. You can use pre-shredded carrots for convenience.
  • Sliced green onions: These are perfect for garnish, adding freshness and a mild onion flavor.

For exact measurements, check the bottom of the article where you can find everything available for printing. Happy cooking!

How to Make Hot Honey Chicken Bowls

Now that we have our ingredients ready, let’s dive into the cooking process! Making these Hot Honey Chicken Bowls is straightforward and fun. Follow these simple steps, and you’ll have a delicious meal on the table in no time.

Step 1: Cook the Rice

Start by cooking the white rice according to the package instructions. This usually takes about 15-20 minutes. While the rice is cooking, you can multitask and prepare the chicken and veggies. Fluffy rice is the perfect base for our sweet and spicy chicken!

Step 2: Prepare the Chicken Coating

In a shallow bowl, mix together the all-purpose flour, garlic powder, onion powder, paprika, salt, and black pepper. This flavorful coating will give the chicken a crispy texture. Make sure everything is well combined for an even flavor!

Step 3: Coat the Chicken

Cut the boneless, skinless chicken thighs into bite-sized pieces. Toss them in the flour mixture, ensuring each piece is well coated. Shake off any excess flour. This step is crucial for that delightful crunch we all love in Hot Honey Chicken Bowls!

Step 4: Cook the Chicken

Heat the vegetable oil in a large skillet over medium-high heat. Once the oil is hot, add the coated chicken pieces. Cook for about 5-7 minutes, turning occasionally, until they are golden brown and cooked through. The sizzling sound is music to my ears!

Step 5: Steam the Vegetables

While the chicken is cooking, steam the broccoli florets until they are tender, about 4-5 minutes. You can use a steamer basket or simply microwave them with a splash of water. Steamed veggies add a lovely crunch and color to your bowls!

Step 6: Make the Hot Honey Sauce

In a small bowl, whisk together the honey, hot sauce, and soy sauce. Once the chicken is cooked, pour this sweet and spicy mixture over the chicken in the skillet. Toss everything to coat evenly. Cook for an additional 2-3 minutes until the sauce thickens slightly. Your kitchen will smell heavenly!

Step 7: Assemble the Bowls

To assemble your Hot Honey Chicken Bowls, divide the cooked rice among four bowls. Top each bowl with the hot honey chicken, steamed broccoli, shredded carrots, and sliced green onions. Feel free to get creative with the presentation. Enjoy every bite of this delightful dish!

Hot Honey Chicken Bowls

Tips for Success

  • Prep your ingredients ahead of time to save precious minutes during cooking.
  • Don’t overcrowd the skillet when cooking the chicken; this ensures a crispy texture.
  • Adjust the hot sauce to your family’s spice tolerance for a personalized kick.
  • For extra crunch, sprinkle chopped peanuts or cashews on top before serving.
  • Feel free to mix in your favorite veggies for added nutrition and flavor!

Equipment Needed

  • Large skillet: Essential for frying the chicken. A non-stick pan works well too.
  • Shallow bowl: Perfect for mixing the flour coating. A plate can also do the trick.
  • Steamer basket: Ideal for steaming veggies. You can use a microwave-safe bowl with a lid as an alternative.
  • Whisk: Great for mixing the hot honey sauce. A fork can work in a pinch!

Variations

  • Spicy Garlic Hot Honey Chicken: Add minced garlic to the hot honey sauce for an extra punch of flavor.
  • Vegetarian Option: Substitute chicken with crispy tofu or tempeh for a plant-based delight.
  • Grain Swap: Use quinoa or cauliflower rice instead of white rice for a healthier alternative.
  • Different Veggies: Mix in bell peppers, snap peas, or zucchini for a colorful twist.
  • Sweet and Sour Variation: Add pineapple chunks to the hot honey sauce for a tropical flair.

Serving Suggestions

  • Pair your Hot Honey Chicken Bowls with a refreshing cucumber salad for a cool contrast.
  • A chilled glass of iced tea or lemonade complements the sweet and spicy flavors perfectly.
  • For a beautiful presentation, serve in colorful bowls and garnish with extra green onions.

FAQs about Hot Honey Chicken Bowls

As you embark on your culinary journey with Hot Honey Chicken Bowls, you might have a few questions. Here are some common queries I’ve encountered, along with helpful answers to guide you!

Can I make Hot Honey Chicken Bowls ahead of time?

Absolutely! You can prepare the chicken and sauce in advance. Just store them separately in the fridge. When you’re ready to eat, reheat and assemble your bowls for a quick meal.

What can I substitute for chicken in this recipe?

If you’re looking for a vegetarian option, crispy tofu or tempeh works wonderfully. You can also use chickpeas for a protein-packed alternative!

How spicy are these Hot Honey Chicken Bowls?

The spice level is adjustable! Start with a tablespoon of hot sauce, and you can always add more if you like it spicier. It’s all about finding that perfect balance for your taste buds.

Can I use brown rice instead of white rice?

Yes, brown rice is a fantastic substitute! It adds a nutty flavor and extra fiber, making your meal even healthier. Just remember, it may take a bit longer to cook.

What sides pair well with Hot Honey Chicken Bowls?

These bowls are delicious on their own, but you can serve them with a light salad or some steamed dumplings for a complete meal. A refreshing drink like iced tea or lemonade complements the flavors beautifully!

Final Thoughts

Creating these Hot Honey Chicken Bowls is more than just cooking; it’s about bringing joy to the table. The sweet and spicy flavors dance together, making every bite a delightful experience. I love how this dish transforms a busy weeknight into a special occasion, allowing my family to gather and savor the moment. Plus, the vibrant colors of the veggies make it visually appealing! Whether you’re a seasoned cook or just starting, this recipe is a fantastic way to impress your loved ones. So, roll up your sleeves and enjoy the culinary adventure that awaits!

“`

Print
clock clock iconcutlery cutlery iconflag flag iconfolder folder iconinstagram instagram iconpinterest pinterest iconfacebook facebook iconprint print iconsquares squares iconheart heart iconheart solid heart solid icon
Hot Honey Chicken Bowls

Hot Honey Chicken Bowls: A Sweet and Spicy Delight!


5 Stars 4 Stars 3 Stars 2 Stars 1 Star

No reviews

  • Author: Isabella
  • Total Time: 35 minutes
  • Yield: 4 servings 1x

Description

Hot Honey Chicken Bowls are a delicious combination of sweet and spicy flavors, featuring crispy chicken thighs coated in a hot honey sauce, served over a bed of fluffy rice with fresh vegetables.


Ingredients

Scale
  • 2 cups cooked white rice
  • 1 pound boneless, skinless chicken thighs
  • 1/2 cup all-purpose flour
  • 1 teaspoon garlic powder
  • 1 teaspoon onion powder
  • 1/2 teaspoon paprika
  • 1/2 teaspoon salt
  • 1/4 teaspoon black pepper
  • 1/4 cup vegetable oil
  • 1/4 cup honey
  • 1 tablespoon hot sauce (adjust to taste)
  • 1 tablespoon soy sauce
  • 1 cup broccoli florets
  • 1/2 cup shredded carrots
  • 1/4 cup sliced green onions

Instructions

  1. Cook the white rice according to package instructions and set aside.
  2. In a shallow bowl, mix the flour, garlic powder, onion powder, paprika, salt, and black pepper.
  3. Cut the chicken thighs into bite-sized pieces and coat them in the flour mixture, shaking off any excess.
  4. Heat the vegetable oil in a large skillet over medium-high heat. Add the coated chicken pieces and cook for about 5-7 minutes, or until golden brown and cooked through.
  5. While the chicken is cooking, steam the broccoli florets until tender, about 4-5 minutes.
  6. In a small bowl, whisk together the honey, hot sauce, and soy sauce. Pour this mixture over the cooked chicken in the skillet and toss to coat evenly. Cook for an additional 2-3 minutes until the sauce thickens slightly.
  7. To assemble the bowls, divide the cooked rice among four bowls. Top with the hot honey chicken, steamed broccoli, shredded carrots, and sliced green onions.

Notes

  • For a crunchier texture, try adding chopped peanuts or cashews on top before serving.
  • For a vegetarian option, substitute the chicken with crispy tofu and use vegetable broth for cooking the rice.
  • Prep Time: 15 minutes
  • Cook Time: 20 minutes
  • Category: Main Course
  • Method: Skillet
  • Cuisine: American

Nutrition

  • Serving Size: 1 bowl
  • Calories: 480
  • Sugar: 24g
  • Sodium: 800mg
  • Fat: 20g
  • Saturated Fat: 3g
  • Unsaturated Fat: 17g
  • Trans Fat: 0g
  • Carbohydrates: 45g
  • Fiber: 2g
  • Protein: 28g
  • Cholesterol: 100mg

The Ultimate Guide to Cottage Cheese Rolls: A Delightful Homemade Treat

Cottage cheese rolls are an underrated gem in the world of baking. Light, fluffy, and subtly sweet, they strike the perfect balance between indulgence and nutrition. Whether you’re looking for a new breakfast staple, a snack to accompany your afternoon tea, or a delicious side for dinner, these rolls check all the boxes.

In this article, we’ll explore everything you need to know about cottage cheese rolls, from their origins and benefits to expert tips and frequently asked questions.

Why Cottage Cheese Rolls Deserve a Spot in Your Kitchen

A Unique Twist on Traditional Rolls

Most bread rolls rely heavily on butter, milk, and yeast for their texture and flavor. Cottage cheese rolls, however, use cottage cheese as a key ingredient, making them distinct in both taste and composition. The cheese adds moisture, a subtle tang, and a protein boost that traditional rolls often lack.

Soft, Chewy, and Perfectly Balanced

One of the standout features of these rolls is their texture. Thanks to the cottage cheese, they have a soft, slightly chewy interior while maintaining a light and airy bite. The subtle sweetness from sugar enhances their flavor without overpowering their delicate, cheesy essence.

Quick and Easy to Make

Unlike yeast-based rolls that require rising time, these cottage cheese rolls are incredibly beginner-friendly. The dough comes together quickly, and you can have fresh, homemade rolls on your table in under an hour.

Gather Your Goodies – Ingredients

  • 3/4 cup cottage cheese
  • 2 eggs
  • 3/4 teaspoon vanilla essence
  • 1/4 cup granulated sugar
  • 1/2 teaspoon baking soda
  • 3/4 teaspoon white vinegar
  • 2 cups plain flour
  • 1/4 teaspoon salt
  • 3/4 teaspoon baking powder
  • 2 tablespoons milk
  • 2 tablespoons sugar

Baking Bliss – Directions

Step 1: Preheat & Prepare

  • Preheat your oven to 350°F (175°C).
  • Line a baking sheet with parchment paper or a Silpat mat to prevent sticking.

Step 2: Blend the Wet Ingredients

  • In a food processor, combine cottage cheese, eggs, vanilla essence, and sugar.
  • Process until smooth and well-mixed.

Step 3: Activate the Baking Soda

  • In a small bowl, mix baking soda with vinegar until it foams.
  • Add this mixture to the food processor and blend.

Step 4: Introduce the Dry Ingredients

  • Add flour, salt, and baking powder into the food processor.
  • Blend until combined. The dough will be wet and sticky—this is normal!

Step 5: Shape the Dough

  • Flour a work surface and transfer the sticky dough onto it.
  • Divide it into 8 equal portions, rolling each into a ball.
  • Arrange them on the prepared baking sheet, spacing them evenly.

Step 6: Bake & Enhance

  • Bake for 12 minutes.
  • Remove from oven and brush each roll with milk.
  • Sprinkle a bit of sugar on top for extra sweetness.
  • Return to the oven and bake for another 5-10 minutes until golden brown.

Step 7: Cool & Store

  • Allow the rolls to cool slightly before serving.
  • Store leftovers in an airtight container to maintain freshness.

Nutritious Nibbles – Estimated Nutritional Value (Per Roll)

  • Calories: ~120-150 kcal
  • Protein: ~5g
  • Carbohydrates: ~20g
  • Fat: ~3g
  • Fiber: ~1g

Health Benefits of Cottage Cheese Rolls

Rich in Protein

Cottage cheese is packed with protein, making these rolls more satisfying than traditional white bread. They can keep you fuller for longer and provide sustained energy throughout the day.

Lower in Fat Than Butter-Based Rolls

Since cottage cheese contributes moisture and texture, these rolls require less butter or oil, reducing their overall fat content while maintaining a rich, indulgent taste.

A Good Source of Calcium

Cottage cheese is naturally rich in calcium, which is essential for strong bones and teeth. Incorporating these rolls into your diet can be a delicious way to support your calcium intake.

No Yeast, No Problem

Many people avoid homemade bread recipes because working with yeast can be intimidating. Cottage cheese rolls eliminate this concern, making them an excellent choice for those who want to bake fresh bread without the hassle of proofing and rising times.

Pro Tips for Making the Best Cottage Cheese Rolls

1. Choose the Right Cottage Cheese

The type of cottage cheese you use can impact the texture of the rolls. A smooth, small-curd cottage cheese works best as it blends seamlessly into the dough. If using a chunkier variety, consider blending it before mixing.

2. Use a Food Processor for a Smooth Dough

Cottage cheese can sometimes create small lumps in the dough. Processing the wet ingredients first ensures a uniform consistency, resulting in a smoother roll.

3. Don’t Skip the Baking Soda and Vinegar Reaction

This step might seem minor, but it’s crucial. The reaction between baking soda and vinegar helps create air pockets in the dough, leading to a lighter texture.

4. Avoid Overmixing the Dough

While it’s important to mix the ingredients well, overworking the dough can lead to tough rolls. Mix just until everything is combined.

5. Customize with Flavors and Toppings

  • Sweet Variation: Add a touch of cinnamon or nutmeg to the dough for a warm, aromatic twist.
  • Savory Variation: Mix in some fresh herbs, garlic powder, or grated cheese for a more robust flavor.
  • Toppings: Sprinkle sesame seeds, poppy seeds, or a dusting of sugar on top before baking for an extra layer of taste and texture.

Serving Suggestions: How to Enjoy Cottage Cheese Rolls

Pairing with Spreads and Dips

These rolls are incredibly versatile and pair well with both sweet and savory spreads. Try them with:

  • Honey or fruit preserves for a breakfast treat
  • Garlic butter or herb cream cheese for a savory snack
  • Nut butter or chocolate spread for a dessert-like indulgence

As a Side for Meals

Cottage cheese rolls complement various dishes beautifully. Serve them with:

  • Soups and stews for a warm, comforting meal
  • Salads as a light, protein-rich addition
  • Eggs and avocado for a nutritious breakfast option

Make Them Part of a Lunchbox or Picnic

Since they are soft and travel well, these rolls make a great addition to lunchboxes or picnic baskets. Pair them with some cheese, deli meats, or fresh veggies for a wholesome, on-the-go meal.

Frequently Asked Questions (FAQs)

1. Can I Use Different Types of Flour?

Yes! While plain all-purpose flour works best for achieving a light texture, you can experiment with whole wheat flour for added fiber. If using whole wheat, consider mixing it with all-purpose flour to prevent the rolls from becoming too dense.

2. How Should I Store These Rolls?

To keep them fresh, store cottage cheese rolls in an airtight container at room temperature for up to 3 days. If you want them to last longer, refrigerate them for up to a week or freeze them for up to 3 months.

3. Can I Make These Rolls Gluten-Free?

Yes! Substitute all-purpose flour with a gluten-free flour blend. Keep in mind that the texture may vary slightly, so using a blend that contains xanthan gum can help maintain the structure of the rolls.

4. Can I Prepare the Dough in Advance?

Since this recipe does not use yeast, the dough is best baked immediately. However, you can mix the dough and store it in the refrigerator for a few hours before baking if needed.

5. Can I Substitute Cottage Cheese with Another Ingredient?

Greek yogurt or ricotta cheese can be used as substitutes, but they may slightly alter the texture and flavor. If using Greek yogurt, opt for full-fat to maintain the richness.

6. Why Are My Rolls Too Dense?

If your rolls turned out denser than expected, it could be due to overmixing the dough, not using the correct cottage cheese consistency, or skipping the baking soda and vinegar reaction. Ensure you follow the steps carefully for the best results.

7. Can I Double the Recipe?

Absolutely! If you’re baking for a crowd, simply double the ingredients while keeping the same preparation method. You may need to bake in batches depending on oven space.

Final Thoughts: A Simple Yet Rewarding Bake

Cottage cheese rolls offer the best of both worlds—comforting, homemade bread with a nutritional boost from protein-rich cottage cheese. They are easy to prepare, require no yeast, and offer a delightful balance of softness and flavor.

Whether you enjoy them fresh from the oven with a pat of butter or as part of a meal, these rolls are sure to become a household favorite. Their versatility, ease of preparation, and delicious taste make them a recipe worth keeping in your repertoire.

So the next time you’re craving a homemade baked good that’s quick, nutritious, and undeniably delicious, give these cottage cheese rolls a try. Your taste buds—and your family—will thank you!