Chicken Scampi Recipe: A Quick and Delicious Meal

Introduction to Chicken Scampi Recipe

What is Chicken Scampi?

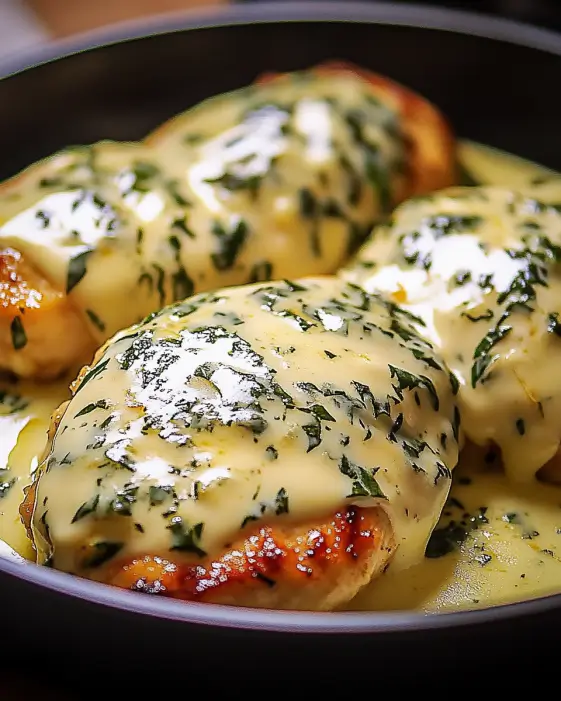
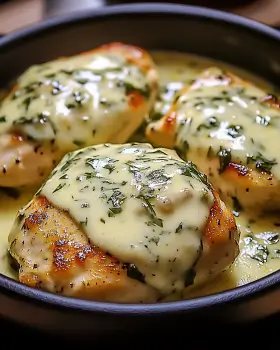
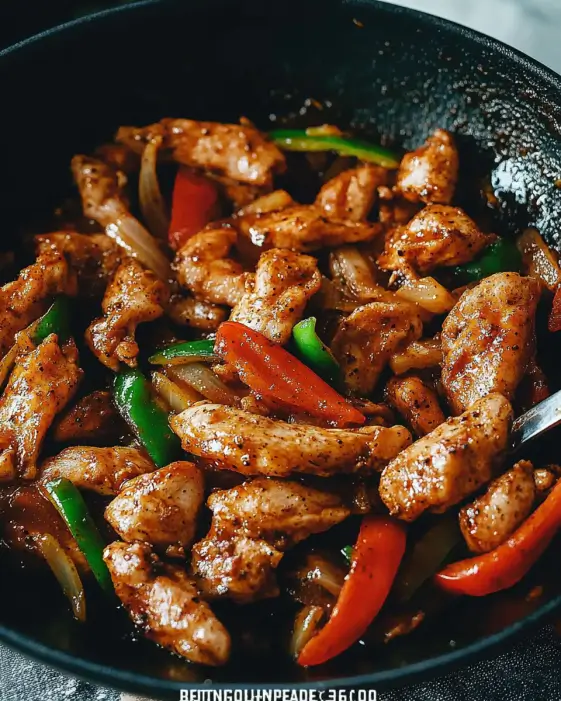
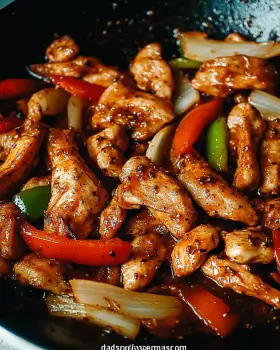
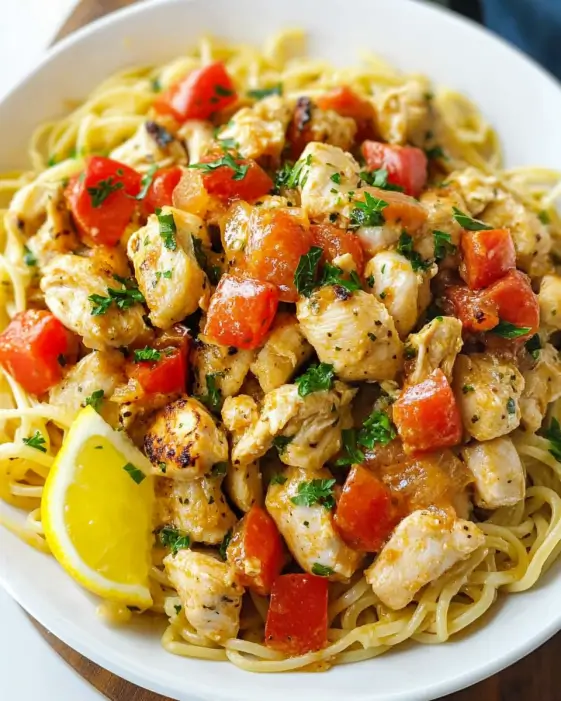
Chicken Scampi is a delightful dish that combines tender chicken with a rich, buttery sauce. Traditionally, scampi refers to a type of shrimp, but this recipe gives it a delicious twist by using chicken instead. The dish is known for its vibrant flavors, thanks to the addition of garlic, lemon, and white wine. It’s a perfect meal for any occasion, whether it’s a cozy family dinner or a special gathering with friends.

Why You Should Try This Chicken Scampi Recipe

There are many reasons to try this Chicken Scampi recipe. First, it’s incredibly easy to make, even for beginner cooks. With just a few simple ingredients, you can create a restaurant-quality meal right in your kitchen. Second, the combination of flavors is simply irresistible. The garlic and lemon create a bright, zesty taste that pairs perfectly with the chicken and pasta.

Moreover, this dish is versatile. You can easily customize it by adding your favorite vegetables or adjusting the spice level to suit your taste. Plus, it’s a great way to impress your guests without spending hours in the kitchen. In just about 30 minutes, you can serve a delicious, hearty meal that everyone will love. So, roll up your sleeves and get ready to enjoy a delightful Chicken Scampi that will have everyone asking for seconds!

Ingredients for Chicken Scampi Recipe

To create a mouthwatering Chicken Scampi, you’ll need a few key ingredients. Each one plays a vital role in building the dish’s rich flavors. Here’s what you’ll need:

  • 2 pounds boneless, skinless chicken breasts, diced
  • 8 ounces spaghetti or fettuccine
  • 4 tablespoons unsalted butter
  • 4 tablespoons extra virgin olive oil
  • 4 cloves garlic, finely chopped
  • 1 teaspoon crushed red pepper flakes (adjust to taste)
  • 1 cup chicken stock
  • 1 cup dry white wine (or substitute with more chicken stock)
  • Juice and zest of 1 lemon
  • Salt and freshly ground black pepper to taste
  • 1/4 cup fresh parsley, chopped
  • Grated Parmesan cheese for garnish

These ingredients come together to create a delightful balance of flavors. The chicken provides protein, while the pasta serves as a hearty base. The garlic and lemon add brightness, and the butter and olive oil create a luscious sauce. Don’t forget the fresh parsley and Parmesan cheese for that finishing touch!

Feel free to experiment with the ingredients. For instance, you can add vegetables like spinach or cherry tomatoes for extra nutrition and color. This Chicken Scampi recipe is all about making it your own while enjoying the classic flavors that everyone loves.

Step-by-Step Preparation of Chicken Scampi Recipe

Step 1: Preparing the Chicken

Start by preparing the chicken. First, take your 2 pounds of boneless, skinless chicken breasts and dice them into bite-sized pieces. This helps the chicken cook evenly and makes it easier to eat. Once diced, season the chicken with salt and freshly ground black pepper. This simple step enhances the flavor of the chicken, making it even more delicious.

Step 2: Sautéing the Aromatics

Next, it’s time to sauté the aromatics. In a large frying pan, combine 4 tablespoons of unsalted butter and 4 tablespoons of extra virgin olive oil over medium heat. Once the butter has melted, add 4 finely chopped cloves of garlic and 1 teaspoon of crushed red pepper flakes. Stir the mixture for about a minute. You’ll know it’s ready when the garlic becomes fragrant and slightly golden. This step is crucial as it builds the base flavor for your Chicken Scampi.

Step 3: Cooking the Chicken

Now, introduce the seasoned chicken to the pan. Sauté the chicken for about 5 to 7 minutes, stirring occasionally. You want the chicken to turn golden brown and be fully cooked through. This is where the magic happens! The chicken absorbs the flavors from the garlic and oil, making it tender and tasty.

Step 4: Adding the Sauce

Once the chicken is cooked, it’s time to add the sauce. Pour in 1 cup of chicken stock and 1 cup of dry white wine (or more chicken stock if you prefer). Allow the mixture to come to a gentle simmer. Let it cook for about 5 minutes. This allows the flavors to meld together beautifully, creating a rich sauce that will coat your pasta perfectly.

Step 5: Combining with Pasta

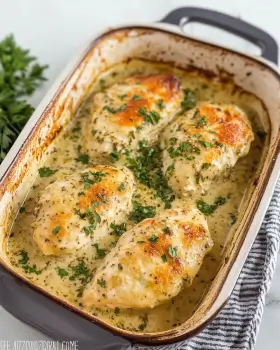
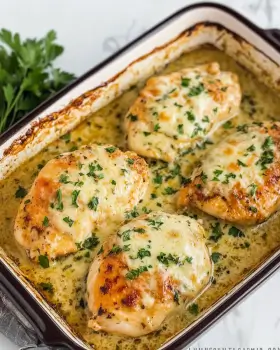
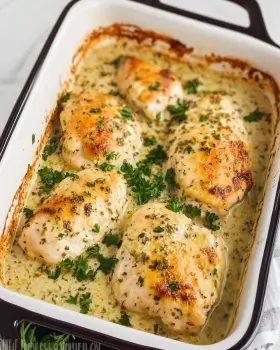
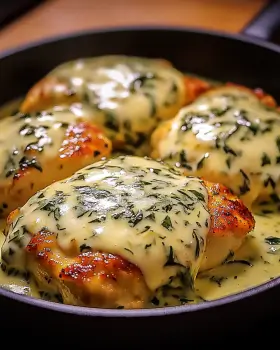
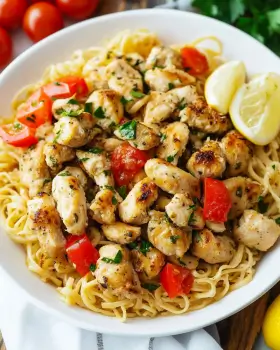
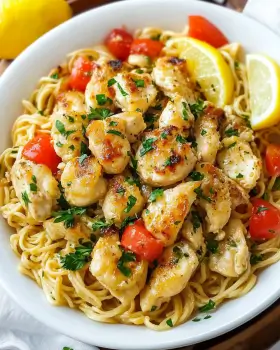
Finally, it’s time to bring everything together! Squeeze the juice of 1 lemon and add the zest into the pan. Then, add the drained spaghetti or fettuccine. Gently toss everything together, ensuring the pasta is well-coated with the luscious sauce. This step is essential for achieving that delightful Chicken Scampi experience. Once combined, take the pan off the heat and sprinkle with fresh parsley. Serve immediately, garnished with grated Parmesan cheese for that extra touch of flavor!

Variations of Chicken Scampi Recipe

Shrimp Scampi Variation

If you love seafood, why not try a Shrimp Scampi variation? This version swaps out chicken for succulent shrimp, creating a delightful twist on the classic recipe. To make this dish, simply follow the same steps as the Chicken Scampi recipe. However, instead of using 2 pounds of chicken, use 1 to 1.5 pounds of large shrimp, peeled and deveined.

When cooking the shrimp, sauté them for about 3 to 4 minutes until they turn pink and opaque. Be careful not to overcook them, as shrimp can become tough if left on the heat too long. The rest of the recipe remains the same, allowing the garlic, lemon, and white wine flavors to shine through. This Shrimp Scampi is perfect for a special occasion or a cozy dinner at home!

Vegetarian Scampi Option

For those who prefer a meat-free meal, a Vegetarian Scampi option is a fantastic choice. Instead of chicken, you can use hearty vegetables like zucchini, bell peppers, and mushrooms. Start by dicing your vegetables into bite-sized pieces. Sauté them in the butter and olive oil mixture just like you would with the chicken.

Cook the vegetables until they are tender, which usually takes about 5 to 7 minutes. Then, follow the same steps for adding the sauce and pasta. You can also add some chickpeas or white beans for extra protein. This Vegetarian Scampi is not only delicious but also colorful and nutritious, making it a great option for everyone at the table!

Cooking Note for Chicken Scampi Recipe

When preparing your Chicken Scampi, there are a few important cooking notes to keep in mind. These tips will help you achieve the best results and ensure your dish is bursting with flavor.

First, always use fresh ingredients whenever possible. Fresh garlic, lemon, and herbs will elevate the taste of your dish significantly. Dried herbs can be used in a pinch, but fresh parsley adds a vibrant touch that enhances the overall presentation.

Next, be mindful of the cooking time for the chicken. Overcooking can lead to dry, tough meat. Aim for a golden brown color and ensure the chicken is cooked through but still juicy. Using a meat thermometer can help; the internal temperature should reach 165°F (75°C).

Additionally, when adding the chicken stock and white wine, allow the mixture to simmer gently. This step is crucial for developing the sauce’s flavor. If you find the sauce too thin, let it simmer a bit longer to reduce and thicken. On the other hand, if it becomes too thick, you can always add a splash of extra chicken stock or water to reach your desired consistency.

Lastly, remember to taste as you go! Adjust the seasoning with salt, pepper, or even more lemon juice to suit your palate. Cooking is all about personal preference, and this Chicken Scampi recipe is flexible enough to accommodate your taste.

By following these cooking notes, you’ll create a Chicken Scampi that’s not only delicious but also a joy to prepare. Enjoy the process and savor the delightful flavors that come together in this wonderful dish!

Serving Suggestions for Chicken Scampi Recipe

Best Side Dishes to Pair

When serving your Chicken Scampi, choosing the right side dishes can elevate the meal even further. Here are some delightful options that pair beautifully with this dish:

  • Garlic Bread: A classic choice, garlic bread is perfect for soaking up the delicious sauce. You can make it easily by spreading butter and minced garlic on slices of baguette, then toasting them until golden.
  • Caesar Salad: A fresh Caesar salad adds a crisp contrast to the rich flavors of the Chicken Scampi. The crunchy romaine lettuce, creamy dressing, and crunchy croutons make for a refreshing side.
  • Steamed Vegetables: Lightly steamed vegetables like broccoli, asparagus, or green beans provide a healthy and colorful addition to your meal. They add nutrition and balance to the dish.
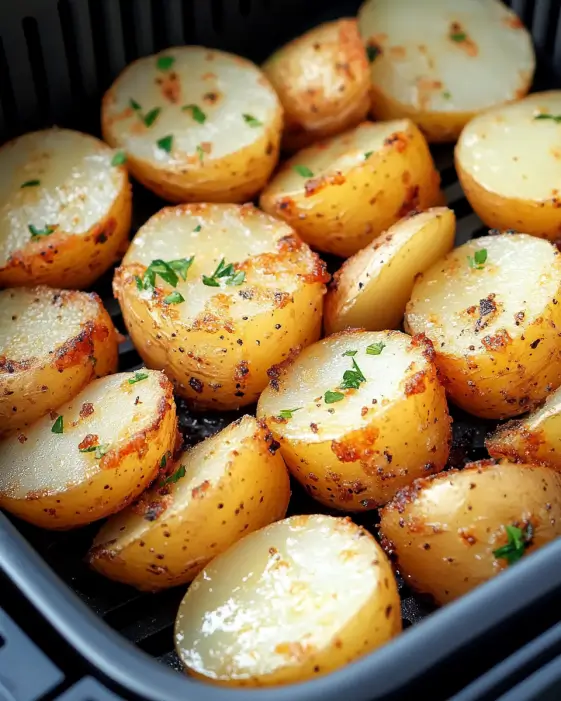
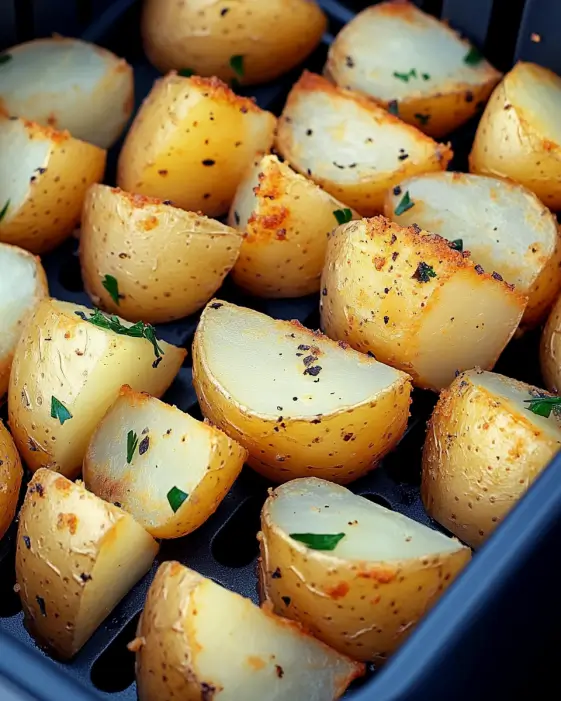
  • Roasted Potatoes: For a heartier option, consider serving roasted potatoes. Season them with herbs and spices for a flavorful side that complements the chicken.

These side dishes not only enhance the overall dining experience but also add variety to your plate. Feel free to mix and match based on your preferences and what you have on hand!

Wine Pairing Recommendations

Pairing the right wine with your Chicken Scampi can enhance the flavors of the dish. Here are some excellent wine options to consider:

  • Sauvignon Blanc: This white wine is known for its crisp acidity and citrus notes, making it a perfect match for the lemony flavors in the Chicken Scampi.
  • Chardonnay: A lightly oaked Chardonnay can complement the buttery sauce beautifully. Its creamy texture pairs well with the richness of the dish.
  • Pinot Grigio: If you prefer a lighter option, Pinot Grigio offers a refreshing taste that balances the garlic and lemon in the recipe.
  • Prosecco: For a sparkling option, Prosecco adds a fun and festive touch. Its bubbles and fruity notes can enhance the overall dining experience.

When selecting a wine, consider your personal taste and the flavors of the dish. Enjoying a glass of wine alongside your Chicken Scampi can make your meal feel even more special!

Tips for Perfecting Your Chicken Scampi Recipe

To make your Chicken Scampi truly shine, consider these helpful tips. They will guide you in creating a dish that’s not only delicious but also visually appealing. With a few simple adjustments, you can elevate your cooking game!

First, always start with high-quality ingredients. Fresh chicken, vibrant garlic, and ripe lemons will enhance the flavors significantly. When possible, choose organic or locally sourced products. This small change can make a big difference in taste.

Next, pay attention to the cooking temperature. Cooking the chicken over medium heat allows it to brown nicely without burning. If the heat is too high, the chicken may cook unevenly. A golden-brown exterior adds flavor and texture, making your dish more enjoyable.

Don’t forget to let the chicken rest for a few minutes after cooking. This step allows the juices to redistribute, keeping the meat tender and juicy. If you cut into it right away, you might lose those delicious juices!

When it comes to the sauce, balance is key. Taste as you go! If you find the sauce too acidic, a pinch of sugar can help mellow the flavors. Conversely, if it’s too rich, a splash of lemon juice can brighten it up. Adjusting the seasoning to your liking ensures a dish that suits your palate perfectly.

Lastly, presentation matters! Serve your Chicken Scampi in a large, shallow bowl. This allows the pasta to spread out, showcasing the chicken and sauce beautifully. A sprinkle of fresh parsley and a generous amount of grated Parmesan cheese on top will add color and make the dish look inviting.

By following these tips, you’ll create a Chicken Scampi that’s not only tasty but also a feast for the eyes. Enjoy the process and have fun experimenting with flavors!

Breakdown of Time for Chicken Scampi Recipe

Prep Time

Preparing your Chicken Scampi is quick and easy! The prep time for this recipe is about 10 to 15 minutes. During this time, you will gather all your ingredients, dice the chicken, and chop the garlic. Having everything ready before you start cooking makes the process smoother and more enjoyable. Plus, it helps you stay organized in the kitchen!

Cooking Time

The cooking time for Chicken Scampi is approximately 15 to 20 minutes. This includes sautéing the chicken, adding the sauce, and combining everything with the pasta. The key is to cook the chicken until it’s golden brown and fully cooked, which usually takes about 5 to 7 minutes. After that, simmering the sauce for about 5 minutes allows the flavors to meld beautifully.

Total Time

In total, you can expect to spend around 30 to 35 minutes from start to finish. This makes Chicken Scampi a fantastic option for a weeknight dinner or a last-minute meal for guests. With just a little time and effort, you can serve a delicious dish that everyone will love!

Nutritional Information for Chicken Scampi Recipe

Calories

When it comes to enjoying a delicious Chicken Scampi, being mindful of the calories is important. Each serving of this delightful dish contains approximately 550 calories. This makes it a satisfying meal that can fit into a balanced diet. The combination of chicken, pasta, and sauce provides a hearty option without going overboard on calories.

Protein

Protein is essential for maintaining muscle health and overall well-being. In this Chicken Scampi recipe, you’ll find about 38 grams of protein per serving. The diced chicken breasts are the primary source of protein, making this dish a great choice for those looking to increase their protein intake. Pairing it with pasta adds a nice balance of carbohydrates, making it a well-rounded meal.

Sodium

Monitoring sodium intake is crucial for many people. Each serving of Chicken Scampi contains around 800 milligrams of sodium. This amount can vary based on the chicken stock and added salt. To reduce sodium levels, consider using low-sodium chicken stock and adjusting the salt to your taste. This way, you can enjoy the flavors without worrying too much about sodium content.

Overall, this Chicken Scampi recipe offers a delicious and nutritious meal option. With a good balance of calories, protein, and sodium, it’s a dish that can be enjoyed as part of a healthy lifestyle. Remember to pair it with fresh vegetables or a light salad for added nutrients and fiber!

FAQs about Chicken Scampi Recipe

Can I use frozen chicken for this Chicken Scampi Recipe?

Yes, you can use frozen chicken for this Chicken Scampi recipe! However, it’s important to thaw the chicken completely before cooking. You can do this by placing it in the refrigerator overnight or using the defrost setting on your microwave. Once thawed, follow the recipe as usual. Just keep in mind that cooking times may vary slightly, so ensure the chicken reaches an internal temperature of 165°F (75°C) for safety.

What type of pasta is best for Chicken Scampi Recipe?

When it comes to pasta for Chicken Scampi, both spaghetti and fettuccine are excellent choices. Spaghetti offers a classic, thin texture that pairs well with the sauce, while fettuccine provides a wider surface area to hold the delicious flavors. You can also experiment with other pasta types like linguine or penne. Ultimately, it’s all about your personal preference!

How can I make Chicken Scampi Recipe gluten-free?

Making a gluten-free Chicken Scampi is easy! Simply substitute regular pasta with gluten-free pasta made from rice, quinoa, or other gluten-free grains. Many brands offer delicious options that cook similarly to traditional pasta. Additionally, ensure that your chicken stock and any other ingredients are labeled gluten-free. This way, you can enjoy a tasty Chicken Scampi without any gluten concerns!

Can I prepare Chicken Scampi Recipe in advance?

Yes, you can prepare Chicken Scampi in advance, but it’s best to store the components separately. Cook the chicken and sauce ahead of time, then refrigerate them in an airtight container. When you’re ready to serve, simply reheat the chicken and sauce in a pan. Cook the pasta fresh to ensure it remains al dente. This method helps maintain the dish’s texture and flavor, making it a convenient option for busy days!

Conclusion on Chicken Scampi Recipe

In conclusion, the Chicken Scampi recipe is a delightful dish that brings together the best of flavors and textures. With its tender chicken, zesty lemon, and aromatic garlic, this meal is sure to impress anyone at your dinner table. Whether you’re cooking for family or hosting friends, this recipe is a fantastic choice that’s both easy to prepare and delicious to eat.

Not only is Chicken Scampi versatile, but it also allows for creativity in the kitchen. You can easily adapt the recipe to suit your taste preferences, whether by adding vegetables, swapping chicken for shrimp, or even making a vegetarian version. The possibilities are endless, making it a dish you can enjoy time and time again.

As you embark on your cooking journey, remember to embrace the process. Cooking is not just about the final dish; it’s about the joy of creating something special. With each step, you’ll learn and grow as a cook, gaining confidence in your abilities. So, gather your ingredients, follow the steps, and savor the delightful flavors of your homemade Chicken Scampi.

We hope this recipe becomes a staple in your kitchen, bringing warmth and happiness to your meals. Enjoy every bite, and don’t forget to share your delicious creation with loved ones. Happy cooking!

Smothered Cheesy Sour Cream Chicken is a must-try dish!

Introduction to Smothered Cheesy Sour Cream Chicken Recipe

Smothered Cheesy Sour Cream Chicken Recipe is just what you need. This recipe combines tender chicken breasts with a creamy, cheesy sauce that will make your taste buds dance with joy. It’s perfect for family dinners or gatherings with friends.

Imagine succulent chicken, perfectly seasoned and baked to perfection, all smothered in a rich sour cream and cheese mixture. This dish not only satisfies your hunger but also warms your heart. Plus, it’s easy to prepare, making it a great choice for busy weeknights or special occasions.

In this article, we’ll guide you through the ingredients, preparation steps, and even some variations to make this dish your own. Whether you’re a seasoned cook or a beginner in the kitchen, you’ll find this recipe simple and rewarding. So, let’s dive into the delightful world of cheesy chicken goodness!

Ingredients for Smothered Cheesy Sour Cream Chicken Recipe

Smothered Cheesy Sour Cream Chicken Recipe, you’ll need a few simple ingredients. Each one plays a vital role in bringing out the flavors and textures that make this dish so special. Here’s what you’ll need:

  • 4 boneless, skinless chicken breasts (approximately 1.5 pounds)
  • 1 teaspoon garlic powder
  • 1 teaspoon onion powder
  • 1 teaspoon smoked paprika
  • Salt and freshly ground black pepper to taste
  • 2 tablespoons extra virgin olive oil
  • 1 cup sour cream
  • 1 cup grated sharp cheddar cheese
  • 1 cup condensed cream of chicken soup
  • 1 cup sliced green onions (reserve half for garnish)
  • 1/2 cup panko breadcrumbs (optional)

These ingredients are not only easy to find but also combine beautifully to create a creamy, cheesy sauce that perfectly complements the chicken. The garlic and onion powders add depth, while the smoked paprika gives a subtle warmth. The sour cream and cream of chicken soup create a luscious base, and the cheddar cheese brings it all together with its rich flavor.

Feel free to adjust the seasonings to suit your taste. For instance, if you love a bit of heat, consider adding some cayenne pepper or diced jalapeños to the mix. The beauty of this recipe lies in its versatility, allowing you to make it your own!

Preparation of Smothered Cheesy Sour Cream Chicken Recipe

Smothered Cheesy Sour Cream Chicken Recipe. This section will guide you through each step, ensuring that your dish turns out perfectly every time. Let’s get started!

Step 1: Preparing the Chicken

First, take your boneless, skinless chicken breasts and place them on a clean cutting board. Pat them dry with paper towels. This helps the seasonings stick better. Next, season both sides of the chicken generously with garlic powder, onion powder, smoked paprika, salt, and freshly ground black pepper. Make sure to cover every inch for maximum flavor!

In a large skillet, heat 2 tablespoons of extra virgin olive oil over medium-high heat. Once the oil is hot, carefully add the seasoned chicken breasts. Sear them for about 5-7 minutes on each side. You want them to develop a nice golden crust. This step locks in the juices and adds a delicious flavor. After searing, set the chicken aside on a plate.

Step 2: Making the Cheesy Sour Cream Sauce

While the chicken rests, it’s time to make the creamy sauce. In a mixing bowl, combine 1 cup of sour cream, 1 cup of condensed cream of chicken soup, half of the sliced green onions, and half of the grated sharp cheddar cheese. Stir everything together until the mixture is smooth and well blended. This creamy sauce is what makes the dish so delightful!

Step 3: Combining Ingredients

Now, it’s time to bring everything together. Take a baking dish and arrange the seared chicken breasts in a single layer. Pour the cheesy sour cream sauce over the chicken, making sure each piece is well covered. This will ensure that every bite is packed with flavor. Next, sprinkle the remaining cheddar cheese and green onions on top. If you enjoy a crunchy texture, feel free to add panko breadcrumbs for an extra layer of deliciousness!

Step 4: Cooking the Dish

Preheat your oven to 375°F (190°C) if you haven’t done so already. Cover the baking dish with aluminum foil and place it in the oven. Bake for 25 minutes. After that, carefully remove the foil and continue baking for another 10-15 minutes. You’ll know it’s done when the chicken is fully cooked, and the cheese is melted and bubbly. Let the dish rest for a few minutes before serving. This allows the flavors to settle and makes it easier to serve!

Smothered Cheesy Sour Cream Chicken Recipe is now ready to be enjoyed. The preparation is simple, and the results are absolutely delicious!

Variation of Smothered Cheesy Sour Cream Chicken Recipe

Smothered Cheesy Sour Cream Chicken Recipe is a hit on its own, there are plenty of ways to mix things up! Variations can add new flavors and textures, making this dish even more exciting. Let’s explore some alternative ingredients and different cooking methods that you can try.

Alternative Ingredients

One of the best parts about cooking is the ability to customize recipes. Here are some alternative ingredients you might consider:

  • Cheese Options: Instead of sharp cheddar, try mozzarella for a milder taste or pepper jack for a spicy kick.
  • Vegetables: Add some diced bell peppers, mushrooms, or spinach to the creamy sauce for extra nutrition and flavor.
  • Protein Variations: Swap chicken for turkey or even tofu for a vegetarian option. Just adjust the cooking time accordingly.
  • Herbs and Spices: Fresh herbs like parsley or thyme can brighten the dish. You can also experiment with different spices like cumin or Italian seasoning.

These alternatives can help you create a unique version of the dish that suits your taste preferences or dietary needs.

Different Cooking Methods

Smothered Cheesy Sour Cream Chicken Recipe. Here are a few ideas:

  • Slow Cooker: For a hands-off approach, place the seared chicken and sauce in a slow cooker. Cook on low for 4-6 hours. This method makes the chicken incredibly tender!
  • Instant Pot: If you’re short on time, use an Instant Pot. Sear the chicken using the sauté function, then add the sauce and cook on high pressure for about 10 minutes.
  • Grilling: For a smoky flavor, grill the chicken instead of searing it. Then, finish it off in the oven with the sauce for a delicious twist.

These cooking methods can add variety to your meal prep and keep things interesting in the kitchen. Feel free to experiment and find what works best for you!

Cooking Note for Smothered Cheesy Sour Cream Chicken Recipe

Smothered Cheesy Sour Cream Chicken Recipe, there are a few cooking notes to keep in mind. These tips will help ensure that your dish turns out perfectly every time. First, always check the internal temperature of the chicken. It should reach 165°F (75°C) to be safe for consumption. Using a meat thermometer can help you avoid undercooking or overcooking the chicken.

Additionally, if you prefer a creamier sauce, consider adding a splash of chicken broth or milk to the mixture. This can help thin it out if it seems too thick. On the other hand, if you want a thicker sauce, let it simmer a bit longer on the stove before pouring it over the chicken.

Lastly, don’t forget to let the dish rest for a few minutes after baking. This resting time allows the juices to redistribute, making the chicken more tender and flavorful. Enjoy the process, and remember that cooking is all about experimenting and having fun!

Serving Suggestions for Smothered Cheesy Sour Cream Chicken Recipe

Smothered Cheesy Sour Cream Chicken Recipe is ready, it’s time to serve it up! This dish pairs wonderfully with a variety of sides that complement its rich flavors. Here are some serving suggestions:

  • Fluffy Rice: Serve the chicken over a bed of fluffy white or brown rice. The rice will soak up the creamy sauce, making every bite delicious.
  • Pasta: For a hearty meal, try serving it with pasta. Fettuccine or penne works great, and the sauce clings beautifully to the noodles.
  • Steamed Vegetables: Add some color and nutrition by serving steamed broccoli, green beans, or carrots on the side. They provide a nice contrast to the creamy chicken.
  • Salad: A fresh garden salad can balance the richness of the dish. Toss together some mixed greens, cherry tomatoes, and a light vinaigrette.

Feel free to mix and match these sides based on your preferences. The goal is to create a well-rounded meal that everyone will enjoy!

Tips for Perfecting Smothered Cheesy Sour Cream Chicken Recipe

Smothered Cheesy Sour Cream Chicken Recipe even better, consider these helpful tips:

  • Marinate the Chicken: For extra flavor, marinate the chicken in the seasonings for a few hours or overnight. This allows the spices to penetrate the meat.
  • Use Fresh Ingredients: Whenever possible, use fresh herbs and vegetables. They enhance the flavor and add a vibrant touch to your dish.
  • Experiment with Cheese: Don’t hesitate to try different types of cheese. Mixing cheeses can create a unique flavor profile that elevates the dish.
  • Garnish: Always garnish your dish with fresh herbs or additional green onions before serving. It adds a pop of color and freshness.

These tips can help you achieve the best results and impress your family and friends with your cooking skills!

Cooking Note for Smothered Cheesy Sour Cream Chicken Recipe

Smothered Cheesy Sour Cream Chicken Recipe, there are a few cooking notes to keep in mind. These tips will help ensure that your dish turns out perfectly every time. First, always check the internal temperature of the chicken. It should reach 165°F (75°C) to be safe for consumption. Using a meat thermometer can help you avoid undercooking or overcooking the chicken.

Additionally, if you prefer a creamier sauce, consider adding a splash of chicken broth or milk to the mixture. This can help thin it out if it seems too thick. On the other hand, if you want a thicker sauce, let it simmer a bit longer on the stove before pouring it over the chicken.

Lastly, don’t forget to let the dish rest for a few minutes after baking. This resting time allows the juices to redistribute, making the chicken more tender and flavorful. Enjoy the process, and remember that cooking is all about experimenting and having fun!

Another important note is to keep an eye on the baking time. Ovens can vary, so check the chicken a few minutes before the suggested time. If you notice the cheese is browning too quickly, you can cover it loosely with foil to prevent burning while the chicken finishes cooking.

Lastly, if you have leftovers, store them in an airtight container in the refrigerator. They can be enjoyed the next day, and the flavors will continue to meld together, making it even tastier!

Serving Suggestions for Smothered Cheesy Sour Cream Chicken Recipe

Smothered Cheesy Sour Cream Chicken Recipe is ready, it’s time to serve it up! This dish pairs wonderfully with a variety of sides that complement its rich flavors. Here are some serving suggestions:

  • Fluffy Rice: Serve the chicken over a bed of fluffy white or brown rice. The rice will soak up the creamy sauce, making every bite delicious.
  • Pasta: For a hearty meal, try serving it with pasta. Fettuccine or penne works great, and the sauce clings beautifully to the noodles.
  • Steamed Vegetables: Add some color and nutrition by serving steamed broccoli, green beans, or carrots on the side. They provide a nice contrast to the creamy chicken.
  • Salad: A fresh garden salad can balance the richness of the dish. Toss together some mixed greens, cherry tomatoes, and a light vinaigrette.
  • Garlic Bread: For a delightful twist, serve with warm garlic bread. It’s perfect for dipping into the cheesy sauce!

Feel free to mix and match these sides based on your preferences. The goal is to create a well-rounded meal that everyone will enjoy! You can also consider adding a splash of lemon juice to your vegetables for a refreshing zing. This will enhance the overall flavor profile of your meal.

Smothered Cheesy Sour Cream Chicken look as good as it tastes!

Tips for Perfecting Smothered Cheesy Sour Cream Chicken Recipe

Smothered Cheesy Sour Cream Chicken Recipe even better, consider these helpful tips:

  • Marinate the Chicken: For extra flavor, marinate the chicken in the seasonings for a few hours or overnight. This allows the spices to penetrate the meat, making it more flavorful and tender.
  • Use Fresh Ingredients: Whenever possible, use fresh herbs and vegetables. Fresh ingredients enhance the flavor and add a vibrant touch to your dish. They can make a big difference in taste!
  • Experiment with Cheese: Don’t hesitate to try different types of cheese. Mixing cheeses can create a unique flavor profile that elevates the dish. For instance, combining cheddar with mozzarella can give you a delightful stretchiness.
  • Garnish: Always garnish your dish with fresh herbs or additional green onions before serving. This adds a pop of color and freshness, making your Smothered Cheesy Sour Cream Chicken look as good as it tastes.
  • Check for Doneness: Use a meat thermometer to ensure the chicken reaches an internal temperature of 165°F (75°C). This guarantees that your chicken is safe to eat and perfectly cooked.
  • Adjust the Sauce: If you prefer a creamier sauce, consider adding a splash of chicken broth or milk to the mixture. This can help thin it out if it seems too thick. Conversely, if you want a thicker sauce, let it simmer a bit longer on the stove before pouring it over the chicken.
  • Let it Rest: After baking, let the dish rest for a few minutes. This resting time allows the juices to redistribute, making the chicken more tender and flavorful.
  • Store Leftovers Properly: If you have leftovers, store them in an airtight container in the refrigerator. They can be enjoyed the next day, and the flavors will continue to meld together, making it even tastier!

These tips can help you achieve the best results and impress your family and friends with your cooking skills! Remember, cooking is all about experimenting and having fun, so don’t be afraid to make this recipe your own!

Breakdown of Time for Smothered Cheesy Sour Cream Chicken Recipe

Smothered Cheesy Sour Cream Chicken Recipe can help you plan your cooking better. Here’s a simple breakdown of the time required for preparation and cooking:

Prep Time

The prep time for this delicious dish is approximately 15-20 minutes. During this time, you will gather all your ingredients, season the chicken, and prepare the cheesy sour cream sauce. It’s a quick process that sets the stage for a delightful meal!

Cooking Time

Once you’ve prepped everything, the cooking time is about 35-40 minutes. This includes 25 minutes of covered baking and an additional 10-15 minutes uncovered to allow the cheese to melt and bubble. This step is crucial for achieving that perfect golden crust on top!

Total Time

In total, you can expect to spend around 50-60 minutes from start to finish. This includes both prep and cooking time. It’s a manageable timeframe for a dish that’s sure to impress your family and friends. Plus, the end result is a comforting meal that’s worth every minute spent in the kitchen!

Nutritional Information for Smothered Cheesy Sour Cream Chicken Recipe

Smothered Cheesy Sour Cream Chicken Recipe not only satisfies your taste buds but also provides valuable nutrients. Here’s a breakdown of the nutritional information per serving:

Calories

Each serving of this delightful dish contains approximately 420 calories. This makes it a hearty option for dinner, providing enough energy to keep you satisfied without overindulging. The combination of chicken, cheese, and sour cream contributes to the calorie count, but it also ensures a filling meal.

Protein

Smothered Cheesy Sour Cream Chicken a great choice for those looking to increase their protein intake.

Sodium

When it comes to sodium, each serving contains around 800 milligrams. While this is a reasonable amount for a flavorful dish, it’s important to be mindful of your overall sodium intake throughout the day. If you’re watching your sodium levels, consider using low-sodium versions of the cream of chicken soup and cheese to help reduce the total sodium content.

Smothered Cheesy Sour Cream Chicken Recipe is a delicious and nutritious option for dinner. With its balance of calories, protein, and flavor, it’s sure to become a favorite in your household!

FAQs about Smothered Cheesy Sour Cream Chicken Recipe

Can I use other types of cheese in the Smothered Cheesy Sour Cream Chicken Recipe?

Smothered Cheesy Sour Cream Chicken Recipe lies in its versatility. While sharp cheddar cheese is a classic choice, you can experiment with other types of cheese. For a milder flavor, mozzarella works wonderfully. If you prefer a bit of spice, consider using pepper jack cheese. Mixing different cheeses can also create a unique flavor profile that enhances the dish. Just remember to adjust the amount based on the cheese’s strength and flavor!

How can I make the Smothered Cheesy Sour Cream Chicken Recipe healthier?

Smothered Cheesy Sour Cream Chicken Recipe healthier is quite simple! Here are a few tips:

  • Use Leaner Cuts: Opt for skinless chicken thighs instead of breasts for a juicier option with slightly more flavor.
  • Low-Fat Dairy: Substitute regular sour cream and cream of chicken soup with low-fat or fat-free versions. This can significantly reduce the calorie and fat content.
  • Add Vegetables: Incorporate more vegetables into the dish. Adding spinach, bell peppers, or zucchini can boost the nutritional value and add color.
  • Reduce Cheese: You can cut back on the amount of cheese used or choose a lower-fat cheese option to maintain flavor without the extra calories.

These adjustments can help you enjoy this delicious dish while keeping it lighter and healthier!

What side dishes pair well with Smothered Cheesy Sour Cream Chicken Recipe?

Smothered Cheesy Sour Cream Chicken Recipe with the right side dishes can elevate your meal. Here are some great options:

  • Fluffy Rice: White or brown rice is perfect for soaking up the creamy sauce.
  • Pasta: Serve it with fettuccine or penne for a hearty combination.
  • Steamed Vegetables: Broccoli, green beans, or carrots add a nutritious touch and balance the richness of the chicken.
  • Garlic Bread: A side of warm garlic bread is great for dipping into the cheesy sauce.
  • Garden Salad: A fresh salad with mixed greens and a light vinaigrette can provide a refreshing contrast.

Feel free to mix and match these sides based on your preferences and dietary needs!

Can I prepare the Smothered Cheesy Sour Cream Chicken Recipe in advance?

Smothered Cheesy Sour Cream Chicken Recipe in advance! This makes it a great option for meal prep or busy weeknights. Here’s how:

  • Prep Ahead: You can season the chicken and prepare the cheesy sour cream sauce a day in advance. Store them separately in the refrigerator until you’re ready to cook.
  • Assemble and Refrigerate: If you want to assemble the dish ahead of time, you can place the seared chicken in the baking dish, cover it with the sauce, and refrigerate it. Just make sure to bake it within 24 hours for the best results.
  • Reheating: If you have leftovers, store them in an airtight container. Reheat in the oven or microwave until warmed through.

This advance preparation can save you time and make dinner a breeze!

Conclusion on Smothered Cheesy Sour Cream Chicken Recipe

Smothered Cheesy Sour Cream Chicken Recipe is a delightful dish that brings comfort and satisfaction to any meal. With its creamy sauce, tender chicken, and rich flavors, it’s no wonder this recipe has become a favorite for many families. Whether you’re cooking for a special occasion or a cozy weeknight dinner, this dish is sure to impress.

Not only is it easy to prepare, but it also allows for plenty of customization. You can experiment with different cheeses, add vegetables, or even try various cooking methods to make it your own. The versatility of this recipe means you can enjoy it in many ways, keeping your meals exciting and fresh.

Smothered Cheesy Sour Cream Chicken will surely be a hit. Its comforting flavors and satisfying texture make it a dish that everyone will love. So, roll up your sleeves, get cooking, and enjoy the deliciousness that awaits!

Remember, cooking is not just about following a recipe; it’s about creating memories and sharing joy with those you care about. We hope this recipe inspires you to whip up your own version of this cheesy delight. Happy cooking!

Mozzarella Chicken with Basil Cream Sauce is delightful!

Introduction to Mozzarella Chicken with Basil Cream Sauce

Welcome to the delightful world of Mozzarella Chicken with Basil Cream Sauce! This dish is not just a meal; it’s an experience that brings comfort and joy to your dining table. Imagine tender chicken breasts enveloped in a rich, creamy sauce, bursting with the fresh flavors of basil and melted mozzarella. It’s a dish that’s perfect for family dinners, special occasions, or even a cozy night in.

What Makes Mozzarella Chicken with Basil Cream Sauce Special?

What sets Mozzarella Chicken with Basil Cream Sauce apart is its incredible flavor profile. The combination of creamy textures and aromatic herbs creates a symphony of taste that tantalizes your taste buds. The heavy whipping cream provides a luscious base, while the mozzarella adds a gooey, cheesy goodness that is hard to resist. Fresh basil elevates the dish, giving it a vibrant, garden-fresh taste.

Moreover, this recipe is versatile. You can easily customize it to suit your preferences. Whether you want to add vegetables for extra nutrition or swap out cheeses, the possibilities are endless. Plus, it’s simple enough for beginner cooks yet impressive enough to wow your guests. With just a few ingredients and straightforward steps, you can create a restaurant-quality meal right in your kitchen.

So, gather your ingredients and get ready to embark on a culinary adventure. This Mozzarella Chicken with Basil Cream Sauce is sure to become a favorite in your household!

Ingredients for Mozzarella Chicken with Basil Cream Sauce

To create the mouthwatering Mozzarella Chicken with Basil Cream Sauce, you’ll need a handful of simple yet flavorful ingredients. Each component plays a vital role in crafting this delicious dish. Here’s what you’ll need:

  • 4 boneless, skinless chicken breasts (approximately 1.5 pounds) – This is the star of the dish, providing a juicy and tender base.
  • 1 teaspoon sea salt – Enhances the natural flavors of the chicken.
  • 1/2 teaspoon freshly ground black pepper – Adds a subtle kick to the seasoning.
  • 1 tablespoon extra virgin olive oil – Used for cooking the chicken, giving it a lovely golden color.
  • 2 cloves garlic, finely chopped – Infuses the dish with a delightful aroma and flavor.
  • 1 cup heavy whipping cream – Creates a rich and creamy sauce that envelops the chicken.
  • 1 cup mozzarella cheese, shredded – Melts beautifully, adding a gooey texture.
  • 1/2 cup Parmesan cheese, finely grated – Offers a sharp, nutty flavor that complements the mozzarella.
  • 1/4 cup fresh basil leaves, chopped – Provides a fresh, herbal note that brightens the dish.
  • 1 teaspoon dried Italian herbs – A blend of herbs that enhances the overall flavor.
  • 1 tablespoon fresh lemon juice – Adds a zesty brightness to balance the creaminess.

These ingredients come together to create a dish that is not only delicious but also visually appealing. The vibrant colors of the basil and the creamy sauce make it a feast for the eyes as well. So, gather these ingredients and prepare to indulge in a delightful culinary experience!

Step-by-Step Preparation of Mozzarella Chicken with Basil Cream Sauce

Now that you have all your ingredients ready, it’s time to dive into the cooking process. This step-by-step guide will help you create the perfect Mozzarella Chicken with Basil Cream Sauce. Follow along, and soon you’ll have a delicious meal to enjoy!

Step 1: Preparing the Chicken

First, take your boneless, skinless chicken breasts and place them on a clean cutting board. Season both sides with sea salt and freshly ground black pepper. This simple seasoning enhances the chicken’s natural flavors. Next, heat a large frying pan over medium heat and add the extra virgin olive oil. Once the oil is hot, carefully place the seasoned chicken breasts in the pan.

Cook the chicken for about 6-7 minutes on each side. You want them to turn a lovely golden brown and be fully cooked through. To check if they’re done, you can cut into one of the breasts; the juices should run clear. Once cooked, transfer the chicken to a plate and keep it warm while you prepare the sauce.

Step 2: Making the Basil Cream Sauce

In the same pan where you cooked the chicken, add the finely chopped garlic. Sauté it for about 30 seconds, just until it becomes fragrant. Be careful not to burn it! Now, pour in the heavy whipping cream and let it come to a gentle simmer. This creamy base is what makes the sauce so rich and delicious.

Gradually stir in the shredded mozzarella and grated Parmesan cheese. Keep stirring until the cheeses melt completely and the sauce becomes smooth and creamy. Then, add the chopped fresh basil, dried Italian herbs, and fresh lemon juice. These ingredients will add layers of flavor to your sauce, making it irresistible!

Step 3: Combining Chicken and Sauce

Now it’s time to bring everything together! Carefully place the cooked chicken breasts back into the pan with the creamy basil sauce. Make sure to coat each piece generously with the sauce. This step allows the chicken to absorb all those wonderful flavors. Let it simmer for an additional 3-5 minutes. This will ensure the chicken is heated through and infused with the creamy goodness.

Step 4: Final Touches and Serving

Once the chicken is ready, it’s time to serve! Plate the chicken and drizzle it with the remaining basil cream sauce from the pan. For a beautiful presentation, garnish with extra fresh basil leaves. This adds a pop of color and freshness to your dish.

Now, take a moment to admire your creation before digging in. The Mozzarella Chicken with Basil Cream Sauce is not only delicious but also visually stunning. Enjoy every bite of this creamy delight!

Variations of Mozzarella Chicken with Basil Cream Sauce

While the classic Mozzarella Chicken with Basil Cream Sauce is a delightful dish on its own, there are many ways to switch things up! Whether you want to experiment with different cheeses or try alternative sauces, these variations will keep your meals exciting and flavorful.

Different Cheese Options

Cheese is a key ingredient in this recipe, and you can easily customize it to suit your taste. Here are some cheese alternatives to consider:

  • Provolone: This cheese melts beautifully and adds a slightly sharper flavor compared to mozzarella.
  • Fontina: Known for its creamy texture, fontina will create a rich and decadent sauce.
  • Goat Cheese: For a tangy twist, crumbled goat cheese can be stirred into the sauce, giving it a unique flavor.
  • Cheddar: If you prefer a sharper taste, try using mild or sharp cheddar cheese for a different flavor profile.

Feel free to mix and match these cheeses to create your perfect blend. Each option will bring its own character to the dish, making it a fun culinary adventure!

Alternative Sauces to Try

If you’re in the mood for something different, consider trying these alternative sauces:

  • Pesto Sauce: Swap the basil cream sauce for a vibrant pesto sauce. This will add a fresh, herby flavor that pairs wonderfully with chicken.
  • Alfredo Sauce: For a classic Italian twist, use a creamy alfredo sauce instead. It’s rich and pairs perfectly with the chicken.
  • Tomato Basil Sauce: A light tomato basil sauce can provide a refreshing contrast to the richness of the chicken, making it a great option for summer meals.
  • Buffalo Sauce: For those who enjoy a kick, toss the chicken in buffalo sauce for a spicy, tangy flavor that’s sure to please!

These variations allow you to explore new flavors while still enjoying the essence of Mozzarella Chicken with Basil Cream Sauce. So, don’t hesitate to get creative in the kitchen!

Cooking Note for Mozzarella Chicken with Basil Cream Sauce

When preparing Mozzarella Chicken with Basil Cream Sauce, a few cooking notes can help ensure your dish turns out perfectly every time. These tips will enhance your cooking experience and elevate the flavors of your meal.

First, always use fresh ingredients whenever possible. Fresh basil, for instance, adds a vibrant flavor that dried herbs simply can’t match. If you can, pick basil from your garden or buy it from a local farmer’s market. The freshness will shine through in your sauce.

Next, pay attention to the cooking temperature. Cooking the chicken over medium heat allows it to brown nicely without burning. If the heat is too high, the outside may cook too quickly, leaving the inside undercooked. Always check the internal temperature of the chicken; it should reach 165°F (75°C) for safe consumption.

Additionally, when making the sauce, stir continuously after adding the cheeses. This helps prevent the cheese from clumping and ensures a smooth, creamy texture. If the sauce becomes too thick, you can thin it out with a splash of chicken broth or additional cream.

Lastly, don’t rush the simmering process. Allowing the chicken to sit in the sauce for a few minutes helps it absorb all the delicious flavors. This step is crucial for achieving that rich, creamy taste that makes this dish so special.

By following these cooking notes, you’ll create a Mozzarella Chicken with Basil Cream Sauce that is not only delicious but also a joy to prepare. Happy cooking!

Serving Suggestions for Mozzarella Chicken with Basil Cream Sauce

Once you’ve prepared your delicious Mozzarella Chicken with Basil Cream Sauce, it’s time to think about how to serve it. The right side dishes and beverages can elevate your meal, making it even more enjoyable. Here are some ideal serving suggestions to complement this creamy delight.

Ideal Side Dishes

Pairing your Mozzarella Chicken with the right side dishes can enhance the overall dining experience. Here are some fantastic options:

  • Garlic Bread: A classic choice, garlic bread is perfect for soaking up the creamy sauce. Its crunchy texture contrasts beautifully with the tender chicken.
  • Steamed Vegetables: Lightly steamed broccoli, asparagus, or green beans add a healthy touch. Their freshness balances the richness of the sauce.
  • Cauliflower Rice: For a low-carb option, serve the chicken over cauliflower rice. It’s a great way to enjoy the flavors without the extra carbs.
  • Mixed Green Salad: A simple salad with mixed greens, cherry tomatoes, and a light vinaigrette provides a refreshing contrast to the creamy dish.
  • Pasta: If you’re in the mood for something heartier, serve the chicken over a bed of pasta. The sauce will coat the noodles beautifully, creating a satisfying meal.

These side dishes not only complement the flavors of the Mozzarella Chicken but also add variety to your plate. Choose one or two to create a well-rounded meal that everyone will love!

Wine Pairings

To elevate your dining experience even further, consider pairing your Mozzarella Chicken with the right wine. Here are some excellent wine options:

  • Chardonnay: A buttery Chardonnay complements the creamy sauce perfectly. Its rich flavor enhances the dish without overpowering it.
  • Sauvignon Blanc: This crisp white wine offers a refreshing contrast to the richness of the chicken. Its citrus notes pair well with the basil and lemon in the sauce.
  • Pinot Grigio: Light and zesty, Pinot Grigio is another great choice. It’s easy to drink and won’t overshadow the flavors of the dish.
  • Light Red Wines: If you prefer red wine, opt for a light-bodied option like Pinot Noir. Its subtle fruitiness can complement the dish nicely.

Choosing the right wine can enhance the flavors of your meal and create a delightful dining experience. So, pour a glass and enjoy your Mozzarella Chicken with Basil Cream Sauce to the fullest!

Tips for Perfecting Mozzarella Chicken with Basil Cream Sauce

Creating the perfect Mozzarella Chicken with Basil Cream Sauce is all about attention to detail. With a few helpful tips, you can elevate this dish to new heights. Here are some essential tips to ensure your meal turns out delicious every time!

First, always start with high-quality chicken. Fresh, organic chicken breasts will not only taste better but also provide a juicier texture. If possible, choose chicken that is free from antibiotics and hormones for a healthier option.

Next, don’t skip the seasoning! Properly seasoning the chicken with sea salt and black pepper enhances its natural flavors. You can also experiment with additional spices, like paprika or garlic powder, for an extra kick.

When cooking the chicken, make sure your pan is hot enough before adding the oil. This helps achieve a nice sear, locking in the juices. If the chicken sticks to the pan, it may not be ready to flip yet. Patience is key!

For the sauce, consider using freshly grated cheeses instead of pre-shredded ones. Freshly grated cheese melts better and provides a creamier texture. Plus, it tastes so much richer!

As you prepare the sauce, keep the heat low to avoid scorching the cream. Stir continuously to ensure the cheese melts evenly. If the sauce becomes too thick, add a splash of chicken broth or a bit more cream to reach your desired consistency.

Lastly, let the chicken rest in the sauce for a few minutes before serving. This allows the flavors to meld beautifully, making each bite even more delicious. Trust us; it’s worth the wait!

By following these tips, you’ll create a Mozzarella Chicken with Basil Cream Sauce that is not only flavorful but also visually stunning. Enjoy the process and savor the delightful results!

Breakdown of Time for Mozzarella Chicken with Basil Cream Sauce

Understanding the time required for each step in preparing Mozzarella Chicken with Basil Cream Sauce can help you plan your cooking session effectively. Here’s a detailed breakdown of the time you’ll need for preparation and cooking.

Prep Time

The prep time for this delicious dish is quite manageable. You’ll need about 15 minutes to gather and prepare your ingredients. This includes:

  • Seasoning the chicken breasts with salt and pepper.
  • Chopping the garlic and fresh basil.
  • Grating the Parmesan cheese and shredding the mozzarella.

Having everything ready before you start cooking will make the process smoother and more enjoyable!

Cooking Time

The cooking time for Mozzarella Chicken with Basil Cream Sauce is approximately 20-25 minutes. Here’s how it breaks down:

  • Cooking the chicken: 12-14 minutes (6-7 minutes on each side).
  • Making the basil cream sauce: 8-10 minutes (including sautéing garlic and melting the cheeses).
  • Simmering the chicken in the sauce: 3-5 minutes.

This cooking time allows the chicken to become perfectly golden and ensures the sauce is rich and creamy.

Total Time

When you combine both the prep and cooking times, the total time to prepare Mozzarella Chicken with Basil Cream Sauce is about 35-40 minutes. This makes it a fantastic option for a weeknight dinner or a special occasion when you want to impress your guests without spending hours in the kitchen.

With this time breakdown, you can easily plan your cooking session and enjoy the delightful process of creating this creamy, flavorful dish!

Nutritional Information for Mozzarella Chicken with Basil Cream Sauce

Understanding the nutritional content of your meals is essential for maintaining a balanced diet. The Mozzarella Chicken with Basil Cream Sauce is not only delicious but also provides a good amount of nutrients. Here’s a breakdown of the nutritional information per serving:

Calories

480 calories. This calorie count makes it a satisfying meal that can fit into various dietary plans. The combination of chicken, cream, and cheese contributes to the overall caloric content, providing energy for your day.

Protein Content

38 grams of protein. This protein comes primarily from the chicken and the cheeses used in the sauce. Protein is essential for muscle repair and growth, making this dish a great option for those looking to increase their protein intake.

Sodium Levels

800 milligrams. This level of sodium is typical for creamy dishes, especially those that include cheese and seasonings. If you are watching your sodium intake, consider using low-sodium chicken broth or cheese alternatives to help reduce the overall sodium content without sacrificing flavor.

Overall, the Mozzarella Chicken with Basil Cream Sauce is a well-rounded dish that provides a good balance of calories, protein, and flavor. Enjoying it as part of a varied diet can contribute to your nutritional needs while satisfying your taste buds!

FAQs about Mozzarella Chicken with Basil Cream Sauce

Can I make Mozzarella Chicken with Basil Cream Sauce ahead of time?

Yes, you can prepare Mozzarella Chicken with Basil Cream Sauce ahead of time! To do this, cook the chicken and make the sauce as directed. Once everything is combined, let it cool completely before storing it in an airtight container. You can keep it in the refrigerator for up to 3 days. When you’re ready to serve, simply reheat it on the stove over low heat until warmed through. This makes it a great option for busy weeknights or meal prepping for the week!

What can I substitute for heavy cream in the sauce?

If you’re looking for a lighter alternative to heavy cream, there are several options you can try. Half-and-half is a popular choice that will still give you a creamy texture without being as rich. You can also use whole milk, but keep in mind that the sauce may be less thick. For a dairy-free option, consider using coconut cream or cashew cream. These alternatives will provide a creamy consistency while adding a unique flavor to your dish.

Is Mozzarella Chicken with Basil Cream Sauce suitable for meal prep?

Absolutely! Mozzarella Chicken with Basil Cream Sauce is perfect for meal prep. The dish stores well in the refrigerator and can be easily reheated. Just make sure to keep the chicken and sauce in separate containers if you prefer to maintain the texture. This way, you can enjoy a delicious, homemade meal throughout the week without the hassle of cooking every day. It’s a great way to save time while still enjoying a flavorful dish!

How can I make this dish spicier?

If you love a bit of heat, there are several ways to spice up your Mozzarella Chicken with Basil Cream Sauce. One simple method is to add red pepper flakes to the sauce while it simmers. Start with a small amount and adjust to your taste. You can also incorporate diced jalapeños or a splash of hot sauce for an extra kick. For those who enjoy a smoky flavor, consider adding chipotle powder or smoked paprika. These additions will enhance the dish while giving it a delightful spicy twist!

Conclusion on Mozzarella Chicken with Basil Cream Sauce

In conclusion, Mozzarella Chicken with Basil Cream Sauce is a delightful dish that combines rich flavors and creamy textures, making it a favorite for many. This recipe is not only easy to prepare but also offers a wonderful opportunity to impress family and friends with your culinary skills. The tender chicken, enveloped in a luscious sauce, creates a comforting meal that is perfect for any occasion.

As you explore this recipe, remember that the beauty of cooking lies in creativity. Feel free to experiment with different cheeses, sauces, and side dishes to make this dish your own. Whether you choose to stick to the classic version or try out the variations, each bite will be a testament to your cooking prowess.

Moreover, the nutritional benefits of this dish, including its high protein content and satisfying flavors, make it a great addition to your meal rotation. With just a few simple ingredients and straightforward steps, you can create a restaurant-quality meal right in your kitchen.

So, gather your ingredients, follow the steps, and enjoy the process of making Mozzarella Chicken with Basil Cream Sauce. It’s a dish that promises to bring joy to your table and warmth to your heart. Happy cooking!

Sweet Garlic Carrots Recipe: A Flavorful Delight!

Introduction to Sweet Garlic Carrots Recipe

The Appeal of Sweet Garlic Carrots

Sweet Garlic Carrots Recipe is not only easy to prepare but also offers a wonderful balance of sweetness and savory garlic. The combination of tender carrots glazed in a buttery, garlicky sauce is simply irresistible.

One of the best things about this recipe is its versatility. You can serve these carrots alongside a variety of main dishes, from roasted chicken to grilled steak. They also make a great addition to holiday feasts or family gatherings. Plus, the bright orange color adds a cheerful touch to your table, making your meal visually appealing.

Another reason to love sweet garlic carrots is their nutritional benefits. Carrots are packed with vitamins and minerals, particularly vitamin A, which is essential for good vision and immune function. When you prepare them with garlic, you not only enhance their flavor but also add the health benefits of garlic, known for its anti-inflammatory and antioxidant properties.

In this article, we will guide you through the ingredients, preparation steps, and tips to make the perfect sweet garlic carrots. Whether you are a seasoned cook or a beginner, this recipe is sure to impress. So, let’s dive into the delicious world of sweet garlic carrots!

Ingredients for Sweet Garlic Carrots Recipe

To create the perfect sweet garlic carrots, you’ll need a few simple ingredients. Each one plays a vital role in bringing out the delicious flavors of this dish. Here’s what you’ll need:

  • 2 pounds baby carrots: These tender carrots are sweet and cook quickly, making them ideal for this recipe.
  • 4 tablespoons unsalted butter: Butter adds richness and helps to create a lovely glaze.
  • 4 cloves garlic, finely chopped: Fresh garlic provides a robust flavor that complements the sweetness of the carrots.
  • 1/4 cup packed brown sugar: This ingredient adds sweetness and helps caramelize the carrots.
  • 1 teaspoon sea salt: Salt enhances the overall flavor of the dish.
  • 1/2 teaspoon freshly ground black pepper: A touch of pepper adds a mild heat that balances the sweetness.
  • 1 tablespoon fresh parsley, finely chopped: This is for garnish, adding a pop of color and freshness to the dish.

Sweet Garlic Carrots Recipe a must-try. Gather these items, and you’ll be ready to start cooking!

Step-by-Step Preparation of Sweet Garlic Carrots Recipe

Step 1: Preparing the Carrots

Sweet Garlic Carrots Recipe, start by preparing the baby carrots. First, rinse them under cold water to remove any dirt. If you prefer, you can peel them, but baby carrots are usually tender enough to skip this step. Next, fill a large saucepan with water and bring it to a rolling boil. Once the water is boiling, carefully add the baby carrots. Allow them to simmer for about 5 minutes. This quick blanching helps to soften the carrots just enough, making them tender but still crisp. After 5 minutes, drain the carrots and set them aside. This step is crucial for achieving that perfect texture in your final dish.

Step 2: Making the Garlic Mixture

Now that your carrots are prepped, it’s time to create the flavorful garlic mixture. In the same saucepan, melt 4 tablespoons of unsalted butter over medium heat. As the butter melts, it will start to bubble and foam. This is the perfect time to add the finely chopped garlic. Sauté the garlic for 1-2 minutes, stirring frequently. You want to release the wonderful aroma of the garlic without letting it brown. Browning can lead to a bitter taste, so keep an eye on it! Once the garlic is fragrant and lightly golden, you’re ready for the next step.

Step 3: Combining Ingredients

With the garlic mixture ready, it’s time to add the sweet elements. Sprinkle in 1/4 cup of packed brown sugar, 1 teaspoon of sea salt, and 1/2 teaspoon of freshly ground black pepper. Stir the mixture well until the sugar has completely dissolved into the buttery garlic. This creates a lovely glaze that will coat the carrots beautifully. Make sure everything is well combined, as this will enhance the flavor of your sweet garlic carrots.

Step 4: Cooking the Carrots

Now, it’s time to bring it all together! Return the drained carrots to the saucepan. Gently toss them in the garlic and butter glaze, ensuring they are well-coated. Continue to cook the carrots for an additional 5-7 minutes, stirring occasionally. This step allows the carrots to absorb the flavors and become beautifully caramelized. You’ll know they’re done when they are tender and have a lovely golden color. Once finished, remove the saucepan from the heat. For a fresh finish, sprinkle 1 tablespoon of finely chopped parsley over the top before serving. This adds a pop of color and a hint of freshness to your dish!

Variation of Sweet Garlic Carrots Recipe

Alternative Ingredients to Consider

Sweet Garlic Carrots Recipe is delicious as is, there are many ways to switch things up! You can easily customize this dish to suit your taste or dietary needs. Here are some alternative ingredients to consider:

  • Honey or Maple Syrup: Instead of brown sugar, try using honey or maple syrup for a different kind of sweetness. Both options add a unique flavor that pairs wonderfully with garlic.
  • Different Vegetables: If you want to mix it up, consider adding other vegetables like sliced bell peppers or zucchini. They can add color and variety to your dish.
  • Herbs and Spices: Experiment with fresh herbs like thyme or rosemary for an aromatic twist. You can also add a pinch of red pepper flakes for a bit of heat.
  • Vegan Butter: For a dairy-free version, substitute the unsalted butter with vegan butter or olive oil. This keeps the dish plant-based while still delicious.

These alternatives can help you create a version of sweet garlic carrots that fits your preferences. Feel free to get creative and make this recipe your own!

Different Cooking Methods

In addition to ingredient variations, you can also explore different cooking methods to prepare your sweet garlic carrots. Here are a few options:

  • Roasting: Instead of simmering, try roasting the carrots in the oven. Toss them with the garlic mixture and spread them on a baking sheet. Roast at 400°F (200°C) for about 20-25 minutes, or until they are tender and caramelized.
  • Steaming: For a healthier option, steam the carrots instead of boiling them. This method helps retain more nutrients. After steaming, toss them in the garlic mixture as usual.
  • Grilling: If you’re firing up the grill, consider skewering the carrots and grilling them. Brush them with the garlic glaze while grilling for a smoky flavor.

Sweet Garlic Carrots Recipe. Each method brings out different flavors and textures, making your dish even more exciting!

Cooking Note for Sweet Garlic Carrots Recipe

Sweet Garlic Carrots Recipe, there are a few important cooking notes to keep in mind. These tips will help ensure that your carrots turn out perfectly every time.

First, the size of your carrots matters. If you’re using larger carrots instead of baby carrots, be sure to cut them into uniform pieces. This helps them cook evenly. Aim for pieces that are about the same size as baby carrots for the best results.

Next, pay attention to the cooking time. Overcooking can lead to mushy carrots, which is not what you want. Keep an eye on them while they simmer and sauté. The goal is to achieve a tender texture while still maintaining a slight crunch.

Also, remember that the sweetness can be adjusted. If you prefer a sweeter flavor, feel free to add a bit more brown sugar or honey. On the other hand, if you want a more savory taste, reduce the sugar slightly. Taste as you go to find the perfect balance for your palate.

Lastly, don’t skip the garnish! The fresh parsley not only adds color but also a burst of freshness that brightens the dish. A sprinkle of lemon zest can also enhance the flavors, giving your sweet garlic carrots a delightful twist.

Sweet Garlic Carrots Recipe!

Serving Suggestions for Sweet Garlic Carrots Recipe

Pairing with Main Dishes

Sweet Garlic Carrots Recipe:

  • Roasted Chicken: The juicy, tender meat of roasted chicken pairs beautifully with the sweetness of the carrots. The garlic flavor enhances the overall meal.
  • Grilled Steak: A perfectly grilled steak with its rich flavor contrasts nicely with the sweet garlic carrots, creating a balanced plate.
  • Baked Salmon: The light, flaky texture of baked salmon complements the carrots, making for a healthy and delicious combination.
  • Pork Chops: Sweet garlic carrots add a delightful touch to savory pork chops, enhancing the meal with their vibrant flavor.
  • Vegetarian Dishes: For a meatless option, serve the carrots alongside a hearty grain bowl or a vegetable stir-fry. They add a pop of color and sweetness to any vegetarian meal.

These pairings not only enhance the flavors of your main dishes but also create a visually appealing plate. The bright orange of the carrots adds a cheerful touch to your dining experience!

Creative Serving Ideas

Sweet Garlic Carrots Recipe, creativity can elevate your dish even further. Here are some fun and unique serving ideas:

  • Carrot Salad: Toss the sweet garlic carrots with fresh greens, nuts, and a light vinaigrette for a refreshing salad. This adds crunch and a variety of textures.
  • Carrot Mash: For a twist, mash the cooked carrots with a bit of butter and cream. This creates a creamy side dish that’s perfect for special occasions.
  • Skewers: Thread the glazed carrots onto skewers for a fun presentation. This is especially great for barbecues or outdoor gatherings.
  • Carrot Soup: Use leftover sweet garlic carrots to make a delicious soup. Blend them with vegetable broth and seasonings for a comforting dish.
  • Garnish with Nuts: Sprinkle toasted nuts, like almonds or walnuts, over the carrots before serving. This adds a delightful crunch and nutty flavor.

These creative serving ideas can make your sweet garlic carrots stand out at any meal. Whether you’re hosting a dinner party or enjoying a family meal, these suggestions will impress your guests and family alike!

Tips for Perfecting Sweet Garlic Carrots Recipe

Choosing the Right Carrots

Sweet Garlic Carrots Recipe, selecting the right carrots is essential. Freshness is key! Look for baby carrots that are bright orange and firm to the touch. Avoid any that are soft or have blemishes, as these can affect the taste and texture of your dish.

If you can, opt for organic carrots. They tend to have a sweeter flavor and are free from harmful pesticides. If you prefer larger carrots, that’s perfectly fine! Just remember to cut them into uniform pieces. This ensures they cook evenly, giving you that perfect tender bite.

Another tip is to check the size of the carrots. Smaller carrots are naturally sweeter and cook faster, while larger ones may require a bit more time. If you’re using larger carrots, consider cutting them into smaller sticks or rounds to match the cooking time of baby carrots. This way, you’ll achieve that delightful caramelization without overcooking.

Adjusting Sweetness and Flavor

Sweet Garlic Carrots Recipe is how you can adjust the sweetness and flavor to suit your taste. If you prefer a sweeter dish, feel free to add a little more brown sugar or honey. Start with a small amount and taste as you go. This way, you can find the perfect balance that works for you.

On the flip side, if you want a more savory flavor, consider reducing the sugar slightly. You can also enhance the savory notes by adding a pinch of salt or a dash of soy sauce. This adds depth to the dish without overpowering the sweetness of the carrots.

Don’t forget about the garlic! If you love garlic, feel free to add an extra clove or two. The more garlic, the more flavor! Just be careful not to let it brown too much, as this can lead to a bitter taste. Experimenting with different herbs and spices can also elevate your dish. Fresh thyme or rosemary can add a lovely aroma and taste that pairs beautifully with the sweetness of the carrots.

Sweet Garlic Carrots Recipe that’s perfectly tailored to your palate. Enjoy the process of making this dish your own!

Breakdown of Time for Sweet Garlic Carrots Recipe

Prep Time

Sweet Garlic Carrots Recipe is quick and easy! The prep time typically takes about 10 minutes. This includes washing the baby carrots and chopping the garlic. If you choose to peel the carrots, it may add an extra minute or two. However, using baby carrots usually means you can skip peeling altogether, making your prep even faster!

Cooking Time

The cooking time for this delightful dish is around 15 minutes. First, you’ll blanch the carrots for about 5 minutes to soften them. Then, you’ll sauté the garlic and combine it with the carrots for an additional 10 minutes. This step allows the flavors to meld beautifully, resulting in perfectly glazed carrots.

Total Time

Sweet Garlic Carrots Recipe is perfect for busy weeknights or when you want to impress guests without spending hours in the kitchen. Enjoy the delicious results in no time!

Nutritional Information for Sweet Garlic Carrots Recipe

Calories

Sweet Garlic Carrots Recipe, it’s good to know the nutritional benefits. Each serving contains approximately 150 calories. This makes it a light yet satisfying side dish that can fit into various meal plans. The balance of flavors and nutrients makes these carrots a great addition to your diet.

Protein

In terms of protein, each serving of sweet garlic carrots provides about 1 gram. While this may seem low, remember that carrots are primarily a carbohydrate-rich vegetable. They are not a significant source of protein, but they do offer other essential nutrients. Pairing them with a protein-rich main dish can create a well-rounded meal.

Sodium

For sodium content, each serving contains around 200 milligrams. This amount is reasonable for a side dish, especially considering the flavor it brings to your meal. If you’re watching your sodium intake, you can adjust the sea salt in the recipe to suit your dietary needs. Reducing the salt slightly will still allow you to enjoy the delicious taste of these sweet garlic carrots.

Sweet Garlic Carrots Recipe is not only tasty but also provides a good mix of calories, protein, and sodium. Enjoy this delightful dish knowing it contributes to a balanced diet!

FAQs about Sweet Garlic Carrots Recipe

Can I use frozen carrots for this recipe?

Sweet Garlic Carrots Recipe. However, keep in mind that frozen carrots may have a slightly different texture compared to fresh baby carrots. To use frozen carrots, simply thaw them first and drain any excess water. Then, follow the same cooking steps as you would with fresh carrots. You may need to adjust the cooking time slightly, as frozen carrots can take a bit longer to become tender. The flavor will still be delicious, and you’ll enjoy the sweet garlic glaze just the same!

How can I store leftover sweet garlic carrots?

Sweet Garlic Carrots Recipe, storing them is easy! Allow the carrots to cool completely before transferring them to an airtight container. You can keep them in the refrigerator for up to 3-4 days. When you’re ready to enjoy them again, simply reheat in the microwave or on the stovetop. If you want to maintain their texture, avoid overcooking them during reheating. You can also add a splash of water or a little butter to help revive the glaze!

What are some variations for dietary restrictions?

Sweet Garlic Carrots Recipe to accommodate dietary restrictions. Here are some ideas:

  • Vegan Option: Substitute the unsalted butter with vegan butter or olive oil. This keeps the dish plant-based while still delicious.
  • Low-Sugar Version: If you’re watching your sugar intake, consider using a sugar substitute like stevia or erythritol. Adjust the amount to taste, as these sweeteners can vary in sweetness.
  • Gluten-Free: This recipe is naturally gluten-free, so you can enjoy it without any modifications!
  • Allergy-Friendly: If you have allergies to garlic, you can replace it with shallots or omit it entirely. You can also add other herbs like dill or basil for flavor.

These variations allow you to enjoy sweet garlic carrots while catering to different dietary needs. Feel free to get creative and make this recipe work for you!

Conclusion on Sweet Garlic Carrots Recipe

Sweet Garlic Carrots Recipe is a delightful addition to any meal. Its combination of sweet and savory flavors makes it a crowd-pleaser, perfect for family dinners or special occasions. The simplicity of the recipe allows even novice cooks to create a dish that looks and tastes impressive.

By following the steps outlined in this article, you can easily prepare these glazed carrots that are not only delicious but also nutritious. With their vibrant color and appealing aroma, sweet garlic carrots can brighten up your table and enhance your dining experience.

Remember, the beauty of this recipe lies in its versatility. Feel free to experiment with different ingredients and cooking methods to make it your own. Whether you choose to roast, steam, or grill, the sweet garlic glaze will always shine through, making your carrots irresistible.

As you enjoy your sweet garlic carrots, take pride in knowing that you’ve created a dish that is both tasty and healthy. With their rich flavor and appealing presentation, these carrots are sure to become a favorite in your household. So, gather your ingredients, follow the steps, and savor the delightful taste of sweet garlic carrots!

Black Pepper Chicken is a must-try recipe today!

Introduction to Black Pepper Chicken Recipe

What is Black Pepper Chicken?

Black Pepper Chicken is a delightful dish that brings together tender chicken pieces and a medley of vibrant vegetables. This recipe is known for its bold flavors, primarily driven by the use of freshly cracked black pepper. The combination of soy sauce, oyster sauce, and a hint of rice vinegar creates a savory and slightly tangy profile that perfectly complements the heat from the black pepper. This dish is not only delicious but also quick to prepare, making it a favorite for busy weeknight dinners.

Why You Should Try This Black Pepper Chicken Recipe

There are many reasons to try this Black Pepper Chicken Recipe. First, it’s incredibly easy to make, even for those who are new to cooking. With just a few simple ingredients, you can whip up a meal that tastes like it came from a restaurant. Second, the recipe is versatile. You can easily adjust the spice levels to suit your taste, making it perfect for everyone in the family. Plus, it’s packed with protein and nutrients, thanks to the chicken and colorful vegetables.

Moreover, this dish pairs wonderfully with steamed jasmine rice, creating a satisfying and wholesome meal. Whether you’re looking to impress guests or simply enjoy a comforting dinner at home, this Black Pepper Chicken Recipe is sure to become a staple in your kitchen. So, roll up your sleeves and get ready to savor a dish that’s bursting with flavor!

Ingredients for Black Pepper Chicken Recipe

To create a mouthwatering Black Pepper Chicken, you’ll need a selection of fresh ingredients that come together to form a delicious meal. Here’s what you’ll need:

  • 2 pounds boneless, skinless chicken thighs, diced into small chunks
  • 1 tablespoon canola oil
  • 1 tablespoon toasted sesame oil
  • 1 medium onion, sliced thin
  • 1 red bell pepper, cut into strips
  • 1 green bell pepper, cut into strips
  • 4 cloves garlic, finely chopped
  • 1 inch fresh ginger, finely chopped
  • 1/4 cup soy sauce
  • 2 tablespoons oyster sauce
  • 1 tablespoon rice vinegar
  • 1 tablespoon freshly cracked black pepper (or to taste)
  • 1 teaspoon granulated sugar
  • 2 green onions, chopped (for garnish)
  • Steamed jasmine rice (for serving)

These ingredients not only provide flavor but also contribute to the dish’s vibrant colors. The combination of chicken, fresh vegetables, and aromatic spices creates a delightful experience for your taste buds. Make sure to gather everything before you start cooking, as this will help streamline the process and ensure a smooth cooking experience.

Now that you have your ingredients ready, let’s move on to the next step: preparing the Black Pepper Chicken!

Step-by-Step Preparation of Black Pepper Chicken Recipe

Step 1: Marinating the Chicken

Marinating the chicken is a crucial step in this Black Pepper Chicken Recipe. Start by placing the diced chicken thighs in a mixing bowl. Then, add the soy sauce, oyster sauce, rice vinegar, freshly cracked black pepper, and granulated sugar. Stir everything together until the chicken is well-coated. This mixture not only adds flavor but also tenderizes the meat. For the best results, let the chicken marinate for at least 30 minutes. If you have more time, marinating for up to two hours in the fridge will enhance the flavors even more.

Step 2: Preparing the Sauce

While the chicken is marinating, you can prepare the sauce. The combination of soy sauce and oyster sauce creates a rich base. The rice vinegar adds a tangy kick, while the sugar balances the flavors. If you like it spicy, feel free to add more black pepper or even a dash of chili sauce. This sauce will coat the chicken beautifully, making every bite delicious. Set the sauce aside until you’re ready to cook the chicken.

Step 3: Cooking the Chicken

Once the chicken has marinated, it’s time to cook! Heat a large frying pan or wok over medium-high heat. Add the canola oil and toasted sesame oil, allowing them to shimmer. Carefully add the marinated chicken to the pan, spreading it out evenly. Sauté the chicken for about 5-7 minutes, stirring occasionally. You want the chicken to be golden brown and fully cooked. This step is essential for locking in the flavors from the marinade.

Step 4: Combining Ingredients

After the chicken is cooked, transfer it to a plate and keep it warm. In the same pan, toss in the sliced onion, red bell pepper, and green bell pepper. Stir-fry these vegetables for about 3-4 minutes. You want them to be vibrant and slightly tender. Next, add the minced garlic and ginger, cooking for an additional minute. This will release their aromatic fragrance, enhancing the overall flavor of the dish. Finally, return the cooked chicken to the pan, mixing everything together. Allow it to heat through for another 2-3 minutes.

Step 5: Final Touches

Now that everything is combined, it’s time for the final touches! Serve the spicy pepper chicken over a bed of steamed jasmine rice. This not only makes for a beautiful presentation but also balances the dish’s flavors. To finish, garnish with chopped green onions for a fresh and colorful touch. Your Black Pepper Chicken is now ready to be enjoyed!

Variations of Black Pepper Chicken Recipe

Spicy Black Pepper Chicken Variation

If you love heat, then the Spicy Black Pepper Chicken Variation is perfect for you! To amp up the spice level, consider adding sliced jalapeños or crushed red pepper flakes during the cooking process. This will give your dish an extra kick that spice lovers will appreciate. You can also increase the amount of freshly cracked black pepper in the marinade. Just remember, the key is to balance the heat with the other flavors. Pairing this spicy version with a cooling side, like cucumber salad, can help balance the heat and make for a delightful meal.

Vegetarian Black Pepper Chicken Alternative

For those who prefer a meat-free option, the Vegetarian Black Pepper Chicken Alternative is a fantastic choice. Instead of chicken, you can use firm tofu or tempeh. Start by pressing the tofu to remove excess moisture, then cut it into cubes. Marinate the tofu in the same sauce as the chicken for at least 30 minutes. When cooking, sauté the tofu until it’s golden brown and crispy on the outside. You can also add more vegetables, like broccoli or snap peas, to enhance the dish’s texture and flavor. This vegetarian version is just as satisfying and packed with flavor, making it a great option for everyone!

Cooking Note for Black Pepper Chicken Recipe

When preparing the Black Pepper Chicken Recipe, there are a few important cooking notes to keep in mind. These tips will help ensure that your dish turns out perfectly every time.

First, always use fresh ingredients. Fresh vegetables and high-quality chicken will enhance the flavors of your dish. If possible, choose organic chicken and locally sourced vegetables. This not only improves taste but also supports local farmers.

Next, pay attention to the heat level. Cooking on medium-high heat is crucial for achieving that perfect sear on the chicken. This helps lock in moisture and flavor. However, be careful not to overcrowd the pan. If you add too much chicken at once, it can lower the pan’s temperature, leading to steaming instead of sautéing. If you have a lot of chicken, consider cooking it in batches.

Additionally, timing is key. Make sure to stir-fry the vegetables just until they are tender but still crisp. Overcooking them can result in a mushy texture, which is not desirable. You want the vegetables to retain their vibrant colors and crunch.

Lastly, don’t forget to taste as you go! Adjust the seasoning according to your preference. If you like it spicier, add more black pepper or a splash of hot sauce. If you prefer a sweeter flavor, a little extra sugar can balance the heat. Cooking is all about personal preference, so feel free to make this dish your own!

By following these cooking notes, you’ll create a delicious Black Pepper Chicken that’s sure to impress your family and friends. Happy cooking!

Serving Suggestions for Black Pepper Chicken Recipe

Best Side Dishes to Pair with Black Pepper Chicken

When it comes to serving your Black Pepper Chicken, choosing the right side dishes can elevate your meal. Here are some fantastic options that complement the flavors of the chicken:

  • Steamed Jasmine Rice: This is the classic pairing. The fluffy rice absorbs the savory sauce, making each bite delightful.
  • Stir-Fried Vegetables: A mix of broccoli, snap peas, and carrots adds color and nutrition. The crunchiness of the veggies balances the tender chicken.
  • Asian Cucumber Salad: This refreshing salad, made with sliced cucumbers, rice vinegar, and sesame oil, provides a cool contrast to the spicy chicken.
  • Egg Fried Rice: For a heartier option, egg fried rice is a great choice. The eggs add protein and richness, making the meal more filling.
  • Spring Rolls: Crispy spring rolls filled with vegetables or shrimp can serve as a delightful appetizer or side dish.

These side dishes not only enhance the meal but also add variety to your dining experience. Feel free to mix and match based on your preferences and what you have on hand!

Ideal Serving Temperature for Black Pepper Chicken

Serving temperature plays a crucial role in enjoying your Black Pepper Chicken. Ideally, this dish should be served hot. The warmth enhances the flavors and aromas, making each bite more enjoyable. Here are some tips for serving:

  • After cooking, let the chicken rest for a few minutes before serving. This allows the juices to redistribute, keeping the chicken moist.
  • If you need to keep the dish warm before serving, cover it with a lid or aluminum foil. This helps retain heat without overcooking the chicken.
  • For the best experience, serve the Black Pepper Chicken immediately after cooking. This ensures that the vegetables remain crisp and the chicken stays juicy.

By paying attention to serving temperature, you’ll ensure that your Black Pepper Chicken is not only delicious but also a memorable dining experience for you and your guests!

Tips for Perfecting Your Black Pepper Chicken Recipe

Choosing the Right Chicken

When it comes to making the best Black Pepper Chicken, selecting the right chicken is essential. For this recipe, boneless, skinless chicken thighs are recommended. They are juicy and flavorful, making them perfect for stir-frying. However, if you prefer a leaner option, chicken breasts can also work well. Just remember that chicken breasts may cook faster, so keep an eye on them to avoid dryness.

Another option is to use organic chicken. Organic chicken often has a richer flavor and is free from antibiotics and hormones. This choice not only benefits your health but also enhances the overall taste of your dish. If you’re feeling adventurous, consider trying dark meat chicken, like drumsticks or wings, for a different texture and flavor profile.

Lastly, always ensure that your chicken is fresh. Check the expiration date and look for a bright pink color. Fresh chicken will yield the best results in your Black Pepper Chicken Recipe, ensuring a delicious meal every time!

Adjusting Spice Levels in Black Pepper Chicken Recipe

One of the great things about the Black Pepper Chicken Recipe is its versatility in spice levels. If you enjoy a mild flavor, you can easily adjust the amount of black pepper used. Start with the recommended tablespoon, and taste the dish as you cook. If you want more heat, gradually add more black pepper until it reaches your desired level.

For those who love a spicy kick, consider adding other spicy ingredients. Sliced jalapeños or crushed red pepper flakes can elevate the heat. Just be cautious and add a little at a time, as it’s easier to increase spice than to tone it down. You can also experiment with different types of pepper, like white pepper or even Szechuan peppercorns, for a unique twist.

Additionally, if you’re cooking for a group with varying spice preferences, serve the black pepper chicken with a side of chili sauce. This way, everyone can customize their dish to their liking. Remember, cooking is all about personal taste, so feel free to make this recipe your own!

Breakdown of Time for Black Pepper Chicken Recipe

Prep Time

The prep time for this Black Pepper Chicken Recipe is quite manageable. You’ll need about 10-15 minutes to gather your ingredients and prepare them. This includes dicing the chicken, slicing the vegetables, and chopping the garlic and ginger. If you choose to marinate the chicken, add an additional 30 minutes to 2 hours, depending on how much time you have. This marinating step is crucial for infusing flavor into the chicken, so it’s worth the wait!

Cooking Time

Once you’re ready to cook, the actual cooking time is relatively quick. Expect to spend about 15-20 minutes on the stovetop. This includes sautéing the marinated chicken, stir-frying the vegetables, and combining everything together. The fast cooking process helps retain the freshness and crunch of the vegetables while ensuring the chicken is perfectly cooked. It’s a great option for busy weeknights when you want a delicious meal without spending hours in the kitchen.

Total Time

In total, if you include the marinating time, the Black Pepper Chicken Recipe will take approximately 40 minutes to 2 hours and 20 minutes. If you skip the marinating step, the total time will be around 25-35 minutes. This makes it a fantastic choice for a quick yet flavorful dinner. Whether you’re in a rush or have a bit more time to spare, this recipe can easily fit into your schedule!

Nutritional Information for Black Pepper Chicken Recipe

Calories in Black Pepper Chicken

When it comes to enjoying a delicious meal, knowing the calorie content can help you make informed choices. Each serving of this Black Pepper Chicken contains approximately 350 calories. This makes it a satisfying option for dinner without being overly heavy. The balance of protein, fats, and carbohydrates ensures that you feel full and energized after your meal. If you’re watching your calorie intake, pairing this dish with steamed vegetables instead of rice can help reduce the overall calorie count while still providing a nutritious meal.

Protein Content in Black Pepper Chicken

Protein is an essential nutrient that plays a vital role in building and repairing tissues. Each serving of Black Pepper Chicken offers about 28 grams of protein. This high protein content comes primarily from the chicken thighs, making it an excellent choice for those looking to increase their protein intake. Including protein in your meals can help you feel fuller for longer, making it easier to manage hunger throughout the day. Whether you’re an athlete or just someone looking to maintain a healthy diet, this dish can support your nutritional needs.

Sodium Levels in Black Pepper Chicken

Sodium is another important factor to consider when preparing meals. Each serving of Black Pepper Chicken contains around 800 milligrams of sodium. This level is primarily due to the soy sauce and oyster sauce used in the recipe. While sodium is necessary for bodily functions, it’s essential to consume it in moderation. If you’re watching your sodium intake, consider using low-sodium soy sauce or reducing the amount of sauce in the recipe. This way, you can still enjoy the flavors without exceeding your daily sodium limit.

FAQs about Black Pepper Chicken Recipe

Can I use other types of meat for this Black Pepper Chicken Recipe?

Absolutely! While this Black Pepper Chicken Recipe features chicken thighs, you can easily substitute other types of meat. Chicken breasts are a popular alternative, offering a leaner option. If you prefer red meat, thinly sliced beef or pork can work well too. Just remember to adjust the cooking times accordingly, as different meats may require varying lengths of time to cook through. For a seafood twist, shrimp can also be a delicious choice. Simply sauté them until they turn pink and opaque, which usually takes just a few minutes. The key is to ensure that whatever meat you choose is cooked thoroughly for the best flavor and texture.

How can I make Black Pepper Chicken less spicy?

If you want to tone down the spice in your Black Pepper Chicken, there are several easy ways to do so. First, reduce the amount of freshly cracked black pepper in the marinade. Start with half a tablespoon instead of a full tablespoon, and taste as you go. You can also omit any additional spicy ingredients, like jalapeños or crushed red pepper flakes, if you’re using them. Another great tip is to add more vegetables to the dish. This will help balance the heat and provide a milder flavor. Finally, serving the chicken with a side of cooling sauces, like yogurt or a sweet chili sauce, can help offset the spice and make the dish more enjoyable for those who prefer milder flavors.

What are some common mistakes to avoid in Black Pepper Chicken Recipe?

When making Black Pepper Chicken, there are a few common mistakes to watch out for. One mistake is overcrowding the pan while cooking the chicken. This can lead to steaming instead of sautéing, resulting in less flavorful chicken. Always cook in batches if necessary. Another mistake is not marinating the chicken long enough. Allowing the chicken to marinate for at least 30 minutes enhances the flavor significantly. Additionally, be careful not to overcook the vegetables. They should be tender yet still crisp to maintain their vibrant colors and nutrients. Lastly, remember to taste your dish as you cook. Adjusting the seasoning along the way ensures that the final product is perfectly balanced.

Can I prepare Black Pepper Chicken in advance?

Yes, you can prepare Black Pepper Chicken in advance, making it a great option for meal prep! You can marinate the chicken a day ahead and store it in the refrigerator. This allows the flavors to deepen, resulting in a more delicious dish. When you’re ready to cook, simply follow the cooking instructions. If you have leftovers, they can be stored in an airtight container in the fridge for up to three days. Reheat gently on the stovetop or in the microwave, adding a splash of water or broth to keep it moist. This makes it easy to enjoy a quick and tasty meal throughout the week!

Conclusion on Black Pepper Chicken Recipe

In conclusion, the Black Pepper Chicken Recipe is a fantastic dish that combines bold flavors with simple preparation. This recipe not only highlights the aromatic qualities of black pepper but also showcases the versatility of chicken and vegetables. Whether you’re a seasoned cook or just starting out, this dish is approachable and rewarding.

By following the steps outlined in this article, you can create a meal that is both satisfying and nutritious. The balance of protein, vegetables, and spices makes it a wholesome choice for any dinner table. Plus, with the ability to customize spice levels and ingredient choices, you can make this dish your own.

As you explore the variations and tips provided, you’ll find endless possibilities to keep your Black Pepper Chicken exciting. From adding a spicy twist to creating a vegetarian alternative, the options are plentiful. Remember, cooking is about experimenting and finding what works best for you and your loved ones.

So, gather your ingredients, roll up your sleeves, and get ready to enjoy a delightful meal that’s sure to impress. Whether served on a busy weeknight or at a special gathering, this Black Pepper Chicken Recipe is bound to become a favorite in your home. Happy cooking!

Hobo Casserole with Ground Beef and Potatoes is delicious!

Introduction

What is Hobo Casserole with Ground Beef and Potatoes?

Hobo Casserole with Ground Beef and Potatoes is a hearty dish that combines simple ingredients into a delicious meal. This comforting casserole features layers of ground beef, tender potatoes, and savory vegetables, all baked together in a creamy sauce. It’s a one-dish wonder that’s perfect for busy weeknights or family gatherings. The name “Hobo Casserole” comes from its rustic origins, where it was often made with whatever ingredients were on hand. Today, it remains a beloved recipe for its ease and flavor.

The Appeal of Hobo Casserole with Ground Beef and Potatoes

The appeal of Hobo Casserole with Ground Beef and Potatoes lies in its simplicity and versatility. First, it’s easy to prepare, making it a great choice for novice cooks or anyone short on time. Second, the ingredients are affordable and widely available, which means you can whip it up without breaking the bank. Additionally, this dish is highly customizable. You can add your favorite vegetables or swap out the ground beef for other proteins. This flexibility allows you to cater to different tastes and dietary needs.

Moreover, the comforting flavors and textures make it a family favorite. The creamy sauce, combined with the melted cheese on top, creates a delightful experience with every bite. Whether you’re serving it for a casual dinner or a special occasion, Hobo Casserole with Ground Beef and Potatoes is sure to please everyone at the table.

Ingredients

To create a delicious Hobo Casserole with Ground Beef and Potatoes, you will need the following ingredients:

  • 1 pound ground beef
  • 4 medium potatoes, thinly sliced
  • 1 medium onion, diced
  • 1 can (15 ounces) green beans, drained
  • 1 can (10.5 ounces) cream of mushroom soup
  • 1 cup shredded cheddar cheese
  • 1 teaspoon garlic powder
  • 1 teaspoon salt
  • 1/2 teaspoon black pepper
  • 1 tablespoon olive oil

These ingredients come together to create a hearty and satisfying meal. The ground beef provides protein, while the potatoes add a comforting texture. The green beans contribute a pop of color and nutrition, and the cream of mushroom soup binds everything together with its creamy goodness. Finally, the cheddar cheese on top adds a deliciously melty finish that everyone will love.

Feel free to adjust the ingredients based on your preferences. For instance, you can swap the green beans for corn or peas for a different flavor. You can also add spices like red pepper flakes for a little kick. The beauty of this dish is its adaptability, making it easy to cater to your family’s tastes.

Preparation of Hobo Casserole with Ground Beef and Potatoes

Step 1: Prepping the Ingredients

Before you start cooking, it’s important to prep all your ingredients. Begin by washing the potatoes thoroughly. Then, slice them thinly to ensure they cook evenly. Next, dice the onion into small pieces. This will help it blend well with the beef and potatoes. Finally, open the cans of green beans and cream of mushroom soup, draining the beans before use. Having everything ready will make the cooking process smooth and enjoyable.

Step 2: Cooking the Ground Beef

Now, it’s time to cook the ground beef. Heat a large skillet over medium heat and add the olive oil. Once the oil is hot, add the diced onion. Sauté the onion for about 5 minutes until it becomes soft and translucent. Then, add the ground beef to the skillet. Cook it for 7-10 minutes, breaking it apart with a spatula. Make sure it’s browned and crumbly. After cooking, drain any excess grease from the pan to keep the casserole from being too oily.

Step 3: Layering the Ingredients

With the beef cooked, it’s time to layer the ingredients. In a large bowl, combine the browned beef and onions with the thinly sliced potatoes, drained green beans, cream of mushroom soup, garlic powder, salt, and black pepper. Stir everything together until well mixed. This step is crucial as it ensures that every bite of the casserole is packed with flavor. Once mixed, pour the mixture into a greased 9×13-inch baking dish. Spread it out evenly across the bottom to create a uniform layer.

Step 4: Baking the Casserole

Now that your casserole is assembled, it’s time to bake it. Cover the dish tightly with aluminum foil to keep the moisture in. Place it in the preheated oven at 350°F and bake for 45 minutes. This allows the flavors to meld and the potatoes to cook through. After 45 minutes, carefully remove the foil. Sprinkle the shredded cheddar cheese evenly over the top. Return the dish to the oven without the foil and bake for an additional 15-20 minutes. You’ll know it’s done when the cheese is melted and bubbly, and the potatoes are fork-tender. Let it rest for about 5 minutes before serving, allowing the flavors to settle.

Variation of Hobo Casserole with Ground Beef and Potatoes

Vegetarian Option

If you’re looking for a meatless version of Hobo Casserole with Ground Beef and Potatoes, you’re in luck! You can easily create a delicious vegetarian option. Instead of ground beef, use a combination of hearty vegetables like mushrooms, bell peppers, and zucchini. These veggies add great flavor and texture to the dish.

To make the vegetarian casserole, start by sautéing the diced onion in olive oil until soft. Then, add your chosen vegetables and cook until they are tender. Next, mix in the thinly sliced potatoes, drained green beans, cream of mushroom soup, garlic powder, salt, and black pepper. Follow the same baking instructions as the original recipe. This vegetarian version is just as comforting and satisfying, making it a great choice for everyone at the table.

Alternative Protein Choices

For those who prefer different proteins, there are plenty of alternatives to ground beef in Hobo Casserole with Ground Beef and Potatoes. Ground turkey or chicken can be used for a leaner option. These meats provide a similar texture and flavor while reducing the fat content.

Another option is to use plant-based ground meat, which is perfect for those following a vegetarian or vegan diet. Brands like Beyond Meat or Impossible Foods offer great substitutes that mimic the taste and texture of beef. Simply follow the same cooking steps as you would with ground beef. No matter which protein you choose, the casserole will still be delicious and satisfying!

Cooking Note for Hobo Casserole with Ground Beef and Potatoes

When preparing Hobo Casserole with Ground Beef and Potatoes, there are a few cooking notes to keep in mind to ensure the best results. First, always use fresh ingredients whenever possible. Fresh potatoes and vegetables will enhance the flavor and texture of your dish. If you have leftover vegetables in your fridge, feel free to toss them in. This dish is all about using what you have on hand!

Next, consider the thickness of your potato slices. Thinly sliced potatoes will cook more evenly and quickly, while thicker slices may require additional baking time. If you prefer a crispy top, you can broil the casserole for a few minutes at the end of the baking time. Just keep a close eye on it to prevent burning.

Additionally, if you want to add more flavor, try incorporating herbs like thyme or rosemary into the beef mixture. These herbs can elevate the taste and make your casserole even more delightful. For a creamier texture, you can mix in a splash of milk or sour cream with the cream of mushroom soup.

Lastly, remember that every oven is different. If you find that your casserole is not cooking as expected, you may need to adjust the baking time or temperature slightly. Always check for doneness by ensuring the potatoes are fork-tender and the cheese is bubbly. With these tips in mind, you’ll create a delicious Hobo Casserole that your family will love!

Serving Suggestions for Hobo Casserole with Ground Beef and Potatoes

When it comes to serving Hobo Casserole with Ground Beef and Potatoes, there are plenty of delightful options to enhance your meal. This hearty dish is versatile and pairs well with various sides and accompaniments. Here are some serving suggestions to consider:

  • Fresh Salad: A crisp green salad is a perfect complement to the rich flavors of the casserole. Consider a simple mixed greens salad with a light vinaigrette. The freshness of the salad balances the hearty casserole beautifully.
  • Garlic Bread: Serve warm garlic bread on the side for a comforting touch. The buttery, garlicky flavor pairs wonderfully with the creamy casserole, making every bite even more enjoyable.
  • Steamed Vegetables: For a nutritious addition, serve steamed vegetables like broccoli or carrots. These colorful veggies add a pop of color to your plate and provide extra vitamins and minerals.
  • Pickles or Relish: Adding a side of pickles or relish can bring a tangy contrast to the dish. The acidity cuts through the richness of the casserole, making it a delightful combination.
  • Hot Sauce: If you enjoy a bit of heat, consider offering hot sauce on the side. A few dashes can elevate the flavors and add a spicy kick to your serving.

For a complete meal, you can also serve the casserole with a side of fruit. Fresh fruit salad or sliced apples can provide a refreshing end to your dinner. No matter how you choose to serve it, Hobo Casserole with Ground Beef and Potatoes is sure to be a hit at your table!

Tips for Making the Best Hobo Casserole with Ground Beef and Potatoes

Creating the perfect Hobo Casserole with Ground Beef and Potatoes is all about attention to detail. Here are some helpful tips to ensure your casserole turns out delicious every time:

  • Choose Quality Meat: Start with good-quality ground beef. Look for lean options to reduce excess grease. If you prefer, you can also use grass-fed beef for a healthier choice.
  • Season Generously: Don’t be shy with the seasonings! Besides garlic powder, consider adding onion powder, paprika, or even a dash of Worcestershire sauce for extra flavor. These spices can elevate the taste of your casserole.
  • Layer Wisely: When layering your ingredients, make sure to spread them evenly. This helps ensure that every bite is packed with flavor. You can also alternate layers of potatoes and beef for a more visually appealing dish.
  • Cover While Baking: Always cover your casserole with foil during the first part of baking. This keeps the moisture in, allowing the potatoes to cook thoroughly without drying out.
  • Check for Doneness: Use a fork to test the potatoes for tenderness. If they’re not fork-tender after the initial baking time, cover and bake for a little longer. Every oven is different, so keep an eye on it!
  • Let It Rest: After baking, let the casserole sit for about 5 minutes before serving. This resting time allows the flavors to meld and makes it easier to serve.
  • Experiment with Toppings: While cheddar cheese is a classic topping, feel free to experiment! Try adding mozzarella, pepper jack, or even crumbled feta for a unique twist. You can also sprinkle fresh herbs like parsley or chives on top for added freshness.
  • Make It Ahead: If you’re short on time, consider preparing the casserole ahead of time. You can assemble it the night before and store it in the fridge. Just add a few extra minutes to the baking time if it’s cold from the fridge.

By following these tips, you’ll create a Hobo Casserole with Ground Beef and Potatoes that’s not only tasty but also a hit with family and friends. Enjoy the process and happy cooking!

Breakdown of Time for Hobo Casserole with Ground Beef and Potatoes

Prep Time

Preparing Hobo Casserole with Ground Beef and Potatoes is quick and straightforward. You can expect to spend about 15-20 minutes on prep work. This includes washing and slicing the potatoes, dicing the onion, and gathering all your ingredients. Having everything ready will make the cooking process smoother and more enjoyable.

Cooking Time

The cooking time for this delicious casserole is approximately 1 hour. This includes 45 minutes of baking covered with foil, followed by an additional 15-20 minutes uncovered to melt the cheese. During this time, the flavors meld beautifully, and the potatoes become tender. It’s essential to keep an eye on the casserole during the last few minutes to ensure the cheese doesn’t burn.

Total Time

In total, you’ll need about 1 hour and 15-20 minutes to prepare and cook Hobo Casserole with Ground Beef and Potatoes. This makes it a perfect option for a weeknight dinner when you want something hearty and satisfying without spending all evening in the kitchen. With minimal effort and time, you can serve a delightful meal that your family will love!

Nutritional Information for Hobo Casserole with Ground Beef and Potatoes

Calories

When it comes to enjoying Hobo Casserole with Ground Beef and Potatoes, understanding the calorie content is essential. Each serving contains approximately 350 calories. This makes it a filling option for dinner without going overboard on calories. The combination of ground beef, potatoes, and cheese provides a satisfying meal that keeps you energized.

Protein

Protein is a vital nutrient, and this casserole delivers! Each serving offers about 22 grams of protein. The ground beef is the primary source of protein, making this dish a great choice for those looking to increase their protein intake. Protein is essential for muscle repair and growth, making this casserole a smart option for active individuals and families.

Sodium

While enjoying Hobo Casserole with Ground Beef and Potatoes, it’s important to be mindful of sodium levels. Each serving contains around 800 milligrams of sodium. This amount is typical for many casseroles, especially those that include canned soups. If you’re watching your sodium intake, consider using low-sodium cream of mushroom soup or rinsing the green beans before adding them to the dish. These small adjustments can help reduce the overall sodium content while still keeping the flavors intact.

FAQs about Hobo Casserole with Ground Beef and Potatoes

Can I make Hobo Casserole with Ground Beef and Potatoes ahead of time?

Absolutely! You can prepare Hobo Casserole with Ground Beef and Potatoes ahead of time. Simply assemble the casserole as directed, but do not bake it right away. Cover it tightly with plastic wrap or aluminum foil and store it in the refrigerator. When you’re ready to bake, just remove the cover and pop it in the oven. You may need to add a few extra minutes to the baking time if it’s cold from the fridge. This makes it a great option for busy weeknights or meal prep!

What can I substitute for ground beef in Hobo Casserole with Ground Beef and Potatoes?

If you’re looking for alternatives to ground beef, there are several options! Ground turkey or chicken works well and provides a leaner option. For a vegetarian twist, consider using plant-based ground meat, which mimics the texture of beef. You can also use a mix of hearty vegetables like mushrooms, bell peppers, and zucchini for a delicious vegetarian casserole. Each option will still yield a tasty dish that everyone can enjoy!

How do I store leftovers of Hobo Casserole with Ground Beef and Potatoes?

Storing leftovers is easy! Allow the casserole to cool completely before transferring it to an airtight container. You can keep it in the refrigerator for up to 3-4 days. When you’re ready to enjoy it again, simply reheat individual portions in the microwave or warm it in the oven until heated through. This makes for a quick and satisfying meal later in the week!

Can I freeze Hobo Casserole with Ground Beef and Potatoes?

Yes, you can freeze Hobo Casserole with Ground Beef and Potatoes! To do this, prepare the casserole as directed but do not bake it. Instead, cover it tightly with plastic wrap and then aluminum foil to prevent freezer burn. It can be stored in the freezer for up to 2-3 months. When you’re ready to enjoy it, thaw it in the refrigerator overnight and then bake as usual. This is a fantastic way to have a homemade meal ready to go whenever you need it!

Conclusion

Recap of Hobo Casserole with Ground Beef and Potatoes Benefits

Hobo Casserole with Ground Beef and Potatoes is not just a meal; it’s a comforting experience that brings families together. This dish is packed with benefits, making it a favorite for many. First, it’s incredibly easy to prepare, allowing even novice cooks to create a delicious dinner. The use of simple, affordable ingredients means you can enjoy a hearty meal without stretching your budget. Plus, the versatility of this casserole allows you to customize it to suit your family’s tastes, whether you prefer different proteins or additional vegetables.

Moreover, the nutritional value of Hobo Casserole is noteworthy. With a good balance of protein, carbohydrates, and essential vitamins, it provides a satisfying meal that fuels your body. The creamy texture and melted cheese on top create a delightful combination that everyone will love. Whether you’re serving it on a busy weeknight or at a family gathering, this casserole is sure to impress.

Encouragement to Try the Recipe

If you haven’t yet tried making Hobo Casserole with Ground Beef and Potatoes, now is the perfect time! Gather your ingredients and follow the simple steps outlined in this article. You’ll find that the process is straightforward and enjoyable. Plus, the end result is a warm, comforting dish that will have everyone asking for seconds.

Don’t hesitate to experiment with different ingredients and flavors. Whether you stick to the classic recipe or make it your own, you’re bound to create a meal that brings joy to your table. So roll up your sleeves, get cooking, and enjoy the deliciousness of Hobo Casserole with Ground Beef and Potatoes!

Honey BBQ Chicken Rice is a must-try recipe today!

Introduction to Honey BBQ Chicken Rice

Are you looking for a delicious and satisfying meal that combines sweet and savory flavors? Look no further than Honey BBQ Chicken Rice! This dish is not only easy to prepare but also packed with flavor that will delight your taste buds. The combination of tender chicken thighs, a tangy BBQ sauce, and fluffy jasmine rice creates a perfect harmony of textures and tastes.

Honey BBQ Chicken Rice is a fantastic option for family dinners or gatherings with friends. It’s a crowd-pleaser that appeals to both kids and adults alike. The sweetness from the honey and maple syrup balances beautifully with the spices, making each bite a delightful experience. Plus, it’s a versatile dish that you can customize to suit your preferences.

In this article, we will guide you through the ingredients, preparation steps, and variations of this mouthwatering recipe. Whether you’re a seasoned cook or a beginner in the kitchen, you’ll find this recipe easy to follow. So, roll up your sleeves and get ready to create a meal that will impress everyone at your table!

Ingredients for Honey BBQ Chicken Rice

To create the delightful Honey BBQ Chicken Rice, you’ll need a selection of fresh and flavorful ingredients. Each component plays a vital role in bringing this dish to life. Here’s what you’ll need:

  • 2 cups cooked jasmine rice: This fluffy rice serves as the perfect base for the dish, absorbing all the delicious flavors.
  • 1 pound chicken thighs, diced: Tender chicken thighs add richness and juiciness to the meal.
  • 1 cup tangy BBQ sauce: The star of the show, this sauce provides the sweet and spicy kick.
  • 1/4 cup maple syrup: This natural sweetener enhances the flavor profile, adding a touch of sweetness.
  • 1 tablespoon avocado oil: A healthy oil for cooking that adds a subtle flavor.
  • 1 teaspoon smoked paprika: This spice gives a smoky depth to the chicken.
  • 1 teaspoon dried thyme: A fragrant herb that complements the other flavors beautifully.
  • 1/2 teaspoon sea salt: Essential for enhancing the overall taste of the dish.
  • 1/4 teaspoon freshly ground black pepper: Adds a mild heat and depth of flavor.
  • 1/4 teaspoon cayenne pepper (optional): For those who enjoy a little extra heat, this spice is a great addition.
  • 1/4 cup sliced scallions (for garnish): These fresh greens add a crunchy texture and a pop of color to the dish.

Gathering these ingredients will set you on the right path to making a delicious Honey BBQ Chicken Rice. Each item contributes to the overall taste, making it a well-rounded meal that everyone will love. Now that you have your ingredients ready, let’s move on to the preparation steps!

Preparation of Honey BBQ Chicken Rice

Now that you have gathered all your ingredients, it’s time to dive into the preparation of Honey BBQ Chicken Rice. This process is straightforward and will have your kitchen smelling amazing in no time. Let’s break it down into easy steps!

Step 1: Marinating the Chicken for Honey BBQ Chicken Rice

Start by marinating the diced chicken thighs. In a bowl, combine the chicken with smoked paprika, dried thyme, sea salt, black pepper, and cayenne pepper if you like it spicy. Mix everything well, ensuring the chicken is evenly coated with the spices. Allow it to marinate for at least 15 minutes. This step enhances the flavor and makes the chicken more tender.

Step 2: Cooking the Chicken for Honey BBQ Chicken Rice

Next, heat the avocado oil in a large frying pan over medium-high heat. Once the oil is hot, add the marinated chicken thighs. Sauté the chicken for about 8-10 minutes, stirring frequently. You want the chicken to turn golden brown and be fully cooked. This step is crucial as it locks in the flavors and gives the chicken a nice texture.

Step 3: Preparing the Rice for Honey BBQ Chicken Rice

While the chicken is cooking, prepare your jasmine rice if you haven’t done so already. You can use leftover rice or cook it fresh. To cook jasmine rice, rinse it under cold water until the water runs clear. Then, combine 1 cup of rice with 1.5 cups of water in a pot. Bring it to a boil, then reduce the heat to low, cover, and let it simmer for about 15 minutes. Once done, fluff it with a fork and set it aside.

Step 4: Combining Ingredients for Honey BBQ Chicken Rice

Once the chicken is cooked, it’s time to bring everything together. In a separate bowl, whisk together the BBQ sauce and maple syrup until smooth. Pour this sweet and spicy mixture over the cooked chicken in the pan. Stir well to coat each piece of chicken with the sauce. Let it simmer for an additional 3-4 minutes. This allows the flavors to meld beautifully, creating a sticky and delicious coating.

Now, you’re ready to serve! Place a generous scoop of jasmine rice on each plate and top it with the flavorful BBQ chicken. Don’t forget to garnish with sliced scallions for that fresh crunch. Enjoy your homemade Honey BBQ Chicken Rice!

Variation of Honey BBQ Chicken Rice

While the classic Honey BBQ Chicken Rice recipe is delicious as is, there are many ways to switch things up! Variations can enhance flavors, add nutrition, or cater to dietary preferences. Let’s explore some alternative ingredients and different cooking methods that can make this dish even more exciting.

Alternative Ingredients for Honey BBQ Chicken Rice

Experimenting with different ingredients can lead to delightful new flavors. Here are some alternatives you might consider:

  • Protein Options: Instead of chicken thighs, try using chicken breasts, shrimp, or even tofu for a vegetarian option. Each protein brings its unique taste and texture.
  • BBQ Sauce Variations: You can use different types of BBQ sauce, such as honey mustard or teriyaki sauce, to change the flavor profile. Each sauce will give a unique twist to the dish.
  • Sweeteners: If you want to reduce sugar, consider using agave syrup or coconut sugar instead of maple syrup. These alternatives can provide a similar sweetness with different health benefits.
  • Vegetables: Add colorful veggies like bell peppers, corn, or broccoli to the dish. They not only enhance the nutrition but also add vibrant colors and textures.

Different Cooking Methods for Honey BBQ Chicken Rice

There are various cooking methods you can use to prepare Honey BBQ Chicken Rice, each offering a unique taste and texture:

  • Grilling: For a smoky flavor, grill the marinated chicken instead of pan-frying. This method adds a delicious char and is perfect for summer barbecues.
  • Slow Cooking: Use a slow cooker to prepare the chicken. Combine the marinated chicken and sauce in the slow cooker and let it cook on low for 4-6 hours. This method makes the chicken incredibly tender and flavorful.
  • Oven Baking: Bake the marinated chicken in the oven at 375°F (190°C) for about 25-30 minutes. This method is hands-off and allows the chicken to cook evenly.
  • Stir-Frying: For a quick meal, stir-fry the chicken with vegetables in a wok. This method is fast and keeps the chicken juicy while adding a crunch from the veggies.

These variations and cooking methods can help you create a personalized version of Honey BBQ Chicken Rice that suits your taste and dietary needs. Feel free to mix and match ingredients and techniques to discover your favorite combination!

Cooking Note for Honey BBQ Chicken Rice

When preparing Honey BBQ Chicken Rice, a few cooking notes can help ensure your dish turns out perfectly every time. These tips will enhance the flavors and textures, making your meal even more enjoyable.

First, always use fresh ingredients. Fresh chicken and high-quality BBQ sauce can significantly impact the overall taste of your dish. If possible, opt for organic chicken thighs for a richer flavor and better texture.

Next, pay attention to the cooking temperature. Cooking the chicken over medium-high heat allows it to brown nicely while keeping it juicy inside. If the heat is too low, the chicken may steam instead of sear, resulting in a less appealing texture.

Additionally, don’t rush the marinating process. Allowing the chicken to marinate for at least 15 minutes—or even longer if you have time—lets the spices penetrate the meat, enhancing the flavor. For even better results, marinate the chicken overnight in the refrigerator.

When combining the BBQ sauce and maple syrup, whisk them together until smooth. This ensures that the flavors meld well and coat the chicken evenly. If you prefer a thicker sauce, let it simmer a bit longer after adding it to the chicken.

Lastly, consider the serving temperature. Honey BBQ Chicken Rice is best enjoyed hot. If you need to prepare it in advance, keep the chicken and rice separate until serving. This way, you can reheat them without compromising the texture.

By following these cooking notes, you’ll create a delicious Honey BBQ Chicken Rice that’s sure to impress your family and friends. Happy cooking!

Serving Suggestions for Honey BBQ Chicken Rice

Now that you’ve prepared your delicious Honey BBQ Chicken Rice, it’s time to think about how to serve it! Presentation can elevate your meal, making it even more enjoyable. Here are some serving suggestions to enhance your dining experience:

  • Garnish with Fresh Herbs: A sprinkle of fresh herbs like cilantro or parsley can add a burst of color and flavor. They complement the sweetness of the BBQ sauce beautifully.
  • Pair with a Side Salad: A light side salad with mixed greens, cherry tomatoes, and a tangy vinaigrette can balance the richness of the chicken. It adds freshness and crunch to your meal.
  • Serve with Grilled Vegetables: Grilled zucchini, bell peppers, or asparagus make a great side dish. Their smoky flavor pairs well with the sweet and spicy chicken.
  • Offer Extra BBQ Sauce: For those who love extra flavor, serve additional BBQ sauce on the side. This allows guests to customize their meal to their liking.
  • Include Cornbread or Biscuits: Soft cornbread or flaky biscuits can be a delightful addition. They soak up the sauce and add a comforting touch to the meal.
  • Use Bowls for a Cozy Presentation: Instead of plates, consider serving the Honey BBQ Chicken Rice in bowls. This creates a warm, inviting atmosphere, perfect for family dinners.

These serving suggestions can help you create a well-rounded meal that’s not only delicious but also visually appealing. Whether you’re hosting a dinner party or enjoying a cozy night in, these ideas will make your Honey BBQ Chicken Rice shine!

Tips for Perfecting Honey BBQ Chicken Rice

To make your Honey BBQ Chicken Rice truly unforgettable, consider these helpful tips. Each suggestion is designed to enhance the flavors and textures of your dish, ensuring that every bite is a delight.

  • Choose the Right Chicken: Opt for bone-in, skin-on chicken thighs for extra flavor and moisture. If you prefer boneless, ensure they are evenly cut for consistent cooking.
  • Marinate Longer: For deeper flavor, marinate the chicken for several hours or overnight. This allows the spices to penetrate the meat, making it more flavorful and tender.
  • Adjust the Sweetness: If you like your BBQ sauce sweeter, feel free to add more maple syrup or honey. Taste as you go to find the perfect balance for your palate.
  • Experiment with Spices: Don’t hesitate to add your favorite spices or herbs. A pinch of garlic powder or onion powder can elevate the flavor profile even more.
  • Use a Meat Thermometer: To ensure your chicken is cooked perfectly, use a meat thermometer. The internal temperature should reach 165°F (75°C) for safe consumption.
  • Let It Rest: After cooking, let the chicken rest for a few minutes before serving. This helps the juices redistribute, keeping the meat moist and tender.
  • Serve Immediately: Honey BBQ Chicken Rice is best enjoyed fresh. If you need to prepare it in advance, store the chicken and rice separately to maintain their textures.
  • Garnish Creatively: Get creative with your garnishes! Try adding sesame seeds, chopped nuts, or even a drizzle of sriracha for an extra kick.

By following these tips, you’ll be well on your way to creating a mouthwatering Honey BBQ Chicken Rice that will impress your family and friends. Enjoy the cooking process and savor the delicious results!

Breakdown of Time for Honey BBQ Chicken Rice

Understanding the time needed for each step in preparing Honey BBQ Chicken Rice can help you plan your cooking efficiently. Here’s a detailed breakdown of the time required for preparation and cooking, ensuring you can enjoy this delicious meal without any rush.

Prep Time for Honey BBQ Chicken Rice

The prep time for Honey BBQ Chicken Rice is approximately 20-30 minutes. This includes:

  • Gathering and measuring all your ingredients.
  • Marinating the chicken, which takes about 15 minutes. You can let it marinate longer if you have time, enhancing the flavor.
  • Preparing the jasmine rice, which can be done simultaneously while the chicken marinates.

Cooking Time for Honey BBQ Chicken Rice

The cooking time for this dish is around 15-20 minutes. Here’s how it breaks down:

  • Sautéing the marinated chicken takes about 8-10 minutes until it’s golden brown and fully cooked.
  • Combining the chicken with the BBQ sauce and letting it simmer for an additional 3-4 minutes allows the flavors to meld.
  • Cooking the jasmine rice, if not pre-cooked, will take about 15 minutes.

Total Time for Honey BBQ Chicken Rice

In total, you can expect to spend about 35-50 minutes from start to finish. This includes both prep and cooking times. If you prepare the rice in advance or use leftover rice, you can significantly reduce the total time. This makes Honey BBQ Chicken Rice a quick and satisfying meal option for busy weeknights or casual gatherings.

Nutritional Information for Honey BBQ Chicken Rice

Understanding the nutritional content of your meals is essential for maintaining a balanced diet. Honey BBQ Chicken Rice is not only delicious but also provides a good mix of nutrients. Let’s break down the key nutritional components of this dish.

Calories in Honey BBQ Chicken Rice

Each serving of Honey BBQ Chicken Rice contains approximately 400 calories. This calorie count makes it a satisfying meal option without being overly heavy. The combination of chicken, rice, and sauce provides energy to keep you fueled throughout the day. If you’re watching your calorie intake, consider adjusting portion sizes or adding more vegetables to your plate.

Protein Content in Honey BBQ Chicken Rice

Protein is vital for muscle repair and overall health. In each serving of Honey BBQ Chicken Rice, you’ll find about 32 grams of protein. This high protein content comes primarily from the chicken thighs, making it an excellent choice for those looking to increase their protein intake. Including protein in your meals can help you feel fuller for longer, which is beneficial for weight management.

Sodium Levels in Honey BBQ Chicken Rice

When it comes to sodium, each serving of Honey BBQ Chicken Rice contains around 800 milligrams. While sodium is necessary for bodily functions, it’s important to monitor your intake. If you’re concerned about sodium levels, consider using low-sodium BBQ sauce or reducing the amount of added salt in the recipe. Balancing sodium intake is key to maintaining heart health.

Overall, Honey BBQ Chicken Rice is a nutritious meal that offers a good balance of calories, protein, and flavor. By being mindful of the ingredients and portion sizes, you can enjoy this dish while keeping your dietary goals in check. Enjoy your delicious and wholesome meal!

FAQs about Honey BBQ Chicken Rice

What can I substitute for chicken in Honey BBQ Chicken Rice?

If you’re looking for alternatives to chicken in Honey BBQ Chicken Rice, there are several options. You can use chicken breasts for a leaner choice, or try shrimp for a seafood twist. For a vegetarian option, tofu or tempeh works wonderfully. Just ensure that you adjust the cooking times accordingly, as different proteins may require different cooking methods to achieve the best texture and flavor.

Can I make Honey BBQ Chicken Rice in advance?

Absolutely! Honey BBQ Chicken Rice can be made in advance, making it a great option for meal prep. You can cook the chicken and rice ahead of time and store them separately in airtight containers. When you’re ready to eat, simply reheat them together in a pan or microwave. This way, you can enjoy a delicious meal without the hassle of cooking from scratch every time.

What sides pair well with Honey BBQ Chicken Rice?

To complement your Honey BBQ Chicken Rice, consider serving it with a variety of sides. A fresh garden salad with mixed greens and a light vinaigrette adds a refreshing crunch. Grilled vegetables, such as zucchini or bell peppers, can enhance the meal’s flavor and nutrition. Additionally, cornbread or biscuits can provide a comforting touch, soaking up the delicious BBQ sauce.

How can I make Honey BBQ Chicken Rice healthier?

Making Honey BBQ Chicken Rice healthier is easy with a few simple adjustments. Start by using skinless chicken thighs or breasts to reduce fat content. You can also opt for a low-sugar BBQ sauce or make your own to control the ingredients. Adding more vegetables, like broccoli or snap peas, boosts the nutritional value and adds color. Lastly, consider serving the dish with brown rice instead of jasmine rice for added fiber and nutrients.

Conclusion on Honey BBQ Chicken Rice

In conclusion, Honey BBQ Chicken Rice is a delightful dish that brings together sweet and savory flavors in a satisfying way. With its tender chicken thighs, tangy BBQ sauce, and fluffy jasmine rice, this meal is sure to please everyone at your table. Whether you’re cooking for a family dinner or a casual gathering with friends, this recipe is both easy to prepare and incredibly delicious.

By following the steps outlined in this article, you can create a meal that not only tastes great but also offers nutritional benefits. The high protein content from the chicken, combined with the wholesome rice, makes it a balanced option for any occasion. Plus, the versatility of this dish allows you to customize it to suit your taste preferences and dietary needs.

Remember, cooking is all about experimenting and having fun. Don’t hesitate to try different ingredients or cooking methods to make this dish your own. Whether you choose to grill, bake, or stir-fry, the possibilities are endless!

So, gather your ingredients, roll up your sleeves, and get ready to enjoy a plate of Honey BBQ Chicken Rice. Your taste buds will thank you, and your family and friends will be asking for seconds. Happy cooking!

Crispy Air Fryer Potato Slices are a must-try snack!

Introduction to Crispy Air Fryer Potato Slices

If you’re looking for a delicious and healthier way to enjoy potato slices, you’ve come to the right place! Crispy air fryer potato slices are not only easy to make but also packed with flavor. With just a few simple ingredients, you can create a delightful snack or side dish that everyone will love. Let’s dive into what makes these potato slices so special and the benefits of using an air fryer.

What Makes Crispy Air Fryer Potato Slices Special?

Crispy air fryer potato slices stand out because they offer a perfect balance of crunch and tenderness. The air fryer circulates hot air around the potato slices, creating a crispy exterior while keeping the inside soft and fluffy. This cooking method allows you to enjoy the satisfying crunch of fried potatoes without the excess oil. Plus, the seasoning options are endless, making it easy to customize the flavor to your liking!

Benefits of Using an Air Fryer for Potato Slices

Using an air fryer for your potato slices comes with several benefits. First, it significantly reduces the amount of oil needed, making your dish healthier. You can enjoy the same great taste of fried potatoes with fewer calories and less fat. Second, air fryers cook food faster than traditional ovens, saving you time in the kitchen. Lastly, they are easy to clean, as most air fryer baskets are dishwasher safe. This means less hassle and more time to enjoy your crispy air fryer potato slices!

Ingredients for Crispy Air Fryer Potato Slices

To create your own crispy air fryer potato slices, you’ll need a few simple ingredients. These ingredients not only enhance the flavor but also ensure that your potato slices turn out perfectly crispy. Here’s what you’ll need:

  • 2 large russet potatoes: Russet potatoes are ideal for this recipe due to their high starch content, which helps achieve that crispy texture.
  • 2 tablespoons extra virgin olive oil: This oil adds flavor and helps the seasonings stick to the potatoes while promoting crispiness.
  • 1 teaspoon garlic powder: Garlic powder gives a savory kick that elevates the overall taste of the potato slices.
  • 1 teaspoon dried onion flakes: These flakes add a subtle sweetness and depth of flavor.
  • 1 teaspoon smoked paprika: Smoked paprika brings a warm, smoky flavor that complements the potatoes beautifully.
  • 1/2 teaspoon sea salt: Salt enhances the natural flavors of the potatoes, making them more delicious.
  • 1/4 teaspoon freshly ground black pepper: This adds a hint of spice and balances the flavors.
  • Chopped fresh chives or parsley (for garnish): Fresh herbs not only add color but also a burst of freshness to your dish.

With these ingredients on hand, you’re ready to prepare your crispy air fryer potato slices. The combination of seasonings can be adjusted to suit your taste, so feel free to get creative!

Preparation of Crispy Air Fryer Potato Slices

Now that you have your ingredients ready, it’s time to prepare your crispy air fryer potato slices. Each step is crucial to ensure that your potato medallions turn out perfectly crispy and flavorful. Let’s go through the preparation process step by step.

Step 1: Selecting the Right Potatoes

Choosing the right potatoes is essential for achieving the best texture. For crispy air fryer potato slices, russet potatoes are the top choice. Their high starch content helps create that desired crunch. Look for firm potatoes without any blemishes or soft spots. Fresh potatoes will yield the best results!

Step 2: Washing and Peeling the Potatoes

Once you have your russet potatoes, it’s time to wash them. Rinse the potatoes under cold water to remove any dirt or debris. You can use a vegetable brush for a thorough clean. After washing, you can choose to peel the potatoes or leave the skin on for added texture and nutrients. If you prefer a rustic look, keep the skin!

Step 3: Slicing the Potatoes

Next, slice the potatoes into medallions. Aim for 1/4-inch thick slices to ensure even cooking. Use a sharp knife or a mandoline slicer for consistent thickness. This step is important because uniform slices will cook evenly, giving you that perfect crispiness. Be careful while slicing to avoid any accidents!

Step 4: Seasoning the Potato Slices

Now it’s time to season your potato slices! In a mixing bowl, combine the sliced potatoes with olive oil, garlic powder, dried onion flakes, smoked paprika, sea salt, and black pepper. Toss the slices gently until they are well coated with the seasoning mixture. This step adds flavor and helps achieve that crispy texture.

Step 5: Preheating the Air Fryer

Before cooking, preheat your air fryer to 400°F (200°C) for about 5 minutes. Preheating is crucial as it ensures that the potato slices start cooking immediately, promoting even crispiness. While the air fryer is heating up, you can prepare your seasoned potato slices for cooking.

Step 6: Cooking the Potato Slices

Once the air fryer is preheated, it’s time to cook your potato slices. Place them in a single layer in the air fryer basket, making sure not to overcrowd them. This allows hot air to circulate freely, ensuring that each slice gets crispy. Cook the potato medallions for 15-20 minutes, shaking the basket halfway through for even cooking. Keep an eye on them, and remove them once they are golden brown and crispy!

With these preparation steps, you’re well on your way to enjoying delicious crispy air fryer potato slices. The process is simple and rewarding, making it a great choice for any meal or snack!

Variation of Crispy Air Fryer Potato Slices

While the classic recipe for crispy air fryer potato slices is delicious on its own, there are many ways to switch things up! By experimenting with different seasonings and cooking methods, you can create a variety of flavors that will keep your taste buds excited. Let’s explore some fun variations!

Different Seasoning Options

One of the best parts about making crispy air fryer potato slices is the ability to customize the flavors. Here are some seasoning ideas to try:

  • Italian Herb Blend: Mix dried oregano, basil, and thyme for a Mediterranean twist.
  • Spicy Cajun: Add cayenne pepper, paprika, and garlic powder for a zesty kick.
  • Cheesy Delight: Sprinkle nutritional yeast or grated Parmesan cheese for a cheesy flavor.
  • Sweet and Savory: Combine cinnamon and a touch of brown sugar for a unique sweet twist.
  • Asian-Inspired: Use soy sauce, sesame oil, and a sprinkle of sesame seeds for an Asian flair.

Feel free to mix and match these seasonings to create your own signature blend. The possibilities are endless, and you can adjust the spice levels to suit your preferences!

Alternative Cooking Methods

If you don’t have an air fryer, don’t worry! There are other cooking methods you can use to achieve crispy potato slices. Here are a couple of alternatives:

  • Oven Baking: Preheat your oven to 425°F (220°C). Spread the seasoned potato slices on a baking sheet lined with parchment paper. Bake for 25-30 minutes, flipping halfway through, until golden brown and crispy.
  • Pan-Frying: Heat a few tablespoons of oil in a skillet over medium heat. Add the seasoned potato slices in a single layer and cook for about 5-7 minutes on each side, or until crispy and golden.

These alternative methods can also yield delicious results, so feel free to choose the one that works best for you. No matter how you cook them, crispy potato slices are sure to be a hit!

Cooking Note for Crispy Air Fryer Potato Slices

When it comes to making crispy air fryer potato slices, a few cooking notes can help you achieve the best results. These tips will ensure that your potato medallions turn out perfectly crispy and delicious every time.

First, always preheat your air fryer. This step is crucial as it helps the potato slices start cooking immediately, leading to a crispier texture. If you skip this step, the slices may end up soggy instead of crispy.

Next, avoid overcrowding the air fryer basket. If you place too many potato slices at once, they won’t cook evenly. Instead, cook them in batches if necessary. This allows hot air to circulate around each slice, ensuring they all get that delightful crunch.

Additionally, consider the thickness of your potato slices. Keeping them uniform at about 1/4-inch thick will help them cook evenly. Thicker slices may require a longer cooking time, while thinner ones may cook faster. Keep an eye on them to prevent burning.

Lastly, don’t forget to shake the basket halfway through cooking. This simple action redistributes the potato slices, promoting even cooking and crispiness. It’s a small step that makes a big difference!

By following these cooking notes, you’ll be well on your way to enjoying perfectly crispy air fryer potato slices that are sure to impress your family and friends!

Serving Suggestions for Crispy Air Fryer Potato Slices

Now that you’ve prepared your crispy air fryer potato slices, it’s time to think about how to serve them! These delightful medallions can be enjoyed in various ways, making them a versatile addition to any meal. Let’s explore some tasty serving suggestions that will elevate your dining experience.

Pairing with Dips and Sauces

One of the best ways to enjoy crispy air fryer potato slices is by pairing them with delicious dips and sauces. Here are some popular options:

  • Ketchup: A classic choice, ketchup adds a sweet and tangy flavor that complements the crispy potatoes.
  • Ranch Dressing: Creamy ranch dressing provides a cool contrast to the warm, crispy slices.
  • Garlic Aioli: This rich and flavorful dip enhances the savory taste of the potato medallions.
  • Spicy Sriracha Sauce: For those who love heat, a drizzle of Sriracha adds a spicy kick that pairs perfectly with the crispy texture.
  • Guacamole: Creamy guacamole brings a fresh and zesty flavor that balances the crunch of the potato slices.

Feel free to get creative with your dips! You can even mix and match to find your favorite combinations. Dipping sauces not only add flavor but also make eating your crispy air fryer potato slices even more fun!

Serving as a Side Dish or Snack

Crispy air fryer potato slices can be served as a delightful side dish or a tasty snack. Here are some ideas for incorporating them into your meals:

  • As a Side Dish: Serve your potato slices alongside grilled chicken, fish, or burgers for a satisfying meal. They add a crunchy texture that complements the main dish beautifully.
  • As a Snack: Enjoy them on their own as a quick and healthy snack. They’re perfect for munching while watching a movie or during a game night with friends.
  • In a Salad: Toss crispy potato slices into a fresh salad for added crunch. They can replace croutons and provide a unique twist to your greens.
  • In a Wrap: Add potato slices to a wrap with your favorite fillings for a hearty and satisfying lunch option.

With these serving suggestions, you can enjoy your crispy air fryer potato slices in various ways. Whether as a side dish or a snack, they are sure to be a hit at any gathering!

Tips for Perfect Crispy Air Fryer Potato Slices

To achieve the ultimate crispy air fryer potato slices, a few key tips can make all the difference. These tips will help you select the right ingredients, ensure even cooking, and store any leftovers properly. Let’s explore these helpful hints!

Choosing the Right Potato Variety

The type of potato you choose plays a significant role in the texture and flavor of your crispy air fryer potato slices. For the best results, opt for high-starch potatoes like russets. Their starchy nature helps create that desired crispiness. You can also try Yukon Gold potatoes, which have a creamy texture and a buttery flavor. Avoid waxy potatoes, like red or new potatoes, as they tend to hold more moisture and may not crisp up as well.

Ensuring Even Cooking

To ensure your potato slices cook evenly, it’s essential to maintain uniform thickness. Aim for 1/4-inch slices, as this thickness allows for optimal cooking time and crispiness. Additionally, avoid overcrowding the air fryer basket. If the slices are packed too tightly, they won’t cook evenly. Instead, cook them in batches if necessary. Remember to shake the basket halfway through cooking to promote even browning and crispiness.

Storing Leftover Potato Slices

If you happen to have leftover crispy air fryer potato slices, storing them properly is key to maintaining their texture. Allow the slices to cool completely before storing them in an airtight container. Place a paper towel in the container to absorb any excess moisture. This will help keep the slices crispy. When you’re ready to enjoy them again, reheat the potato slices in the air fryer for a few minutes at 350°F (175°C) to restore their crunch. Avoid microwaving, as this can make them soggy.

By following these tips, you’ll be well on your way to creating perfect crispy air fryer potato slices every time. Enjoy the delicious crunch and flavor that these tips can help you achieve!

Breakdown of Time for Crispy Air Fryer Potato Slices

Understanding the time needed for preparing and cooking crispy air fryer potato slices is essential for planning your meal. Here’s a simple breakdown of the time involved in each step, so you can enjoy your delicious potato medallions without any stress!

Prep Time

The prep time for crispy air fryer potato slices is quite manageable. You’ll need about 15-20 minutes to wash, peel (if desired), slice, and season the potatoes. This includes:

  • Washing the potatoes: 2-3 minutes
  • Peeling (optional): 2-3 minutes
  • Slicing the potatoes: 5-7 minutes
  • Seasoning the slices: 5-7 minutes

In total, you can expect to spend around 15-20 minutes on prep work, making it a quick and easy process!

Cooking Time

Once your potatoes are prepped, the cooking time in the air fryer is straightforward. You’ll need about 15-20 minutes to achieve that perfect crispiness. Here’s how it breaks down:

  • Preheating the air fryer: 5 minutes
  • Cooking the potato slices: 15-20 minutes

During the cooking phase, remember to shake the basket halfway through to ensure even cooking. This will help all the slices get that delightful golden brown color!

Total Time

When you combine both prep and cooking times, the total time for making crispy air fryer potato slices is approximately 30-40 minutes. Here’s a quick summary:

  • Prep Time: 15-20 minutes
  • Cooking Time: 15-20 minutes

Total Time: 30-40 minutes

This total time makes crispy air fryer potato slices a fantastic option for a quick snack or side dish. With just a little bit of effort, you can enjoy a delicious and healthy treat in no time!

Nutritional Information for Crispy Air Fryer Potato Slices

Understanding the nutritional content of your food is essential for maintaining a balanced diet. Crispy air fryer potato slices are not only delicious but also provide a good source of nutrients. Let’s break down the nutritional information for a serving of these tasty potato medallions.

Calories

Each serving of crispy air fryer potato slices contains approximately 180 calories. This makes them a relatively low-calorie option compared to traditional fried potatoes. The air fryer method significantly reduces the amount of oil used, allowing you to enjoy a satisfying snack without the guilt. You can indulge in these crispy delights while keeping your calorie intake in check!

Protein

In terms of protein, each serving provides about 3 grams. While potatoes are not a high-protein food, they do offer some essential amino acids. Pairing your crispy air fryer potato slices with a protein-rich dip, like hummus or Greek yogurt, can enhance the overall protein content of your meal. This combination not only boosts the nutritional value but also adds a delightful flavor contrast!

Sodium

When it comes to sodium, a serving of crispy air fryer potato slices contains around 300 mg. This amount is relatively moderate, especially considering that you can control the salt added during the seasoning process. If you’re watching your sodium intake, feel free to adjust the sea salt to suit your dietary needs. Using herbs and spices can also enhance flavor without adding extra sodium!

Overall, crispy air fryer potato slices are a nutritious and tasty option for snacking or as a side dish. With their balanced calorie count, moderate protein, and controllable sodium levels, they can fit well into a healthy eating plan. Enjoy these delightful potato medallions guilt-free, knowing they provide both flavor and nutrition!

FAQs about Crispy Air Fryer Potato Slices

How do I make my air fryer potato slices extra crispy?

To achieve extra crispy air fryer potato slices, there are a few key tips to follow. First, ensure that your potato slices are uniform in thickness, ideally around 1/4 inch. This helps them cook evenly. Second, preheat your air fryer before adding the potato slices. A hot air fryer will start cooking the slices immediately, promoting crispiness. Additionally, avoid overcrowding the basket; cook in batches if necessary. Finally, shake the basket halfway through cooking to ensure even browning. These steps will help you enjoy perfectly crispy potato slices every time!

Can I use sweet potatoes for crispy air fryer potato slices?

Absolutely! Sweet potatoes can be used to make delicious crispy air fryer slices. They offer a slightly different flavor and sweetness compared to russet potatoes. Just like with regular potatoes, slice the sweet potatoes into uniform medallions and season them to your liking. Keep in mind that sweet potatoes may cook a bit faster, so monitor them closely to avoid burning. Enjoy the unique taste of sweet potato slices as a delightful alternative!

What are the best seasonings for crispy air fryer potato slices?

The best seasonings for crispy air fryer potato slices depend on your personal taste preferences. Some popular options include:

  • Garlic Powder: Adds a savory kick.
  • Smoked Paprika: Provides a warm, smoky flavor.
  • Italian Herbs: A mix of oregano, basil, and thyme for a Mediterranean twist.
  • Cajun Seasoning: For a spicy and zesty flavor.
  • Cheese Powder: For a cheesy delight.

Feel free to experiment with different combinations to find your favorite blend. The versatility of seasonings allows you to customize your crispy air fryer potato slices to suit any occasion!

How long do crispy air fryer potato slices last?

Crispy air fryer potato slices are best enjoyed fresh, but if you have leftovers, they can last for about 2-3 days when stored properly. Allow the slices to cool completely before placing them in an airtight container. To maintain their crispiness, consider adding a paper towel to absorb any moisture. When you’re ready to eat them again, reheat the slices in the air fryer at 350°F (175°C) for a few minutes. This will help restore their crunchiness. Avoid microwaving, as this can make them soggy.

Conclusion on Crispy Air Fryer Potato Slices

In conclusion, crispy air fryer potato slices are a fantastic addition to any meal or snack time. They offer a delightful crunch and can be easily customized with various seasonings to suit your taste. The air fryer method not only makes them healthier by using less oil but also saves you time in the kitchen. With simple ingredients and straightforward preparation steps, you can whip up a batch of these delicious potato medallions in no time.

Whether you enjoy them as a side dish, a snack, or even in a salad, crispy air fryer potato slices are sure to please everyone at the table. Plus, with the tips and variations provided, you can keep things exciting and fresh every time you make them. So, gather your ingredients, fire up your air fryer, and get ready to enjoy a crispy, flavorful treat that everyone will love!

Don’t forget to share your creations with family and friends. They’ll be impressed by your culinary skills and may even ask for the recipe! Happy cooking, and enjoy your crispy air fryer potato slices!

Chicken Spring Rolls Recipe: A Quick and Tasty Delight

Introduction to Chicken Spring Rolls Recipe

What Are Chicken Spring Rolls?

Chicken spring rolls are a delightful dish that combines crispy textures with savory flavors. These tasty treats are made by wrapping a mixture of cooked chicken, fresh vegetables, and flavorful sauces in rice paper. Once rolled, they are fried until golden brown, creating a crunchy exterior that contrasts beautifully with the tender filling inside. Often served as an appetizer or snack, chicken spring rolls are popular in many cuisines, especially in Asian cooking. They are not only delicious but also versatile, allowing for various fillings and dipping sauces.

Why You Should Try This Chicken Spring Rolls Recipe

This chicken spring rolls recipe is a must-try for several reasons. First, it’s simple and quick to prepare, making it perfect for busy weeknights or casual gatherings. The combination of shredded chicken, fresh veggies, and aromatic herbs creates a burst of flavor in every bite. Plus, the crispy texture adds an exciting crunch that everyone loves.

Moreover, this recipe is adaptable. You can easily customize the filling to suit your taste preferences. Whether you prefer a spicy kick or a vegetarian option, the possibilities are endless. Additionally, serving these spring rolls with sweet chili sauce elevates the experience, providing a perfect balance of sweetness and heat.

So, gather your ingredients and get ready to impress your family and friends with these delicious chicken spring rolls. They are sure to become a favorite in your household!

Ingredients for Chicken Spring Rolls Recipe

To create the perfect chicken spring rolls, you’ll need a variety of fresh ingredients that come together to make a delicious filling. Here’s what you’ll need:

  • 1 pound cooked and shredded boneless, skinless chicken breasts
  • 1 cup grated carrots
  • 1 cup finely chopped cabbage
  • 1/2 cup sliced green onions
  • 1/4 cup chopped fresh cilantro
  • 1 tablespoon soy sauce
  • 1 teaspoon sesame oil
  • 1 package (8 ounces) rice paper wrappers
  • Vegetable oil, for frying
  • Sweet chili sauce, for serving

These ingredients not only provide a wonderful flavor but also add a colorful presentation to your dish. The combination of chicken, fresh vegetables, and herbs creates a nutritious filling that everyone will enjoy. Make sure to gather everything before you start cooking, as it will make the preparation process smoother and more enjoyable!

Step-by-Step Preparation of Chicken Spring Rolls Recipe

Step 1: Preparing the Filling

To kick off your chicken spring rolls recipe, start by preparing the filling. In a large mixing bowl, combine the shredded chicken, grated carrots, chopped cabbage, sliced green onions, and fresh cilantro. These ingredients bring a burst of color and flavor to your dish. Next, drizzle in the soy sauce and sesame oil. These two ingredients are key to enhancing the taste of your filling. Stir everything together until all the ingredients are well mixed and coated with the sauce. This step is crucial, as it ensures that every bite is packed with flavor!

Step 2: Assembling the Spring Rolls

Now that your filling is ready, it’s time to assemble the spring rolls. Begin by preparing a shallow bowl filled with warm water. This will help soften the rice paper wrappers. Take one wrapper and submerge it in the water for about 10-15 seconds. You want it to be soft but not too mushy. Carefully lift it out and place it on a clean, flat surface. Spoon about 2-3 tablespoons of the chicken filling onto the center of the wrapper. Fold the sides inward, then roll it tightly from the bottom to secure the filling inside. Repeat this process with the remaining wrappers and filling. Make sure to keep the rolls tight to prevent any filling from spilling out during frying!

Step 3: Cooking the Spring Rolls

With your spring rolls assembled, it’s time to cook them! Heat about 1/2 inch of vegetable oil in a large skillet over medium heat. You’ll know the oil is ready when it shimmers. Gently place the spring rolls in the hot oil, frying them in batches. Cook each side for about 3-4 minutes, or until they turn a beautiful golden brown and become crispy. This frying process is what gives the spring rolls their delightful crunch. Once cooked, transfer them to a plate lined with paper towels to absorb any excess oil. Now, your crispy chicken spring rolls are ready to be served!

Variation of Chicken Spring Rolls Recipe

Vegetarian Option

If you’re looking for a vegetarian twist on the classic chicken spring rolls, you’re in luck! This variation is just as delicious and satisfying. Instead of chicken, you can use a mix of fresh vegetables and tofu. Start with the same base of grated carrots and chopped cabbage. Then, add in some diced bell peppers, sliced mushrooms, and even some bean sprouts for extra crunch. For protein, include firm tofu that has been pressed and cubed. Season the filling with soy sauce and sesame oil, just like in the original recipe. This vegetarian option is not only colorful but also packed with nutrients, making it a great choice for everyone!

Spicy Chicken Spring Rolls

If you love a bit of heat, try making spicy chicken spring rolls! To add some kick, mix in chopped jalapeños or red chili flakes into your chicken filling. You can also use a spicy sauce instead of regular soy sauce. Sriracha or a spicy chili garlic sauce works wonderfully. This will give your spring rolls a fiery flavor that pairs perfectly with the sweetness of the chili sauce for dipping. Just remember to adjust the amount of spice to your liking. These spicy chicken spring rolls are sure to impress anyone who enjoys a little heat in their meal!

Cooking Note for Chicken Spring Rolls Recipe

When preparing chicken spring rolls, there are a few important cooking notes to keep in mind. First, ensure that your oil is at the right temperature before frying. If the oil is too cool, the spring rolls will absorb excess oil and become greasy. Conversely, if the oil is too hot, they may burn on the outside while remaining uncooked on the inside. A good test is to drop a small piece of the filling into the oil; if it sizzles immediately, the oil is ready.

Additionally, avoid overcrowding the skillet when frying. Frying in batches allows for even cooking and ensures that each spring roll gets that perfect golden-brown color. If you place too many in at once, the temperature of the oil will drop, leading to soggy spring rolls.

After frying, let the spring rolls rest on paper towels. This step is crucial as it helps remove any excess oil, keeping your spring rolls crispy. If you want to keep them warm while frying the rest, place them in a preheated oven at a low temperature. This way, they stay hot and ready to serve without losing their crunch.

Lastly, feel free to experiment with different fillings and spices. The beauty of chicken spring rolls lies in their versatility. Whether you want to add more vegetables, switch up the protein, or try different sauces, the choice is yours. Enjoy the cooking process and have fun creating your own unique version of this delicious dish!

Serving Suggestions for Chicken Spring Rolls Recipe

Serving chicken spring rolls is an exciting opportunity to showcase their deliciousness and versatility. Here are some delightful suggestions to enhance your dining experience:

  • With Dipping Sauces: Sweet chili sauce is a classic choice, but don’t stop there! Consider offering a variety of dipping sauces. Soy sauce mixed with a splash of rice vinegar adds a tangy twist. For those who enjoy heat, a spicy sriracha or a creamy peanut sauce can elevate the flavors even more.
  • On a Bed of Greens: Present your crispy chicken spring rolls on a bed of fresh greens. A mix of lettuce, spinach, and herbs not only adds color but also provides a refreshing crunch. This makes for a beautiful and appetizing display.
  • With Fresh Herbs: Garnish your spring rolls with fresh herbs like cilantro or mint. These herbs not only enhance the visual appeal but also add a burst of flavor that complements the filling perfectly.
  • As Part of a Platter: Create a spring roll platter by including a variety of rolls. You can mix traditional chicken spring rolls with vegetarian or spicy versions. This allows guests to sample different flavors and makes for a fun sharing experience.
  • With a Side Salad: Pair your spring rolls with a light salad. A simple cucumber and carrot salad dressed with lime juice and sesame oil can provide a refreshing contrast to the crispy rolls.

These serving suggestions not only enhance the presentation of your chicken spring rolls but also create a delightful dining experience. Whether you’re hosting a party or enjoying a family meal, these ideas will surely impress your guests and make your dish stand out!

Tips for Perfect Chicken Spring Rolls Recipe

Creating the perfect chicken spring rolls is an art that combines technique and creativity. Here are some helpful tips to ensure your spring rolls turn out crispy, flavorful, and visually appealing:

  • Use Fresh Ingredients: Fresh vegetables and herbs make a significant difference in flavor. Choose vibrant, crisp veggies and fragrant herbs to enhance the taste of your filling.
  • Don’t Overfill: While it’s tempting to pack in a lot of filling, overfilling can lead to messy spring rolls. Stick to 2-3 tablespoons of filling per wrapper to ensure they roll up neatly and stay intact during frying.
  • Keep Wrappers Moist: Rice paper wrappers can dry out quickly. If you’re working in batches, cover the unused wrappers with a damp cloth to keep them moist and pliable.
  • Test the Oil Temperature: Before frying, test the oil temperature with a small piece of filling. If it sizzles immediately, the oil is ready. This step helps achieve that perfect golden-brown color.
  • Fry in Batches: Frying too many spring rolls at once can lower the oil temperature, resulting in soggy rolls. Fry in small batches to maintain the oil’s heat and ensure even cooking.
  • Let Them Drain: After frying, place the spring rolls on paper towels to absorb excess oil. This keeps them crispy and prevents them from becoming greasy.
  • Experiment with Flavors: Don’t hesitate to try different spices and sauces in your filling. Adding garlic, ginger, or even a splash of lime juice can elevate the flavor profile of your spring rolls.
  • Serve Immediately: For the best texture, serve your chicken spring rolls right after frying. They are at their crispiest when fresh out of the pan!

By following these tips, you’ll be well on your way to mastering the art of chicken spring rolls. Enjoy the process and have fun experimenting with different flavors and presentations!

Breakdown of Time for Chicken Spring Rolls Recipe

Prep Time

Preparing your chicken spring rolls is a breeze! The prep time for this recipe is approximately 20 minutes. This includes gathering all your ingredients, shredding the chicken, and chopping the vegetables. Having everything ready before you start will make the process smoother and more enjoyable. So, take a moment to set up your workspace and get organized!

Cooking Time

Once your filling is ready and the spring rolls are assembled, the cooking time is about 15-20 minutes. This includes heating the oil and frying the spring rolls until they are golden brown and crispy. Remember, frying in batches is key to achieving that perfect crunch. So, be patient and allow each batch to cook properly for the best results!

Total Time

In total, you can expect to spend around 35-40 minutes from start to finish. This includes both prep and cooking time. With such a quick turnaround, you can easily whip up these delicious chicken spring rolls for a weeknight dinner or a fun gathering with friends. Enjoy the process and savor the delightful flavors of your homemade spring rolls!

Nutritional Information for Chicken Spring Rolls Recipe

Calories

When it comes to enjoying chicken spring rolls, knowing the calorie content can help you make informed choices. Each chicken spring roll contains approximately 150-200 calories, depending on the size and the amount of filling used. This makes them a relatively light option for an appetizer or snack. If you’re watching your calorie intake, consider serving them with a side salad to create a balanced meal without adding too many extra calories.

Protein

Chicken spring rolls are a great source of protein, thanks to the shredded chicken. Each roll typically contains around 10-12 grams of protein. This protein content helps keep you feeling full and satisfied, making them a perfect choice for a quick meal or snack. If you opt for the vegetarian version, you can still achieve a good protein level by including tofu or other protein-rich ingredients.

Sodium

Sodium levels in chicken spring rolls can vary based on the ingredients used, especially the soy sauce. On average, each spring roll contains about 300-400 milligrams of sodium. If you’re concerned about sodium intake, consider using low-sodium soy sauce or reducing the amount of soy sauce in the filling. This way, you can enjoy your delicious spring rolls while keeping your sodium levels in check.

FAQs About Chicken Spring Rolls Recipe

Can I make Chicken Spring Rolls ahead of time?

Yes, you can prepare chicken spring rolls ahead of time! To do this, assemble the spring rolls but do not fry them yet. Instead, place the uncooked rolls on a baking sheet lined with parchment paper. Cover them with a damp cloth or plastic wrap to keep them moist. You can store them in the refrigerator for up to a few hours. When you’re ready to serve, simply heat the oil and fry them until golden brown. This way, you can enjoy fresh, crispy spring rolls without the last-minute rush!

What dipping sauces go well with Chicken Spring Rolls?

Chicken spring rolls pair wonderfully with a variety of dipping sauces. The classic choice is sweet chili sauce, which adds a delightful sweetness and a hint of heat. Other great options include:

  • Soy Sauce: A simple soy sauce mixed with a splash of rice vinegar for a tangy twist.
  • Peanut Sauce: Creamy and rich, this sauce complements the flavors of the spring rolls beautifully.
  • Sriracha: For those who love spice, a drizzle of sriracha can add a fiery kick.
  • Hoisin Sauce: This sweet and savory sauce is another fantastic option that enhances the taste of the rolls.

Feel free to mix and match these sauces to find your favorite combination!

How do I store leftover Chicken Spring Rolls?

If you have leftover chicken spring rolls, storing them properly is key to maintaining their crispiness. First, let the spring rolls cool completely. Then, place them in an airtight container lined with paper towels to absorb any moisture. Store them in the refrigerator for up to 2 days. When you’re ready to enjoy them again, reheat the spring rolls in an oven at 350°F (175°C) for about 10-15 minutes. This will help restore their crispy texture. Avoid microwaving, as this can make them soggy.

Conclusion on Chicken Spring Rolls Recipe

In conclusion, the chicken spring rolls recipe is a delightful and versatile dish that brings joy to any meal. With its crispy exterior and flavorful filling, it’s no wonder these spring rolls are a favorite among many. Whether you’re preparing them for a family dinner, a party, or just a cozy night in, they are sure to impress.

Not only are they easy to make, but they also allow for creativity in the kitchen. You can customize the filling to suit your taste, whether you prefer a classic chicken version, a spicy kick, or a vegetarian alternative. The possibilities are endless! Plus, serving them with a variety of dipping sauces adds an extra layer of fun and flavor.

Remember to follow the tips provided to achieve the perfect crispy texture and delicious taste. With a little practice, you’ll master the art of making chicken spring rolls that are not only tasty but also visually appealing. So, gather your ingredients, roll up your sleeves, and enjoy the process of creating this delightful dish.

We hope you enjoy making and sharing these chicken spring rolls with your loved ones. They are not just a meal; they are an experience filled with flavor, crunch, and joy. Happy cooking!

Crunchy Air Fryer Granola Recipe is easy to make!

Introduction to Crunchy Air Fryer Granola Recipe

Crunchy Air Fryer Granola Recipe takes the classic treat to a whole new level. With its delightful crunch and wholesome ingredients, it’s not just tasty but also easy to make. Plus, using an air fryer means you can achieve that perfect crispiness without the need for excessive oil or baking time.

What Makes This Granola Recipe Special?

This granola recipe stands out for several reasons. First, it combines rolled oats and nuts, providing a hearty base that’s rich in fiber and healthy fats. The addition of agave syrup or brown rice syrup gives it a natural sweetness, while the coconut oil adds a hint of tropical flavor. Moreover, the use of almond extract and nutmeg elevates the taste, making it a delightful treat for your taste buds. The best part? You can customize it with your favorite dried fruits or seeds, making it truly your own!

Benefits of Using an Air Fryer for Granola

Using an air fryer for making granola offers numerous benefits. First, it cooks the granola evenly, ensuring every bite is perfectly crunchy. The air fryer circulates hot air around the food, which helps to achieve that golden-brown color without burning. Additionally, air frying requires less oil compared to traditional baking methods, making this recipe a healthier option. It also significantly reduces cooking time, allowing you to enjoy your homemade granola in just a fraction of the time. With these advantages, it’s no wonder that air fryers are becoming a popular choice for many home cooks!

Ingredients for Crunchy Air Fryer Granola Recipe

Crunchy Air Fryer Granola Recipe, you’ll need a few simple ingredients. Each component plays a vital role in achieving that perfect balance of flavor and texture. Here’s what you’ll need:

  • 2 cups rolled oats: These are the base of your granola, providing fiber and a chewy texture.
  • 1 cup chopped nuts: Choose your favorites, like pecans or hazelnuts, for added crunch and healthy fats.
  • 1/2 cup agave syrup or brown rice syrup: This natural sweetener binds the ingredients together and adds a touch of sweetness.
  • 1/4 cup melted coconut oil: This ingredient not only helps with binding but also adds a subtle coconut flavor.
  • 1/2 teaspoon almond extract: A splash of this extract enhances the overall flavor profile.
  • 1/2 teaspoon nutmeg: This warm spice adds depth and a hint of sweetness.
  • 1/4 teaspoon sea salt: A pinch of salt balances the sweetness and enhances the flavors.
  • 1/2 cup chopped dried fruit: Options like apricots or figs add a chewy texture and natural sweetness.

These ingredients come together to create a delightful granola that’s perfect for snacking or breakfast. Feel free to mix and match based on your preferences. The beauty of this recipe lies in its versatility, allowing you to experiment with different nuts, seeds, and dried fruits!

Step-by-Step Preparation of Crunchy Air Fryer Granola Recipe

Crunchy Air Fryer Granola Recipe. Follow these simple steps to create a delicious batch of granola that you can enjoy any time of the day!

Step 1: Gather Your Ingredients

Before you start, make sure you have all your ingredients on hand. This includes rolled oats, chopped nuts, agave syrup or brown rice syrup, melted coconut oil, almond extract, nutmeg, sea salt, and dried fruit. Having everything ready will make the process smoother and more enjoyable!

Step 2: Mix Dry Ingredients

In a large mixing bowl, combine the rolled oats, chopped nuts, nutmeg, and sea salt. Stir these dry ingredients together until they are well blended. This step is important because it ensures that the flavors are evenly distributed throughout your granola.

Step 3: Combine Wet Ingredients

In a separate bowl, whisk together the agave syrup (or brown rice syrup), melted coconut oil, and almond extract. Mix until the ingredients are smooth and well combined. This mixture will help bind your granola together and add a lovely sweetness.

Step 4: Mix Everything Together

Now, it’s time to bring the dry and wet ingredients together. Drizzle the syrup mixture over the oat mixture. Stir thoroughly to ensure that every oat and nut is coated with the syrup. This step is crucial for achieving that delightful crunch in your granola!

Step 5: Air Fry the Granola

Preheat your air fryer to 290°F. Once it’s ready, spread the granola mixture in a single layer in the air fryer basket. Cook for 12 minutes, shaking the basket halfway through. This helps to promote even browning. After the initial cooking time, check the granola. If you want it crunchier, continue cooking for an additional 3-4 minutes, keeping a close eye to prevent burning.

Step 6: Cool and Store

Once your granola is perfectly golden and crunchy, transfer it to a cooling rack. Allow it to cool completely. This cooling step is essential, as it helps the granola firm up. After it’s cooled, fold in the chopped dried fruit. Finally, store your granola in a sealed container at room temperature for up to two weeks. Enjoy your homemade crunchy delight!

Variations of Crunchy Air Fryer Granola Recipe

Crunchy Air Fryer Granola Recipe is its versatility. You can easily customize it to suit your taste preferences or dietary needs. Here are some exciting variations to consider:

Nut-Free Options

If you have nut allergies or simply prefer to avoid nuts, you can still enjoy delicious granola. Substitute the chopped nuts with seeds like sunflower seeds or pumpkin seeds. These seeds provide a satisfying crunch and are packed with nutrients. You can also add in some puffed rice or quinoa for extra texture. This way, you can create a nut-free granola that’s just as tasty!

Flavor Variations

Feel free to get creative with flavors! You can add spices like cinnamon or ginger for a warm, cozy taste. For a tropical twist, mix in some shredded coconut or dried pineapple. If you love chocolate, consider adding cocoa powder to the wet mixture or folding in some dark chocolate chips after cooking. The possibilities are endless, and you can tailor the flavors to match your mood or the season!

Sweetener Alternatives

If you’re looking for different sweetening options, there are plenty to choose from. Instead of agave syrup or brown rice syrup, you can use honey or maple syrup for a unique flavor. For a lower-calorie option, try using stevia or monk fruit sweetener. Just remember to adjust the quantity based on the sweetness level of your chosen sweetener. This way, you can enjoy your granola while keeping it aligned with your dietary goals!

Crunchy Air Fryer Granola Recipe uniquely yours. Experimenting with different ingredients not only keeps things exciting but also allows you to discover new favorite combinations. Enjoy the process of creating your perfect granola blend!

Cooking Note for Crunchy Air Fryer Granola Recipe

Crunchy Air Fryer Granola Recipe, there are a few important cooking notes to keep in mind. These tips will help ensure that your granola turns out perfectly every time, giving you that delightful crunch and flavor you desire.

First, always preheat your air fryer. This step is crucial as it helps to create an even cooking environment. If you skip this, your granola may not cook uniformly, leading to some parts being overcooked while others remain soft. Preheating also helps achieve that golden-brown color that makes granola so appealing.

Next, consider the size of your air fryer basket. If you have a smaller air fryer, you may need to cook your granola in batches. Overcrowding the basket can prevent proper air circulation, resulting in uneven cooking. Spread the granola mixture in a single layer for the best results. If you find that your batch is too large, simply divide it and cook it in two rounds.

Additionally, keep an eye on the cooking time. Air fryers can vary in temperature and cooking efficiency. While the recipe suggests 12 minutes, it’s wise to check your granola a few minutes before the timer goes off. If it’s already golden and crunchy, you can take it out early. Remember, granola will continue to harden as it cools, so don’t worry if it seems a bit soft right out of the fryer.

Lastly, allow your granola to cool completely on a cooling rack. This step is essential for achieving that perfect crunch. If you store it while it’s still warm, moisture can build up, making your granola chewy instead of crispy. Once cooled, you can mix in your favorite dried fruits or other add-ins, ensuring they stay intact and flavorful.

Crunchy Air Fryer Granola Recipe that you can enjoy for breakfast, snacks, or even as a topping for desserts. Happy cooking!

Serving Suggestions for Crunchy Air Fryer Granola Recipe

Crunchy Air Fryer Granola Recipe, it’s time to enjoy it! This granola is not only tasty on its own but also versatile enough to be paired with various foods. Here are some delightful serving suggestions to elevate your granola experience:

Pairing with Yogurt

One of the best ways to enjoy your granola is by pairing it with yogurt. Simply take a bowl of your favorite yogurt—be it plain, Greek, or flavored—and sprinkle a generous amount of your crunchy granola on top. This combination creates a satisfying breakfast or snack that’s rich in protein and fiber. You can also add fresh fruits like berries or banana slices for an extra burst of flavor and nutrition. The creamy yogurt complements the crunchy granola perfectly, making each bite a delightful experience!

Using as a Topping for Smoothies

Crunchy Air Fryer Granola Recipe is by using it as a topping for smoothies. After blending your favorite fruits and vegetables into a smoothie, sprinkle some granola on top. This adds a wonderful crunch and texture to your drink, making it more filling and enjoyable. Whether you’re having a berry smoothie or a green smoothie, the granola will enhance the flavor and provide a nutritious boost. It’s a great way to make your smoothies even more satisfying!

Enjoying as a Snack

Of course, you can always enjoy your granola as a snack on its own! Keep a small container of your homemade granola handy for those mid-afternoon cravings. It’s a healthy option that’s easy to grab and munch on. The combination of oats, nuts, and dried fruits provides a perfect balance of energy and satisfaction. Plus, it’s a great alternative to processed snacks, giving you a wholesome treat that you can feel good about. Whether you’re at home, at work, or on the go, your crunchy granola will be a delightful companion!

Crunchy Air Fryer Granola Recipe in various delicious ways. Feel free to mix and match these ideas to find your favorite combinations. Happy snacking!

Tips for Perfecting Your Crunchy Air Fryer Granola Recipe

Crunchy Air Fryer Granola Recipe even better, consider these helpful tips. They will guide you in adjusting cooking times, storing your granola properly, and customizing its texture and crunch. With these tips, you’ll be able to create the perfect batch every time!

Adjusting Cooking Time

Cooking time can vary based on your air fryer model and the size of your granola batch. Start with the recommended 12 minutes, but keep an eye on it. If your granola looks golden brown before the timer goes off, feel free to take it out early. Remember, granola continues to harden as it cools. If you prefer a crunchier texture, you can add a few extra minutes, but be cautious. Check every minute to avoid burning. This way, you can achieve the perfect crunch that you desire!

Storing Granola Properly

Crunchy Air Fryer Granola Recipe can last up to two weeks!

Customizing Texture and Crunch

Everyone has their own preference when it comes to granola texture. If you like it clumpier, try adding a bit more syrup to the mixture. This will help the oats stick together better. You can also press the mixture down firmly in the air fryer basket before cooking. For a lighter texture, simply stir the mixture less when combining the wet and dry ingredients. Experiment with these techniques to find the perfect balance of crunch and chewiness that suits your taste!

Crunchy Air Fryer Granola Recipe. Enjoy the process of creating your ideal granola, and don’t hesitate to get creative along the way!

Breakdown of Time for Crunchy Air Fryer Granola Recipe

Crunchy Air Fryer Granola Recipe is essential for planning your cooking session. Here’s a simple breakdown of the time involved in preparing and cooking your delicious granola.

Prep Time

The prep time for this granola recipe is quite short. You’ll need about 10-15 minutes to gather your ingredients and mix them together. This includes measuring out the oats, nuts, and other ingredients, as well as combining the wet and dry mixtures. Having everything ready will make the process smooth and enjoyable!

Cooking Time

Once your granola mixture is ready, the cooking time in the air fryer is approximately 12-16 minutes. This includes the initial cooking time of 12 minutes, plus an optional additional 3-4 minutes if you prefer a crunchier texture. Remember to shake the basket halfway through to ensure even cooking. Keeping an eye on the granola during this time is important to prevent burning.

Total Time

Crunchy Air Fryer Granola Recipe in no time! It’s a perfect option for busy mornings or a quick snack during the day.

By knowing the time breakdown, you can easily fit this delightful recipe into your schedule. Enjoy the process and the delicious results!

Nutritional Information for Crunchy Air Fryer Granola Recipe

Crunchy Air Fryer Granola Recipe is essential for making informed choices about your diet. This granola is not only delicious but also packed with nutrients that can benefit your health. Here’s a breakdown of the key nutritional components per serving:

Calories

Each serving of this delightful granola contains approximately 180 calories. This makes it a great option for a snack or breakfast that won’t weigh you down. The balance of oats, nuts, and dried fruits provides energy to keep you going throughout the day. Plus, with its satisfying crunch, you’ll feel full and content after enjoying a serving!

Protein

In terms of protein, this granola offers about 4 grams per serving. The combination of rolled oats and nuts contributes to this protein content, making it a wholesome choice. Protein is essential for building and repairing tissues, and it helps keep you feeling full longer. Including this granola in your diet can support your overall health and wellness.

Sodium

When it comes to sodium, this granola contains roughly 50 milligrams per serving. This is a relatively low amount, especially considering that many snacks can be high in sodium. Keeping sodium levels in check is important for maintaining healthy blood pressure and overall heart health. Enjoying this granola allows you to indulge without worrying about excessive sodium intake.

Crunchy Air Fryer Granola Recipe is a nutritious option that provides a good balance of calories, protein, and low sodium. It’s a perfect addition to a healthy diet, whether you enjoy it on its own, with yogurt, or as a topping for smoothies. With its wholesome ingredients, you can feel good about fueling your body with this tasty treat!

FAQs about Crunchy Air Fryer Granola Recipe

Can I use rolled oats instead of quick oats?

Crunchy Air Fryer Granola Recipe is designed specifically for rolled oats. Rolled oats provide a hearty texture and are perfect for granola. Quick oats can become mushy when cooked, which is not ideal for achieving that delightful crunch. So, stick with rolled oats for the best results!

How do I make my granola clumpier?

If you prefer clumpier granola, there are a few tricks you can try. First, increase the amount of syrup slightly. This extra sweetness helps the oats stick together better. Additionally, when mixing the wet and dry ingredients, press the mixture down firmly in the air fryer basket. This will encourage clumping as it cooks. Lastly, avoid stirring the granola too much during cooking, as this can break apart the clusters. With these tips, you’ll enjoy a deliciously clumpy granola!

Can I add dried fruits to the granola?

Yes, you can definitely add dried fruits to your granola! In fact, the recipe includes dried fruits like apricots or figs for added flavor and texture. Just make sure to fold them in after the granola has cooled completely. This way, the dried fruits will stay intact and flavorful. Feel free to experiment with your favorite dried fruits to create a unique blend that suits your taste!

How long does homemade granola last?

Crunchy Air Fryer Granola Recipe can last up to two weeks when stored properly. Make sure to keep it in an airtight container at room temperature, away from direct sunlight. If you want to extend its shelf life, consider storing it in the fridge or freezer. Just remember to let it come to room temperature before enjoying it again. With proper storage, you can savor your delicious granola for days to come!

Conclusion on Crunchy Air Fryer Granola Recipe

Crunchy Air Fryer Granola Recipe is a fantastic way to enjoy a wholesome snack that’s both delicious and easy to make. With its delightful crunch and customizable ingredients, this granola can fit into any diet or lifestyle. Whether you’re looking for a quick breakfast, a tasty topping for yogurt, or a satisfying snack, this recipe has you covered.

By using an air fryer, you not only save time but also create a healthier version of granola without compromising on flavor. The combination of rolled oats, nuts, and dried fruits provides essential nutrients, making it a smart choice for your daily diet. Plus, the ability to adjust flavors and ingredients means you can make it uniquely yours!

As you experiment with different variations, you’ll discover new favorites that keep your taste buds excited. Remember to follow the tips for perfecting your granola, ensuring that each batch turns out just right. With a little practice, you’ll master the art of making crunchy granola that your family and friends will love.

So, gather your ingredients, fire up your air fryer, and get ready to enjoy a delightful homemade treat. Your journey into the world of granola has just begun, and the possibilities are endless. Happy cooking!