Hamburger Steak with Onions and Gravy is Delicious!

Introduction to Hamburger Steak with Onions and Gravy Recipe

What is Hamburger Steak with Onions and Gravy?

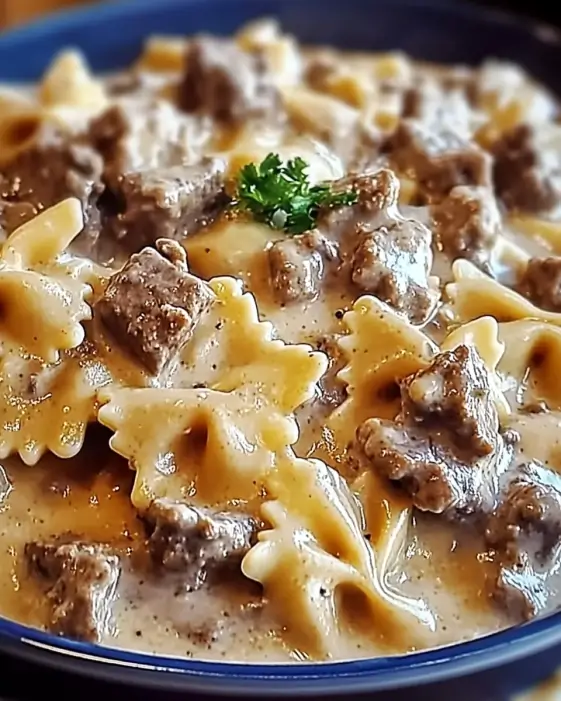
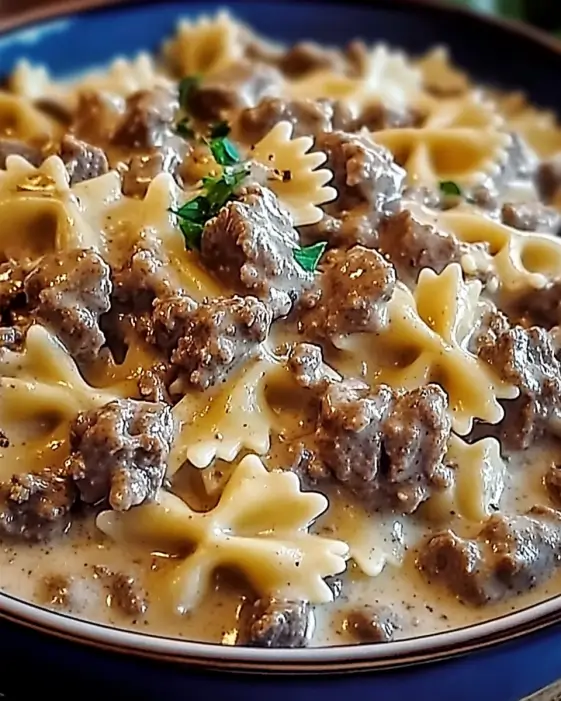
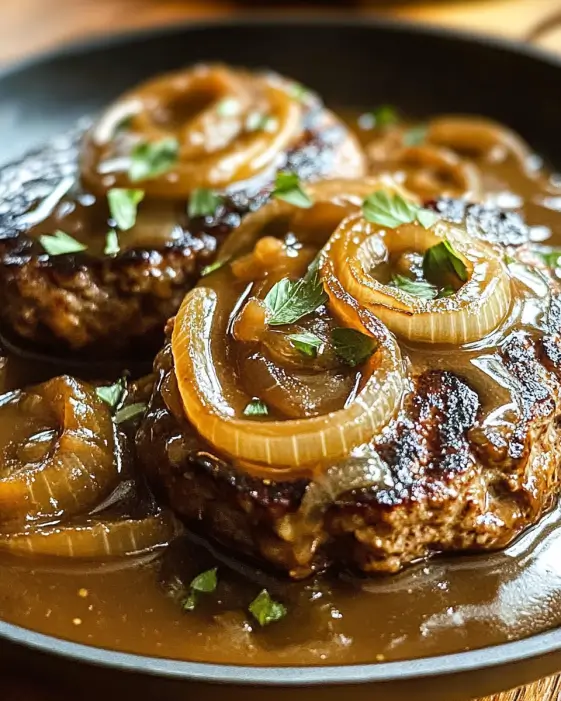
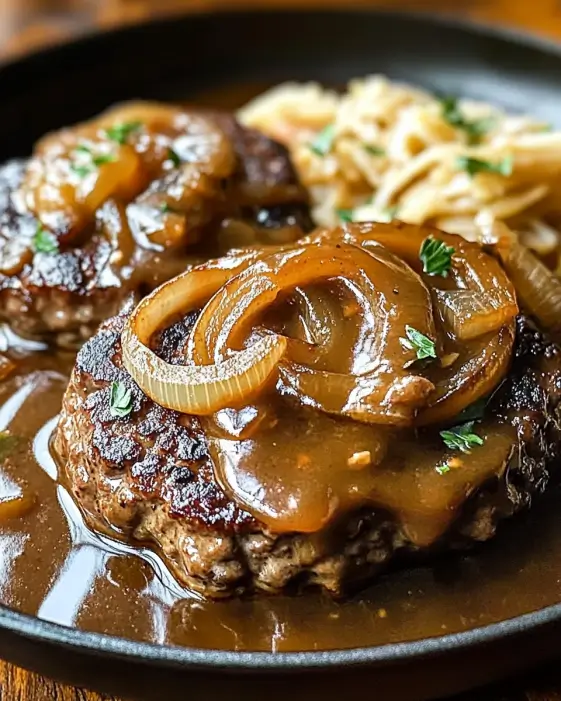
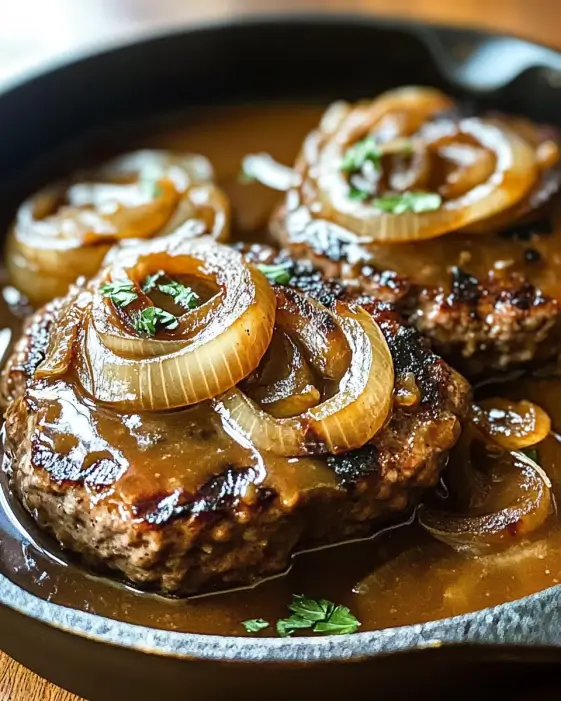
Hamburger steak with onions and gravy is a classic comfort food dish that brings warmth and satisfaction to the dinner table. This dish features juicy hamburger patties, seasoned to perfection, served with a rich, savory gravy made from caramelized onions and beef broth. The combination of flavors creates a delightful experience that is both hearty and delicious. Often enjoyed with sides like mashed potatoes or rice, this meal is perfect for family gatherings or a cozy weeknight dinner.

Why You Should Try This Recipe

There are many reasons to try this hamburger steak with onions and gravy recipe. First, it’s simple to make, requiring just a few ingredients that you likely already have in your kitchen. Second, the cooking process is quick, making it an excellent choice for busy weeknights. Additionally, the dish is versatile; you can easily customize it to suit your taste preferences. Whether you prefer a little kick with added spices or a touch of sweetness with caramelized onions, this recipe can adapt to your liking.

Moreover, this meal is not only delicious but also nutritious. With a good balance of protein and healthy fats, it can fit into various dietary plans. Plus, the satisfaction of homemade cooking is unmatched. So, gather your ingredients and get ready to enjoy a comforting plate of hamburger steak with onions and gravy!

Ingredients for Hamburger Steak with Onions and Gravy Recipe

To create a mouthwatering hamburger steak with onions and gravy, you’ll need a few simple ingredients. Each component plays a vital role in building the rich flavors of this dish. Here’s what you’ll need:

  • 1 pound ground beef (80/20 blend): This blend provides the right amount of fat for juicy patties.
  • 1 teaspoon salt: Enhances the overall flavor of the beef.
  • 1/2 teaspoon black pepper: Adds a mild kick to the seasoning.
  • 1/2 teaspoon garlic powder: Brings a savory depth to the patties.
  • 1/2 teaspoon onion powder: Complements the fresh onions used in the gravy.
  • 1 tablespoon Worcestershire sauce: Adds a rich umami flavor to the beef.
  • 1 tablespoon vegetable oil: Used for frying the patties to a golden brown.
  • 1 large onion, thinly sliced: The star of the gravy, providing sweetness and depth.
  • 2 cups beef broth: Forms the base of the gravy, adding richness.
  • 2 tablespoons all-purpose flour: Helps thicken the gravy for a luscious texture.
  • 1 tablespoon butter: Adds a touch of creaminess to the gravy.
  • Chopped parsley for garnish (optional): A fresh touch to brighten the dish.

These ingredients come together to create a delightful meal that is sure to please everyone at the table. Make sure to gather everything before you start cooking, as it will make the process smoother and more enjoyable!

Preparation of Hamburger Steak with Onions and Gravy Recipe

Step 1: Preparing the Hamburger Patties

To start, grab a large bowl and combine the ground beef with salt, black pepper, garlic powder, onion powder, and Worcestershire sauce. Mix everything gently until just combined. Be careful not to overmix, as this can make the patties tough. Once mixed, divide the beef mixture into four equal portions. Shape each portion into a patty, about 1/2 inch thick. This thickness helps them cook evenly and stay juicy.

Step 2: Cooking the Onions

Next, heat the vegetable oil in a large skillet over medium-high heat. Once the oil is hot, carefully add the hamburger patties to the skillet. Cook them for about 4-5 minutes on each side. You want them to be nicely browned and cooked through. After cooking, remove the patties from the skillet and set them aside on a plate. In the same skillet, add the thinly sliced onions. Cook them over medium heat, stirring occasionally, until they become soft and caramelized. This should take about 8-10 minutes. The caramelization process brings out the natural sweetness of the onions, enhancing the flavor of your dish.

Step 3: Making the Gravy

Once the onions are beautifully caramelized, sprinkle the flour over them. Stir well to combine, cooking for an additional minute. This step helps to eliminate the raw flour taste. Gradually pour in the beef broth while stirring constantly. This will help prevent any lumps from forming. Bring the mixture to a gentle simmer and let it thicken for about 3-5 minutes. You’ll notice the gravy becoming rich and velvety, perfect for topping your hamburger steaks.

Step 4: Combining Everything Together

Now it’s time to bring everything together! Return the cooked hamburger patties to the skillet, spooning the delicious gravy over them. Reduce the heat to low and let the patties simmer in the gravy for another 5 minutes. This allows the flavors to meld beautifully. Finally, stir in the butter until it melts and combines with the gravy. This adds a lovely creaminess to the sauce. Your hamburger steak with onions and gravy is now ready to be served!

Variation of Hamburger Steak with Onions and Gravy Recipe

Alternative Ingredients

While the classic hamburger steak with onions and gravy recipe is delicious, you can easily switch things up with alternative ingredients. For instance, if you want a leaner option, consider using ground turkey or chicken instead of beef. These meats can still be flavorful when seasoned well. You can also experiment with different types of ground beef, such as a leaner blend or even a grass-fed option for a healthier choice.

Additionally, you can enhance the flavor profile by adding different spices. For a bit of heat, try incorporating cayenne pepper or crushed red pepper flakes into the beef mixture. If you enjoy a smoky flavor, consider adding smoked paprika. You can also swap out the Worcestershire sauce for soy sauce or teriyaki sauce for a different twist.

For the gravy, feel free to use vegetable broth instead of beef broth for a vegetarian version. You can also add mushrooms to the onions while they cook, which will add an earthy flavor and extra texture. Lastly, if you want a creamier gravy, consider stirring in a splash of heavy cream or sour cream just before serving.

Different Cooking Methods

There are various cooking methods you can use to prepare hamburger steak with onions and gravy, depending on your preferences and available equipment. One popular method is grilling. Instead of pan-frying the patties, you can grill them on a barbecue or stovetop grill pan. This will give the patties a nice char and smoky flavor.

Another option is baking. Preheat your oven to 375°F (190°C) and place the formed patties on a baking sheet. Bake for about 20-25 minutes, flipping halfway through. While the patties are baking, you can prepare the gravy on the stovetop as usual. This method is great for cooking multiple patties at once without the need for constant attention.

If you prefer a slow-cooked version, consider using a slow cooker. Brown the patties in a skillet first, then transfer them to the slow cooker. Add the onions and gravy ingredients, and cook on low for 6-8 hours. This method allows the flavors to meld beautifully and results in incredibly tender patties.

With these variations and cooking methods, you can enjoy hamburger steak with onions and gravy in new and exciting ways. Feel free to get creative and make this dish your own!

Cooking Note for Hamburger Steak with Onions and Gravy Recipe

When preparing hamburger steak with onions and gravy, there are a few cooking notes to keep in mind to ensure your dish turns out perfectly every time. First, the quality of your ground beef is essential. Opt for an 80/20 blend, as the fat content helps keep the patties juicy and flavorful. If you choose a leaner blend, be cautious not to overcook the patties, as they may dry out.

Next, when cooking the onions, patience is key. Allow them to caramelize slowly over medium heat. This process enhances their natural sweetness and adds depth to the gravy. Stir them occasionally to prevent burning, and don’t rush this step. The longer you cook the onions, the more flavor they will develop.

As you make the gravy, remember to sprinkle the flour evenly over the onions. This helps to avoid clumping. Gradually adding the beef broth while stirring continuously will also help create a smooth, lump-free gravy. If you find the gravy too thick, you can always add a little more broth to reach your desired consistency.

Lastly, let the hamburger patties simmer in the gravy for a few minutes. This step allows the flavors to meld together beautifully. The butter added at the end not only enriches the gravy but also gives it a lovely sheen. Serve your hamburger steak with onions and gravy hot, and enjoy the comforting flavors that come from this classic dish!

Serving Suggestions for Hamburger Steak with Onions and Gravy Recipe

Best Side Dishes

When it comes to serving hamburger steak with onions and gravy, the right side dishes can elevate your meal to new heights. Here are some delicious options to consider:

  • Mashed Potatoes: Creamy mashed potatoes are a classic pairing. They soak up the rich gravy beautifully, making each bite a delight.
  • Rice: Fluffy white or brown rice is another excellent choice. It provides a neutral base that complements the savory flavors of the dish.
  • Steamed Vegetables: Lightly steamed broccoli, green beans, or carrots add a pop of color and nutrition to your plate.
  • Coleslaw: A refreshing coleslaw can provide a crunchy contrast to the tender hamburger steak, balancing the meal perfectly.
  • Biscuits or Bread Rolls: Soft biscuits or warm bread rolls are perfect for mopping up any leftover gravy, ensuring nothing goes to waste.

These side dishes not only enhance the meal but also add variety to your dining experience. Choose one or two to create a well-rounded plate that everyone will enjoy!

Pairing with Beverages

To complete your meal, consider pairing your hamburger steak with onions and gravy with the right beverages. Here are some suggestions:

  • Red Wine: A glass of red wine, such as Cabernet Sauvignon or Merlot, complements the rich flavors of the beef and gravy.
  • Beer: A cold lager or amber ale can be a refreshing choice, balancing the savory notes of the dish.
  • Iced Tea: For a non-alcoholic option, iced tea with a hint of lemon is a great way to cleanse your palate.
  • Sparkling Water: If you prefer something light, sparkling water with a slice of lemon or lime can be very refreshing.

Choosing the right beverage can enhance the overall dining experience, making your hamburger steak with onions and gravy even more enjoyable. Cheers to a delicious meal!

Tips for Perfect Hamburger Steak with Onions and Gravy Recipe

Creating the perfect hamburger steak with onions and gravy requires attention to detail and a few helpful tips. These suggestions will ensure your dish turns out delicious every time, making it a favorite at your dinner table.

  • Choose Quality Meat: Start with high-quality ground beef. An 80/20 blend is ideal for juicy patties. If you prefer leaner meat, be cautious not to overcook it, as it can dry out quickly.
  • Don’t Overmix: When forming the patties, mix the ingredients just until combined. Overmixing can lead to tough patties. Gently shape them into uniform sizes for even cooking.
  • Season Generously: Season the beef mixture well. The right amount of salt and spices enhances the flavor. Don’t be afraid to adjust the seasonings to suit your taste.
  • Caramelize the Onions: Take your time when cooking the onions. Caramelizing them slowly over medium heat brings out their natural sweetness. Stir occasionally to prevent burning and achieve a beautiful golden color.
  • Thicken the Gravy: When adding flour to the onions, ensure it’s evenly distributed. Gradually pour in the beef broth while stirring to avoid lumps. If the gravy is too thick, add a little more broth until you reach your desired consistency.
  • Simmer for Flavor: After adding the patties back to the skillet, let them simmer in the gravy. This step allows the flavors to meld together, making each bite more delicious.
  • Finish with Butter: Stirring in butter at the end adds richness and a glossy finish to the gravy. It elevates the dish and makes it even more appealing.
  • Garnish for Presentation: A sprinkle of chopped parsley not only adds color but also a fresh flavor. It makes your dish look inviting and appetizing.

By following these tips, you’ll create a mouthwatering hamburger steak with onions and gravy that your family and friends will love. Enjoy the process and savor the delicious results!

Breakdown of Time for Hamburger Steak with Onions and Gravy Recipe

Prep Time

Preparing hamburger steak with onions and gravy is quick and straightforward. The prep time for this recipe is approximately 15 minutes. During this time, you will gather all your ingredients, mix the ground beef with seasonings, and shape the patties. Having everything ready before you start cooking will make the process smoother and more enjoyable.

Cooking Time

The cooking time for this delicious dish is about 25-30 minutes. This includes cooking the hamburger patties for about 8-10 minutes, caramelizing the onions for 8-10 minutes, and making the gravy for an additional 5-7 minutes. The key is to cook the patties until they are browned and cooked through while allowing the onions to develop their sweet flavor. The gravy should simmer until it thickens, creating a rich sauce to complement the patties.

Total Time

In total, you can expect to spend around 40-45 minutes from start to finish. This includes both prep and cooking time. With this efficient timeline, you can have a hearty and satisfying meal ready in no time. It’s perfect for busy weeknights or when you want to impress your family with a homemade dinner without spending hours in the kitchen!

Nutritional Information for Hamburger Steak with Onions and Gravy Recipe

Calories

When it comes to enjoying a hearty meal, knowing the calorie content can help you make informed choices. Each serving of hamburger steak with onions and gravy contains approximately 350 calories. This makes it a satisfying option for dinner without going overboard on calories. The balance of protein and fats in this dish contributes to its overall caloric value, making it a filling meal that can keep you energized.

Protein

Protein is an essential nutrient that plays a vital role in building and repairing tissues. Each serving of this delicious hamburger steak provides about 28 grams of protein. This high protein content is primarily from the ground beef, making it an excellent choice for those looking to increase their protein intake. Whether you’re an active individual or just want to maintain a healthy diet, this dish can help you meet your protein needs while enjoying a flavorful meal.

Sodium

Sodium is another important factor to consider in your diet. Each serving of hamburger steak with onions and gravy contains around 600 milligrams of sodium. While this is a reasonable amount for a savory dish, it’s always good to be mindful of your overall sodium intake throughout the day. If you’re watching your sodium levels, consider using low-sodium beef broth or reducing the amount of added salt in the recipe. This way, you can still enjoy the rich flavors without compromising your dietary goals.

FAQs about Hamburger Steak with Onions and Gravy Recipe

Can I use ground turkey instead of beef?

Yes, you can definitely use ground turkey instead of beef for this recipe! Ground turkey is a leaner option and can still be flavorful when seasoned properly. Just make sure to adjust the cooking time slightly, as turkey may cook faster than beef. Adding a bit of extra seasoning or moisture, like a splash of broth, can help keep the turkey patties juicy and delicious.

How do I store leftovers?

Storing leftovers is easy! Allow the hamburger steak with onions and gravy to cool completely before transferring it to an airtight container. You can keep it in the refrigerator for up to 3-4 days. If you want to store it for a longer period, consider freezing it. Place the cooled dish in a freezer-safe container, and it can last for up to 3 months. Just remember to thaw it in the refrigerator before reheating!

Can I make this recipe ahead of time?

Absolutely! This recipe is great for making ahead of time. You can prepare the hamburger patties and the gravy in advance. Simply store them separately in the refrigerator. When you’re ready to serve, reheat the patties in a skillet and warm the gravy on the stove. This way, you can enjoy a delicious homemade meal without the last-minute rush!

What can I serve with Hamburger Steak with Onions and Gravy?

There are many delicious options to serve alongside hamburger steak with onions and gravy. Classic choices include creamy mashed potatoes or fluffy rice, which soak up the rich gravy beautifully. You can also add steamed vegetables for a nutritious touch or a fresh salad for a crunchy contrast. Don’t forget about warm bread rolls or biscuits to mop up any leftover gravy. These sides will complement your meal perfectly!

Conclusion on Hamburger Steak with Onions and Gravy Recipe

In conclusion, hamburger steak with onions and gravy is a delightful dish that combines simplicity with rich flavors. This recipe is not only easy to prepare but also offers a comforting meal that can be enjoyed by the whole family. The juicy hamburger patties paired with the savory onion gravy create a satisfying experience that warms the heart and fills the belly.

Whether you’re cooking for a special occasion or just a cozy weeknight dinner, this dish is sure to impress. With its versatility, you can easily adapt the recipe to suit your taste preferences or dietary needs. From alternative ingredients to different cooking methods, the possibilities are endless!

As you gather around the table to enjoy this classic comfort food, remember that the joy of cooking comes from sharing delicious meals with loved ones. So, roll up your sleeves, follow the steps, and savor the delightful flavors of hamburger steak with onions and gravy. Happy cooking!

Creamy Beef Bowtie Pasta is a family favorite dish.

Introduction to Creamy Beef Bowtie Pasta

Creamy Beef Bowtie Pasta. This dish combines tender bowtie pasta with savory ground beef, all enveloped in a rich and creamy sauce. It’s a perfect blend of flavors and textures that will leave everyone asking for seconds!

Not only is this recipe easy to prepare, but it also packs a punch in terms of nutrition. With protein from the beef and a touch of veggies from the peas, it’s a well-rounded meal. Plus, the creamy sauce made with heavy cream and Parmesan cheese adds a delightful richness that makes this dish truly special.

Creamy Beef Bowtie Pasta is sure to impress. It’s quick to whip up, taking less than 30 minutes from start to finish. So, roll up your sleeves and get ready to create a dish that will warm hearts and fill bellies!

Ingredients for Creamy Beef Bowtie Pasta

Creamy Beef Bowtie Pasta, you’ll need a few simple ingredients. Each component plays a vital role in building the flavors and textures of this dish. Here’s what you’ll need:

  • 1 pound ground beef: This is the star of the dish, providing rich flavor and protein.
  • 8 ounces bowtie pasta: The fun shape of bowtie pasta holds the creamy sauce beautifully.
  • 1 tablespoon olive oil: Used for sautéing, it adds a nice depth of flavor.
  • 1 small onion, diced: Onions bring sweetness and aroma to the dish.
  • 2 cloves garlic, minced: Garlic adds a punch of flavor that complements the beef.
  • 1 teaspoon Italian seasoning: This blend of herbs enhances the overall taste.
  • 1/2 teaspoon salt: Essential for bringing out the flavors of the ingredients.
  • 1/4 teaspoon black pepper: Adds a hint of spice to the creamy sauce.
  • 1 cup beef broth: This adds moisture and depth to the sauce.
  • 1 cup heavy cream: The key ingredient for that luscious, creamy texture.
  • 1 cup grated Parmesan cheese: This cheese melts beautifully, enriching the sauce.
  • 1 cup frozen peas: Peas add a pop of color and a touch of sweetness.
  • Fresh parsley, chopped: For garnish, it adds freshness and a lovely presentation.

Creamy Beef Bowtie Pasta, making it a meal that’s both satisfying and enjoyable!

Preparation of Creamy Beef Bowtie Pasta

Creamy Beef Bowtie Pasta. This process is straightforward and quick, making it perfect for any home cook. Let’s break it down into easy steps!

Step 1: Cook the Bowtie Pasta

First, bring a large pot of salted water to a boil. Once boiling, add the bowtie pasta. Cook it according to the package instructions until it’s al dente, which usually takes about 8-10 minutes. Stir occasionally to prevent sticking. Once done, drain the pasta in a colander and set it aside. Remember, you want the pasta to have a slight bite to it, as it will continue to cook when mixed with the sauce.

Step 2: Prepare the Beef Mixture

In the same pot, heat 1 tablespoon of olive oil over medium heat. Add the diced onion and sauté for about 3-4 minutes until it becomes translucent. This step is crucial as it builds the base flavor of your dish. Next, stir in the minced garlic and cook for an additional 30 seconds. The aroma will be delightful! Now, add the ground beef to the pot. Use a spoon to break it apart as it cooks. Brown the beef for about 5-7 minutes, ensuring it’s no longer pink. If there’s excess fat, drain it off to keep the dish from becoming greasy.

Step 3: Create the Creamy Sauce

Once the beef is browned, it’s time to add flavor. Sprinkle in the Italian seasoning, salt, and black pepper. Stir well to combine. Then, pour in 1 cup of beef broth and bring the mixture to a gentle simmer. This will help infuse the flavors. After a few minutes, reduce the heat to low. Now, add 1 cup of heavy cream and 1 cup of grated Parmesan cheese. Stir continuously until the cheese melts and the sauce becomes creamy and smooth. This is where the magic happens!

Step 4: Combine Ingredients

Creamy Beef Bowtie Pasta is ready to serve!

Variation of Creamy Beef Bowtie Pasta

Creamy Beef Bowtie Pasta recipe is delicious as is, there are many ways to switch things up! Whether you want to try different ingredients or make dietary modifications, these variations can add a new twist to your meal. Let’s explore some alternative ingredients and dietary modifications that can enhance your dish.

Alternative Ingredients for Creamy Beef Bowtie Pasta

Sometimes, you might want to experiment with different flavors or ingredients. Here are a few alternatives to consider:

  • Ground Turkey or Chicken: For a leaner option, swap out the ground beef for ground turkey or chicken. This will reduce the fat content while still providing protein.
  • Whole Wheat Bowtie Pasta: If you’re looking for a healthier pasta option, whole wheat bowtie pasta is a great choice. It adds fiber and nutrients to your meal.
  • Vegetables: Add sautéed mushrooms, bell peppers, or spinach for extra nutrition and flavor. These veggies can enhance the dish’s texture and color.
  • Different Cheeses: Instead of Parmesan, try using mozzarella or cheddar for a different cheesy flavor. Each cheese brings its unique taste to the creamy sauce.

Creamy Beef Bowtie Pasta even more delightful and tailored to your taste preferences!

Dietary Modifications for Creamy Beef Bowtie Pasta

If you or your guests have specific dietary needs, you can easily modify the recipe. Here are some ideas:

  • Gluten-Free: Use gluten-free bowtie pasta to make this dish suitable for those with gluten sensitivities. There are many great options available in stores.
  • Dairy-Free: For a dairy-free version, substitute heavy cream with coconut milk or a dairy-free cream alternative. Nutritional yeast can replace Parmesan cheese for a cheesy flavor without dairy.
  • Low-Carb: If you’re following a low-carb diet, consider using zucchini noodles or spaghetti squash instead of pasta. This will keep the dish light and healthy.

Creamy Beef Bowtie Pasta without compromising their dietary preferences!

Cooking Note for Creamy Beef Bowtie Pasta

Creamy Beef Bowtie Pasta, there are a few cooking notes to keep in mind. These tips will help you achieve the best results and ensure your dish turns out perfectly every time.

First, always use a large pot for cooking the pasta. This allows the bowtie pasta to move freely in the boiling water, preventing it from sticking together. Stirring occasionally while it cooks is also essential. This simple step helps maintain the pasta’s texture and prevents clumping.

Next, when browning the ground beef, make sure to break it into small pieces. This ensures even cooking and allows the meat to absorb the flavors of the seasonings. If you notice any excess fat after cooking, don’t hesitate to drain it. This will keep your sauce from becoming too greasy.

As you prepare the creamy sauce, remember to keep the heat low after adding the heavy cream and cheese. High heat can cause the cream to curdle, ruining the smooth texture of your sauce. Stir continuously until everything is well combined and creamy.

Creamy Beef Bowtie Pasta looking beautiful and appetizing!

Creamy Beef Bowtie Pasta!

Serving Suggestions for Creamy Beef Bowtie Pasta

Creamy Beef Bowtie Pasta is ready, it’s time to think about how to serve it! Presentation can elevate your dish and make it even more enjoyable. Here are some delightful serving suggestions to consider:

First, serve the pasta in large, shallow bowls. This allows the creamy sauce to spread out beautifully, showcasing the vibrant colors of the peas and parsley. A sprinkle of freshly chopped parsley on top not only adds a pop of color but also enhances the dish’s aroma.

Creamy Beef Bowtie Pasta with a fresh side salad. A simple green salad with mixed greens, cherry tomatoes, and a light vinaigrette complements the richness of the pasta. The crispness of the salad balances the creamy texture, making each bite delightful.

Another great option is to serve garlic bread on the side. The warm, buttery bread is perfect for soaking up any leftover sauce. You can easily make garlic bread by spreading butter and minced garlic on slices of baguette, then toasting them in the oven until golden brown.

If you want to add a touch of elegance, consider serving the pasta with a glass of white wine. A crisp Chardonnay or a light Pinot Grigio pairs wonderfully with the creamy flavors of the dish. This combination can turn a simple dinner into a special occasion.

Creamy Beef Bowtie Pasta the next day can be just as satisfying!

Creamy Beef Bowtie Pasta will not only taste amazing but also look appealing on the table. Enjoy the smiles and compliments from your family and friends as they dig into this comforting dish!

Tips for Perfecting Creamy Beef Bowtie Pasta

Creamy Beef Bowtie Pasta truly exceptional, consider these helpful tips. They will enhance the flavors and ensure a delightful dining experience for everyone!

First, always taste as you cook. This simple step allows you to adjust the seasoning to your liking. If you prefer a bit more spice, add a pinch of red pepper flakes. For a richer flavor, consider adding a splash of Worcestershire sauce to the beef mixture.

Next, don’t rush the browning of the beef. Take your time to let it brown evenly. This caramelization adds depth to the flavor, making your dish even more delicious. Remember, patience is key!

When it comes to the cream sauce, use high-quality heavy cream. The better the cream, the creamier and richer your sauce will be. If you want to elevate the dish further, consider adding a splash of white wine after browning the beef. Let it simmer for a minute to cook off the alcohol before adding the broth.

Another tip is to reserve a bit of pasta water before draining. This starchy water can be added to the sauce if it becomes too thick. It helps to create a silky texture that clings beautifully to the pasta.

Creamy Beef Bowtie Pasta sit for a few minutes before serving. This resting time allows the flavors to meld together, making each bite even more flavorful. Plus, it gives you a moment to set the table and prepare for a lovely meal!

Creamy Beef Bowtie Pasta that’s not only delicious but also a hit with family and friends. Enjoy the process and the wonderful flavors that come together in this comforting dish!

Breakdown of Time for Creamy Beef Bowtie Pasta

Creamy Beef Bowtie Pasta can help you plan your meal better. Here’s a simple breakdown of the time required for each step, ensuring you can enjoy this delicious dish without any rush!

Prep Time

Creamy Beef Bowtie Pasta is approximately 10-15 minutes. During this time, you’ll gather all your ingredients, chop the onion and garlic, and measure out the seasonings. Having everything ready before you start cooking makes the process smoother and more enjoyable!

Cooking Time

Once you begin cooking, the total cooking time is about 15-20 minutes. This includes boiling the pasta, browning the beef, and creating the creamy sauce. Each step is quick, allowing you to have a hearty meal on the table in no time!

Total Time

Creamy Beef Bowtie Pasta an excellent choice for a weeknight dinner or a last-minute gathering. With just a little time and effort, you’ll have a delicious meal that everyone will love!

Nutritional Information for Creamy Beef Bowtie Pasta

Creamy Beef Bowtie Pasta not only satisfies your taste buds but also provides a good amount of nutrients. Here’s a breakdown of the nutritional information per serving, so you can enjoy this dish while being mindful of your dietary needs.

Calories

Creamy Beef Bowtie Pasta contains approximately 600 calories. This calorie count includes the rich flavors from the ground beef, heavy cream, and Parmesan cheese. While it’s a hearty meal, it’s important to balance it with lighter options throughout the day.

Protein

One of the standout features of this dish is its protein content. Each serving provides about 30 grams of protein. The ground beef is a significant source of protein, which is essential for muscle repair and overall health. Pairing this dish with a side salad can help round out your meal with additional nutrients.

Sodium

Creamy Beef Bowtie Pasta contains around 800 milligrams per serving. This amount can vary based on the beef broth and cheese used. If you’re watching your sodium intake, consider using low-sodium broth and cheese to help reduce the overall sodium content. This way, you can enjoy the creamy goodness without worrying too much about salt levels.

Creamy Beef Bowtie Pasta while making informed choices about your diet. It’s a delicious meal that can fit into a balanced lifestyle when enjoyed in moderation!

FAQs about Creamy Beef Bowtie Pasta

Can I use a different type of pasta for Creamy Beef Bowtie Pasta?

Absolutely! While bowtie pasta is a fun and charming choice, you can use other types of pasta as well. Penne, fusilli, or even spaghetti can work wonderfully in this recipe. Just keep in mind that cooking times may vary slightly, so be sure to check the package instructions. The key is to choose a pasta shape that can hold onto the creamy sauce, ensuring every bite is delicious!

How can I make Creamy Beef Bowtie Pasta healthier?

Creamy Beef Bowtie Pasta without sacrificing flavor. First, consider using ground turkey or chicken instead of beef. This will reduce the fat content while still providing protein. You can also swap heavy cream for half-and-half or a dairy-free alternative like coconut milk. Additionally, adding more vegetables, such as spinach or bell peppers, can boost the nutritional value and add color to your dish. These simple changes can make your meal healthier while keeping it tasty!

What can I serve with Creamy Beef Bowtie Pasta?

Creamy Beef Bowtie Pasta with the right sides can elevate your meal. A fresh green salad with mixed greens, cherry tomatoes, and a light vinaigrette is a perfect complement. The crispness of the salad balances the creamy pasta beautifully. Garlic bread is another fantastic option, perfect for soaking up any leftover sauce. For a heartier meal, consider serving it with roasted vegetables or a side of steamed broccoli. These sides not only enhance the meal but also add more nutrients to your plate!

Can I make Creamy Beef Bowtie Pasta ahead of time?

Creamy Beef Bowtie Pasta ahead of time! To do this, follow the recipe up until the point of combining the pasta with the sauce. Allow the dish to cool completely, then store it in an airtight container in the refrigerator. When you’re ready to serve, reheat it gently on the stove, adding a splash of milk or cream to restore the creamy texture. This makes it a great option for meal prep or for entertaining guests, allowing you to enjoy more time with your loved ones!

Conclusion on Creamy Beef Bowtie Pasta

Creamy Beef Bowtie Pasta is a delightful dish that brings comfort and satisfaction to the dinner table. With its rich flavors and creamy texture, it’s no wonder this recipe has become a family favorite. The combination of tender bowtie pasta, savory ground beef, and a luscious sauce creates a meal that is both hearty and enjoyable.

Creamy Beef Bowtie Pasta for everyone. From adding vegetables to swapping out ingredients, the possibilities are endless!

Creamy Beef Bowtie Pasta are what truly make it special. So, roll up your sleeves, gather your ingredients, and get ready to whip up a dish that will warm hearts and fill bellies.

Creamy Beef Bowtie Pasta is perfect for busy weeknights or special occasions. We hope you enjoy making and sharing this recipe as much as we do. Happy cooking!

Instant Pot Chicken Stew Recipe is easy and delicious!

Introduction to Instant Pot Chicken Stew Recipe

Are you looking for a warm and comforting meal that’s easy to prepare? Look no further than the Instant Pot Chicken Stew Recipe! This dish is not only delicious but also packed with nutrients. It’s perfect for busy weeknights or cozy weekends. With tender chicken, hearty vegetables, and aromatic herbs, this stew is sure to become a family favorite.

What Makes Instant Pot Chicken Stew Special?

What sets the Instant Pot Chicken Stew apart from traditional stew recipes? The answer lies in the cooking method. The Instant Pot uses pressure cooking, which locks in flavors and moisture. This means your chicken will be incredibly tender and juicy. Plus, the vegetables will retain their vibrant colors and nutrients. The combination of these elements creates a stew that is not only tasty but also visually appealing.

Another special aspect of this recipe is its versatility. You can easily customize it to suit your taste. Whether you prefer a thicker stew or want to add different vegetables, the Instant Pot allows for endless possibilities. This adaptability makes it a go-to recipe for any occasion.

Benefits of Using an Instant Pot for Stew

Using an Instant Pot for your chicken stew comes with several benefits. First, it significantly reduces cooking time. Traditional stews can take hours to simmer, but the Instant Pot can have your meal ready in under 30 minutes. This is a game-changer for those with busy schedules.

Additionally, the Instant Pot is energy-efficient. It uses less electricity compared to a stovetop or oven, making it a more eco-friendly option. You can enjoy a hearty meal without worrying about high energy bills.

Lastly, the Instant Pot is incredibly easy to clean. With just one pot to wash, you’ll spend less time in the kitchen and more time enjoying your delicious stew. Overall, the Instant Pot Chicken Stew Recipe is a fantastic choice for anyone looking to create a wholesome meal with minimal effort.

Ingredients for Instant Pot Chicken Stew Recipe

To create a mouthwatering Instant Pot Chicken Stew, you’ll need a selection of fresh ingredients. Each component plays a vital role in building flavor and texture. Here’s what you’ll need:

  • 2 pounds boneless, skinless chicken thighs: Cut into 1-inch pieces for even cooking.
  • 1 tablespoon olive oil: This adds richness and helps sauté the vegetables.
  • 1 medium onion: Diced to enhance the stew’s flavor base.
  • 3 cloves garlic: Minced for a fragrant aroma.
  • 4 medium carrots: Sliced to add sweetness and color.
  • 3 medium potatoes: Diced for heartiness; you can use regular or sweet potatoes.
  • 2 cups chicken broth: This is the stew’s liquid foundation, providing depth of flavor.
  • 1 teaspoon dried thyme: A classic herb that complements chicken beautifully.
  • 1 teaspoon dried rosemary: Adds a fragrant, earthy note.
  • 1 bay leaf: Infuses the stew with a subtle flavor.
  • Salt and pepper: To taste, enhancing all the other flavors.
  • 1 cup frozen peas: Stirred in at the end for a pop of color and sweetness.
  • 2 tablespoons fresh parsley: Chopped for garnish, adding freshness to the dish.

These ingredients come together to create a comforting and satisfying meal. Feel free to adjust the quantities based on your preferences or dietary needs. For instance, if you love a creamier stew, consider adding 1/2 cup of heavy cream just before serving. This will elevate the dish to a whole new level of richness!

Step-by-Step Preparation of Instant Pot Chicken Stew Recipe

Now that you have all your ingredients ready, it’s time to dive into the step-by-step preparation of your Instant Pot Chicken Stew. Following these simple steps will ensure that your stew turns out tender, flavorful, and absolutely delicious!

Step 1: Preparing the Ingredients

Before you start cooking, it’s essential to prepare all your ingredients. Begin by washing and chopping the vegetables. Dice the onion, mince the garlic, slice the carrots, and dice the potatoes. If you’re using fresh parsley for garnish, chop that as well. Having everything prepped and ready to go will make the cooking process smooth and enjoyable.

Step 2: Sautéing the Chicken

Next, set your Instant Pot to the sauté function. Add the tablespoon of olive oil and let it heat up. Once hot, add the diced onion and minced garlic. Sauté for about 2-3 minutes until they become fragrant and translucent. This step builds a flavorful base for your stew.

Now, add the chicken pieces to the pot. Season them with salt and pepper. Cook for about 5 minutes, stirring occasionally. You want the chicken to be lightly browned, which adds depth to the flavor of your stew.

Step 3: Adding Vegetables and Seasonings

After the chicken is browned, it’s time to add the rest of the ingredients. Toss in the sliced carrots and diced potatoes. Then, pour in the chicken broth, and sprinkle in the dried thyme, dried rosemary, and bay leaf. Stir everything together to ensure the flavors meld well. This combination of ingredients will create a hearty and satisfying stew.

Step 4: Pressure Cooking the Stew

Once everything is combined, close the lid of the Instant Pot. Make sure the valve is set to sealing. Select the manual or pressure cook setting and set the timer for 10 minutes on high pressure. This is where the magic happens! The pressure will cook the chicken and vegetables quickly, locking in all the delicious flavors.

Step 5: Releasing Pressure and Serving

When the cooking time is complete, allow for a natural release for 10 minutes. This means you don’t touch the valve right away, letting the pressure decrease gradually. After 10 minutes, carefully switch the valve to venting to release any remaining pressure. Open the lid and stir in the frozen peas. Let the stew sit for about 5 minutes to warm the peas through.

Before serving, remember to remove the bay leaf. Taste the stew and adjust the seasoning with additional salt and pepper if needed. Serve hot, garnished with fresh parsley for a pop of color and flavor. Enjoy your comforting bowl of Instant Pot Chicken Stew!

Variations of Instant Pot Chicken Stew Recipe

One of the best things about the Instant Pot Chicken Stew Recipe is its flexibility. You can easily modify it to suit your taste or use what you have on hand. Here are some exciting variations to consider:

Adding Different Vegetables

Feel free to get creative with the vegetables in your stew! While carrots and potatoes are classic choices, you can add a variety of other veggies. Consider including:

  • Celery: Adds a nice crunch and flavor.
  • Green beans: For a fresh, vibrant touch.
  • Bell peppers: They bring sweetness and color.
  • Mushrooms: For an earthy flavor that complements the chicken.
  • Spinach or kale: Stir in some greens for added nutrition.

Mix and match based on your preferences or what’s in season. Just remember to cut the vegetables into similar sizes for even cooking!

Using Alternative Proteins

If you want to switch things up, consider using different proteins. While chicken thighs are tender and flavorful, you can try:

  • Chicken breasts: A leaner option that cooks quickly.
  • Turkey: Ground turkey or turkey thighs can be a great substitute.
  • Beef: Use cubed beef for a heartier stew.
  • Vegetarian options: Replace chicken with chickpeas or lentils for a plant-based version.

Each protein will bring its unique flavor and texture, making your stew a new experience every time!

Spicing It Up: Flavor Variations

To enhance the flavor of your Instant Pot Chicken Stew, consider adding different spices and herbs. Here are some ideas:

  • Cumin: Adds a warm, earthy flavor.
  • Paprika: For a smoky touch.
  • Chili powder: If you like a bit of heat, this is a great addition.
  • Fresh herbs: Try adding fresh thyme, rosemary, or basil just before serving for a burst of freshness.

Experimenting with spices can transform your stew into a whole new dish. Don’t be afraid to try different combinations until you find your perfect flavor profile!

Cooking Note for Instant Pot Chicken Stew Recipe

When preparing your Instant Pot Chicken Stew, there are a few important cooking notes to keep in mind. These tips will help ensure that your stew turns out perfectly every time.

First, always make sure to cut your chicken and vegetables into uniform pieces. This helps them cook evenly. If the pieces are too large, they may not cook through, while smaller pieces can become mushy.

Next, don’t skip the sautéing step! Browning the chicken and onions adds a depth of flavor that enhances the overall taste of the stew. It’s a simple step that makes a big difference.

Also, be mindful of the liquid ratio. The Instant Pot requires enough liquid to create steam for pressure cooking. If you find your stew is too thick, you can always add a bit more chicken broth or water after cooking.

Lastly, remember that the flavors will continue to develop as the stew sits. If you have time, let it rest for a few minutes before serving. This allows the ingredients to meld together beautifully.

By following these cooking notes, you’ll create a delicious and satisfying Instant Pot Chicken Stew that your family will love!

Serving Suggestions for Instant Pot Chicken Stew Recipe

Once your Instant Pot Chicken Stew is ready, it’s time to think about how to serve it. The right side dishes and garnishes can elevate your meal, making it even more enjoyable. Here are some fantastic serving suggestions to consider.

Best Side Dishes to Pair

When it comes to side dishes, you want something that complements the rich flavors of your stew. Here are some great options:

  • Crusty Bread: A warm, crusty loaf is perfect for soaking up the delicious broth. Consider sourdough or a baguette for a delightful pairing.
  • Rice: Serve your stew over a bed of fluffy white or brown rice. This adds a nice texture and helps absorb the flavors.
  • Mashed Potatoes: Creamy mashed potatoes can be a comforting side. They pair wonderfully with the stew, making for a hearty meal.
  • Salad: A fresh green salad with a light vinaigrette can balance the richness of the stew. Try adding ingredients like cherry tomatoes, cucumbers, and avocado.
  • Roasted Vegetables: Roasted seasonal vegetables, such as Brussels sprouts or zucchini, can add a lovely contrast to the stew.

These side dishes not only enhance the meal but also provide a variety of flavors and textures that everyone will enjoy.

Garnishing Ideas

Garnishing your Instant Pot Chicken Stew can make it look even more appetizing. Here are some simple yet effective garnishing ideas:

  • Fresh Parsley: As mentioned in the recipe, chopped fresh parsley adds a pop of color and freshness. Sprinkle it on just before serving.
  • Chopped Green Onions: These can add a mild onion flavor and a nice crunch. Scatter them on top for a vibrant touch.
  • Grated Parmesan Cheese: A sprinkle of Parmesan can add a savory, cheesy flavor that complements the stew beautifully.
  • Cracked Black Pepper: A few cracks of fresh black pepper can enhance the dish’s aroma and flavor.
  • Red Pepper Flakes: If you like a bit of heat, a pinch of red pepper flakes can add a spicy kick to your stew.

These garnishing ideas not only make your stew visually appealing but also enhance the overall flavor experience. Enjoy your meal with these delightful touches!

Tips for Perfecting Your Instant Pot Chicken Stew Recipe

To ensure your Instant Pot Chicken Stew turns out perfectly every time, it’s essential to keep a few tips in mind. These insights will help you avoid common pitfalls and make the most of your cooking experience.

Common Mistakes to Avoid

Even the best cooks can make mistakes. Here are some common errors to watch out for:

  • Skipping the Sauté Step: This step is crucial for building flavor. Don’t rush it! Browning the chicken and onions adds depth to your stew.
  • Overfilling the Instant Pot: Be mindful of the maximum fill line. Overfilling can prevent proper pressure cooking and lead to uneven results.
  • Not Using Enough Liquid: The Instant Pot needs liquid to create steam. If your stew is too thick, it may not cook properly. Always ensure you have enough broth or water.
  • Ignoring the Natural Release: Allowing for a natural release helps the flavors meld together. Don’t rush to open the lid right away!
  • Not Tasting Before Serving: Always taste your stew before serving. Adjust the seasoning as needed to enhance the flavors.

By avoiding these common mistakes, you’ll be on your way to creating a delicious and satisfying stew that everyone will love!

Storage Tips for Leftovers

If you have leftovers, storing them properly is key to maintaining their flavor and freshness. Here are some helpful storage tips:

  • Cool Before Storing: Allow the stew to cool to room temperature before transferring it to an airtight container. This helps prevent condensation and keeps it fresh.
  • Refrigerate: Store your stew in the refrigerator for up to 3-4 days. Make sure it’s in a sealed container to avoid absorbing other odors.
  • Freeze for Longer Storage: If you want to keep it longer, consider freezing the stew. It can last up to 3 months in the freezer. Just make sure to leave some space in the container for expansion.
  • Reheat Gently: When reheating, do so gently on the stovetop or in the microwave. Add a splash of broth or water if it’s too thick after being stored.

Following these storage tips will help you enjoy your Instant Pot Chicken Stew even after the first serving. It’s a great way to have a comforting meal ready to go!

Breakdown of Time for Instant Pot Chicken Stew Recipe

Understanding the time involved in making your Instant Pot Chicken Stew is essential for planning your meal. Here’s a quick breakdown of the time you’ll need for each step of the process.

Prep Time

The prep time for this delicious stew is relatively short. You’ll spend about 15-20 minutes washing, chopping, and measuring your ingredients. This includes:

  • Washing and peeling the vegetables.
  • Dicing the onion and potatoes.
  • Slicing the carrots and mincing the garlic.
  • Measuring out the herbs and spices.

Having everything prepped in advance will make the cooking process smoother and more enjoyable!

Cooking Time

The cooking time in the Instant Pot is quick and efficient. Here’s how it breaks down:

  • Sautéing: About 5-7 minutes to brown the chicken and soften the onions and garlic.
  • Pressure Cooking: Once the lid is closed, the stew cooks for 10 minutes on high pressure.
  • Natural Release: Allowing the pressure to release naturally takes an additional 10 minutes.

In total, the cooking time is approximately 25-30 minutes, making it a fantastic option for a weeknight dinner!

Total Time

When you combine the prep time and cooking time, the total time for your Instant Pot Chicken Stew is around 40-50 minutes. This includes:

  • Prep Time: 15-20 minutes
  • Cooking Time: 25-30 minutes

This means you can have a hearty, homemade meal ready in under an hour. It’s perfect for those busy days when you want something comforting without spending all evening in the kitchen!

Nutritional Information for Instant Pot Chicken Stew Recipe

Understanding the nutritional content of your meals is essential for maintaining a balanced diet. The Instant Pot Chicken Stew Recipe is not only delicious but also provides a good mix of nutrients. Here’s a closer look at the calories and macronutrients in each serving.

Calories and Macronutrients

Each serving of this hearty stew contains approximately:

  • Calories: 320
  • Protein: 30g
  • Fat: 12g
  • Net Carbohydrates: 20g

This nutritional profile makes the stew a great option for those looking to enjoy a filling meal without excessive calories. The protein content is particularly beneficial for muscle repair and growth, while the healthy fats provide energy and support overall health. The carbohydrates from the vegetables offer essential nutrients and fiber, making this stew a well-rounded choice.

Sodium Content

When it comes to sodium, it’s important to be mindful, especially if you’re watching your intake. The sodium content in your Instant Pot Chicken Stew will vary based on the chicken broth you use. On average, a serving may contain:

  • Sodium: Approximately 600-800mg

To reduce sodium levels, consider using low-sodium chicken broth or making your own broth at home. This way, you can control the amount of salt added to your stew. Balancing flavors with herbs and spices can also help enhance taste without relying heavily on sodium.

Overall, the Instant Pot Chicken Stew Recipe is a nutritious option that can fit well into a healthy eating plan. Enjoy this comforting dish knowing it’s not only tasty but also good for you!

FAQs about Instant Pot Chicken Stew Recipe

Can I use frozen chicken in the Instant Pot Chicken Stew Recipe?

Yes, you can use frozen chicken in your Instant Pot Chicken Stew Recipe! The Instant Pot is designed to handle frozen ingredients. However, you will need to adjust the cooking time. Instead of cooking for 10 minutes, increase the time to about 15-20 minutes. This ensures that the chicken cooks thoroughly and remains tender. Just remember to check that the internal temperature of the chicken reaches 165°F (75°C) for safety.

How long does it take to cook chicken stew in an Instant Pot?

The total cooking time for chicken stew in the Instant Pot is quite efficient. After sautéing the ingredients, the stew cooks under high pressure for 10 minutes. If you are using frozen chicken, increase this time to 15-20 minutes. Additionally, allow for a natural pressure release of about 10 minutes after cooking. In total, you can have a delicious chicken stew ready in about 40-50 minutes, including prep time!

Can I make Instant Pot Chicken Stew Recipe ahead of time?

Absolutely! Making the Instant Pot Chicken Stew ahead of time is a great idea. You can prepare it a day in advance and store it in the refrigerator. The flavors will deepen and improve as it sits. Just reheat it gently on the stovetop or in the microwave before serving. If you want to make it even further in advance, consider freezing the stew. It can last up to 3 months in the freezer. Just remember to leave some space in the container for expansion!

What can I substitute for chicken in the Instant Pot Chicken Stew Recipe?

If you want to substitute chicken in your stew, there are several delicious options. You can use:

  • Turkey: Ground turkey or turkey thighs work well and provide a similar flavor.
  • Beef: Cubed beef can create a heartier stew. Just adjust the cooking time to ensure it becomes tender.
  • Pork: Pork shoulder or tenderloin can also be a tasty alternative.
  • Vegetarian options: For a plant-based version, consider using chickpeas, lentils, or even tofu. These options will add protein and texture to your stew.

Each substitute will bring its unique flavor, making your stew a new experience every time!

Conclusion on Instant Pot Chicken Stew Recipe

In conclusion, the Instant Pot Chicken Stew Recipe is a fantastic way to enjoy a hearty and nutritious meal with minimal effort. This dish combines tender chicken, vibrant vegetables, and aromatic herbs, creating a comforting stew that warms the heart and satisfies the palate. Whether you’re cooking for your family on a busy weeknight or preparing a cozy meal for friends, this recipe is sure to impress.

The versatility of the Instant Pot allows you to customize the stew to your liking. You can experiment with different vegetables, proteins, and spices, making each batch unique. Plus, the quick cooking time means you can have a delicious homemade meal ready in under an hour. It’s a perfect solution for those who want to enjoy wholesome food without spending all day in the kitchen.

As you prepare your Instant Pot Chicken Stew, remember the tips and variations shared throughout this article. They will help you create a dish that not only tastes great but also meets your dietary preferences. Don’t hesitate to make it your own by adding your favorite ingredients or adjusting the seasonings.

So, gather your ingredients, fire up your Instant Pot, and get ready to enjoy a bowl of this delightful stew. With its rich flavors and comforting warmth, the Instant Pot Chicken Stew Recipe is bound to become a staple in your home. Happy cooking!

Creamy Chicken and Rice is a comforting family favorite.

Introduction to Creamy Chicken and Rice Recipe

Creamy Chicken and Rice Recipe is a classic dish that brings warmth and satisfaction to any table. This recipe is not just about filling your stomach; it’s about creating a meal that feels like a warm hug. With its creamy texture and rich flavors, it’s perfect for family dinners or cozy nights in.

Imagine tender pieces of chicken, perfectly cooked rice, and vibrant vegetables all enveloped in a luscious cream sauce. This dish is not only delicious but also easy to prepare, making it a go-to option for busy weeknights. Plus, it serves as a fantastic base for creativity. You can easily customize it with your favorite ingredients or seasonal vegetables.

Whether you’re a seasoned cook or just starting your culinary journey, this recipe is simple enough for anyone to master. In the following sections, we will guide you through the ingredients, preparation steps, and even some variations to keep things exciting. So, let’s dive into the creamy goodness and discover how to make this delightful dish!

Ingredients for Creamy Chicken and Rice Recipe

Creamy Chicken and Rice Recipe, you’ll need a selection of fresh and flavorful ingredients. Each component plays a vital role in building the dish’s rich taste and creamy texture. Here’s what you’ll need:

  • 2 cups cooked white rice
  • 1 pound boneless, skinless chicken breasts, diced
  • 1 tablespoon olive oil
  • 1 small onion, diced
  • 2 cloves garlic, minced
  • 1 cup chicken broth
  • 1 cup heavy cream
  • 1 cup frozen peas and carrots
  • 1 teaspoon dried thyme
  • 1 teaspoon paprika
  • Salt and pepper to taste
  • 1/2 cup grated Parmesan cheese
  • Fresh parsley, chopped (for garnish)

These ingredients come together to create a dish that is not only comforting but also packed with flavor. The chicken provides a hearty protein source, while the rice serves as a filling base. The combination of cream and chicken broth creates a luscious sauce that binds everything together beautifully.

Creamy Chicken and Rice Recipe.

Step-by-Step Preparation of Creamy Chicken and Rice Recipe

Creamy Chicken and Rice Recipe to life! This step-by-step guide will help you navigate through the cooking process with ease. Let’s get started!

Step 1: Preparing the Chicken

First, heat a large skillet over medium heat. Add 1 tablespoon of olive oil to the skillet. Once the oil is hot, add the diced chicken breasts. Season the chicken with salt, pepper, dried thyme, and paprika. Cook the chicken for about 5-7 minutes, stirring occasionally. You want the chicken to be browned and cooked through. Once done, remove the chicken from the skillet and set it aside on a plate. This step ensures that the chicken remains juicy and flavorful.

Step 2: Cooking the Rice

If you haven’t cooked your rice yet, now is the time! You can use any method you prefer, whether it’s on the stovetop or in a rice cooker. For this recipe, 2 cups of cooked white rice are needed. Make sure the rice is fluffy and not sticky. If you have leftover rice, that works perfectly too! Just ensure it’s heated through when you add it later.

Step 3: Combining Ingredients

In the same skillet where you cooked the chicken, add the diced onion and minced garlic. Sauté them for about 2-3 minutes until the onion becomes translucent. This step adds a wonderful aroma to your dish. Next, pour in 1 cup of chicken broth and bring it to a gentle simmer. Stir in 1 cup of heavy cream and let it cook for another 2-3 minutes. This will allow the sauce to thicken slightly, creating a creamy base for your dish.

Step 4: Simmering for Flavor

Creamy Chicken and Rice Recipe is almost ready to serve!

Variation of Creamy Chicken and Rice Recipe

Creamy Chicken and Rice Recipe is delicious as is, there are many ways to switch things up! Variations can enhance flavors and cater to different dietary needs. Let’s explore some alternative ingredients and different cooking methods to keep your meals exciting.

Alternative Ingredients

Creamy Chicken and Rice Recipe is its versatility. You can easily swap out ingredients to suit your taste or what you have on hand. Here are some ideas:

  • Protein Options: Instead of chicken, try using shrimp, turkey, or even tofu for a vegetarian option. Each protein brings its unique flavor to the dish.
  • Vegetable Choices: Feel free to add bell peppers, broccoli, or spinach. These veggies not only add color but also boost the nutritional value.
  • Grain Alternatives: If you want a healthier twist, consider using brown rice or quinoa. These grains provide more fiber and nutrients.
  • Flavor Enhancers: Experiment with different herbs and spices. Basil, oregano, or even a splash of lemon juice can elevate the dish.

Creamy Chicken and Rice Recipe to your liking, making it a dish you can enjoy time and again.

Different Cooking Methods

Creamy Chicken and Rice Recipe. Here are a few options:

  • One-Pot Method: For a simpler cleanup, try cooking everything in one pot. Start by sautéing the chicken, then add the onion and garlic. Next, pour in the chicken broth, rice, and vegetables. Cover and simmer until the rice is cooked through.
  • Slow Cooker: If you have more time, consider using a slow cooker. Combine all ingredients except the cream and cheese. Cook on low for 4-6 hours. Stir in the cream and cheese just before serving for a creamy finish.
  • Instant Pot: For a quick meal, use an Instant Pot. Sauté the chicken, then add the other ingredients. Cook on high pressure for about 10 minutes. This method locks in flavors and saves time.

Creamy Chicken and Rice Recipe in various ways. Whether you prefer a quick stovetop meal or a slow-cooked delight, there’s a method for everyone!

Cooking Note for Creamy Chicken and Rice Recipe

Creamy Chicken and Rice Recipe, there are a few important cooking notes to keep in mind. These tips will help ensure that your dish turns out perfectly every time, enhancing both flavor and texture.

First, always use fresh ingredients whenever possible. Fresh chicken, vegetables, and herbs will elevate the taste of your dish significantly. If you’re using frozen vegetables, make sure to thaw them beforehand for even cooking.

Next, pay attention to the cooking times. Overcooking the chicken can lead to a dry texture, while undercooking can be unsafe. Aim for a golden-brown color on the chicken, which indicates it’s cooked through. Use a meat thermometer if you’re unsure; the internal temperature should reach 165°F (75°C).

Another key point is to adjust the creaminess to your liking. If you prefer a lighter dish, consider using half-and-half or even low-fat milk instead of heavy cream. This will still give you a creamy texture without being too rich.

Don’t forget to taste as you go! Adjusting the seasoning is crucial. A pinch of salt or a dash of pepper can make a big difference in flavor. Additionally, adding a squeeze of lemon juice just before serving can brighten the dish and enhance its overall taste.

Creamy Chicken and Rice Recipe!

Serving Suggestions for Creamy Chicken and Rice Recipe

Creamy Chicken and Rice Recipe is ready, it’s time to think about how to serve it! Presentation can elevate your meal, making it even more enjoyable. Here are some delightful serving suggestions to consider:

  • Garnish with Fresh Herbs: A sprinkle of chopped fresh parsley or basil on top adds a pop of color and freshness. It also enhances the dish’s aroma, making it even more inviting.
  • Pair with a Side Salad: A light, crisp salad complements the creamy richness of the chicken and rice. Consider a simple green salad with a vinaigrette dressing to balance the flavors.
  • Serve with Crusty Bread: A slice of warm, crusty bread is perfect for soaking up the creamy sauce. It adds a satisfying crunch and makes the meal feel more complete.
  • Accompany with Steamed Vegetables: For added nutrition, serve your dish with a side of steamed vegetables like broccoli or green beans. This not only adds color but also boosts the meal’s healthiness.
  • Offer a Sprinkle of Cheese: If you love cheese, consider adding extra grated Parmesan or a sprinkle of mozzarella on top just before serving. It melts beautifully and adds an extra layer of flavor.

Creamy Chicken and Rice Recipe a standout dish at any meal. Whether it’s a family dinner or a gathering with friends, these ideas will surely impress your guests!

Tips for Perfecting Your Creamy Chicken and Rice Recipe

Creamy Chicken and Rice Recipe, a few tips can make all the difference. These simple yet effective suggestions will help you achieve a dish that is not only delicious but also visually appealing. Let’s explore some key tips to elevate your cooking experience!

First, always start with high-quality ingredients. Fresh chicken, vibrant vegetables, and good-quality cream will enhance the overall flavor of your dish. When possible, choose organic or locally sourced products for the best taste.

Next, don’t rush the cooking process. Allow the chicken to brown properly before removing it from the skillet. This step adds depth to the flavor. Similarly, sauté the onions and garlic until they are fragrant and translucent. This builds a solid flavor base for your creamy sauce.

When adding the chicken broth and cream, stir gently to combine. This helps to incorporate all the flavors without breaking down the ingredients. If you want a thicker sauce, let it simmer a bit longer before adding the rice and vegetables.

Another important tip is to taste as you go. Adjust the seasoning gradually. A little salt or pepper can enhance the dish significantly. If you like a bit of heat, consider adding a pinch of red pepper flakes for a spicy kick.

For a creamier texture, consider adding a splash of white wine along with the chicken broth. This adds a layer of complexity to the flavor profile. Just remember to let it cook off for a minute before adding the cream.

Lastly, let your dish rest for a few minutes after cooking. This allows the flavors to meld together beautifully. When you serve it, the creamy sauce will be perfectly thick and rich, making every bite a delight.

Creamy Chicken and Rice Recipe. Enjoy the process and savor the delicious results!

Breakdown of Time for Creamy Chicken and Rice Recipe

Creamy Chicken and Rice Recipe can help you plan your cooking efficiently. Here’s a detailed breakdown of the time required for preparation and cooking. This will ensure that you can enjoy your meal without feeling rushed!

Prep Time

Creamy Chicken and Rice Recipe is approximately 15 minutes. During this time, you will gather all your ingredients, dice the chicken, chop the onion, and mince the garlic. If you’re using frozen vegetables, make sure to thaw them beforehand. Having everything ready will make the cooking process smoother and more enjoyable.

Cooking Time

The cooking time for this recipe is about 20 minutes. This includes browning the chicken, sautéing the onion and garlic, and simmering the sauce. Once you combine all the ingredients, allow them to heat through for about 5 minutes. This step is crucial for melding the flavors together and ensuring everything is cooked perfectly.

Total Time

Creamy Chicken and Rice Recipe to take around 35 minutes from start to finish. This makes it a quick and satisfying meal option for busy weeknights. With just a little bit of preparation and cooking, you’ll have a delicious dish ready to serve in no time!

Nutritional Information for Creamy Chicken and Rice Recipe

Creamy Chicken and Rice Recipe not only satisfies your taste buds but also provides valuable nutrients. Here’s a breakdown of the nutritional information per serving, so you can enjoy this dish while being mindful of your dietary needs.

Calories

Creamy Chicken and Rice Recipe contains approximately 480 calories. This calorie count makes it a hearty meal option, perfect for providing energy throughout the day. The combination of chicken, rice, and cream contributes to the overall caloric content, ensuring you feel full and satisfied after your meal.

Protein

Protein is a vital nutrient for building and repairing tissues, and this recipe delivers! Each serving provides about 32 grams of protein. The boneless, skinless chicken breasts are the primary source of protein in this dish, making it an excellent choice for those looking to increase their protein intake. This high protein content supports muscle health and keeps you feeling energized.

Sodium

Creamy Chicken and Rice Recipe contains around 800 milligrams. While sodium is necessary for various bodily functions, it’s important to monitor your intake. If you’re watching your sodium levels, consider using low-sodium chicken broth or adjusting the amount of added salt in the recipe. This way, you can enjoy the creamy goodness without compromising your health goals.

Creamy Chicken and Rice Recipe as part of a balanced diet. It’s a delicious way to fuel your body while savoring every bite!

FAQs about Creamy Chicken and Rice Recipe

Can I use brown rice instead of white rice in the Creamy Chicken and Rice Recipe?

Creamy Chicken and Rice Recipe. Brown rice adds a nutty flavor and is higher in fiber, making it a healthier option. However, keep in mind that brown rice takes longer to cook. You may need to adjust the cooking time accordingly. If you choose brown rice, it’s best to cook it separately before adding it to the creamy mixture. This way, you ensure that both the rice and the chicken are perfectly cooked!

How can I make the Creamy Chicken and Rice Recipe healthier?

Creamy Chicken and Rice Recipe healthier without sacrificing flavor. Here are some tips:

  • Use Leaner Protein: Opt for skinless chicken thighs or turkey for a leaner protein source.
  • Reduce the Cream: Substitute half-and-half or low-fat milk for heavy cream. This will lower the fat content while still keeping it creamy.
  • Add More Vegetables: Incorporate a variety of vegetables like spinach, zucchini, or bell peppers. This boosts the nutritional value and adds color.
  • Choose Whole Grains: As mentioned earlier, using brown rice or quinoa can increase fiber and nutrients.
  • Limit Sodium: Use low-sodium chicken broth and reduce added salt to keep sodium levels in check.

Creamy Chicken and Rice Recipe that still tastes delicious!

What can I serve with Creamy Chicken and Rice Recipe?

Creamy Chicken and Rice Recipe is a complete meal on its own, but pairing it with complementary sides can enhance your dining experience. Here are some great options:

  • Side Salad: A fresh green salad with a light vinaigrette can balance the richness of the dish.
  • Steamed Vegetables: Broccoli, green beans, or asparagus add color and nutrition to your plate.
  • Garlic Bread: A slice of warm garlic bread is perfect for soaking up the creamy sauce.
  • Fruit Salad: A light fruit salad can provide a refreshing contrast to the creamy flavors.

Creamy Chicken and Rice Recipe but also create a well-rounded meal that everyone will enjoy!

Can I make the Creamy Chicken and Rice Recipe in advance?

Creamy Chicken and Rice Recipe in advance! This dish is perfect for meal prep. Here’s how to do it:

  • Prepare Ahead: You can cook the chicken and prepare the creamy sauce a day in advance. Store them separately in airtight containers in the refrigerator.
  • Reheat Gently: When you’re ready to serve, reheat the chicken and sauce in a skillet over low heat. Add the cooked rice and stir until everything is heated through.
  • Storage: If you have leftovers, store them in the fridge for up to 3 days. Reheat thoroughly before serving.

Creamy Chicken and Rice Recipe in advance not only saves time but also allows the flavors to meld beautifully, making it even more delicious when you serve it!

Conclusion on Creamy Chicken and Rice Recipe

Creamy Chicken and Rice Recipe is a delightful dish that combines comfort and flavor in every bite. It’s a versatile recipe that can easily adapt to your preferences, making it a staple for any home cook. Whether you’re preparing a cozy family dinner or a meal for friends, this dish is sure to impress.

With its creamy texture and rich taste, it’s no wonder that this recipe has become a favorite for many. The combination of tender chicken, fluffy rice, and vibrant vegetables creates a satisfying meal that warms the heart. Plus, the ease of preparation means you can whip it up even on the busiest of weeknights.

As you explore the variations and tips provided, don’t hesitate to make this recipe your own. Experiment with different proteins, vegetables, and cooking methods to discover new flavors and textures. The possibilities are endless, and each version can bring something unique to your table.

Creamy Chicken and Rice Recipe. Your family and friends will surely appreciate the effort, and you’ll find joy in serving a dish that brings everyone together. Happy cooking!

Sticky Beef Noodles Recipe: A Quick Dinner Delight

Introduction to Sticky Beef Noodles Recipe

Welcome to the delightful world of Sticky Beef Noodles! This dish is not just a meal; it’s an experience that brings together flavors and textures in a way that will make your taste buds dance. If you’re looking for a quick, satisfying dinner that’s packed with protein and veggies, you’ve come to the right place. Sticky Beef Noodles are perfect for busy weeknights or when you want to impress your family and friends.

What Makes Sticky Beef Noodles Special?

So, what sets Sticky Beef Noodles apart from other noodle dishes? First, it’s all about the sauce. The combination of soy sauce, oyster sauce, and hoisin sauce creates a rich, savory flavor that clings to the noodles and beef. This sticky goodness is what gives the dish its name!

Moreover, the use of flank steak adds a tender and juicy element to the meal. When cooked just right, it melts in your mouth, making every bite a delight. The addition of fresh vegetables like bell peppers and snap peas not only adds color but also provides a satisfying crunch. Plus, they’re packed with nutrients!

Another fantastic aspect of this recipe is its versatility. You can easily swap out the beef for chicken, shrimp, or even tofu, making it suitable for various dietary preferences. Whether you’re a meat lover or a vegetarian, there’s a version of Sticky Beef Noodles just for you.

In short, Sticky Beef Noodles are a delicious, easy-to-make dish that brings a taste of Asian cuisine right to your kitchen. With its sticky sauce, tender beef, and vibrant veggies, it’s sure to become a family favorite. Let’s dive into the ingredients you’ll need to create this mouthwatering meal!

Ingredients for Sticky Beef Noodles Recipe

To create the perfect Sticky Beef Noodles, you’ll need a selection of fresh ingredients that come together to form a delicious meal. Here’s what you’ll need:

  • 1 pound flank steak: Thinly sliced against the grain for tenderness.
  • 8 ounces rice noodles: These will serve as the base of your dish.
  • 3 tablespoons soy sauce: Adds a savory depth to the flavor.
  • 2 tablespoons oyster sauce: Provides a rich umami taste.
  • 1 tablespoon hoisin sauce: Sweet and tangy, it enhances the overall flavor.
  • 1 tablespoon brown sugar: Balances the savory notes with a hint of sweetness.
  • 2 teaspoons sesame oil: Adds a nutty aroma and flavor.
  • 3 cloves garlic: Minced for a fragrant kick.
  • 1 inch ginger: Grated to bring warmth and spice.
  • 1 bell pepper: Sliced for color and crunch.
  • 1 cup snap peas: Adds freshness and a crisp texture.
  • 2 green onions: Chopped for garnish and flavor.
  • 1 tablespoon vegetable oil: For cooking the beef and vegetables.
  • Sesame seeds: Optional, for garnish and added crunch.

These ingredients come together to create a dish that is not only tasty but also visually appealing. The vibrant colors of the vegetables combined with the rich sauce make for a feast for the eyes as well as the palate. Now that you have your ingredients ready, let’s move on to the preparation steps to bring this Sticky Beef Noodles Recipe to life!

Preparation of Sticky Beef Noodles Recipe

Now that you have gathered all the ingredients, it’s time to prepare your Sticky Beef Noodles. This process is straightforward and will have your kitchen smelling amazing in no time. Let’s break it down into easy steps!

Step 1: Marinating the Beef

Start by marinating the flank steak. In a bowl, combine 2 tablespoons of soy sauce, 1 tablespoon of oyster sauce, and 1 tablespoon of hoisin sauce. Add the sliced beef to the bowl and mix well. Let it sit for about 15-20 minutes. This step is crucial as it allows the beef to absorb the flavors, making it tender and delicious.

Step 2: Preparing the Noodles

While the beef is marinating, cook the rice noodles according to the package instructions. Usually, this involves boiling them in water for a few minutes until they are soft. Once cooked, drain the noodles and rinse them under cold water to stop the cooking process. Set them aside for later use.

Step 3: Cooking the Beef

Next, heat 1 tablespoon of vegetable oil in a large skillet or wok over medium-high heat. Once the oil is hot, add the marinated beef. Cook for about 3-4 minutes, stirring frequently, until the beef is browned and cooked through. Be careful not to overcrowd the pan; you want the beef to sear nicely. Once done, remove the beef from the skillet and set it aside.

Step 4: Combining Ingredients

In the same skillet, add the minced garlic, grated ginger, sliced bell pepper, and snap peas. Stir-fry these ingredients for about 2-3 minutes until the vegetables are tender-crisp. This quick cooking method keeps the veggies vibrant and full of nutrients. After that, return the cooked beef to the skillet.

Step 5: Final Touches

Now, pour the remaining sauce mixture over the beef and vegetables. Stir well to combine everything. Cook for an additional 2 minutes, allowing the sauce to thicken slightly. Finally, add the cooked rice noodles to the skillet. Toss everything together until the noodles are well coated in the sticky sauce. Your Sticky Beef Noodles are almost ready!

Serve hot, garnished with chopped green onions and sesame seeds if desired. Enjoy the delightful flavors and textures of this amazing dish!

Variation of Sticky Beef Noodles Recipe

One of the best things about the Sticky Beef Noodles Recipe is its versatility. You can easily customize it to suit your taste or dietary needs. Whether you want to switch up the protein or explore vegetarian options, there are plenty of ways to make this dish your own. Let’s take a closer look at some alternative proteins and vegetarian options you can use!

Alternative Proteins to Use

If you’re not a fan of flank steak or simply want to try something different, there are several alternative proteins you can use in this recipe:

  • Chicken: Thinly sliced chicken breast or thighs can be a great substitute. They cook quickly and absorb flavors well, just like beef.
  • Pork: Pork tenderloin, sliced thinly, can add a different flavor profile. It’s tender and pairs nicely with the sticky sauce.
  • Shrimp: For a seafood twist, shrimp is a fantastic option. They cook quickly and add a delightful sweetness to the dish.
  • Tofu: For a plant-based option, firm tofu is perfect. It absorbs the sauce beautifully and provides a good source of protein.

Feel free to experiment with these proteins. Each one brings its unique taste and texture, making your Sticky Beef Noodles a new experience every time!

Vegetarian Options for Sticky Beef Noodles

If you’re looking for a vegetarian version of Sticky Beef Noodles, you can easily make some adjustments. Here are a few ideas:

  • Tofu or Tempeh: As mentioned earlier, tofu is a great protein source. Tempeh, which is fermented soybeans, can also be used for a nutty flavor and firmer texture.
  • Seitan: This wheat-based protein has a chewy texture that mimics meat. It’s perfect for those who want a hearty vegetarian option.
  • Mushrooms: Use a mix of shiitake, portobello, or button mushrooms for a rich, umami flavor. They add depth to the dish and are very satisfying.
  • Vegetable Medley: Load up on your favorite vegetables like broccoli, carrots, and zucchini. This not only enhances the flavor but also boosts the nutritional value.

By incorporating these vegetarian options, you can enjoy a delicious and satisfying meal that everyone will love. The key is to ensure that whatever protein you choose, it’s cooked well and coated in that sticky, flavorful sauce!

Cooking Note for Sticky Beef Noodles Recipe

When preparing your Sticky Beef Noodles, there are a few important cooking notes to keep in mind. These tips will help you achieve the best results and ensure that your dish turns out perfectly every time.

First, make sure to slice the flank steak against the grain. This technique helps to break down the muscle fibers, resulting in tender pieces of beef. If you slice with the grain, the meat can become tough and chewy.

Next, don’t skip the marinating step. Allowing the beef to soak in the sauce for at least 15-20 minutes enhances its flavor and tenderness. If you have more time, marinating for a few hours or even overnight in the refrigerator can deepen the taste even further.

When cooking the beef, ensure your skillet or wok is hot before adding the meat. A hot pan helps to sear the beef quickly, locking in juices and flavor. Avoid overcrowding the pan, as this can cause the beef to steam instead of sear. If necessary, cook the beef in batches.

As for the vegetables, remember to keep them crisp. Stir-frying them for just a few minutes will maintain their vibrant color and crunch. Overcooking can lead to mushy veggies, which detracts from the overall texture of the dish.

Finally, when combining the noodles with the beef and vegetables, toss gently but thoroughly. This ensures that every strand of noodle is coated in the sticky sauce, making each bite flavorful. If the noodles seem dry, you can add a splash of water or extra sauce to help them mix better.

By following these cooking notes, you’ll create a delicious Sticky Beef Noodles dish that’s sure to impress your family and friends. Happy cooking!

Serving Suggestions for Sticky Beef Noodles Recipe

Once your Sticky Beef Noodles are ready, it’s time to think about how to serve them. This dish is not only delicious on its own, but it can also be enhanced with some thoughtful side dishes and garnishes. Let’s explore some great serving suggestions that will elevate your meal!

Pairing with Side Dishes

To create a well-rounded meal, consider pairing your Sticky Beef Noodles with some tasty side dishes. Here are a few ideas:

  • Spring Rolls: These crispy delights are filled with fresh vegetables and can be served with a sweet chili dipping sauce. They add a nice crunch and complement the noodles perfectly.
  • Asian Slaw: A refreshing slaw made with cabbage, carrots, and a tangy dressing can provide a nice contrast to the rich flavors of the noodles.
  • Steamed Broccoli: Simple steamed broccoli adds a healthy touch. Its bright green color and mild flavor balance the dish beautifully.
  • Edamame: These young soybeans are not only nutritious but also fun to eat. They can be served warm or cold, sprinkled with sea salt for extra flavor.

These side dishes not only enhance the meal but also add variety to your dining experience. Feel free to mix and match based on your preferences!

Garnishing Ideas

Garnishing your Sticky Beef Noodles can make the dish look even more appealing. Here are some simple yet effective garnishing ideas:

  • Chopped Green Onions: Sprinkle some fresh green onions on top for a burst of color and flavor. They add a nice crunch and a mild onion taste.
  • Sesame Seeds: Toasted sesame seeds can add a nutty flavor and a bit of crunch. They also look great sprinkled over the dish.
  • Cilantro: Fresh cilantro can bring a bright, herbal note to the dish. If you enjoy its flavor, don’t hesitate to add a handful on top.
  • Red Pepper Flakes: For those who like a bit of heat, a sprinkle of red pepper flakes can add a spicy kick to your noodles.

These garnishes not only enhance the visual appeal of your Sticky Beef Noodles but also add layers of flavor. With these serving suggestions, you can create a delightful dining experience that everyone will enjoy!

Tips for Perfecting Your Sticky Beef Noodles Recipe

To make your Sticky Beef Noodles truly shine, consider these helpful tips. They will guide you in achieving the best flavor and texture, ensuring that every bite is a delight!

First, always use fresh ingredients. Fresh vegetables not only taste better but also add vibrant colors to your dish. Look for crisp snap peas and bright bell peppers to enhance the overall appeal.

Next, pay attention to the cooking time. Overcooking the beef can lead to a tough texture. Aim for a quick sear, just until the beef is browned. This keeps it juicy and tender.

When it comes to the noodles, make sure not to overcook them. Rice noodles should be al dente, meaning they should still have a slight bite. This will help them hold up when mixed with the sauce and other ingredients.

Another tip is to adjust the sauce to your taste. If you prefer a sweeter flavor, add a bit more brown sugar. For a saltier kick, increase the soy sauce. Taste as you go to find the perfect balance!

Don’t forget about the garnishes! They can elevate your dish from good to great. A sprinkle of sesame seeds or chopped green onions adds not just flavor but also a beautiful presentation.

Lastly, serve your Sticky Beef Noodles immediately after cooking. This ensures that the noodles remain warm and the sauce is still sticky. Enjoying the dish fresh will give you the best experience!

By following these tips, you’ll be well on your way to mastering the art of Sticky Beef Noodles. Your family and friends will be impressed with your culinary skills, and you’ll enjoy every delicious bite!

Breakdown of Time for Sticky Beef Noodles Recipe

Understanding the time needed for each step in the Sticky Beef Noodles Recipe can help you plan your cooking efficiently. Here’s a simple breakdown of the time required for preparation and cooking. This way, you can enjoy your meal without feeling rushed!

Prep Time

The prep time for Sticky Beef Noodles is approximately 30 minutes. This includes:

  • Gathering and measuring all your ingredients.
  • Marinating the flank steak for about 15-20 minutes.
  • Cooking the rice noodles, which usually takes around 10 minutes.
  • Chopping vegetables like bell peppers and green onions.

Taking your time during prep ensures that everything is ready when you start cooking. It makes the cooking process smoother and more enjoyable!

Cooking Time

The cooking time for this dish is about 10-15 minutes. Here’s how it breaks down:

  • Cooking the marinated beef takes about 3-4 minutes.
  • Stir-frying the vegetables will take around 2-3 minutes.
  • Combining the beef, vegetables, and noodles with the sauce will take an additional 2-3 minutes.

Cooking quickly at high heat helps to lock in flavors and keep the vegetables crisp. This is key to achieving that perfect sticky texture!

Total Time

In total, you can expect to spend about 40-45 minutes from start to finish. This includes both prep and cooking time. It’s a manageable timeframe for a delicious homemade meal that serves four people!

With this time breakdown, you can easily fit Sticky Beef Noodles into your busy schedule. Whether it’s a weeknight dinner or a weekend treat, you’ll have a tasty dish ready in no time!

Nutritional Information for Sticky Beef Noodles Recipe

Understanding the nutritional content of your meals is essential for maintaining a balanced diet. The Sticky Beef Noodles Recipe not only satisfies your taste buds but also provides a good amount of nutrients. Let’s break down the nutritional information for this delicious dish!

Calories

Each serving of Sticky Beef Noodles contains approximately 450 calories. This makes it a hearty meal that can keep you energized throughout the day. The combination of protein from the beef and carbohydrates from the rice noodles provides a balanced source of energy. If you’re watching your calorie intake, consider adjusting portion sizes or pairing it with lighter side dishes.

Protein Content

One of the standout features of this recipe is its protein content. Each serving offers about 30 grams of protein. This is primarily from the flank steak, which is an excellent source of high-quality protein. Protein is essential for muscle repair and growth, making this dish a great option for active individuals or anyone looking to maintain a healthy diet.

Sodium Levels

When it comes to sodium, each serving contains around 800 milligrams. This is mainly due to the soy sauce and oyster sauce used in the recipe. While sodium is necessary for bodily functions, it’s important to monitor your intake. If you’re concerned about sodium levels, consider using low-sodium soy sauce or reducing the amount of sauce in the recipe. This way, you can enjoy your Sticky Beef Noodles while keeping your sodium consumption in check.

In summary, the Sticky Beef Noodles Recipe is not only delicious but also provides a good balance of calories, protein, and sodium. By being mindful of your ingredients and portion sizes, you can enjoy this dish as part of a healthy and satisfying meal plan!

FAQs about Sticky Beef Noodles Recipe

Can I use different types of noodles for this recipe?

Absolutely! While rice noodles are the traditional choice for Sticky Beef Noodles, you can experiment with various types. For instance, egg noodles or udon noodles can be great alternatives. They offer a different texture and flavor, making your dish unique. Just remember to adjust the cooking time according to the type of noodles you choose. Enjoy the flexibility of this recipe!

How can I make Sticky Beef Noodles spicier?

If you love a bit of heat, there are several ways to spice up your Sticky Beef Noodles. One simple method is to add red pepper flakes to the sauce. You can also toss in sliced jalapeños or fresh chili peppers during the stir-fry. For an extra kick, consider using spicy chili sauce or sriracha. Adjust the spice level to your liking, and enjoy the fiery flavor!

What is the best way to store leftovers?

Storing leftovers properly is key to enjoying your Sticky Beef Noodles later. Allow the dish to cool completely before transferring it to an airtight container. You can store it in the refrigerator for up to 3 days. When reheating, add a splash of water or extra sauce to prevent the noodles from drying out. Heat it in a skillet over medium heat or in the microwave until warmed through. This way, you can savor the delicious flavors again!

Can I prepare Sticky Beef Noodles in advance?

Yes, you can prepare some components of Sticky Beef Noodles in advance! You can marinate the beef a few hours ahead or even overnight for deeper flavor. Additionally, you can chop the vegetables and cook the noodles ahead of time. Just store them separately in the refrigerator. When you’re ready to eat, simply stir-fry everything together and enjoy a quick, delicious meal!

Conclusion on Sticky Beef Noodles Recipe

In conclusion, the Sticky Beef Noodles Recipe is a delightful dish that combines savory flavors, tender beef, and vibrant vegetables. It’s not just a meal; it’s a celebration of taste and texture that can easily become a staple in your kitchen. With its simple preparation and quick cooking time, this recipe is perfect for busy weeknights or special occasions.

Whether you choose to stick with the classic flank steak or explore alternative proteins, the versatility of this dish allows you to cater to various dietary preferences. Plus, the option to customize the spice level and add your favorite vegetables makes it even more appealing. You can create a unique version of Sticky Beef Noodles that suits your taste buds!

As you gather your ingredients and follow the steps, remember to enjoy the process. Cooking is not just about the final dish; it’s about the joy of creating something delicious. With each stir and toss, you’re crafting a meal that will bring smiles to your family and friends.

So, why not give this Sticky Beef Noodles Recipe a try? With its rich flavors and satisfying textures, it’s sure to impress everyone at the table. Don’t forget to share your culinary creations and variations with others. Happy cooking, and enjoy every sticky, flavorful bite!

Hearty Ground Beef and Potatoes Skillet is delicious!

Introduction to Hearty Beef and Potatoes Skillet

Are you looking for a comforting meal that warms the heart and fills the belly? Look no further than the Hearty Beef and Potatoes Skillet! This dish is not only delicious but also incredibly easy to prepare. It combines the rich flavors of ground beef with tender potatoes, making it a perfect choice for busy weeknights or cozy family dinners.

The beauty of this recipe lies in its simplicity. With just a handful of ingredients, you can create a satisfying meal that everyone will love. The savory beef, combined with the earthy potatoes and aromatic spices, creates a delightful harmony of flavors. Plus, it’s a one-pan wonder, which means less cleanup for you!

Whether you’re a seasoned cook or a kitchen novice, this Hearty Beef and Potatoes Skillet is sure to impress. It’s versatile too! You can easily customize it by adding your favorite vegetables or swapping out the beef for another protein. This dish is not just a meal; it’s an experience that brings family and friends together around the table.

So, roll up your sleeves and get ready to dive into this delightful recipe. In the following sections, we’ll guide you through the ingredients, preparation steps, and tips to make your Hearty Beef and Potatoes Skillet a true masterpiece. Let’s get cooking!

Ingredients for Hearty Beef and Potatoes Skillet

To create a delicious Hearty Beef and Potatoes Skillet, you’ll need a few simple ingredients. Each one plays a vital role in building the rich flavors of this dish. Here’s what you’ll need:

  • 1 pound ground beef: This is the star of the dish, providing protein and flavor.
  • 4 medium potatoes, diced (about 4 cups): Potatoes add heartiness and texture, making the meal filling.
  • 1 medium onion, chopped: Onions bring sweetness and depth to the dish.
  • 2 cloves garlic, minced: Garlic adds a wonderful aroma and enhances the overall flavor.
  • 1 cup beef broth: This adds moisture and richness to the skillet.
  • 1 tablespoon Worcestershire sauce: A splash of this sauce gives a savory kick.
  • 1 teaspoon paprika: Paprika adds a hint of smokiness and color.
  • 1 teaspoon dried oregano: Oregano brings a touch of earthiness.
  • Salt and pepper to taste: Essential for seasoning and enhancing flavors.
  • 2 tablespoons olive oil: Used for sautéing the vegetables and beef.
  • 1 cup shredded cheddar cheese (optional): Cheese adds creaminess and a delicious topping.
  • Fresh parsley, chopped (for garnish, optional): Parsley adds a pop of color and freshness.

Gathering these ingredients is the first step toward creating your Hearty Beef and Potatoes Skillet. Each component contributes to the overall taste and texture, making this dish a delightful experience. Now that you have everything ready, let’s move on to the preparation steps!

Step-by-Step Preparation of Hearty Beef and Potatoes Skillet

Now that you have all your ingredients ready, it’s time to dive into the cooking process! This Hearty Beef and Potatoes Skillet comes together in just a few simple steps. Follow along to create a delicious meal that your family will love.

Step 1: Preparing the Ingredients

Before you start cooking, it’s important to prepare your ingredients. Begin by washing and peeling the potatoes. Then, dice them into small cubes, about one inch in size. This helps them cook evenly. Next, chop the onion and mince the garlic. Having everything ready will make the cooking process smooth and enjoyable.

Step 2: Cooking the Beef

In a large skillet, heat the olive oil over medium heat. Once the oil is hot, add the chopped onion and minced garlic. Sauté them for about 3-4 minutes until the onion becomes translucent. This step releases wonderful aromas that will fill your kitchen!

Next, add the ground beef to the skillet. Use a spatula to break it apart as it cooks. Stir it occasionally, allowing it to brown evenly. This should take about 5-7 minutes. If there’s excess fat, feel free to drain it off. This keeps your dish from becoming too greasy.

Step 3: Adding the Potatoes

Once the beef is browned, it’s time to add the diced potatoes. Stir them into the skillet, ensuring they mix well with the beef. Then, pour in the beef broth. This will add moisture and flavor to the dish. Don’t forget to add the Worcestershire sauce, which gives a savory kick!

Step 4: Incorporating Vegetables and Seasonings

Now, it’s time to season your Hearty Beef and Potatoes Skillet. Sprinkle in the paprika, dried oregano, salt, and pepper. These spices will enhance the flavors and make your dish even more delicious. Stir everything together, making sure the potatoes are well-coated with the seasonings.

Step 5: Simmering for Flavor

Bring the mixture to a boil, then reduce the heat to low. Cover the skillet with a lid and let it simmer for about 20-25 minutes. This allows the potatoes to become tender and absorb all the wonderful flavors. Stir occasionally to prevent sticking. If you’re using cheese, sprinkle it on top during the last 5 minutes of cooking. This will melt beautifully and add a creamy texture!

Once everything is cooked to perfection, remove the skillet from heat. If you like, garnish with fresh parsley for a pop of color. Your Hearty Beef and Potatoes Skillet is now ready to serve!

Variation of Hearty Beef and Potatoes Skillet

While the classic Hearty Beef and Potatoes Skillet is a favorite, there are many ways to switch things up! Variations can enhance flavors and cater to different dietary preferences. Let’s explore some alternative ingredients and cooking methods that can make this dish even more exciting.

Alternative Ingredients to Consider

One of the best things about the Hearty Beef and Potatoes Skillet is its versatility. Here are some alternative ingredients you might want to try:

  • Ground Turkey or Chicken: For a leaner option, swap out the ground beef for ground turkey or chicken. This change reduces fat while still providing protein.
  • Sweet Potatoes: Instead of regular potatoes, use sweet potatoes for a slightly sweeter flavor and added nutrients. They also bring a beautiful color to the dish!
  • Mixed Vegetables: Add bell peppers, carrots, or peas to boost the nutrition and flavor. These veggies add color and crunch, making the dish more appealing.
  • Spices and Herbs: Experiment with different spices like cumin or thyme. Fresh herbs like basil or cilantro can also add a fresh twist.
  • Cheese Variations: Instead of cheddar, try using mozzarella or pepper jack cheese for a different taste. Each cheese brings its unique flavor profile.

These alternative ingredients can help you create a Hearty Beef and Potatoes Skillet that suits your taste and dietary needs. Feel free to mix and match to find your perfect combination!

Different Cooking Methods

In addition to ingredient variations, you can also explore different cooking methods for your Hearty Beef and Potatoes Skillet. Here are a few options:

  • Oven-Baked: After sautéing the beef and vegetables, transfer everything to a baking dish. Cover with foil and bake at 375°F for about 30-35 minutes. This method allows the flavors to meld beautifully.
  • Slow Cooker: For a hands-off approach, combine all ingredients in a slow cooker. Cook on low for 6-8 hours or high for 3-4 hours. This method results in tender potatoes and flavorful beef.
  • Instant Pot: If you’re short on time, use an Instant Pot. Sauté the beef and vegetables, then add the broth and potatoes. Cook on high pressure for about 10 minutes, followed by a quick release.

These cooking methods can add variety to your Hearty Beef and Potatoes Skillet experience. Choose the one that fits your schedule and enjoy a delicious meal!

Cooking Note for Hearty Beef and Potatoes Skillet

When preparing your Hearty Beef and Potatoes Skillet, a few cooking notes can help ensure your dish turns out perfectly every time. These tips will enhance the flavors and textures, making your meal even more enjoyable.

First, always choose a large skillet. A spacious pan allows for even cooking and prevents overcrowding. This is important because it helps the beef brown nicely and the potatoes cook evenly. If your skillet is too small, the ingredients may steam instead of sauté, which can affect the overall flavor.

Next, consider the type of ground beef you use. Lean ground beef is a great option, as it has less fat. However, if you prefer a richer flavor, you can opt for a higher fat content. Just remember to drain any excess fat after browning the meat to keep your dish from becoming greasy.

When adding the potatoes, make sure they are cut into uniform pieces. This ensures they cook at the same rate. If some pieces are larger than others, you may end up with some that are undercooked while others are mushy. Aim for about one-inch cubes for the best results.

Lastly, don’t rush the simmering process. Allowing the dish to simmer for the full 20-25 minutes is crucial. This step helps the potatoes absorb the flavors from the beef and seasonings, resulting in a more delicious meal. Stir occasionally to prevent sticking and ensure even cooking.

By following these cooking notes, you’ll create a Hearty Beef and Potatoes Skillet that is not only tasty but also satisfying. Enjoy the process and the delightful aromas that fill your kitchen as you cook!

Serving Suggestions for Hearty Beef and Potatoes Skillet

Once your Hearty Beef and Potatoes Skillet is ready, it’s time to think about how to serve it! This dish is not only filling but also versatile, making it easy to pair with various sides and garnishes. Here are some delightful serving suggestions to elevate your meal:

  • Fresh Salad: A crisp green salad is a perfect complement to the hearty skillet. Consider a simple mix of lettuce, tomatoes, cucumbers, and a light vinaigrette. The freshness of the salad balances the richness of the beef and potatoes.
  • Crusty Bread: Serve your Hearty Beef and Potatoes Skillet with slices of crusty bread or dinner rolls. This is great for soaking up the delicious juices from the skillet, making every bite even more enjoyable.
  • Steamed Vegetables: Add a side of steamed vegetables like broccoli, green beans, or carrots. These colorful veggies not only enhance the meal’s nutrition but also add a lovely visual appeal.
  • Pickles or Relish: For a tangy twist, consider serving pickles or a side of relish. The acidity cuts through the richness of the dish, providing a delightful contrast.
  • Garnish with Cheese: If you didn’t add cheese during cooking, consider sprinkling some shredded cheese on top just before serving. This adds a creamy texture and extra flavor.
  • Hot Sauce: For those who enjoy a bit of heat, offer hot sauce on the side. A few dashes can elevate the flavors and add a spicy kick!

These serving suggestions can help you create a well-rounded meal that everyone will love. Feel free to mix and match based on your preferences and what you have on hand. The Hearty Beef and Potatoes Skillet is a fantastic centerpiece, and with these sides, you’ll have a complete and satisfying dinner!

Tips for Perfecting Hearty Beef and Potatoes Skillet

To make your Hearty Beef and Potatoes Skillet truly shine, consider these helpful tips. They will enhance the flavors and ensure a delightful dining experience for you and your loved ones.

  • Use Fresh Ingredients: Fresh vegetables and quality ground beef can make a big difference in taste. Whenever possible, choose fresh produce and high-quality meat for the best flavor.
  • Season Gradually: Start with a little salt and pepper, then taste as you go. This allows you to adjust the seasoning to your liking without overpowering the dish.
  • Don’t Skip the Browning: Browning the beef properly adds depth to the flavor. Make sure to let it cook without stirring too much at first, allowing it to develop a nice crust.
  • Experiment with Spices: Feel free to add your favorite spices or herbs. A pinch of cayenne pepper or a dash of Italian seasoning can elevate the dish even further.
  • Check Potato Doneness: Potatoes can vary in cooking time. Check for tenderness by piercing them with a fork. They should be soft but not mushy.
  • Let It Rest: After cooking, let the skillet sit for a few minutes before serving. This allows the flavors to meld together, making each bite even more delicious.
  • Customize to Taste: Don’t hesitate to make this dish your own! Add your favorite vegetables or adjust the spices to suit your family’s preferences.

By following these tips, you’ll create a Hearty Beef and Potatoes Skillet that is not only delicious but also a joy to prepare. Enjoy the process and the wonderful meal that awaits!

Breakdown of Time for Hearty Beef and Potatoes Skillet

Understanding the time needed for each step in preparing your Hearty Beef and Potatoes Skillet can help you plan your cooking efficiently. Here’s a simple breakdown of the time involved:

Prep Time

Preparing your ingredients is the first step. This includes washing, peeling, and dicing the potatoes, chopping the onion, and mincing the garlic. Expect to spend about 10-15 minutes on this task. Having everything ready will make the cooking process smoother and more enjoyable.

Cooking Time

The actual cooking time for the Hearty Beef and Potatoes Skillet is approximately 30-35 minutes. This includes browning the beef, sautéing the vegetables, and simmering the dish until the potatoes are tender. It’s important to keep an eye on the skillet and stir occasionally to ensure even cooking.

Total Time

In total, you should plan for about 45-50 minutes from start to finish. This includes both prep and cooking time. With this efficient timeline, you can have a delicious meal ready in no time!

By keeping track of the time for each step, you can ensure that your Hearty Beef and Potatoes Skillet turns out perfectly every time. Enjoy the process and the delightful meal that awaits!

Nutritional Information for Hearty Beef and Potatoes Skillet

Understanding the nutritional content of your meals is essential for maintaining a balanced diet. The Hearty Beef and Potatoes Skillet is not only delicious but also provides a good mix of nutrients. Here’s a breakdown of the nutritional information per serving:

Calories

Each serving of the Hearty Beef and Potatoes Skillet contains approximately 450 calories. This makes it a satisfying meal that can keep you energized throughout the day. The combination of protein from the beef and carbohydrates from the potatoes provides a balanced source of energy.

Protein

With about 30 grams of protein per serving, this dish is an excellent choice for those looking to increase their protein intake. Protein is vital for muscle repair and growth, making this skillet a great post-workout meal.

Sodium

The sodium content in the Hearty Beef and Potatoes Skillet is around 800 mg per serving. While sodium is necessary for bodily functions, it’s important to monitor your intake. You can reduce sodium by using low-sodium beef broth or limiting added salt during cooking.

Overall, the Hearty Beef and Potatoes Skillet offers a well-rounded meal that is both nutritious and satisfying. By being mindful of the ingredients and portion sizes, you can enjoy this dish while maintaining a healthy lifestyle.

Nutritional Information for Hearty Beef and Potatoes Skillet

Understanding the nutritional content of your meals is essential for maintaining a balanced diet. The Hearty Beef and Potatoes Skillet is not only delicious but also provides a good mix of nutrients. Here’s a breakdown of the nutritional information per serving:

Calories

Each serving of the Hearty Beef and Potatoes Skillet contains approximately 450 calories. This makes it a satisfying meal that can keep you energized throughout the day. The combination of protein from the beef and carbohydrates from the potatoes provides a balanced source of energy. If you’re looking to manage your calorie intake, consider adjusting portion sizes or adding more vegetables to the mix.

Protein

With about 30 grams of protein per serving, this dish is an excellent choice for those looking to increase their protein intake. Protein is vital for muscle repair and growth, making this skillet a great post-workout meal. The ground beef serves as a rich source of protein, which is essential for maintaining muscle mass and overall health.

Sodium

The sodium content in the Hearty Beef and Potatoes Skillet is around 800 mg per serving. While sodium is necessary for bodily functions, it’s important to monitor your intake. You can reduce sodium by using low-sodium beef broth or limiting added salt during cooking. This way, you can enjoy the flavors without worrying too much about sodium levels.

Overall, the Hearty Beef and Potatoes Skillet offers a well-rounded meal that is both nutritious and satisfying. By being mindful of the ingredients and portion sizes, you can enjoy this dish while maintaining a healthy lifestyle. Remember, balance is key, and this dish can fit nicely into a varied diet!

FAQs about Hearty Beef and Potatoes Skillet

Can I use different types of meat in Hearty Beef and Potatoes Skillet?

Absolutely! The Hearty Beef and Potatoes Skillet is very versatile. You can substitute ground beef with ground turkey, chicken, or even plant-based meat alternatives. Each option brings its unique flavor and texture. Just remember to adjust cooking times slightly, as leaner meats may cook faster than beef. This flexibility allows you to cater to different dietary preferences while still enjoying a delicious meal!

How can I make Hearty Beef and Potatoes Skillet healthier?

There are several ways to make your Hearty Beef and Potatoes Skillet healthier. First, consider using lean ground meat, such as turkey or chicken, to reduce fat content. You can also increase the vegetable content by adding bell peppers, spinach, or carrots. Using sweet potatoes instead of regular potatoes can add more nutrients and fiber. Additionally, opt for low-sodium beef broth to keep sodium levels in check. These simple swaps can enhance the nutritional value of your dish without sacrificing flavor!

What are some side dishes that pair well with Hearty Beef and Potatoes Skillet?

When serving your Hearty Beef and Potatoes Skillet, consider pairing it with a fresh side salad or steamed vegetables. A crisp green salad with a light vinaigrette complements the richness of the skillet. You can also serve it with crusty bread or dinner rolls to soak up the delicious juices. For a heartier option, consider roasted vegetables or a side of coleslaw. These sides not only add variety but also enhance the overall meal experience!

Can I prepare Hearty Beef and Potatoes Skillet in advance?

Yes, you can prepare the Hearty Beef and Potatoes Skillet in advance! This dish stores well in the refrigerator for up to three days. To do this, simply cook the skillet as directed, let it cool, and then transfer it to an airtight container. When you’re ready to enjoy it, reheat on the stove or in the microwave until heated through. This makes it a great option for meal prep or busy weeknights when you want a quick and satisfying dinner!

Conclusion on Hearty Beef and Potatoes Skillet

In conclusion, the Hearty Beef and Potatoes Skillet is a delightful dish that brings comfort and satisfaction to the dinner table. With its simple ingredients and straightforward preparation, it’s perfect for both novice cooks and seasoned chefs alike. This recipe not only fills the belly but also warms the heart, making it an ideal choice for family gatherings or cozy weeknight meals.

As you’ve seen, the versatility of this dish allows for endless customization. Whether you choose to swap out the ground beef for turkey, add a variety of vegetables, or experiment with different spices, the Hearty Beef and Potatoes Skillet can easily adapt to your taste preferences. This flexibility ensures that you can enjoy it time and time again without it ever feeling repetitive.

Moreover, the nutritional benefits of this meal make it a smart choice for those looking to maintain a balanced diet. With a good mix of protein, carbohydrates, and essential vitamins, it provides the energy needed for a busy day. Plus, the option to prepare it in advance makes it a convenient option for meal planning.

So, gather your ingredients, follow the steps, and enjoy the process of creating this hearty dish. As the aroma fills your kitchen, you’ll know you’re in for a treat. The Hearty Beef and Potatoes Skillet is more than just a meal; it’s a way to bring loved ones together and create lasting memories around the table. Happy cooking!

Honey Garlic Chicken Breasts Recipe is a must-try!

Introduction to Honey Garlic Chicken Breasts Recipe

Honey Garlic Chicken Breasts Recipe is a perfect choice. This dish combines the sweetness of honey with the savory flavor of garlic, creating a mouthwatering experience that everyone will love.

Not only is this recipe simple to prepare, but it also requires minimal ingredients. With just a few pantry staples, you can whip up a delightful dinner in no time. The chicken breasts become tender and juicy, soaking up the rich marinade that enhances their flavor. Plus, it’s a versatile dish that can be served in various ways, making it suitable for any occasion.

Whether you’re cooking for a weeknight dinner or a special gathering, this recipe is sure to be a hit. The combination of sweet and savory notes will tantalize your taste buds, leaving you wanting more. So, roll up your sleeves and get ready to create a dish that’s not only satisfying but also healthy!

In the following sections, we will guide you through the ingredients, preparation steps, and some exciting variations of this delightful recipe. Let’s dive in and discover how to make the perfect Honey Garlic Chicken Breasts!

Ingredients for Honey Garlic Chicken Breasts Recipe

Honey Garlic Chicken Breasts Recipe, you will need a few simple ingredients. These items are easy to find and can be found in most kitchens. Here’s what you’ll need:

  • 2 boneless, skinless chicken breasts (about 1 pound total)
  • 1/4 cup honey
  • 1/4 cup soy sauce
  • 2 cloves garlic, minced
  • 1 tablespoon olive oil
  • 1 teaspoon ground ginger
  • 1/2 teaspoon black pepper
  • 1/4 teaspoon red pepper flakes (optional)
  • 2 green onions, sliced (for garnish)

These ingredients come together to create a delightful marinade that infuses the chicken with flavor. The honey adds a touch of sweetness, while the soy sauce provides a savory depth. Garlic and ginger bring aromatic notes, making each bite a burst of flavor.

Feel free to adjust the ingredients to suit your taste. For instance, if you prefer a spicier dish, you can increase the amount of red pepper flakes. On the other hand, if you like it sweeter, adding a bit more honey can enhance the flavor profile. The beauty of this recipe lies in its flexibility!

Now that you have gathered all the ingredients, you are ready to move on to the next step: preparing the chicken for marinating. Let’s get started!

Step-by-Step Preparation of Honey Garlic Chicken Breasts Recipe

Honey Garlic Chicken Breasts Recipe. This section will guide you through each step, ensuring that your chicken turns out flavorful and juicy. Let’s get started!

Step 1: Marinating the Chicken

The first step in creating this delicious dish is marinating the chicken. Marinating helps to infuse the chicken with flavor and keeps it moist during cooking. Here’s how to do it:

  • In a small bowl, whisk together the honey, soy sauce, minced garlic, olive oil, ground ginger, black pepper, and red pepper flakes (if you’re using them).
  • Once mixed, set aside half of the marinade for later use. This reserved marinade will be used to glaze the chicken at the end.
  • Next, place the chicken breasts in a resealable plastic bag or a shallow dish.
  • Pour the remaining marinade over the chicken, ensuring it’s well-coated.
  • Seal the bag or cover the dish and refrigerate for at least 30 minutes. For even more flavor, marinate for up to 2 hours.

Marinating is a crucial step, so don’t skip it! The longer the chicken sits in the marinade, the more flavorful it will be.

Step 2: Preparing the Honey Garlic Sauce

While the chicken is marinating, you can prepare the honey garlic sauce. This sauce will add an extra layer of flavor to your dish. Here’s how to do it:

  • Take the reserved marinade that you set aside earlier.
  • Pour it into a small saucepan and bring it to a gentle simmer over medium heat.
  • Let it simmer for about 5 minutes. This will help to thicken the sauce and enhance its flavors.
  • Once thickened, remove it from the heat and set it aside. This sauce will be used to glaze the chicken later.

By preparing the sauce in advance, you’ll save time when it’s time to cook the chicken. Plus, it ensures that the flavors meld beautifully!

Step 3: Cooking the Chicken Breasts

Now that your chicken is marinated and your sauce is ready, it’s time to cook the chicken. Follow these steps for perfectly cooked chicken breasts:

  • Preheat your grill or stovetop skillet over medium-high heat.
  • Remove the chicken from the marinade and discard the used marinade. This is important for food safety.
  • Place the chicken breasts on the grill or skillet.
  • Cook the chicken for about 6-7 minutes on each side. You want the internal temperature to reach 165°F.
  • As the chicken cooks, it should develop a beautiful golden brown color.

Cooking the chicken properly is key to achieving that juicy texture. Make sure to keep an eye on the temperature!

Step 4: Glazing the Chicken with Sauce

The final step is to glaze the chicken with the honey garlic sauce. This will add a delicious finish to your dish. Here’s how to do it:

  • During the last minute of cooking, brush the reserved honey garlic sauce over the chicken.
  • This will create a sticky, flavorful glaze that enhances the overall taste.
  • Once cooked, remove the chicken from the heat and let it rest for about 5 minutes before slicing.

Letting the chicken rest allows the juices to redistribute, making each bite tender and juicy. Now, you’re ready to serve your delicious Honey Garlic Chicken Breasts!

Variations of Honey Garlic Chicken Breasts Recipe

Honey Garlic Chicken Breasts Recipe is not only delicious on its own, but it also offers plenty of room for creativity. You can easily customize this dish to suit your taste or to incorporate seasonal ingredients. Here are a couple of exciting variations to try!

Honey Garlic Chicken Breasts Recipe with Vegetables

Honey Garlic Chicken Breasts Recipe can enhance both the flavor and nutrition of the dish. Here’s how to do it:

  • Choose your favorite vegetables, such as bell peppers, broccoli, or snap peas.
  • Chop the vegetables into bite-sized pieces.
  • After marinating the chicken, toss the vegetables in the remaining marinade.
  • Grill or sauté the vegetables alongside the chicken for about 5-7 minutes, or until they are tender-crisp.
  • Serve the chicken and vegetables together, drizzled with the reserved honey garlic sauce.

This variation not only adds color to your plate but also provides a balanced meal. The sweetness of the honey garlic sauce pairs beautifully with the fresh crunch of the vegetables!

Spicy Honey Garlic Chicken Breasts Recipe

Honey Garlic Chicken Breasts Recipe is perfect for you. Here’s how to spice things up:

  • Increase the amount of red pepper flakes in the marinade to suit your spice preference.
  • For an extra kick, add a tablespoon of sriracha or your favorite hot sauce to the marinade.
  • Follow the original recipe for marinating and cooking the chicken.
  • During the last minute of cooking, brush the chicken with the reserved marinade, just like in the original recipe.

This spicy version will tantalize your taste buds and add an exciting twist to your meal. Pair it with a cooling side, like a cucumber salad, to balance the heat!

Honey Garlic Chicken Breasts Recipe can be. Feel free to experiment with different ingredients and flavors to make it your own!

Cooking Note for Honey Garlic Chicken Breasts Recipe

Honey Garlic Chicken Breasts Recipe, there are a few important cooking notes to keep in mind. These tips will help ensure that your chicken turns out perfectly every time, making your meal a delightful experience.

First, always ensure that your chicken breasts are of uniform thickness. If they are uneven, consider pounding them gently with a meat mallet. This helps them cook evenly, preventing some parts from drying out while others remain undercooked.

Next, monitor the cooking temperature closely. Using a meat thermometer is a great way to check if your chicken has reached the safe internal temperature of 165°F. This ensures that the chicken is fully cooked and safe to eat, while also keeping it juicy and tender.

Another tip is to let the chicken rest after cooking. Allowing it to sit for about 5 minutes before slicing helps the juices redistribute throughout the meat. This simple step can make a big difference in the overall texture and flavor of your dish.

Lastly, don’t forget about the marinade! The reserved honey garlic sauce adds a wonderful glaze to the chicken. Brushing it on during the last minute of cooking enhances the flavor and gives the chicken a beautiful, sticky finish.

Honey Garlic Chicken Breasts Recipe to new heights. Enjoy the process and savor the delicious results!

Serving Suggestions for Honey Garlic Chicken Breasts Recipe

Honey Garlic Chicken Breasts Recipe, it’s time to think about how to serve it. The right sides can elevate your meal and create a well-rounded dining experience. Here are some delightful serving suggestions to complement your chicken:

  • Steamed Rice: A classic choice! Serve the chicken over a bed of fluffy steamed rice. The rice will soak up the sweet and savory sauce, making each bite even more enjoyable.
  • Quinoa: For a healthier option, try serving the chicken with quinoa. This protein-packed grain adds a nutty flavor and pairs beautifully with the honey garlic sauce.
  • Vegetable Stir-Fry: Enhance your meal with a colorful vegetable stir-fry. Use seasonal veggies like bell peppers, broccoli, and snap peas. The crunchiness of the vegetables adds texture and nutrition.
  • Salad: A fresh salad can balance the richness of the chicken. Consider a simple green salad with a light vinaigrette or a cucumber salad to cool down the palate.
  • Mashed Potatoes: For a comforting side, serve the chicken with creamy mashed potatoes. The potatoes can be drizzled with the honey garlic sauce for extra flavor.
  • Grilled Corn: If you’re grilling the chicken, why not grill some corn on the cob as well? The sweet corn complements the honey in the chicken perfectly.

Don’t forget to garnish your dish! A sprinkle of sliced green onions adds a pop of color and a fresh flavor that brightens the meal. You can also drizzle a little extra honey over the chicken for a sweet finish.

Honey Garlic Chicken Breasts Recipe will shine on the dinner table. Enjoy the delightful combination of flavors and textures, and watch your family and friends savor every bite!

Tips for Perfect Honey Garlic Chicken Breasts Recipe

Honey Garlic Chicken Breasts Recipe, consider these helpful tips. They will ensure that your chicken turns out flavorful, juicy, and perfectly cooked every time.

  • Choose Quality Chicken: Start with fresh, high-quality chicken breasts. Organic or free-range chicken often has better flavor and texture.
  • Marinate Longer: For maximum flavor, marinate the chicken for at least 2 hours, or even overnight if you have the time. This allows the flavors to penetrate deeply.
  • Use a Meat Thermometer: To avoid overcooking, use a meat thermometer to check the internal temperature. Aim for 165°F for perfectly cooked chicken.
  • Let It Rest: After cooking, let the chicken rest for 5 minutes before slicing. This helps the juices redistribute, keeping the meat moist.
  • Adjust the Sweetness: If you prefer a sweeter dish, feel free to add more honey to the marinade. Taste it before marinating to find your perfect balance.
  • Experiment with Flavors: Don’t hesitate to add your favorite herbs or spices to the marinade. Fresh thyme, rosemary, or even a splash of lime juice can enhance the flavor.
  • Grill or Sear: For a delicious crust, consider grilling or searing the chicken. This adds a smoky flavor and a nice texture to the dish.
  • Serve Immediately: Honey garlic chicken is best enjoyed fresh. Serve it right after cooking for the best taste and texture.

Honey Garlic Chicken Breasts Recipe that’s not only delicious but also a crowd-pleaser. Enjoy the process and the delightful flavors that come with it!

Breakdown of Time for Honey Garlic Chicken Breasts Recipe

Honey Garlic Chicken Breasts Recipe can help you plan your meal better. Here’s a detailed breakdown of the time needed for preparation and cooking:

Prep Time

The prep time for this recipe is quite manageable. Here’s what to expect:

  • Gathering ingredients: 5 minutes
  • Marinating the chicken: 30 minutes (or up to 2 hours for more flavor)
  • Preparing the honey garlic sauce: 5 minutes

In total, the prep time can range from 40 minutes to 2 hours, depending on how long you choose to marinate the chicken. If you’re short on time, a 30-minute marinade will still yield delicious results!

Cooking Time

Once your chicken is marinated and your sauce is ready, the cooking time is quick:

  • Cooking the chicken: 12-14 minutes (6-7 minutes on each side)
  • Glazing the chicken: 1 minute

So, the total cooking time is about 13-15 minutes. This means you can have a flavorful meal ready in no time!

Total Time

When you combine both prep and cooking times, here’s the total time you’ll need:

  • Minimum total time: 53 minutes (30 minutes marinating + 13 minutes cooking)
  • Maximum total time: 2 hours and 15 minutes (2 hours marinating + 15 minutes cooking)

Honey Garlic Chicken Breasts Recipe fits perfectly into your meal planning!

Nutritional Information for Honey Garlic Chicken Breasts Recipe

Honey Garlic Chicken Breasts Recipe not only offers delicious flavors but also provides valuable nutrients. Here’s a breakdown of the nutritional information per serving:

Calories

Honey Garlic Chicken Breasts Recipe contains approximately 310 calories. This makes it a satisfying option for dinner without being overly heavy. The combination of protein and healthy fats helps keep you full and energized.

Protein

Protein is a vital nutrient for building and repairing tissues. In this recipe, you’ll find about 30 grams of protein per serving. Chicken breasts are an excellent source of lean protein, making this dish a great choice for those looking to increase their protein intake.

Sodium

When it comes to sodium, this recipe contains around 800 milligrams per serving. The soy sauce contributes to the sodium content, so if you’re watching your salt intake, consider using low-sodium soy sauce. This small adjustment can help you enjoy the flavors without compromising your dietary needs.

Honey Garlic Chicken Breasts Recipe is a nutritious option that balances flavor and health. With its rich protein content and moderate calorie count, it’s perfect for a wholesome meal. Enjoy this dish knowing you’re nourishing your body while delighting your taste buds!

FAQs about Honey Garlic Chicken Breasts Recipe

Can I use chicken thighs instead of breasts for this recipe?

Honey Garlic Chicken Breasts Recipe. Chicken thighs are often juicier and more flavorful due to their higher fat content. Just keep in mind that thighs may take a little longer to cook. Ensure they reach an internal temperature of 165°F for safe consumption. The marinade will work wonderfully with thighs, giving you a deliciously tender and flavorful dish!

How can I make the sauce thicker for the Honey Garlic Chicken Breasts Recipe?

Honey Garlic Chicken Breasts Recipe, there are a couple of easy methods to achieve this. One option is to simmer the reserved marinade for a longer time. This will help reduce the liquid and concentrate the flavors. Another method is to mix a teaspoon of cornstarch with a tablespoon of cold water to create a slurry. Stir this mixture into the simmering sauce and cook for an additional minute until it thickens. Both methods will give you a rich, sticky glaze that clings beautifully to the chicken!

What sides pair well with Honey Garlic Chicken Breasts Recipe?

Honey Garlic Chicken Breasts Recipe pairs well with a variety of options. Here are some delicious suggestions:

  • Steamed Vegetables: Broccoli, carrots, or green beans add color and nutrition.
  • Rice or Quinoa: Both options soak up the sauce and complement the flavors perfectly.
  • Salads: A fresh garden salad or a cucumber salad can balance the sweetness of the chicken.
  • Mashed Potatoes: Creamy mashed potatoes provide a comforting side that pairs well with the honey garlic sauce.
  • Grilled Corn: Sweet corn on the cob is a great addition, especially during summer barbecues.

These sides will enhance your meal and create a well-rounded dining experience. Enjoy experimenting with different combinations!

Conclusion on Honey Garlic Chicken Breasts Recipe

Honey Garlic Chicken Breasts Recipe is a delightful dish that brings together the perfect balance of sweet and savory flavors. With its simple ingredients and easy preparation, it’s an ideal choice for both busy weeknights and special occasions. The tender chicken, infused with a rich marinade, is sure to impress your family and friends.

Throughout this article, we’ve explored various aspects of the recipe, from the essential ingredients to step-by-step preparation. We’ve also discussed exciting variations and serving suggestions that can elevate your meal. Whether you choose to add vegetables or spice things up, the versatility of this dish allows you to customize it to your liking.

Honey Garlic Chicken Breasts Recipe lies in marinating the chicken properly and cooking it to the right temperature. By following the tips and techniques shared in this article, you can create a flavorful and satisfying meal that everyone will love.

So, why not give this recipe a try? Gather your ingredients, roll up your sleeves, and enjoy the process of cooking. The delicious aroma of honey and garlic will fill your kitchen, making it a warm and inviting space. Once you take that first bite, you’ll understand why this dish is a favorite among many.

Honey Garlic Chicken Breasts Recipe. Happy cooking!

Grilled Chicken Cobb Salad Recipe is a must-try dish!

Introduction to Grilled Chicken Cobb Salad Recipe

The Grilled Chicken Cobb Salad is a delightful dish that combines fresh ingredients with savory flavors. This salad is not just a meal; it’s a celebration of textures and tastes. With juicy grilled chicken, crisp vegetables, and creamy avocado, it’s a feast for both the eyes and the palate. Whether you’re looking for a healthy lunch or a light dinner, this recipe fits the bill perfectly.

What Makes the Grilled Chicken Cobb Salad Recipe Special?

What sets the Grilled Chicken Cobb Salad apart is its versatility. You can customize it to suit your taste preferences or dietary needs. The combination of protein, healthy fats, and fresh veggies makes it a balanced meal. Plus, it’s easy to prepare, making it a great option for busy weeknights or casual gatherings.

Another highlight is the vibrant colors of the ingredients. The bright greens of the salad mix, the red of the cherry tomatoes, and the creamy avocado create a visually appealing dish. This not only makes it more appetizing but also encourages you to enjoy a variety of nutrients.

Moreover, grilling the chicken adds a smoky flavor that elevates the entire salad. The balsamic vinaigrette ties everything together, providing a tangy finish that complements the richness of the avocado and bacon. Each bite is a delightful experience, making this salad a favorite among many.

In summary, the Grilled Chicken Cobb Salad is special because it’s nutritious, customizable, and bursting with flavor. It’s a dish that can easily become a staple in your meal rotation. So, let’s dive into the ingredients and preparation steps to create this delicious salad!

Ingredients for Grilled Chicken Cobb Salad Recipe

To create a delicious Grilled Chicken Cobb Salad, you’ll need a variety of fresh ingredients. Each component plays a vital role in delivering flavor and nutrition. Here’s what you’ll need:

  • 2 boneless, skinless chicken breasts (about 1 pound total)
  • 1 teaspoon olive oil
  • Salt and pepper, to taste
  • 6 cups mixed salad greens (such as romaine, spinach, and arugula)
  • 1 cup cherry tomatoes, halved
  • 1 avocado, diced
  • 1/2 cup cooked bacon, crumbled
  • 1/2 cup cucumber, diced
  • 1/4 cup red onion, thinly sliced
  • 1/4 cup fresh parsley, chopped
  • 1/4 cup balsamic vinaigrette (check for paleo-friendly ingredients)

These ingredients come together to create a salad that is not only tasty but also packed with nutrients. The chicken provides lean protein, while the vegetables add fiber and essential vitamins. The avocado contributes healthy fats, making this salad a well-rounded meal.

Feel free to adjust the quantities based on your preferences or dietary needs. For instance, if you love avocados, you can add more! The beauty of this Grilled Chicken Cobb Salad Recipe lies in its flexibility. Now that you have your ingredients ready, let’s move on to the preparation steps!

Step-by-Step Preparation of Grilled Chicken Cobb Salad Recipe

Now that you have all your ingredients ready, it’s time to dive into the preparation of your Grilled Chicken Cobb Salad. This step-by-step guide will help you create a delicious and visually appealing salad that everyone will love. Let’s get started!

Step 1: Preparing the Chicken for Grilling

First, you need to prepare the chicken breasts. Start by rinsing them under cold water and patting them dry with paper towels. This helps remove any excess moisture. Next, brush the chicken with 1 teaspoon of olive oil. This not only adds flavor but also helps prevent sticking on the grill.

Now, season the chicken with salt and pepper to taste. Don’t be shy with the seasoning; it enhances the overall flavor of the chicken. If you want to add more depth, consider marinating the chicken in lemon juice, garlic, and herbs for at least 30 minutes. This extra step will make your chicken even more flavorful!

Step 2: Grilling the Chicken

Once your chicken is seasoned, it’s time to grill! Preheat your grill to medium-high heat. This ensures that the chicken cooks evenly and gets those beautiful grill marks. Place the chicken breasts on the grill and cook for about 6-7 minutes on each side. You’ll know it’s done when the internal temperature reaches 165°F.

After grilling, remove the chicken from the grill and let it rest for 5 minutes. This resting period allows the juices to redistribute, keeping the chicken moist and tender. Once rested, slice the chicken into strips. Set it aside while you prepare the salad.

Step 3: Chopping the Vegetables

While the chicken is resting, it’s time to chop the vegetables. Start with the mixed salad greens. Rinse them thoroughly and pat them dry. Tear or chop the greens into bite-sized pieces and place them in a large salad bowl.

Next, halve the cherry tomatoes and dice the cucumber. For the avocado, cut it in half, remove the pit, and scoop out the flesh. Dice it into cubes. Finally, thinly slice the red onion and chop the fresh parsley. Add all these colorful veggies to the bowl with the greens. The vibrant colors will make your salad look inviting!

Step 4: Assembling the Salad

Now that you have all your ingredients prepped, it’s time to assemble the salad. Start by adding the chopped vegetables to the bowl with the mixed greens. Then, take the sliced grilled chicken and arrange it on top of the salad. This not only looks great but also ensures that everyone gets a taste of the chicken in each serving.

For an extra touch, sprinkle the crumbled bacon over the salad. This adds a delightful crunch and savory flavor. Finally, don’t forget to add the chopped parsley for a fresh finish!

Step 5: Making the Dressing

The last step is to make the dressing. For this recipe, we recommend using balsamic vinaigrette. If you have a store-bought version, check for paleo-friendly ingredients. Alternatively, you can make your own by whisking together balsamic vinegar, olive oil, salt, and pepper in a small bowl.

Once your dressing is ready, drizzle it over the assembled salad. Toss gently to combine all the ingredients, ensuring that the dressing coats everything evenly. Your Grilled Chicken Cobb Salad is now ready to be served!

Variations of Grilled Chicken Cobb Salad Recipe

The Grilled Chicken Cobb Salad is a fantastic base for creativity. You can easily switch up the ingredients to suit your taste or dietary preferences. Here are some exciting variations to consider!

Alternative Proteins to Use

If you’re looking to mix things up, there are several alternative proteins you can use in your Grilled Chicken Cobb Salad. Here are a few ideas:

  • Grilled Shrimp: Shrimp cooks quickly and adds a delightful seafood flavor. Just season and grill them for a few minutes until they turn pink.
  • Steak: Grilled steak can add a rich, hearty flavor. Choose a tender cut, season it well, and grill to your desired doneness.
  • Tofu: For a plant-based option, marinated and grilled tofu is a great choice. It absorbs flavors well and adds protein without meat.
  • Turkey: Ground turkey or turkey breast can be grilled or sautéed. It’s a leaner option that still provides plenty of protein.

These alternatives not only change the flavor profile but also keep your meals exciting. Feel free to experiment with different seasonings and marinades to enhance the taste!

Vegetarian Options for Grilled Chicken Cobb Salad Recipe

If you prefer a vegetarian version of the Grilled Chicken Cobb Salad, you can easily adapt the recipe. Here are some tasty substitutions:

  • Chickpeas: Roasted chickpeas add a crunchy texture and are packed with protein. Toss them with spices before roasting for extra flavor.
  • Grilled Portobello Mushrooms: These meaty mushrooms can be marinated and grilled, providing a satisfying texture and taste.
  • Hard-Boiled Eggs: Adding sliced hard-boiled eggs can boost the protein content and add creaminess to the salad.
  • Quinoa: Cooked quinoa can be mixed in for a nutty flavor and additional protein. It’s also gluten-free!

By incorporating these vegetarian options, you can enjoy a delicious and filling salad that meets your dietary needs. The key is to keep the balance of flavors and textures, ensuring every bite is enjoyable!

Cooking Note for Grilled Chicken Cobb Salad Recipe

When preparing the Grilled Chicken Cobb Salad, there are a few cooking notes to keep in mind to ensure the best results. These tips will help you achieve a flavorful and visually appealing dish.

First, always use fresh ingredients. Fresh vegetables and herbs not only enhance the taste but also add vibrant colors to your salad. When selecting your salad greens, look for crisp leaves without any wilting or browning. This will ensure that your salad is both nutritious and appetizing.

Next, pay attention to the chicken. For the juiciest grilled chicken, avoid overcooking. Use a meat thermometer to check the internal temperature, ensuring it reaches 165°F. This guarantees that the chicken is safe to eat while remaining tender and moist.

Additionally, consider marinating the chicken before grilling. A simple marinade of olive oil, lemon juice, garlic, and herbs can infuse the chicken with extra flavor. Allow the chicken to marinate for at least 30 minutes, or even overnight, for the best results.

Lastly, when assembling the salad, layer the ingredients thoughtfully. Start with the greens, then add the vegetables, and finally top with the sliced chicken and bacon. This not only looks appealing but also ensures that every bite is balanced with flavors and textures.

By following these cooking notes, you’ll create a Grilled Chicken Cobb Salad that is not only delicious but also a feast for the eyes. Enjoy the process and have fun experimenting with different ingredients!

Serving Suggestions for Grilled Chicken Cobb Salad Recipe

When it comes to serving your Grilled Chicken Cobb Salad, presentation and pairing can elevate the dining experience. Here are some delightful serving suggestions to consider:

  • Chilled Plates: Serve the salad on chilled plates. This keeps the salad fresh and crisp, enhancing the overall enjoyment.
  • Garnish with Extra Herbs: A sprinkle of fresh herbs, like basil or cilantro, can add a burst of flavor and color. It makes the dish look even more inviting!
  • Accompany with Whole Grain Bread: Serve the salad with slices of whole grain or sourdough bread. This adds a hearty element and is perfect for soaking up any leftover dressing.
  • Pair with a Light Beverage: Consider serving the salad with a refreshing drink, such as iced tea or sparkling water with lemon. These beverages complement the salad’s flavors without overpowering them.
  • Offer Additional Dressings: Provide a selection of dressings on the side. This allows guests to customize their salads according to their taste preferences.
  • Serve as a Main Course: This salad is filling enough to be a main dish. For a complete meal, consider adding a side of fruit or a light soup.

These serving suggestions not only enhance the visual appeal of your Grilled Chicken Cobb Salad but also create a more enjoyable dining experience. Whether it’s a casual lunch or a festive dinner, these tips will help you impress your guests and make the meal memorable!

Tips for Perfecting Your Grilled Chicken Cobb Salad Recipe

Creating the perfect Grilled Chicken Cobb Salad is all about attention to detail. Here are some helpful tips to ensure your salad is not only delicious but also visually stunning and satisfying.

First, always choose high-quality ingredients. Fresh, organic vegetables and free-range chicken can significantly enhance the flavor of your salad. When shopping, look for vibrant greens and ripe avocados. These ingredients will make your salad pop with color and taste.

Next, consider the texture. A great salad has a mix of crunchy, creamy, and tender elements. The crispy bacon and fresh cucumbers provide crunch, while the avocado adds creaminess. Make sure to balance these textures for a delightful eating experience.

Don’t forget about seasoning! While you may season the chicken, it’s also important to season the vegetables. A sprinkle of salt and pepper on the salad greens can elevate the overall flavor. Additionally, consider adding a squeeze of fresh lemon juice for a zesty kick.

Another tip is to let the grilled chicken rest before slicing. This allows the juices to redistribute, keeping the chicken moist. If you slice it too soon, you may end up with dry chicken. Patience pays off here!

For added flavor, try experimenting with different dressings. While balsamic vinaigrette is a classic choice, you can also try a honey mustard or a creamy ranch dressing. Each dressing brings its own unique taste to the salad.

Lastly, serve the salad immediately after assembling. This ensures that the greens remain crisp and fresh. If you need to prepare it in advance, keep the dressing separate until you’re ready to serve. This will prevent the salad from becoming soggy.

By following these tips, you’ll create a Grilled Chicken Cobb Salad that is not only delicious but also a feast for the eyes. Enjoy the process and feel free to get creative with your ingredients!

Breakdown of Time for Grilled Chicken Cobb Salad Recipe

Understanding the time required for each step in the Grilled Chicken Cobb Salad Recipe can help you plan your cooking efficiently. Here’s a breakdown of the time you’ll need for preparation and cooking.

Prep Time

The prep time for this delicious salad is approximately 20 minutes. This includes gathering your ingredients, washing and chopping the vegetables, and preparing the chicken for grilling. If you choose to marinate the chicken, you may want to add an additional 30 minutes to allow the flavors to infuse.

Cooking Time

Cooking the chicken takes about 15 minutes. You’ll grill the chicken for 6-7 minutes on each side, ensuring it reaches the perfect internal temperature of 165°F. While the chicken is grilling, you can also prepare the salad ingredients, making this step efficient.

Total Time

In total, you can expect to spend around 35-40 minutes from start to finish. This includes both prep and cooking time. If you decide to marinate the chicken beforehand, the total time may extend to about 1 hour and 10 minutes. Regardless, this salad is quick to prepare, making it an excellent choice for a healthy meal any day of the week!

Nutritional Information for Grilled Chicken Cobb Salad Recipe

Understanding the nutritional content of your meals is essential for maintaining a balanced diet. The Grilled Chicken Cobb Salad is not only delicious but also packed with nutrients. Here’s a breakdown of the nutritional information per serving:

Calories

Each serving of the Grilled Chicken Cobb Salad contains approximately 420 calories. This makes it a satisfying meal option without being overly heavy. The combination of protein, healthy fats, and fiber from the vegetables helps keep you full and energized throughout the day.

Protein Content

This salad is a great source of protein, providing about 30 grams per serving. The grilled chicken is the primary protein source, contributing lean protein that supports muscle health and keeps you feeling satiated. Adding ingredients like hard-boiled eggs or chickpeas can further boost the protein content if desired.

Sodium Levels

The sodium content in the Grilled Chicken Cobb Salad is approximately 800 mg per serving. This includes the natural sodium found in the ingredients as well as any added salt during cooking. If you’re watching your sodium intake, consider using low-sodium bacon or dressing to help reduce the overall sodium levels without sacrificing flavor.

In summary, the Grilled Chicken Cobb Salad is a nutritious choice that balances calories, protein, and sodium. It’s a meal that not only tastes great but also supports your health goals. Enjoy this salad as part of a well-rounded diet!

FAQs about Grilled Chicken Cobb Salad Recipe

Can I make the Grilled Chicken Cobb Salad Recipe ahead of time?

Yes, you can prepare parts of the Grilled Chicken Cobb Salad ahead of time! To save time, you can grill the chicken and chop the vegetables a day in advance. Store the chicken in an airtight container in the refrigerator. Keep the chopped vegetables in a separate container to maintain their freshness. However, it’s best to assemble the salad just before serving. This way, the greens stay crisp, and the flavors remain vibrant. If you want to make the dressing ahead, you can do that too. Just give it a good shake before drizzling it over the salad!

What can I substitute for chicken in the Grilled Chicken Cobb Salad Recipe?

If you’re looking for alternatives to chicken in the Grilled Chicken Cobb Salad, there are plenty of options! You can use grilled shrimp for a seafood twist or steak for a heartier flavor. For a vegetarian option, consider marinated and grilled tofu or chickpeas. These substitutes provide protein while keeping the salad delicious and satisfying. Feel free to experiment with different proteins to find your favorite combination!

How do I store leftovers from the Grilled Chicken Cobb Salad Recipe?

Storing leftovers from your Grilled Chicken Cobb Salad is simple! Place any uneaten salad in an airtight container. If you have leftover dressing, store it separately to prevent the salad from becoming soggy. The salad can be kept in the refrigerator for up to 2 days. However, it’s best to consume it within the first day for optimal freshness. When ready to eat, you can add a little more dressing to revive the flavors. Enjoy your delicious salad again!

Conclusion on Grilled Chicken Cobb Salad Recipe

The Grilled Chicken Cobb Salad is more than just a meal; it’s a delightful experience that brings together fresh ingredients and vibrant flavors. This recipe is perfect for anyone looking to enjoy a nutritious dish that is both satisfying and easy to prepare. With its colorful array of vegetables, creamy avocado, and juicy grilled chicken, this salad is sure to please everyone at the table.

As we’ve explored, the versatility of the Grilled Chicken Cobb Salad allows you to customize it to your liking. Whether you prefer different proteins, want to make it vegetarian, or simply wish to add your favorite toppings, the possibilities are endless. This adaptability makes it a fantastic option for any occasion, from casual lunches to festive dinners.

Moreover, the nutritional benefits of this salad cannot be overlooked. With a balanced mix of protein, healthy fats, and fiber, it supports a healthy lifestyle while keeping you full and energized. Plus, the ease of preparation means you can whip it up in no time, making it a go-to recipe for busy weeknights.

In conclusion, the Grilled Chicken Cobb Salad is a delicious and nutritious choice that everyone can enjoy. So, gather your ingredients, fire up the grill, and treat yourself to this delightful dish. You’ll be amazed at how a simple salad can bring so much joy and satisfaction to your meal. Happy cooking!

Crispy Salmon Rice Bowl is a must-try recipe today!

Introduction to the Crispy Salmon Rice Bowl

crispy salmon rice bowl is not just a feast for your taste buds; it’s also a vibrant and colorful dish that brings together a variety of flavors and textures. This delightful bowl combines tender salmon, fluffy jasmine rice, and fresh vegetables, making it a perfect choice for lunch or dinner. Let’s explore what makes this dish so special and why rice bowls have become a staple in modern cuisine.

What Makes the Crispy Salmon Rice Bowl Special?

crispy salmon rice bowl stands out for several reasons. First, the salmon is baked to perfection, resulting in a crispy skin that adds a satisfying crunch. The combination of garlic powder and smoked paprika gives the fish a smoky flavor that pairs beautifully with the other ingredients. Additionally, the vibrant colors of broccoli, carrots, and avocado not only make the dish visually appealing but also pack it with essential nutrients.

Moreover, this dish is highly customizable. You can easily swap out the vegetables or add your favorite toppings. Whether you prefer a spicy kick or a tangy sauce, the options are endless. This versatility makes the crispy salmon rice bowl a favorite among home cooks and food enthusiasts alike.

The Popularity of Rice Bowls in Modern Cuisine

Rice bowls have surged in popularity in recent years, and it’s easy to see why. They offer a convenient way to enjoy a balanced meal in one bowl. With a base of rice, a protein, and a variety of vegetables, rice bowls are not only filling but also nutritious. They cater to various dietary preferences, making them suitable for everyone.

Furthermore, rice bowls are perfect for meal prep. You can prepare all the components in advance and assemble them when you’re ready to eat. This makes them an excellent choice for busy individuals or families looking for quick and healthy meal options. The crispy salmon rice bowl, in particular, combines the best of both worlds: it’s easy to make and incredibly satisfying.

In conclusion, the crispy salmon rice bowl is a delightful dish that brings together flavor, nutrition, and convenience. Whether you’re a seasoned chef or a beginner in the kitchen, this recipe is sure to impress. So, let’s get started on making this delicious meal!

Ingredients for the Crispy Salmon Rice Bowl

crispy salmon rice bowl, you’ll need a selection of fresh ingredients that come together to make a delicious and nutritious meal. Here’s what you’ll need:

  • 2 cups cooked jasmine rice: This fluffy rice serves as the base of your bowl, providing a light and fragrant foundation.
  • 1 pound salmon fillet, skin-on: The star of the dish! The skin helps keep the salmon moist while adding a delightful crunch when cooked.
  • 2 tablespoons olive oil: This healthy fat is used to coat the salmon and vegetables, enhancing flavor and promoting crispiness.
  • 1 teaspoon garlic powder: A dash of garlic powder adds a savory depth to the salmon.
  • 1 teaspoon smoked paprika: This spice gives the salmon a smoky flavor that complements the other ingredients beautifully.
  • Salt and freshly ground black pepper: Essential seasonings to enhance the overall taste of the dish.
  • 1 cup broccoli florets: These vibrant green veggies add color and crunch, along with a wealth of nutrients.
  • 1 cup grated carrots: Sweet and crunchy, carrots provide a lovely contrast to the salmon.
  • 1 ripe avocado, sliced: Creamy avocado adds richness and healthy fats to the bowl.
  • 2 tablespoons low-sodium soy sauce: This sauce brings a savory umami flavor that ties all the ingredients together.
  • 1 tablespoon toasted sesame seeds: These seeds add a nutty flavor and a delightful crunch.
  • 2 green onions, finely chopped: Fresh green onions provide a pop of color and a mild onion flavor.

crispy salmon rice bowl that’s not only delicious but also packed with nutrients. Let’s move on to the next step: preparing the salmon!

Step-by-Step Preparation of the Crispy Salmon Rice Bowl

crispy salmon rice bowl. Follow these simple steps to create a meal that’s not only delicious but also visually appealing.

Step 1: Preparing the Salmon

First, preheat your oven to 425°F (220°C). This high temperature will help achieve that crispy skin we all love. While the oven heats up, line a baking sheet with parchment paper. This makes cleanup a breeze!

Next, in a mixing bowl, whisk together 2 tablespoons of olive oil, 1 teaspoon of garlic powder, 1 teaspoon of smoked paprika, and a pinch of salt and pepper. This mixture will coat the salmon and enhance its flavor.

Place the salmon fillet, skin side down, on the prepared baking sheet. Generously brush the top of the salmon with the olive oil mixture. Make sure it’s well coated for maximum flavor and crispiness.

Step 2: Cooking the Rice

While the salmon is getting ready, it’s time to cook the jasmine rice. If you haven’t done so already, rinse 1 cup of jasmine rice under cold water until the water runs clear. This helps remove excess starch, ensuring fluffy rice.

In a pot, combine the rinsed rice with 2 cups of water. Bring it to a boil over medium-high heat. Once boiling, reduce the heat to low, cover the pot, and let it simmer for about 15 minutes. After that, remove it from heat and let it sit, covered, for another 5 minutes. Fluff the rice with a fork before serving.

Step 3: Assembling the Bowl

crispy salmon rice bowl. Start by dividing the cooked jasmine rice into four serving bowls. Make sure to create a nice bed of rice for the other ingredients.

Next, carefully place a piece of the baked salmon on top of the rice in each bowl. The salmon should be flaky and tender, with that beautiful crispy skin facing up. Surround the salmon with the roasted broccoli florets and grated carrots for a colorful presentation.

Step 4: Adding Toppings and Sauces

Now comes the fun part—adding toppings! Slice a ripe avocado and arrange the slices on top of the salmon and veggies. This adds a creamy texture that complements the dish perfectly.

Drizzle each bowl with 2 tablespoons of low-sodium soy sauce for a savory kick. Then, sprinkle 1 tablespoon of toasted sesame seeds over the top for added crunch and flavor. Finally, finish with a scattering of finely chopped green onions for a fresh touch.

crispy salmon rice bowl is now ready to be enjoyed! Serve immediately and savor the delightful combination of flavors and textures.

Variations of the Crispy Salmon Rice Bowl

crispy salmon rice bowl is a fantastic dish, but it’s also incredibly versatile. You can easily switch up the ingredients to suit your taste or dietary needs. Let’s explore some alternative proteins and vegetarian options that can make your rice bowl just as delightful!

Alternative Proteins for Your Rice Bowl

If you’re looking to mix things up, consider using different proteins in your rice bowl. Here are a few tasty alternatives:

  • Chicken: Grilled or baked chicken breast can be a great substitute. Season it with similar spices to keep the flavor profile consistent.
  • Tofu: For a plant-based option, try marinated and baked tofu. It absorbs flavors well and adds a nice texture.
  • Shrimp: Sautéed or grilled shrimp can add a seafood twist. Just cook them until they’re pink and opaque.
  • Beef: Thinly sliced beef, marinated and stir-fried, can provide a hearty alternative. Use a similar seasoning mix for a cohesive taste.

crispy salmon rice bowl remains delicious and satisfying.

Vegetarian Options for the Crispy Salmon Rice Bowl

If you prefer a vegetarian meal, there are plenty of options to create a delicious rice bowl without meat. Here are some ideas:

  • Grilled Vegetables: Use a mix of bell peppers, zucchini, and eggplant. Grill or roast them for added flavor.
  • Chickpeas: Roasted chickpeas can add protein and crunch. Season them with spices for extra flavor.
  • Tempeh: This fermented soy product is packed with protein. Marinate and bake it for a tasty addition.
  • Edamame: These young soybeans are a great source of protein. Simply steam them and toss them in for a pop of color and nutrition.

crispy salmon rice bowl that’s just as satisfying and flavorful. The key is to keep the balance of textures and flavors, ensuring that every bite is a delight!

Cooking Note for the Crispy Salmon Rice Bowl

crispy salmon rice bowl, there are a few cooking tips to keep in mind. These will help you achieve the best results and ensure that your meal is both delicious and visually appealing.

First, always choose fresh salmon. Fresh fish not only tastes better but also has a firmer texture, which is essential for that perfect flakiness. If you can, buy your salmon from a trusted fishmonger or grocery store that specializes in seafood.

Next, pay attention to the cooking time. Salmon can easily overcook, leading to a dry texture. Keep an eye on it while it bakes. The fish is done when it turns opaque and flakes easily with a fork. If you prefer a crispy skin, remember to switch to broil for the last few minutes of cooking. This will give you that delightful crunch without compromising the fish’s moisture.

Additionally, feel free to experiment with the vegetables. While broccoli and carrots are great choices, you can also add bell peppers, snap peas, or even zucchini. Just make sure to cut them into similar sizes for even cooking.

crispy salmon rice bowl to the next level. Consider adding a squeeze of fresh lime or lemon juice for brightness. A drizzle of sriracha or chili oil can add a spicy kick if you enjoy heat. These small touches can make a big difference in flavor.

crispy salmon rice bowl that’s not only tasty but also a feast for the eyes. Enjoy the process and have fun experimenting with different flavors!

Serving Suggestions for the Crispy Salmon Rice Bowl

crispy salmon rice bowl, it’s time to think about how to enhance your meal experience. Pairing the right sides and drinks can elevate your dish, making it even more enjoyable. Let’s explore some fantastic serving suggestions!

Pairing Sides with Your Rice Bowl

crispy salmon rice bowl is a complete meal on its own, adding a few sides can create a more rounded dining experience. Here are some delightful side options:

  • Asian Cucumber Salad: This refreshing salad, made with thinly sliced cucumbers, rice vinegar, and sesame oil, adds a crunchy contrast to the warm rice bowl.
  • Edamame: Steamed edamame sprinkled with sea salt is a great source of protein and complements the flavors of the salmon.
  • Seaweed Salad: This light and tangy salad brings a unique flavor that pairs well with the savory elements of the rice bowl.
  • Pickled Vegetables: A small serving of pickled carrots or radishes can add a zesty kick, balancing the richness of the salmon and avocado.

These sides not only enhance the meal but also add variety to your plate, making it visually appealing and satisfying.

Best Drinks to Complement the Crispy Salmon Rice Bowl

crispy salmon rice bowl:

  • Green Tea: A warm cup of green tea is a classic choice. Its light flavor complements the dish without overpowering it.
  • Sparkling Water: For a refreshing option, try sparkling water with a slice of lemon or lime. It cleanses the palate beautifully.
  • White Wine: A chilled glass of Sauvignon Blanc or Pinot Grigio pairs well with salmon, enhancing the meal’s flavors.
  • Fruit-Infused Iced Tea: A fruity iced tea, like peach or raspberry, can add a sweet contrast to the savory elements of the bowl.

crispy salmon rice bowl, making your meal even more enjoyable. Cheers to a delightful dining experience!

Tips for Perfecting Your Crispy Salmon Rice Bowl

crispy salmon rice bowl, a few tips can make all the difference. From selecting the right salmon to mastering rice cooking techniques, these insights will help you achieve a delicious and satisfying meal every time.

Choosing the Right Salmon

When it comes to salmon, quality matters. Opt for fresh, wild-caught salmon whenever possible. Wild salmon tends to have a richer flavor and firmer texture compared to farmed varieties. If you can’t find wild salmon, look for sustainably farmed options. These are often raised in better conditions and have a lower environmental impact.

Additionally, pay attention to the cut of salmon you choose. A fillet with the skin on is ideal for this recipe. The skin not only helps keep the fish moist during cooking but also crisps up beautifully in the oven. If you prefer skinless salmon, you can still enjoy the dish, but you may need to adjust the cooking time slightly to prevent drying out.

crispy salmon rice bowl and ensure a delightful dining experience.

Rice Cooking Techniques for Optimal Texture

crispy salmon rice bowl. Here are some techniques to achieve fluffy, delicious jasmine rice:

  • Rinse the Rice: Always rinse your jasmine rice under cold water before cooking. This removes excess starch, preventing the rice from becoming gummy.
  • Use the Right Water Ratio: A common ratio for jasmine rice is 1 cup of rice to 1.5 cups of water. Adjust this slightly based on your preference for softer or firmer rice.
  • Let it Rest: After cooking, let the rice sit covered for about 5 minutes. This allows the steam to finish cooking the rice and helps achieve a fluffy texture.
  • Fluff with a Fork: Once rested, use a fork to fluff the rice gently. This separates the grains and enhances the overall texture.

crispy salmon rice bowl. The fluffy jasmine rice will complement the tender salmon and fresh vegetables beautifully, making each bite a delight!

Breakdown of Time for the Crispy Salmon Rice Bowl

crispy salmon rice bowl can help you plan your cooking efficiently. Here’s a simple breakdown of the time required for each step, ensuring you can enjoy this delicious meal without any rush.

Prep Time

crispy salmon rice bowl is approximately 15-20 minutes. This includes gathering your ingredients, washing and chopping the vegetables, and preparing the salmon. Taking your time during this stage ensures that everything is ready for cooking, making the process smoother and more enjoyable.

Cooking Time

Once you’ve prepped your ingredients, the cooking time is about 20-25 minutes. This includes:

  • 12-15 minutes for baking the salmon and vegetables in the oven.
  • 15 minutes for cooking the jasmine rice on the stovetop.

Both the salmon and rice can be cooked simultaneously, making this a quick and efficient meal to prepare.

Total Time

crispy salmon rice bowl to take around 35-45 minutes. This includes both prep and cooking time. With a little organization, you can have a delicious and nutritious meal ready in no time!

Nutritional Information for the Crispy Salmon Rice Bowl

crispy salmon rice bowl is not only delicious but also packed with nutrients. Let’s break down the key nutritional components of this delightful dish.

Calories in the Crispy Salmon Rice Bowl

crispy salmon rice bowl contains approximately 500-600 calories. This calorie count can vary based on the specific ingredients and portion sizes used. The combination of salmon, rice, and vegetables provides a satisfying meal that keeps you energized throughout the day.

Protein Content

crispy salmon rice bowl offers around 30-35 grams of protein, primarily from the salmon. This makes it an excellent choice for those looking to increase their protein intake, whether for muscle building or overall health.

Sodium Levels

crispy salmon rice bowl contains about 600-800 milligrams per serving. The sodium content mainly comes from the soy sauce and any added salt. To keep sodium levels in check, consider using low-sodium soy sauce and adjusting the salt to your taste. This way, you can enjoy the flavors without overdoing it on sodium.

crispy salmon rice bowl is a nutritious meal option that provides a good balance of calories, protein, and sodium. It’s a great choice for anyone looking to enjoy a healthy and satisfying dish!

FAQs about the Crispy Salmon Rice Bowl

Can I use frozen salmon for the Crispy Salmon Rice Bowl?

crispy salmon rice bowl. Just make sure to thaw it properly before cooking. The best way to thaw salmon is to place it in the refrigerator overnight. If you’re short on time, you can also submerge the sealed salmon in cold water for about an hour. Once thawed, follow the same preparation steps as you would with fresh salmon. Just keep an eye on the cooking time, as frozen salmon may take a few extra minutes to cook through.

What type of rice is best for the Crispy Salmon Rice Bowl?

crispy salmon rice bowl due to its fragrant aroma and fluffy texture. However, you can also use other types of rice, such as basmati or brown rice, if you prefer. Just keep in mind that cooking times and water ratios may vary. For a healthier option, brown rice offers more fiber and nutrients, but it will take longer to cook. Whichever rice you choose, make sure to rinse it well before cooking to achieve the best texture.

How can I make the Crispy Salmon Rice Bowl gluten-free?

crispy salmon rice bowl gluten-free is easy! Simply substitute the low-sodium soy sauce with a gluten-free alternative, such as tamari or coconut aminos. These options provide a similar savory flavor without the gluten. Additionally, ensure that any other sauces or toppings you use are also gluten-free. With these simple swaps, you can enjoy a delicious and gluten-free version of this delightful dish!

What are some good toppings for the Crispy Salmon Rice Bowl?

crispy salmon rice bowl and add extra flavor and texture. Here are some great options to consider:

  • Sliced Radishes: These add a crunchy texture and a peppery flavor.
  • Sesame Oil Drizzle: A light drizzle of sesame oil can enhance the nutty flavor of the dish.
  • Chili Flakes: For those who enjoy a bit of heat, sprinkle some chili flakes on top.
  • Fresh Herbs: Chopped cilantro or basil can add a fresh, aromatic touch.
  • Fried Shallots: These crispy bits add a savory crunch that complements the salmon beautifully.

crispy salmon rice bowl. The possibilities are endless!

Conclusion: Enjoying Your Crispy Salmon Rice Bowl

crispy salmon rice bowl is more than just a meal; it’s an experience that brings together vibrant flavors, textures, and colors. This dish is not only easy to prepare but also offers a nutritious option for lunch or dinner. With its combination of flaky salmon, fluffy jasmine rice, and fresh vegetables, every bite is a delightful journey for your taste buds.

crispy salmon rice bowl, remember that the beauty of this dish lies in its versatility. Feel free to experiment with different proteins, vegetables, and toppings to make it your own. Whether you stick to the classic recipe or try out new variations, you’re sure to create a meal that satisfies your cravings.

crispy salmon rice bowl is perfect for sharing with family and friends. It’s a great way to introduce others to the joys of rice bowls and healthy eating. Set up a DIY rice bowl bar, allowing everyone to customize their bowls with their favorite ingredients. This interactive dining experience can make mealtime fun and engaging.

crispy salmon rice bowl. Enjoy the process of cooking, the joy of sharing, and the satisfaction of a meal well made. Bon appétit!

Baked Pineapple Salmon Recipe is a must-try dish!

Introduction to Baked Pineapple Salmon Recipe

Baked Pineapple Salmon Recipe is a delightful dish that combines the rich flavors of salmon with the sweet and tangy taste of pineapple. This recipe not only pleases your taste buds but also provides a nutritious option for dinner. With just a few simple ingredients, you can create a meal that feels gourmet without spending hours in the kitchen.

Why Baked Pineapple Salmon is a Must-Try Dish

First and foremost, this dish is packed with nutrients. Salmon is known for its high protein content and omega-3 fatty acids, which are great for heart health. Pineapple adds a burst of vitamins and minerals, making this meal both tasty and beneficial. Moreover, the combination of sweet and savory flavors creates a unique culinary experience that is sure to impress your family and friends.

Another reason to try this recipe is its versatility. You can easily customize it to suit your taste. Whether you prefer a hint of spice or a tropical twist, this dish can adapt to your preferences. Plus, it’s perfect for any occasion, from a casual weeknight dinner to a special gathering.

Baked Pineapple Salmon Recipe is quick to prepare. With minimal prep time and a short baking duration, you can have a delicious meal ready in no time. So, roll up your sleeves and get ready to enjoy a dish that’s not only good for you but also bursting with flavor!

Ingredients for Baked Pineapple Salmon Recipe

Baked Pineapple Salmon Recipe, you’ll need a few fresh ingredients that come together beautifully. Here’s what you’ll need:

  • 2 (6-ounce) salmon fillets
  • 1 cup fresh pineapple, chopped
  • 2 tablespoons tamari or soy sauce
  • 1 tablespoon maple syrup
  • 1 tablespoon avocado oil
  • 1 teaspoon minced garlic
  • 1 teaspoon grated ginger
  • 1/2 teaspoon freshly ground black pepper
  • 1/4 teaspoon sea salt
  • 2 green onions, sliced (for garnish)
  • Lime wedges (for serving)

These ingredients are not only easy to find but also contribute to the dish’s vibrant flavors. The salmon fillets serve as the star of the show, while the pineapple adds a tropical sweetness. The tamari or soy sauce, along with maple syrup, creates a delicious glaze that enhances the overall taste. Garlic and ginger bring warmth and depth, making every bite a delightful experience.

Baked Pineapple Salmon Recipe is both delicious and nutritious. Now that you have your ingredients ready, let’s move on to the preparation steps!

Step-by-Step Preparation of Baked Pineapple Salmon Recipe

Baked Pineapple Salmon Recipe. This step-by-step guide will help you create a delicious meal with ease. Let’s get started!

Step 1: Preparing the Salmon

First, take your salmon fillets and rinse them under cold water. This helps to remove any excess salt or impurities. After rinsing, gently pat them dry with a paper towel. This step is important because it allows the glaze to stick better to the fish.

Next, place the salmon fillets in a baking dish. Make sure they are skin-side down. This will help keep the fish moist while it bakes. If you prefer, you can line the baking dish with parchment paper for easier cleanup.

Step 2: Making the Pineapple Glaze

In a mixing bowl, combine the tamari or soy sauce, maple syrup, avocado oil, minced garlic, grated ginger, black pepper, and sea salt. Use a whisk or fork to mix everything together until it’s well blended. This glaze is what gives the salmon its delicious flavor, so make sure it’s mixed thoroughly!

Once your glaze is ready, you can set it aside for a moment. The flavors will meld together beautifully while you prepare the salmon.

Step 3: Combining Ingredients

Now it’s time to bring everything together! Pour the prepared glaze over the salmon fillets, ensuring they are generously coated. Use a brush or spoon to spread the glaze evenly. This will help every bite be packed with flavor.

After coating the salmon, sprinkle the chopped pineapple over the top. The pineapple not only adds sweetness but also creates a lovely presentation. It’s like a tropical party on your plate!

Step 4: Baking the Salmon

With everything in place, it’s time to bake! Preheat your oven to 400°F (200°C) if you haven’t done so already. Place the baking dish in the oven and let the salmon bake for about 15-20 minutes. Keep an eye on it, as cooking times may vary based on the thickness of the fillets.

When the salmon is done, it should be tender and flake easily with a fork. Once it’s ready, take it out of the oven and let it sit for a few moments. This resting time allows the juices to redistribute, making the salmon even more flavorful.

Baked Pineapple Salmon Recipe is prepared, you’re just a few steps away from enjoying a delightful meal!

Variations of Baked Pineapple Salmon Recipe

Baked Pineapple Salmon Recipe is already a delightful dish, you can easily add your personal touch. Here are a couple of fun variations to consider. They will not only enhance the flavor but also make your meal even more exciting!

Tropical Twist: Adding Coconut

Baked Pineapple Salmon Recipe brings a tropical flair that pairs perfectly with the pineapple. To do this, simply sprinkle about 1/4 cup of unsweetened shredded coconut over the salmon and pineapple before baking. The coconut will toast slightly in the oven, adding a delightful crunch and flavor. This twist is sure to transport your taste buds to a sunny beach!

Spicy Kick: Incorporating Jalapeños

Baked Pineapple Salmon Recipe an exciting flavor profile that’s sure to impress anyone who loves a little spice!

Baked Pineapple Salmon Recipe will be a hit at the dinner table!

Cooking Note for Baked Pineapple Salmon Recipe

Baked Pineapple Salmon Recipe, there are a few important cooking notes to keep in mind. These tips will help ensure that your salmon turns out perfectly every time, making your meal not only delicious but also visually appealing.

First, always choose fresh salmon fillets. Fresh fish has a vibrant color and a pleasant smell. If you can, buy wild-caught salmon for the best flavor and health benefits. If you opt for frozen salmon, make sure to thaw it completely before cooking. This will help it cook evenly.

Next, pay attention to the thickness of your salmon fillets. Thicker fillets may require a bit more time in the oven, while thinner ones will cook faster. A good rule of thumb is to bake salmon for about 4-6 minutes per half-inch of thickness. Always check for doneness by gently flaking the fish with a fork. It should be opaque and flake easily when it’s ready.

Additionally, consider using a meat thermometer to check the internal temperature of the salmon. It should reach 145°F (63°C) for safe consumption. This method ensures that your salmon is cooked perfectly without being overdone.

Baked Pineapple Salmon Recipe.

By following these cooking notes, you’ll be well on your way to creating a stunning and delicious dish that everyone will love. Enjoy the process and savor the delightful flavors of your homemade salmon!

Serving Suggestions for Baked Pineapple Salmon Recipe

Baked Pineapple Salmon Recipe, it’s time to think about how to serve it. The right side dishes and beverages can elevate your meal, making it even more enjoyable. Here are some fantastic serving suggestions to complement your salmon dish!

Ideal Side Dishes

When it comes to side dishes, you want to choose options that balance the flavors of the salmon while adding variety to your plate. Here are a few ideal side dishes to consider:

  • Coconut Rice: This fragrant rice dish pairs beautifully with the tropical flavors of the salmon. The creaminess of coconut milk enhances the overall experience.
  • Quinoa Salad: A light quinoa salad with fresh vegetables and a citrus dressing adds a refreshing touch. It’s nutritious and complements the salmon perfectly.
  • Steamed Asparagus: The bright green color and crisp texture of asparagus provide a lovely contrast. Simply steam and season with a bit of lemon juice for a zesty finish.
  • Roasted Sweet Potatoes: Their natural sweetness pairs well with the glaze on the salmon. Roasting brings out their flavor and adds a delightful crunch.

These side dishes not only enhance the meal but also add a pop of color to your plate. Feel free to mix and match based on your preferences and what you have on hand!

Perfect Pairings with Wine

Baked Pineapple Salmon Recipe with the right wine. Here are some excellent wine options that complement the flavors of the dish:

  • Sauvignon Blanc: This white wine is crisp and refreshing, with citrus notes that enhance the pineapple glaze.
  • Chardonnay: A lightly oaked Chardonnay offers a creamy texture that pairs well with the richness of the salmon.
  • Pinot Grigio: This wine is light and fruity, making it a great match for the tropical flavors of the dish.
  • Rosé: A chilled rosé provides a lovely balance of fruitiness and acidity, making it a versatile choice for seafood.

Choosing the right wine can elevate your meal, making it feel even more special. So, pour yourself a glass and enjoy the delightful combination of flavors!

Tips for Perfecting Your Baked Pineapple Salmon Recipe

Baked Pineapple Salmon Recipe turns out perfectly every time, consider these helpful tips. They will enhance the flavors and presentation of your dish, making it a standout meal for any occasion.

First, marinate the salmon for at least 30 minutes before baking. This allows the flavors from the glaze to penetrate the fish, resulting in a more flavorful dish. If you have time, marinating it for a few hours in the refrigerator can make a big difference.

Next, don’t skip the resting period after baking. Allowing the salmon to rest for about 5 minutes before serving helps the juices redistribute. This simple step ensures that each bite is moist and flavorful.

Also, consider using a broiler for the last few minutes of cooking. This technique can give your salmon a beautiful caramelized finish. Just keep a close eye on it to prevent burning!

For added texture, you can sprinkle some toasted nuts or seeds on top before serving. Chopped almonds or sesame seeds can add a delightful crunch that contrasts nicely with the tender salmon.

Lastly, always taste your glaze before pouring it over the salmon. Adjust the sweetness or saltiness to your liking. If you prefer a sweeter glaze, add a bit more maple syrup. For a saltier kick, a dash more tamari or soy sauce can do the trick.

Baked Pineapple Salmon Recipe to new heights. Enjoy the process and the delicious results!

Breakdown of Time for Baked Pineapple Salmon Recipe

Baked Pineapple Salmon Recipe can help you plan your meal better. Here’s a simple breakdown of the time required for preparation and cooking. This way, you can enjoy your delicious dish without any rush!

Prep Time

The prep time for this recipe is quite short. You’ll need about 10-15 minutes to gather your ingredients and prepare the salmon. This includes rinsing the fish, making the glaze, and arranging everything in the baking dish. It’s a quick and easy process that anyone can manage!

Cooking Time

Once your salmon is ready, the cooking time is approximately 15-20 minutes. This allows the salmon to bake perfectly, becoming tender and flaky. Keep an eye on it as it cooks, especially if your fillets are thicker or thinner than average. Adjust the time as needed to ensure it’s cooked just right!

Total Time

Baked Pineapple Salmon Recipe to take about 30-35 minutes from start to finish. This includes both prep and cooking time. It’s a fantastic option for a weeknight dinner when you want something healthy and delicious without spending hours in the kitchen.

With this time breakdown, you can easily fit this delightful meal into your busy schedule. Enjoy the process and the wonderful flavors of your homemade salmon!

Nutritional Information for Baked Pineapple Salmon Recipe

Baked Pineapple Salmon Recipe not only delights your taste buds but also provides valuable nutrients. Here’s a closer look at the nutritional information for this delicious dish.

Calories

Baked Pineapple Salmon Recipe contains approximately 320 calories. This makes it a great option for those looking to enjoy a satisfying meal without consuming excessive calories. The combination of salmon and pineapple offers a nutritious balance that keeps you feeling full and energized.

Protein Content

One of the standout features of this recipe is its high protein content. Each serving provides about 30 grams of protein. Salmon is an excellent source of protein, which is essential for muscle repair and growth. Including protein-rich foods in your diet can help you feel satiated and support overall health.

Sodium Levels

Baked Pineapple Salmon Recipe contains around 400 milligrams. While this is a moderate amount, it’s important to be mindful of your overall sodium intake, especially if you are watching your salt consumption. Using low-sodium tamari or soy sauce can help reduce the sodium levels without sacrificing flavor.

Baked Pineapple Salmon Recipe is not only delicious but also packed with nutrients. With a good balance of calories, protein, and moderate sodium levels, it’s a fantastic choice for a healthy meal. Enjoy this delightful dish knowing you’re nourishing your body with every bite!

FAQs about Baked Pineapple Salmon Recipe

Can I use frozen salmon for this recipe?

Baked Pineapple Salmon Recipe. However, it’s important to thaw the salmon completely before cooking. You can do this by placing it in the refrigerator overnight or using the defrost setting on your microwave. Thawing ensures that the salmon cooks evenly and retains its moisture, resulting in a delicious meal.

What can I substitute for pineapple?

Baked Pineapple Salmon Recipe a unique taste!

How do I know when the salmon is done?

To check if your salmon is done, look for a few key signs. The fish should be opaque and flake easily with a fork. You can also use a meat thermometer to check the internal temperature; it should reach 145°F (63°C) for safe consumption. If you don’t have a thermometer, gently press the salmon with a fork. If it flakes apart easily, it’s ready to enjoy!

Can I make this recipe ahead of time?

Baked Pineapple Salmon Recipe ahead of time. Simply marinate the salmon in the glaze and cover it in the refrigerator for up to 24 hours. When you’re ready to cook, just follow the baking instructions. This makes it a convenient option for busy weeknights or special occasions, allowing you to enjoy a delicious meal with minimal effort!

Conclusion on Baked Pineapple Salmon Recipe

Baked Pineapple Salmon Recipe is a delightful dish that brings together the best of both worlds: health and flavor. With its simple preparation and vibrant ingredients, this recipe is perfect for anyone looking to enjoy a nutritious meal without spending hours in the kitchen. The combination of tender salmon and sweet pineapple creates a unique taste that is sure to impress your family and friends.

Moreover, the versatility of this dish allows you to customize it to your liking. Whether you choose to add coconut for a tropical twist or jalapeños for a spicy kick, the possibilities are endless. This adaptability makes it a fantastic option for various occasions, from casual weeknight dinners to festive gatherings.

Baked Pineapple Salmon Recipe, remember the helpful tips and variations shared throughout this article. They will guide you in creating a meal that not only looks beautiful but also tastes incredible. With its rich flavors and nutritious profile, this dish is bound to become a favorite in your household.

So, gather your ingredients, follow the steps, and enjoy the delightful experience of making and sharing this wonderful recipe. Your taste buds will thank you, and your loved ones will be eager for seconds. Happy cooking!