Lucky Shamrock Sugar Cookie Bars: A Festive and Buttery Delight

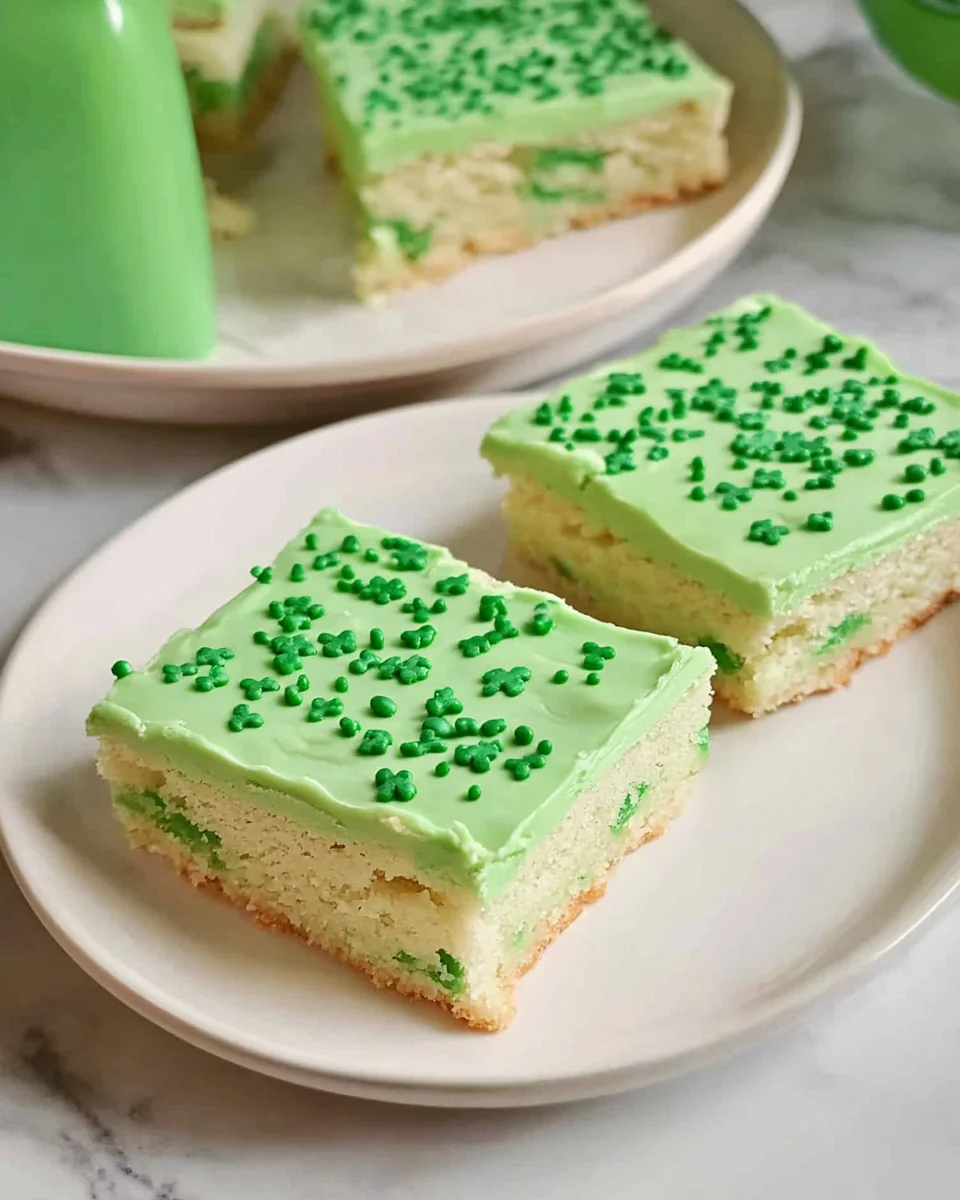
When St. Patrick’s Day rolls around, it’s the perfect excuse to bake something festive, fun, and absolutely delicious. Lucky Shamrock Sugar Cookie Bars are a soft, buttery, melt-in-your-mouth treat that combines the best of classic sugar cookies with the ease of a bar dessert. These bars are simple to make, beautifully decorated, and perfect for parties, school events, or a cozy night in with family.

Instead of rolling and cutting out individual cookies, this recipe allows you to spread the dough in a baking pan, bake, frost, and slice—making it a time-saving alternative to traditional sugar cookies. Topped with a creamy green frosting and festive sprinkles, these bars bring the spirit of St. Patrick’s Day to life in every bite.

Why These Sugar Cookie Bars Are a Must-Try

These sugar cookie bars offer the best of both worlds—all the flavor and texture of a sugar cookie without the hassle of rolling out dough or using cookie cutters. Here’s why you’ll love them:

1. Soft and Buttery Texture

  • These bars have a perfect balance of chewiness and softness, thanks to the creamed butter and sugar in the dough.
  • Unlike crispy sugar cookies, these bars remain light, thick, and fluffy, making them a crowd-pleaser for all ages.

2. Quick and Easy to Make

  • No need to chill dough or roll out individual cookies—just press it into the pan and bake.
  • The one-bowl mixing method makes cleanup easy and the process stress-free.

3. Festive and Perfect for Celebrations

  • The bright green frosting and festive sprinkles make these bars a standout dessert for St. Patrick’s Day parties, office gatherings, or bake sales.
  • You can customize the decorations with different sprinkles, edible gold flakes, or even gold chocolate coins for a fun touch.

4. Great for Feeding a Crowd

  • Since these bars are baked in a sheet pan, they can easily be sliced into 36-40 servings, making them perfect for sharing.

5. Customizable to Suit Any Flavor Preference

  • The classic vanilla-almond flavor pairs beautifully with the creamy frosting, but you can easily swap out flavors to suit your taste (more on that later!).

Festive & Delicious Ingredients:

For the Cookie Base:
  • Butter (softened)
  • Granulated sugar
  • Eggs
  • Vanilla extract
  • Salt
  • Baking soda
  • All-purpose flour
For the Frosting:
  • Butter (softened)
  • Powdered sugar
  • Almond extract
  • Milk
  • Green food coloring
  • St. Patrick’s Day sprinkles

Baking Up a Bite-Sized Celebration:

  1. Prepare the Cookie Dough: Cream butter and sugar, then add eggs and vanilla. Mix in dry ingredients until a smooth dough forms.
  2. Bake to Perfection: Spread the dough evenly in a 12×17-inch greased baking pan and bake at 375°F for 15 minutes until lightly golden.
  3. Make the Frosting: Beat butter until smooth, then mix in powdered sugar, almond extract, and milk. Add green food coloring until the desired shade is reached.
  4. Frost & Decorate: Spread frosting over the cooled cookie bars and top with festive sprinkles.
  5. Slice & Serve: Cut into squares or bars and enjoy this buttery, melt-in-your-mouth sugar cookie delight!

Nutritional Breakdown (Per Serving Estimate):

  • Calories: ~401
  • Carbohydrates: ~71g
  • Protein: ~4g
  • Fat: ~11g
  • Sugar: ~45g
  • Sodium: ~175mg

How to Serve Sugar Cookie Bars for Maximum Enjoyment

These bars are delicious on their own, but a few creative serving ideas can elevate them to the next level:

1. Paired with Ice Cream

  • Serve these bars warm or chilled with a scoop of vanilla bean or mint chocolate chip ice cream for a creamy, refreshing combination.

2. Drizzled with White Chocolate or Caramel

  • Melted white chocolate, dark chocolate, or caramel sauce can be drizzled over the frosting for an extra layer of indulgence.

3. Cut into Fun Shapes

  • Instead of slicing into squares, use a sharp cookie cutter to create shamrock-shaped bars for an extra festive touch.

4. Layered as a Dessert Parfait

  • Crumble the bars into a glass and layer them with whipped cream and crushed Oreos for a quick and easy St. Patrick’s Day trifle.

5. Served with Coffee or Hot Cocoa

  • These bars pair beautifully with Irish coffee, hot chocolate, or a frothy latte, making them a cozy treat for any time of day.

Creative Variations to Try

One of the best things about sugar cookie bars is how easy they are to customize. Whether you want to change the flavor, texture, or decorations, here are some fun variations to experiment with:

1. Lemon or Orange Sugar Cookie Bars

  • Add lemon or orange zest to the dough for a bright, citrusy twist.
  • Use a lemon glaze instead of frosting for a refreshing alternative.

2. Chocolate-Dipped Sugar Cookie Bars

  • After frosting, dip half of each bar into melted white or dark chocolate for a gourmet finish.
  • Sprinkle with crushed pistachios, coconut flakes, or sprinkles for added texture.

3. Gluten-Free Sugar Cookie Bars

  • Swap all-purpose flour for a gluten-free baking blend to make these bars suitable for gluten-sensitive guests.

4. Funfetti Celebration Bars

  • Mix rainbow sprinkles directly into the dough for a confetti-style look.
  • Use a vanilla or cream cheese frosting with additional sprinkles on top.

5. Mint Chocolate Cookie Bars

  • Replace vanilla extract with peppermint extract for a fresh, cool flavor.
  • Add mini chocolate chips to the dough for a mint chocolate chip twist.

Frequently Asked Questions (FAQs)

1. Can I Make These Bars Ahead of Time?

Yes! These bars can be made a day or two in advance. Simply store them in an airtight container at room temperature until ready to serve.

2. How Do I Keep My Sugar Cookie Bars Soft?

  • Do not overbake—the bars should be slightly golden but still soft in the center.
  • Store them in an airtight container to prevent them from drying out.

3. Can I Freeze Sugar Cookie Bars?

Absolutely! To freeze:

  • Wrap unfrosted bars tightly in plastic wrap and store in the freezer for up to 3 months.
  • When ready to serve, thaw at room temperature and frost just before serving.

4. Can I Use a Different Frosting?

Yes! Instead of buttercream frosting, try:

  • Cream cheese frosting for a tangy, rich flavor.
  • Whipped chocolate ganache for a decadent twist.
  • Lemon glaze for a refreshing citrus contrast.

5. What Type of Sprinkles Work Best?

  • Nonpareils (tiny round sprinkles) work well without bleeding into the frosting.
  • Jumbo sprinkles or gold stars add a fun, festive look.
  • Avoid colored sugar, as it may dissolve into the frosting over time.

6. Can I Cut the Recipe in Half?

Yes! If you don’t need as many bars, halve the ingredients and bake in a 9×9-inch pan for the same delicious results.

Final Thoughts: A Festive Treat Worth Baking

These Lucky Shamrock Sugar Cookie Bars are the ultimate combination of soft, buttery texture and festive flair. Perfect for St. Patrick’s Day—or any occasion when you’re craving something sweet and celebratory—this recipe is sure to become a family favorite.

The best part? They’re easy to make, perfect for sharing, and endlessly customizable. Whether you go with the classic green frosting, add chocolate drizzle, or experiment with citrus zest, these bars are guaranteed to impress.

So the next time you’re looking for a fun and simple dessert, give these sugar cookie bars a try. They’re so good, they just might bring you a little luck!

The Ultimate Moist Carrot Cake: A Timeless Classic

Few desserts can match the comforting, nostalgic appeal of homemade carrot cake. With its moist, tender crumb, warm spices, and rich cream cheese frosting, this cake is a true crowd-pleaser. Whether it’s for a birthday, Easter celebration, or a cozy weekend treat, this heavenly carrot cake is guaranteed to become a favorite in your kitchen.

This recipe stands out because of its unbelievable moisture and deep flavor, thanks to the combination of applesauce (or oil), fresh grated carrots, crushed pineapple, and shredded coconut. These ingredients come together to create a cake that is perfectly balanced in sweetness, texture, and spice.

Let’s explore why this carrot cake is a must-try, the best ways to serve it, and how you can customize it to suit your taste.

Why This Carrot Cake is a Must-Try

Carrot cake has been a staple in bakeries and home kitchens for decades, but not all recipes are created equal. This version is particularly special because it combines classic flavors with modern baking techniques to create a cake that is moist, flavorful, and incredibly easy to make.

Here’s what makes this recipe stand out:

1. Incredibly Moist Texture

  • The use of applesauce (or oil), crushed pineapple, and freshly grated carrots keeps the cake soft and moist for days.
  • No dry or dense texture—just a light, fluffy crumb that melts in your mouth.

2. A Perfect Balance of Flavors

  • The sweetness of the carrots and coconut pairs beautifully with the slight tang of the cream cheese frosting.
  • A touch of cinnamon and vanilla adds depth, making each bite warm and aromatic.

3. Foolproof and Easy to Make

  • This recipe requires just one mixing bowl and simple pantry ingredients.
  • Even beginner bakers can achieve perfect results with this straightforward method.

4. No Butter or Oil Required (If Using Applesauce)

  • Using unsweetened applesauce instead of oil reduces the fat content while keeping the cake just as moist and flavorful.
  • This small tweak makes the cake a bit lighter while still maintaining its rich taste.

5. Perfect for Any Occasion

  • Whether you’re making a layered celebration cake, cupcakes, or a sheet cake, this recipe is versatile and adaptable.
  • It’s great for holidays, birthdays, or as an everyday dessert.

Wholesome & Flavorful Ingredients:

  • Applesauce (or oil) for extra moisture
  • Granulated sugar
  • Eggs
  • All-purpose flour
  • Baking soda & baking powder
  • Salt & cinnamon
  • Freshly grated carrots
  • Shredded sweetened coconut
  • Crushed pineapple (with juice)
  • Chopped nuts (optional)
  • Vanilla extract

Creamy Dreamy Cream Cheese Frosting:

  • Butter (softened)
  • Cream cheese (softened)
  • Vanilla extract
  • Powdered sugar
  • Toasted pecans or coconut (for garnish)

A Foolproof Guide to Baking Perfection:

  1. Mix the Batter: Combine wet ingredients, then fold in dry ingredients until well incorporated. Stir in grated carrots, coconut, pineapple, and nuts.
  2. Bake Until Golden: Pour the batter into greased cake pans and bake at 350°F for 25-40 minutes, depending on pan size.
  3. Cool Completely: Let cakes cool before frosting to prevent melting.
  4. Whip Up the Frosting: Beat butter and cream cheese until fluffy, then mix in vanilla and powdered sugar until smooth.
  5. Assemble & Frost: Layer cakes with generous dollops of frosting, spreading evenly. Chill before serving for the best texture.

Nutritional Breakdown (Per Serving Estimate):

  • Calories: ~499
  • Carbohydrates: ~77g
  • Protein: ~5g
  • Fat: ~20g
  • Sugar: ~61g
  • Sodium: ~274mg

Best Ways to Serve Carrot Cake

This cake is delicious on its own, but a few thoughtful additions can take it to the next level. Here are some of the best ways to serve it:

1. Classic Layered Carrot Cake

  • For a traditional presentation, bake the cake in two or three layers and spread cream cheese frosting between each.
  • Top with toasted pecans or coconut flakes for added texture.

2. Carrot Cake Cupcakes

  • Portion the batter into cupcake liners for a fun, bite-sized version of the cake.
  • Pipe the frosting into beautiful swirls for an elegant look.

3. Sheet Pan Carrot Cake

  • If you’re baking for a crowd, make it in a 9×13-inch pan for easy slicing and serving.
  • A thick layer of frosting on top makes it simple yet stunning.

4. Warm with a Scoop of Ice Cream

  • Try serving the cake slightly warmed with a scoop of vanilla or cinnamon ice cream for a decadent dessert.

5. Drizzled with Caramel or Honey

  • A light drizzle of caramel sauce or honey enhances the sweetness and richness of the cake.

Creative Variations to Try

This carrot cake recipe is already perfect as is, but if you love experimenting in the kitchen, here are some fun variations to explore:

1. Nut-Free Carrot Cake

  • If you or your guests have nut allergies, simply omit the chopped nuts and add extra coconut or raisins for texture.

2. Chocolate Carrot Cake

  • Add ½ cup of cocoa powder to the dry ingredients for a chocolate-infused twist.
  • Fold in chocolate chips for extra indulgence.

3. Lemon-Carrot Cake

  • Add fresh lemon zest to the batter for a bright citrusy note.
  • Pair with a lemon cream cheese frosting for a refreshing flavor.

4. Maple-Spiced Carrot Cake

  • Substitute brown sugar for some of the granulated sugar and add a dash of nutmeg and cloves for a more spiced, maple-like flavor.
  • Drizzle with maple glaze instead of traditional frosting.

5. Vegan Carrot Cake

  • Use flaxseed eggs (1 tablespoon flaxseed + 3 tablespoons water per egg) instead of regular eggs.
  • Swap dairy-free cream cheese and plant-based butter for a vegan frosting.

Frequently Asked Questions (FAQs)

1. Why is my carrot cake too dense?

  • Make sure not to overmix the batter—stir just until the ingredients are combined.
  • Use freshly grated carrots instead of pre-shredded ones from the store, which are often too dry.

2. Can I make this cake ahead of time?

Yes! In fact, this cake tastes even better the next day as the flavors have time to meld together. Store it:

  • At room temperature (unfrosted) for up to 24 hours.
  • In the refrigerator (frosted) for up to 5 days in an airtight container.

3. Can I freeze carrot cake?

Absolutely! Wrap the unfrosted cake layers in plastic wrap and aluminum foil, then freeze for up to 3 months. When ready to serve, thaw in the fridge overnight and frost before serving.

4. What’s the best way to store leftover carrot cake?

  • Refrigerator: Since the frosting contains cream cheese, store the cake in an airtight container in the fridge.
  • Freezer: If freezing slices, wrap each slice individually in plastic wrap before placing in a freezer-safe bag.

5. Can I use raisins in this recipe?

Yes! If you love raisins in carrot cake, add ½ cup of golden or regular raisins when mixing in the carrots.

6. What’s the best frosting for carrot cake?

The classic choice is cream cheese frosting, but you can also use:

  • Whipped vanilla frosting for a lighter option.
  • Brown butter frosting for a richer, nuttier taste.
  • Coconut frosting for a tropical twist.

Final Thoughts: A Carrot Cake That Stands the Test of Time

This homemade carrot cake is more than just a dessert—it’s a slice of tradition, nostalgia, and comfort all in one. Its moist, spiced layers combined with a luscious cream cheese frosting make it a go-to recipe for any celebration.

The best part? It’s easy to make, endlessly adaptable, and always a crowd favorite. Whether you enjoy it as a layered cake, cupcakes, or a simple sheet cake, this carrot cake is guaranteed to be a showstopper.

So, the next time you’re craving something sweet, spiced, and irresistibly moist, give this ultimate carrot cake recipe a try. You just might find yourself making it for every occasion!

Easter Celebration Poke Cake: A Festive and Flavorful Treat

Few desserts capture the joy and vibrancy of spring quite like an Easter poke cake. With its pastel swirls, creamy texture, and burst of vanilla flavor, this cake is a show-stopping centerpiece for any Easter gathering. Simple yet impressive, this moist and colorful cake brings together the convenience of a boxed cake mix with the fun of flavored pudding, making every bite light, sweet, and irresistible.

Whether you’re hosting a family Easter brunch, a church potluck, or just looking for a fun dessert to brighten your spring table, this cake is the perfect choice. The best part? It’s easy to make, endlessly customizable, and guaranteed to impress both kids and adults alike.

Why This Easter Poke Cake is a Must-Try

Poke cakes have been a nostalgic favorite since the 1970s, and for good reason. They are light, creamy, and incredibly easy to prepare, making them the ultimate foolproof dessert. This Easter version takes the classic poke cake up a notch with a pastel color palette and a silky vanilla pudding filling, making it the perfect dessert for springtime celebrations.

Here’s why you’ll love this cake:

1. Beautiful and Festive

  • The pastel swirls create a colorful, marbled effect, making it visually stunning without any complicated decorating skills required.
  • A topping of whipped cream and Easter sprinkles makes it even more festive.

2. Moist and Flavorful

  • The vanilla pudding filling seeps into every bite, ensuring a soft, melt-in-your-mouth texture.
  • The cool whipped topping adds a light and creamy contrast to the fluffy cake layers.

3. No Special Baking Skills Required

  • Even beginner bakers can make this cake with ease.
  • No need for complicated frosting techniques—just spread the whipped topping and sprinkle with decorations.

4. Customizable to Your Taste

  • Swap out vanilla pudding for lemon, coconut, or pistachio for a new twist.
  • Add fresh fruit or crushed pineapple for an extra burst of flavor.

5. Make-Ahead Friendly

  • This cake actually tastes better after chilling, so it’s perfect for preparing a day in advance.

A Rainbow of Sweet Ingredients:

  • White cake mix (plus required ingredients)
  • Pastel gel food coloring
  • Instant vanilla pudding mix
  • Milk
  • Cool Whip (thawed)
  • Easter-themed sprinkles (optional)

A Slice of Spring in Every Bite:

  1. Create the Colorful Batter: Prepare the white cake mix, divide it into bowls, and mix each with a pastel food color. Swirl the colors together for a marbled effect.
  2. Bake to Perfection: Follow the cake mix instructions, then let the cake cool slightly before poking holes throughout.
  3. Infuse with Pudding: Whisk together pudding mix and milk, then pour over the cake, letting it seep into the holes for extra moisture and flavor.
  4. Chill for Flavor Fusion: Refrigerate for at least two hours to allow the pudding to set.
  5. Frost & Decorate: Spread a thick layer of Cool Whip over the cake and top with festive Easter sprinkles.
  6. Slice & Enjoy: Serve chilled for a light, creamy, and colorful dessert experience.

Nutritional Breakdown (Per Serving Estimate):

  • Calories: ~280
  • Carbohydrates: ~45g
  • Protein: ~3g
  • Fat: ~9g
  • Sugar: ~32g
  • Sodium: ~200mg

Best Ways to Serve Easter Poke Cake

While this cake is delicious on its own, pairing it with the right accompaniments can enhance its flavors and presentation. Here are some great ways to serve it:

1. With Fresh Fruit

  • A side of mixed berries (strawberries, raspberries, blueberries) balances the sweetness of the cake.
  • Sliced peaches or pineapple complement the creamy vanilla pudding filling.

2. With a Scoop of Ice Cream

  • Vanilla ice cream pairs beautifully with the soft cake texture.
  • Lemon or strawberry ice cream adds a refreshing contrast.

3. Drizzled with a Fruit Sauce

  • Raspberry or strawberry sauce adds an elegant finishing touch.
  • A light lemon glaze enhances the citrus notes in the cake.

4. Garnished with Toasted Coconut or Nuts

  • A sprinkle of toasted coconut flakes adds texture and a hint of nuttiness.
  • Chopped pecans or almonds give a nice crunch.

5. Served Chilled for Maximum Flavor

  • This cake is best enjoyed cold, so make sure to refrigerate for at least a few hours before serving.

Creative Variations to Try

One of the best things about this poke cake is how easy it is to customize. Here are a few variations to try:

1. Lemon Poke Cake

  • Use lemon pudding instead of vanilla for a bright, citrusy twist.
  • Add a touch of lemon zest to the cake batter for extra freshness.

2. Coconut Cream Poke Cake

  • Swap vanilla pudding for coconut cream pudding.
  • Top with toasted coconut flakes for a tropical flair.

3. Strawberry Shortcake Poke Cake

  • Use strawberry pudding or mix in pureed strawberries.
  • Top with sliced fresh strawberries before serving.

4. Chocolate Lovers’ Poke Cake

  • Replace vanilla pudding with chocolate pudding for a richer dessert.
  • Drizzle with chocolate ganache before serving.

5. Almond & White Chocolate Poke Cake

  • Use white chocolate pudding and add a teaspoon of almond extract to the batter.
  • Garnish with slivered almonds for extra crunch.

Frequently Asked Questions (FAQs)

1. Why is it called a “poke cake”?

Poke cakes get their name from the technique of poking holes all over the cake after baking. These holes are then filled with pudding, fruit puree, or syrup, ensuring that every bite is moist, flavorful, and delicious.

2. How long does this cake need to chill?

For the best results, chill the cake for at least 2 hours before serving. This allows the pudding to fully absorb into the cake and enhances the flavor.

3. Can I make this cake ahead of time?

Yes! This cake is even better when made a day in advance. Simply store it covered in the refrigerator and add the whipped topping and sprinkles just before serving.

4. Can I use homemade whipped cream instead of Cool Whip?

Absolutely! If you prefer homemade whipped cream, simply whip 2 cups of heavy cream with ¼ cup powdered sugar until soft peaks form. Spread it over the cake just before serving.

5. What’s the best way to store leftovers?

  • Refrigerator: Store in an airtight container for up to 4 days.
  • Freezer: You can freeze individual slices for up to 2 months. Let them thaw in the fridge before eating.

6. Can I make this cake without food coloring?

Yes! The food coloring is simply for aesthetic appeal. If you prefer a natural look, just bake the cake as is and proceed with the recipe as usual.

7. What other decorations can I use?

  • Mini chocolate eggs or pastel-colored M&Ms for an Easter touch.
  • Crushed graham crackers to mimic a “spring garden” effect.
  • Edible flowers for an elegant, natural decoration.

Final Thoughts: A Perfect Easter Dessert for Every Celebration

This Easter Celebration Poke Cake is the ideal combination of fun, flavor, and nostalgia. With its soft texture, creamy filling, and vibrant pastel swirls, it’s a festive dessert that brings joy to any table.

The ease of preparation, endless customization options, and make-ahead convenience make this cake a go-to recipe for springtime gatherings. Whether you enjoy it as a centerpiece for Easter brunch or as a sweet treat to welcome the new season, it’s guaranteed to be a hit with family and friends.

So the next time you’re looking for a colorful, crowd-pleasing dessert, give this Easter Poke Cake a try. With its moist, creamy layers and fun, festive look, it’s sure to become a new spring tradition!

Soft & Fluffy No-Oven Turkish Bread (Bazlama): A Perfect Homemade Flatbread

Bread has been a staple in cuisines across the world for centuries, and few things are as satisfying as making your own soft, fluffy flatbread from scratch. This No-Oven Turkish Bread, also known as Bazlama, is a simple yet incredibly delicious bread that requires minimal ingredients and no baking. Cooked on the stovetop, it develops a golden crust on the outside with a soft, airy texture inside, making it a perfect choice for wraps, dipping, or simply enjoying with butter.

Whether you’re a beginner looking for an easy bread recipe or someone wanting a quick alternative to store-bought flatbreads, this recipe is a must-try.

Why This No-Oven Turkish Bread is a Must-Try

Bazlama is one of the simplest and most satisfying types of bread to make, and here’s why it’s worth adding to your regular cooking routine:

1. No Oven Needed

This bread is cooked entirely in a skillet on the stovetop, making it accessible to anyone, even without an oven. Perfect for those living in small spaces or looking for a quick bread recipe without the hassle of baking.

2. Soft, Fluffy, and Incredibly Versatile

Bazlama has a slightly chewy, airy texture, making it ideal for sandwiches, wraps, or as a side dish. It pairs beautifully with Mediterranean, Middle Eastern, and even Indian dishes.

3. Requires Only a Few Basic Ingredients

With just flour, yeast, milk, water, sugar, and salt, this bread is as simple as it gets. There’s no need for complicated techniques or long proofing times.

4. Perfect for Meal Prep & Freezing

Bazlama stores well and can be frozen for future use, making it a great option for meal planning. You can cook a batch and have homemade bread ready whenever you need it.

5. Naturally Vegan-Friendly (With a Dairy-Free Option)

By swapping the milk for more water or using a plant-based milk alternative, this bread becomes a vegan-friendly staple that can complement a variety of diets.

Simple & Traditional Ingredients:

  • Bread flour or all-purpose flour
  • Warm milk
  • Warm water
  • Instant dry yeast
  • Sugar
  • Salt
  • Melted unsalted butter or olive oil (optional, for brushing)
  • Chopped parsley (optional, for garnish)

Fluffy Flatbread in Just a Few Steps:

  1. Activate the Yeast: Mix warm milk, warm water, sugar, and yeast in a bowl. Let sit until foamy.
  2. Prepare the Dough: Combine the flour and salt, then add the yeast mixture. Knead until smooth.
  3. Let it Rise: Cover and allow the dough to double in size for about an hour.
  4. Shape the Bread: Divide into equal pieces, roll them out into flat rounds about 5mm thick.
  5. Cook Without an Oven: Heat a pan over medium heat, cook the bread until bubbles form, then flip. Continue until both sides are golden and cooked through.
  6. Finish & Serve: Brush with melted butter or olive oil and sprinkle with parsley for extra flavor.

Nutritional Breakdown (Per Serving Estimate):

  • Calories: ~180
  • Carbohydrates: ~35g
  • Protein: ~6g
  • Fat: ~2g
  • Sodium: ~150mg

How to Enjoy Turkish Bazlama

Bazlama is incredibly versatile, and there are so many delicious ways to serve it. Here are some of the best ways to enjoy it:

1. As a Wrap for Savory Fillings

Bazlama is perfectly soft and pliable, making it great for wrapping around grilled meats, falafel, kebabs, or fresh veggies. Try it as a substitute for pita or naan.

2. Dipped into Hummus, Tzatziki, or Baba Ganoush

The slightly chewy texture makes it an excellent dipping bread for Mediterranean spreads and dips.

3. Served Alongside Stews and Curries

Use it to scoop up rich sauces and hearty stews, just like naan or roti. It pairs beautifully with butter chicken, lentil soups, or slow-cooked lamb dishes.

4. Topped with Cheese & Herbs

Brush it with garlic butter and sprinkle with feta or Parmesan for a cheesy flatbread variation.

5. Sweet Option with Honey & Butter

For a sweet twist, drizzle it with honey or spread some jam for a quick breakfast or dessert option.

Creative Variations to Try

While Bazlama is delicious on its own, you can easily customize it to suit your taste preferences:

1. Garlic & Herb Flatbread

Mix garlic powder, oregano, or rosemary into the dough for an aromatic twist.

2. Cheese-Stuffed Turkish Bread

Roll small amounts of cheese (feta, mozzarella, or cheddar) inside the dough before cooking for a gooey surprise in every bite.

3. Spiced Flatbread

Add paprika, cumin, or za’atar seasoning to the dough for an extra burst of flavor.

4. Whole Wheat or Multigrain Version

For a healthier alternative, swap half of the all-purpose flour with whole wheat flour, or add flaxseeds or sesame seeds to the dough.

5. Yogurt-Infused Dough

Replace some of the liquid with Greek yogurt for a slightly tangy flavor and even softer texture.

Frequently Asked Questions (FAQs)

1. How is Bazlama Different from Naan or Pita Bread?

  • Bazlama is a thicker, softer flatbread that is pan-cooked rather than baked.
  • Naan usually includes yogurt or eggs and is traditionally baked in a tandoor.
  • Pita bread has a hollow pocket inside, while Bazlama is dense and fluffy throughout.

2. Can I Make This Without Yeast?

Yes! If you don’t have yeast, you can substitute 1 teaspoon of baking powder for a quick version. However, yeast provides the best texture and flavor.

3. Why Didn’t My Flatbread Puff Up?

If your Bazlama didn’t develop air pockets, it could be due to:

  • Not letting the dough rest enough before rolling it out.
  • Rolling the dough too thin (it should be around 5mm thick).
  • Not using a hot enough pan—the heat should be medium-high to create bubbles.

4. Can I Store & Reheat This Bread?

Yes! Bazlama keeps well:

  • Room Temperature: Store in an airtight bag for up to 2 days.
  • Refrigerator: Keeps for up to 5 days in a sealed container.
  • Freezer: Wrap individually and freeze for up to 2 months.

To reheat, simply warm it in a skillet over low heat, or microwave for 15 seconds to soften.

5. Can I Use a Different Type of Flour?

Yes! You can use:

  • Bread flour for a slightly chewier texture.
  • Whole wheat flour for a denser, healthier option.
  • Gluten-free flour blends if needed (though texture may vary).

6. What’s the Best Pan to Use?

A cast-iron skillet or heavy-bottomed pan works best. Thin pans may not retain enough heat to properly cook the bread.

Final Thoughts: A Homemade Flatbread You’ll Want to Make Again & Again

This No-Oven Turkish Bread (Bazlama) is the perfect example of how simple ingredients can create something incredibly satisfying. Whether you’re a bread lover looking for an easy stovetop option or just want a quick and fluffy flatbread for meals, this recipe is a fantastic addition to your home cooking repertoire.

The best part? It’s versatile, foolproof, and pairs well with everything. From savory wraps to sweet honey-drizzled slices, this bread is a blank canvas for creativity.

So next time you’re in the mood for fresh, homemade bread, skip the oven and try this delicious, pillowy Turkish flatbread. Once you do, you’ll wonder how you ever lived without it!

Quick & Easy Cottage Cheese Flatbread: A Two-Ingredient Game Changer

There’s something incredibly satisfying about making homemade flatbread—especially when it only requires two simple ingredients. This cottage cheese flatbread is soft, chewy, and packed with protein, making it an excellent choice for those who want a quick, nutritious, and versatile bread alternative.

Whether you’re using it as a wrap, a pizza base, or simply enjoying it with dips, this flatbread delivers on both flavor and texture. With no need for yeast, proofing, or complicated techniques, it’s a fantastic beginner-friendly recipe that fits into any meal plan.

Why You’ll Love This Flatbread Recipe

This flatbread isn’t just easy—it’s a game changer for those looking for a healthier, high-protein bread alternative. Here’s why you’ll want to make it again and again:

1. Just Two Simple Ingredients

No long grocery lists or special ingredients—just cottage cheese and self-rising flour. If you don’t have self-rising flour, you can easily make your own with flour, baking powder, and salt.

2. High in Protein, Low in Effort

Cottage cheese adds a natural protein boost, making this flatbread a great post-workout snack or balanced meal component. It’s also much easier to prepare than traditional yeast-based breads.

3. Quick & No Fuss

From mixing the dough to cooking, this flatbread is ready in under 15 minutes. No need to wait for dough to rise or preheat an oven—just mix, roll, and cook in a skillet.

4. Soft, Chewy, and Versatile

This flatbread is soft yet sturdy enough to hold toppings, making it great for wraps, sandwiches, and mini pizzas.

5. Pairs Well with Everything

Thanks to its mild, slightly tangy flavor, this flatbread pairs perfectly with both sweet and savory toppings.

Simple & Wholesome Ingredients:

  • Cottage cheese
  • Self-rising flour

Soft, Chewy, and Ready in Minutes:

  1. Mix the Dough: Combine cottage cheese and self-rising flour until a soft, slightly sticky dough forms. Add more flour if needed.
  2. Shape the Flatbread: Divide into four portions, flatten into ¼-inch thick rounds, and shape as desired.
  3. Cook to Perfection: Cook each flatbread in a hot non-stick skillet for 2-3 minutes per side until golden brown spots appear.
  4. Serve & Enjoy: Eat warm as is, or pair with hummus, avocado, smoked salmon, or a drizzle of honey for a flavorful touch.

Nutritional Breakdown (Per Serving Estimate):

  • Calories: ~150
  • Carbohydrates: ~20g
  • Protein: ~9g
  • Fat: ~4g
  • Sodium: ~200mg

Best Ways to Serve This Flatbread

One of the best things about this cottage cheese flatbread is how adaptable it is. Whether you’re craving something savory, sweet, or classic, this bread works beautifully in many different dishes.

1. As a Wrap or Sandwich Bread

  • Fill with grilled chicken, turkey, hummus, or roasted veggies for a delicious wrap.
  • Use it as a flatbread sandwich base for deli meats, cheese, and greens.

2. As a Quick Pizza Base

  • Spread with tomato sauce, cheese, and your favorite toppings for a homemade personal pizza.
  • Try a white pizza version with ricotta, garlic, and fresh herbs.

3. With Dips & Spreads

  • Cut into pieces and serve with hummus, tzatziki, or guacamole.
  • Spread with cream cheese and smoked salmon for a quick and elegant appetizer.

4. Sweet Breakfast Flatbread

  • Drizzle with honey and cinnamon for a lightly sweet treat.
  • Top with Greek yogurt and fresh fruit for a balanced breakfast.

5. As a Side Dish

  • Serve alongside soups, stews, or curries instead of traditional bread.
  • Use it to scoop up sauces or dips with Mediterranean or Indian-inspired meals.

Creative Variations to Try

While this recipe is fantastic as is, you can easily customize it to suit your taste with a few simple tweaks:

1. Herb & Garlic Flatbread

  • Add garlic powder, dried oregano, or fresh parsley to the dough for extra flavor.

2. Cheesy Flatbread

  • Mix grated Parmesan or shredded cheddar into the dough for a richer taste.

3. Spicy Kick

  • Add chili flakes or black pepper to the dough for a hint of heat.

4. Whole Wheat Version

  • Substitute whole wheat flour for a fiber-rich option, but add a little extra liquid if needed.

5. Dairy-Free Option

  • Try using lactose-free or plant-based cottage cheese alternatives.

Frequently Asked Questions (FAQs)

1. Can I Use Regular Flour Instead of Self-Rising Flour?

Yes! If you don’t have self-rising flour, you can make your own by mixing:

  • 1 cup all-purpose flour
  • 1 ½ teaspoons baking powder
  • ¼ teaspoon salt

This will create the same effect as self-rising flour.

2. What’s the Best Way to Store Leftovers?

  • Room Temperature: Store in an airtight container for up to 2 days.
  • Refrigerator: Keep in the fridge for up to 5 days.
  • Freezer: Freeze for up to 2 months, separating layers with parchment paper.

3. Can I Reheat the Flatbread?

Yes! To bring back the soft texture:

  • Microwave for 10-15 seconds
  • Toast lightly in a pan or oven at 350°F for a few minutes

4. Is This Flatbread Gluten-Free?

Not as written, but you can substitute self-rising flour with a gluten-free baking blend and a teaspoon of baking powder.

5. Does the Flatbread Taste Like Cottage Cheese?

No! While cottage cheese adds a slight tang and extra moisture, the flavor is very mild, making it perfect for both sweet and savory dishes.

6. Can I Make This Dough Ahead of Time?

Yes! You can prepare the dough in advance, wrap it tightly, and refrigerate for up to 24 hours before rolling and cooking.

7. Can I Cook This Flatbread in the Oven Instead of a Skillet?

Yes! Bake at 375°F (190°C) for about 10-12 minutes, flipping halfway through for an evenly cooked texture.

Final Thoughts: A Simple, Nutritious Flatbread for Any Meal

This two-ingredient cottage cheese flatbread proves that delicious, homemade bread doesn’t have to be complicated. It’s quick to prepare, high in protein, and incredibly versatile, making it a fantastic staple for busy kitchens.

Whether you enjoy it as a wrap, a side dish, or a base for creative toppings, this flatbread is a great alternative to store-bought breads. Plus, with so many ways to customize it, you’ll never get bored.

So the next time you need a quick, easy, and satisfying bread option, give this cottage cheese flatbread a try. Once you do, it just might become a new favorite in your kitchen!

Old-Fashioned Amish Egg Custard: A Creamy, Nostalgic Delight

Few desserts capture the essence of simple, homemade comfort like Amish Egg Custard. This rich, creamy, and delicately sweetened dish has been a staple in Amish kitchens for generations. Whether served as a light dessert, a sweet breakfast, or a satisfying afternoon treat, this smooth and velvety custard is both easy to make and incredibly satisfying.

Unlike modern custard recipes that may rely on thickeners like cornstarch, Amish Egg Custard is thickened naturally by eggs, resulting in a silky texture with a delicate balance of sweetness and warmth from cinnamon and nutmeg. If you love classic, no-fuss desserts that let simple ingredients shine, this custard is a must-try.

Why Amish Egg Custard is a Classic Worth Making

This dish has stood the test of time for good reason. Here’s why Amish Egg Custard remains a beloved recipe in many households:

1. Timeless and Simple

  • Made with just a handful of pantry staples, this custard is effortless yet delicious.
  • It doesn’t require fancy equipment—just a whisk, a saucepan, and an oven.

2. A Creamy, Smooth Texture

  • Eggs naturally thicken the custard, creating a lusciously smooth consistency.
  • Unlike pudding, it has a firmer texture that holds its shape when sliced.

3. A Versatile Dish for Any Occasion

  • Serve it warm or chilled as a dessert, breakfast, or snack.
  • Enjoy it on its own or topped with fresh berries, caramel sauce, or whipped cream.

4. No Water Bath Needed

  • Many custard recipes require a water bath (bain-marie) for even cooking, but this Amish version uses a simple oven method to set the custard without hassle.

5. A Great Way to Use Up Extra Eggs

  • If you raise chickens or find yourself with an abundance of eggs, this recipe is a fantastic way to use them up in a delicious, wholesome dish.

Rich & Simple Ingredients:

  • Whole milk
  • Eggs
  • White sugar
  • Brown sugar
  • All-purpose flour
  • Salt
  • Vanilla extract
  • Cinnamon & nutmeg

Silky Perfection in Every Bite:

  1. Scald the Milk: Heat milk until just below boiling, forming a light skin on top.
  2. Mix the Custard Base: Beat eggs with sugars, flour, and salt until well combined.
  3. Temper & Combine: Slowly add warm milk to the egg mixture while whisking to prevent curdling.
  4. Flavor & Bake: Stir in vanilla, pour into a metal pan, and sprinkle with cinnamon and nutmeg.
  5. Bake & Rest: Bake at 475°F for 3 minutes, then turn off the oven and let the custard set as it cools.
  6. Chill & Serve: Refrigerate until firm and enjoy cold or at room temperature.

Nutritional Breakdown (Per Serving Estimate):

  • Calories: ~177
  • Carbohydrates: ~26g
  • Protein: ~7g
  • Fat: ~6g
  • Sugar: ~25g
  • Sodium: ~100mg

Best Ways to Serve Amish Egg Custard

This custard is incredibly versatile, and a few thoughtful touches can elevate the experience. Here are some of the best ways to enjoy it:

1. Plain and Simple

  • The classic way to enjoy Amish Egg Custard is chilled or at room temperature, with its delicate sweetness and subtle spice shining through.

2. With Fresh Fruit

  • Sliced strawberries, raspberries, blueberries, or bananas add a fresh contrast to the creamy texture.
  • A drizzle of honey or maple syrup complements the custard’s rich flavor.

3. Topped with Whipped Cream

  • A dollop of homemade whipped cream adds extra indulgence.
  • Sprinkle with a pinch of cinnamon or cocoa powder for a decorative touch.

4. With a Caramelized Sugar Crust

  • For a crème brûlée-style twist, sprinkle the top with sugar and broil for a caramelized crust.

5. Paired with Coffee or Tea

  • The gentle sweetness of custard pairs beautifully with strong black coffee, espresso, or herbal teas.

6. Served Alongside Baked Goods

  • Enjoy custard with a slice of Amish apple pie, warm banana bread, or homemade shortbread cookies for a heartwarming treat.

Creative Variations to Try

While the classic version is delicious as is, there are plenty of ways to customize it to your taste:

1. Coconut Egg Custard

  • Swap out some of the milk for coconut milk for a tropical twist.
  • Add toasted coconut flakes for a bit of texture.

2. Maple or Honey Custard

  • Replace granulated sugar with maple syrup or honey for a deeper, richer sweetness.

3. Chocolate Egg Custard

  • Stir in a little cocoa powder or melted dark chocolate for a decadent variation.

4. Spiced Custard

  • Enhance the warm spices with a pinch of cardamom, cloves, or allspice.

5. Pumpkin Custard

  • Mix in pureed pumpkin and a touch of pumpkin pie spice for a seasonal treat.

6. Almond or Citrus Twist

  • A splash of almond extract or fresh orange zest can add a bright, unique flavor.

Frequently Asked Questions (FAQs)

1. Why Did My Custard Turn Out Watery?

If your custard has a watery texture, it may be due to:

  • Overheating the milk – Scald the milk, but don’t let it boil.
  • Skipping the tempering step – Slowly add warm milk to the eggs while whisking to prevent curdling.
  • Not letting it fully set – Allow it to cool completely before serving.

2. Can I Make This Custard Without Flour?

Yes! The flour helps stabilize the texture, but you can omit it. The custard may be slightly softer but will still set properly.

3. Can I Use a Different Type of Milk?

For the best texture, whole milk is recommended, but you can use:

  • 2% milk (slightly less creamy).
  • A mix of milk and heavy cream for extra richness.
  • Dairy-free alternatives like almond milk or coconut milk (may slightly alter texture).

4. How Do I Prevent My Custard from Curdling?

  • Temper the eggs properly – Slowly whisk in warm milk rather than adding it all at once.
  • Avoid high heat – Bake as instructed and let it cool gradually in the oven.

5. Can I Make This Recipe in Individual Portions?

Absolutely! Pour the custard into ramekins or small oven-safe dishes for single servings. The baking time may need to be slightly reduced.

6. How Long Does This Custard Last?

Stored in an airtight container in the refrigerator, the custard stays fresh for up to 5 days.

7. Can I Freeze Egg Custard?

While possible, freezing is not recommended as it can alter the texture and make it watery when thawed.

Final Thoughts: A Classic Dessert That Stands the Test of Time

Amish Egg Custard is more than just a dessert—it’s a taste of tradition, a reminder of home, and a testament to how simple ingredients can create something extraordinary. With its silky smooth texture, rich vanilla aroma, and gentle warmth from cinnamon and nutmeg, this custard is a dish that comforts the soul and satisfies the taste buds.

Its versatility, ease of preparation, and nostalgic charm make it a recipe that deserves a place in every kitchen. Whether you enjoy it as a breakfast treat, an after-dinner dessert, or a comforting snack, this custard never goes out of style.

So the next time you’re in the mood for a homemade, old-fashioned dessert, give Amish Egg Custard a try. With its creamy consistency and delicate sweetness, it’s a dish that’s as timeless as it is delicious.

Crispy Amish Onion Fritters: A Classic Homestyle Treat

Amish cooking is known for its simple, hearty, and flavorful dishes, and Amish Onion Fritters are no exception. These crispy, golden fritters are a staple in Amish kitchens, combining thinly sliced onions with a lightly seasoned batter before being fried to perfection. Whether served as a side dish, snack, or appetizer, these fritters deliver a crunchy bite with a soft, savory interior, making them an instant favorite.

What makes these fritters truly special is their versatility and ease of preparation. With just a handful of pantry staples, you can create a comforting, restaurant-quality dish right in your own kitchen. Whether paired with a creamy dip, served alongside a hearty meal, or enjoyed on their own, these fritters are guaranteed to please.

Why These Onion Fritters Are a Must-Try

There are plenty of fried treats out there, but Amish Onion Fritters stand out for several reasons. Here’s why this recipe is worth adding to your collection:

1. A Perfectly Balanced Flavor

  • The natural sweetness of the onions is enhanced as they caramelize in the batter.
  • The light seasoning of salt, black pepper, and sugar brings out the depth of flavors.
  • The crispy exterior and soft interior create a satisfying texture contrast.

2. Easy to Make with Simple Ingredients

No need for complicated steps or fancy equipment—this recipe comes together quickly using basic pantry ingredients like flour, baking powder, and milk.

3. Pairs Well with Many Dishes

These fritters are incredibly versatile and can be served as:

  • A savory breakfast alongside eggs and bacon.
  • A side dish with soups, stews, or roasted meats.
  • A snack or appetizer with sour cream, ranch, or a spicy dipping sauce.

4. A Budget-Friendly Recipe

Using onions and a few other affordable ingredients, this recipe is a great way to stretch a meal while delivering bold flavors.

5. A Classic Amish Comfort Food

Amish cuisine focuses on wholesome, home-cooked meals, and these onion fritters are a prime example. They are crispy, warm, and packed with rustic charm, just like something straight out of an Amish farmhouse kitchen.

Simple & Flavorful Ingredients:

  • Thinly sliced onions
  • All-purpose flour
  • Baking powder
  • Salt & sugar
  • Black pepper
  • Milk
  • Oil for frying
  • Sour cream & chives (optional, for serving)

Crispy Perfection in Every Bite:

  1. Prepare the Batter: Mix flour, baking powder, sugar, salt, and black pepper. Gradually add milk, stirring until smooth.
  2. Coat the Onions: Stir in the sliced onions, ensuring they are fully coated in the batter.
  3. Fry Until Golden: Heat oil in a skillet and drop spoonfuls of the mixture, flattening slightly. Fry for 2-3 minutes per side until golden brown and crispy.
  4. Drain & Serve: Transfer to paper towels to drain excess oil. Serve hot with sour cream and chives for extra flavor.

Nutritional Breakdown (Per Serving Estimate):

  • Calories: ~210
  • Carbohydrates: ~28g
  • Protein: ~4g
  • Fat: ~9g
  • Sodium: ~420mg

Best Ways to Serve Amish Onion Fritters

While these fritters are delicious on their own, pairing them with the right accompaniments can elevate the experience. Here are some serving suggestions:

1. With a Cool and Creamy Dip

Dipping these crispy fritters in a cool, creamy sauce enhances their flavor. Some great options include:

  • Sour cream with fresh chives for a classic touch.
  • Garlic aioli for a rich, garlicky contrast.
  • Spicy sriracha mayo for a little heat.
  • Honey mustard for a sweet and tangy kick.

2. As a Side Dish for Hearty Meals

These fritters pair perfectly with:

  • Beef stew or pot roast for a rustic, homey dinner.
  • Grilled or roasted chicken for a crispy side dish.
  • Hearty bean soups or chowders for added texture and flavor.

3. Topped with Cheese and Herbs

For a gourmet twist, sprinkle the hot fritters with:

  • Grated Parmesan cheese for a salty, nutty flavor.
  • Chopped parsley or scallions for a fresh, vibrant touch.

4. As a Breakfast Addition

Pairing fritters with scrambled eggs and sausage creates a deliciously unexpected breakfast that’s both crispy and satisfying.

Creative Variations to Try

One of the best things about this recipe is how customizable it is. Here are some fun ways to put a unique spin on these Amish onion fritters:

1. Cheesy Onion Fritters

Mix in grated cheddar, Parmesan, or mozzarella cheese into the batter for an extra layer of richness and flavor.

2. Spicy Onion Fritters

For those who love heat, add:

  • A pinch of cayenne pepper for mild spice.
  • Finely chopped jalapeños for a bold kick.
  • A dash of hot sauce in the batter for extra zing.

3. Herb-Infused Fritters

Enhance the aroma by adding fresh or dried herbs such as:

  • Thyme or oregano for a Mediterranean twist.
  • Rosemary for a fragrant, earthy touch.
  • Dill for a hint of freshness.

4. Onion and Corn Fritters

Add sweet corn kernels to the batter for a slightly sweet and crunchy variation that complements the onions beautifully.

5. Gluten-Free Option

Replace regular flour with gluten-free all-purpose flour to make these fritters suitable for gluten-sensitive diets.

Frequently Asked Questions (FAQs)

1. Can I Use a Different Type of Onion?

Yes! While yellow onions provide the best balance of sweetness and flavor, you can also use:

  • Red onions for a slightly sharper taste.
  • Sweet onions for a milder, caramelized flavor.
  • Green onions for a lighter, more delicate texture.

2. How Do I Keep My Fritters Crispy?

To maintain maximum crispiness:

  • Drain on paper towels immediately after frying.
  • Avoid overcrowding the pan, which can lower the oil temperature.
  • Serve immediately, as fritters tend to soften over time.

3. Can I Make These Ahead of Time?

Yes! While they are best served fresh, you can make the batter ahead of time and store it in the refrigerator for up to 24 hours. When ready to serve, simply fry them fresh.

4. Can These Be Baked Instead of Fried?

For a healthier alternative, you can bake the fritters at 375°F for 15-20 minutes, flipping halfway through. They won’t be as crispy as the fried version but will still be delicious.

5. Can I Air Fry These Fritters?

Yes! To air fry, lightly spray the basket with oil and air fry at 375°F for 10-12 minutes, flipping halfway. This method uses less oil while still delivering a crispy texture.

6. What’s the Best Oil for Frying?

Use a neutral, high-smoke point oil such as:

  • Vegetable oil
  • Canola oil
  • Peanut oil

Avoid using olive oil, as it has a lower smoke point and can burn easily.

7. Can I Freeze These Fritters?

Yes! To freeze, follow these steps:

  • Allow the fritters to cool completely.
  • Place them in a single layer on a baking sheet and freeze for 1 hour.
  • Transfer them to a freezer bag and store for up to 3 months.
  • To reheat, bake in the oven at 350°F for 10-12 minutes or air fry until heated through.

Final Thoughts: A Classic Recipe with Timeless Appeal

Amish Onion Fritters are the perfect example of how simple ingredients can create an incredible dish. With their crispy exterior, soft onion-filled center, and savory seasoning, they offer an irresistible combination of flavors and textures that’s hard to beat.

Whether you’re making these for a cozy family dinner, a potluck, or a fun appetizer, they’re sure to be a hit. The best part? They’re easy to customize, affordable, and absolutely delicious.

So the next time you’re craving something crispy, flavorful, and deeply satisfying, whip up a batch of homemade Amish Onion Fritters—a recipe that proves comfort food never goes out of style.

Amish Poor Man’s Steak: A Comforting, Budget-Friendly Classic

Sometimes, the best meals are the simplest ones—recipes that use basic ingredients to create something hearty, satisfying, and full of flavor. Amish Poor Man’s Steak is one such dish, a humble yet delicious meal that has been passed down through generations. Made with seasoned ground beef, coated in flour, pan-fried until golden, and baked in a rich mushroom gravy, this dish is pure comfort food at its finest.

This dish is budget-friendly, easy to make, and deeply flavorful, making it a staple in Amish kitchens and home-cooked meals across the country. If you’re looking for a filling, homey dinner that doesn’t break the bank, this recipe deserves a spot in your regular meal rotation.

Why This Recipe is a Must-Try

There’s a reason why this dish has stood the test of time. Here’s why Amish Poor Man’s Steak is so beloved:

1. Budget-Friendly & Made with Pantry Staples

This dish was originally created to stretch simple ingredients while still delivering a filling, hearty meal. Instead of using expensive cuts of steak, ground beef is transformed into a tender, flavorful alternative that’s just as satisfying.

2. Full of Homestyle Comfort

The combination of crispy pan-fried patties and creamy mushroom gravy makes this dish incredibly cozy and comforting—perfect for chilly nights or when you need a meal that feels like a warm hug.

3. Make-Ahead Friendly

One of the best things about this recipe is that the beef mixture is prepared the night before, allowing the flavors to meld together. This makes it a great meal prep option for busy families.

4. A Family-Favorite Dish

This is the kind of down-home meal that everyone—from kids to grandparents—will love. The creamy gravy, tender beef, and rich flavors make it a dish that always gets requested again.

5. Pairs Perfectly with Classic Sides

This dish is incredibly versatile and can be served with a variety of comforting sides, making it a well-rounded meal that everyone will enjoy.

Simple Yet Satisfying Ingredients:

  • Ground beef
  • Milk
  • Cracker crumbs
  • Salt & black pepper
  • Finely chopped onion
  • All-purpose flour (for dredging)
  • Cream of mushroom soup
  • Water or broth

Step-by-Step Homestyle Cooking:

  1. Prepare the Beef Mixture – Mix ground beef, milk, cracker crumbs, salt, pepper, and onion until well combined. Shape into a loaf and refrigerate overnight.
  2. Slice and Dredge – The next day, slice the beef loaf into ½-inch thick patties and lightly coat each piece with flour.
  3. Pan Fry Until Golden – Brown the patties in a hot skillet over medium-high heat, searing both sides for extra flavor.
  4. Make the Gravy – Whisk together cream of mushroom soup and water or broth until smooth.
  5. Bake to Perfection – Transfer the browned patties to a baking dish, pour the savory mushroom gravy over them, and bake at 350°F for 1 hour.
  6. Serve & Enjoy – Dish out the tender steak patties with their rich, flavorful gravy over mashed potatoes or egg noodles.

Hearty Nutritional Breakdown (Per Serving Estimate):

  • Calories: ~450
  • Carbohydrates: ~30g
  • Protein: ~28g
  • Fat: ~22g
  • Sodium: ~800mg

Best Ways to Serve Amish Poor Man’s Steak

While this dish is fantastic on its own, pairing it with the right sides can elevate the meal even further. Here are some of the best accompaniments:

1. Creamy Mashed Potatoes

Nothing soaks up that rich mushroom gravy better than a pile of fluffy mashed potatoes. The combination of buttery, creamy potatoes and savory steak patties is absolutely perfect.

2. Egg Noodles or Buttered Pasta

If you want to serve this dish like a classic Salisbury steak, pair it with buttered egg noodles or pasta. The tender noodles and thick, flavorful gravy create an irresistible combination.

3. Buttery Dinner Rolls or Biscuits

A warm, fluffy dinner roll or biscuit is ideal for scooping up every last drop of gravy. Try serving this dish with a side of homemade Amish bread or cornbread for an extra special touch.

4. Steamed or Roasted Vegetables

For a bit of color and balance, serve this dish with steamed green beans, roasted carrots, or sautéed Brussels sprouts. The natural sweetness of roasted vegetables pairs beautifully with the rich, savory steak.

5. Classic Amish Coleslaw

A crisp, refreshing side of coleslaw with a light vinegar dressing adds a pleasant contrast to the richness of the dish.

Creative Variations to Try

One of the best things about Amish Poor Man’s Steak is that it’s incredibly adaptable. Here are a few ways you can change it up:

1. Cheesy Variation

For an extra layer of indulgence, mix in shredded cheddar or Parmesan cheese into the beef mixture before forming the patties. You can also top each steak with cheese before baking for a gooey, melty finish.

2. Herb & Garlic Infusion

Enhance the flavor by adding fresh herbs like thyme, rosemary, or parsley into the beef mixture. Minced garlic and a splash of Worcestershire sauce can also deepen the flavor profile.

3. Mushroom & Onion Lovers’ Version

If you love mushrooms and onions, sauté extra mushrooms and caramelized onions and stir them into the gravy before baking.

4. Spicy Twist

For a little heat, add a pinch of red pepper flakes, cayenne pepper, or smoked paprika to the beef mixture.

5. Ground Turkey or Chicken Alternative

For a lighter version, swap out the ground beef for ground turkey or chicken. Just be sure to adjust the seasoning slightly, as these meats have a milder flavor.

Frequently Asked Questions (FAQs)

1. Why Is It Called “Poor Man’s Steak”?

This dish was originally created as a budget-friendly alternative to traditional steak. By using ground beef instead of expensive cuts, families could still enjoy a flavorful, hearty meal without breaking the bank.

2. Can I Make This Recipe Ahead of Time?

Absolutely! The beef mixture should be refrigerated overnight, which allows the flavors to develop. You can also fully prepare and bake the dish, then reheat it when ready to serve.

3. How Do I Store Leftovers?

  • Refrigerator: Store in an airtight container for up to 3 days.
  • Freezer: Wrap individual patties in foil and place in a freezer-safe bag. They can be frozen for up to 2 months.
  • Reheating: Warm in the oven at 325°F or on the stovetop with a little extra gravy.

4. Can I Use Store-Bought Gravy Instead of Cream of Mushroom Soup?

Yes! If you prefer, you can substitute homemade beef gravy or store-bought brown gravy instead of the mushroom soup.

5. Can I Cook This in a Slow Cooker?

Yes! After pan-frying the patties, transfer them to a slow cooker, cover with the gravy, and cook on LOW for 4-5 hours. This will result in incredibly tender steak patties that melt in your mouth.

6. How Can I Prevent My Patties from Falling Apart?

Make sure to:

  • Chill the beef mixture overnight before forming the patties.
  • Dredge lightly in flour to help them hold together during pan-frying.
  • Avoid flipping them too much in the skillet—let them develop a crust before turning.

Final Thoughts: A Timeless Comfort Dish Worth Making Again and Again

Amish Poor Man’s Steak is a dish that proves you don’t need fancy ingredients to create something delicious. It’s a warm, hearty, and satisfying meal that brings together simple flavors in the best way possible.

With its rich, creamy mushroom gravy, crispy pan-fried crust, and tender, flavorful beef patties, this dish is a true classic that deserves a place in every home cook’s collection. Whether you’re making it for a weeknight dinner, Sunday supper, or meal prep, it’s a recipe that everyone will love.

So the next time you’re in the mood for a comforting, homestyle meal, give this timeless Amish favorite a try—you might just find yourself making it again and again!

Cheesy Pepperoni Tortellini Bake: A Comforting Twist on Pizza Night

There’s something incredibly satisfying about a warm, cheesy casserole fresh out of the oven—especially when it combines the best elements of pizza and pasta in one dish. This Cheesy Pepperoni Tortellini Bake is the ultimate comfort food, bringing together cheese-filled tortellini, rich tomato sauce, gooey melted cheese, and savory pepperoni for a meal that’s hearty, indulgent, and guaranteed to become a family favorite.

Whether you’re feeding a crowd, preparing a weeknight dinner, or meal-prepping for the week ahead, this baked pasta dish delivers big flavors with minimal effort. It’s an easy, fuss-free recipe that comes together quickly and bakes to golden perfection, making it the kind of meal you’ll want to make again and again.

Why You’ll Love This Tortellini Bake

This dish is a winner for so many reasons. It’s simple to make, packed with cheesy goodness, and incredibly versatile. Here’s why it deserves a place in your recipe rotation:

1. It’s the Best of Pizza and Pasta in One

If you love cheesy baked pasta dishes and classic pepperoni pizza, this casserole gives you the best of both worlds. The savory pizza sauce, melty mozzarella, and crispy pepperoni bring those familiar pizzeria flavors, while the pillowy cheese-filled tortellini adds a satisfying pasta element.

2. Quick and Easy for Busy Nights

This recipe is low-effort but high-reward, making it perfect for hectic weeknights. With minimal prep time and just 25-30 minutes in the oven, you’ll have a hot, cheesy, homemade meal on the table fast.

3. A Crowd-Pleasing Favorite

Whether you’re cooking for kids, adults, or picky eaters, this dish is universally loved. It’s hearty, flavorful, and endlessly customizable—so everyone can enjoy it.

4. Great for Leftovers and Meal Prep

This tortellini bake reheats beautifully, making it an excellent choice for meal prep or next-day leftovers. You can even freeze portions for a future easy dinner.

5. Customizable to Your Taste

You can easily adjust the ingredients to suit your preferences—whether that means making it spicier, meatier, vegetarian-friendly, or extra cheesy.

Irresistible Ingredients:

  • Refrigerated cheese tortellini
  • Olive oil
  • Onion (chopped)
  • Garlic (minced)
  • Pizza sauce
  • Diced tomatoes
  • Dried oregano
  • Dried basil
  • Shredded mozzarella cheese
  • Sliced pepperoni
  • Grated Parmesan cheese
  • Salt and pepper

Baked to Perfection:

  1. Preheat & Prepare – Heat the oven to 375°F and cook the tortellini until al dente.
  2. Sauté the Aromatics – Cook onions and garlic in olive oil until fragrant.
  3. Create the Sauce – Stir in pizza sauce, diced tomatoes, oregano, and basil, then season with salt and pepper. Simmer briefly.
  4. Layer the Casserole – Mix the tortellini with the sauce, then layer in a baking dish with pepperoni and mozzarella.
  5. Top It Off – Finish with Parmesan cheese and another layer of pepperoni for extra flavor.
  6. Bake to Perfection – Cook for 25-30 minutes until bubbly and golden.
  7. Rest & Serve – Let sit for a few minutes before serving for the best texture.

Nutritional Breakdown (Per Serving Estimate):

  • Calories: ~450
  • Carbohydrates: ~45g
  • Protein: ~20g
  • Fat: ~22g
  • Sodium: ~900mg

What to Serve with This Tortellini Bake

This dish is a meal in itself, but pairing it with the right sides can elevate your dinner experience. Here are some great accompaniments:

1. A Crisp Green Salad

A simple Caesar salad or Italian side salad helps balance out the richness of the pasta. The freshness of lettuce, tomatoes, cucumbers, and a tangy vinaigrette provides a nice contrast to the cheesy, saucy tortellini.

2. Garlic Bread or Breadsticks

Nothing pairs better with a cheesy baked dish than warm, buttery garlic bread or crispy breadsticks. They’re perfect for scooping up any extra sauce from your plate.

3. Roasted Vegetables

For a healthier side, roast some broccoli, zucchini, or bell peppers with olive oil and seasoning. The slight caramelization of the veggies adds depth and flavor that complements the rich pasta bake.

4. A Light Soup

A cup of tomato basil soup or minestrone makes for a comforting, well-rounded meal, especially on cooler nights.

5. A Refreshing Dessert

After a cheesy, hearty dish, something light and refreshing—like lemon sorbet, fresh fruit, or a simple vanilla ice cream—makes the perfect dessert.

Ways to Customize Your Tortellini Bake

This recipe is delicious as written, but if you love to experiment in the kitchen, here are some fun variations to try:

1. Make It Extra Meaty

For a heartier version, add:

  • Cooked Italian sausage for extra flavor
  • Ground beef or turkey for a protein boost
  • Diced ham or bacon for a smoky twist

2. Spice It Up

If you love a little heat, try adding:

  • Crushed red pepper flakes for some spice
  • Sliced jalapeños for a fiery kick
  • Pepper jack cheese instead of mozzarella for extra heat

3. Go Vegetarian

Skip the pepperoni and add:

  • Sautéed mushrooms, bell peppers, or zucchini
  • Black olives for a briny touch
  • Spinach for extra greens

4. Change Up the Cheese

Mix and match different cheeses for more depth:

  • Provolone or gouda for a smoky element
  • Parmesan for a sharp, nutty bite
  • Ricotta dollops for extra creaminess

5. Try a Different Sauce

  • Use alfredo sauce instead of tomato sauce for a creamy, indulgent version.
  • Swap out pizza sauce for marinara or spicy arrabbiata sauce for a deeper tomato flavor.

Frequently Asked Questions (FAQs)

1. Can I Use Frozen Tortellini Instead of Refrigerated?

Yes! Just boil the frozen tortellini for a minute or two longer than the package instructions before adding it to the casserole.

2. How Do I Prevent the Casserole from Drying Out?

To keep the pasta bake moist and saucy:

  • Use a little extra pizza sauce or diced tomatoes if you like a saucier consistency.
  • Cover the casserole with foil for the first 15 minutes of baking, then remove it to let the cheese brown.

3. Can I Make This Dish Ahead of Time?

Yes! You can:

  • Assemble the casserole up to 24 hours in advance and refrigerate it. Bake it when ready to serve.
  • Freeze the unbaked dish for up to 3 months—just thaw it in the fridge overnight before baking.

4. How Do I Store and Reheat Leftovers?

  • Refrigerate leftovers in an airtight container for up to 3 days.
  • Reheat individual portions in the microwave with a splash of water to keep them from drying out.
  • For best texture, reheat in the oven at 350°F for about 15 minutes.

5. Can I Make This in a Slow Cooker?

Yes! Assemble the dish in a slow cooker and cook on LOW for 3-4 hours or until heated through. This is a great way to keep it warm for parties or gatherings.

Final Thoughts: A Cheesy, Comforting Classic

This Cheesy Pepperoni Tortellini Bake is the perfect blend of pizza and pasta, making it a go-to dish for weeknight dinners, family gatherings, or meal prep. With its rich tomato sauce, gooey cheese, hearty tortellini, and crispy pepperoni, this casserole is comfort food at its finest.

The best part? It’s incredibly easy to customize—whether you add extra meat, spice, veggies, or different cheeses, you can make this dish your own every time.

So next time you’re craving something warm, cheesy, and satisfying, grab your ingredients and whip up this irresistible baked tortellini dish. One bite, and it just might become a three-peat in your kitchen too!

Cajun Potato Soup: A Bold, Hearty, and Comforting Southern Classic

Cajun cuisine is all about big flavors, bold spices, and heartwarming meals. This Cajun Potato Soup is no exception—it’s a rich, creamy, and slightly spicy dish that brings together the robust flavors of andouille sausage, tender potatoes, and a velvety cheese-infused broth. Whether you’re looking for a comforting weeknight dinner or a crowd-pleasing soup for colder months, this recipe is sure to satisfy.

With a deep-rooted Southern influence, Cajun Potato Soup captures the essence of Louisiana cooking, blending classic ingredients like Cajun seasoning, smoky paprika, and hearty potatoes into a soul-warming dish. In this guide, we’ll explore the origins of Cajun flavors, pro tips for achieving the best texture, creative variations, and frequently asked questions to help you master this dish.

The Influence of Cajun Cooking in This Soup

Cajun cuisine is a unique and flavor-packed culinary tradition that originated from the Acadian people of Louisiana. Known for its bold seasonings, hearty ingredients, and one-pot wonders, Cajun food embraces layered spices and rich, comforting textures.

This Cajun Potato Soup follows that same tradition, incorporating:

  • The Holy Trinity of Cajun Cooking – Onion, celery, and bell peppers create the base of many classic Cajun dishes, adding depth and balance.
  • Cajun Seasoning – A signature blend of paprika, cayenne, garlic, and herbs that delivers a perfect balance of heat and savory notes.
  • Andouille Sausage – A smoky, spiced sausage that elevates the dish, adding layers of richness and depth.

While Cajun food is often bold and spicy, this soup can be customized to fit any heat level, making it a versatile and approachable dish for all palates.

Why This Cajun Potato Soup Stands Out

1. A Perfect Balance of Creamy and Spicy

The combination of velvety potatoes, rich cream, and a smoky, well-seasoned broth makes this soup both comforting and flavorful. The heat from the Cajun seasoning and cayenne pepper is balanced by the creamy texture, giving it a smooth and bold bite.

2. A Hearty, Satisfying Meal

This soup isn’t just flavorful—it’s filling. The potatoes, sausage, and cheese create a well-rounded dish that can be enjoyed as a main course or paired with a side for an even heartier meal.

3. Quick and Easy One-Pot Wonder

With simple ingredients and minimal prep time, this soup is an excellent choice for busy weeknights. It comes together in just under an hour and is cooked in a single pot, making cleanup a breeze.

4. A Versatile Dish with Customization Options

While this recipe delivers the classic Cajun flavor, you can easily modify it to suit your preferences. Whether you want to make it spicier, swap the protein, or create a vegetarian version, there are endless ways to make this soup your own.

Ingredients – A Perfect Blend of Spice and Comfort

For the Savory Sausage Base

  • 1 tablespoon vegetable oil
  • 1 ring (13.5 ounces) andouille sausage, sliced into ¼-inch rounds

Flavor-Packed Vegetables

  • 1 large onion, diced (about 1 cup)
  • ½ cup diced celery (about 1 rib)
  • ½ red bell pepper, seeded and diced
  • 2 teaspoons garlic, minced

The Bold Cajun Soup Base

  • 1 teaspoon Cajun seasoning
  • ½ teaspoon kosher salt
  • ½ teaspoon black pepper
  • ½ teaspoon paprika
  • ¼ teaspoon cayenne pepper
  • 4 cups (960g) chicken broth
  • 4 large russet potatoes, peeled and cubed

For the Creamy, Cheesy Finish

  • ½ cup (119g) heavy whipping cream
  • 1 cup (113g) mild cheddar cheese, shredded
  • Fresh parsley, chopped (for garnish)

Directions – Bringing the Bayou to Your Kitchen

1. Brown the Sausage for Maximum Flavor

  • Heat oil in a large pot over medium heat.
  • Add sliced andouille sausage and cook for 3-4 minutes until browned.
  • Remove the sausage and set it aside.

2. Sauté the Holy Trinity

  • In the same pot, sauté onion, celery, and bell pepper until softened (5-8 minutes).
  • Stir in garlic and cook for an additional minute.

3. Build the Cajun-Infused Soup Base

  • Add Cajun seasoning, salt, black pepper, paprika, cayenne pepper, chicken broth, and potatoes.
  • Lower the heat and let the soup simmer for 20-25 minutes, or until the potatoes are tender.

4. Create the Creamy, Cheesy Magic

  • Return the browned sausage to the pot.
  • Stir in heavy cream and shredded cheddar cheese, cooking for another 5 minutes until everything is heated through and the cheese is fully melted.

5. Garnish and Serve

  • Ladle into bowls, garnish with chopped fresh parsley, and serve warm.

Nutritional Breakdown – A Hearty, Satisfying Meal

  • Calories: ~420 per serving
  • Protein: 18g
  • Total Fat: 25g
  • Carbohydrates: 35g
  • Fiber: 4g
  • Sodium: 850mg

Expert Tips for the Best Cajun Potato Soup

1. Choose the Right Potatoes for Creaminess

Russet potatoes are ideal because they break down easily, creating a naturally thick and creamy texture. If you prefer a chunkier soup, Yukon Gold potatoes are a great alternative, as they hold their shape better while still adding richness.

2. Brown the Sausage for More Flavor

Taking the time to sear the andouille sausage before adding other ingredients releases its smoky, spicy flavors into the base of the soup, enhancing the overall depth of flavor.

3. Control the Heat Level to Your Preference

If you love spicy food, you can increase the amount of cayenne pepper or add diced jalapeños. If you prefer a milder flavor, simply reduce the Cajun seasoning and omit the cayenne for a gentler heat.

4. Don’t Skip the Heavy Cream and Cheese

Adding heavy whipping cream and cheddar cheese gives this soup its signature richness. Stir them in at the end of cooking to prevent curdling and maintain a smooth texture.

5. Let the Flavors Meld Together

Like most soups, Cajun Potato Soup tastes even better the next day. Allowing it to sit for a few hours or overnight enhances the flavors, making it an excellent make-ahead meal.

Creative Variations to Try

1. Smoky Chicken and Potato Soup

  • Swap the andouille sausage for shredded smoked chicken for a lighter, yet equally flavorful variation.
  • Add extra garlic and a dash of liquid smoke to enhance the smokiness.

2. Spicy Shrimp and Potato Chowder

  • Replace the sausage with shrimp, adding it during the last 5 minutes of cooking to prevent overcooking.
  • Stir in a splash of hot sauce or a squeeze of fresh lemon juice for a tangy finish.

3. Vegetarian Cajun Potato Soup

  • Skip the meat and add black beans, corn, and extra bell peppers for a plant-based twist.
  • Use vegetable broth instead of chicken broth to keep it vegetarian-friendly.

4. Loaded Cajun Baked Potato Soup

  • Add crispy bacon crumbles and a dollop of sour cream before serving.
  • Top with extra shredded cheddar cheese and green onions for a loaded potato feel.

Frequently Asked Questions (FAQs)

1. Can I Make This Soup in a Slow Cooker?

Yes! To adapt this recipe for a slow cooker:

  • Brown the sausage first, then transfer everything except the cream and cheese to the slow cooker.
  • Cook on low for 6-8 hours or high for 3-4 hours.
  • Stir in the cream and cheese just before serving.

2. Can I Make This Soup Dairy-Free?

Absolutely! Swap the heavy cream for coconut milk or a dairy-free alternative like cashew cream. Use nutritional yeast instead of cheese for a similar depth of flavor.

3. What’s the Best Way to Store and Reheat Leftovers?

  • Refrigeration: Store in an airtight container for up to 4 days.
  • Freezing: Freeze in portions for up to 3 months. Thaw in the fridge before reheating.
  • Reheating: Warm on the stove over medium heat, adding extra broth if it thickens too much.

4. What Are the Best Sides to Serve with Cajun Potato Soup?

  • Cornbread or garlic bread for dipping
  • A simple green salad to balance the richness
  • Crispy fried okra or hush puppies for a Southern-inspired pairing

5. Can I Use a Different Sausage?

Yes! If you can’t find andouille sausage, try:

  • Chorizo for a spicier alternative
  • Smoked sausage for a milder flavor
  • Chicken sausage for a leaner option

Final Thoughts: A Comforting Bowl of Cajun Goodness

Cajun Potato Soup is the ultimate comfort dish, blending bold spices, creamy potatoes, and smoky andouille sausage into one irresistible bowl. Whether you’re looking for a quick weeknight meal, a meal prep staple, or a dish to impress guests, this soup delivers big on flavor, texture, and warmth.

With plenty of ways to customize it—from adjusting the heat level to swapping ingredients—you can make it your own while staying true to its Cajun roots. So grab a bowl, add your favorite toppings, and enjoy a rich, hearty taste of Louisiana with every bite!