Mint Oreo Parfaits: A Refreshing and Creamy Dessert for Any Occasion

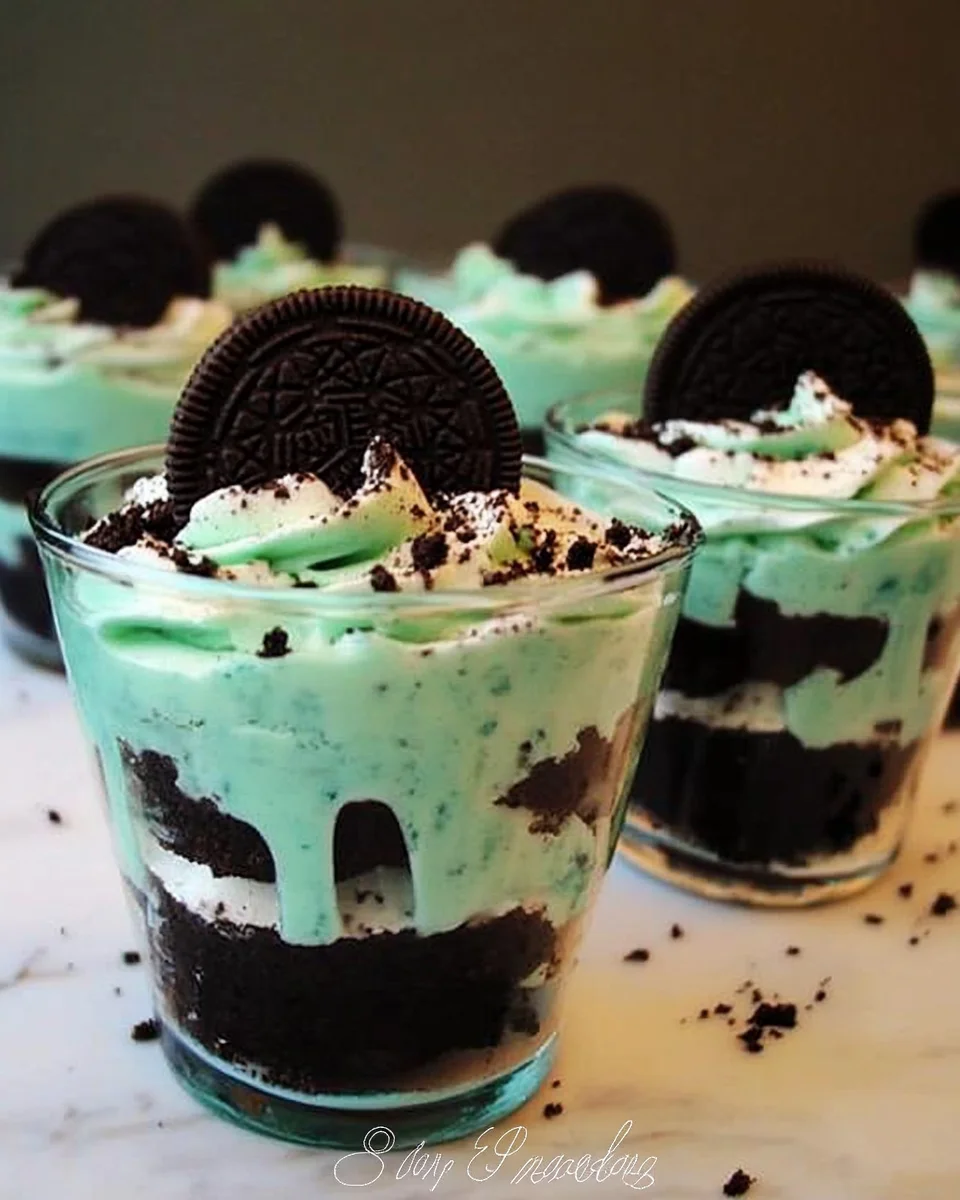
Some desserts are too good to reserve for just one holiday, and Mint Oreo Parfaits fall perfectly into that category. While they’re often associated with St. Patrick’s Day thanks to their vibrant green color and cool mint flavor, these parfaits are a delicious treat year-round. Whether you’re hosting a festive gathering, looking for an easy make-ahead dessert, or just craving something sweet and refreshing, this creamy, crunchy, and minty parfait will hit the spot.

With layers of crushed Mint Oreo cookies and a rich, fluffy pudding-cream cheese mixture, this dessert is both visually appealing and incredibly satisfying. The contrast of textures—the crunch of Oreos against the smooth, velvety filling—makes every bite a delight.

In this article, we’ll dive deep into everything you need to know about Mint Oreo Parfaits, from expert tips on how to make them perfectly to FAQs, creative variations, and the best ways to serve them.

Why Mint Oreo Parfaits Are a Must-Try Dessert

1. A Fun and Festive Dessert

There’s something undeniably playful and festive about this parfait. The bright green color makes it a standout on any dessert table, and the cool mint flavor adds a refreshing twist. It’s the perfect treat for St. Patrick’s Day, Christmas, or even a summer gathering when you want something chilled and creamy.

2. Easy to Make, Yet Impressive

While these parfaits look elegant and layered, they’re actually very simple to assemble. The no-bake aspect makes them even more appealing—you don’t need an oven, just a few ingredients and a little patience while they chill. Despite being so easy, they have a restaurant-quality presentation that makes them a hit at parties.

3. The Perfect Make-Ahead Dessert

One of the best things about these parfaits is that they can be prepared in advance. If you have guests coming over or need a dessert for a gathering, you can make them the day before and store them in the fridge. The flavors meld together beautifully over time, making them even more delicious after a few hours of chilling.

4. A Treat for All Ages

Kids love these parfaits because they’re sweet, creamy, and filled with Oreos, while adults appreciate the balance of flavors between the richness of the pudding-cream cheese mixture and the refreshing hint of mint. No matter who you’re serving, these parfaits will be a hit.

The Perfect Combination: Ingredients

  • Mint Oreo cookies (crushed)
  • Vanilla instant pudding mix
  • Milk
  • Peppermint extract
  • Green food coloring
  • Cream cheese (softened)
  • Cool Whip (thawed)

Crafting the Layers: Directions

  1. Crush the Mint Oreo cookies and set aside.
  2. Mix peppermint extract, green food coloring, and pudding mix with milk, then whisk until thickened.
  3. In a separate bowl, beat cream cheese until smooth.
  4. Combine the pudding mixture with the cream cheese and mix well.
  5. Gently fold in the Cool Whip to maintain a light texture.
  6. In small cups, layer crushed Oreos, followed by the pudding mixture. Repeat for two layers of each.
  7. Garnish with extra cookie crumbs and a mini Oreo piece on top.

Nutritional Breakdown: Sweet Facts Per Serving (Estimated per parfait)

  • Calories: 250-350
  • Carbohydrates: 30-45g
  • Fat: 12-18g
  • Sugar: 20-30g
  • Protein: 3-5g

Expert Tips for Perfect Mint Oreo Parfaits

1. Achieving the Perfect Green Color

To get that signature minty green hue, gel food coloring is the best option. Unlike liquid food coloring, which can water down the mixture, gel colors are more concentrated, meaning you only need a tiny amount to get that bright, eye-catching green.

2. Layering for the Best Visual Appeal

The key to making picture-perfect parfaits is to layer them neatly. When adding the crushed Oreos, press them lightly against the sides of the cup for a defined, visible layer. When spooning in the creamy filling, use a piping bag or a spoon with precision to prevent smudging the layers.

3. Keeping the Texture Just Right

For the best results, don’t overmix the Cool Whip when folding it into the pudding and cream cheese mixture. Overmixing can deflate the Cool Whip, resulting in a denser texture instead of a light and fluffy filling. A gentle folding technique will keep the filling soft and airy.

4. Choosing the Right Serving Size

These parfaits are rich and indulgent, so smaller servings are best. Using 3-5 ounce cups is ideal—you get just the right amount of sweetness without it becoming overwhelming. If you’re serving a larger crowd, you can even make mini parfaits in shot glasses for a fun bite-sized option.

5. Customizing the Flavor

If you love mint but want a stronger or milder taste, you can adjust the peppermint extract accordingly. Start with a small amount and taste-test before adding more, as mint flavor can quickly become overpowering.

Frequently Asked Questions About Mint Oreo Parfaits

1. Can I Use Regular Oreos Instead of Mint Oreos?

Yes! If you don’t have Mint Oreos on hand or prefer a more subtle mint flavor, regular Oreos work just as well. You can still get the minty flavor from the extract in the filling.

2. How Long Can I Store These Parfaits?

These parfaits can be stored in the refrigerator for up to two days in an airtight container. However, the longer they sit, the softer the Oreo crumbs will become. If you like a bit of crunch, serve them within a few hours of assembly.

3. Can I Freeze Mint Oreo Parfaits?

Freezing is not recommended because the texture of the pudding-cream cheese mixture may change once thawed. However, if you want a frozen version, try making them in small silicone molds and serving them semi-frozen for a different texture.

4. What’s the Best Way to Serve These Parfaits?

Mint Oreo Parfaits are best served chilled. You can make them extra special by topping them with a dollop of whipped cream, extra cookie crumbles, or even a drizzle of chocolate syrup.

5. Can I Make This Dessert in a Large Trifle Bowl Instead of Individual Cups?

Absolutely! Instead of layering in individual cups, you can assemble it in a large glass trifle dish for a show-stopping presentation. Just layer the Oreos and pudding mixture the same way, and serve with a large spoon for scooping.

Fun Variations to Try

Want to switch things up? Here are a few creative ways to put a spin on this recipe:

1. Chocolate Mint Parfaits

Add chocolate pudding alongside the vanilla layer for a double-flavored parfait with even more richness.

2. Grasshopper Parfaits

Mix in chopped Andes mints or drizzle chocolate sauce between layers for a dessert that resembles the classic grasshopper pie.

3. Frozen Mint Oreo Cups

Spoon the mixture into silicone molds and freeze them for a firmer, ice cream-like dessert.

4. Mini Dessert Shooters

Use small shot glasses for an elegant and portion-controlled dessert option, perfect for parties.

5. Dairy-Free Version

Swap out the cream cheese and Cool Whip for dairy-free alternatives, such as coconut whipped cream and vegan cream cheese, to make a plant-based version of this parfait.

Conclusion: A Dessert Worth Celebrating

Mint Oreo Parfaits are more than just a dessert—they’re a fun, easy-to-make treat that’s perfect for holidays, parties, and casual indulgence. With cool mint flavors, creamy layers, and crunchy Oreo goodness, this parfait is sure to be a crowd-pleaser no matter when you serve it.

Whether you’re making these for St. Patrick’s Day, a summer gathering, or just because you love mint desserts, they’re an irresistible addition to any occasion. With endless variations and easy make-ahead options, they’re the kind of no-fuss dessert that looks fancy but requires minimal effort.

So grab your ingredients, start layering, and treat yourself to the ultimate Mint Oreo Parfait experience. It’s a dessert worth savoring!

Shamrock Shake Fudge: A St. Patrick’s Day Treat with a Minty Twist

St. Patrick’s Day is a time for celebration, and what better way to get into the festive spirit than with a vibrant, minty dessert? If you love the classic Shamrock Shake, you’re going to adore this Shamrock Shake Fudge—a creamy, melt-in-your-mouth treat that captures the refreshing mint flavor of the beloved seasonal milkshake in a rich, chocolatey fudge form.

With its bright green hue and smooth texture, this fudge is the perfect addition to any St. Patrick’s Day celebration, party, or dessert table. It’s easy to make, visually stunning, and packed with that cool mint flavor everyone loves. Whether you’re a seasoned baker or just looking for a simple yet impressive treat, this Shamrock Shake Fudge is a must-try.

Why Shamrock Shake Fudge is the Ultimate St. Patrick’s Day Dessert

1. Inspired by the Classic Shamrock Shake

The Shamrock Shake is a well-known seasonal favorite, but let’s be honest—it’s only available for a limited time each year. This fudge captures the essence of the minty milkshake and transforms it into a treat you can enjoy anytime, no drive-thru required.

2. A Festive Pop of Green

St. Patrick’s Day is all about vibrant green hues, and this fudge fits right in. The bold green color makes it a perfect addition to any holiday spread, adding a touch of whimsy and fun to your dessert table.

3. Creamy, Rich, and Minty Goodness

This fudge has an irresistible texture—soft, smooth, and indulgently creamy. The combination of white chocolate and mint extract creates a refreshing yet rich flavor that melts in your mouth.

4. Perfect for Parties and Gifting

If you’re hosting a St. Patrick’s Day party, this fudge is an excellent make-ahead treat that will impress guests without requiring hours in the kitchen. It also makes a great homemade gift—simply wrap individual pieces in decorative bags for a festive, thoughtful present.

The Magic Blend: Ingredients

  • White chocolate chips
  • Mint extract
  • Green food coloring

Creating a Festive Delight: Directions

  1. Melt white chocolate chips until smooth.
  2. Stir in mint extract for a refreshing flavor.
  3. Add green food coloring to achieve the perfect Shamrock Shake hue.
  4. Pour the mixture into a lined dish and smooth it out evenly.
  5. Chill until firm, then slice into squares and serve.

Sweet Stats: Nutritional Information (Estimated per serving)

  • Calories: 150-200
  • Carbohydrates: 20-30g
  • Fat: 8-12g
  • Sugar: 15-25g
  • Protein: 1-3g

Expert Tips for the Perfect Shamrock Shake Fudge

Making fudge may seem intimidating, but with these pro tips, you’ll have a flawless batch every time.

1. Use High-Quality White Chocolate

White chocolate is the base of this fudge, so using a high-quality brand makes all the difference. Cheap white chocolate can result in a grainy texture, so opt for premium chocolate chips or bars for the best results.

2. Achieve the Perfect Green Color

To get that signature Shamrock Shake look, use gel food coloring instead of liquid. Gel colors are more concentrated and won’t alter the consistency of the fudge. Start with a small amount and add more until you achieve the perfect shade of green.

3. Balance the Mint Flavor

Mint extract can be overpowering if too much is used. Start with a small amount, then taste and adjust accordingly. You want a refreshing mint flavor without it tasting like toothpaste!

4. Chill Before Cutting

For clean, professional-looking squares, let the fudge fully set in the refrigerator before slicing. Use a sharp knife, and wipe it clean between cuts to maintain smooth edges.

FAQs: Everything You Need to Know About Shamrock Shake Fudge

1. Can I Use a Different Type of Chocolate?

Yes! While white chocolate is the best choice for replicating the classic Shamrock Shake look and flavor, you can experiment with milk or dark chocolate for a different twist. Just keep in mind that using darker chocolate will change the color and taste.

2. How Long Does This Fudge Last?

When stored properly in an airtight container, this fudge stays fresh for up to two weeks in the refrigerator. If you need to store it longer, you can freeze it for up to three months—just let it thaw at room temperature before serving.

3. Can I Make This Fudge Without Mint Extract?

Absolutely! If mint isn’t your thing, you can leave out the extract or substitute it with vanilla, almond, or coconut extract for a different flavor profile.

4. What’s the Best Way to Serve This Fudge?

This fudge is delicious on its own, but you can also:

  • Top it with whipped cream and chocolate shavings for an extra indulgent treat.
  • Pair it with hot cocoa or coffee for a delicious mint-chocolate combo.
  • Use cookie cutters to cut it into fun shapes like shamrocks for extra festive flair.

5. Can I Add Mix-Ins to This Fudge?

Yes! For a little extra crunch or variety, try mixing in:

  • Crushed chocolate cookies (like Oreos)
  • Mini marshmallows
  • Chopped nuts
  • Dark chocolate chips

Creative Ways to Customize Your Shamrock Shake Fudge

If you want to get creative, there are plenty of ways to customize this fudge to make it your own!

1. Shamrock Shake Swirl Fudge

Instead of a solid green color, try swirling white and green fudge together for a marbled effect. This gives the fudge a playful and eye-catching look.

2. Mint Chocolate Chip Fudge

For a twist on the classic, stir in mini chocolate chips before the fudge sets. This gives it the same mint chocolate chip ice cream feel in fudge form.

3. Layered Shamrock Fudge

Create a double-layered effect by pouring a dark chocolate layer on the bottom and the green mint layer on top. This adds depth of flavor and a beautiful contrast in colors.

4. Festive Toppings

Want to make this fudge extra special? Try adding:

  • Gold sprinkles or edible glitter for a St. Patrick’s Day “pot of gold” effect.
  • Crushed Andes mints for even more minty goodness.
  • Drizzled dark chocolate for a sophisticated look.

How to Serve and Display Your Shamrock Shake Fudge

Presentation is key, especially when serving this fudge at a party or event. Here are some fun ways to display it:

  • On a dessert platter with other green and gold-themed treats.
  • Packaged in mini gift boxes as party favors.
  • Arranged in a glass jar for a fun, grab-and-go snack station.
  • Served alongside Shamrock Shakes for the ultimate St. Patrick’s Day treat pairing.

Conclusion: A Sweet Way to Celebrate St. Patrick’s Day

There’s no better way to embrace the festive spirit of St. Patrick’s Day than with a batch of homemade Shamrock Shake Fudge. This creamy, minty, and utterly indulgent treat captures the essence of the classic shake while offering a fun and unique twist that’s perfect for any holiday celebration.

Whether you’re making it for a party, gifting it to friends, or just indulging in a seasonal sweet treat, this fudge is a guaranteed crowd-pleaser. With its vibrant green color, rich chocolate flavor, and refreshing minty finish, it’s sure to become a new St. Patrick’s Day tradition.

So grab your ingredients, get creative with your toppings, and enjoy the magic of Shamrock Shake Fudge—a dessert that’s as fun to make as it is to eat!

Bunny Butt Cake Pops: A Fun and Festive Easter Treat

Easter is a time for celebration, family gatherings, and, of course, delicious treats. If you’re looking for a fun, playful, and adorable dessert to add to your holiday spread, look no further than Bunny Butt Cake Pops. These bite-sized delights not only taste amazing but also bring a touch of humor and creativity to your Easter table.

With their fluffy marshmallow tails and tiny chocolate paws, these cake pops are an instant hit with kids and adults alike. Whether you’re hosting an Easter party, preparing a festive gift box, or just looking for an enjoyable baking project, Bunny Butt Cake Pops are a perfect choice.

In this guide, we’ll explore everything you need to know about these charming treats, from expert decorating tips to common questions and storage solutions.

Why Bunny Butt Cake Pops Are a Must-Try Dessert

1. A Delightful Twist on Traditional Cake Pops

Cake pops have become a go-to dessert for parties and celebrations, but adding a festive bunny theme takes them to the next level. Instead of the usual round cake pop, these feature a bunny’s backside, complete with little feet and a fluffy tail. The result? A dessert that’s not only delicious but also adorably funny.

2. Perfect for Easter and Spring Gatherings

Easter desserts are all about bright colors, whimsical designs, and fun themes. These cake pops check every box, making them a fantastic addition to Easter brunches, classroom parties, or even as edible gifts for friends and family. Their miniature size also makes them easy to serve and share.

3. A Kid-Friendly Baking Project

If you’re looking for a fun way to get kids involved in the kitchen, this is it. From shaping the cake pops to decorating them with chocolate, there are plenty of simple, mess-free steps that little hands can help with. Plus, they’ll love seeing their bunny butts come to life!

What You’ll Need: Ingredients

  • Cake pop dough
  • White chocolate
  • Pink chocolate
  • Cake pop sticks
  • Parchment paper
  • Paper and pen (for tracing paws)
  • Mini marshmallows

Creating the Cuteness: Directions

  1. Make the Bunny Paws:
    • Draw bunny paw shapes on paper, then place parchment paper over the drawing.
    • Pipe white chocolate over the paw shapes and add pink chocolate details.
    • Let the paws harden completely.
  2. Prepare the Cake Pops:
    • Roll cake pop dough into balls and chill until firm.
    • Melt white chocolate, dip each cake pop into it, and tap off the excess.
    • Let them dry on parchment paper.
  3. Make the Fluffy Tails:
    • Tear open a mini marshmallow slightly but don’t separate it completely.
    • Fold it back onto itself to create a fluffy texture.
  4. Assemble the Bunny Butts:
    • Use melted white chocolate to attach the marshmallow tail to each cake pop.
    • Do the same with the hardened chocolate bunny paws.
    • Let everything set before serving.

Sweet Facts: Nutritional Information (Estimated per cake pop)

  • Calories: 120-180
  • Carbohydrates: 15-25g
  • Fat: 6-10g
  • Sugar: 10-20g
  • Protein: 1-3g

Expert Tips for Decorating the Perfect Bunny Butt Cake Pops

1. Achieving a Smooth White Chocolate Coating

  • Make sure your melted white chocolate is the right consistency. If it’s too thick, add a little vegetable shortening or coconut oil to thin it out.
  • Dip the cake pops quickly and evenly to avoid streaks or clumps.
  • Let excess chocolate drip off before setting the cake pops down to dry.

2. Creating Realistic Bunny Paws

  • If you’re not confident in freehand piping, trace bunny paw shapes on paper first, then place parchment paper over it as a guide.
  • Use light pink chocolate for the paw details to make them pop against the white background.
  • Let the chocolate paws harden completely before attaching them to the cake pops.

3. Making the Fluffiest Bunny Tails

  • Instead of using a plain mini marshmallow, tear it slightly and fold it back to create a fluffier look.
  • Attach the tail firmly with melted white chocolate so it stays in place while serving.
  • For extra texture, roll the marshmallow in white sanding sugar or shredded coconut before attaching it.

FAQs: Everything You Need to Know About Bunny Butt Cake Pops

1. Can I Use Store-Bought Cake for the Cake Pop Dough?

Yes! If you don’t have time to bake a cake from scratch, you can use a store-bought cake or even leftover cake from another dessert. Simply crumble it up and mix it with frosting to create the cake pop dough.

2. How Do I Prevent Cake Pops from Falling Off the Stick?

Cake pops can sometimes slide off the stick if they’re too heavy or not secured properly. Here are a few tips to keep them in place:

  • Chill the cake balls before inserting the sticks to help them hold their shape.
  • Dip the tip of the stick into melted chocolate before inserting it into the cake ball. This helps create a strong bond.
  • Let the cake pops fully set before dipping them into the white chocolate.

3. How Long Do These Cake Pops Last?

Bunny Butt Cake Pops can be stored for up to a week in an airtight container at room temperature. If you need to keep them longer, they can be refrigerated for up to two weeks or frozen for up to three months. Just be sure to bring them to room temperature before serving.

4. Can I Make These Cake Pops Without a Stick?

Absolutely! If you prefer, you can serve them as cake truffles instead. Simply dip the cake balls in white chocolate, place them on parchment paper, and add the decorations as usual.

5. How Do I Get a Smooth, Even Cake Pop Dough?

For the best texture, make sure the cake is crumbled finely before mixing it with frosting. Use just enough frosting to hold the mixture together—too much can make the dough too soft and difficult to shape.

Creative Variations to Try

If you want to add your own unique twist to these cake pops, here are a few fun ideas:

1. Chocolate Bunny Butts

Instead of white chocolate, use milk or dark chocolate to coat the cake pops. This works especially well if you’re making chocolate cake pops inside.

2. Carrot Cake Bunny Pops

For a flavorful Easter treat, use carrot cake and cream cheese frosting as the base for your cake pop dough. It adds a warm, spiced flavor that pairs beautifully with white chocolate.

3. Bunny Face Cake Pops

Want to make both sides of the bunny? Decorate some cake pops with cute bunny faces using candy eyes and pink candy noses to complement your bunny butt pops.

4. Coconut-Coated Bunny Pops

For an extra fluffy look, roll the white chocolate-coated cake pops in sweetened shredded coconut before adding the decorations.

How to Serve and Display Bunny Butt Cake Pops

Presentation is everything, especially when serving these at an Easter gathering. Here are a few ideas for displaying your Bunny Butt Cake Pops beautifully:

  • Easter Basket Display: Arrange the cake pops in a decorative Easter basket filled with colored shredded paper or edible grass.
  • Cake Pop Stand: Use a styrofoam block or a cake pop stand to keep them upright and evenly spaced.
  • Gift Packaging: Wrap individual cake pops in clear treat bags and tie them with pastel-colored ribbons for a festive take-home treat.
  • Easter Dessert Table: Pair them with other spring-themed treats, such as cupcakes decorated with candy eggs, pastel sugar cookies, or chocolate nests.

Conclusion: A Sweet Easter Tradition

Bunny Butt Cake Pops are more than just a cute Easter dessert—they’re a fun, hands-on baking experience that brings joy to both the baker and the lucky ones who get to eat them. Whether you’re making them for a festive gathering, as gifts, or just for the love of baking, these cake pops never fail to bring smiles.

With endless decorating possibilities, easy make-ahead storage, and a simple yet effective design, they are sure to become an Easter tradition for years to come. So grab your cake mix, melt that chocolate, and start creating your own adorable bunny butts—because Easter desserts should be just as fun as the holiday itself!

Easy Bunny Cupcakes: A Whimsical Treat for Easter and Springtime

Baking is more than just mixing ingredients and popping them in the oven; it’s an experience that brings joy, creativity, and sometimes a bit of nostalgia. With Easter right around the corner, there’s no better way to celebrate than by whipping up a batch of Easy Bunny Cupcakes. These adorable, colorful treats are perfect for family gatherings, spring parties, or simply brightening up your kitchen with a bit of holiday magic.

From their pastel swirled interiors to the fluffy marshmallow ears and tails, these cupcakes aren’t just delicious—they’re a delightful centerpiece for any Easter celebration. Whether you’re a seasoned baker or someone who just enjoys a bit of festive fun, this recipe is easy to follow, allowing even kids to join in on the creativity.

Let’s dive into everything you need to know about these charming Bunny Cupcakes—from tips and tricks to frequently asked questions and the best ways to store and serve them.

Why These Bunny Cupcakes Are Perfect for Easter

Easter is a holiday rich in symbolism, often associated with themes of renewal, joy, and togetherness. And what better way to express that than through baking?

1. A Fun and Festive Dessert

These cupcakes bring the holiday spirit to life with their vibrant pastel colors and bunny-themed decorations. The combination of pink, blue, and yellow cake batter creates a fun swirl effect inside, making every bite a surprise. The marshmallow ears and tails add an extra layer of cuteness, making them irresistible to both kids and adults.

2. Kid-Friendly and Easy to Make

Baking should be an experience the whole family can enjoy, and these cupcakes are a great way to get kids involved. From mixing the batter to dipping marshmallow ears in sprinkles, there are plenty of simple, safe steps for little hands to help with.

3. Versatile for Different Occasions

While these cupcakes are perfect for Easter, they can easily be adapted for baby showers, springtime birthdays, or even a gender reveal party. Adjust the colors and decorations to fit the theme, and you have a dessert that works for multiple occasions.

Gather Your Goodies: Ingredients

Cupcakes:

  • 1 box Pink Velvet Cake Mix
  • 1 box Blue Velvet Cake Mix
  • 1 box French Vanilla Cake Mix
  • 12 eggs (4 per cake mix)
  • Buttermilk (replace the liquid amount on the box with buttermilk—use a splash of vinegar in the measuring cup, fill with milk, and let sit for a few minutes)
  • 2 sticks butter (1 per cake mix, follow box directions)
  • 1/3 cup oil (for French Vanilla Cake Mix)

Frosting:

  • Wilton Ready-to-Use Decorating Icing (for a bright white bunny look)

Bunny Ears:

  • Regular-sized marshmallows
  • Your favorite sprinkles

Bunny Tails:

  • Mini marshmallows
  • White sprinkles

The Magic of Baking: Directions

Cupcakes:

  1. Prepare each cake mix according to its instructions, substituting buttermilk for the liquid.
  2. Place each colored batter in separate piping bags for easy filling.
  3. Line a muffin pan with cupcake liners and preheat the oven to 350°F (175°C).
  4. Fill each liner with small amounts of each colored batter until ¾ full.
  5. Bake for 13-15 minutes or until a toothpick inserted in the center comes out clean.
  6. Let the cupcakes cool completely.

Bunny Ears:

  1. Lay each marshmallow on its side and cut diagonally with a sharp knife.
  2. Dip the cut side into sprinkles and set aside.

Bunny Tails:

  1. Quickly dip a mini marshmallow in water.
  2. Roll it in white sprinkles to create a fluffy tail.

Frosting & Decoration:

  1. Pipe or spread frosting onto each cupcake.
  2. Add the bunny ears and tails to complete the look.

Sweet Stats: Nutritional Info

Note: Nutrition varies based on ingredient brands and serving sizes.

  • Calories: Approx. 250-300 per cupcake
  • Carbs: 30-40g
  • Fat: 10-15g
  • Sugar: 20-30g
  • Protein: 3-5g

Decorating Tips for Picture-Perfect Bunny Cupcakes

While the cupcakes are simple to make, the decorations are where you can truly get creative. Here are a few expert tips to ensure your Bunny Cupcakes look as adorable as they taste.

1. Achieving the Perfect Marshmallow Ears

  • Use fresh marshmallows for the best results—stale marshmallows won’t hold the sprinkles as well.
  • Cut diagonally with a sharp knife to create a natural ear shape.
  • Press the sticky side into sprinkles immediately to ensure they adhere properly.
  • Mix up sprinkle colors for a fun variety, or stick with classic pastel tones for a more elegant look.

2. The Best Frosting for a Fluffy Bunny Look

  • A bright white frosting works best to resemble bunny fur. Wilton’s Ready-to-Use Decorating Icing is a great option, but you can also make a homemade buttercream with extra powdered sugar to keep it firm and pipeable.
  • Use a large round piping tip for a smooth finish or a star tip for a textured, fur-like effect.
  • If you don’t have a piping bag, a ziplock bag with the tip cut off works just as well.

3. Fluffy Bunny Tails That Stay Put

  • A quick dip in water helps the mini marshmallows hold the sprinkles better.
  • Roll them in white nonpareils or shredded coconut for an extra fluffy look.
  • Gently press the tail into the frosting so it stays secure while serving.

Common Questions About Bunny Cupcakes

If you’re making these cupcakes for the first time, you might have a few questions. Here are some frequently asked questions to help you along the way.

1. Can I Use a Homemade Cake Recipe Instead of a Cake Mix?

Absolutely! While this recipe uses cake mixes for convenience, you can substitute your favorite vanilla or butter cake recipe. Just divide the batter into three bowls and add food coloring as needed to achieve the pastel swirl effect.

2. How Do I Keep the Colors from Blending Too Much?

The trick to keeping distinct swirls in your cupcakes is to layer the colors gently instead of mixing them too much. If you prefer a marbled look, use a butter knife to lightly swirl the batter before baking.

3. Can I Make These Cupcakes Ahead of Time?

Yes! The cupcakes themselves can be baked a day in advance and stored in an airtight container at room temperature. For best results, decorate them the day you plan to serve to keep the marshmallow ears fresh and the frosting looking its best.

4. How Should I Store Leftover Cupcakes?

If you have leftovers, store them in an airtight container at room temperature for up to two days. If you need to store them longer, they can be refrigerated for up to five days, but be aware that refrigeration may slightly dry out the cake.

5. Can I Freeze These Cupcakes?

Yes! If you’d like to freeze them, do so before decorating for best results. Once cooled, place the cupcakes in an airtight container and freeze for up to two months. When ready to use, thaw at room temperature before adding frosting and decorations.

Creative Variations to Try

If you want to switch things up or put your own spin on this recipe, here are some fun variations to try:

1. Chocolate Bunny Cupcakes

Swap out the vanilla cake for a rich chocolate cake base and decorate with white or milk chocolate shavings instead of sprinkles.

2. Coconut Bunny Cupcakes

For an extra fluffy texture, sprinkle sweetened coconut flakes over the frosting before adding the ears and tail.

3. Lemon or Strawberry Flavor Twist

Instead of vanilla, try using a lemon or strawberry cake mix for a fruity and refreshing take on these cupcakes.

4. Bunny Face Cupcakes

Instead of just ears and tails, use black licorice or melted chocolate to draw bunny faces for an even more adorable touch.

Conclusion: A Delightful Easter Tradition

There’s something magical about baking festive, themed treats for the holidays. These Easy Bunny Cupcakes not only bring joy to Easter celebrations but also create lasting memories in the kitchen. Whether you’re baking with kids, preparing for a party, or just indulging in a bit of seasonal fun, these cupcakes are a delicious and whimsical addition to your springtime baking lineup.

So, gather your ingredients, let your creativity shine, and enjoy a batch of these charming, pastel-colored Bunny Cupcakes this Easter!

Coconut Lime Fish Soup: A Taste of the Tropics in Every Spoonful

Few dishes capture the essence of coastal comfort and tropical freshness quite like Coconut Lime Fish Soup. This dish masterfully blends rich coconut milk, bright citrus, and tender white fish to create a warming yet refreshing meal. Whether you’re looking for something light yet satisfying or a dish that transports you to a beachside retreat, this soup delivers on all fronts.

Not only is this recipe incredibly easy to prepare, but it also highlights the natural flavors of the ocean with just the right balance of savory, tangy, and mildly sweet notes. The combination of aromatics like garlic, ginger, and lime zest brings depth, while Thai bird chilies provide a customizable kick of heat.

Perfect for any time of the year, this versatile and nourishing soup is one you’ll want to keep in your regular recipe rotation. Let’s dive into what makes Coconut Lime Fish Soup such a standout dish.

Why You’ll Love This Recipe

1. A Nutrient-Packed, Comforting Meal

This soup is rich in healthy fats, lean protein, and immune-boosting ingredients like ginger and garlic. Coconut milk adds creaminess while providing essential nutrients, and the lime juice and zest contribute to digestion and immune health.

2. A Perfect Balance of Flavors

The creamy sweetness of coconut milk, the tang of lime, and the umami depth of fish sauce and soy sauce create a layered broth that’s both soothing and invigorating. The subtle heat from Thai bird chilies makes every bite exciting.

3. Quick and Easy Preparation

This recipe comes together in under 30 minutes, making it perfect for busy weeknights or impromptu dinner gatherings. The ingredients are simple, but the final dish feels elevated and restaurant-worthy.

4. Versatile and Adaptable

While white fish like cod or halibut works best for this soup, it’s easily customizable. You can swap out different proteins, vegetables, or spice levels to suit your preferences.

Pro Tips for the Best Coconut Lime Fish Soup

1. Choose the Right Fish

Opt for firm, flaky white fish such as cod, halibut, snapper, or mahi-mahi. These varieties hold their shape well while absorbing the flavors of the broth. If using frozen fish, thaw it completely and pat it dry before adding it to the soup.

2. Layer Your Flavors for a More Complex Broth

To create a deeply flavorful base, start by sautéing aromatics like garlic, onion, and ginger until fragrant. This step enhances the depth of flavor and makes the soup taste richer.

3. Adjust the Heat to Your Preference

If you enjoy a spicier soup, add extra Thai bird chilies, red pepper flakes, or a dash of hot sauce. For a milder version, omit the chilies and let the natural flavors shine.

4. Don’t Overcook the Fish

To keep the fish tender and flaky, add it towards the end of the cooking process. It only needs 5-7 minutes to cook through. Overcooking can cause it to become tough or rubbery.

5. Add Greens at the Last Minute

Delicate greens like baby spinach or kale wilt quickly, so stir them in just before serving to retain their color, texture, and nutrients.

6. Brighten the Dish with Fresh Lime Juice

For the most vibrant flavor, use fresh lime juice instead of bottled. The zest and juice should be added at different points—zest for fragrance during cooking, and juice for a final burst of brightness before serving.

A Bowl of Coastal Bliss (Ingredients)

For the Soup:

  • 1 lb White Fish Fillets (cod or halibut, cut into bite-sized pieces)
  • 1 tbsp Olive Oil
  • 1 Onion (finely chopped)
  • 3 cloves Garlic (minced)
  • 1 tbsp Ginger (grated)
  • 1 Red Bell Pepper (sliced)
  • 1 can (14 oz) Coconut Milk
  • 4 cups Fish or Vegetable Broth
  • 2 tbsp Fish Sauce
  • 1 tbsp Soy Sauce
  • 1 tbsp Lime Zest
  • 2 tbsp Lime Juice
  • 1 tbsp Sugar
  • 1-2 Thai Bird Chilies (sliced, optional for heat)
  • 1 cup Cherry Tomatoes (halved)
  • 1 cup Baby Spinach or Kale
  • Salt and Pepper (to taste)

For Garnish:

  • Fresh Cilantro (chopped)
  • Lime Wedges
  • Thinly Sliced Green Onions

A Spoonful of Sunshine (Directions)

1. Sauté the Aromatics

Heat olive oil in a pot over medium heat. Sauté the onion until softened, then add garlic and ginger, cooking until fragrant.

2. Cook the Vegetables

Add sliced red bell pepper and cook until slightly tender.

3. Build the Flavorful Broth

Pour in coconut milk and broth. Stir in fish sauce, soy sauce, lime zest, lime juice, and sugar. Simmer for 10 minutes.

4. Poach the Fish and Tomatoes

Add the fish fillets and cherry tomatoes. If using, add Thai bird chilies for extra heat. Simmer until the fish is cooked through.

5. Finish with Greens

Stir in baby spinach or kale and let it wilt. Season with salt and pepper.

6. Serve with Fresh Garnishes

Ladle into bowls and top with fresh cilantro, sliced green onions, and a squeeze of lime.

Nourishment in Every Sip (Nutritional Information Per Serving)

  • Calories: ~250 kcal
  • Protein: ~22g
  • Carbohydrates: ~14g
  • Fat: ~12g
  • Saturated Fat: ~8g
  • Cholesterol: ~45mg
  • Sodium: ~900mg
  • Potassium: ~700mg
  • Fiber: ~3g
  • Vitamin A: ~20% DV
  • Vitamin C: ~40% DV
  • Calcium: ~6% DV
  • Iron: ~10% DV

How to Serve Coconut Lime Fish Soup

1. Classic Island Style

Serve the soup as is, in a deep bowl, garnished with fresh cilantro, green onions, and lime wedges for an authentic tropical presentation.

2. Over Rice or Noodles

For a heartier meal, ladle the soup over steamed jasmine rice or serve with rice noodles. The grains absorb the flavorful broth, making each bite even more satisfying.

3. Paired with Crusty Bread

A warm slice of crusty baguette or sourdough is perfect for dipping into the creamy, citrus-infused broth.

4. As a Light Starter

Serve small portions as a starter course before a larger seafood-based entrée, such as grilled shrimp, seared scallops, or coconut-crusted fish.

5. Wine Pairing

Pair this soup with a crisp, citrusy Sauvignon Blanc or a lightly oaked Chardonnay. These wines complement the zesty lime and creamy coconut flavors beautifully.

Frequently Asked Questions

1. Can I Use a Different Type of Fish?

Yes! While white fish fillets work best, you can substitute with shrimp, scallops, or even tofu for a vegetarian version. Just adjust the cooking time accordingly.

2. How Can I Make This Soup Dairy-Free and Gluten-Free?

This soup is naturally dairy-free thanks to the coconut milk. To make it gluten-free, simply use tamari instead of soy sauce.

3. Can I Make This Soup Ahead of Time?

Yes! You can prepare the broth ahead of time and store it in the refrigerator for up to two days. When ready to serve, simply reheat the broth and add the fish and greens at the last minute.

4. How Do I Store Leftovers?

  • Refrigeration: Store leftovers in an airtight container for up to 3 days.
  • Freezing: The broth can be frozen without the fish or greens for up to 3 months. Add fresh fish and vegetables when reheating for the best texture.
  • Reheating: Warm gently over low heat to prevent overcooking the fish.

5. Can I Add More Vegetables?

Absolutely! This soup is highly adaptable. You can add mushrooms, carrots, zucchini, or bok choy for additional texture and nutrients.

6. How Spicy Is This Soup?

The spice level depends on how many Thai bird chilies you use. If you prefer a milder version, simply omit the chilies or use a pinch of red pepper flakes instead.

7. Can I Substitute the Coconut Milk?

If you prefer a lighter broth, you can replace coconut milk with extra broth or cashew cream for a different texture. However, coconut milk provides a signature creaminess that makes this dish unique.

Conclusion: A Tropical Escape in a Bowl

Coconut Lime Fish Soup is the kind of dish that warms your soul while refreshing your palate. It’s light yet satisfying, rich yet balanced, and brings together the best elements of tropical cuisine in one easy-to-make meal.

Whether you’re in the mood for something comforting on a cool evening or craving a fresh, citrusy meal on a warm day, this soup delivers every time. The silky coconut broth, tender fish, and zesty lime finish make it a dish that feels both nourishing and indulgent.

Plus, it’s versatile enough to accommodate different dietary needs, making it an excellent choice for families, food lovers, and anyone looking to explore global flavors from their own kitchen.

So grab your ingredients, simmer up a pot of this vibrant, aromatic soup, and let each spoonful transport you to a tropical paradise—no passport required.

Tuna Crudo with Citrus Caper Vinaigrette: A Dish of Simplicity and Elegance

Few dishes can rival the elegance and simplicity of tuna crudo. This Italian-inspired dish celebrates the purity of raw fish, allowing its delicate flavor and buttery texture to shine. When paired with a bright citrus caper vinaigrette, the dish reaches new heights of freshness, balancing the richness of the tuna with acidity and salinity.

Perfect for an appetizer or a light meal, Tuna Crudo with Citrus Caper Vinaigrette is a no-cook recipe that comes together in minutes but looks like a dish from a high-end restaurant. Whether you’re hosting a dinner party, enjoying a summer evening, or simply treating yourself to a refined meal, this dish is an ideal choice.

What Is Tuna Crudo?

The term “crudo” means “raw” in Italian, and it refers to thinly sliced raw fish, meat, or even vegetables that are enhanced with simple yet flavorful ingredients like olive oil, citrus, herbs, and seasonings.

Unlike sashimi, which is served plain, or ceviche, which is “cooked” by citrus juice, crudo is gently dressed in a vinaigrette or infused oil, allowing the natural flavor of the fish to remain the star.

Tuna crudo is especially popular because of its silky texture and rich umami flavor. It pairs beautifully with bright, acidic components like lemon, orange, and capers, which cut through the richness of the fish and add layers of complexity to each bite.

Why You’ll Love This Recipe

  • No Cooking Required – This dish comes together in under 15 minutes, making it ideal for a quick yet impressive appetizer.
  • Elegant Presentation – The vibrant colors and delicate plating make this a show-stopping dish for any occasion.
  • Fresh and Healthy – Packed with protein, healthy fats, and bright flavors, tuna crudo is a delicious yet nutritious choice.
  • Customizable – You can easily adjust the flavors, garnishes, and level of acidity to suit your personal taste.

A Symphony of Freshness (Ingredients)

  • 1 lb Sushi-Grade Ahi Tuna (thinly sliced)
  • 1 Persian Cucumber (thinly sliced)
  • ¼ cup Extra Virgin Olive Oil
  • Zest of ½ Lemon and ½ Orange
  • Juice of 1 Small Lemon
  • Juice of 1 Small Orange
  • 2 tbsp Caper Brine
  • 1-2 tbsp Capers
  • Toasted Sesame Seeds, Flaky Salt, and Black Pepper (for garnish)
  • Rice Paper Crisps (optional, for serving)

Mastering the Art of Crudo (Directions)

1. Prepare the Citrus Caper Vinaigrette

Whisk together olive oil, citrus juices, zest, caper brine, and capers in a small bowl. Set aside.

2. Slice the Tuna with Precision

Using a sharp knife, cut the sushi-grade tuna into thin slices and arrange them gently on a platter.

3. Assemble with Elegance

Place a thin slice of cucumber on each tuna piece, then drizzle the citrus caper vinaigrette over the top.

4. The Finishing Touches

Sprinkle with flaky salt, black pepper, and toasted sesame seeds. Garnish with additional citrus zest for an extra layer of brightness.

5. Serve and Savor

Enjoy the crudo as is or alongside crispy rice paper crisps for added texture.

Light Yet Luxurious (Nutritional Information Per Serving)

  • Calories: 122 kcal
  • Carbohydrates: 1g
  • Protein: 0.1g
  • Fat: 14g
  • Saturated Fat: 2g
  • Polyunsaturated Fat: 1g
  • Monounsaturated Fat: 10g
  • Sodium: 56mg
  • Potassium: 22mg
  • Fiber: 0.1g
  • Sugar: 0.2g
  • Vitamin A: 17 IU
  • Vitamin C: 0.5mg
  • Calcium: 3mg
  • Iron: 0.1mg

Pro Tips for the Perfect Tuna Crudo

1. Choose High-Quality, Sushi-Grade Tuna

The success of this dish depends entirely on the quality of the fish. Look for sushi-grade ahi tuna, yellowfin tuna, or bigeye tuna from a trusted fishmonger. The fish should have a bright red or deep pink color, a clean ocean scent, and a firm texture.

2. Slice with Precision

Use a sharp knife to cut the tuna into thin, even slices. If you struggle to achieve clean cuts, place the tuna in the freezer for 15-20 minutes to firm it up slightly before slicing.

3. Balance the Acidity

Citrus is essential in crudo, but too much acidity can overpower the delicate flavor of the fish. Instead of drenching the tuna in vinaigrette, lightly drizzle it over the slices to enhance, rather than mask, the natural flavor.

4. Use High-Quality Olive Oil

Since olive oil is a key ingredient in this dish, opt for a cold-pressed extra virgin olive oil with a fruity and slightly peppery finish. This will add depth and richness to the crudo.

5. Let the Ingredients Shine

Minimalism is key with crudo. While garnishes like toasted sesame seeds, flaky salt, and fresh herbs can enhance the dish, avoid adding too many overpowering ingredients that could take away from the purity of the tuna.

How to Serve Tuna Crudo Like a Chef

1. Classic Plating

Arrange the thinly sliced tuna in a single layer on a chilled plate. Drizzle the vinaigrette evenly over the top and finish with delicate garnishes like microgreens, capers, and citrus zest.

2. With Crispy Rice Paper Chips

For added texture, fry rice paper crisps and serve them alongside the crudo. These delicate, airy chips add a satisfying crunch and make for an elegant presentation.

3. As a Salad Topper

Lay the tuna crudo over a bed of arugula or mixed greens for a light and refreshing salad. The vinaigrette acts as a built-in dressing, eliminating the need for additional seasoning.

4. With a Glass of Wine

A chilled Sauvignon Blanc, Albariño, or a dry Rosé pairs beautifully with this dish. These wines offer bright acidity and citrus notes that complement the flavors of the crudo.

Frequently Asked Questions

Can I Use Another Type of Fish?

Yes! While ahi tuna is the most common choice, you can also use:

  • Yellowtail (Hamachi) – Slightly firmer with a buttery flavor.
  • Salmon – Rich and fatty with a delicate sweetness.
  • Albacore – Milder in flavor but still delicious.

Whatever fish you choose, make sure it is sushi-grade to ensure safety and optimal flavor.

How Far in Advance Can I Prepare This Dish?

For the best texture and freshness, slice the tuna and assemble the crudo just before serving. However, you can make the vinaigrette ahead of time and store it in the fridge for up to 24 hours.

Will the Citrus Juice Cook the Fish Like Ceviche?

No. Unlike ceviche, where the fish is left to marinate in citrus juice for an extended period, crudo is only lightly dressed before serving. This preserves the raw texture of the tuna.

What If I Don’t Like Raw Fish?

If raw fish isn’t your thing, try searing the tuna for just 30 seconds per side before slicing. This adds a slight crust while keeping the inside tender and rare.

Can I Use Frozen Tuna?

Yes, but thaw it properly in the refrigerator overnight and pat it dry before slicing. Avoid tuna that has been frozen and thawed multiple times, as this can affect the texture.

Is There a Substitute for Capers?

If you’re not a fan of capers, try using finely chopped green olives or pickled shallots for a similar briny flavor.

Can I Add Extra Heat?

Absolutely! For a spicy kick, add:

  • Thinly sliced jalapeños or serrano peppers
  • A dash of red pepper flakes
  • A drizzle of chili oil

These ingredients will add warmth without overpowering the dish.

Conclusion: The Beauty of Simplicity

Tuna Crudo with Citrus Caper Vinaigrette is a testament to the power of fresh, high-quality ingredients. With just a handful of simple components, this dish delivers an elegant, restaurant-worthy experience that can be made in minutes.

Whether you’re preparing it for a special occasion or enjoying a light and refreshing meal, this crudo is sure to impress. The balance of buttery tuna, bright citrus, and briny capers creates a symphony of flavors that lingers on the palate long after the last bite.

So, the next time you’re looking for a dish that is effortlessly sophisticated yet incredibly easy to make, Tuna Crudo should be at the top of your list. Pair it with a crisp white wine, a warm summer evening, and good company, and you have the perfect recipe for a truly memorable dining experience.

Moqueca: The Heart of Brazilian Coastal Cuisine

Brazilian cuisine is as diverse as the country itself, drawing influences from Indigenous, African, and Portuguese traditions. One dish that beautifully represents this cultural fusion is Moqueca, a rich and aromatic fish stew simmered in a velvety coconut broth with bright lime zest, tomatoes, and peppers.

Moqueca is more than just a meal—it’s a tradition passed down through generations, a dish meant to be shared with family and friends. Whether you’re preparing it for a casual dinner or a special occasion, its bold flavors and comforting warmth make it an unforgettable culinary experience.

In this article, we’ll explore the origins of Moqueca, its regional variations, cooking tips, serving suggestions, and frequently asked questions to help you perfect this Brazilian classic.

The Origins of Moqueca: A Culinary Crossroads

Moqueca has deep roots in Brazil’s coastal regions, where fresh seafood is abundant. There are two main regional variations, each with its unique characteristics:

Moqueca Baiana (Bahian Moqueca)

This version, originating from the northeastern state of Bahia, reflects the strong African influence in Bahian cuisine. It features coconut milk, palm oil (dendê), and plenty of bold spices, resulting in a creamy and vibrant dish.

Moqueca Capixaba (Capixaba Moqueca)

Hailing from the southeastern state of Espírito Santo, this version is lighter and omits coconut milk. Instead, it relies on tomatoes, annatto (for color), and olive oil to create a rich yet more broth-like consistency.

The version most commonly enjoyed outside of Brazil is Moqueca Baiana, thanks to its indulgent coconut-based sauce and layered depth of flavor.

Why You’ll Love Moqueca

  • Bursting with flavor – A perfect balance of creamy coconut, zesty lime, and aromatic spices.
  • Quick and easy – Despite its depth of flavor, Moqueca comes together in just 30 minutes.
  • Customizable – Works with a variety of seafood, from firm white fish to shrimp and scallops.
  • Healthy and nourishing – Rich in protein, healthy fats, and essential vitamins.

The Flavor Symphony (Ingredients)

  • 2 tbsp Coconut Oil
  • 2 tbsp Olive Oil
  • ½ Yellow Onion (diced)
  • 1 Jalapeño (diced, seeds removed for less heat)
  • 1 Red Bell Pepper (sliced)
  • 1 Yellow Bell Pepper (sliced)
  • 2 cloves Garlic (finely chopped)
  • 1 tsp Sweet Paprika
  • ¼ tsp Cayenne Pepper (adjust for spice preference)
  • 1 tsp Kosher Salt
  • ½ tsp Ground Black Pepper
  • 2 lbs Cod or Firm White Fish (cut into large 1-2 inch pieces)
  • 2 Vine Tomatoes (chopped with juices or 1 can diced tomatoes)
  • 2 cups Seafood Stock (or vegetable stock)
  • 1 can (13 oz) Full-Fat Coconut Milk
  • 1 Lime (zested + wedges for serving)
  • 2 Green Onions (chopped, for garnish)

Brazilian Rice (Side Option)

  • ½ Yellow Onion (diced)
  • 1 Garlic Clove (finely chopped)
  • 1 cup Jasmine Rice (washed and rinsed)
  • 2 cups Vegetable Stock
  • ½ tsp Kosher Salt

Savor the Tradition (Directions)

  1. Build the Flavor Base – Heat coconut and olive oil in a large pot over medium heat. Sauté onions and jalapeño for 2-3 minutes until softened.
  2. Add the Peppers – Stir in bell peppers and cook for another 2-3 minutes until slightly tender.
  3. Introduce the Spices – Add garlic, paprika, and cayenne; sauté for 1-2 minutes until fragrant.
  4. Incorporate the Tomatoes – Stir in the chopped tomatoes (or canned) and cook for 2-3 minutes to release their juices.
  5. Prepare the Fish – Pat the fish dry, season with salt and pepper, and place it gently over the vegetables.
  6. Pour in the Liquids – Add coconut milk and seafood stock, followed by lime zest. Stir gently to combine without breaking the fish.
  7. Simmer to Perfection – Cover the pot with a lid slightly ajar and let it simmer (not boil) for 10-15 minutes until the fish is tender.
  8. Serve and Garnish – Spoon the moqueca over jasmine rice and garnish with green onions and lime wedges.

Nourishment in Every Bite (Nutritional Information Per Serving)

  • Calories: 764 kcal
  • Carbohydrates: 56g
  • Protein: 50g
  • Fat: 39g
  • Saturated Fat: 27g
  • Cholesterol: 98mg
  • Sodium: 1877mg
  • Potassium: 1718mg
  • Fiber: 6g
  • Sugar: 9g
  • Vitamin A: 2255 IU
  • Vitamin C: 119mg
  • Calcium: 136mg
  • Iron: 4mg

Expert Tips for the Perfect Moqueca

1. Choose the Right Fish

Since the fish simmers directly in the broth, it’s important to use a firm, white fish that won’t fall apart. Cod, halibut, sea bass, or snapper work well. If you want to experiment, shrimp or even a mix of seafood can be used.

2. Don’t Skip the Lime Zest

Lime zest is essential in Moqueca—it brightens up the dish and enhances the flavors of the coconut milk and spices. Use a microplane to finely zest a whole lime before juicing it.

3. Sauté the Vegetables Until Softened

Cooking the onions, garlic, and peppers until they are slightly softened helps create a deeper flavor base. Be patient with this step—it’s worth it.

4. Simmer Gently to Keep the Fish Intact

Once you add the fish to the stew, avoid excessive stirring. A gentle simmer allows the fish to cook through while staying firm and flaky.

5. Balance the Spice

Moqueca is not meant to be overly spicy, but you can adjust the heat level by adding or omitting jalapeños, cayenne, or serrano peppers.

6. Let It Rest Before Serving

Like many stews, Moqueca benefits from sitting for a few minutes before serving. This allows the flavors to meld together beautifully.

How to Serve Moqueca Like a Pro

1. Traditional Brazilian Style

In Brazil, Moqueca is almost always served with white rice, which helps absorb the flavorful broth. A side of farofa (toasted cassava flour) adds a crunchy contrast.

2. Modern and Light

For a lighter take, pair Moqueca with cauliflower rice or a simple green salad with a citrus vinaigrette.

3. With Crusty Bread

A slice of rustic bread is perfect for sopping up every last bit of the coconut-infused sauce.

4. Wine Pairing

A crisp Sauvignon Blanc or a fruity Viognier complements the rich coconut flavors while balancing the acidity of the tomatoes and lime.

Frequently Asked Questions

What Does “Moqueca” Mean?

The word Moqueca comes from the Indigenous Tupi-Guarani language and means “stewed” or “slowly cooked,” referring to the traditional method of gently simmering fish with vegetables and spices.

Can I Use Frozen Fish?

Yes, but make sure to fully thaw and pat it dry before cooking to prevent excess water from diluting the stew’s flavor.

Is Moqueca Spicy?

Moqueca is typically mild with a gentle warmth from paprika and jalapeños. However, you can increase the heat by adding extra cayenne or fresh chilies.

What Can I Substitute for Coconut Milk?

If you prefer a lighter version, you can use cashew cream or light coconut milk. For a non-creamy Moqueca, try the Capixaba version, which omits coconut milk entirely.

Can I Make Moqueca with Shrimp?

Absolutely! Shrimp, scallops, or even a mix of seafood can be used. Keep in mind that shrimp cook faster than fish, so adjust the simmering time accordingly.

How Do I Store and Reheat Leftovers?

  • Refrigerate: Store in an airtight container for up to 2 days.
  • Reheat: Gently warm over low heat on the stovetop, adding a splash of stock or coconut milk to loosen the broth if needed.
  • Freezing: Not recommended, as the coconut milk may separate and the fish can become mushy upon thawing.

What’s the Difference Between Moqueca and Other Fish Stews?

  • Moqueca – Brazilian, coconut-based with lime, tomatoes, and peppers.
  • Bouillabaisse – French, saffron-infused with multiple seafood types.
  • Cioppino – Italian-American, tomato-based with a variety of seafood.
  • Thai Coconut Curry – Spiced with lemongrass, ginger, and Thai chilies.

Each has its unique personality, but Moqueca stands out for its tropical brightness and comforting texture.

Conclusion: Why Moqueca Deserves a Spot in Your Kitchen

Moqueca is more than just a recipe—it’s an experience. It brings the warmth of Brazil’s coastal kitchens to your home, offering a taste of tradition with every spoonful.

Its perfect balance of creamy, tangy, and savory flavors makes it a dish that satisfies both the adventurous and the comfort-seekers. Plus, its quick cooking time and simple ingredient list make it accessible for home cooks of all levels.

Whether you’re looking for an exciting new seafood dish or a way to transport yourself to Brazil through food, Moqueca is a must-try. Serve it with rice, lime wedges, and good company, and you’ll have a meal that’s truly unforgettable.

Now that you have all the tips and knowledge to master Moqueca, it’s time to bring this vibrant dish to your kitchen. Enjoy the process, embrace the flavors, and share the experience with those around you. Bom apetite!

Marry Me Salmon: A Dish to Fall in Love With

There are some dishes that go beyond just being a meal—they create memories, set the mood, and turn an ordinary evening into something special. Marry Me Salmon is one of those dishes. With its rich, creamy sauce, bright citrus notes, and tender, flaky salmon, it’s the kind of meal that could win over even the most hesitant of hearts. Whether you’re cooking for a date night, a family gathering, or simply treating yourself, this recipe delivers elegance and comfort in every bite.

In this deep dive, we’ll explore why this dish is so beloved, the best ways to serve it, expert cooking tips, and frequently asked questions to ensure your Marry Me Salmon turns out perfectly every time.

What Makes Marry Me Salmon So Special?

A Creamy, Luxurious Sauce

The star of this dish is undoubtedly the sauce. A blend of heavy cream, garlic, lemon juice, and fresh herbs creates a velvety texture that perfectly complements the natural richness of salmon. The contrast of creamy and tangy flavors makes each bite irresistible.

A Showstopper on Any Table

With its golden, slightly crisp edges and delicate creamy drizzle, Marry Me Salmon looks as impressive as it tastes. Whether served with simple sides or a lavish spread, it has an effortlessly elegant appearance.

Quick and Easy Yet Gourmet

Despite its restaurant-quality taste, Marry Me Salmon is incredibly simple to make. With just a handful of ingredients and minimal preparation time, you can create a dish that feels indulgent without spending hours in the kitchen.

A Balance of Indulgence and Nutrition

While this dish leans into decadence with its rich sauce, it also offers a range of health benefits thanks to the salmon. Packed with omega-3 fatty acids, high-quality protein, and essential vitamins, it’s a meal that nourishes both the body and the soul.

The Magic Mix (Ingredients)

  • 4 fresh salmon fillets (about 6 ounces each)
  • 3 cloves garlic (minced)
  • 1 lemon (juiced)
  • 1 cup heavy cream (or a lighter alternative)
  • 2 tablespoons fresh parsley (chopped)
  • 2 tablespoons fresh dill (chopped, plus more for garnish)
  • Salt and pepper (to taste)

Love at First Bite (Directions)

  1. Preheat the Oven – Set your oven to 400°F (200°C) to get it nice and hot.
  2. Season the Salmon – Sprinkle salt and pepper on both sides of the salmon fillets and arrange them in a baking dish.
  3. Make the Creamy Sauce – In a bowl, mix the minced garlic, lemon juice, heavy cream, parsley, and dill. Whisk until smooth and well combined.
  4. Coat the Salmon – Pour the sauce over the fillets, making sure they are well covered.
  5. Bake to Perfection – Place the dish in the preheated oven and bake for 15-20 minutes, or until the salmon flakes easily with a fork.
  6. Garnish and Serve – Drizzle the creamy sauce over the salmon and top with extra dill for a fresh, elegant touch.

A Nutritional Love Story (Per Serving)

  • Calories: 420 kcal
  • Protein: 35g
  • Carbohydrates: 4g
  • Fat: 30g
  • Saturated Fat: 15g
  • Cholesterol: 100mg
  • Sodium: 320mg
  • Potassium: 900mg
  • Vitamin A: 600 IU
  • Vitamin C: 15mg
  • Calcium: 80mg
  • Iron: 1.5mg

Pro Tips for the Perfect Marry Me Salmon

1. Choose the Best Salmon

Fresh, high-quality salmon makes all the difference. Opt for wild-caught salmon whenever possible, as it tends to have a firmer texture and richer flavor compared to farmed varieties. If using frozen salmon, be sure to thaw it completely and pat it dry before cooking to ensure even cooking.

2. Let the Fish Rest Before Cooking

Taking the salmon out of the fridge 15-20 minutes before cooking helps it cook more evenly. Cooking cold salmon straight from the fridge can lead to uneven textures, with the outside cooking faster than the inside.

3. Don’t Skip the Searing Step

If you want to add an extra layer of depth to your dish, sear the salmon in a hot pan for a couple of minutes before baking. This step enhances the flavor by creating a beautiful golden crust while keeping the inside moist and tender.

4. Adjust the Sauce Consistency

The sauce thickens as it bakes, but if you prefer a thinner consistency, you can add a splash of broth or an extra squeeze of lemon juice before serving. Conversely, if you want a thicker, richer sauce, let it simmer for a couple of minutes before pouring it over the salmon.

5. Watch Your Baking Time

Overcooked salmon becomes dry and loses its delicate flakiness. Keep an eye on the baking time and check for doneness by inserting a fork into the thickest part of the fish—it should flake easily but still look moist.

6. Garnish for a Finishing Touch

A sprinkle of fresh herbs like dill or parsley just before serving adds a burst of color and freshness, elevating the dish’s visual appeal and flavor.

Serving Suggestions: Pairing Perfection

1. Classic and Light

A simple side of steamed asparagus or green beans keeps things fresh and balances the richness of the sauce.

2. Cozy and Comforting

Serve with creamy mashed potatoes or buttery rice to soak up every bit of the delicious sauce.

3. Elegant and Sophisticated

For a fine-dining experience at home, pair the salmon with a crisp white wine like Chardonnay or Sauvignon Blanc.

4. Healthy and Wholesome

Opt for quinoa or cauliflower rice for a lighter take on this indulgent dish.

5. Bread on the Side

A slice of crusty baguette is perfect for mopping up the extra sauce—you won’t want to waste a drop!

Frequently Asked Questions

What is the meaning behind “Marry Me” Salmon?

The name comes from the idea that this dish is so irresistibly delicious, it could inspire a marriage proposal. It’s a playful nod to its romantic and impressive nature, making it a popular choice for date nights and special occasions.

Can I use a different type of fish?

Absolutely! While salmon works beautifully in this recipe, you can substitute other firm fish like cod, halibut, or trout. Keep in mind that cooking times may vary depending on the thickness of the fish.

Is there a way to make this dish lighter?

Yes! You can swap heavy cream for half-and-half or even coconut milk for a dairy-free version. Reducing the amount of cream and replacing it with vegetable broth is another way to lighten up the dish while maintaining its creamy texture.

How do I store leftovers?

Leftover Marry Me Salmon can be stored in an airtight container in the refrigerator for up to 3 days. To reheat, gently warm it in a skillet over low heat with a splash of broth or cream to keep it from drying out. Avoid microwaving for too long, as it can overcook the salmon.

Can I make this dish ahead of time?

While it’s best enjoyed fresh, you can prepare the sauce in advance and store it in the refrigerator for up to two days. When you’re ready to cook, simply reheat the sauce, pour it over the salmon, and bake as usual.

Can I freeze Marry Me Salmon?

Freezing is not recommended, as the creamy sauce can separate and change texture when thawed. However, if you must freeze it, store it in an airtight container and reheat slowly with added cream or broth to help restore the sauce’s consistency.

What’s the best way to tell if my salmon is done?

The easiest way to check for doneness is by using a fork—when the salmon flakes easily and appears opaque, it’s ready. You can also use a food thermometer; the internal temperature should reach 125-130°F for medium-rare and 135-140°F for a more well-done fillet.

Final Thoughts: A Dish Worth Falling For

Marry Me Salmon is more than just a meal; it’s an experience. With its creamy, dreamy sauce and perfectly cooked salmon, this dish has the power to make any dinner feel like a special occasion. Whether you’re cooking to impress someone special or simply treating yourself to a restaurant-quality meal at home, this recipe is a guaranteed winner.

It’s simple yet luxurious, indulgent yet wholesome, and quick to make while delivering unforgettable flavors. No matter how you serve it—alongside roasted vegetables, over a bed of fluffy rice, or paired with a crisp glass of wine—one thing is certain: this dish is bound to be love at first bite.

So, go ahead, give it a try, and see why so many people are falling head over heels for Marry Me Salmon.

Cajun Comfort in a Pot: Smothered Potatoes and Sausage

Smothered Potatoes and Sausage is a true Southern classic, deeply rooted in the Cajun tradition of slow-cooked, comforting meals. This dish takes simple, humble ingredients and transforms them into a rich, flavorful masterpiece. Whether served as a side or as a main dish over rice, it embodies everything that makes Cajun cooking special—bold flavors, hearty textures, and a cooking process designed to bring people together.

In this guide, we’ll dive deep into the history of this dish, expert tips for the best results, FAQs, and serving suggestions to make your meal unforgettable.

The Heart and Soul of Cajun Cooking

A Dish Born from Tradition

Cajun cuisine is known for its resourcefulness and deep flavors. The early Acadians, who settled in Louisiana, had to make the most of what they had—homegrown vegetables, preserved meats, and simple seasonings. Smothered dishes became a staple because they required only a handful of ingredients and could be left to cook slowly while families attended to their daily work.

Smothered potatoes are a perfect example of this style. By cooking them in a flavorful base of onions, bell peppers, celery (known as the Cajun Trinity), and smoked sausage, the dish develops a richness that far exceeds the sum of its parts. The result? A warm, deeply satisfying meal that brings the taste of Louisiana straight to your kitchen.

Why You’ll Love This Recipe

  • Minimal Ingredients, Maximum Flavor: With just a few kitchen staples, you can create a dish that’s packed with layers of taste.
  • Perfect for Any Occasion: Serve it as a side, make it the star of the meal, or even enjoy leftovers for breakfast with eggs.
  • One-Pot Simplicity: Everything cooks in a single pot, making cleanup a breeze.

Gather Your Goodies (Ingredients)

  • 3 tbsp Bacon Grease (or substitute with vegetable oil)
  • 2 lbs Yukon Gold Potatoes (cut into 1 to 1 ½ inch cubes)
  • ¼ lb Smoked Sausage (sliced into ¼-inch medallions)
  • 2 cups Yellow Onions (chopped)
  • 1 cup Green Bell Peppers (chopped)
  • ½ cup Celery (chopped)
  • 5 cloves Garlic (chopped)
  • 2 cups Chicken Stock (or substitute with vegetable stock or water)

Herb & Spice Magic:

  • 1 tbsp Creole Seasoning
  • ½ tsp Kosher Salt
  • ½ tsp Ground Black Pepper

Crafting the Cajun Goodness (Directions)

1. Prep Like a Pro

  • Gather and measure all ingredients before you start.

2. Build the Flavor Base

  • Place bacon in a cold Dutch oven over medium heat and fry until crispy (about 5-6 minutes). Remove the bacon and set aside.
  • In the bacon grease, brown the sausage for about 5 minutes. Remove and reserve.

3. Sauté the Trinity

  • In the same pot, add onions, bell peppers, and celery. Cook until onions start to brown and turn translucent (about 15 minutes).
  • Stir in the chopped garlic and spice blend. Sauté for another 2 minutes until fragrant.

4. Smother Those Potatoes

  • Increase heat to medium-high. Add potatoes and stir well, letting them brown slightly for about 5 minutes.
  • Return the sausage to the pot and mix.

5. Simmer to Perfection

  • Pour in the chicken stock, ensuring it reaches just the top of the potatoes (not covering them).
  • Bring to a boil, then lower heat and let simmer, partially covered, for about 20 minutes.
  • Stir occasionally and check potatoes for doneness. If needed, simmer longer in 5-minute intervals.

6. The Finishing Touches

  • If desired, add the crispy bacon back in.
  • Serve as a side dish or over rice as a main meal.

Fuel for the Soul (Nutritional Info Per Serving)

  • Calories: 224 kcal
  • Carbohydrates: 28g
  • Protein: 6g
  • Fat: 10g
  • Saturated Fat: 4g
  • Cholesterol: 17mg
  • Sodium: 374mg
  • Potassium: 696mg
  • Fiber: 4g
  • Sugar: 4g
  • Vitamin A: 363 IU
  • Vitamin C: 42mg
  • Calcium: 35mg
  • Iron: 1mg

Pro Tips for the Best Smothered Potatoes and Sausage

1. Choose the Right Potatoes

The type of potato you use can make a big difference. Yukon Golds are ideal because they hold their shape while absorbing flavors beautifully. If you prefer a softer, creamier texture, Russet potatoes will break down more and create a thicker gravy. Red potatoes work well if you want firmer bites with less starch release.

2. Get That Perfect Browning

The secret to deep flavor is browning your sausage and potatoes properly. Let the sausage develop a golden crust before removing it from the pan, and do the same for the potatoes before adding stock. This step enhances the dish’s rich, smoky taste.

3. Balance Your Seasonings

Cajun seasoning can vary in saltiness and heat, so taste as you go. If using a store-bought blend, adjust the salt accordingly. A homemade spice mix with paprika, garlic powder, onion powder, thyme, and cayenne can give you complete control over the flavor profile.

4. Control the Thickness of Your Sauce

Since potatoes naturally release starch as they cook, the sauce will thicken over time. If it becomes too thick, add a splash of extra stock. If you prefer a thicker consistency, let it simmer uncovered for the last few minutes.

5. Let It Rest Before Serving

Once cooked, allow the dish to sit for a few minutes before serving. This gives the flavors time to meld and the sauce to settle, resulting in a more cohesive dish.

Serving Suggestions: Making It a Complete Meal

Smothered Potatoes and Sausage is incredibly versatile, working well as a standalone dish or as part of a larger spread. Here are some ways to serve it:

1. Classic Southern Style

Serve it over white rice to soak up every bit of that flavorful sauce. Pair it with a side of cornbread for the ultimate comfort meal.

2. As a Side Dish

This dish makes a fantastic side for grilled meats like pork chops, fried catfish, or blackened chicken. It’s hearty enough to complement bold flavors but doesn’t overpower the main protein.

3. Brunch with a Twist

For a Southern-style breakfast, serve leftover smothered potatoes with fried eggs and a side of buttery biscuits. The combination of smoky sausage and creamy potatoes works wonderfully in a morning meal.

4. Make It a One-Pot Feast

Turn this into a full one-pot meal by adding extra vegetables like mushrooms, okra, or even diced tomatoes. You can also mix in cooked shrimp during the last few minutes for a seafood variation.

Frequently Asked Questions

What Type of Sausage Works Best?

Smoked sausage is ideal because it adds a rich, savory depth to the dish. Andouille sausage brings a bit of heat and traditional Cajun flavor, while milder smoked pork sausage keeps it more balanced. If you prefer a leaner option, turkey or chicken sausage works well too.

Can I Make This Dish Ahead of Time?

Yes! Smothered Potatoes and Sausage actually tastes even better the next day as the flavors have more time to develop. Store leftovers in an airtight container in the refrigerator for up to 5 days. Reheat on the stovetop over medium heat, adding a bit of stock if needed.

Can This Be Made in a Slow Cooker?

Absolutely. To make it in a slow cooker:

  1. Brown the sausage and onions in a pan before adding them to the slow cooker.
  2. Add all remaining ingredients and cook on low for 4-6 hours.
  3. Stir occasionally and check the potatoes for doneness before serving.

Is This Dish Spicy?

It depends on the sausage and Cajun seasoning you use. Andouille sausage and some store-bought Creole seasonings can be spicy, so if you prefer a milder version, opt for regular smoked sausage and use a mild seasoning blend.

What’s the Best Way to Store and Reheat Leftovers?

  • Storage: Keep leftovers in an airtight container in the fridge for up to 5 days.
  • Reheating: Warm in a skillet over medium heat, adding a little extra broth or water to prevent drying out. It can also be microwaved in short intervals, stirring in between.

Can I Freeze Smothered Potatoes?

Freezing is possible but not ideal. The potatoes may become grainy or mushy when thawed. If you do freeze it, store in an airtight container for up to 3 months. Thaw in the refrigerator overnight before reheating.

Bringing It All Together: The Perfect Comfort Dish

Smothered Potatoes and Sausage is more than just a meal—it’s a piece of Southern tradition, a dish that brings warmth and comfort to any table. With its rich flavors, simple ingredients, and easy one-pot preparation, it’s a go-to recipe that’s perfect for busy weeknights, lazy Sundays, or sharing with friends and family.

Whether you’re an experienced cook or just discovering Cajun cuisine, this dish is a foolproof way to bring bold, authentic flavors into your home. Pair it with rice, cornbread, or your favorite Southern sides, and you’ve got a meal that satisfies on every level.

So go ahead, grab a beer (as Sweet Daddy D suggests), take your time, and enjoy the process—because great food, like great company, is always worth the wait.

Green Velvet Brownies: A St. Patrick’s Day Dessert with a Decadent Twist

When it comes to festive desserts, few treats stand out quite like Green Velvet Brownies with Cream Cheese Frosting. These brownies are a fun and colorful spin on traditional red velvet, swapping out the signature red for a vibrant green that makes them perfect for St. Patrick’s Day or any themed celebration. With their rich chocolate flavor, fudgy-yet-cakey texture, and luscious cream cheese frosting, these brownies are guaranteed to be a crowd-pleaser.

Whether you’re hosting a St. Patrick’s Day party, looking for a unique dessert to share, or simply craving something indulgent, these green velvet brownies check all the boxes. Their bold color, velvety smooth texture, and tangy frosting create a perfect balance of sweetness and richness in every bite.

What Makes These Brownies Special?

While regular brownies are known for their deep chocolate flavor, velvet brownies have a more delicate chocolate taste with a smooth, almost creamy texture. They combine elements of chocolate cake and brownies, giving you a dessert that’s fudgy yet airy, dense yet tender. Here’s why these Green Velvet Brownies stand out:

  • A Unique Take on Classic Brownies – While most brownies are deep brown, these stand out with their vibrant green hue, making them festive and fun.
  • Perfectly Balanced Texture – They’re not too cakey, not too fudgy, but the perfect in-between.
  • Rich Chocolate Flavor – Even though they’re not as intensely chocolatey as regular brownies, they still pack plenty of smooth chocolate notes.
  • Tangy and Creamy Frosting – The cream cheese frosting adds a delicious contrast to the sweet brownie base, balancing out the flavors beautifully.
  • Great for Special Occasions – These brownies are ideal for St. Patrick’s Day, birthdays, and themed parties.

Ingredients: A Vibrant Twist on Classic Brownies

  • For the Brownies:
    • Semi-sweet chocolate chips
    • Butter
    • Granulated sugar
    • Large eggs
    • All-purpose flour
    • Green food coloring
    • Baking powder
    • Vanilla extract
    • Salt
  • For the Cream Cheese Frosting:
    • Cream cheese, softened
    • Butter, softened
    • Powdered sugar
    • Salt
    • Vanilla extract

Directions: Baking the Perfect Green Velvet Brownies

  1. Melt the Chocolate and Butter: Combine chocolate chips and butter, melting until smooth.
  2. Mix the Batter: Stir in sugar, then whisk in eggs one at a time. Add flour, green food coloring, baking powder, vanilla, and salt.
  3. Bake the Brownies: Pour batter into a foil-lined 9-inch square pan and bake at 350°F for 44-48 minutes. Let cool completely.
  4. Prepare the Frosting: Beat cream cheese and butter until creamy, then gradually mix in powdered sugar, salt, and vanilla extract.
  5. Assemble and Serve: Spread the frosting over cooled brownies, cut into squares, and enjoy!

Nutritional Facts (Per Serving, Approximate):

  • Calories: 290
  • Carbohydrates: 39g
  • Protein: 3g
  • Fat: 14g
  • Saturated Fat: 8g
  • Cholesterol: 58mg
  • Sodium: 105mg
  • Sugar: 32g

The Secret to Perfect Green Velvet Brownies

To ensure these brownies turn out soft, rich, and delicious, here are some key baking tips:

  1. Use High-Quality Chocolate – Since the brownies aren’t overly sweet, using good-quality chocolate chips or baking chocolate makes a difference.
  2. Don’t Overmix the Batter – Overmixing can make the brownies too dense and tough. Mix until just combined for the best texture.
  3. Measure Flour Correctly – Too much flour can lead to dry, crumbly brownies. Always use the spoon-and-level method rather than scooping directly from the bag.
  4. Let Them Cool Completely Before Frosting – If you frost the brownies while they’re warm, the frosting may melt, making it difficult to spread evenly.
  5. Use an Entire Bottle of Green Food Coloring – This ensures the brownies achieve their deep, vibrant green shade rather than looking dull.

How to Serve and Enjoy These Brownies

These Green Velvet Brownies are delicious on their own, but they can also be dressed up in creative ways:

  • Add Green and White Sprinkles – Sprinkle over the frosting for a festive St. Patrick’s Day look.
  • Drizzle with White Chocolate – A white chocolate drizzle adds an elegant touch and an extra layer of flavor.
  • Serve with Ice Cream – A scoop of vanilla or mint chocolate chip ice cream pairs beautifully with these brownies.
  • Dust with Powdered Sugar – If you prefer a lighter frosting, you can dust the brownies with powdered sugar instead.
  • Turn Them into a Brownie Trifle – Layer the brownies with whipped cream and crushed cookies for a fun dessert cup.

Frequently Asked Questions

1. What Makes Velvet Brownies Different from Regular Brownies?

Velvet brownies are similar to traditional brownies but have a lighter, smoother texture with a subtle chocolate flavor. They also contain food coloring, giving them their signature red or green hue. Unlike classic brownies, which are more dense and fudgy, velvet brownies lean slightly toward a cake-like texture while still being moist.

2. Do These Brownies Taste Like Regular Chocolate Brownies?

Not exactly. While they contain cocoa powder or melted chocolate, the chocolate flavor is milder than a traditional brownie. Instead, they have a smooth, rich texture with subtle cocoa notes, making them taste almost like a mix between chocolate cake and brownies.

3. Can I Use a Different Color Instead of Green?

Yes! If you love the velvet brownie texture but want a different color for another occasion, you can swap out the green food coloring for:

  • Red (Classic Red Velvet Brownies)
  • Blue (Perfect for Fourth of July or Frozen-Themed Desserts)
  • Purple (Fun for Halloween or Mardi Gras)

4. How Can I Make These Brownies Extra Fudgy?

If you prefer extra fudgy brownies, try these adjustments:

  • Use only 1 teaspoon of baking powder instead of the full amount.
  • Add an extra egg yolk for a richer, denser texture.
  • Reduce the baking time by 2-3 minutes so they stay gooey in the center.

5. Can I Make These Without Frosting?

Yes! While the cream cheese frosting adds an extra layer of richness, these brownies are still delicious on their own. If you prefer them unfrosted, you can dust them with powdered sugar or drizzle with white chocolate for a lighter version.

6. Can I Make These Ahead of Time?

Absolutely! Green velvet brownies can be made in advance and stored:

  • At Room Temperature: Store unfrosted brownies in an airtight container for up to 3 days.
  • Refrigerated: Once frosted, keep them in the fridge for up to 4 days.
  • Frozen: For longer storage, freeze unfrosted brownies for up to 3 months. Thaw overnight in the fridge before serving.

7. What’s the Best Way to Cut These Brownies Without Making a Mess?

For clean, even slices, follow these tips:

  • Chill the brownies before cutting – This helps them firm up for smoother slices.
  • Use a sharp knife and wipe it clean between cuts – This prevents frosting and crumbs from sticking.
  • Lightly grease the knife with cooking spray for extra clean cuts.

Fun Variations to Try

Want to put a twist on these brownies? Try these fun variations:

  • Mint Green Velvet Brownies – Add ½ teaspoon of peppermint extract to the batter for a refreshing minty flavor.
  • Oreo Green Velvet Brownies – Mix crushed Oreos into the batter and sprinkle on top of the frosting.
  • Nutty Green Velvet Brownies – Fold in chopped pecans or walnuts for extra crunch.
  • Green Velvet Cheesecake Brownies – Swirl a layer of cheesecake batter into the brownie batter before baking for a marbled effect.

Final Thoughts: A Festive Treat Worth Baking

Green Velvet Brownies are more than just a dessert—they’re a celebration of flavor, texture, and creativity. With their rich, chocolatey taste, velvety texture, and luscious cream cheese frosting, they offer the perfect balance of indulgence and festivity.

Whether you’re baking them for St. Patrick’s Day, a special occasion, or just because you love a good brownie, this recipe is one you’ll come back to again and again. Their vibrant color and incredible taste make them a standout dessert that will impress everyone who tries them.

So, grab your green food coloring, mix up a batch, and enjoy a treat that’s as fun to look at as it is to eat!