Mint Chocolate Chip Cookies: A Cool and Chewy Treat

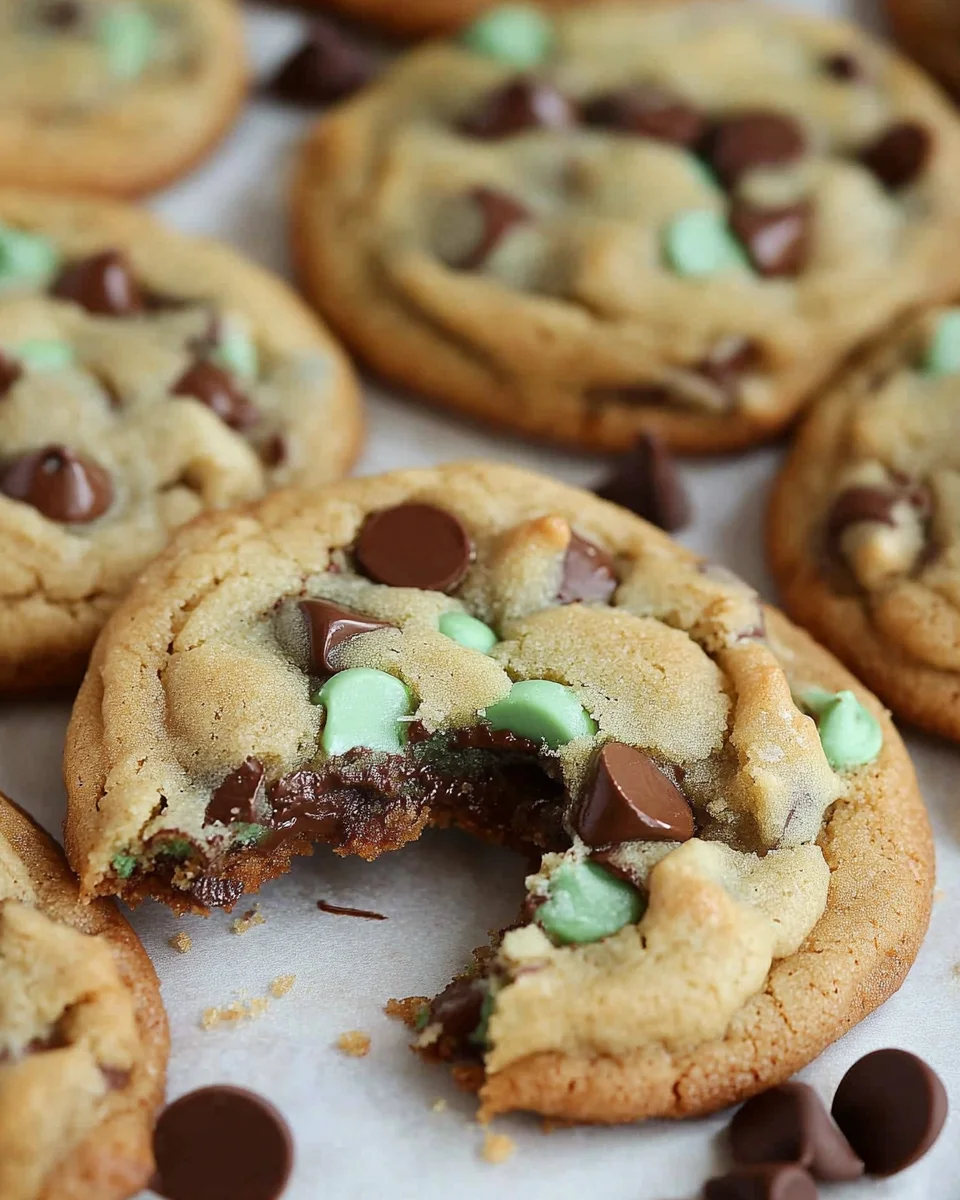
Mint chocolate chip cookies are a refreshing twist on the classic chocolate chip cookie, combining the cool essence of peppermint with rich, melty chocolate chips. These cookies have a soft and chewy center, crisp golden edges, and an irresistible balance of sweetness and minty freshness.

Perfect for holidays, cookie exchanges, or satisfying year-round cravings, this recipe is easy to make, requires no chilling time, and delivers bakery-style results with minimal effort. Whether you love mint desserts or are looking for a fun variation on traditional cookies, these Mint Chocolate Chip Cookies are guaranteed to impress.

In this guide, we’ll explore why these cookies are special, how to customize them, the best way to serve and store them, expert baking tips, and answers to frequently asked questions to ensure your cookies turn out perfect every time.

Why You’ll Love This Recipe

1. The Perfect Flavor Combination

Chocolate and mint are a classic pairing that never goes out of style. The richness of chocolate chips balances perfectly with the cool, refreshing taste of peppermint extract, creating a cookie that feels both indulgent and light.

2. Soft and Chewy with Crisp Edges

These cookies have a perfectly chewy center, thanks to brown sugar and butter, while the edges develop a light crisp for added texture.

3. No Need to Chill the Dough

Many cookie recipes require chilling time for the dough, but these cookies can be baked immediately, making them a quick and easy option for last-minute baking.

4. Customizable to Your Taste

With different mix-in options like Andes mints, white chocolate chips, or dark chocolate chunks, you can personalize these cookies to your liking.

5. A Fun and Festive Treat

Mint chocolate chip cookies fit perfectly into holiday celebrations, especially during Christmas and St. Patrick’s Day, when mint-flavored treats are especially popular.

Creative Variations to Try

1. Double Chocolate Mint Cookies

For an even richer chocolate flavor, replace half of the all-purpose flour with cocoa powder to create a double chocolate version. This results in deep, fudgy cookies with a hint of peppermint.

2. Mint Chocolate Cookie Bars

Instead of scooping individual cookies, press the dough into a baking pan and create chewy cookie bars. Slice into squares for a different presentation with the same delicious taste.

3. White Chocolate Mint Cookies

Swap out the chocolate chips for white chocolate chips for a sweeter, creamier contrast to the mint flavor.

4. Crushed Candy Cane Cookies

For a festive touch, add crushed candy canes to the cookie dough or sprinkle them on top before baking. This variation is perfect for Christmas cookie platters.

5. Thin and Crispy Mint Cookies

If you prefer crunchy cookies instead of chewy ones, press the dough balls flatter before baking, and bake them a couple of minutes longer to create crispier cookies.

Best Ways to Serve Mint Chocolate Chip Cookies

1. With a Cold Glass of Milk

The cool mint flavor pairs perfectly with a refreshing glass of milk, making for a classic cookie experience.

2. Warm with a Scoop of Ice Cream

Serve these cookies warm, fresh from the oven with a scoop of vanilla or mint chocolate chip ice cream for a decadent dessert.

3. Dipped in Chocolate

For an extra indulgence, dip half of each cookie in melted dark or white chocolate and let them set for a bakery-style finish.

4. As a Cookie Sandwich

Spread a layer of chocolate ganache, marshmallow fluff, or buttercream frosting between two cookies to make an irresistible sandwich treat.

5. With Hot Cocoa or Coffee

Pairing these cookies with a warm drink like hot chocolate, peppermint mocha, or espresso enhances their rich and minty flavors.

Expert Baking Tips for Perfect Cookies

1. Use High-Quality Peppermint Extract

For the best mint flavor, always use pure peppermint extract, not spearmint or imitation mint flavoring, which can taste artificial.

2. Don’t Overbake

The key to soft and chewy cookies is removing them from the oven when they are still slightly underbaked in the center. They will continue to set as they cool on the baking sheet.

3. Reserve Some Chocolate for Topping

For picture-perfect cookies, save some chocolate chips or Andes mints to press into the tops of the cookies right after baking.

4. Measure Flour Properly

To prevent dense or dry cookies, measure flour using the spoon-and-level method instead of scooping directly from the bag, which can pack in too much flour.

5. Rotate Baking Sheets for Even Baking

If baking multiple trays at once, rotate them halfway through baking to ensure the cookies bake evenly.

Storage and Freezing Tips

Storing Baked Cookies

  • Store cookies in an airtight container at room temperature for up to 5 days.
  • Place a slice of bread in the container to keep cookies soft longer.

Freezing Cookie Dough

  • Scoop the dough into portions, place them on a baking sheet, and freeze until solid.
  • Transfer the frozen dough balls into a zip-top bag, label, and freeze for up to 3 months.
  • When ready to bake, add 1-2 extra minutes to the baking time (no need to thaw).

Freezing Baked Cookies

  • Place fully cooled cookies in an airtight container with parchment paper between layers.
  • Freeze for up to 2 months and thaw at room temperature before serving.

Frequently Asked Questions (FAQs)

1. Can I Use Mint Extract Instead of Peppermint Extract?

Mint extract contains a blend of peppermint and spearmint, which changes the flavor profile slightly. If you want the classic chocolate-mint taste, stick to peppermint extract.

2. Why Did My Cookies Turn Out Flat?

Flat cookies can result from over-softened butter, too little flour, or skipping the chilling step. Make sure your butter is soft but still cool to the touch, and measure flour correctly.

3. Can I Make These Cookies Without Chocolate Chips?

Yes! You can omit the chocolate chips and replace them with Andes mints, crushed peppermint candies, or even leave them plain for a simple mint cookie.

4. How Do I Make the Cookies Greener?

If you want a festive look, add a drop or two of green food coloring to the dough before mixing. Be careful not to add too much, or the color may look artificial.

5. Can I Use Dairy-Free or Vegan Substitutes?

Yes! To make these cookies dairy-free or vegan:

  • Use vegan butter or coconut oil instead of regular butter.
  • Swap the egg for a flax egg (1 tbsp ground flaxseed + 2.5 tbsp water).
  • Choose dairy-free chocolate chips.

Final Thoughts: A Refreshing and Delicious Cookie for Any Occasion

Mint chocolate chip cookies bring a fun and refreshing twist to the classic chocolate chip cookie. With a perfectly chewy texture, cool peppermint flavor, and rich chocolate chips, they are ideal for holidays, special occasions, or everyday indulgence.

Whether you enjoy them straight from the oven, dipped in chocolate, or sandwiched with ice cream, these cookies are a crowd-pleaser that will quickly become a favorite.

Try baking a batch today and enjoy the perfect balance of chocolate and mint in every bite!

Easter Lemon Pavlovas: A Light and Elegant Spring Dessert

Easter is a time of renewal, celebration, and indulgence in seasonal flavors, and nothing captures the essence of spring quite like Easter Lemon Pavlovas. These delicate meringue nests, crisp on the outside and marshmallow-soft on the inside, are filled with tangy lemon curd and topped with fresh berries or toasted coconut. The combination of airy meringue, rich citrus filling, and colorful decorations makes them a show-stopping dessert for any Easter gathering or springtime celebration.

Pavlovas have a reputation for being elegant yet surprisingly simple to make. With the right technique and a little patience, you can create a dessert that is both visually stunning and irresistibly delicious. In this guide, we will explore what makes Easter Lemon Pavlovas special, creative variations, ideal pairings, expert baking tips, storage recommendations, and frequently asked questions to help you perfect this festive treat.

Why You’ll Love This Dessert

1. A Stunning and Elegant Easter Treat

Easter Lemon Pavlovas are light, delicate, and beautifully festive, making them perfect for spring celebrations. The vibrant yellow of the lemon curd, paired with pastel-colored decorations, creates a visually appealing dessert that looks just as good as it tastes.

2. A Perfect Balance of Textures

One of the defining features of a pavlova is its contrasting textures—a crisp, airy shell that gives way to a soft, marshmallow-like center. When combined with smooth, zesty lemon curd and juicy berries, each bite offers a harmonious blend of crunch, creaminess, and tartness.

3. Light Yet Indulgent

Unlike heavy cakes or dense cheesecakes, pavlovas are delightfully light, making them an excellent choice for a spring dessert that doesn’t feel too rich. The whipped egg whites create a cloud-like texture, while the lemon curd adds just the right amount of richness.

4. Naturally Gluten-Free

For those with dietary restrictions, pavlovas are naturally gluten-free, making them a wonderful option for guests who need an allergy-friendly dessert.

5. Versatile and Customizable

While the classic lemon curd filling is bright and refreshing, these pavlovas can be customized with different curds, creams, and toppings, allowing you to tailor the recipe to your taste preferences.

A Festive Citrus Delight (Ingredients)

For the Pavlovas:
  • Egg whites
  • Granulated sugar
  • Food coloring (optional)
  • Cornstarch
  • Lemon juice
  • Lemon zest
  • Lemon extract (optional, for extra citrus flavor)
For the Lemon Curd:
  • Unsalted butter
  • Golden sugar
  • Large eggs
  • Fresh lemon juice
  • Lemon zest
Toppings (Optional):
  • Mixed berries (blueberries, raspberries, strawberries)
  • Toasted coconut flakes
  • Powdered sugar

Crispy, Fluffy, and Bursting with Lemon Flavor (Directions)

  1. Prepare the Meringue – Whip egg whites and gradually add sugar until stiff peaks form. Fold in lemon juice, zest, and cornstarch.
  2. Pipe the Pavlovas – Transfer meringue to a piping bag and shape into small nests on a lined baking sheet.
  3. Bake to Perfection – Bake at 250°F for 1 hour, then turn off the oven and leave the pavlovas inside for another 30 minutes to prevent cracking.
  4. Make the Lemon Curd – Beat butter and sugar, then mix in eggs, lemon juice, and zest. Cook over low heat until thickened.
  5. Assemble and Serve – Fill the pavlova nests with lemon curd, garnish with berries and toasted coconut, then dust with powdered sugar.

Nutritional Breakdown (Per Serving – Approximate)

  • Calories: 150 kcal
  • Carbohydrates: 20g
  • Protein: 3g
  • Fat: 6g
  • Sodium: 30mg

Creative Variations to Try

1. Lemon Raspberry Pavlovas

For an extra layer of flavor, swirl fresh raspberry puree into the lemon curd before filling the pavlovas. The combination of sweet raspberries and tangy lemon creates a vibrant contrast.

2. Coconut Lemon Pavlovas

Enhance the tropical notes by adding coconut extract to the meringue and topping the pavlovas with toasted coconut flakes. This variation brings a subtle nutty sweetness that pairs beautifully with lemon.

3. Lemon Blueberry Pavlovas

Swap out the raspberries for blueberries, either fresh or in a compote, for a deeper, jam-like sweetness that balances the tart lemon curd.

4. Whipped Cream and Lemon Curd Duo

Instead of using just lemon curd, layer the pavlovas with a mix of whipped cream and curd for a lighter, silkier filling.

5. Chocolate Lemon Pavlovas

For a richer twist, drizzle melted white or dark chocolate over the pavlovas before serving. The chocolate adds depth and decadence, while still letting the citrus flavors shine.

Best Pairings for Easter Lemon Pavlovas

Pavlovas are delicious on their own, but pairing them with the right accompaniments can elevate the entire dessert experience. Here are some of the best ways to serve them:

1. A Refreshing Citrus Cocktail

A lemon or orange-infused cocktail, such as a lemon spritz or citrus sangria, complements the brightness of the pavlova beautifully.

2. A Hot Cup of Tea

Pairing pavlovas with a delicate tea, such as Earl Grey, chamomile, or jasmine, enhances their light, airy nature without overpowering the flavors.

3. A Scoop of Sorbet

A small scoop of raspberry or mango sorbet on the side adds an extra fruity note and a refreshing contrast to the creamy filling.

4. Fresh Fruit Platter

A platter of strawberries, kiwi, pineapple, and grapes complements the pavlovas and adds a colorful, fresh element to the dessert table.

Expert Tips for Perfect Pavlovas

1. Use Room-Temperature Egg Whites

Cold egg whites won’t whip as effectively, so let them sit at room temperature for at least 30 minutes before beating.

2. Add Sugar Gradually for a Smooth Meringue

Adding sugar too quickly can cause the meringue to be grainy instead of glossy. Add it one tablespoon at a time, allowing it to dissolve before adding more.

3. Don’t Open the Oven Door Too Soon

A sudden temperature change can cause the pavlovas to crack or collapse. Always let them cool gradually in the oven after baking.

4. Avoid Humid Conditions

Meringues absorb moisture from the air, which can make them sticky or soft. If it’s humid, try to bake pavlovas on a dry day or use a dehumidifier in the kitchen.

5. Fill Just Before Serving

Pavlovas soften over time when filled with curd or cream. For the best texture, fill them right before serving.

Storage and Make-Ahead Instructions

How to Store Unfilled Pavlovas

  • Keep them in an airtight container at room temperature for up to 5 days.
  • Do not refrigerate unfilled pavlovas, as moisture will make them soft.

How to Store Lemon Curd

  • Store lemon curd in an airtight container in the fridge for up to 5 days.
  • If making in advance, press a piece of plastic wrap directly onto the surface to prevent a skin from forming.

How to Store Assembled Pavlovas

  • Once filled, pavlovas should be served immediately.
  • If needed, refrigerate assembled pavlovas for up to 2 hours, but be aware that they will soften over time.

Frequently Asked Questions (FAQs)

1. Can I Make Pavlovas a Day in Advance?

Yes! You can bake the pavlovas up to 2 days ahead, but it’s best to fill them just before serving to maintain their crisp texture.

2. What If My Pavlova Cracks?

Cracks are common and don’t affect the flavor. Simply top with extra whipped cream and berries to cover any imperfections.

3. Can I Freeze Pavlovas?

It’s not recommended to freeze pavlovas, as they can absorb moisture and become soggy upon thawing.

4. Why Is My Pavlova Sticky?

Sticky pavlovas are usually the result of high humidity. Try to bake them on a dry day or store them in an airtight container with silica gel packs.

5. What Other Fillings Can I Use Besides Lemon Curd?

While lemon curd is a classic choice, you can also fill pavlovas with pastry cream, chocolate mousse, vanilla custard, or fruit compote.

Final Thoughts: A Perfectly Light and Elegant Easter Dessert

Easter Lemon Pavlovas are a beautiful and delicious way to celebrate the season. Their airy texture, bright citrus flavor, and elegant presentation make them a standout dessert for any spring gathering.

Whether you stick to the classic lemon curd filling or experiment with creative variations, these pavlovas are guaranteed to impress. Light yet indulgent, simple yet stunning, they bring a touch of elegance to any Easter table.

Try making them for your next gathering, and enjoy a bite of springtime bliss in every spoonful!

Easter Egg Cheesecake: A Fun and Festive No-Bake Dessert

Easter is a time for gathering with loved ones, enjoying festive treats, and embracing creativity in the kitchen. One dessert that captures the essence of the holiday is Easter Egg Cheesecake, a playful twist on traditional cheesecake. Instead of baking in a pan, this recipe uses hollow chocolate Easter eggs as the base, creating an eye-catching, creamy, and indulgent treat that is both delicious and visually stunning.

This no-bake dessert combines a buttery cookie crust, a smooth cheesecake filling, and a chocolate shell that adds a delightful crunch. The final touch? Mini chocolate eggs, cookie crumbs, and a drizzle of melted chocolate, making each serving a bite-sized masterpiece.

Whether you’re hosting an Easter brunch, looking for a fun activity with kids, or simply want to impress your guests, this Easter Egg Cheesecake is a must-try recipe.

Why You’ll Love This Recipe

1. A Unique and Creative Dessert

Traditional cheesecakes are often baked in large pans, but this version transforms chocolate Easter eggs into edible dessert cups. Not only does this eliminate the need for baking, but it also makes for an impressive presentation.

2. No-Bake and Easy to Prepare

Unlike traditional cheesecakes that require baking and water baths, this recipe is completely no-bake. That means less hassle, no cracks, and a smooth, creamy filling every time.

3. Perfect for Easter and Spring Celebrations

These cheesecakes are customizable and festive, making them a fantastic addition to any Easter gathering, dessert table, or springtime celebration.

4. Simple Ingredients, Big Flavor

With just a few ingredients—chocolate eggs, crushed cookies, cream cheese, powdered sugar, and heavy cream—you can create a dessert that feels luxurious and indulgent without being overly complicated.

5. Make-Ahead Friendly

Since the cheesecakes need time to chill and set, they can be prepared a day in advance, allowing you to focus on other Easter festivities.

A Fun and Creamy Delight (Ingredients)

Chocolate Shell:
  • Hollow chocolate Easter eggs (milk or dark chocolate)
Cookie Base:
  • Crushed graham crackers or digestive biscuits
  • Melted butter (salted or unsalted)
Cheesecake Filling:
  • Full-fat cream cheese
  • Powdered sugar
  • Cold heavy whipping cream
  • Vanilla extract
Toppings (Optional):
  • Melted chocolate drizzle
  • Mini chocolate eggs
  • Extra cookie crumbs
  • Fresh edible flowers

A Simple and Stunning Easter Dessert (Directions)

  1. Split the Easter Eggs – Carefully cut chocolate eggs in half using a warm knife along the seam.
  2. Prepare the Cookie Base – Mix crushed graham crackers with melted butter until the texture resembles wet sand.
  3. Press into Eggshells – Evenly distribute the cookie mixture into the chocolate egg halves, pressing gently to form a firm base. Chill for 15 minutes.
  4. Make the Cheesecake Filling – Beat cream cheese, powdered sugar, and vanilla extract until smooth. In a separate bowl, whip heavy cream to stiff peaks, then fold into the cream cheese mixture.
  5. Fill and Chill – Spoon the cheesecake filling into the chocolate egg halves and smooth out the top. Refrigerate for at least 2 hours.
  6. Decorate and Serve – Garnish with melted chocolate, mini eggs, cookie crumbs, or fresh flowers. Serve chilled and enjoy!

Nutritional Breakdown (Per Serving – Approximate)

  • Calories: 270 kcal
  • Carbohydrates: 12g
  • Protein: 4g
  • Fat: 23g
  • Saturated Fat: 13g
  • Sugar: 6g
  • Sodium: 237mg

Creative Variations to Try

1. Chocolate Lovers’ Easter Cheesecake

For an even richer flavor, mix melted chocolate or cocoa powder into the cheesecake filling. You can also use Oreo crumbs instead of graham crackers for the base.

2. Nutella Cheesecake Filling

Stir Nutella or another hazelnut spread into the cheesecake mixture for a smooth, nutty twist. Top with chopped hazelnuts or Ferrero Rocher chocolates for an added crunch.

3. Biscoff Easter Egg Cheesecake

For a warm and spiced flavor, replace the cookie base with crushed Biscoff biscuits and mix Biscoff spread into the filling.

4. Fruity Cheesecake Delight

Fold in fresh berries, lemon zest, or a swirl of fruit preserves into the cheesecake filling for a bright and refreshing contrast to the rich chocolate shell.

5. Mini Egg Explosion

Crush Cadbury Mini Eggs and fold them into the filling for a colorful, crunchy surprise in every bite.

The Best Toppings for Extra Flair

Toppings are what make this dessert truly special. Here are some ideas to make each cheesecake unique:

  • Chocolate Drizzle – A fine drizzle of melted chocolate adds extra decadence.
  • Mini Chocolate Eggs – A classic Easter topping that makes each cheesecake colorful and festive.
  • Whipped Cream Swirls – Light and airy, this balances the richness of the cheesecake.
  • Fresh Berries – Strawberries, raspberries, or blueberries provide a refreshing contrast to the creamy filling.
  • Sprinkles – Fun and playful, perfect for adding a touch of whimsy.
  • Crushed Cookies – Reserved cookie crumbs sprinkled on top enhance the texture and flavor.

How to Serve Easter Egg Cheesecake

1. As an Elegant Easter Dessert

Serve each chocolate egg half on a dessert plate, garnished with a few extra toppings. This presentation makes it feel sophisticated yet playful.

2. On a Festive Dessert Board

Create an Easter dessert grazing board with these cheesecakes, chocolate bunnies, marshmallow chicks, mini cupcakes, and pastel-colored candies.

3. With a Side of Coffee or Tea

The richness of the cheesecake pairs beautifully with a hot cup of coffee, tea, or even a glass of cold milk.

4. As a Fun DIY Dessert Station

Set up a cheesecake decorating station where guests can add their own toppings. This is a great interactive activity for kids and adults alike.

Expert Tips for the Best Results

1. Handle Chocolate Eggs with Care

Hollow chocolate eggs are delicate and can crack easily. Use a warm knife to separate them and work slowly to prevent breakage.

2. Use Full-Fat Cream Cheese for the Best Texture

For a rich and creamy filling, always use full-fat cream cheese. Avoid spreadable or low-fat versions, as they can result in a runny texture.

3. Whip the Cream Properly

Heavy cream should be whipped to stiff peaks before folding it into the cheesecake mixture. This helps create a light and fluffy filling.

4. Chill for at Least 2 Hours

The cheesecakes need time to firm up in the refrigerator. For best results, let them chill overnight.

5. Decorate Just Before Serving

If adding sprinkles, whipped cream, or fresh fruit, do so right before serving to maintain freshness and prevent sogginess.

Storage and Make-Ahead Instructions

Refrigeration

Store leftover Easter egg cheesecakes in an airtight container in the fridge for up to 3 days.

Freezing

These cheesecakes can be frozen for up to 3 months. To freeze:

  1. Wrap each egg half tightly in plastic wrap.
  2. Place them in an airtight container before freezing.
  3. Thaw overnight in the refrigerator before serving.

Making Ahead

Since this is a no-bake dessert, you can prepare it a day in advance. Just wait to add toppings until right before serving for the best texture and appearance.

Frequently Asked Questions (FAQs)

1. Can I Use Dark Chocolate Eggs Instead of Milk Chocolate?

Yes! Dark chocolate eggs add a slightly bitter contrast to the sweet cheesecake filling, making for a more sophisticated flavor profile.

2. What If My Chocolate Egg Breaks?

If your chocolate egg cracks, don’t worry! Simply turn this into a layered cheesecake dessert by crushing the chocolate and layering it with the filling in a glass or jar.

3. Can I Make This Recipe Gluten-Free?

Absolutely! Just use gluten-free cookies for the base, and the rest of the ingredients should be naturally gluten-free.

4. Can I Make a Large Version Instead of Individual Portions?

Yes! Instead of using small chocolate eggs, you can use a large hollow chocolate egg and fill it as one big cheesecake.

5. How Do I Cut the Chocolate Eggs Without Breaking Them?

Use a sharp knife dipped in warm water, wipe it dry, and then gently score the seam of the chocolate egg until it naturally separates.

Final Thoughts: A Show-Stopping Easter Dessert

Easter Egg Cheesecake is more than just a dessert—it’s a fun, creative, and visually stunning treat that brings joy to any celebration. With its crunchy chocolate shell, buttery cookie base, and rich, creamy filling, it’s a delicious twist on classic cheesecake that is sure to impress.

Whether you stick to the traditional version or experiment with new flavors and toppings, this no-bake cheesecake is a foolproof, make-ahead recipe that guarantees smiles all around.

Give it a try this Easter, and enjoy a sweet, memorable dessert that’s as fun to make as it is to eat!

Coconut Lime Chicken and Rice: A Creamy and Zesty Tropical Delight

Coconut Lime Chicken and Rice is a flavor-packed dish that perfectly balances rich, creamy coconut with the bright, zesty freshness of lime. Inspired by Caribbean and Southeast Asian flavors, this dish combines tender, marinated chicken with fragrant coconut-infused rice, making it a go-to recipe for weeknight dinners, meal prep, or even special occasions.

What makes this dish special is its simple preparation and bold flavors. The coconut milk adds a velvety richness, the lime provides a tangy contrast, and the perfectly cooked chicken ties everything together. Whether you serve it with a side of grilled vegetables, a crisp salad, or a fresh mango salsa, Coconut Lime Chicken and Rice is a dish that brings sunshine to your plate.

This guide will explore why this dish is a must-try, different ways to customize it, ideal pairings, expert cooking tips, storage recommendations, and answers to common questions to help you create the perfect meal.

Why Coconut Lime Chicken and Rice is a Must-Try Dish

1. A Perfect Balance of Flavors

The creaminess of coconut milk, combined with the tangy brightness of fresh lime, creates an unforgettable harmony of flavors. It’s a delicate yet bold contrast that makes each bite interesting and satisfying.

2. A One-Pan Meal for Easy Cooking

This dish is simple to prepare, requiring only one pan for the chicken and a single pot for the rice. The result is minimal cleanup while still delivering a meal that feels elegant and restaurant-quality.

3. Packed with Nutrients

Coconut Lime Chicken and Rice is not just delicious—it’s also nutritious.

  • Chicken provides lean protein to keep you full and energized.
  • Coconut milk contains healthy fats that support digestion and brain function.
  • Lime is rich in vitamin C, helping boost immunity and improve skin health.
  • Basmati rice is a great source of carbohydrates, giving you sustained energy.

4. Versatile for Any Occasion

This dish is elegant enough for a dinner party but also quick enough for a busy weeknight meal. Whether you’re looking to impress guests or whip up something easy for meal prep, Coconut Lime Chicken and Rice delivers every time.

5. Customizable for Different Diets

With a few tweaks, this dish can easily fit into various dietary preferences:

  • Dairy-Free – Use coconut milk and avoid any dairy-based toppings.
  • Gluten-Free – Naturally gluten-free, making it safe for those with sensitivities.
  • Low-Carb/Keto – Swap the rice for cauliflower rice or zucchini noodles.
  • Vegan Version – Use tofu or chickpeas instead of chicken for a plant-based alternative.

A Creamy and Zesty Delight (Ingredients)

For the Chicken:
  • Boneless, skinless chicken breasts
  • Full-fat coconut milk
  • Fresh lime juice
  • Lime zest
  • Minced garlic
  • Soy sauce
  • Honey
  • Ground cumin
  • Ground coriander
  • Salt and black pepper
  • Olive oil
  • Fresh cilantro (for garnish)
For the Rice:
  • Basmati rice
  • Water
  • Full-fat coconut milk
  • Salt
  • Lime zest
  • Fresh lime juice
  • Chopped fresh cilantro

Bold, Creamy, and Perfectly Balanced (Directions)

  1. Marinate the Chicken – Mix coconut milk, lime juice, zest, garlic, soy sauce, honey, cumin, and coriander. Coat chicken and let marinate for at least 30 minutes (or up to 4 hours).
  2. Prepare the Rice – Rinse basmati rice, then cook with coconut milk, water, and salt. Simmer until tender, then stir in lime zest, juice, and cilantro.
  3. Sear the Chicken – Heat olive oil in a pan over medium-high heat. Cook chicken for 5-7 minutes per side until golden and fully cooked.
  4. Serve & Garnish – Plate the rice, top with chicken, and garnish with extra lime zest, cilantro, and lime wedges.

Nutritional Breakdown (Per Serving – Approximate)

  • Calories: 522 kcal
  • Carbohydrates: 45g
  • Protein: 40g
  • Fat: 22g
  • Sodium: 480mg

Creative Variations to Try

1. Spicy Coconut Lime Chicken

For an extra kick of heat, add crushed red pepper flakes, cayenne pepper, or chopped Thai chilies to the marinade. This variation brings a fiery contrast to the creamy coconut sauce.

2. Honey Garlic Coconut Lime Chicken

Enhance the natural sweetness by adding honey and garlic to the marinade. The honey caramelizes beautifully, creating a slightly sweet and savory glaze on the chicken.

3. Mango Coconut Lime Chicken

For a tropical twist, serve the dish with fresh mango slices or a mango salsa. The natural sweetness of mango pairs perfectly with the creamy coconut and tangy lime.

4. Cilantro Lime Chicken with Coconut Rice

If you love fresh herbs, increase the amount of chopped cilantro in the dish. The herbaceous freshness complements the coconut beautifully.

5. Thai-Inspired Coconut Lime Chicken

Add a touch of fish sauce, lemongrass, or Thai basil for an authentic Thai-inspired flavor profile. Serve with steamed jasmine rice for the best results.

Best Side Dishes to Serve with Coconut Lime Chicken and Rice

1. Grilled Vegetables

A simple side of grilled zucchini, bell peppers, or asparagus adds a smoky contrast to the creamy and citrusy flavors.

2. Fresh Mango Salsa

A vibrant mango salsa made with diced mango, red onion, cilantro, and lime juice adds a sweet and tangy freshness to the dish.

3. Cucumber Raita or Yogurt Sauce

A cool cucumber raita or Greek yogurt sauce with garlic and herbs helps balance out the richness of the coconut milk.

4. Roasted Sweet Potatoes

The natural sweetness of roasted sweet potatoes pairs well with the savory and tangy notes of the dish.

5. Coconut Quinoa

For a healthier alternative to rice, try cooking quinoa in coconut milk for a nutty, protein-rich base.

Expert Cooking Tips for the Best Results

1. Marinate the Chicken for Maximum Flavor

For the best taste, marinate the chicken for at least 30 minutes, but for even more depth, marinate for up to 4 hours. This allows the flavors to fully absorb into the meat.

2. Use Full-Fat Coconut Milk for Creaminess

Full-fat coconut milk creates a richer, silkier sauce. If you use light coconut milk, the sauce will be less creamy but still flavorful.

3. Toast the Rice for Extra Depth

For a richer flavor, toast the rice in a little butter or coconut oil before adding the liquid. This step enhances the nutty aroma of the rice.

4. Cook Chicken Until Golden Brown

Searing the chicken until golden and slightly crispy locks in moisture and enhances its texture. Make sure the internal temperature reaches 165°F (74°C) for safety.

5. Adjust Lime for Taste

If you prefer a stronger citrus kick, add extra lime zest or juice before serving.

Storage and Reheating Tips

How to Store Leftovers

  • Refrigeration: Store in an airtight container for up to 4 days.
  • Freezing: While the chicken freezes well for up to 2 months, the rice may slightly change in texture.

How to Reheat Without Losing Flavor

  • Stovetop: Reheat with a splash of coconut milk or broth to prevent drying out.
  • Microwave: Heat in 30-second intervals, stirring occasionally to ensure even warming.

Frequently Asked Questions (FAQs)

1. Can I Use Chicken Thighs Instead of Breasts?

Yes! Chicken thighs are juicier and more flavorful. Adjust the cooking time as they may take slightly longer to cook through.

2. Can I Use Lemon Instead of Lime?

Lemon can be used, but lime gives a more authentic tropical flavor. Lemon will make the dish slightly more tart and less sweet.

3. Can I Make This Dish Ahead of Time?

Yes! You can marinate the chicken and cook the rice ahead of time, then just sear the chicken fresh before serving.

4. Is This Dish Spicy?

By default, it is not spicy, but you can add heat with crushed red pepper, Thai chilies, or cayenne.

5. Can I Make This Dish in an Instant Pot?

Yes! You can cook the rice and chicken together in an Instant Pot, reducing cooking time while keeping all the flavors intact.

Final Thoughts: A Flavorful and Versatile Dish for Every Occasion

Coconut Lime Chicken and Rice is a dish that feels like a tropical getaway on a plate. With its creamy coconut base, bright lime zest, and perfectly cooked chicken, it’s a balanced, flavorful meal that is easy to prepare and endlessly customizable.

Whether you’re making it for a family dinner, meal prep, or a special occasion, this dish is sure to impress and satisfy. Try it today, and bring a taste of the tropics to your table!

Jamaican Steamed Cabbage: A Flavorful and Easy Caribbean Side Dish

Jamaican steamed cabbage is a simple yet incredibly flavorful side dish that pairs well with a variety of Caribbean meals. Infused with aromatic spices, fresh herbs, and a subtle hint of heat, this dish is a staple in Jamaican cuisine. Unlike traditional boiled cabbage, Jamaican steamed cabbage retains its slight crunch, making it a satisfying complement to jerk chicken, oxtail, curry dishes, or even served on its own.

This dish is not only easy to prepare but also highly nutritious, offering a low-calorie, fiber-rich option that adds depth and balance to any meal. The combination of fresh vegetables, savory seasonings, and slow steaming allows the flavors to develop beautifully, making each bite bursting with Caribbean essence.

In this guide, we’ll explore why Jamaican steamed cabbage is a must-try dish, creative ways to customize it, ideal pairings, cooking tips, storage recommendations, and answers to frequently asked questions.

Why Jamaican Steamed Cabbage is a Must-Try Dish

1. A Classic Caribbean Comfort Food

Jamaican steamed cabbage is a dish that many Caribbean households enjoy regularly. It’s a comforting, homey recipe that brings people together, much like rice and peas or plantains. The savory, slightly spicy, and herbaceous flavors make it a standout side that enhances any meal.

2. Packed with Flavor Using Simple Ingredients

Although this dish requires minimal ingredients, it is full of rich, bold flavors. The sweetness of bell peppers, the warmth of thyme, and the slight kick from Scotch bonnet pepper work together to create a dish that is both simple and satisfying.

3. A Healthy and Nutritious Side

Cabbage is a nutrient-dense vegetable that is high in fiber, vitamin C, and antioxidants, making it an excellent addition to a balanced diet. This dish is naturally low in calories and can be easily adapted to fit various dietary preferences.

4. Quick and Easy to Make

With minimal prep and cooking time, Jamaican steamed cabbage is perfect for busy weeknights or last-minute meal planning. It requires only one pot and a handful of ingredients, making it an effortless yet rewarding dish.

5. Versatile and Easily Customizable

One of the best things about this recipe is its versatility. Whether you prefer a mild version, an extra spicy kick, or added protein, Jamaican steamed cabbage can be adapted to suit your taste.

A Classic Caribbean Side Dish (Ingredients)

For the Cabbage Stir-Fry:
  • Green cabbage, chopped
  • Sweet onion, sliced
  • Bell pepper (any color), sliced
  • Baby carrots, diced
  • Minced garlic
  • Olive oil
  • Butter
  • Fresh thyme sprigs (or dried thyme)
  • Onion powder
  • Seasoned salt
  • Black pepper
  • Paprika
  • Scotch bonnet pepper (optional, for heat)
  • Water

Soft, Flavorful, and Perfectly Seasoned (Directions)

  1. Prep the Vegetables – Chop the cabbage, dice the onions, bell pepper, and carrots, then set aside.
  2. Sauté the Aromatics – Heat olive oil and butter in a large pot. Add garlic and stir until fragrant.
  3. Cook the Vegetables – Add bell peppers, carrots, and onions, stirring to combine. Cook for 2-3 minutes.
  4. Steam the Cabbage – Add chopped cabbage, thyme, spices, and the remaining butter. Pour water into the pot and cover.
  5. Simmer to Perfection – Let it cook for 10-15 minutes, stirring occasionally. Adjust cooking time based on your preferred cabbage texture.
  6. Serve & Enjoy – Remove the thyme sprigs and scotch bonnet pepper before serving.

Nutritional Breakdown (Per Serving – Approximate)

  • Calories: 120 kcal
  • Carbohydrates: 10g
  • Protein: 2g
  • Fat: 8g
  • Fiber: 3g
  • Sodium: 280mg

Creative Variations to Try

1. Coconut Steamed Cabbage

For a rich, creamy texture, add a splash of coconut milk to the cabbage while steaming. The natural sweetness of coconut balances the heat from the Scotch bonnet pepper, creating a smooth and slightly tropical taste.

2. Curried Jamaican Cabbage

Incorporate Jamaican curry powder for a bolder, spiced variation. The curry adds depth and warmth, making the cabbage even more aromatic and flavorful.

3. Steamed Cabbage with Saltfish

For a heartier dish, add flaked saltfish (salted cod) to the cabbage. The saltiness of the fish pairs beautifully with the mild sweetness of the cabbage, creating a well-balanced dish.

4. Spicy Scotch Bonnet Cabbage

If you love extra heat, finely chop a Scotch bonnet pepper and mix it into the dish while steaming. This will infuse the cabbage with intense Caribbean spice and heat.

5. Garlic Butter Cabbage

For a richer, more indulgent taste, sauté the cabbage in a generous amount of garlic-infused butter before steaming. This method enhances the natural flavors while adding a velvety finish.

Best Dishes to Serve with Jamaican Steamed Cabbage

Jamaican steamed cabbage is incredibly versatile and pairs well with a variety of main courses. Here are some traditional pairings:

1. Jerk Chicken or Jerk Pork

The spicy, smoky flavors of jerk chicken or pork balance beautifully with the mild, slightly sweet taste of steamed cabbage. The cabbage also provides a cooling contrast to the bold heat of jerk seasoning.

2. Curry Goat or Curry Chicken

Cabbage’s light, crisp texture complements the rich, saucy nature of Jamaican curries, making it a great side to absorb the flavors of curry goat or curry chicken.

3. Fried Dumplings or Festival

Pairing steamed cabbage with Jamaican fried dumplings or festival (sweet fried dough) adds a delightful contrast of crispy and soft textures, making it a complete and satisfying meal.

4. Rice and Peas

A plate of steamed cabbage alongside Jamaican rice and peas creates a well-rounded, traditional Caribbean meal that is both filling and nutritious.

5. Fried or Grilled Fish

The lightness of steamed cabbage works well with crispy fried snapper or grilled tilapia, making it a refreshing, balanced meal.

Expert Tips for Perfect Jamaican Steamed Cabbage

1. Don’t Overcook the Cabbage

Cabbage should be steamed until tender but still slightly crisp. Overcooking will make it too soft and watery, losing its texture and freshness.

2. Use Fresh Thyme for Maximum Flavor

Fresh thyme provides a more aromatic and authentic taste, but dried thyme can be used if fresh isn’t available.

3. Add Scotch Bonnet Pepper Whole for Mild Heat

If you want a subtle heat without overwhelming spice, add a whole Scotch bonnet pepper to the pot while steaming and remove it before serving.

4. Stir Occasionally for Even Cooking

To ensure the spices and flavors are evenly distributed, stir the cabbage occasionally as it steams.

5. Customize the Seasoning to Your Preference

Jamaican cuisine is all about adjusting flavors to your taste. Feel free to experiment with extra garlic, a splash of vinegar, or a touch of smoked paprika for a personalized touch.

Storage and Reheating Tips

How to Store Leftovers

  • Refrigeration: Store leftover steamed cabbage in an airtight container for up to 4 days.
  • Freezing: While possible, freezing may change the texture. If freezing, store in a freezer-safe bag for up to 1 month.

How to Reheat Without Losing Texture

  • Stovetop: Reheat over low heat in a skillet, adding a splash of water if needed.
  • Microwave: Heat in 30-second intervals, stirring in between.

Frequently Asked Questions (FAQs)

1. Can I Make Jamaican Steamed Cabbage Without Scotch Bonnet Pepper?

Yes! If you prefer a milder dish, simply omit the Scotch bonnet pepper or substitute with a small amount of crushed red pepper flakes.

2. Is This Dish Vegan?

Yes! Jamaican steamed cabbage is naturally vegan, but make sure to use plant-based butter or omit it altogether for a completely vegan-friendly version.

3. Can I Add Meat to This Dish?

Absolutely! Many people enjoy adding saltfish, bacon, or even shredded chicken to make the dish heartier.

4. What’s the Best Type of Cabbage to Use?

Green cabbage is traditionally used in Jamaican steamed cabbage, but Savoy or Napa cabbage can also work.

5. Can I Use Frozen Cabbage Instead of Fresh?

Fresh cabbage is recommended for the best texture, but frozen cabbage can be used in a pinch—just be sure to drain excess water after thawing.

Final Thoughts: A Simple Yet Flavorful Side Dish for Any Meal

Jamaican steamed cabbage is a staple in Caribbean cuisine that brings together simple ingredients, bold seasonings, and a perfect balance of heat and sweetness. Whether served alongside jerk chicken, curry goat, or fried fish, this dish adds depth and freshness to any plate.

With endless ways to customize the flavors, this recipe is as versatile as it is delicious. Whether you keep it traditional or add your own twist, this dish is sure to become a favorite at your table.

Give it a try, and enjoy a true taste of Jamaica in every bite!

Curry Fried Chicken: A Bold and Crispy Fusion of Caribbean and Southern Flavors

Curry fried chicken is a mouthwatering combination of Caribbean spices and classic Southern frying techniques. This dish takes crispy, golden fried chicken and infuses it with the bold, aromatic flavors of Jamaican curry powder, allspice, and jerk seasoning. The result? A perfectly spiced, extra-crunchy chicken with deep, complex flavors.

This recipe is a must-try for spice lovers and fried chicken enthusiasts. Whether you’re looking to elevate your fried chicken game, explore new flavors, or simply try a dish that balances crispiness and rich seasoning, curry fried chicken delivers on all fronts.

In this guide, we’ll explore why this dish stands out, creative ways to customize it, the best side dishes to serve alongside it, expert cooking tips, storage recommendations, and answers to frequently asked questions.

Why Curry Fried Chicken is a Must-Try Dish

1. A Unique Blend of Bold Caribbean Spices

Unlike traditional fried chicken, this recipe incorporates Jamaican curry powder, which is known for its earthy, warm, and slightly spicy flavor profile. The addition of allspice, thyme, jerk seasoning, and turmeric creates a flavorful crust that is both aromatic and deeply satisfying.

2. Extra Crispy and Juicy Texture

By using a cornstarch and flour coating and a double-dredging technique, the chicken achieves a super crispy exterior while remaining incredibly juicy inside. The high-heat frying locks in moisture, creating the perfect balance of crunch and tenderness.

3. Infused with Authentic Jamaican Flavors

This dish stays true to Caribbean flavors by incorporating ingredients like green seasoning, pimento berries (allspice), coconut milk, and jerk seasoning. These ingredients add depth, smokiness, and a mild heat that lingers with every bite.

4. Perfect for Any Occasion

Whether you’re serving it at a family dinner, cookout, game night, or Sunday brunch, curry fried chicken is a crowd-pleasing dish that never disappoints. Its vibrant flavors make it stand out on any table.

5. Customizable to Fit Your Spice Tolerance

Jamaican cuisine is known for its bold, spicy flavors, but this recipe can easily be adjusted to fit your heat preference. Whether you prefer a milder version with less jerk seasoning or an extra-spicy kick with Scotch bonnet peppers, it’s easy to make this dish your own.

For the Chicken Marinade:
  • Bone-in, skin-on chicken quarters
  • White vinegar or lemon/lime juice (for rinsing)
  • Jamaican curry powder
  • Turmeric powder
  • Onion powder
  • Garlic powder
  • Smoked paprika
  • All-purpose seasoning
  • Crushed pimento berries (allspice)
  • Fresh thyme or dried thyme
  • Bay leaves
  • Green seasoning
  • Jerk seasoning
  • Olive oil
  • Unsweetened coconut milk
For the Crispy Coating:
  • All-purpose flour
  • Cornstarch
  • Smoked paprika
  • Curry powder
  • Ground turmeric
  • Salt and black pepper
For Frying:
  • Neutral vegetable oil (with a high smoke point)

Golden and Crispy Perfection (Directions)

  1. Prepare the Chicken – Rinse the chicken with vinegar or lemon water, then pat dry.
  2. Create the Marinade – Mix the seasonings, curry powder, jerk seasoning, and coconut milk, then massage into the chicken. Marinate for at least 4 hours or overnight for maximum flavor.
  3. Prepare the Coating – Combine flour, cornstarch, and spices in a separate bowl.
  4. Coat the Chicken – Dredge each piece in the seasoned flour mixture, ensuring an even coating. For extra crunch, double-dredge by repeating this step.
  5. Heat the Oil – Bring oil to 350°F in a deep fryer or heavy-bottomed pot.
  6. Fry to Perfection – Cook in batches for 10-12 minutes, ensuring the internal temperature reaches 165°F.
  7. Rest and Serve – Let the fried chicken rest on a wire rack to maintain crispiness. Serve warm with your favorite sides.

Nutritional Breakdown (Per Serving – Approximate)

  • Calories: 3968 kcal
  • Carbohydrates: 123g
  • Protein: 85g
  • Fat: 347g
  • Sodium: 2820mg
  • Iron: 8% Daily Value

Creative Ways to Customize Your Curry Fried Chicken

1. Spicy Scotch Bonnet Curry Chicken

For a fiery kick, blend Scotch bonnet peppers into the marinade or add extra cayenne pepper to the flour coating. This will give the chicken a serious heat boost while maintaining the signature curry flavor.

2. Honey-Glazed Curry Fried Chicken

If you love a sweet-and-spicy balance, drizzle honey or a honey-garlic glaze over the fried chicken right before serving. The sweetness enhances the warm spices and adds an extra layer of flavor.

3. Coconut Curry Fried Chicken

For a richer coconut flavor, replace part of the marinade’s liquid with coconut cream and add toasted coconut flakes to the coating. This creates a tropical twist on the dish with a subtle sweetness.

4. Curry Fried Chicken Wings

Instead of using larger chicken pieces, make crispy, bite-sized wings. Serve them with a spicy jerk BBQ sauce or a cooling yogurt dip for an easy appetizer or game-day snack.

5. Air-Fried Curry Chicken for a Healthier Option

Want a healthier version without sacrificing crispiness? Use an air fryer at 375°F for 20-25 minutes, flipping halfway through. The air fryer method reduces oil while still delivering a crispy crust.

The Best Side Dishes to Serve with Curry Fried Chicken

1. Jamaican Rice and Peas

A classic pairing, fluffy rice cooked with coconut milk, red kidney beans, and thyme complements the spicy, crispy chicken with a creamy and savory balance.

2. Fried Sweet Plantains

The natural caramelized sweetness of plantains adds a beautiful contrast to the spicy, savory chicken, making it a perfect Caribbean-inspired side dish.

3. Creamy Coleslaw with Lime Dressing

A refreshing, crunchy slaw with a hint of lime helps balance the richness of the fried chicken while providing a cooling effect for the spices.

4. Buttermilk Cornbread

For a Southern-inspired touch, serve curry fried chicken with moist, slightly sweet cornbread. The soft texture pairs beautifully with the crispy crust of the chicken.

5. Garlic Butter Corn on the Cob

Charred, buttery corn with a hint of garlic and herbs makes a simple yet delicious pairing that enhances the spiced flavors of the chicken.

Expert Tips for the Crispiest, Most Flavorful Curry Fried Chicken

1. Marinate for Maximum Flavor

Let the chicken marinate for at least 4 hours, or preferably overnight. This deepens the flavor and tenderizes the meat, ensuring it stays juicy after frying.

2. Use a Double-Dredging Method

For extra crunch, coat the chicken in flour, let it rest for 5 minutes, and then coat it again. This creates a thicker crust that fries up perfectly crispy.

3. Maintain the Right Oil Temperature

Fry the chicken at 350°F for the best results. Too low, and the chicken will be greasy; too high, and the outside will burn before the inside cooks through.

4. Rest the Fried Chicken on a Wire Rack

Instead of placing fried chicken on paper towels, let it cool on a wire rack. This prevents steam from softening the crust, keeping it extra crispy.

5. Don’t Overcrowd the Fryer

Frying too many pieces at once lowers the oil temperature, leading to soggy chicken. Cook in small batches for even, golden-brown frying.

Storage and Reheating Tips

How to Store Leftover Fried Chicken

  • Refrigeration: Store in an airtight container for up to 3 days.
  • Freezing: Freeze fried chicken for up to 2 months in a sealed container.

How to Reheat for Maximum Crispiness

  • Oven: Bake at 375°F for 10-15 minutes, then broil for 2 minutes to crisp up the skin.
  • Air Fryer: Reheat at 375°F for 5-7 minutes for a crispy, hot bite.
  • Microwave (Not Recommended): This can make the crust soft and soggy.

Frequently Asked Questions (FAQs)

1. What’s the Difference Between Jamaican Curry and Indian Curry?

Jamaican curry uses allspice, thyme, and Scotch bonnet peppers, creating a bolder, spicier, and slightly smoky flavor compared to Indian curry, which often features cumin, coriander, and garam masala.

2. Can I Make This Recipe with Boneless Chicken?

Yes! Boneless chicken cooks faster but may not be as juicy as bone-in pieces. Adjust frying time accordingly.

3. How Can I Make This Recipe Gluten-Free?

Replace all-purpose flour with gluten-free flour and make sure the cornstarch is gluten-free. The result is still crispy and flavorful.

4. Can I Bake the Chicken Instead of Frying It?

Yes, bake at 400°F for 35-40 minutes, flipping halfway. For extra crispiness, broil for 5 minutes at the end.

5. How Do I Reduce the Spice Level?

To make it milder, reduce the jerk seasoning and use a mild curry powder. You can also omit Scotch bonnet peppers for less heat.

Final Thoughts: A Must-Try Recipe for Bold Flavor Lovers

Curry fried chicken is an unforgettable dish that perfectly blends Caribbean and Southern flavors. With its rich spice profile, golden crunch, and tender juiciness, it’s a meal that delivers excitement in every bite.

Whether you’re trying it for the first time or making it a new family favorite, this recipe is a game-changer. Give it a try, and experience the perfect fusion of bold flavors and crispy perfection!

Baked Jamaican Jerk Chicken Wings: A Spicy and Flavorful Caribbean Classic

Jamaican jerk chicken wings are bold, smoky, and irresistibly spicy, making them one of the most iconic dishes in Caribbean cuisine. Traditionally, jerk chicken is grilled over pimento wood, but this oven-baked version delivers all the authentic flavors without the need for an outdoor grill. The secret lies in the spicy, aromatic jerk seasoning, which infuses the wings with a perfect balance of heat, sweetness, and smokiness.

These Baked Jamaican Jerk Chicken Wings are perfect for game nights, parties, family dinners, or anytime you’re craving a taste of the islands. With their crispy texture and fiery jerk sauce, they deliver a burst of Caribbean flavor in every bite.

This guide will explore why this dish is special, creative variations, the best sides to serve with it, expert cooking tips, storage instructions, and frequently asked questions to ensure you get the best possible results.

Why These Jerk Chicken Wings Are a Must-Try

1. Authentic Caribbean Flavor with a Simple Cooking Method

Jerk seasoning is a unique blend of heat, spice, and aromatic herbs, making it one of the most flavorful seasonings in the world. Traditionally, jerk chicken is grilled, but this oven-baked method makes it accessible to home cooks without sacrificing taste.

2. Crispy on the Outside, Juicy on the Inside

Despite being baked, these wings achieve a perfectly crisp texture, thanks to the marinating process and final broiling step. The inside remains tender and juicy, while the outside develops a flavorful, caramelized crust.

3. Perfect for Any Occasion

These wings work as a party appetizer, a game-day snack, or even a full meal when paired with traditional Jamaican sides. Their bold flavors and satisfying heat make them a crowd favorite.

4. Adjustable Spice Level

Jerk seasoning is known for its heat, but you can easily adjust the spice level by modifying the amount of Scotch bonnet peppers, cayenne, or jerk paste used in the marinade and sauce.

5. A Versatile Recipe with Endless Variations

This dish can be adapted in countless ways—from air-fried wings to jerk-glazed drumsticks, boneless tenders, or even tofu for a plant-based version.

A Bold and Spicy Delight (Ingredients)

For the Chicken Wings:
  • Organic chicken wings, disjointed
  • Jerk seasoning paste or marinade
  • Homemade jerk dry rub seasoning
  • Scotch bonnet peppers, chopped
For the BBQ Jerk Sauce:
  • Unsalted butter
  • BBQ sauce (premium quality)
  • Jerk broth (from baked chicken)
  • Organic chicken stock
  • Jerk seasoning paste (optional)
  • Thyme sprigs
  • Cornstarch (mixed with warm water for thickening)

Crispy, Smoky, and Packed with Heat (Directions)

  1. Marinate the Wings – Coat chicken with jerk paste, dry rub, and scotch bonnet peppers. Let it sit for at least 10-15 minutes, or for best results, marinate overnight.
  2. Bake the Chicken – Arrange wings in a greased baking dish, cover with foil, and bake at 400°F for 30-35 minutes. Drain excess liquid (jerk broth) and set aside. Return wings to the oven for another 10 minutes.
  3. Prepare the Jerk BBQ Sauce – In a saucepan, melt butter, then add BBQ sauce, jerk broth, chicken stock, jerk seasoning paste, and thyme. Simmer for 3-5 minutes, then thicken with cornstarch slurry.
  4. Coat and Bake Again – Brush the wings generously with jerk BBQ sauce and bake uncovered for another 10-15 minutes. Broil for the last 5 minutes for extra crispiness.
  5. Serve and Enjoy – Garnish with fresh herbs and serve with rice, plantains, or traditional Jamaican hard-dough bread.

Nutritional Breakdown (Per Serving – Approximate)

  • Calories: 735 kcal
  • Carbohydrates: 46g
  • Protein: 44g
  • Fat: 41g
  • Sodium: 1183mg
  • Sugar: 34g

Creative Variations on Jerk Chicken Wings

1. Air-Fried Jerk Wings

For an extra-crispy texture, cook the wings in an air fryer at 375°F for 12-15 minutes. Brush with jerk BBQ sauce and air fry for another 2-3 minutes to caramelize the glaze.

2. Honey Jerk Chicken Wings

For a sweet and spicy balance, add honey or brown sugar to the jerk sauce, giving the wings a sticky, caramelized coating that enhances the smoky flavors.

3. Jerk Lemon Pepper Wings

Combine jerk seasoning with lemon zest and black pepper for a citrusy twist that balances out the heat with a burst of freshness.

4. Jerk Garlic Butter Wings

After baking, toss the wings in a garlic butter sauce infused with jerk seasoning for an extra layer of richness.

5. Mango Jerk Chicken Wings

Blend fresh mango puree into the jerk sauce to add a fruity sweetness that complements the fiery heat.

Best Side Dishes to Pair with Jerk Chicken Wings

A great side dish can enhance the flavors of jerk chicken wings, balancing out the heat with complementary textures and tastes.

1. Jamaican Rice and Peas

A classic side for jerk chicken, this dish combines fluffy rice, kidney beans, coconut milk, and spices for a rich and creamy contrast to the spicy wings.

2. Fried Plantains

The sweet caramelized flavor of fried plantains helps cool the heat of the jerk spice, making them a perfect pairing.

3. Creamy Coleslaw

A crisp, refreshing coleslaw with a tangy dressing balances out the bold, spicy flavors of the wings.

4. Garlic Butter Corn on the Cob

Grilled or roasted corn brushed with garlic butter pairs wonderfully with the smoky jerk flavors.

5. Jamaican Hard-Dough Bread

Thick, slightly sweet Jamaican hard-dough bread is traditionally served with jerk chicken, soaking up all the flavorful sauce and juices.

6. Mac and Cheese

A rich, cheesy mac and cheese adds a creamy contrast to the bold spices of the jerk wings, making for a decadent meal.

Expert Tips for Perfect Baked Jerk Chicken Wings

1. Let the Wings Marinate for Maximum Flavor

Jerk seasoning works best when it has time to fully absorb into the meat. For the most flavorful wings, marinate them for at least 2 hours, or overnight if possible.

2. Pat the Chicken Dry Before Baking

To get the crispiest texture, pat the wings dry with a paper towel before seasoning. Removing excess moisture allows them to brown beautifully.

3. Bake on a Wire Rack for Even Cooking

Placing the wings on a wire rack over a baking sheet ensures air circulates around them, allowing for even crisping on all sides.

4. Broil at the End for a Crispy Finish

For a charred, smoky effect similar to grilling, broil the wings for the last 3-5 minutes of baking, keeping a close eye to prevent burning.

5. Adjust the Heat to Your Preference

If you want milder wings, use fewer Scotch bonnet peppers and increase the sweetness in the sauce. For extra heat, add more cayenne or extra jerk paste.

Storage and Reheating Instructions

How to Store Leftovers

  • Refrigeration: Store leftover wings in an airtight container in the fridge for up to 4 days.
  • Freezing: You can freeze cooked wings in a sealed container for up to 2 months. Reheat directly from frozen or thaw in the fridge overnight.

How to Reheat for Maximum Crispiness

  • Oven: Bake at 350°F for 10-12 minutes until heated through, then broil for a few minutes for a crispy finish.
  • Air Fryer: Reheat at 375°F for 5-7 minutes for a crispy texture.
  • Microwave: This method is not recommended, as it softens the crispy skin.

Frequently Asked Questions (FAQs)

1. What Makes Jerk Chicken Spicy?

Jerk chicken gets its signature heat from Scotch bonnet peppers, which are known for their intense spiciness and fruity undertones. You can adjust the heat level by using fewer peppers or substituting with milder alternatives like habanero or jalapeño.

2. Can I Use Store-Bought Jerk Seasoning?

Yes! While homemade jerk seasoning offers the freshest flavors, store-bought jerk pastes and dry rubs work well if you’re short on time.

3. What’s the Best Way to Get Crispy Jerk Wings in the Oven?

For extra crispiness:

  • Bake the wings on a wire rack so air circulates evenly.
  • Pat them dry before seasoning to remove excess moisture.
  • Broil for a few minutes at the end for a charred finish.

4. Can I Use This Recipe for Other Meats?

Absolutely! The jerk seasoning works great on drumsticks, thighs, pork, shrimp, or even tofu for a vegetarian version.

5. Are Jerk Wings Too Spicy for Kids?

If making these for kids or spice-sensitive eaters, reduce the Scotch bonnet peppers and balance the heat with a touch of honey or brown sugar.

Final Thoughts: A Bold and Satisfying Dish for Every Occasion

Baked Jamaican Jerk Chicken Wings bring the perfect balance of heat, spice, and smokiness, making them a must-try dish for anyone who loves bold flavors. Whether you’re hosting a party, preparing a weeknight dinner, or simply craving a taste of the Caribbean, these wings deliver restaurant-quality taste with minimal effort.

With endless variations, easy preparation, and incredible depth of flavor, this recipe will quickly become a favorite in your kitchen. Try them once, and you’ll be hooked on their fiery, addictive taste!

Jamaican Rice and Peas: Discover the Authentic Recipe!

Jamaican Rice and Peas

Introduction to Jamaican Rice and Peas

Few dishes capture the spirit and soul of Caribbean cooking quite like Jamaican Rice and Peas. Fragrant, comforting, and bursting with flavor, this beloved side dish is anything but ordinary. Made with creamy coconut milk, aromatic thyme, and a hint of Scotch bonnet pepper, it transforms simple rice and kidney beans into a rich, savory experience. Whether served alongside jerk chicken or enjoyed on its own, Jamaican Rice and Peas is a true taste of the islands—warm, welcoming, and unforgettable. Ready to bring this island classic to your kitchen? Let’s get cooking!

Why You’ll Love This Jamaican Rice and Peas

This Jamaican Rice and Peas recipe is a lifesaver for busy days. It’s incredibly easy to whip up, taking just 45 minutes from start to finish. The combination of creamy coconut milk and hearty kidney beans creates a delightful flavor that will have your family asking for seconds. Plus, it’s a versatile side dish that pairs beautifully with any main course, making it a must-try for your dinner table!

Ingredients for Jamaican Rice and Peas

Gathering the right ingredients is key to making authentic Jamaican Rice and Peas. Here’s what you’ll need:

  • Long-grain white rice: This is the base of the dish, providing a fluffy texture that absorbs all the delicious flavors.
  • Kidney beans: Canned kidney beans are a convenient choice. They add protein and a hearty bite to the dish.
  • Coconut milk: This creamy ingredient brings a rich, tropical flavor that makes the dish truly special.
  • Water: Essential for cooking the rice and beans, balancing the richness of the coconut milk.
  • Green onions: These add a fresh, mild onion flavor that brightens up the dish.
  • Garlic: Minced garlic infuses the dish with a warm, aromatic essence that’s hard to resist.
  • Dried thyme: A staple herb in Jamaican cooking, it adds an earthy note that complements the other flavors.
  • Allspice: This spice gives a warm, slightly sweet flavor, reminiscent of the Caribbean. It’s a must-have!
  • Salt and black pepper: These seasonings enhance the overall taste, bringing all the flavors together.
  • Scotch bonnet pepper: For those who love a kick, this whole pepper adds heat without overwhelming the dish. Just remember, don’t cut it!

For those looking to customize, consider using vegetable broth instead of water for a vegetarian twist. A squeeze of lime juice before serving can also add a refreshing zing!

Exact measurements for these ingredients can be found at the bottom of the article, ready for printing. Happy cooking!

How to Make Jamaican Rice and Peas

Now that you have all your ingredients ready, let’s dive into the cooking process! Making Jamaican Rice and Peas is straightforward and rewarding. Follow these simple steps, and you’ll have a delicious dish that will transport you straight to the Caribbean.

Step 1: Rinse the Rice

Start by rinsing the long-grain white rice under cold water. This step is crucial as it removes excess starch, preventing the rice from becoming gummy. Rinse until the water runs clear, and then let it drain. Trust me, this little effort makes a big difference!

Step 2: Combine Ingredients

In a large pot, combine the coconut milk, water, kidney beans, chopped green onions, minced garlic, dried thyme, allspice, salt, and black pepper. Stir everything together until well mixed. The aroma will start to fill your kitchen, and you’ll know you’re on the right track!

Step 3: Add the Rice

Now, gently add the rinsed rice to the pot. Stir it in carefully, ensuring the rice is evenly distributed. Place the whole Scotch bonnet pepper on top of the mixture. Remember, don’t cut it! This keeps the heat level just right, allowing the flavors to meld without overwhelming your taste buds.

Step 4: Bring to a Boil

Turn the heat to medium-high and bring the mixture to a boil. Keep an eye on it, as you don’t want it to boil over. Once it starts bubbling, reduce the heat to low. Cover the pot with a lid, and let it simmer. This is where the magic happens!

Step 5: Simmer

Let the rice and peas simmer for about 20-25 minutes. During this time, the rice will absorb the coconut milk and spices, creating a creamy, flavorful dish. Avoid lifting the lid too often, as this can release steam and affect cooking time. Patience is key!

Step 6: Fluff and Serve

Once the rice is tender and the liquid is absorbed, remove the pot from heat. Let it sit, covered, for an additional 10 minutes. This allows the rice to finish cooking and absorb any remaining moisture. Finally, carefully remove the Scotch bonnet pepper, fluff the rice with a fork, and serve warm. Enjoy the delightful flavors of Jamaican Rice and Peas!

Tips for Success

  • Always rinse your rice thoroughly to achieve that perfect fluffy texture.
  • For extra flavor, sauté the garlic and green onions in a bit of oil before adding them to the pot.
  • Don’t skip the resting time after cooking; it makes a world of difference in texture.
  • Feel free to adjust the spice level by using a milder pepper if Scotch bonnet is too hot.
  • Experiment with adding vegetables like bell peppers or carrots for added nutrition!

Equipment Needed

  • Large pot: A heavy-bottomed pot works best for even cooking. A Dutch oven is a great alternative.
  • Measuring cups: Essential for accurate ingredient portions. You can also use a standard coffee mug in a pinch.
  • Wooden spoon: Perfect for stirring without scratching your pot. A silicone spatula is a good substitute.
  • Colander: Useful for rinsing the rice. A fine mesh sieve can work just as well.

Variations

  • Vegetarian Version: Swap out water for vegetable broth to enhance the flavor while keeping it meat-free.
  • Spicy Kick: If you love heat, add a few sliced jalapeños or a pinch of cayenne pepper for an extra kick.
  • Herb Infusion: Experiment with fresh herbs like cilantro or parsley for a fresh twist on the traditional flavor.
  • Mixed Beans: Try using black beans or pinto beans instead of kidney beans for a different texture and taste.
  • Nutty Flavor: Add a handful of toasted coconut flakes or chopped nuts for a delightful crunch and nutty flavor.

Serving Suggestions

  • Pair Jamaican Rice and Peas with grilled jerk chicken for a classic Caribbean meal.
  • Serve alongside sautéed vegetables for a colorful and nutritious plate.
  • A refreshing mango salad complements the dish beautifully.
  • For drinks, try a chilled rum punch or coconut water.
  • Garnish with fresh cilantro for a pop of color and flavor!

FAQs about Jamaican Rice and Peas

What is the difference between Jamaican Rice and Peas and regular rice and beans?


Jamaican Rice and Peas is unique because it uses coconut milk, which adds a rich, creamy flavor. The dish also features allspice and thyme, giving it a distinct Caribbean twist. Regular rice and beans often lack these flavorful elements.


Can I make Jamaican Rice and Peas ahead of time?


Absolutely! This dish reheats beautifully. Just store it in an airtight container in the fridge for up to three days. When you’re ready to enjoy it, simply reheat on the stovetop or in the microwave.


Is Jamaican Rice and Peas gluten-free?


Yes, Jamaican Rice and Peas is naturally gluten-free! It’s a great option for those with gluten sensitivities. Just ensure that any additional ingredients you use are also gluten-free.


Can I use brown rice instead of white rice?


Yes, you can use brown rice for a healthier option. Just keep in mind that brown rice takes longer to cook, so adjust the cooking time accordingly. It will add a nuttier flavor and more fiber to the dish.


What can I serve with Jamaican Rice and Peas?


This dish pairs wonderfully with grilled meats, especially jerk chicken or fish. You can also serve it alongside a fresh salad or sautéed vegetables for a complete meal. The possibilities are endless!

Final Thoughts

Cooking Jamaican Rice and Peas is more than just preparing a meal; it’s about creating a warm, inviting experience for your family. The rich flavors of coconut milk and spices transport you to the Caribbean, filling your home with delightful aromas. This dish is a reminder that even on the busiest days, you can whip up something special that brings everyone together. Whether it’s a weeknight dinner or a festive gathering, Jamaican Rice and Peas is sure to impress. I hope you enjoy making it as much as I do, and that it becomes a cherished part of your family meals!

“`

Print
clock clock iconcutlery cutlery iconflag flag iconfolder folder iconinstagram instagram iconpinterest pinterest iconfacebook facebook iconprint print iconsquares squares iconheart heart iconheart solid heart solid icon
Jamaican Rice and Peas

Jamaican Rice and Peas: Discover the Authentic Recipe!


5 Stars 4 Stars 3 Stars 2 Stars 1 Star

No reviews

  • Author: Isabella
  • Total Time: 45 minutes
  • Yield: 6 servings 1x
  • Diet: Vegetarian

Description

A traditional Jamaican dish made with rice and kidney beans cooked in coconut milk, flavored with spices and herbs.


Ingredients

Scale
  • 2 cups long-grain white rice
  • 1 can (15 ounces) kidney beans, drained and rinsed
  • 1 can (13.5 ounces) coconut milk
  • 1 ½ cups water
  • 4 green onions, chopped
  • 2 cloves garlic, minced
  • 1 teaspoon dried thyme
  • 1 teaspoon allspice
  • ½ teaspoon salt
  • ½ teaspoon black pepper
  • 1 Scotch bonnet pepper (whole, do not cut)

Instructions

  1. Rinse the rice under cold water until the water runs clear. This helps remove excess starch and prevents the rice from becoming gummy.
  2. In a large pot, combine the coconut milk, water, kidney beans, green onions, garlic, thyme, allspice, salt, and black pepper. Stir well to combine.
  3. Add the rinsed rice to the pot and stir gently. Place the whole Scotch bonnet pepper on top of the mixture (do not cut it, as this will keep the heat level manageable).
  4. Bring the mixture to a boil over medium-high heat. Once boiling, reduce the heat to low, cover the pot, and let it simmer for about 20-25 minutes, or until the rice is tender and the liquid is absorbed.
  5. Remove the pot from heat and let it sit, covered, for an additional 10 minutes. This allows the rice to finish cooking and absorb any remaining moisture.
  6. Carefully remove the Scotch bonnet pepper before serving. Fluff the rice with a fork and serve warm.

Notes

  • For a vegetarian version, use vegetable broth instead of water.
  • Add a squeeze of lime juice before serving for a fresh twist.
  • Prep Time: 10 minutes
  • Cook Time: 35 minutes
  • Category: Side Dish
  • Method: Stovetop
  • Cuisine: Jamaican

Nutrition

  • Serving Size: 1 serving
  • Calories: 230
  • Sugar: 0g
  • Sodium: 300mg
  • Fat: 7g
  • Saturated Fat: 5g
  • Unsaturated Fat: 2g
  • Trans Fat: 0g
  • Carbohydrates: 40g
  • Fiber: 6g
  • Protein: 6g
  • Cholesterol: 0mg

Baked Mayonnaise Fish: A Simple, Delicious Delight!

Baked Mayonnaise Fish

Introduction to Baked Mayonnaise Fish

When it comes to easy, flavorful seafood dishes, baked fish with mayonnaise is a true winner. This recipe transforms humble ingredients into a moist, tender, and richly savory meal that feels both comforting and elegant. With minimal prep and a short bake time, it’s perfect for busy evenings when you want something satisfying without the fuss. The creamy mayonnaise creates a golden, flavorful crust that seals in the fish’s natural juices, making every bite a delight. Simple, quick, and delicious—this baked mayonnaise fish is sure to become a staple in your kitchen.

Why You’ll Love This Baked Mayonnaise Fish

This Baked Mayonnaise Fish is a true gem for busy families. It’s incredibly easy to prepare, taking just 10 minutes of your time. The creamy topping adds a burst of flavor that makes even the pickiest eaters smile. Plus, it’s baked, so you can set it and forget it while you tackle other tasks. With its delightful taste and simple steps, this dish is sure to become a weeknight favorite!

Ingredients for Baked Mayonnaise Fish

Gathering the right ingredients is key to making this Baked Mayonnaise Fish a success. Here’s what you’ll need:

  • Fish fillets: I love using tilapia or cod for their mild flavors and flaky textures. You can also experiment with salmon or haddock for a richer taste.
  • Mayonnaise: This creamy base is what makes the dish so luscious. It keeps the fish moist while adding a delightful tang.
  • Dijon mustard: A spoonful of this adds a zesty kick that balances the richness of the mayonnaise.
  • Lemon juice: Freshly squeezed lemon juice brightens the dish and enhances the flavors beautifully.
  • Garlic powder: This brings a warm, savory note that complements the fish perfectly.
  • Onion powder: A dash of onion powder adds depth without overpowering the dish.
  • Paprika: This spice not only adds color but also a subtle smokiness that elevates the overall flavor.
  • Salt and pepper: Essential for seasoning, these staples help bring all the flavors together.
  • Parmesan cheese: A sprinkle of grated Parmesan on top creates a deliciously crispy crust as it bakes.
  • Fresh parsley: Chopped parsley is perfect for garnishing, adding a pop of color and freshness.

For those who like a bit of heat, consider adding a teaspoon of hot sauce to the mayonnaise mixture. You can find the exact quantities for each ingredient at the bottom of the article, ready for printing!

How to Make Baked Mayonnaise Fish

Now that you have all your ingredients ready, let’s dive into the steps for making this Baked Mayonnaise Fish. I promise it’s as easy as pie, and you’ll be amazed at how quickly it comes together!

Step 1: Preheat the Oven

First things first, preheat your oven to 400°F (200°C). This ensures that your fish will bake evenly and come out perfectly flaky. While the oven warms up, you can get started on the next steps!

Step 2: Prepare the Mayonnaise Mixture

In a medium bowl, combine the mayonnaise, Dijon mustard, lemon juice, garlic powder, onion powder, paprika, salt, and pepper. Mix everything together until it’s smooth and creamy. This mixture is the star of the show, adding a rich flavor to your fish!

Step 3: Arrange the Fish Fillets

Next, take your fish fillets and place them in a baking dish. Make sure they’re spaced out a bit so they cook evenly. If you’re using frozen fillets, be sure to thaw them first. Trust me, it makes a difference!

Step 4: Add the Topping

Now, it’s time to spread that delicious mayonnaise mixture over the top of each fillet. Don’t be shy—make sure each piece is generously coated. This will keep the fish moist and flavorful as it bakes.

Step 5: Bake the Fish

Sprinkle the grated Parmesan cheese over the mayonnaise-covered fish. This will create a lovely, crispy crust. Place the baking dish in the preheated oven and bake for 15-20 minutes. You’ll know it’s done when the fish flakes easily with a fork and looks opaque.

Step 6: Garnish and Serve

Once your fish is out of the oven, let it cool for a few minutes. Then, garnish with fresh parsley for a pop of color. Serve it up with your favorite sides, and watch your family dig in with delight!

Tips for Success

  • Always use fresh fish for the best flavor and texture.
  • Don’t skip the resting time after baking; it helps the fish retain moisture.
  • Feel free to adjust the seasoning to suit your taste preferences.
  • For a crispy topping, broil the fish for the last 2 minutes of baking.
  • Pair with a light salad for a refreshing meal.

Equipment Needed

  • Baking dish: A glass or ceramic dish works well, but any oven-safe dish will do.
  • Mixing bowl: Use a medium-sized bowl for combining the mayonnaise mixture.
  • Spatula: A rubber spatula is perfect for spreading the topping evenly.
  • Measuring cups and spoons: Essential for accurate ingredient measurements.

Variations

  • Spicy Baked Mayonnaise Fish: Add a teaspoon of hot sauce or a pinch of cayenne pepper to the mayonnaise mixture for a fiery kick.
  • Herb-Infused Version: Mix in fresh herbs like dill or basil into the mayonnaise for a fragrant twist.
  • Cheesy Delight: Swap out Parmesan for a blend of your favorite cheeses, like mozzarella or cheddar, for a gooey topping.
  • Low-Fat Option: Use Greek yogurt instead of mayonnaise for a lighter, tangy alternative that still packs flavor.
  • Vegetable Topping: Add thinly sliced tomatoes or spinach on top of the fish before adding the mayonnaise mixture for extra nutrition.

Serving Suggestions

  • Pair your Baked Mayonnaise Fish with a light, crisp salad for a refreshing contrast.
  • Serve alongside steamed vegetables like broccoli or asparagus for a nutritious boost.
  • A glass of chilled white wine complements the flavors beautifully.
  • For a cozy touch, present the fish on a colorful platter with lemon wedges.

FAQs about Baked Mayonnaise Fish

As you embark on your culinary adventure with Baked Mayonnaise Fish, you might have a few questions. Here are some common queries I’ve encountered, along with helpful answers!

Can I use frozen fish fillets for this recipe?


Absolutely! Just make sure to thaw them completely before baking. This ensures even cooking and helps the mayonnaise mixture adhere better.


What can I substitute for mayonnaise?


If you’re looking for a lighter option, Greek yogurt works wonderfully. It adds creaminess while keeping the dish healthy and tangy.


How do I know when the fish is done baking?


The fish is ready when it flakes easily with a fork and appears opaque. Keep an eye on it during the last few minutes to avoid overcooking.


Can I make this dish ahead of time?


Yes! You can prepare the fish and mayonnaise mixture in advance. Just cover and refrigerate until you’re ready to bake. It’s a great time-saver!


What sides pair well with Baked Mayonnaise Fish?


Light salads, steamed veggies, or even a fluffy rice pilaf make excellent companions. They balance the richness of the fish beautifully!

Final Thoughts

Cooking should be a joyful experience, and my Baked Mayonnaise Fish embodies that spirit. It’s not just about the delicious flavors; it’s about creating moments around the dinner table. This recipe brings families together, turning busy weeknights into delightful culinary adventures. The ease of preparation means you can spend more time enjoying your meal and less time stressing in the kitchen. Plus, the smiles on your loved ones’ faces as they savor each bite? That’s the real reward. So, roll up your sleeves and dive into this delightful dish—you won’t regret it!

“`

Print
clock clock iconcutlery cutlery iconflag flag iconfolder folder iconinstagram instagram iconpinterest pinterest iconfacebook facebook iconprint print iconsquares squares iconheart heart iconheart solid heart solid icon
Baked Mayonnaise Fish

Baked Mayonnaise Fish: A Simple, Delicious Delight!


5 Stars 4 Stars 3 Stars 2 Stars 1 Star

No reviews

  • Author: Isabella
  • Total Time: 30 minutes
  • Yield: 2 servings 1x

Description

Baked Mayonnaise Fish is a simple and delicious dish featuring fish fillets topped with a creamy mayonnaise mixture and baked to perfection.


Ingredients

Scale
  • 2 (6-ounce) fish fillets (such as tilapia or cod)
  • 1/2 cup mayonnaise
  • 1 tablespoon Dijon mustard
  • 1 tablespoon lemon juice
  • 1 teaspoon garlic powder
  • 1 teaspoon onion powder
  • 1/2 teaspoon paprika
  • Salt and pepper to taste
  • 1/4 cup grated Parmesan cheese
  • 1 tablespoon fresh parsley, chopped (for garnish)

Instructions

  1. Preheat your oven to 400°F (200°C).
  2. In a medium bowl, combine the mayonnaise, Dijon mustard, lemon juice, garlic powder, onion powder, paprika, salt, and pepper. Mix until well combined.
  3. Place the fish fillets in a baking dish and spread the mayonnaise mixture evenly over the top of each fillet.
  4. Sprinkle the grated Parmesan cheese over the mayonnaise-covered fish.
  5. Bake in the preheated oven for 15-20 minutes, or until the fish flakes easily with a fork and is opaque in color.
  6. Remove from the oven and let it cool for a few minutes. Garnish with fresh parsley before serving.

Notes

  • For a spicy kick, add a teaspoon of hot sauce to the mayonnaise mixture.
  • Try using different types of fish, such as salmon or haddock, for varied flavors and textures.
  • Prep Time: 10 minutes
  • Cook Time: 20 minutes
  • Category: Main Dish
  • Method: Baking
  • Cuisine: American

Nutrition

  • Serving Size: 1 fillet
  • Calories: 350
  • Sugar: 1g
  • Sodium: 500mg
  • Fat: 24g
  • Saturated Fat: 4g
  • Unsaturated Fat: 20g
  • Trans Fat: 0g
  • Carbohydrates: 2g
  • Fiber: 0g
  • Protein: 30g
  • Cholesterol: 70mg

Leprechaun Bait: A Festive and Irresistible St. Patrick’s Day Snack

St. Patrick’s Day is a time for celebration, fun traditions, and of course, delicious treats. While some may indulge in traditional Irish fare, others look for festive, playful snacks to enjoy during the holiday. Leprechaun Bait is the perfect balance of sweet, salty, and crunchy, making it a crowd-pleasing treat for parties, school events, or a fun family activity.

This snack mix is bright, colorful, and easy to make, requiring no baking and just a few simple ingredients. The combination of cereal, pretzels, marshmallows, and green M&M’s all coated in creamy white chocolate makes it not only delicious but also perfectly themed for the holiday. Whether you’re setting a trap for mischievous leprechauns or just looking for a festive snack to share, this mix is sure to be a hit.

Why You’ll Love This St. Patrick’s Day Snack Mix

1. Quick and Easy to Make

With no baking required, Leprechaun Bait comes together in just a few minutes. Simply mix, coat, and let it set—it’s that easy!

2. Perfect for Parties and Gatherings

This crunchy, sweet, and salty snack mix is ideal for St. Patrick’s Day parties, school events, or festive movie nights. It’s easy to make in large batches, and the bright green and gold colors make it stand out on any snack table.

3. Kid-Friendly Fun

Not only is this snack mix perfect for kids to eat, but it’s also a great activity for them to help make. Letting children mix the ingredients, sprinkle in extra marshmallows, and stir in the melted chocolate adds an interactive element that makes holiday treats even more fun.

4. Customizable to Your Taste

While the classic recipe includes Chex cereal, Lucky Charms, pretzels, and M&M’s, you can easily switch up the ingredients to match your taste preferences. Add nuts for a protein boost, swap out the cereal for popcorn, or drizzle dark chocolate for a more indulgent version.

5. A Creative and Playful St. Patrick’s Day Tradition

If your family sets up a leprechaun trap every year, Leprechaun Bait is the perfect “evidence” that a mischievous leprechaun was nearby. Scatter some around the trap or leave a few crumbs on a plate for a fun surprise on St. Patrick’s Day morning.

Pot of Gold Ingredients

  • Chex cereal (corn or any variety)
  • Lucky Charms cereal
  • Pretzel sticks
  • Cereal marshmallows (extra for more fun)
  • Green M&M’s (mint or white chocolate variety)
  • White chocolate (melted for coating)

How to Make This Irresistible Mix

Step One: Combine the Crunchy Goodness

  • In a large bowl, mix together Chex cereal, Lucky Charms, pretzel sticks, cereal marshmallows, and M&M’s.

Step Two: Melt the Magic

  • Melt the white chocolate in a double boiler or microwave, stirring until smooth.

Step Three: Coat and Set

  • Pour the melted chocolate over the snack mix, stirring until everything is evenly coated.
  • Spread the mixture out on parchment paper and let it harden.

Step Four: Break and Enjoy

  • Once the chocolate has set, break the mix into pieces and serve.
  • Store in an airtight container or the fridge for freshness.

Nutritional Treasure Map (Per Serving, Estimated)

  • Calories: ~180 kcal
  • Carbohydrates: 30g
  • Protein: 2g
  • Fat: 7g
  • Sugar: 18g
  • Sodium: 90mg

Creative Ways to Serve Leprechaun Bait

The magic of this treat is not just in its taste but also in how you present it. Here are some fun and creative ways to serve and share Leprechaun Bait:

1. St. Patrick’s Day Party Favors

Portion the snack mix into small treat bags and tie them with a green ribbon. Attach a cute tag that reads “Leprechaun Bait – Guaranteed to Catch a Leprechaun!” for an adorable party favor or classroom treat.

2. Serve in Mini Cauldrons or Gold Pots

For a more thematic presentation, serve the snack mix in mini black cauldrons or gold foil-wrapped bowls to resemble a pot of gold at the end of the rainbow.

3. Create a St. Patrick’s Day Snack Board

Combine Leprechaun Bait with other festive treats like gold chocolate coins, green-dyed popcorn, and rainbow-colored fruit for an eye-catching St. Patrick’s Day dessert board.

4. Pair with a Festive Drink

Serve alongside a green mint milkshake, Irish cream hot chocolate, or a sparkling lemonade for a complete holiday treat.

FAQs: Everything You Need to Know About Leprechaun Bait

1. How Long Does Leprechaun Bait Stay Fresh?

This snack mix stays fresh for up to a week when stored in an airtight container at room temperature. If you want to keep it longer, you can refrigerate it for up to two weeks.

2. Can I Make This Recipe in Advance?

Yes! Leprechaun Bait is a great make-ahead treat. Prepare it a day or two before your event and store it in an airtight container to keep it fresh.

3. Can I Use Different Types of Chocolate?

Absolutely! While white chocolate is the classic choice, you can also try:

  • Milk chocolate for a classic chocolatey flavor
  • Dark chocolate for a more balanced sweetness
  • Green candy melts for an extra festive touch

4. Can I Make This Recipe Nut-Free?

Yes! This recipe is naturally nut-free, but always check ingredient labels if serving to individuals with allergies. If you want to add extra crunch, consider using pretzel pieces or popcorn instead of nuts.

5. Can I Add Other Mix-Ins?

Definitely! Some fun additions to customize your Leprechaun Bait include:

  • Mini marshmallows for extra sweetness
  • Coconut flakes for a tropical twist
  • Crispy rice cereal for added crunch
  • Gold sprinkles for a little extra sparkle

6. How Do I Melt the White Chocolate Without Burning It?

The best way to melt white chocolate is:

  • In a double boiler over low heat, stirring constantly.
  • In the microwave, heating in 30-second intervals, stirring between each round.
  • With a slow cooker or mini crockpot, which keeps it warm without overheating.

7. Can I Make a Healthier Version?

If you want to lighten up the recipe, try:

  • Using whole grain or unsweetened cereals
  • Swapping white chocolate for yogurt-covered pieces
  • Adding dried fruit like raisins, cranberries, or banana chips

8. What If My White Chocolate Hardens Too Fast?

If your chocolate hardens before you mix it thoroughly, place the entire mixture on a baking sheet and pop it in a warm oven (about 200°F) for a couple of minutes. This will help soften the chocolate and make it easier to stir.

Fun Variations of Leprechaun Bait

1. Mint Chocolate Leprechaun Bait

  • Use mint chocolate chips instead of white chocolate for a refreshing minty flavor.
  • Add crushed peppermint candies for an extra crunch.

2. Lucky Charms Popcorn Mix

  • Swap out Chex cereal for air-popped popcorn for a lighter, crunchier texture.

3. Rainbow Leprechaun Bait

  • Add rainbow-colored candies or fruit-flavored cereal to mimic a rainbow at the end of the leprechaun’s trail.

4. Peanut Butter Lover’s Bait

  • Stir melted peanut butter into the white chocolate for a sweet and nutty twist.

Final Thoughts: The Ultimate St. Patrick’s Day Snack

Leprechaun Bait is more than just a snack—it’s a playful, festive, and delicious way to celebrate St. Patrick’s Day. Whether you’re making it for a party, classroom treat, or family movie night, this sweet and salty mix is sure to be a hit.

Its easy preparation, colorful appearance, and endless customizations make it a must-have for holiday festivities. Plus, the fact that it’s a no-bake recipe means it’s stress-free and perfect for busy parents, teachers, or last-minute planners.

So, if you’re looking for a fun and delicious way to bring some St. Patrick’s Day magic into your home, whip up a batch of Leprechaun Bait—but don’t be surprised if it disappears before the leprechauns even get a chance to find it!