Creamy Chicken and Dumplings: Discover the Best Recipe!

gutenberg

Introduction to Creamy Chicken and Dumplings

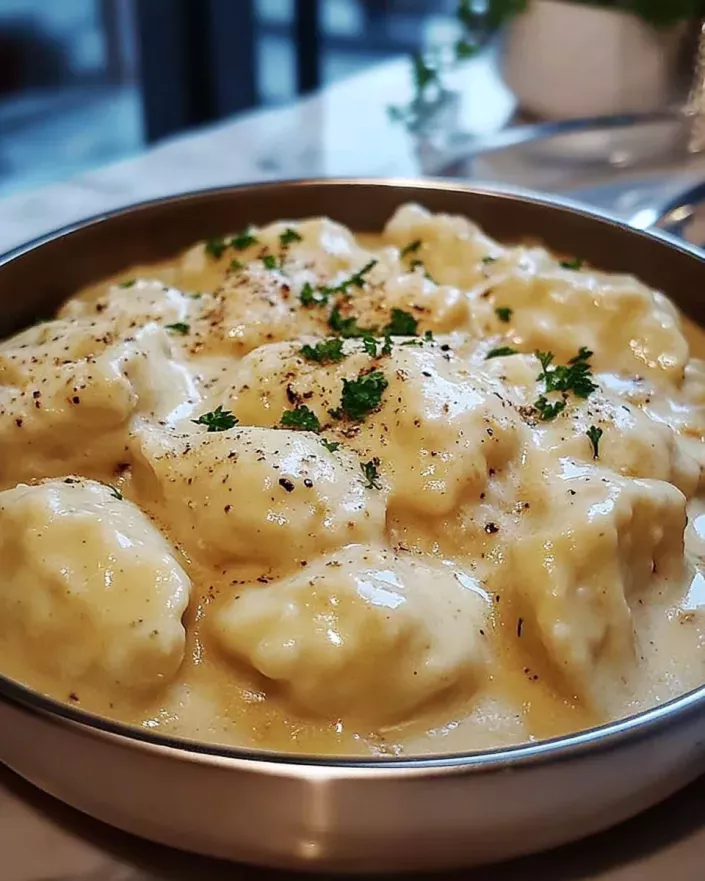
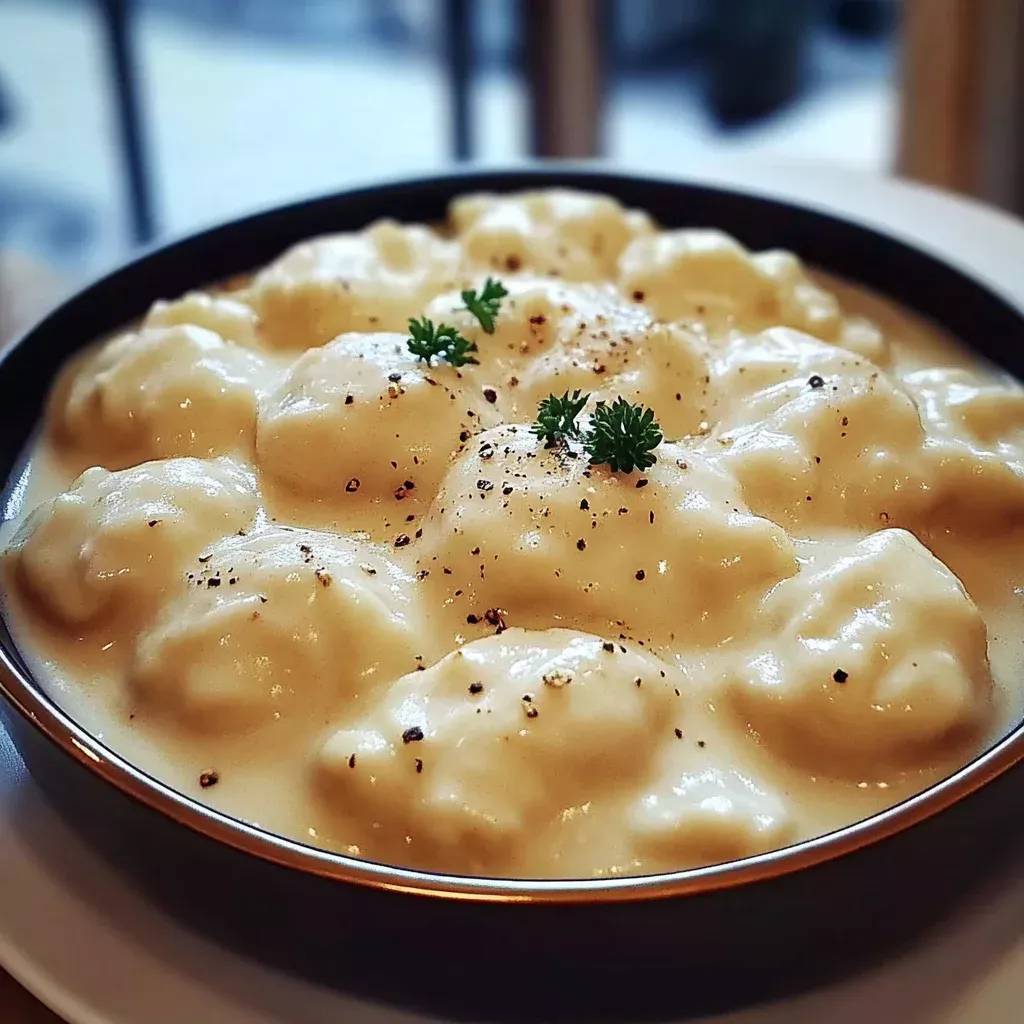
Creamy Chicken and Dumplings is the ultimate comfort food, perfect for cozy nights in! This hearty dish features tender chunks of chicken in a rich, velvety broth, paired with soft, pillowy dumplings that soak up all the flavorful goodness. With a blend of savory herbs and creamy texture, every bite feels like a warm hug. Whether you’re looking for a satisfying dinner or a meal to feed the family, this recipe is sure to become a new favorite. Ready to discover the best way to enjoy this classic? Let’s dive in!

Why You’ll Love This Creamy Chicken and Dumplings

This Creamy Chicken and Dumplings recipe is a lifesaver for busy weeknights. It’s quick to prepare, taking just 45 minutes from start to finish. The flavors meld beautifully, creating a dish that’s both comforting and satisfying. Plus, it’s a one-pot wonder, which means less cleanup for you! Whether you’re feeding a crowd or enjoying a cozy night in, this dish is sure to please everyone at the table.

Ingredients for Creamy Chicken and Dumplings

Gathering the right ingredients is the first step to creating this delightful dish. Here’s what you’ll need:

  • Olive oil: A healthy fat for sautéing, adding flavor and richness.
  • Onion: Diced onion brings a sweet and savory base to the dish.
  • Carrots: These add a pop of color and natural sweetness.
  • Celery: A classic aromatic that enhances the overall flavor profile.
  • Garlic: Minced garlic infuses the dish with a warm, aromatic essence.
  • Dried thyme: This herb adds a subtle earthiness that complements the chicken.
  • Dried rosemary: A fragrant herb that brings a hint of pine flavor.
  • Salt and black pepper: Essential seasonings to enhance all the flavors.
  • Chicken broth: The heart of the dish, providing depth and moisture.
  • Cooked, shredded chicken: Use leftover rotisserie chicken or poach your own for convenience.
  • Frozen peas: These add a burst of color and sweetness, plus they’re easy to use.
  • Heavy cream: This is what makes the dish creamy and indulgent.
  • All-purpose flour: The base for the dumplings, giving them structure.
  • Baking powder: This helps the dumplings rise and become fluffy.
  • Milk: Adds moisture to the dumpling batter, making it tender.
  • Unsalted butter: Melted butter enriches the dumplings with flavor.
  • Fresh parsley: A lovely garnish that adds freshness and color.

For those looking to lighten things up, consider substituting half-and-half for the heavy cream and using skinless chicken breast. You can also toss in your favorite vegetables like corn or green beans for extra flavor and nutrition. Exact measurements for each ingredient can be found at the bottom of the article, ready for printing!

How to Make Creamy Chicken and Dumplings

Now that we have our ingredients ready, let’s get cooking! This process is straightforward and rewarding. Follow these steps, and you’ll have a comforting meal in no time.

Step 1: Sauté the Vegetables

Start by heating the olive oil in a large pot over medium heat. Once it’s shimmering, add the diced onion, carrots, and celery. Sauté these veggies for about 5 minutes until they soften and become fragrant. The aroma will fill your kitchen, making it feel like home. Stir in the minced garlic, dried thyme, dried rosemary, salt, and black pepper. Cook for another minute to let those flavors mingle.

Step 2: Simmer the Chicken Mixture

Next, pour in the chicken broth and bring the mixture to a gentle simmer. This is where the magic happens! Add the shredded chicken and frozen peas, stirring them in. Then, pour in the heavy cream, which will give the dish its signature creamy texture. Let it simmer on low heat while you prepare the dumplings. This step allows the flavors to deepen and develop.

Step 3: Prepare the Dumpling Batter

In a mixing bowl, combine the all-purpose flour, baking powder, and salt. In another bowl, whisk together the milk and melted butter until smooth. Pour the wet ingredients into the dry ingredients and stir gently until just combined. Remember, don’t overmix! You want the dumplings to be light and fluffy, not dense.

Step 4: Cook the Dumplings

Now it’s time to drop spoonfuls of the dumpling batter onto the simmering chicken mixture. Make sure to cover the pot with a lid and let the dumplings cook for about 15 minutes without lifting the lid. This is crucial! The steam will help them rise and become fluffy. You’ll know they’re done when they look puffy and cooked through.

Step 5: Garnish and Serve

Once the dumplings are cooked, remove the pot from heat. Sprinkle fresh parsley on top for a pop of color and freshness. Serve your Creamy Chicken and Dumplings hot, and watch as your family gathers around the table, ready to dig in. Enjoy every comforting bite!

Tips for Success

  • Prep your ingredients ahead of time to save precious minutes during cooking.
  • Use leftover rotisserie chicken for a quick shortcut without sacrificing flavor.
  • Don’t lift the lid while the dumplings are cooking; it’s essential for fluffiness.
  • Feel free to adjust seasonings to suit your family’s taste preferences.
  • For a thicker sauce, let the chicken mixture simmer a bit longer before adding dumplings.

Equipment Needed

  • Large pot or Dutch oven: A sturdy pot is essential for even cooking.
  • Wooden spoon: Perfect for stirring without scratching your pot.
  • Mixing bowls: Use two for combining wet and dry ingredients.
  • Measuring cups and spoons: Accurate measurements ensure the best results.
  • Serving spoon: For ladling out those delicious portions!

Variations

  • For a healthier twist, swap heavy cream for Greek yogurt or light sour cream.
  • Add a splash of white wine to the chicken broth for a richer flavor.
  • Incorporate seasonal vegetables like zucchini or bell peppers for added nutrition.
  • Try using different herbs, such as dill or basil, to change up the flavor profile.
  • For a spicy kick, add a pinch of red pepper flakes or diced jalapeños.

Serving Suggestions

  • Pair your Creamy Chicken and Dumplings with a crisp green salad for a refreshing contrast.
  • A side of garlic bread or crusty rolls is perfect for soaking up the creamy sauce.
  • Serve with a glass of chilled white wine or sparkling water for a delightful meal.
  • For presentation, sprinkle extra parsley on top for a vibrant touch.

FAQs about Creamy Chicken and Dumplings

Can I use frozen chicken instead of cooked chicken?


Absolutely! If you’re in a pinch, you can use frozen chicken. Just make sure to cook it thoroughly before shredding it for the recipe. This will add a bit more time, but it’s a great option if you don’t have leftovers on hand.


How can I make this dish gluten-free?


To make Creamy Chicken and Dumplings gluten-free, simply substitute the all-purpose flour with a gluten-free flour blend. You can also check that your baking powder is gluten-free. The dumplings will still turn out fluffy and delicious!


Can I prepare this dish in advance?


Yes! You can prepare the chicken mixture ahead of time and store it in the fridge. Just make the dumplings fresh when you’re ready to serve. This way, you’ll have a comforting meal ready in no time!


What can I serve with Creamy Chicken and Dumplings?


This dish pairs wonderfully with a simple green salad or some crusty bread. The fresh crunch of a salad complements the creamy texture perfectly. You can also serve it with a side of roasted vegetables for a complete meal.


How do I store leftovers?


Store any leftovers in an airtight container in the fridge for up to three days. Reheat gently on the stovetop, adding a splash of chicken broth or cream to loosen the sauce if it thickens. Enjoy your comforting meal again!

Final Thoughts

Making Creamy Chicken and Dumplings is more than just cooking; it’s about creating memories. The warmth of the dish wraps around you like a cozy blanket, inviting everyone to gather and share their day. I love how this recipe transforms simple ingredients into a comforting meal that feels special. Whether it’s a busy weeknight or a chilly weekend, this dish brings joy to the table. So, roll up your sleeves, embrace the process, and let the delightful aroma fill your home. Trust me, your family will thank you for this delicious hug in a bowl!

“`

Print
clock clock iconcutlery cutlery iconflag flag iconfolder folder iconinstagram instagram iconpinterest pinterest iconfacebook facebook iconprint print iconsquares squares iconheart heart iconheart solid heart solid icon
Creamy Chicken and Dumplings

Creamy Chicken and Dumplings: Discover the Best Recipe!


5 Stars 4 Stars 3 Stars 2 Stars 1 Star

No reviews

  • Author: Isabella
  • Total Time: 45 minutes
  • Yield: 6 servings 1x
  • Diet: Comfort Food

Description

A comforting and creamy dish featuring tender chicken and fluffy dumplings, perfect for a cozy meal.


Ingredients

Scale
  • 2 tablespoons olive oil
  • 1 medium onion, diced
  • 2 carrots, diced
  • 2 celery stalks, diced
  • 3 cloves garlic, minced
  • 1 teaspoon dried thyme
  • 1 teaspoon dried rosemary
  • 1/2 teaspoon salt
  • 1/4 teaspoon black pepper
  • 4 cups chicken broth
  • 2 cups cooked, shredded chicken
  • 1 cup frozen peas
  • 1 cup heavy cream
  • 1 cup all-purpose flour
  • 1 tablespoon baking powder
  • 1/2 teaspoon salt
  • 1/2 cup milk
  • 1/4 cup unsalted butter, melted
  • 1 tablespoon fresh parsley, chopped (for garnish)

Instructions

  1. In a large pot, heat the olive oil over medium heat. Add the onion, carrots, and celery, and sauté for about 5 minutes until the vegetables are softened. Stir in the garlic, thyme, rosemary, salt, and pepper, and cook for an additional minute.
  2. Pour in the chicken broth and bring the mixture to a simmer. Add the shredded chicken and frozen peas, then stir in the heavy cream. Let it simmer on low heat while you prepare the dumplings.
  3. In a mixing bowl, combine the flour, baking powder, and salt. In another bowl, whisk together the milk and melted butter. Pour the wet ingredients into the dry ingredients and stir until just combined. Do not overmix.
  4. Drop spoonfuls of the dumpling batter onto the simmering chicken mixture. Cover the pot and let the dumplings cook for about 15 minutes without lifting the lid.
  5. Once the dumplings are cooked through, remove the pot from heat. Garnish with fresh parsley before serving.

Notes

  • For a lighter version, substitute half-and-half for the heavy cream and use skinless chicken breast.
  • Add your favorite vegetables like corn or green beans for extra flavor and nutrition.
  • Prep Time: 15 minutes
  • Cook Time: 30 minutes
  • Category: Main Course
  • Method: Stovetop
  • Cuisine: American

Nutrition

  • Serving Size: 1 serving
  • Calories: 450
  • Sugar: 3g
  • Sodium: 800mg
  • Fat: 25g
  • Saturated Fat: 15g
  • Unsaturated Fat: 5g
  • Trans Fat: 0g
  • Carbohydrates: 30g
  • Fiber: 2g
  • Protein: 25g
  • Cholesterol: 100mg

Cheesy Garlic Baked Green Beans: A Savory Twist on a Classic Side Dish

The Side Dish That Brings Back Family Memories

There are some side dishes that never fail to bring warmth to the dinner table, and for me, green beans have always been one of them. I still remember Sunday dinners at my grandmother’s house, where she would serve a big bowl of freshly roasted green beans alongside a comforting meal. Back then, I never fully appreciated the simplicity of this humble vegetable, but as I grew older, I realized how versatile and delicious green beans could be.

One day, I decided to experiment with the classic recipe. Instead of just roasting them with salt and pepper, I added garlic, parmesan, and mozzarella, and suddenly, this simple dish turned into something extraordinary. The combination of crisp-tender green beans, roasted garlic, and gooey, golden cheese made this one of my favorite side dishes to serve. It became a family favorite, requested at every gathering, whether it was a casual weeknight dinner or a holiday feast.

If you’re looking for a quick, flavorful, and nutritious side dish, these Cheesy Garlic Baked Green Beans are the perfect addition to your meal. They’re easy to make, packed with bold flavors, and pair well with almost any main dish. Whether you’re a lifelong green bean lover or someone who’s still learning to enjoy vegetables, this recipe will win you over with its cheesy, garlicky goodness.

Why You’ll Love This Recipe

1. A Perfect Balance of Flavors

The savory garlic, sharp parmesan, and creamy mozzarella create an irresistible combination that enhances the natural sweetness of the green beans.

2. Quick and Easy to Make

With just a few simple ingredients and 25 minutes, you can whip up this side dish without spending too much time in the kitchen.

3. A Crowd-Pleaser for Any Occasion

Whether it’s a holiday meal, a family dinner, or a summer barbecue, these cheesy baked green beans always disappear fast.

4. Low-Carb and Keto-Friendly

This dish is naturally low in carbs and packed with nutrients, making it a great option for those following a healthy or keto-friendly diet.

5. Easily Customizable

You can switch up the cheeses, seasonings, or even add a bit of spice to make this recipe your own.

What You’ll Need (Ingredients)

For the Green Beans:

  • 1 pound fresh green beans, trimmed and washed
  • 1 tablespoon olive oil
  • 1 teaspoon onion powder
  • 1 tablespoon minced garlic
  • 1 teaspoon salt
  • ½ teaspoon black pepper

For the Cheesy Topping:

  • ¼ cup shredded parmesan cheese
  • 1½ cups shredded mozzarella cheese
  • Additional salt and pepper to taste

How to Make These Savory Green Beans (Directions)

  1. Preheat the Oven: Set to 425°F and line a baking sheet with parchment paper.
  2. Season the Green Beans: In a large bowl, whisk together olive oil, onion powder, minced garlic, salt, pepper, and parmesan. Toss the green beans until evenly coated.
  3. Bake Until Tender: Spread the seasoned green beans in a single layer on the prepared baking sheet. Bake for 20 minutes.
  4. Add the Cheese: Turn off the oven, remove the green beans, and sprinkle them with shredded mozzarella.
  5. Broil to Perfection: Set the oven to broil and place the green beans back in. Broil for 4-5 minutes, or until the cheese is golden and bubbly.
  6. Final Seasoning: Taste and adjust with additional salt and pepper if needed. Serve immediately.

A Nutritious and Delicious Bite: Nutritional Breakdown (Per Serving Estimate)

  • Calories: 180 kcal
  • Carbohydrates: 6g
  • Protein: 8g
  • Fat: 13g (Saturated: 5g)
  • Cholesterol: 20mg
  • Sodium: 450mg
  • Fiber: 3g
  • Sugar: 2g

Pro Tips for the Best Cheesy Baked Green Beans

Choose Fresh Green Beans for the Best Texture

Fresh green beans roast beautifully, giving you a slight crispness with a tender bite. If you use frozen or canned beans, they may become too soft.

Dry the Green Beans Before Baking

After washing, pat the green beans completely dry with a paper towel. This helps the olive oil and seasonings stick better, ensuring even roasting.

Roast at a High Temperature for Perfect Browning

Baking at 425°F helps caramelize the garlic and cheese, giving the green beans a deep, rich flavor.

Broil for a Crispy, Golden Cheese Topping

Once you add the mozzarella, broil for 4-5 minutes to get that delicious bubbly, golden-brown crust on top.

Don’t Overcrowd the Pan

Spread the green beans in a single layer to allow even roasting. Overcrowding can lead to steaming instead of roasting.

Add a Crunchy Topping for Extra Texture

For a twist, sprinkle toasted breadcrumbs or crushed almonds over the green beans before broiling.

Frequently Asked Questions

1. Can I Use Frozen or Canned Green Beans?

Yes, but fresh green beans work best for a crisp texture. If using frozen green beans, thaw and pat them dry before roasting. If using canned green beans, drain and rinse them well, then pat them dry to remove excess moisture.

2. How Do I Store Leftovers?

Store leftover green beans in an airtight container in the refrigerator for up to 5 days.

3. How Do I Reheat Them?

For the best texture, reheat in a preheated oven at 350°F for 10-15 minutes. You can also microwave them in 30-second intervals, but they may lose some crispness.

4. Can I Make This Recipe in an Air Fryer?

Yes! Preheat the air fryer to 400°F, season the green beans as usual, and air fry for 15 minutes, shaking the basket halfway through. Add the mozzarella and air fry for another 5 minutes.

5. What Can I Serve with These Cheesy Green Beans?

These green beans pair well with a variety of main dishes, including:

  • Grilled chicken or steak
  • Baked salmon
  • Roast turkey or ham (perfect for holidays)
  • Garlic butter shrimp

6. Can I Add More Seasonings?

Absolutely! Try adding:

  • Red pepper flakes for a little heat
  • Smoked paprika for a deeper flavor
  • Italian seasoning for extra herbs

7. Can I Make This Dish Dairy-Free?

Yes! Simply omit the cheese or use dairy-free cheese alternatives for a lactose-free version.

8. Can I Make This Ahead of Time?

Yes! You can season and bake the green beans ahead of time, then store them in the refrigerator. When ready to serve, reheat, add the cheese, and broil for a fresh-out-of-the-oven taste.

Serving Ideas: How to Elevate This Dish

1. Serve It as an Appetizer

Turn these cheesy green beans into a finger food appetizer by arranging them on a platter with a side of garlic aioli or marinara sauce for dipping.

2. Make It a Holiday Side Dish

For a festive touch, top with crispy fried onions or crumbled bacon before serving at Thanksgiving or Christmas dinner.

3. Pair with a Refreshing Drink

A glass of white wine or iced tea complements the cheesy, garlicky flavors perfectly.

4. Add a Protein for a One-Pan Meal

Toss in sliced sausage, diced chicken, or tofu for a hearty, one-pan dinner.

5. Serve with a Light Salad

Balance out the richness by serving these green beans with a fresh side salad dressed with lemon vinaigrette.

Why This Recipe Deserves a Spot in Your Kitchen

Some side dishes are forgettable, but these Cheesy Garlic Baked Green Beans are anything but. They take a simple vegetable and transform it into something decadent, flavorful, and satisfying. The combination of roasted garlic, parmesan, and melty mozzarella makes this dish irresistible, even for those who aren’t big fans of vegetables.

Whether you’re making a quick weeknight dinner or planning a holiday feast, this recipe is a foolproof way to add a delicious, cheesy twist to your meal. Once you try it, you might never go back to plain green beans again.

So next time you’re looking for an easy yet impressive side dish, give these baked green beans a try. They’re proof that vegetables can be just as exciting as the main course!

Happy cooking!

Bunny Buns: A Whimsical and Fluffy Treat for Every Occasion

A Sweet Tradition That Brings Joy to the Table

There’s something magical about baking bread, especially when it’s shaped into something as delightful as Bunny Buns. I still remember the first time I made these rolls with my grandmother before an Easter brunch. She had a way of making every holiday feel special, and baking together was always part of the tradition. As we rolled out the dough, shaped the ears, and placed tiny little tails on each one, I could feel the excitement in the air.

When the buns came out of the oven, golden brown and slightly crisp on the outside yet soft on the inside, I knew we had created something special. We brushed them with butter, added a pinch of sugar, and watched as everyone at the table couldn’t help but smile before taking a bite.

Now, I make these Bunny Buns not just for Easter but anytime I want to bring a little joy and warmth to the kitchen. They are a perfect mix of whimsical, delicious, and fun to make, making them great for family baking sessions, brunch gatherings, or even as a thoughtful homemade gift.

If you love soft, slightly sweet bread with a golden-brown crust, these Bunny Buns will quickly become one of your favorite recipes.

Why You’ll Love This Recipe

1. A Fun and Festive Baking Project

Whether for Easter, spring celebrations, or a creative afternoon in the kitchen, these bunny-shaped buns bring a playful touch to any meal.

2. Soft, Fluffy, and Buttery Goodness

With a light texture and a hint of sweetness, these buns are perfect on their own or with a spread of butter, jam, or honey.

3. Great for Kids and Family Baking

This recipe is simple enough for kids to help with, from rolling out the dough to shaping the adorable bunny ears and tails.

4. Two Ways to Make It: From Scratch or Pre-Made Dough

If you love homemade bread, the yeast dough version is incredibly rewarding. But if you’re short on time, using refrigerated dough still gives great results with minimal effort.

5. Perfect for Any Occasion

These Bunny Buns aren’t just for Easter—they make a wonderful addition to brunches, baby showers, birthday parties, or just because you want a fun and delicious homemade treat.

What You’ll Need (Ingredients)

For Homemade Dough:

  • 1 cup warm milk
  • 1 tablespoon yeast
  • 4½ cups all-purpose flour
  • 1 teaspoon salt
  • ¼ cup sugar, divided
  • 1 egg
  • 3 tablespoons butter

For Pre-Made Dough Option:

  • 2 cans refrigerated Pillsbury French Bread (or refrigerated bread of choice)
  • 3 tablespoons butter
  • 1 tablespoon sugar

How to Make These Fluffy Bunny Buns (Directions)

For Homemade Dough:

  1. Prepare the Dough: Activate the yeast in warm milk and sugar, then mix with flour, salt, egg, and butter to form a soft dough.
  2. Knead and Let It Rise: Knead the dough using a mixer or by hand, then allow it to rise for about 1½ hours until doubled in size.
  3. Shape the Bunny Buns: Divide the dough into 12 pieces, rolling each into a rope and twisting into bunny shapes. Add small dough balls for tails.
  4. Let It Rise Again: Allow the shaped buns to rise for 20-30 minutes.
  5. Bake to Perfection: Bake at 350°F for 15-20 minutes until golden brown. Brush with butter for extra softness.

For Pre-Made Dough:

  1. Cut and Shape: Divide the dough, roll into ropes, and shape into bunnies as instructed.
  2. Bake and Finish: Bake at 350°F for 20-30 minutes until golden. Brush with butter and sprinkle with sugar if desired.

A Wholesome Bite: Nutritional Breakdown (Per Serving Estimate)

  • Calories: 180 kcal
  • Carbohydrates: 30g
  • Protein: 4g
  • Fat: 5g (Saturated: 2g)
  • Cholesterol: 20mg
  • Sodium: 180mg
  • Sugar: 5g
  • Fiber: 1g

Pro Tips for the Best Bunny Buns

Use Warm Milk for the Best Dough Rise

Warm milk helps activate the yeast properly, resulting in a dough that rises well and creates a light, fluffy texture.

Don’t Skip the Second Rise

Allowing the shaped bunny buns to rise again before baking ensures they keep their shape while becoming extra soft inside.

Shape the Bunnies with Care

To ensure the bunnies hold their shape, roll the dough ropes evenly and twist the ears carefully so they don’t bake together.

Brush with Butter for a Golden Crust

Brushing the warm buns with melted butter right after baking adds a beautiful shine and extra softness.

Add a Sweet Finish

For a sweeter touch, sprinkle the buns with a light dusting of sugar or cinnamon sugar while they’re still warm.

Make Them Extra Special with Fillings

Want to get creative? Try adding a little chocolate, jam, or cream cheese inside the dough before shaping for a surprise filling.

Frequently Asked Questions

1. Can I Make These Buns Ahead of Time?

Yes! You can make the dough, shape the bunnies, and refrigerate them overnight. When ready to bake, let them come to room temperature for about 30 minutes before baking.

2. Can I Freeze These Buns?

Absolutely! Once cooled, store them in an airtight container in the freezer for up to 2 months. To reheat, warm them in the oven at 300°F for 5-10 minutes or microwave for about 20 seconds.

3. What’s the Best Way to Serve Bunny Buns?

These buns taste great:

  • With butter and honey for a simple treat
  • With jam or fruit preserves for extra sweetness
  • As part of a brunch spread with eggs, bacon, and fresh fruit

4. Can I Make This Recipe Without Yeast?

Yes! If you want a quicker version, use store-bought refrigerated dough like Pillsbury French Bread or another type of pre-made bread dough.

5. How Can I Make These Buns Sweeter?

  • Add an extra tablespoon of sugar to the dough
  • Brush with honey butter after baking
  • Sprinkle cinnamon sugar on top before serving

6. Can I Make These Dairy-Free?

Yes! Substitute:

  • Non-dairy milk (like almond or oat milk) for the regular milk
  • Vegan butter or coconut oil instead of regular butter

7. How Do I Keep the Bunny Shape from Spreading?

To prevent the bunnies from spreading too much while baking:

  • Chill the shaped buns for 10 minutes before baking
  • Make sure the twisted bunny ears are firmly pinched together

8. Can I Add a Savory Twist?

Yes! Instead of making them sweet, try:

  • Adding garlic butter or herbs before baking
  • Sprinkling Parmesan cheese on top
  • Stuffing them with cheese and herbs for a delicious savory version

Serving Ideas: How to Make Bunny Buns Even More Special

1. Pair with a Warm Drink

Enjoy these buns with a hot cup of tea, coffee, or a homemade latte for a cozy and comforting experience.

2. Serve with a Spreadable Topping

Set out butter, jam, Nutella, or cream cheese so everyone can customize their Bunny Buns to their liking.

3. Make a Festive Easter Brunch

Pair the Bunny Buns with deviled eggs, fresh fruit, and a light salad for a beautiful Easter meal.

4. Create a Bunny Bread Basket

Place the warm buns in a basket lined with a festive napkin for a charming table centerpiece.

5. Use as a Fun Kid’s Activity

Let kids decorate their Bunny Buns with colored sugar, icing, or mini chocolate chips for eyes.

Why Bunny Buns Are a Must-Try Recipe

There’s something so heartwarming about a recipe that brings smiles to people’s faces before they even take a bite. These Bunny Buns are not only delicious, soft, and buttery, but they also add a touch of fun to any gathering. Whether you make them for Easter brunch, a spring picnic, or just because you feel like baking something whimsical, they will always be a hit.

Baking bread is a tradition that has been passed down through generations, and making these Bunny Buns is a wonderful way to share that tradition with your loved ones. There’s joy in the process—from mixing the dough to shaping the bunnies and finally pulling them out of the oven, golden and ready to be enjoyed.

So why not try them today? Get creative, have fun in the kitchen, and enjoy the simple pleasure of homemade bread. You might just find that making Bunny Buns becomes a new favorite tradition in your home.

Happy baking!

Lighter Spinach Frittata: A Nutritious and Delicious Way to Start Your Day

A Breakfast That Feels Like Home

Some meals are more than just food; they are moments that bring warmth and comfort to the day. For me, a freshly made frittata has always been one of those meals. I remember waking up to the smell of onions sautéing in olive oil, the sound of eggs sizzling in the pan, and the anticipation of a wholesome breakfast that felt like a treat but was packed with nutrition.

My grandmother used to make frittatas on Sunday mornings, always tossing in whatever vegetables she had on hand. Spinach, onions, scallions, and cheese were her go-to ingredients, and she always insisted that a good frittata should be light, fluffy, and full of flavor. Now, whenever I make one, I’m instantly reminded of those slow mornings, sitting around the table with family, enjoying a meal that felt both simple and special.

This Lighter Spinach Frittata is a modern take on that classic tradition. By using a combination of whole eggs and egg whites, it keeps things light and protein-packed while still being rich and satisfying. The addition of fresh spinach, feta, and scallions gives it a bright, savory taste that makes it perfect for breakfast, brunch, or even a quick dinner.

If you’re looking for a healthy yet delicious meal that comes together in minutes, this frittata will become a staple in your kitchen, just like it has in mine.

Why You’ll Love This Recipe

1. High in Protein, Low in Calories

Using a mix of whole eggs and egg whites keeps this frittata light yet satisfying, making it a great option for those watching their calories but still wanting a filling meal.

2. Packed with Nutrients

Spinach is rich in vitamins A, C, and K, while feta and Parmigiano-Reggiano provide calcium and protein, making this dish both nutritious and flavorful.

3. Quick and Easy to Make

With simple ingredients and a total cook time of under 20 minutes, this frittata is perfect for busy mornings or meal prep.

4. Versatile and Customizable

Not a fan of feta? Swap it for goat cheese or mozzarella. Want more veggies? Add mushrooms, bell peppers, or even sun-dried tomatoes. This frittata is incredibly adaptable.

5. Great for Meal Prep

Make it ahead of time, store it in the fridge, and enjoy a healthy breakfast or snack all week long. It reheats beautifully!

What You’ll Need (Ingredients)

For the Frittata Base:

  • 4 large whole eggs
  • 1 cup egg whites
  • 1 teaspoon olive oil
  • ½ cup red onion, finely chopped
  • 3 medium scallions, chopped (plus extra for garnish)
  • 1 ½ cups fresh spinach, chopped
  • 2 ounces crumbled feta cheese (plus extra for garnish, optional)
  • 2 tablespoons Parmigiano-Reggiano, grated
  • ½ teaspoon kosher salt
  • Freshly ground black pepper, to taste

For Garnish (Optional):

  • Diced grape or cherry tomatoes
  • Extra scallions or feta

How to Make This Healthy and Satisfying Frittata (Directions)

  1. Preheat & Prepare: Preheat oven to 400°F (200°C).
  2. Sauté the Aromatics: Heat olive oil in an oven-safe non-stick skillet over medium heat. Add onions and scallions, cooking until softened (about 4 minutes).
  3. Whisk the Eggs: In a bowl, beat whole eggs and egg whites. Stir in salt, black pepper, cheeses, sautéed onions, and spinach.
  4. Cook the Frittata: Pour the egg mixture into the skillet. Cook for 4-5 minutes, until the bottom starts to set.
  5. Bake to Perfection: Transfer the skillet to the oven and bake for 4-5 minutes, until the frittata is fully set.
  6. Serve & Enjoy: Remove from the oven, transfer to a plate, and cut into wedges. Garnish with fresh tomatoes, extra scallions, or more feta if desired.

A Nutritious Start: Nutritional Breakdown (Per Serving Estimate)

  • Calories: 160 kcal
  • Carbohydrates: 4g
  • Protein: 16g
  • Fat: 9g (Saturated: 3g)
  • Cholesterol: 185mg
  • Sodium: 480mg
  • Fiber: 1g
  • Sugar: 2g

Pro Tips for the Best Spinach Frittata

Use Fresh Spinach for the Brightest Flavor

While frozen spinach works in a pinch, fresh spinach adds a brighter, more vibrant taste and better texture. If using frozen, be sure to squeeze out excess water before adding it to the eggs.

Sauté the Onions and Scallions for Extra Sweetness

Cooking the onions and scallions before adding them to the eggs brings out their natural sweetness, enhancing the overall flavor of the frittata.

Don’t Overcook the Eggs

To keep the frittata light and fluffy, cook it just until the eggs are set. Overcooking can lead to a rubbery texture.

Let It Cool Slightly Before Slicing

Allowing the frittata to sit for a few minutes before cutting helps it hold its shape better and enhances the flavors.

Add a Pop of Freshness Before Serving

Topping the frittata with diced cherry tomatoes, extra scallions, or a handful of arugula adds a fresh contrast to the richness of the eggs and cheese.

Frequently Asked Questions

1. Can I Make This Frittata Ahead of Time?

Yes! This frittata stores well in the refrigerator for up to 4 days. Simply reheat a slice in the microwave for 30-45 seconds or warm it in a skillet for a crispier texture.

2. Can I Freeze This Frittata?

Absolutely! Let it cool completely, cut it into slices, and store it in an airtight container in the freezer for up to 2 months. Reheat in the oven or microwave before serving.

3. What Other Vegetables Can I Add?

This frittata is extremely versatile. Some great add-ins include:

  • Mushrooms for an earthy flavor
  • Red bell peppers for sweetness and color
  • Zucchini for extra texture
  • Sun-dried tomatoes for a tangy twist

4. Can I Use a Different Cheese?

Of course! While feta and Parmigiano-Reggiano add a nice saltiness and depth of flavor, you can substitute with:

  • Goat cheese for a creamy texture
  • Mozzarella for a milder taste
  • Cheddar for a sharper flavor

5. What’s the Best Way to Serve This Frittata?

This frittata is delicious on its own, but you can also serve it with:

  • A side of whole-grain toast
  • A simple green salad
  • Fresh fruit for a balanced meal

6. Can I Make This in the Oven Without a Skillet?

Yes! Instead of cooking it on the stovetop, pour the mixture into a greased baking dish and bake at 375°F (190°C) for about 20-25 minutes, or until fully set.

7. How Can I Make This Dairy-Free?

For a dairy-free version, omit the feta and Parmigiano-Reggiano and substitute with:

  • Nutritional yeast for a cheesy flavor
  • Dairy-free cheese alternatives

8. Can I Use Whole Eggs Only?

Yes! If you prefer a richer, more traditional frittata, you can use 6-8 whole eggs instead of a mix of eggs and egg whites.

Serving Ideas: Elevate Your Frittata Experience

1. Pair It with a Light Salad

A simple arugula or mixed greens salad with a lemon vinaigrette perfectly balances the richness of the frittata.

2. Make It a Wrap

Slice the frittata into strips and wrap it in a whole-wheat tortilla with avocado and hummus for a portable breakfast.

3. Serve with Roasted Potatoes

Crispy roasted potatoes or sweet potato hash make an excellent side dish.

4. Add a Dollop of Greek Yogurt

A spoonful of Greek yogurt with fresh herbs on top adds extra creaminess and a hint of tang.

5. Enjoy It for Dinner

Who says frittatas are just for breakfast? Pair it with a glass of white wine and a side of crusty bread for a simple, satisfying dinner.

Why This Spinach Frittata Deserves a Place in Your Kitchen

There are few dishes as effortless, nutritious, and satisfying as a good frittata. This Lighter Spinach Frittata is proof that you don’t need heavy ingredients to create something full of flavor. With its protein-rich eggs, nutrient-packed spinach, and creamy feta, it’s a dish that fuels your body while still feeling indulgent.

Whether you’re making it for a quick breakfast, a weekend brunch, or even a light dinner, this frittata is a versatile, no-fuss recipe that fits any occasion. It’s the kind of meal that feels special, yet is simple enough to make any day of the week.

So, the next time you need a healthy, delicious, and easy meal, try this frittata—you just might find yourself making it again and again.

Happy cooking!

Paula Deen’s Chicken Casserole: A Southern Comfort Classic

A Dish That Feels Like Home

There’s something truly special about a warm, bubbling casserole coming out of the oven. It’s more than just a meal—it’s a reminder of family gatherings, cozy Sunday dinners, and the kind of home-cooked food that brings everyone to the table. For me, Paula Deen’s Chicken Casserole is the ultimate comfort food. It’s creamy, cheesy, and packed with flavor, with a golden, crunchy topping that adds the perfect finishing touch.

I remember the first time I had a dish like this at a family potluck. It was placed right in the center of the table, and before anyone could even get a bite, you could hear people saying, “Who made this? It smells incredible!” After one bite, I was hooked. The combination of tender chicken, rich sauce, and a crispy, buttery topping was just irresistible. Ever since then, it’s been a go-to recipe whenever I need a meal that feels like a warm hug.

Whether you’re feeding a busy family on a weeknight, bringing a dish to a potluck, or just craving something hearty and nostalgic, this chicken casserole never disappoints. It’s one of those meals that’s simple to make, yet tastes like you spent all day in the kitchen.

Why You’ll Love This Recipe

1. Classic Southern Comfort Food

This casserole is rich, creamy, and loaded with flavor, making it one of those crowd-pleasing dishes that everyone will love.

2. Easy to Make with Simple Ingredients

Most of the ingredients are pantry staples, making this dish both budget-friendly and convenient.

3. A One-Pan Wonder for Less Cleanup

Everything is mixed together in one baking dish, which means minimal mess and easy cleanup.

4. Perfect for Meal Prep and Leftovers

Not only does it taste amazing fresh out of the oven, but the leftovers are just as good—if not better—the next day.

5. A Family Favorite for Any Occasion

This dish is great for weeknight dinners, holidays, and potlucks. It’s a meal that brings people together and feels like home.

What You’ll Need (Ingredients)

For the Casserole Base:

  • 3 cups cooked chicken, shredded
  • 1 (10.5 oz) can cream of chicken soup
  • 1 (10.5 oz) can cream of mushroom soup
  • 1 cup sour cream
  • 1 cup mayonnaise
  • 1 teaspoon garlic powder
  • 1 teaspoon onion powder
  • Salt and pepper to taste
  • 2 cups egg noodles, cooked and drained
  • 1 (14.5 oz) can diced tomatoes, drained (optional)

For the Topping:

  • 1 cup shredded cheddar cheese
  • 1 cup crushed cornflakes
  • 2 tablespoons butter, melted

How to Bring This Comforting Casserole to Life (Directions)

  1. Preheat & Prep: Preheat the oven to 350°F (175°C) and grease a 9×13-inch baking dish.
  2. Mix the Filling: In a large bowl, combine shredded chicken, both soups, sour cream, mayonnaise, garlic powder, onion powder, salt, and pepper. Stir until well blended.
  3. Incorporate the Noodles: Gently fold in the cooked egg noodles and diced tomatoes, being careful not to break the noodles.
  4. Assemble the Casserole: Spread the mixture evenly in the greased baking dish.
  5. Add the Cheesy Crunch: Sprinkle shredded cheddar cheese on top, then mix crushed cornflakes with melted butter and spread evenly over the cheese.
  6. Bake Until Golden: Bake for 30-35 minutes or until hot, bubbly, and golden brown on top.
  7. Cool & Serve: Let the casserole rest for a few minutes before serving to allow the flavors to settle.

A Homestyle Bite: Nutritional Breakdown (Per Serving Estimate)

  • Calories: 520 kcal
  • Carbohydrates: 34g
  • Protein: 32g
  • Fat: 29g (Saturated: 10g)
  • Cholesterol: 95mg
  • Sodium: 880mg
  • Fiber: 2g
  • Sugar: 5g

Pro Tips for Making the Best Chicken Casserole

Use Rotisserie Chicken for Extra Flavor

To save time, use a store-bought rotisserie chicken. The pre-seasoned, tender meat adds an extra depth of flavor to the dish.

Mix the Sauce Well for Even Coating

Make sure to thoroughly mix the creamy ingredients before adding the chicken and noodles. This ensures every bite is full of rich, savory goodness.

Don’t Overcook the Noodles

Since the noodles will continue to cook in the oven, slightly undercook them beforehand to prevent them from becoming too soft.

Try Different Cheeses for Variety

Sharp cheddar is a great choice, but you can mix in Monterey Jack, mozzarella, or even a bit of Parmesan for extra depth.

Use a Crispy Topping for the Best Texture

Crushed cornflakes, Ritz crackers, or panko breadcrumbs mixed with melted butter create the perfect crispy, golden-brown topping.

Let It Rest Before Serving

Allow the casserole to sit for 5-10 minutes after baking. This helps it set up and makes it easier to serve.

Frequently Asked Questions

1. Can I Make This Casserole Ahead of Time?

Yes! You can assemble the casserole up to 24 hours in advance and store it covered in the refrigerator. When you’re ready to bake, just pop it in the oven and add a few extra minutes to the cooking time.

2. Can I Freeze This Casserole?

Absolutely! To freeze:

  • Assemble the casserole but do not bake it.
  • Wrap tightly with plastic wrap and foil.
  • Freeze for up to 3 months.
  • When ready to bake, thaw overnight in the fridge and bake as directed.

3. What Can I Serve with This Casserole?

While this dish is hearty on its own, it pairs well with:

  • Steamed or roasted vegetables like broccoli, carrots, or green beans
  • A crisp green salad with a light vinaigrette
  • Garlic bread or dinner rolls to soak up the creamy sauce

4. How Can I Make This Dish Lighter?

If you want a healthier version, try these substitutions:

  • Use Greek yogurt instead of mayonnaise and sour cream
  • Opt for low-fat cheese
  • Swap in whole wheat egg noodles for extra fiber

5. Can I Make This Gluten-Free?

Yes! Use gluten-free egg noodles and substitute the cornflake topping with gluten-free breadcrumbs for a completely gluten-free dish.

6. How Do I Store Leftovers?

  • Refrigerator: Store in an airtight container for up to 3 days.
  • Reheat: Warm in the microwave or oven at 350°F until heated through.

7. Can I Add Extra Vegetables?

Absolutely! Mix in peas, spinach, mushrooms, or bell peppers to make it even heartier and more nutritious.

8. What’s the Best Way to Get a Super Crispy Topping?

For the crispiest topping:

  • Mix the crushed cornflakes with melted butter before sprinkling over the casserole.
  • Broil for the last 2-3 minutes to get a golden, crunchy finish.

Serving Suggestions: Make It a Complete Meal

1. Pair It with a Light Side Dish

Since this dish is rich and creamy, serve it with a simple side salad or roasted vegetables to balance it out.

2. Serve with Homemade Biscuits

A warm, flaky biscuit on the side is perfect for scooping up every last bite of cheesy goodness.

3. Turn It Into a Potluck Favorite

Make a double batch for large gatherings—it’s always the first dish to disappear at family events!

4. Add a Little Heat

For a spicy kick, stir in chopped jalapeños or a dash of hot sauce into the creamy mixture before baking.

Why This Chicken Casserole Deserves a Spot in Your Recipe Collection

Some recipes become instant classics, and this Paula Deen-inspired Chicken Casserole is one of them. It’s the kind of comfort food that brings people together, whether you’re enjoying a casual weeknight dinner or celebrating a special occasion.

With its rich, creamy filling, tender chicken, and crispy, golden topping, this dish is warm, satisfying, and packed with flavor. Best of all, it’s easy to make, adaptable to different tastes, and perfect for meal prep.

So, the next time you need a cozy, crowd-pleasing meal, try this classic Southern casserole. It’s a recipe that never fails to impress and always leaves people asking for seconds.

Happy cooking!

Big Mac Wraps: A Quick and Delicious Twist on a Fast-Food Classic

A Homemade Alternative to a Fast-Food Favorite

There’s something undeniably nostalgic about biting into a Big Mac—the combination of seasoned beef, creamy special sauce, melted cheese, pickles, and crisp lettuce all coming together in one satisfying bite. But what if you could enjoy that same flavor at home, in a lighter, easier-to-make version? That’s exactly what these Big Mac Wraps deliver.

The first time I made these wraps, I was craving a burger but didn’t feel like dealing with grilling patties or assembling a full burger meal. I had tortillas in the kitchen and figured, why not turn the flavors of a Big Mac into a quick, handheld wrap? The result was everything I hoped for—all the classic elements of a Big Mac, but in a form that was easier to eat, lighter, and perfect for a busy night.

Now, these wraps are a go-to meal in my house. They take less time to prepare than driving to a fast-food restaurant, they’re customizable, and best of all, they bring that iconic Big Mac flavor into your own kitchen.

Why You’ll Love This Recipe

1. All the Big Mac Flavor Without the Extra Effort

This wrap captures everything you love about a Big Mac—the juicy beef, tangy sauce, crunchy lettuce, and sharp cheddar cheese—but in a more convenient and mess-free form.

2. Quick and Easy to Make

With just a handful of simple ingredients and 20 minutes, you can make these wraps even faster than ordering from a drive-thru.

3. A Healthier Take on a Fast-Food Classic

By making it at home, you can control the ingredients—use lean beef, opt for whole wheat tortillas, or swap in Greek yogurt for the sauce to make it lighter.

4. Perfect for Meal Prep or On-the-Go Eating

These wraps are portable and easy to store, making them great for meal prepping or quick lunches.

5. Easily Customizable

Prefer turkey over beef? Want to add a little spice? This recipe can be tweaked to suit your tastes while still delivering the signature Big Mac experience.

What You’ll Need (Ingredients)

For the Special Sauce:

  • ½ cup mayonnaise
  • 2 tablespoons finely chopped dill pickles
  • 1 tablespoon yellow mustard
  • 1 teaspoon white vinegar
  • 1 teaspoon paprika
  • ¼ teaspoon garlic powder
  • ¼ teaspoon onion powder

For the Wraps:

  • 1 lb lean ground beef
  • ½ cup finely chopped onion
  • Salt and black pepper to taste
  • 4 large flour tortillas
  • 1 cup shredded lettuce
  • 1 cup shredded cheddar cheese
  • Dill pickle slices (optional)
  • 1 tablespoon olive oil

How to Make These Irresistible Wraps (Directions)

  1. Prepare the Special Sauce: Mix all sauce ingredients in a bowl until smooth. Cover and refrigerate.
  2. Cook the Beef: Heat olive oil in a skillet, sauté onions until soft, then add ground beef, season with salt and pepper, and cook until browned. Drain excess grease.
  3. Assemble the Wraps: Warm the tortillas, spread a generous layer of special sauce, add cooked beef, lettuce, cheese, and pickles.
  4. Wrap and Serve: Fold in the sides and roll tightly into a wrap. Slice in half if desired and serve immediately.

A Balanced Bite: Nutritional Breakdown (Per Serving Estimate)

  • Calories: 350 kcal
  • Carbohydrates: 30g
  • Protein: 20g
  • Fat: 18g (Saturated: 7g)
  • Fiber: 3g
  • Sodium: 650mg

Tips for the Best Big Mac Wraps

Use Lean Ground Beef for Less Grease

Opt for 85% or 90% lean ground beef to get the best balance between juiciness and flavor without too much excess fat.

Toast the Tortillas for a Better Texture

A warm tortilla is easier to fold and holds the ingredients better. Lightly toasting it on a skillet also gives it a slightly crispy, golden texture.

Let the Sauce Sit for Deeper Flavor

Making the special sauce ahead of time allows the flavors to meld together, making it taste even better when it’s time to assemble the wraps.

Layer Ingredients for Even Distribution

To ensure every bite has a perfect balance of flavors, start with a layer of sauce, then beef, followed by lettuce, cheese, and pickles.

Add Extra Crunch for More Texture

For a crunchier bite, sprinkle in crushed tortilla chips or crispy onions before rolling up the wrap.

Make It Spicy for a Kick

If you like a little heat, add sliced jalapeños, red pepper flakes, or a drizzle of hot sauce into the wrap.

Frequently Asked Questions

1. Can I Make These Wraps Ahead of Time?

Yes! Cook the beef and prepare the sauce in advance, then assemble the wraps when you’re ready to eat. If making for meal prep, store the sauce separately to prevent sogginess.

2. Can I Use Ground Turkey Instead of Beef?

Absolutely! Ground turkey is a leaner alternative that still absorbs the sauce flavors well. You can also use ground chicken for a lighter option.

3. What’s the Best Way to Store Leftovers?

Store assembled wraps in an airtight container in the refrigerator for up to 3 days. If possible, store the beef and sauce separately to maintain freshness.

4. How Do I Reheat These Wraps?

  • Microwave: Heat for 30-45 seconds until warm.
  • Skillet: Warm over medium heat for 2-3 minutes, flipping once for an even texture.

5. Can I Freeze the Cooked Beef?

Yes! Cook the beef, let it cool, and freeze it in a ziplock bag for up to 3 months. When ready to eat, thaw overnight in the fridge and reheat before assembling the wraps.

6. How Can I Make These Wraps More Nutritious?

  • Swap regular tortillas for whole wheat or low-carb tortillas
  • Use Greek yogurt instead of mayonnaise for the sauce
  • Add extra veggies like tomatoes or avocado for more nutrients

7. What Can I Serve with Big Mac Wraps?

These wraps are filling on their own, but you can serve them with:

  • Sweet potato fries or regular fries
  • Coleslaw for a fresh, tangy contrast
  • A side salad for extra greens
  • Pickles and extra dipping sauce

8. Can I Turn This into a Big Mac Bowl Instead of a Wrap?

Yes! If you want to skip the tortilla, serve all the ingredients over a bed of lettuce or rice for a Big Mac-inspired bowl.

Serving Suggestions: How to Make It a Complete Meal

1. Pair It with a Classic Side

Serve with crispy fries, onion rings, or potato wedges to keep that fast-food feel at home.

2. Keep It Fresh with a Salad

A simple garden salad or coleslaw balances the richness of the wrap with a fresh, crunchy element.

3. Enjoy with a Milkshake or Soda

To complete the experience, pair with a homemade milkshake, iced tea, or soda for a true diner-style meal.

4. Turn It Into a Party Food Option

Cut the wraps into bite-sized pinwheels and serve with extra dipping sauce for a crowd-friendly appetizer.

Why Big Mac Wraps Are a Must-Try Recipe

Some meals are quick and convenient, while others are packed with flavor—this one is both. Big Mac Wraps are proof that you don’t need fast food to enjoy the best parts of a fast-food favorite.

With bold flavors, simple ingredients, and an easy-to-make format, these wraps are perfect for busy weeknights, meal prepping, or when you’re simply craving a Big Mac but want something a little different.

Whether you’re a Big Mac lover or just looking for a fun, delicious wrap recipe, this is one dish that’s sure to become a regular in your kitchen.

Try it out and enjoy all the flavors of a classic Big Mac—without the drive-thru!

Happy cooking!

Huli Huli Chicken: A Hawaiian Classic with Sweet and Smoky Flavors

A Dish That Brings the Spirit of Hawaii to Your Table

There are some meals that feel like an escape—a chance to travel through flavor alone. Huli Huli Chicken is one of those dishes. The moment you smell the sweet and smoky aroma of pineapple, soy sauce, garlic, and ginger caramelizing on the grill, you can almost hear the ocean waves and feel the warm island breeze.

My first experience with Huli Huli Chicken was during a trip to Maui, where a roadside food stand was grilling massive racks of chicken, basting them continuously with a glossy sauce that sizzled the moment it hit the flames. The name “Huli Huli” means “turn, turn” in Hawaiian, referring to the traditional method of cooking the chicken on a spit, turning it over and over while basting it with sauce.

The first bite was unforgettable—juicy, smoky, sweet, and savory all at once. I knew I had to recreate this magic at home. Though I don’t have a giant rotisserie grill, I found that marinating the chicken and cooking it over a standard grill (or even in the oven) still delivers incredible results. It’s become a family favorite, bringing a little piece of the islands to our table no matter the season.

Whether you’re looking to recreate a Hawaiian vacation, impress guests at a barbecue, or just add a little tropical flair to your dinner routine, this Huli Huli Chicken recipe is one you’ll want to make again and again.

Why You’ll Love This Recipe

1. A Perfect Balance of Sweet and Savory

This dish features a marinade that’s rich with umami from soy sauce, sweet from pineapple and brown sugar, and tangy from vinegar—a perfectly balanced bite every time.

2. Grilled to Perfection

The caramelization from the grill brings out the best in the sauce, creating a smoky, sticky glaze that coats the juicy chicken.

3. Simple Ingredients, Big Flavor

With just a handful of pantry staples, you can create restaurant-quality flavors at home without the need for complicated techniques.

4. Easy to Make Ahead

Since the chicken needs time to marinate, it’s a great make-ahead dish that you can prep the night before and grill the next day.

5. Versatile and Customizable

Want a spicier kick? Add some sriracha. Prefer chicken thighs over breasts? Go for it. This recipe can be adjusted to fit your preferences.

What You’ll Need (Ingredients)

For the Chicken and Marinade:

  • 2 pounds boneless, skinless chicken thighs or breasts
  • 1 cup pineapple juice
  • ½ cup soy sauce
  • ½ cup brown sugar
  • ¼ cup ketchup
  • ¼ cup rice vinegar
  • 4 cloves garlic, minced
  • 1 tablespoon fresh ginger, grated
  • 1 teaspoon sesame oil
  • ½ teaspoon black pepper

For Serving:

  • 1 green onion, chopped (for garnish)
  • Cooked white rice
  • Grilled pineapple slices (optional)

How to Make This Flavorful Hawaiian Dish (Directions)

  1. Prepare the Marinade: In a bowl, whisk together pineapple juice, soy sauce, brown sugar, ketchup, rice vinegar, garlic, ginger, sesame oil, and black pepper.
  2. Marinate the Chicken: Place the chicken in a resealable plastic bag or shallow dish. Pour half of the marinade over the chicken, reserving the other half for basting. Cover and refrigerate for at least 1 hour (overnight for deeper flavor).
  3. Preheat the Grill: Set the grill to medium-high heat.
  4. Grill the Chicken: Remove chicken from the marinade and discard the used marinade. Grill for 6-7 minutes per side, basting occasionally with the reserved marinade. Ensure the chicken reaches an internal temperature of 165°F (75°C).
  5. Serve and Enjoy: Let the chicken rest for a few minutes before slicing. Serve over rice, garnish with green onions, and add grilled pineapple slices for an authentic Hawaiian touch.

A Flavorful Bite: Nutritional Breakdown (Per Serving Estimate)

  • Calories: 390 kcal
  • Carbohydrates: 42g
  • Protein: 38g
  • Fat: 9g (Saturated: 2g)
  • Cholesterol: 110mg
  • Sodium: 920mg
  • Fiber: 1g
  • Sugar: 25g

Pro Tips for the Best Huli Huli Chicken

Marinate for Maximum Flavor

For the best results, marinate the chicken for at least 4 hours, preferably overnight. This allows the meat to absorb all the sweet, salty, and tangy flavors before hitting the grill.

Use Bone-In Chicken for Extra Juiciness

While boneless, skinless chicken works fine, bone-in, skin-on chicken thighs or drumsticks develop an even deeper flavor and retain more moisture.

Baste Frequently for a Sticky Glaze

Huli Huli Chicken is all about layering flavors. Basting the chicken multiple times while grilling helps create that signature glossy, caramelized coating.

Grill Over Medium Heat

To prevent the sugars in the marinade from burning, cook the chicken over medium heat (375°F-400°F) and turn frequently.

Let It Rest Before Slicing

Once the chicken is done, let it rest for 5 minutes before slicing to ensure the juices redistribute, keeping the meat moist and flavorful.

Frequently Asked Questions

1. What Does “Huli Huli” Mean?

In Hawaiian, “Huli” means “turn”, referring to the traditional method of cooking the chicken on a spit while continuously turning it and basting it with sauce.

2. Can I Use Chicken Breasts Instead of Thighs?

Yes! Chicken breasts will work, but they tend to cook faster and can dry out more easily. To keep them juicy:

  • Marinate them for at least 6 hours
  • Grill over medium heat
  • Baste frequently to lock in moisture

3. Can I Make This Recipe Without a Grill?

Yes! If you don’t have a grill, you can:

  • Bake it: Roast at 375°F (190°C) for 25-30 minutes, basting halfway through.
  • Pan-sear it: Cook in a skillet over medium heat, flipping and basting frequently until fully cooked.

4. Can I Use Fresh Pineapple Instead of Pineapple Juice?

Yes! Fresh pineapple juice adds a brighter, more natural sweetness than canned juice. You can also blend fresh pineapple and strain it to create your own juice.

5. How Do I Store Leftovers?

Store leftovers in an airtight container in the refrigerator for up to 3 days. Reheat gently on the stovetop or in the microwave.

6. Can I Freeze the Chicken?

Absolutely! You can:

  • Freeze raw chicken in the marinade for up to 3 months—just thaw overnight in the fridge before grilling.
  • Freeze cooked chicken for up to 3 months and reheat when needed.

7. What Can I Serve with Huli Huli Chicken?

  • Steamed Jasmine Rice – A simple base to soak up all the flavorful sauce.
  • Grilled Pineapple – Enhances the sweetness of the chicken and adds a smoky depth.
  • Hawaiian Macaroni Salad – A creamy, tangy side that pairs beautifully.
  • Coconut Rice – Adds a tropical twist to the meal.
  • Grilled Vegetables – Zucchini, bell peppers, or asparagus complement the dish.

8. How Can I Make This Dish Spicier?

Add a little heat by mixing in:

  • Sriracha or chili flakes to the marinade
  • A dash of cayenne pepper
  • Diced jalapeños

Why Huli Huli Chicken Deserves a Spot in Your Recipe Collection

Some recipes are good, and then there are recipes that become traditions. Huli Huli Chicken is the latter. It’s the kind of dish that’s perfect for summer grilling, family dinners, or even a simple meal prep option.

  • It’s packed with bold Hawaiian flavors
  • It’s easy to make yet feels special
  • It brings a taste of the tropics wherever you are

Even if you’ve never been to Hawaii, this recipe will make you feel like you’re sitting on a beach, enjoying the sunset with a plate full of smoky, sweet, and savory chicken.

So, the next time you fire up the grill, skip the usual burgers and try this Hawaiian classic instead. One bite, and you’ll understand why Huli Huli Chicken has been a favorite for decades.

Happy grilling!

Teriyaki Chicken and Pineapple Foil Packets: A Sweet and Savory No-Fuss Meal

A Taste of Summer in Every Bite

There’s something special about meals that bring back memories of warm summer evenings, backyard gatherings, and simple yet delicious food cooked with minimal effort. For me, Teriyaki Chicken and Pineapple Foil Packets remind me of camping trips with my family, where we would cook dinner over an open fire, letting the smoky air infuse every bite with extra flavor.

I remember my dad wrapping up ingredients in foil packets, tossing them onto the grill, and letting nature do the work. The moment we opened the steaming packets, the aroma of sweet pineapple, savory teriyaki sauce, and tender chicken filled the air. It was the perfect blend of tangy, sweet, and smoky flavors, all packed into a single bite.

Now, I make this dish when I want something easy, flavorful, and mess-free. Whether it’s a busy weeknight, a backyard barbecue, or a meal prep solution, this foil packet dinner never disappoints. It’s proof that great food doesn’t have to be complicated—sometimes, the simplest meals are the most satisfying.

Why You’ll Love This Recipe

1. A Complete Meal in One Packet

These foil packets contain protein, vegetables, and fruit, making them a well-balanced, satisfying meal without needing extra side dishes.

2. Quick and Easy Cleanup

Because everything is cooked in foil, there’s no need for extra pots and pans—just toss the foil after eating for an effortless cleanup.

3. Bursting with Flavor

The combination of sweet pineapple, bold teriyaki sauce, and fresh vegetables makes every bite incredibly flavorful. The foil-sealed cooking method locks in moisture, ensuring juicy, tender chicken.

4. Perfect for Grilling, Baking, or Camping

These foil packets are versatile—you can cook them in the oven, on the grill, or even over a campfire, making them great for any occasion.

5. Customizable to Your Taste

You can switch up the protein, swap vegetables, or add a little spice to make this dish exactly how you like it.

What You’ll Need (Ingredients)

For the Chicken and Vegetables:

  • 2 boneless, skinless chicken breasts
  • 1 cup fresh pineapple chunks
  • 1 red bell pepper, sliced
  • 1 carrot, thinly sliced
  • 1 zucchini, sliced
  • 2 green onions, chopped

For the Marinade and Seasoning:

  • ¼ cup teriyaki sauce
  • 1 tablespoon olive oil
  • Salt and pepper to taste

For Cooking:

  • Aluminum foil for wrapping

How to Create This Effortless One-Pan Dish (Directions)

  1. Preheat & Prep: Heat the oven to 400°F (200°C) and prepare two large pieces of foil.
  2. Assemble the Packets: Place a chicken breast in the center of each foil piece. Drizzle with olive oil, season with salt and pepper, and top with pineapple chunks, bell peppers, carrots, and zucchini.
  3. Add the Flavor: Pour the teriyaki sauce evenly over the chicken and vegetables.
  4. Seal and Bake: Fold the foil tightly around the ingredients, sealing the packets completely. Place on a baking sheet and bake for 25-30 minutes until the chicken reaches an internal temperature of 165°F (75°C).
  5. Serve & Garnish: Carefully open the foil packets, letting the steam escape. Garnish with green onions and enjoy!

A Balanced Bite: Nutritional Breakdown (Per Serving Estimate)

  • Calories: 350 kcal
  • Carbohydrates: 28g
  • Protein: 38g
  • Fat: 9g (Saturated: 1.5g)
  • Cholesterol: 85mg
  • Sodium: 780mg
  • Fiber: 4g
  • Sugar: 16g

Pro Tips for the Best Teriyaki Chicken and Pineapple Foil Packets

Use Fresh Pineapple for a Natural Sweetness

While canned pineapple works, fresh pineapple adds a bright, natural sweetness and a firmer texture that holds up well during cooking.

Marinate the Chicken for Extra Flavor

For deeper teriyaki flavor, marinate the chicken for at least 30 minutes before assembling the foil packets.

Chop Ingredients Evenly for Even Cooking

Cut the vegetables and chicken into similar sizes to ensure everything cooks at the same rate.

Seal the Foil Tightly

Make sure to fold and seal the edges of the foil packets well. This locks in steam, helping the chicken stay juicy and the vegetables tender.

Don’t Overcook the Chicken

Chicken is best when cooked to an internal temperature of 165°F (75°C). Using a meat thermometer helps prevent dryness.

Add a Crunchy Topping for Texture

Sprinkle some toasted sesame seeds, cashews, or chopped peanuts on top before serving for extra crunch.

Frequently Asked Questions

1. Can I Cook These Foil Packets on the Grill?

Yes! Preheat your grill to medium heat (around 375°F-400°F) and cook the packets for 20-25 minutes, flipping them halfway through for even cooking.

2. Can I Use a Different Protein?

Absolutely! This recipe works well with:

  • Salmon or tilapia for a seafood variation
  • Shrimp for a quick-cooking, tropical-inspired dish
  • Tofu or tempeh for a vegetarian option

3. What Other Vegetables Can I Use?

You can swap out or add vegetables such as:

  • Broccoli for extra fiber
  • Snap peas for a crisp bite
  • Mushrooms for an earthy depth of flavor
  • Red onions for a slightly sweet, caramelized taste

4. Can I Make These Foil Packets Ahead of Time?

Yes! You can assemble the packets up to a day in advance and keep them in the refrigerator. Just pop them in the oven or grill when you’re ready to cook.

5. How Do I Store Leftovers?

Store leftovers in an airtight container in the refrigerator for up to 3 days. To reheat, place the packet in the oven at 350°F (175°C) for 10-15 minutes or microwave in a covered dish for 2-3 minutes.

6. How Can I Make This Dish Spicy?

For a spicy kick, add:

  • Red pepper flakes
  • A drizzle of sriracha
  • Chopped fresh jalapeños

7. Can I Add Rice to the Packet?

It’s best to cook rice separately and serve it with the foil packets, but you can add pre-cooked rice inside the packet if you want a one-dish meal.

8. Can I Make This Without Foil?

If you prefer not to use foil, you can cook everything in a baking dish covered with parchment paper or use a cast-iron skillet on the grill.

Serving Suggestions: How to Make It a Complete Meal

1. Serve Over Rice or Noodles

Pair with steamed jasmine rice, coconut rice, or stir-fried noodles to soak up the delicious teriyaki sauce.

2. Add a Fresh Side Salad

A simple cucumber salad with a sesame dressing complements the rich flavors of the dish.

3. Pair with a Light Soup

A miso soup or clear vegetable broth makes for a light and refreshing side.

4. Serve with Grilled Pineapple Slices

For extra sweetness, grill pineapple slices and serve them alongside the dish.

5. Offer a Crunchy Side

Pair with spring rolls, wontons, or roasted edamame for extra texture.

Why This Teriyaki Chicken and Pineapple Foil Packet Recipe Belongs in Your Rotation

Some meals are quick and easy, while others are bursting with flavor—this dish is both. Teriyaki Chicken and Pineapple Foil Packets are a perfect example of how simple ingredients can come together to create something incredible.

With minimal cleanup, endless customization options, and a perfect balance of sweet and savory, this dish is great for busy weeknights, summer barbecues, or meal prep. It’s comforting, healthy, and full of bold flavors, making it a go-to meal whenever you need something satisfying without the hassle.

So, whether you’re grilling outdoors or cooking in the oven, give this tropical-inspired dish a try. One bite, and you’ll see why it’s a family favorite!

Happy cooking!

Pineapple Chicken and Rice: A Tropical Twist on a Classic Comfort Dish

A Dish That Feels Like a Vacation on a Plate

Some meals have a way of transporting you to another place with just one bite. For me, Pineapple Chicken and Rice is one of those dishes. The moment I taste the combination of sweet, juicy pineapple and savory, tender chicken, I’m reminded of warm summer evenings and breezy island getaways.

I first discovered this dish during a family trip to Hawaii. After a long day of exploring, we stumbled upon a little beachside restaurant serving grilled pineapple chicken over fragrant jasmine rice. The flavors were a perfect balance—sweet, salty, tangy, and just a little spicy. It was simple, yet incredibly satisfying. When I returned home, I was determined to recreate that experience in my own kitchen.

What I love most about this recipe is its versatility and ease. It’s a one-pan meal that’s quick enough for a busy weeknight but delicious enough to serve at a gathering. The balance of sweet pineapple, umami-rich soy sauce, and warming ginger creates a dish that’s both comforting and vibrant. It’s one of those meals that you can make again and again without ever getting tired of it.

Whether you’re cooking for your family, meal prepping for the week, or simply craving a tropical-inspired meal, this Pineapple Chicken and Rice is a recipe that never disappoints.

Why You’ll Love This Recipe

1. A Perfect Balance of Flavors

This dish is a delicious mix of sweet and savory. The pineapple adds a natural sweetness that pairs beautifully with the rich, soy-seasoned chicken and fragrant rice.

2. A One-Pan Meal for Easy Cleanup

Everything is cooked in one skillet, which means less time washing dishes and more time enjoying your meal.

3. Quick and Easy to Make

With simple ingredients and a 30-minute cook time, this dish is perfect for busy nights when you need a meal that’s both fast and satisfying.

4. A Nutrient-Packed, Well-Rounded Meal

  • Chicken provides lean protein
  • Pineapple offers vitamins and a natural sweetness
  • Jasmine rice gives the dish a fluffy, fragrant base
  • Bell peppers and onions add crunch and extra nutrition

5. Customizable for Every Taste

This recipe is easily adaptable. Want more heat? Add red pepper flakes. Prefer a vegetarian version? Swap the chicken for tofu. Looking for extra crunch? Toss in some cashews or toasted sesame seeds.

What You’ll Need (Ingredients)

For the Chicken and Pineapple Base:

  • 1 pound chicken breast, cut into cubes
  • 1 cup pineapple, cut into cubes
  • 1 tablespoon olive oil

For the Aromatics and Vegetables:

  • 1 onion, chopped
  • 2 cloves garlic, minced
  • 1 red bell pepper, diced

For the Rice and Seasoning:

  • 1 cup jasmine rice
  • 2 cups chicken broth
  • 1 tablespoon soy sauce
  • 1 teaspoon ginger, grated
  • Salt and pepper to taste

For Garnish:

  • ¼ cup green onions, sliced
  • 1 tablespoon sesame seeds

How to Make This Flavorful Dish (Directions)

  1. Sauté the Chicken: Heat olive oil in a large skillet over medium heat, cook the cubed chicken until golden brown, then remove and set aside.
  2. Cook the Aromatics: In the same skillet, sauté onion, garlic, and bell pepper until softened and fragrant.
  3. Add the Pineapple: Stir in the pineapple chunks and cook for an additional 2 minutes.
  4. Simmer the Rice: Add jasmine rice, chicken broth, soy sauce, grated ginger, salt, and pepper. Bring to a boil, then reduce heat, cover, and let simmer for 18-20 minutes until the rice is tender and has absorbed all the liquid.
  5. Combine Everything: Return the cooked chicken to the skillet, stir well, and let it heat through.
  6. Garnish and Serve: Top with sliced green onions and sesame seeds before serving.

Nutritional Breakdown (Per Serving Estimate)

  • Calories: 480 kcal
  • Carbohydrates: 66g
  • Protein: 30g
  • Fat: 14g (Saturated: 2g)
  • Cholesterol: 70mg
  • Sodium: 900mg
  • Fiber: 3g
  • Sugar: 8g

Pro Tips for the Best Pineapple Chicken and Rice

Use Fresh Pineapple for Maximum Flavor

While canned pineapple works well in this recipe, fresh pineapple enhances the flavor and texture. If using fresh, save the juice to incorporate into the sauce for an extra burst of sweetness.

Marinate the Chicken for Deeper Flavor

If you have time, let the chicken marinate in soy sauce, ginger, and a splash of pineapple juice for 20-30 minutes before cooking. This will help it absorb even more flavor.

Don’t Overcook the Rice

For perfectly fluffy rice, make sure to keep the skillet covered while simmering and let it rest for a few minutes after cooking before fluffing it with a fork.

Add a Crunchy Garnish for Extra Texture

Sprinkle some toasted sesame seeds, chopped cashews, or crispy shallots on top for added texture and flavor.

Adjust the Sweetness to Your Preference

If you prefer a less sweet dish, reduce the pineapple slightly and add a squeeze of fresh lime juice for balance.

Frequently Asked Questions

1. Can I Use Brown Rice Instead of White Rice?

Yes! Brown rice is a great alternative, but keep in mind that it requires more liquid and a longer cooking time. Adjust accordingly to ensure it cooks properly.

2. Can I Make This Dish Ahead of Time?

Absolutely! This meal stores well in the fridge for up to 4 days. Just reheat it in a skillet with a splash of chicken broth or water to prevent it from drying out.

3. Can I Freeze Pineapple Chicken and Rice?

Yes! Let the dish cool completely, then store it in an airtight container and freeze for up to 3 months. Thaw overnight in the fridge and reheat on the stovetop.

4. What Can I Use Instead of Chicken?

If you want a vegetarian version, swap the chicken for:

  • Tofu (pan-fried until golden)
  • Tempeh for extra protein
  • Chickpeas for a hearty, plant-based option

5. Can I Make This Spicy?

Yes! Add a pinch of red pepper flakes, diced jalapeños, or a drizzle of sriracha for a spicier kick.

6. What’s the Best Way to Store Leftovers?

Store in an airtight container in the refrigerator for up to 4 days. Reheat on the stovetop or in the microwave with a little added broth or water to keep it from drying out.

7. Can I Add More Vegetables?

Of course! This dish is great for adding extra veggies. Try mixing in:

  • Broccoli for crunch
  • Snap peas for freshness
  • Carrots for a subtle sweetness

8. What Can I Serve with Pineapple Chicken and Rice?

While this dish is satisfying on its own, it pairs well with:

  • Steamed or roasted vegetables
  • A side of egg rolls or dumplings
  • A fresh cucumber salad

Serving Suggestions: How to Make It a Complete Meal

1. Top with Extra Garnishes

Sprinkle on fresh cilantro, lime wedges, or chopped green onions for a burst of freshness.

2. Pair with a Refreshing Drink

Try serving this dish with iced green tea, pineapple juice, or a tropical smoothie for a refreshing contrast.

3. Turn It into a Meal Prep Staple

Portion leftovers into meal prep containers for easy lunches throughout the week.

4. Serve It in a Pineapple Bowl

For a fun presentation, hollow out a pineapple and serve the rice inside for a restaurant-style experience.

Why Pineapple Chicken and Rice Deserves a Spot in Your Recipe Collection

Some dishes are simple, while others are special—this one is both. Pineapple Chicken and Rice is the kind of meal that delivers big flavors with minimal effort, making it perfect for busy weeknights or lazy weekends.

With its tropical-inspired taste, comforting texture, and endless customization options, this dish never gets boring. It’s a meal that brings warmth, freshness, and a little bit of sunshine to your table, no matter the season.

So the next time you’re craving something sweet, savory, and satisfying, give this Pineapple Chicken and Rice recipe a try. You might just find yourself making it again and again.

Happy cooking!

Creamy Boursin Orzo with Chicken: A Dish You’ll Love!

Creamy Boursin Orzo with Chicken

Introduction to Creamy Boursin Orzo with Chicken

There’s something truly comforting about a dish that blends rich creaminess with tender, flavorful chicken—and this Creamy Boursin Orzo with Chicken does exactly that. Silky orzo pasta soaks up a luscious sauce made with herb-infused Boursin cheese, creating a luxurious texture that wraps around every bite. Juicy, seasoned chicken adds heartiness to the meal, making it as satisfying as it is simple to prepare. Whether you’re looking for a cozy weeknight dinner or a dish to impress guests without the stress, this recipe is a guaranteed crowd-pleaser. Get ready to fall in love with every spoonful!

Why You’ll Love This Creamy Boursin Orzo with Chicken

This Creamy Boursin Orzo with Chicken is a lifesaver for busy nights. It’s quick to prepare, taking just 30 minutes from start to finish. The creamy texture and rich flavors make it a hit with both kids and adults alike. Plus, it’s a one-pan wonder, which means less cleanup for you! Who doesn’t love a delicious meal that’s easy to make and even easier to enjoy?

Ingredients for Creamy Boursin Orzo with Chicken

Gathering the right ingredients is the first step to creating this delightful dish. Here’s what you’ll need:

  • Olive oil: This adds a rich flavor and helps cook the chicken to perfection.
  • Boneless, skinless chicken breasts: Tender and juicy, they’re the star of this dish.
  • Garlic powder: A quick way to infuse that delicious garlic flavor without the fuss.
  • Onion powder: It adds depth and sweetness, enhancing the overall taste.
  • Salt and pepper: Essential for seasoning, these staples bring out the flavors.
  • Orzo pasta: This tiny pasta cooks quickly and absorbs the creamy sauce beautifully.
  • Chicken broth: It provides a savory base, making the dish even more comforting.
  • Boursin cheese: The creamy, herby goodness that makes this dish truly special.
  • Spinach: Fresh and vibrant, it adds color and nutrition to the meal.
  • Cherry tomatoes: These sweet bursts of flavor brighten up the dish.
  • Parmesan cheese: A sprinkle of this adds a salty, nutty finish.
  • Fresh parsley: For garnish, it adds a pop of color and freshness.

If you want to switch things up, consider sautéing some chopped onions and garlic in the olive oil before adding the chicken for an extra flavor boost. You can also substitute Boursin cheese with cream cheese or a similar soft cheese, adding herbs to taste for a different flavor profile. For exact quantities, check the bottom of the article where you can find a printable version!

How to Make Creamy Boursin Orzo with Chicken

Now that you have all your ingredients ready, let’s dive into the cooking process! This Creamy Boursin Orzo with Chicken is straightforward and fun to make. Follow these simple steps, and you’ll have a delicious meal on the table in no time!

Step 1: Cook the Chicken

Start by heating the olive oil in a large skillet over medium heat. Once the oil is shimmering, add the bite-sized chicken pieces. Season them with garlic powder, onion powder, salt, and pepper. Cook the chicken for about 5-7 minutes, stirring occasionally, until it’s browned and cooked through. Once done, remove the chicken from the skillet and set it aside. This step is crucial for building flavor!

Step 2: Toast the Orzo

In the same skillet, add the orzo. Toast it for about 2 minutes, stirring frequently. This little trick enhances the nutty flavor of the orzo, making it even more delicious. You’ll notice a lovely aroma filling your kitchen!

Step 3: Simmer with Broth

Next, pour in the chicken broth and bring it to a boil. Once boiling, reduce the heat to a simmer. Cover the skillet and let it cook for about 10-12 minutes. The orzo should be tender and have absorbed most of the liquid. Keep an eye on it, so it doesn’t stick to the bottom!

Step 4: Add Boursin and Vegetables

Now comes the magic! Stir in the Boursin cheese until it melts and creates a creamy sauce. Then, add the cooked chicken back into the skillet along with the chopped spinach and halved cherry tomatoes. Cook for an additional 2-3 minutes until the spinach wilts. The colors and aromas will make your mouth water!

Step 5: Finish with Parmesan

Finally, remove the skillet from heat and stir in the grated Parmesan cheese. This adds a lovely salty finish to the dish. Taste and adjust the seasoning if needed. Serve warm, garnished with fresh parsley for that extra touch. Enjoy your Creamy Boursin Orzo with Chicken!

Tips for Success

  • Always taste as you go! Adjust seasoning to your preference.
  • For a creamier texture, add a splash of heavy cream at the end.
  • Don’t rush the toasting of the orzo; it enhances the flavor.
  • Feel free to mix in other veggies like bell peppers or zucchini.
  • Leftovers can be stored in the fridge for up to three days.

Equipment Needed

  • Large skillet: A non-stick skillet works wonders for easy cooking and cleanup.
  • Wooden spoon: Perfect for stirring and preventing scratches on your skillet.
  • Measuring cups: Essential for accurate ingredient portions.
  • Cutting board: A must-have for chopping chicken and veggies.

Variations

  • Vegetarian Option: Replace the chicken with sautéed mushrooms or chickpeas for a hearty, meatless meal.
  • Spicy Kick: Add red pepper flakes or diced jalapeños to the skillet for a bit of heat.
  • Herb Infusion: Mix in fresh herbs like basil or thyme for an aromatic twist.
  • Cheese Swap: Try different flavored cheeses like feta or goat cheese for a unique taste.
  • Gluten-Free: Use gluten-free orzo or substitute with quinoa for a gluten-free version.

Serving Suggestions

  • Side Salad: Pair with a fresh garden salad drizzled with a light vinaigrette for a refreshing contrast.
  • Garlic Bread: Serve with warm garlic bread to soak up the creamy sauce.
  • Wine Pairing: A crisp white wine, like Sauvignon Blanc, complements the dish beautifully.
  • Presentation: Garnish with extra parsley and a sprinkle of Parmesan for a restaurant-worthy look.

FAQs about Creamy Boursin Orzo with Chicken

Can I make Creamy Boursin Orzo with Chicken ahead of time?

Absolutely! You can prepare the dish in advance and store it in the fridge. Just reheat it gently on the stove, adding a splash of chicken broth to loosen it up.

What can I substitute for Boursin cheese?

If you don’t have Boursin cheese on hand, cream cheese works well. Just mix in some herbs like dill or chives to mimic that herby flavor.

Can I use a different type of pasta?

Yes! While orzo is perfect for this recipe, you can use other small pasta shapes like ditalini or even rice if you prefer.

Is this dish suitable for meal prep?

Definitely! Creamy Boursin Orzo with Chicken holds up well in the fridge and makes for a delicious lunch the next day.

How can I make this dish healthier?

To lighten it up, use less cheese or substitute with low-fat options. You can also add more veggies like broccoli or bell peppers for extra nutrition!

Final Thoughts

Cooking should be a joyful experience, and this Creamy Boursin Orzo with Chicken truly embodies that spirit. It’s not just a meal; it’s a chance to gather around the table with loved ones, sharing laughter and stories. The creamy texture and vibrant flavors make every bite a delight. Plus, knowing it’s quick and easy to prepare means you can spend more time enjoying the moment rather than stressing in the kitchen. I hope this dish brings as much happiness to your home as it has to mine. Happy cooking!

“`

Print
clock clock iconcutlery cutlery iconflag flag iconfolder folder iconinstagram instagram iconpinterest pinterest iconfacebook facebook iconprint print iconsquares squares iconheart heart iconheart solid heart solid icon
Creamy Boursin Orzo with Chicken

Creamy Boursin Orzo with Chicken: A Dish You’ll Love!


5 Stars 4 Stars 3 Stars 2 Stars 1 Star

5 from 2 reviews

  • Author: Isabella
  • Total Time: 30 minutes
  • Yield: 4 servings 1x

Description

Creamy Boursin Orzo with Chicken is a delicious and comforting dish that combines tender chicken, creamy Boursin cheese, and orzo pasta, making it a perfect meal for any occasion.


Ingredients

Scale
  • 2 tablespoons olive oil
  • 1 pound boneless, skinless chicken breasts, cut into bite-sized pieces
  • 1 teaspoon garlic powder
  • 1 teaspoon onion powder
  • Salt and pepper, to taste
  • 1 cup orzo pasta
  • 4 cups chicken broth
  • 8 ounces Boursin cheese (garlic and herb flavor)
  • 1 cup spinach, chopped
  • 1/2 cup cherry tomatoes, halved
  • 1/4 cup grated Parmesan cheese
  • Fresh parsley, chopped (for garnish)

Instructions

  1. In a large skillet, heat the olive oil over medium heat. Add the chicken pieces and season with garlic powder, onion powder, salt, and pepper. Cook until the chicken is browned and cooked through, about 5-7 minutes. Remove the chicken from the skillet and set aside.
  2. In the same skillet, add the orzo and toast it for about 2 minutes, stirring frequently.
  3. Pour in the chicken broth and bring to a boil. Reduce the heat to a simmer, cover, and cook for about 10-12 minutes or until the orzo is tender and has absorbed most of the liquid.
  4. Stir in the Boursin cheese until melted and creamy. Add the cooked chicken back into the skillet along with the chopped spinach and cherry tomatoes. Cook for an additional 2-3 minutes until the spinach is wilted.
  5. Remove from heat and stir in the grated Parmesan cheese. Adjust seasoning if needed.
  6. Serve warm, garnished with fresh parsley.

Notes

  • For added flavor, consider sautéing some chopped onions and garlic in the olive oil before adding the chicken.
  • Substitute the Boursin cheese with cream cheese or a similar soft cheese if desired, and add herbs to taste for a different flavor profile.
  • Prep Time: 10 minutes
  • Cook Time: 20 minutes
  • Category: Main Course
  • Method: Skillet
  • Cuisine: American

Nutrition

  • Serving Size: 1 serving
  • Calories: 480
  • Sugar: 3g
  • Sodium: 800mg
  • Fat: 22g
  • Saturated Fat: 10g
  • Unsaturated Fat: 8g
  • Trans Fat: 0g
  • Carbohydrates: 40g
  • Fiber: 2g
  • Protein: 30g
  • Cholesterol: 90mg