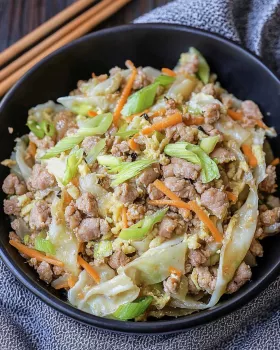
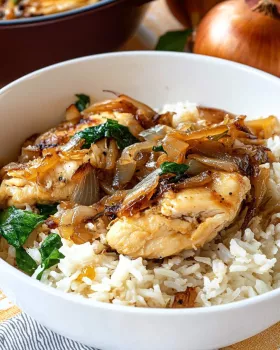
Sometimes the craving for takeout hits hard—but what if you could enjoy all the flavors of your favorite egg roll without the grease, wrapping, or waiting? That’s where Egg Roll in a Bowl comes in. This dish delivers everything you love about the classic appetizer—savory meat, crisp vegetables, and that signature umami kick—deconstructed into a wholesome, one-pan meal that’s ready in minutes. Whether you’re following a low-carb lifestyle or just want a flavorful dinner that doesn’t skimp on satisfaction, this recipe is a total game-changer. Fast, filling, and full of bold flavor, it’s proof that comfort food can also be clean and simple.
Why You’ll Love This Egg Roll in a Bowl
This Egg Roll in a Bowl is a game-changer for busy nights! It’s not just quick to make, but it’s also packed with flavor that will make your taste buds dance. In just 25 minutes, you can serve a wholesome meal that feels indulgent yet is low in carbs. Plus, it’s versatile enough to cater to picky eaters, making it a family favorite. What’s not to love?
Ingredients for Egg Roll in a Bowl
Gathering the right ingredients is key to making a delicious Egg Roll in a Bowl. Here’s what you’ll need:
Ground Pork (or Ground Turkey): This is the star of the dish, providing a savory base. You can also use ground chicken for a lighter option.
Sesame Oil: A little drizzle of this fragrant oil adds a nutty flavor that’s essential for that authentic Asian taste.
Onion: Diced onion brings sweetness and depth to the dish. It caramelizes beautifully when sautéed.
Garlic: Minced garlic adds a punch of flavor. It’s a must-have for any savory dish!
Fresh Ginger: Grated ginger gives a warm, spicy kick that elevates the overall taste.
Coleslaw Mix: This convenient mix of shredded cabbage and carrots is not only time-saving but also adds crunch and color.
Soy Sauce: A splash of soy sauce brings umami and saltiness, tying all the flavors together.
Rice Vinegar: This adds a touch of acidity, balancing the richness of the meat.
Sriracha (optional): If you like a bit of heat, a dash of sriracha will spice things up!
Green Onions: Sliced green onions add freshness and a pop of color when sprinkled on top.
Sesame Seeds: These are perfect for garnishing, adding a delightful crunch and visual appeal.
For those looking for alternatives, you can substitute the ground meat with crumbled tofu or tempeh for a vegetarian option. Feel free to toss in extra veggies like bell peppers or snap peas for added nutrition and crunch!
Exact quantities for each ingredient can be found at the bottom of the article, ready for printing.
How to Make Egg Roll in a Bowl
Now that you have all your ingredients ready, let’s dive into making this delightful Egg Roll in a Bowl! Follow these simple steps, and you’ll have a delicious dinner on the table in no time.
Step 1: Heat the Oil
Start by heating a tablespoon of sesame oil in a large skillet over medium heat. This oil is key to achieving that authentic flavor. Once it’s shimmering, you’re ready for the next step!
Step 2: Cook the Ground Meat
Add one pound of ground pork (or turkey) to the skillet. Use a spatula to break it apart as it cooks. You want it browned and crumbly, which should take about 5-7 minutes. The aroma will start to fill your kitchen, and trust me, it’s heavenly!
Step 3: Sauté Aromatics
Next, toss in the diced onion, minced garlic, and grated ginger. Sauté these for 2-3 minutes until the onion turns translucent. This step is crucial as it builds the flavor base for your Egg Roll in a Bowl. The combination of these ingredients is simply irresistible!
Step 4: Add the Coleslaw Mix
Now, stir in the coleslaw mix along with the soy sauce, rice vinegar, and sriracha if you’re feeling adventurous. Cook everything together for another 5-7 minutes. Stir occasionally until the cabbage is tender but still has a bit of crunch. This is where the magic happens!
Step 5: Final Touches
Once everything is cooked to perfection, remove the skillet from heat. Gently fold in the sliced green onions for a fresh finish. Serve your Egg Roll in a Bowl hot, garnished with sesame seeds for that extra flair. Enjoy every bite of this quick and tasty dinner delight!
Tips for Success
Prep your ingredients ahead of time to save precious minutes during cooking.
Don’t skip the sesame oil; it’s essential for that authentic flavor.
Feel free to adjust the sriracha to your heat preference—start small!
For extra crunch, add some chopped water chestnuts or bell peppers.
Leftovers can be stored in the fridge for up to three days—perfect for lunch!
Equipment Needed
Large Skillet: A non-stick skillet works best, but any large pan will do.
Spatula: A wooden or silicone spatula is perfect for breaking up the meat.
Knife and Cutting Board: Essential for chopping your veggies.
Measuring Spoons: Handy for measuring out sauces and oils.
Variations
Vegetarian Delight: Swap the ground meat for crumbled tofu or tempeh for a hearty vegetarian option.
Spicy Kick: Add more sriracha or toss in some red pepper flakes for an extra spicy version.
Colorful Veggies: Incorporate bell peppers, snap peas, or broccoli for added nutrition and vibrant colors.
Low Sodium: Use low-sodium soy sauce to reduce the salt content without sacrificing flavor.
Gluten-Free: Opt for tamari instead of soy sauce to make this dish gluten-free.
Serving Suggestions
Pair your Egg Roll in a Bowl with steamed jasmine rice or cauliflower rice for a complete meal.
Serve with a side of crispy spring rolls for that authentic touch.
For drinks, try a refreshing iced green tea or a light Asian beer.
Garnish with extra green onions and sesame seeds for a beautiful presentation.
FAQs about Egg Roll in a Bowl
As you embark on your culinary adventure with Egg Roll in a Bowl, you might have a few questions. Here are some common queries I’ve encountered, along with helpful answers to guide you along the way.
Can I make Egg Roll in a Bowl ahead of time?
Absolutely! You can prepare this dish in advance and store it in the fridge for up to three days. Just reheat it on the stove or in the microwave when you’re ready to enjoy it again.
What can I substitute for ground pork?
If you’re looking for alternatives, ground turkey or chicken works wonderfully. For a vegetarian option, crumbled tofu or tempeh is a fantastic choice that still packs a protein punch.
Is Egg Roll in a Bowl suitable for meal prep?
Yes, it’s perfect for meal prep! Portion it out into containers for easy grab-and-go lunches throughout the week. Just remember to keep the garnishes separate until you’re ready to eat.
Can I freeze Egg Roll in a Bowl?
Yes, you can freeze it! Just make sure to let it cool completely before transferring it to an airtight container. It can last in the freezer for up to three months. Thaw it overnight in the fridge before reheating.
How can I make this dish spicier?
If you love heat, feel free to add more sriracha or even some chopped jalapeños. You can also sprinkle in red pepper flakes while cooking for an extra kick!
Final Thoughts
Cooking Egg Roll in a Bowl is more than just preparing a meal; it’s about creating a moment of joy amidst the chaos of daily life. This dish brings together vibrant flavors and comforting textures, making it a delightful experience for both the cook and the family. I love how it transforms a simple weeknight dinner into something special, all while being quick and easy. Whether you’re enjoying it with loved ones or savoring leftovers for lunch, this recipe is sure to become a cherished favorite in your home. Give it a try, and let the deliciousness unfold!
Egg Roll in a Bowl is a quick and tasty dinner delight that combines the flavors of traditional egg rolls without the wrapper.
Ingredients
Scale
1 pound ground pork (or ground turkey)
1 tablespoon sesame oil
1 medium onion, diced
2 cloves garlic, minced
1 teaspoon fresh ginger, grated
4 cups coleslaw mix (shredded cabbage and carrots)
1/4 cup soy sauce
1 tablespoon rice vinegar
1 teaspoon sriracha (optional, for heat)
2 green onions, sliced
1 tablespoon sesame seeds (for garnish)
Instructions
In a large skillet, heat the sesame oil over medium heat.
Add the ground pork and cook until browned, breaking it apart with a spatula, about 5-7 minutes.
Add the diced onion, minced garlic, and grated ginger to the skillet. Sauté for 2-3 minutes until the onion is translucent.
Stir in the coleslaw mix, soy sauce, rice vinegar, and sriracha (if using). Cook for an additional 5-7 minutes, stirring occasionally, until the cabbage is tender.
Remove from heat and stir in the sliced green onions.
Serve hot, garnished with sesame seeds.
Notes
For a vegetarian option, substitute the ground meat with crumbled tofu or tempeh.
Add additional vegetables like bell peppers or snap peas for extra crunch and nutrition.
Mini Orange Cheesecakes Recipe is the perfect treat for any occasion. These little bites of heaven combine the creamy richness of cheesecake with the refreshing zest of oranges. They are not only delicious but also visually appealing, making them a great addition to parties, family gatherings, or even a cozy night in.
What makes these mini cheesecakes so special? First, they are perfectly portioned, allowing everyone to enjoy their own little dessert without the guilt of a large slice. Second, the bright citrus flavor from the fresh orange juice and zest adds a unique twist that sets them apart from traditional cheesecakes. Plus, the buttery graham cracker crust provides a satisfying crunch that complements the smooth filling.
Whether you’re a seasoned baker or a beginner in the kitchen, this recipe is straightforward and fun to prepare. With just a few simple ingredients and steps, you can whip up a batch of these delightful mini cheesecakes in no time. So, roll up your sleeves and get ready to impress your friends and family with this scrumptious dessert!
Ingredients for Mini Orange Cheesecakes Recipe
Mini Orange Cheesecakes Recipe, you will need a handful of simple ingredients. Each component plays a vital role in achieving that perfect balance of flavors and textures. Here’s what you’ll need:
1 cup graham cracker crumbs
2 tablespoons granulated sugar
4 tablespoons unsalted butter, melted
16 ounces cream cheese, softened
1 cup powdered sugar
1 teaspoon vanilla extract
1 teaspoon orange zest
1/4 cup fresh orange juice
2 large eggs
These ingredients come together to create a creamy filling that’s perfectly balanced with the sweetness of the crust. The graham cracker crumbs provide a delightful crunch, while the cream cheese gives that rich, velvety texture we all love in cheesecakes. The addition of fresh orange juice and zest not only enhances the flavor but also adds a refreshing twist that makes these mini cheesecakes stand out.
Before you start baking, make sure to gather all your ingredients. This will help streamline the process and ensure you don’t miss anything important. Now that you have everything ready, let’s move on to the preparation steps!
Preparation of Mini Orange Cheesecakes Recipe
Mini Orange Cheesecakes Recipe. This process is simple and enjoyable, allowing you to create a delicious dessert that will impress everyone. Let’s break it down into easy steps!
Step 1: Prepare the Crust
First, you’ll want to make the crust. In a medium bowl, combine the graham cracker crumbs, granulated sugar, and melted butter. Mix these ingredients together until they are well combined. The mixture should resemble wet sand. Next, take about 1 tablespoon of this mixture and press it firmly into the bottom of each muffin liner. This will form a solid base for your cheesecakes. Make sure to pack it down well to ensure it holds together during baking.
Step 2: Make the Cheesecake Filling
Once your crusts are ready, it’s time to make the cheesecake filling. In a large mixing bowl, beat the softened cream cheese with an electric mixer until it’s smooth and creamy. Gradually add the powdered sugar, mixing until it’s fully incorporated. This step is crucial for achieving a silky texture. Then, add the vanilla extract, orange zest, and fresh orange juice. Mix everything together until it’s smooth and well blended. Remember, the key is to mix just enough to combine the ingredients without overdoing it.
Step 3: Bake the Mini Orange Cheesecakes
Now that your filling is ready, it’s time to pour it over the crusts. Carefully fill each muffin liner with the cheesecake batter, making sure to fill them about 3/4 full. This allows room for the cheesecakes to rise slightly while baking. Preheat your oven to 325°F and place the muffin tin in the oven. Bake for 18-20 minutes. You’ll know they’re done when the edges are set, but the centers are still slightly jiggly. This slight jiggle is what makes them creamy!
Step 4: Chill the Cheesecakes
After baking, remove the mini cheesecakes from the oven and let them cool in the pan for about 10 minutes. This cooling period helps them set properly. Once they’ve cooled, transfer them to the refrigerator. Chill the cheesecakes for at least 2 hours before serving. This step is essential, as it allows the flavors to meld together and the texture to firm up, making each bite a delightful experience.
And there you have it! Your mini orange cheesecakes are now ready to be enjoyed. The preparation is straightforward, and the results are simply delicious. Let’s explore some variations and serving suggestions next!
Variation of Mini Orange Cheesecakes Recipe
Mini Orange Cheesecakes Recipe is already a delightful treat, there are many ways to switch things up! Whether you want to explore different flavors or cater to specific dietary needs, these variations will keep your dessert game exciting. Let’s dive into some alternative flavors and gluten-free options!
Alternative Flavors to Try
If you’re feeling adventurous, consider experimenting with different flavors. Here are a few ideas:
Lemon Cheesecakes: Replace the orange juice and zest with fresh lemon juice and zest for a zesty twist. The tartness of lemon pairs beautifully with the creamy filling.
Berry Cheesecakes: Add a swirl of berry puree, like raspberry or blueberry, into the cheesecake batter before baking. This not only adds flavor but also creates a stunning visual effect.
Chocolate Cheesecakes: Mix in some melted chocolate or cocoa powder into the filling for a rich chocolate flavor. Top with chocolate shavings for an extra treat!
Matcha Cheesecakes: Incorporate matcha powder into the filling for a unique green tea flavor. This option is not only delicious but also adds a beautiful color.
These alternative flavors can easily be swapped in, allowing you to create a variety of mini cheesecakes that cater to different tastes. Feel free to get creative and mix and match flavors!
Gluten-Free Options
If you or your guests are following a gluten-free diet, you can still enjoy these mini cheesecakes. Here’s how to make them gluten-free:
Gluten-Free Crust: Instead of traditional graham crackers, use gluten-free graham cracker crumbs or crushed gluten-free cookies. Almond flour or crushed nuts can also work well for a different texture.
Check Ingredients: Ensure that all other ingredients, like the cream cheese and powdered sugar, are labeled gluten-free. Most brands are, but it’s always good to double-check.
Mini Orange Cheesecakes Recipe that everyone can enjoy!
Cooking Note for Mini Orange Cheesecakes Recipe
Mini Orange Cheesecakes Recipe, there are a few important cooking notes to keep in mind. These tips will help ensure that your cheesecakes turn out perfectly every time. Let’s take a look at some key points to consider during the cooking process.
First, make sure your cream cheese is at room temperature. This step is crucial for achieving a smooth and creamy filling. Cold cream cheese can lead to lumps in your batter, which can affect the texture of your cheesecakes. To speed up the process, you can cut the cream cheese into smaller pieces and let it sit out for about 30 minutes before mixing.
Next, be mindful of the mixing process. When combining the ingredients, mix just until they are incorporated. Overmixing can introduce too much air into the batter, causing the cheesecakes to puff up and crack during baking. A gentle hand will yield the best results!
Additionally, keep an eye on the baking time. Every oven is different, so it’s a good idea to check your cheesecakes a few minutes before the suggested baking time. They should be set around the edges but still slightly jiggly in the center. This slight jiggle indicates that they will firm up as they cool.
Lastly, patience is key when it comes to chilling. Allowing the cheesecakes to chill for at least 2 hours is essential for the flavors to meld and the texture to set. If you can, chill them overnight for the best results. The longer they sit, the more delicious they become!
By following these cooking notes, you’ll be well on your way to creating delightful mini orange cheesecakes that are sure to impress. Now, let’s explore some serving suggestions to make your dessert even more special!
Serving Suggestions for Mini Orange Cheesecakes Recipe
Mini Orange Cheesecakes Recipe is ready, it’s time to think about how to serve them! Presentation can elevate your dessert from simple to spectacular. Here are some delightful serving suggestions to make your mini cheesecakes shine:
Whipped Cream Topping: A dollop of freshly whipped cream on top adds a light and airy touch. You can also pipe it for a more elegant look. Consider adding a sprinkle of orange zest on top for a pop of color and flavor.
Fresh Fruit Garnish: Top each cheesecake with a slice of fresh orange or a few berries. This not only enhances the visual appeal but also adds a burst of freshness that complements the cheesecake.
Chocolate Drizzle: For chocolate lovers, a drizzle of melted chocolate over the top can add a rich contrast to the citrus flavor. Use dark, milk, or white chocolate based on your preference.
Mint Leaves: A sprig of fresh mint can add a beautiful touch of green and a hint of freshness. It’s a simple yet effective way to elevate your presentation.
Mini Dessert Plates: Serve the cheesecakes on colorful mini dessert plates. This adds a fun element to your dessert table and makes each serving feel special.
Mini Orange Cheesecakes Recipe!
Tips for Perfect Mini Orange Cheesecakes Recipe
Mini Orange Cheesecakes Recipe is all about attention to detail. With a few helpful tips, you can ensure that your cheesecakes turn out creamy, flavorful, and visually appealing. Here are some essential tips to keep in mind as you prepare your delightful dessert:
First, always use room temperature ingredients. This is especially important for the cream cheese and eggs. Room temperature ingredients blend more easily, resulting in a smoother filling. If you forget to take them out ahead of time, you can warm the eggs in a bowl of warm water for a few minutes. For cream cheese, cut it into smaller pieces to speed up the softening process.
Next, don’t skip the zest! The orange zest adds a burst of flavor that elevates your cheesecakes. Use a microplane or zester to get fine shavings of the orange peel. Be careful not to include the bitter white pith, as it can affect the taste.
When mixing your batter, remember to mix gently. Overmixing can introduce too much air, leading to cracks in your cheesecakes. Mix just until the ingredients are combined, and you’ll achieve a smooth, creamy texture.
Another tip is to use a water bath for baking. This method helps maintain a consistent temperature and prevents the cheesecakes from drying out. To create a water bath, place your muffin tin inside a larger baking dish filled with hot water. This extra moisture will help your cheesecakes bake evenly.
Lastly, patience is key when it comes to chilling. Allow your mini cheesecakes to cool completely in the pan before transferring them to the refrigerator. Chilling them for at least 2 hours, or even overnight, will enhance the flavors and improve the texture. The longer they chill, the better they taste!
By following these tips, you’ll be well on your way to creating perfect mini orange cheesecakes that are sure to impress your family and friends. Now that you have the tips, let’s break down the time needed for this delicious recipe!
Breakdown of Time for Mini Orange Cheesecakes Recipe
Mini Orange Cheesecakes Recipe is essential for planning your baking session. Knowing how long each step takes will help you manage your time effectively. Here’s a breakdown of the time needed for preparation, cooking, and chilling.
Prep Time
The prep time for this delightful recipe is approximately 20-25 minutes. During this time, you will gather your ingredients, prepare the crust, and mix the cheesecake filling. It’s a straightforward process, and having everything ready will make it even smoother. Make sure to set aside enough time to ensure you can enjoy the experience of baking!
Cooking Time
Once your mini cheesecakes are ready to bake, the cooking time is about 18-20 minutes. Keep an eye on them as they bake. You want the edges to be set while the centers remain slightly jiggly. This will ensure a creamy texture that everyone loves. Remember, every oven is different, so checking a few minutes early is a good idea!
Total Time
In total, you should expect to spend around 2 hours and 45 minutes from start to finish. This includes the prep time, cooking time, and the essential chilling time of at least 2 hours. While the cheesecakes chill, you can clean up your kitchen or prepare other dishes. This makes the process efficient and enjoyable!
Mini Orange Cheesecakes Recipe is not only quick to prepare but also allows you to create a delicious dessert that will impress your guests. Now that you know the timing, let’s take a look at the nutritional information for these delightful treats!
Nutritional Information for Mini Orange Cheesecakes Recipe
Mini Orange Cheesecakes Recipe offers a delightful balance of flavors while providing some essential nutrients. Here’s a closer look at the nutritional information for each serving of these tasty treats:
Calories
Each mini orange cheesecake contains approximately 180 calories. This makes them a relatively light dessert option compared to traditional cheesecakes, allowing you to indulge without feeling overly guilty. The combination of cream cheese and graham cracker crust contributes to the calorie count, but the portion size helps keep it in check.
Protein
In terms of protein, each serving provides about 3 grams. The cream cheese and eggs in the recipe are the primary sources of protein. While this isn’t a high-protein dessert, it does offer a small boost, making it a satisfying treat after a meal or as a snack.
Sodium
Each mini cheesecake contains around 150 milligrams of sodium. This amount is fairly moderate, especially considering that sodium is often a concern in many processed foods. The sodium content mainly comes from the cream cheese and butter used in the recipe. If you’re watching your sodium intake, this dessert can still fit into a balanced diet.
Mini Orange Cheesecakes Recipe provides a delightful treat that can be enjoyed in moderation. With a reasonable calorie count, a touch of protein, and a moderate amount of sodium, these mini cheesecakes are a delicious way to satisfy your sweet tooth while keeping your nutritional goals in mind. Now, let’s address some frequently asked questions about this delightful recipe!
FAQs about Mini Orange Cheesecakes Recipe
Can I use other citrus fruits in this recipe?
Mini Orange Cheesecakes Recipe is quite versatile. You can easily substitute oranges with other citrus fruits like lemons, limes, or grapefruits. Each fruit will bring its unique flavor profile to the cheesecakes. For instance, using lemons will give a zesty and refreshing taste, while limes will add a tangy twist. Just remember to adjust the amount of juice and zest according to the fruit’s strength to maintain the right balance of flavors.
How do I store leftover mini orange cheesecakes?
Storing leftover mini orange cheesecakes is simple! First, make sure they are completely chilled. Then, cover them with plastic wrap or place them in an airtight container. You can store them in the refrigerator for up to 5 days. If you want to keep them longer, consider freezing them. To freeze, wrap each cheesecake individually in plastic wrap and then place them in a freezer-safe container. They can last up to 2 months in the freezer. Just remember to thaw them in the refrigerator before serving!
Can I make mini orange cheesecakes ahead of time?
Mini Orange Cheesecakes Recipe, then store them in the refrigerator until you’re ready to serve. This makes them a great option for parties or gatherings, allowing you to enjoy the event without the stress of last-minute baking.
What can I substitute for cream cheese in the recipe?
Mini Orange Cheesecakes Recipe.
Conclusion on Mini Orange Cheesecakes Recipe
Mini Orange Cheesecakes Recipe is a delightful and versatile dessert that brings a burst of citrus flavor to any occasion. With its creamy filling and crunchy graham cracker crust, this treat is sure to please both family and friends. Whether you’re celebrating a special event or simply indulging in a sweet craving, these mini cheesecakes are the perfect choice.
Not only are they easy to prepare, but they also allow for creativity with various flavor variations and toppings. From lemon to berry flavors, the possibilities are endless! Plus, with gluten-free options available, everyone can enjoy this delicious dessert.
Remember to follow the cooking notes and tips provided to ensure your cheesecakes turn out perfectly every time. The chilling process is essential for achieving that smooth texture and rich flavor, so don’t rush it! With a little patience, you’ll be rewarded with a dessert that’s not only beautiful but also incredibly tasty.
So, gather your ingredients, roll up your sleeves, and get ready to impress your loved ones with these delightful mini orange cheesecakes. They are sure to become a favorite in your dessert repertoire. Happy baking!
Easter is a time of joy, renewal, and celebration. One of the most delightful ways to embrace this festive spirit is through delicious treats. Among these, Robin’s Egg Cupcakes for Easter stand out as a fun and creative dessert. These cupcakes not only taste amazing but also capture the essence of Easter with their vibrant colors and playful decorations.
The Significance of Easter Treats
Easter treats hold a special place in many cultures. They symbolize new beginnings and the arrival of spring. Traditionally, families gather to celebrate with festive meals and sweet delights. Cupcakes, in particular, have become a popular choice for Easter celebrations. Their individual portions make them perfect for sharing, and they can be decorated in countless ways to reflect the holiday’s themes.
Robin’s Egg Cupcakes for Easter are inspired by the beautiful eggs that symbolize rebirth. The blue buttercream frosting mimics the color of robin’s eggs, while the crushed chocolate cookies represent the earth. Topping these cupcakes with candy-coated chocolate eggs adds a playful touch that kids and adults alike will love.
As you prepare to celebrate this joyous occasion, consider making these delightful cupcakes. They are not only a treat for the taste buds but also a feast for the eyes. So, gather your ingredients and get ready to create a sweet masterpiece that will surely impress your family and friends!
Ingredients for Robin’s Egg Cupcakes for Easter
To create the delightful Robin’s Egg Cupcakes for Easter, you’ll need a selection of simple yet essential ingredients. Each component plays a vital role in achieving the perfect flavor and texture. Here’s what you’ll need:
1 ½ cups all-purpose flour
1 cup granulated sugar
½ cup unsalted butter, softened
2 large eggs
½ cup whole milk
1 ½ teaspoons baking powder
½ teaspoon salt
1 teaspoon vanilla extract
½ teaspoon almond extract
1 cup blue buttercream frosting
1 cup crushed chocolate cookies (for “dirt”)
Chocolate eggs or candy-coated chocolate eggs for decoration
These ingredients combine to create a moist and flavorful cupcake that is sure to delight everyone at your Easter gathering. The blue buttercream frosting not only adds sweetness but also gives the cupcakes their signature look. The crushed chocolate cookies provide a fun texture and visual appeal, resembling dirt, while the chocolate eggs add a festive touch.
Feel free to get creative with your ingredients! You can experiment with different flavors of frosting or even try using different types of cookies for the “dirt.” The possibilities are endless, making these cupcakes a versatile choice for your Easter celebration.
Step-by-Step Preparation of Robin’s Egg Cupcakes for Easter
Now that you have gathered all the ingredients, it’s time to dive into the fun part: preparing your Robin’s Egg Cupcakes for Easter! Follow these simple steps to create delightful cupcakes that will impress everyone.
Step 1: Prepping the Batter
Start by preheating your oven to 350°F (175°C). This ensures that your cupcakes bake evenly. Next, line a cupcake pan with paper liners to make removing the cupcakes easy later on.
In a large mixing bowl, cream together the softened butter and granulated sugar. Use an electric mixer for about 2-3 minutes until the mixture is light and fluffy. This step is crucial as it incorporates air, making your cupcakes soft and airy.
Now, add the eggs one at a time, mixing well after each addition. This helps to blend the eggs thoroughly into the batter. Then, stir in the whole milk, vanilla extract, and almond extract. These ingredients add moisture and flavor, making your cupcakes delicious.
In a separate bowl, whisk together the all-purpose flour, baking powder, and salt. Gradually add this dry mixture to the wet ingredients. Mix until just combined. Be careful not to overmix, as this can lead to dense cupcakes.
Step 2: Baking the Cupcakes
Once your batter is ready, it’s time to fill the cupcake liners. Divide the batter evenly among the liners, filling each about two-thirds full. This allows room for the cupcakes to rise without overflowing.
Place the cupcake pan in the preheated oven and bake for 18-20 minutes. To check if they are done, insert a toothpick into the center of a cupcake. If it comes out clean, they are ready! Allow the cupcakes to cool in the pan for about 5 minutes before transferring them to a wire rack. This cooling step is important to prevent sogginess.
Step 3: Making the Frosting
While the cupcakes are cooling, you can prepare the blue buttercream frosting. In a mixing bowl, beat together softened butter and powdered sugar until smooth. Add a splash of milk and a few drops of blue food coloring. Mix until you achieve a light blue color that resembles robin’s eggs.
Feel free to adjust the color to your liking! If you want a deeper blue, simply add more food coloring. Once the frosting is fluffy and well-mixed, it’s ready to be spread on your cooled cupcakes.
Step 4: Decorating with Robin’s Egg Theme
Now comes the fun part—decorating your cupcakes! Take each cooled cupcake and generously frost the top with the blue buttercream. Use a spatula or a piping bag for a more decorative look.
Next, sprinkle crushed chocolate cookies on top to create a “dirt” effect. This adds a delightful crunch and visual appeal. Finally, place a few chocolate eggs or candy-coated chocolate eggs on top of each cupcake. This will give them that festive, Easter touch!
And there you have it! Your Robin’s Egg Cupcakes for Easter are now ready to be enjoyed. They are not only a treat for the taste buds but also a beautiful centerpiece for your Easter celebration.
Variation of Robin’s Egg Cupcakes for Easter
While the classic Robin’s Egg Cupcakes for Easter are delightful, there are many ways to add your personal touch. Whether you want to experiment with flavors or cater to dietary needs, these variations will keep your Easter celebration exciting and inclusive.
Alternative Flavors and Colors
Why not switch things up with different flavors? Instead of the traditional vanilla, you can try chocolate, lemon, or even carrot cake for a unique twist. Each flavor brings its own charm and can complement the festive theme beautifully.
For a chocolate version, simply replace half of the flour with cocoa powder. This will give your cupcakes a rich, chocolatey taste. If you prefer a fruity flavor, consider adding lemon zest or orange zest to the batter. This will brighten up the cupcakes and add a refreshing touch.
When it comes to frosting, the sky’s the limit! You can use pink, yellow, or even green frosting to create a rainbow effect. Mixing colors can make your cupcakes even more visually appealing. Just remember to keep the theme in mind, ensuring that the colors still reflect the joy of Easter.
Gluten-Free Options
If you or your guests are gluten-sensitive, you can easily make gluten-free Robin’s Egg Cupcakes for Easter. Simply substitute the all-purpose flour with a gluten-free flour blend. Many blends work well in baking and can provide a similar texture to regular flour.
Additionally, ensure that your baking powder is gluten-free, as some brands may contain gluten. You can also use almond flour or coconut flour for a different flavor profile. Just remember that these flours may require adjustments in liquid ingredients, so keep an eye on the batter’s consistency.
With these variations, you can create a delightful spread of Robin’s Egg Cupcakes for Easter that everyone can enjoy. Whether you choose to stick with the classic recipe or explore new flavors, your cupcakes will surely be a hit at your celebration!
Cooking Note for Robin’s Egg Cupcakes for Easter
When baking Robin’s Egg Cupcakes for Easter, a few cooking notes can help ensure your cupcakes turn out perfectly every time. These tips will guide you through the process, making it easier and more enjoyable.
First, always measure your ingredients accurately. Using a kitchen scale can help you get precise measurements, especially for flour and sugar. Too much flour can lead to dry cupcakes, while too little can make them dense.
Next, make sure your butter is softened but not melted. Softened butter should be at room temperature, allowing it to cream well with the sugar. This step is crucial for achieving a light and fluffy texture in your cupcakes.
Additionally, avoid overmixing the batter. Once you combine the wet and dry ingredients, mix until just combined. Overmixing can develop gluten, resulting in tough cupcakes. A few lumps are perfectly fine!
When baking, keep an eye on the time. Ovens can vary, so check your cupcakes a couple of minutes before the recommended baking time. If they start to brown too quickly, you can cover them loosely with aluminum foil to prevent burning.
Lastly, allow your cupcakes to cool completely before frosting. If you frost them while they are still warm, the frosting may melt and slide off. Patience is key here, as cooled cupcakes will hold the frosting beautifully.
By following these cooking notes, you’ll be well on your way to creating delicious and visually stunning Robin’s Egg Cupcakes for Easter. Happy baking!
Serving Suggestions for Robin’s Egg Cupcakes for Easter
Once your delightful Robin’s Egg Cupcakes for Easter are ready, it’s time to think about how to serve them. Presentation and pairing can elevate your cupcakes, making them even more enjoyable for your guests. Here are some creative ideas to consider.
Presentation Ideas
Presentation is key when it comes to serving your cupcakes. Start by arranging them on a beautiful platter or cake stand. A tiered cake stand can add height and elegance to your display. You can also use a decorative tablecloth or Easter-themed decorations to enhance the festive atmosphere.
For an extra touch, consider adding edible grass or shredded coconut around the cupcakes. This mimics a nest and ties in beautifully with the robin’s egg theme. You can also use colorful cupcake liners that match the Easter colors, such as pastel pinks, yellows, and greens.
Another fun idea is to create cupcake toppers. You can use small flags or toothpicks with cute Easter designs. This adds a personal touch and makes each cupcake feel special. Don’t forget to include a sign that says “Robin’s Egg Cupcakes” to let everyone know what they are about to enjoy!
Pairing with Beverages
Pairing your Robin’s Egg Cupcakes with the right beverages can enhance the overall experience. For a refreshing option, consider serving iced tea or lemonade. These drinks are light and complement the sweetness of the cupcakes perfectly.
If you prefer something warm, a cup of coffee or hot chocolate can be a delightful choice. The rich flavors of coffee can balance the sweetness of the cupcakes, while hot chocolate adds a cozy touch to your Easter gathering.
For a festive twist, you might also consider serving a sparkling fruit punch. This bubbly drink adds a celebratory feel and is sure to be a hit with both kids and adults. You can even add slices of fresh fruit for a colorful and refreshing addition.
By focusing on presentation and beverage pairings, you can create a memorable experience for your guests. Your Robin’s Egg Cupcakes for Easter will not only taste amazing but also look stunning on the table!
Tips for Perfecting Robin’s Egg Cupcakes for Easter
To ensure your Robin’s Egg Cupcakes for Easter turn out perfectly, it’s essential to keep a few tips in mind. Baking can be a fun adventure, but it also comes with its challenges. Here are some common mistakes to avoid and storage tips to keep your cupcakes fresh.
Common Mistakes to Avoid
Even the best bakers can make mistakes. Here are some common pitfalls to watch out for:
Not Prepping Ingredients: Always gather and measure your ingredients before starting. This helps you avoid missing anything important.
Overmixing the Batter: Mixing too much can lead to tough cupcakes. Mix until just combined for a light texture.
Skipping the Cooling Step: Frosting warm cupcakes can cause the frosting to melt. Always let them cool completely.
Incorrect Oven Temperature: Make sure your oven is preheated correctly. An oven thermometer can help ensure accuracy.
Ignoring Baking Time: Keep an eye on your cupcakes as they bake. Ovens can vary, so check a few minutes early.
By avoiding these common mistakes, you’ll be on your way to baking delicious and beautiful Robin’s Egg Cupcakes for Easter!
Storage Tips
Once your cupcakes are baked and decorated, you’ll want to store them properly to keep them fresh. Here are some helpful storage tips:
Room Temperature: If you plan to eat the cupcakes within a day or two, store them in an airtight container at room temperature. This keeps them moist and delicious.
Refrigeration: For longer storage, you can refrigerate the cupcakes. Just make sure they are in an airtight container to prevent them from drying out.
Freezing: If you want to save some for later, freeze the cupcakes without frosting. Wrap them tightly in plastic wrap and place them in a freezer-safe bag. They can last up to three months!
Frosting After Freezing: When you’re ready to enjoy your frozen cupcakes, thaw them in the fridge overnight. Frost them just before serving for the best taste.
By following these storage tips, you can ensure that your Robin’s Egg Cupcakes for Easter remain fresh and tasty, ready to delight your family and friends!
Breakdown of Time for Robin’s Egg Cupcakes for Easter
When planning to bake Robin’s Egg Cupcakes for Easter, it’s essential to have a clear understanding of the time involved. This will help you organize your baking session and ensure everything runs smoothly. Here’s a breakdown of the time you’ll need for each step of the process.
Prep Time
The prep time for these delightful cupcakes is approximately 20-25 minutes. This includes gathering your ingredients, measuring them accurately, and preparing the batter. Make sure to set aside enough time to cream the butter and sugar properly, as this step is crucial for achieving a light and fluffy texture.
Cooking Time
Once your batter is ready, the cooking time is about 18-20 minutes. Keep an eye on your cupcakes as they bake, checking for doneness with a toothpick. If it comes out clean, they are ready to be taken out of the oven. Allow them to cool in the pan for about 5 minutes before transferring them to a wire rack.
Total Time
In total, you can expect to spend around 45-55 minutes from start to finish. This includes prep time, cooking time, and the initial cooling period. If you plan to frost and decorate your cupcakes afterward, add an additional 15-20 minutes for that step. Overall, you’ll have a delicious batch of Robin’s Egg Cupcakes for Easter ready in about an hour or so!
Nutritional Information for Robin’s Egg Cupcakes for Easter
Understanding the nutritional content of your treats can help you enjoy them more mindfully. Here’s a breakdown of the nutritional information for each serving of Robin’s Egg Cupcakes for Easter. This will give you a clearer picture of what you’re indulging in during your festive celebrations.
Calories
250 calories. This calorie count includes the cupcake itself along with the blue buttercream frosting and toppings. While they are a delightful treat, it’s good to enjoy them in moderation, especially if you’re watching your calorie intake.
Protein
3 grams. This protein content comes mainly from the eggs and milk used in the recipe. While cupcakes are not a significant source of protein, they can still be part of a balanced diet when enjoyed alongside other nutritious foods.
Sodium
150 mg of sodium. This sodium level is fairly standard for baked goods, but if you’re monitoring your sodium intake, it’s something to keep in mind. You can always adjust the salt in the recipe to suit your dietary needs.
Overall, Robin’s Egg Cupcakes for Easter are a delightful treat that can be enjoyed during the holiday season. By being aware of their nutritional content, you can savor these cupcakes while still keeping an eye on your overall health. Enjoy your baking and the sweet moments they bring!
FAQs about Robin’s Egg Cupcakes for Easter
Can I make Robin’s Egg Cupcakes for Easter ahead of time?
Absolutely! You can prepare Robin’s Egg Cupcakes for Easter ahead of time. In fact, baking them a day or two in advance can save you time on the day of your celebration. Just make sure to store them properly. Allow the cupcakes to cool completely before placing them in an airtight container. This will keep them fresh and moist. You can frost them the day you plan to serve them to ensure the frosting looks its best. If you want to bake even further in advance, consider freezing the unfrosted cupcakes. They can be frozen for up to three months!
What can I use instead of eggs in Robin’s Egg Cupcakes for Easter?
If you need an egg substitute for your Robin’s Egg Cupcakes for Easter, there are several options available. One common substitute is to use unsweetened applesauce. For each egg, use ¼ cup of applesauce. Another option is to use mashed bananas, which also work well. You can use ¼ cup of mashed banana per egg. If you prefer a more traditional substitute, consider using flaxseed meal. Mix 1 tablespoon of flaxseed meal with 2.5 tablespoons of water and let it sit for a few minutes until it thickens. This mixture can replace one egg. These alternatives will help you create delicious cupcakes while accommodating dietary needs!
How do I store leftover Robin’s Egg Cupcakes for Easter?
Storing leftover Robin’s Egg Cupcakes for Easter is simple! If you have any cupcakes left after your celebration, place them in an airtight container. This will keep them fresh for up to two days at room temperature. If you want to keep them longer, you can refrigerate them. Just remember to seal them well to prevent them from drying out. For even longer storage, freeze the cupcakes without frosting. Wrap them tightly in plastic wrap and place them in a freezer-safe bag. When you’re ready to enjoy them, thaw them in the fridge overnight and frost them just before serving. This way, you can savor the deliciousness of your cupcakes even after the holiday!
Conclusion on Robin’s Egg Cupcakes for Easter
In conclusion, Robin’s Egg Cupcakes for Easter are a delightful way to celebrate the holiday. These cupcakes not only bring joy to your taste buds but also add a festive touch to your gatherings. With their vibrant blue frosting and charming decorations, they capture the essence of Easter beautifully.
As you prepare to make these cupcakes, remember that the process can be just as enjoyable as the final product. From mixing the batter to decorating with chocolate eggs, each step is an opportunity to create lasting memories with family and friends. Whether you stick to the classic recipe or explore variations, your creativity will shine through.
Moreover, these cupcakes are versatile. You can easily adapt them to suit different tastes and dietary needs. With options for gluten-free baking and alternative flavors, everyone can join in on the fun. Plus, the tips and serving suggestions provided will help you present your cupcakes in a way that impresses your guests.
So, gather your ingredients, roll up your sleeves, and get ready to bake! Your Robin’s Egg Cupcakes for Easter will surely be a hit, bringing smiles and sweetness to your celebration. Enjoy the process, and most importantly, enjoy the delicious results!
Easter is a time of joy, renewal, and celebration. Families come together to honor traditions and create lasting memories. One of the most delightful ways to celebrate this holiday is through festive treats. Easter treats symbolize the arrival of spring and the joy of new beginnings. They often feature bright colors and fun shapes, making them perfect for gatherings and celebrations. From chocolate bunnies to colorful eggs, these treats bring smiles to faces of all ages.
Among the many delicious options, cupcakes stand out as a favorite. They are easy to make, fun to decorate, and can be customized to fit any theme. The Easter Bunny Egg Cupcakes Recipe is a perfect example of how you can combine creativity with flavor. These cupcakes not only taste amazing but also look adorable, making them a hit at any Easter gathering.
Why Choose the Easter Bunny Egg Cupcakes Recipe?
The Easter Bunny Egg Cupcakes Recipe is a delightful choice for several reasons. First, it combines rich chocolate flavor with a fun, festive design. The chocolate cupcakes are moist and fluffy, while the vibrant green frosting mimics grass, creating a playful presentation. Topping them with mini chocolate eggs adds a sweet surprise that everyone will love.
Moreover, this recipe is simple enough for bakers of all skill levels. Whether you’re a seasoned pro or a beginner, you can easily follow the steps to create these charming cupcakes. Plus, they are perfect for sharing with family and friends, making them an ideal treat for Easter celebrations.
In addition, the Easter Bunny Egg Cupcakes Recipe allows for creativity. You can experiment with different flavors, colors, and decorations. This flexibility makes it a fun project for kids and adults alike. So, gather your ingredients and get ready to whip up a batch of these delightful cupcakes that will surely brighten your Easter festivities!
Ingredients for Easter Bunny Egg Cupcakes Recipe
To create the delightful Easter Bunny Egg Cupcakes, you’ll need a variety of ingredients that come together to form a delicious treat. Here’s a complete list of what you’ll need:
1 ½ cups all-purpose flour
1 cup granulated sugar
½ cup unsweetened cocoa powder
1 teaspoon baking powder
½ teaspoon baking soda
¼ teaspoon salt
2 large eggs
½ cup vegetable oil
1 teaspoon vanilla extract
1 cup buttermilk
1 cup chocolate chips
For the frosting, you will need:
1 cup butter, softened
4 cups powdered sugar
2 tablespoons milk
1 teaspoon vanilla extract
Green food coloring
And for the fun decorations:
Mini chocolate eggs (for decoration)
Coconut flakes (for grass)
These ingredients come together to create a rich chocolate cupcake topped with a vibrant green frosting. The mini chocolate eggs and coconut flakes add a playful touch, making these cupcakes perfect for Easter celebrations. Gather your ingredients, and let’s get ready to bake!
Step-by-Step Preparation of Easter Bunny Egg Cupcakes Recipe
Step 1: Preheat the Oven
First things first, preheat your oven to 350°F (175°C). This step is crucial as it ensures that your cupcakes bake evenly. While the oven heats up, you can prepare your cupcake pan. Line it with paper liners to make removing the cupcakes easy once they are baked. This also adds a fun touch to your presentation!
Step 2: Prepare the Cupcake Batter
In a large mixing bowl, combine the dry ingredients. Start by adding 1 ½ cups of all-purpose flour, 1 cup of granulated sugar, ½ cup of unsweetened cocoa powder, 1 teaspoon of baking powder, ½ teaspoon of baking soda, and ¼ teaspoon of salt. Whisk these ingredients together until they are well mixed. This helps to evenly distribute the leavening agents, ensuring your cupcakes rise perfectly.
Next, in another bowl, whisk together the wet ingredients. You’ll need 2 large eggs, ½ cup of vegetable oil, 1 teaspoon of vanilla extract, and 1 cup of buttermilk. Mix these until smooth. Gradually add the wet mixture to the dry ingredients, stirring gently until just combined. Be careful not to overmix, as this can make your cupcakes tough. Finally, fold in 1 cup of chocolate chips for that extra chocolatey goodness!
Step 3: Bake the Cupcakes
Now it’s time to bake! Divide the batter evenly among the cupcake liners, filling each about two-thirds full. This allows room for the cupcakes to rise without overflowing. Place the cupcake pan in the preheated oven and bake for 18-20 minutes. To check if they are done, insert a toothpick into the center of a cupcake. If it comes out clean, they are ready! Once baked, allow the cupcakes to cool completely in the pan before transferring them to a wire rack.
Step 4: Make the Frosting
While your cupcakes are cooling, it’s time to prepare the frosting. In a large bowl, beat 1 cup of softened butter until it’s creamy and smooth. Gradually add 4 cups of powdered sugar, mixing on low speed until combined. This helps prevent a sugary cloud from forming! Then, add 2 tablespoons of milk and 1 teaspoon of vanilla extract. Beat on high speed until the frosting is fluffy and light. This should take about 2-3 minutes.
To give your frosting that grass-like appearance, add a few drops of green food coloring. Mix until you achieve your desired shade of green. This vibrant color will make your cupcakes look even more festive!
Step 5: Decorate the Cupcakes
Once the cupcakes are completely cool, it’s time to frost them! Use a spatula or a piping bag to spread the green frosting on top of each cupcake. Create a textured appearance to mimic grass. After frosting, sprinkle a handful of coconut flakes on top to resemble grass. Finally, place mini chocolate eggs on each cupcake for decoration. These little touches will make your Easter Bunny Egg Cupcakes truly special!
Variation of Easter Bunny Egg Cupcakes Recipe
Alternative Flavors for Cupcakes
While the classic chocolate flavor of the Easter Bunny Egg Cupcakes is delightful, you can easily switch things up! Consider trying different flavors to suit your taste or to surprise your guests. Here are a few fun alternatives:
Vanilla Cupcakes: Replace the cocoa powder with an additional 1 ½ cups of flour. Add 1 tablespoon of vanilla extract for a rich vanilla flavor.
Carrot Cake Cupcakes: Substitute 1 cup of flour with 1 cup of finely grated carrots. Add 1 teaspoon of cinnamon and ½ teaspoon of nutmeg for a warm, spiced flavor.
Red Velvet Cupcakes: Use 1 ½ cups of all-purpose flour, 1 cup of granulated sugar, and 1 tablespoon of cocoa powder. Add 1 tablespoon of red food coloring for that classic red velvet look.
Lemon Cupcakes: Replace the cocoa powder with 1 ½ cups of flour and add the zest of one lemon. Use lemon juice in place of some of the buttermilk for a refreshing citrus flavor.
These variations not only change the flavor but also add a unique twist to your Easter celebrations. Feel free to mix and match flavors to create your own signature cupcake!
Different Decoration Ideas
Decorating your Easter Bunny Egg Cupcakes can be just as fun as baking them! Here are some creative decoration ideas to make your cupcakes stand out:
Colorful Sprinkles: Add a variety of pastel-colored sprinkles on top of the frosting for a festive touch.
Chocolate Bunny Toppers: Place small chocolate bunnies on top of the cupcakes for a cute and thematic decoration.
Fruit Toppings: Use small pieces of fruit like strawberries or blueberries to add a fresh element to your cupcakes.
Edible Glitter: Sprinkle some edible glitter over the frosting for a magical sparkle that kids will love!
Fondant Decorations: Create small fondant shapes like flowers or Easter eggs to place on top of the cupcakes for a professional look.
These decoration ideas can help you personalize your Easter Bunny Egg Cupcakes. Let your creativity shine and make your treats as unique as your celebration!
Cooking Note for Easter Bunny Egg Cupcakes Recipe
When preparing the Easter Bunny Egg Cupcakes, there are a few important cooking notes to keep in mind. These tips will help ensure that your cupcakes turn out perfectly every time, making your baking experience enjoyable and stress-free.
First, always measure your ingredients accurately. Baking is a science, and even a small difference in measurements can affect the final product. Use measuring cups and spoons for dry ingredients and a liquid measuring cup for wet ingredients. This will help you achieve the right texture and flavor.
Next, make sure your butter is softened before you start making the frosting. Softened butter blends more easily with the powdered sugar, resulting in a smooth and creamy frosting. If you forget to take it out of the fridge, you can cut it into small pieces and let it sit at room temperature for about 15-20 minutes.
Additionally, avoid overmixing the cupcake batter. Once you combine the wet and dry ingredients, mix just until you see no dry flour. Overmixing can lead to dense cupcakes instead of light and fluffy ones. Folding in the chocolate chips gently at the end will also help maintain the batter’s texture.
When baking, keep an eye on the cupcakes as they approach the end of the baking time. Ovens can vary, and you want to avoid overbaking. A toothpick inserted into the center should come out clean or with a few moist crumbs, but not wet batter.
Lastly, allow the cupcakes to cool completely before frosting them. If you frost warm cupcakes, the frosting may melt and slide off, ruining your beautiful decorations. Patience is key here!
By following these cooking notes, you’ll be well on your way to creating delicious and visually appealing Easter Bunny Egg Cupcakes that everyone will enjoy. Happy baking!
Serving Suggestions for Easter Bunny Egg Cupcakes Recipe
Ideal Pairings for Your Cupcakes
When it comes to serving your Easter Bunny Egg Cupcakes, pairing them with the right beverages and snacks can enhance the overall experience. Here are some delightful pairings to consider:
Milk: A classic choice! The creamy texture of milk complements the rich chocolate flavor of the cupcakes perfectly.
Hot Chocolate: For chocolate lovers, serving hot chocolate alongside your cupcakes can create a cozy and indulgent treat.
Fruit Juices: Fresh fruit juices, like orange or apple juice, add a refreshing contrast to the sweetness of the cupcakes.
Tea: A light herbal or floral tea can balance the richness of the cupcakes, making for a delightful afternoon treat.
Ice Cream: For a fun twist, serve your cupcakes with a scoop of vanilla or mint chocolate chip ice cream. The combination is sure to please!
These pairings not only enhance the flavors but also create a festive atmosphere for your Easter celebration. Choose your favorites and enjoy the deliciousness together!
Presentation Tips for Easter Celebrations
Presentation is key when serving your Easter Bunny Egg Cupcakes. A beautiful display can make your treats even more inviting. Here are some tips to help you present your cupcakes in style:
Use a Decorative Cake Stand: Elevate your cupcakes on a colorful or themed cake stand. This adds height and draws attention to your delicious creations.
Arrange with Fresh Flowers: Surround your cupcakes with fresh spring flowers. This adds a touch of nature and enhances the festive feel of your table.
Colorful Liners: Choose vibrant cupcake liners that match the Easter theme. Pastel colors or floral patterns can add a cheerful touch.
Label Your Treats: Use cute labels or tags to identify the flavors or decorations. This adds a personal touch and helps guests choose their favorites.
Include Easter Decor: Incorporate Easter-themed decorations, like bunny figurines or colorful eggs, around your cupcake display for a festive atmosphere.
By following these presentation tips, your Easter Bunny Egg Cupcakes will not only taste amazing but also look stunning on your celebration table. Enjoy the smiles and compliments from your guests!
Tips for Perfecting Your Easter Bunny Egg Cupcakes Recipe
Common Mistakes to Avoid
When baking your Easter Bunny Egg Cupcakes, avoiding common mistakes can make a big difference in the final result. Here are some pitfalls to watch out for:
Not Preheating the Oven: Always preheat your oven before baking. This ensures that your cupcakes rise properly and bake evenly.
Overmixing the Batter: Mixing too much can lead to dense cupcakes. Stir just until the ingredients are combined for a light texture.
Skipping the Cooling Time: Allow your cupcakes to cool completely before frosting. Frosting warm cupcakes can cause the icing to melt and slide off.
Incorrect Measurements: Baking is precise. Use measuring cups and spoons to ensure you have the right amounts of each ingredient.
Ignoring the Toothpick Test: Always check for doneness with a toothpick. If it comes out clean or with a few crumbs, your cupcakes are ready!
By being mindful of these common mistakes, you can create perfect Easter Bunny Egg Cupcakes that are sure to impress your family and friends!
Storage Tips for Leftover Cupcakes
If you have leftover Easter Bunny Egg Cupcakes, proper storage will keep them fresh and delicious. Here are some helpful tips:
Room Temperature: Store cupcakes in an airtight container at room temperature for up to 2 days. This keeps them moist and tasty.
Refrigeration: If you need to store them longer, place the cupcakes in the fridge. They can last up to a week, but be sure to let them come to room temperature before serving.
Freezing: For longer storage, freeze the cupcakes without frosting. Wrap each cupcake tightly in plastic wrap and place them in a freezer-safe bag. They can last up to 3 months. When ready to enjoy, thaw them in the fridge overnight and frost them before serving.
Frosting Storage: If you have leftover frosting, store it in an airtight container in the fridge for up to a week. You can also freeze it for up to 3 months. Just remember to let it come to room temperature and re-whip before using.
By following these storage tips, you can enjoy your Easter Bunny Egg Cupcakes even after the holiday celebrations are over!
Breakdown of Time for Easter Bunny Egg Cupcakes Recipe
Prep Time
The prep time for the Easter Bunny Egg Cupcakes Recipe is approximately 30 minutes. This includes gathering your ingredients, measuring them out, and mixing the batter. It’s a fun and engaging process, especially if you involve family or friends in the kitchen. Make sure to take your time to enjoy each step!
Cooking Time
Once your batter is ready, the cooking time is about 18-20 minutes. Keep an eye on the cupcakes as they bake. Ovens can vary, so checking for doneness with a toothpick is essential. If it comes out clean or with a few moist crumbs, your cupcakes are perfectly baked!
Total Time
In total, you can expect to spend around 50 minutes to 1 hour on the entire process. This includes prep time, cooking time, and cooling time before frosting. Remember, patience is key! Allowing the cupcakes to cool completely ensures that your frosting stays beautiful and intact. Enjoy the process, and soon you’ll have a delightful batch of Easter Bunny Egg Cupcakes ready to impress your guests!
Nutritional Information for Easter Bunny Egg Cupcakes Recipe
Calories
When indulging in the delightful Easter Bunny Egg Cupcakes, it’s good to be aware of their caloric content. Each cupcake contains approximately 350 calories. This makes them a sweet treat to enjoy during your Easter celebrations. While they are rich in flavor, moderation is key to enjoying these delicious cupcakes without overindulging.
Protein
Each cupcake provides about 4 grams of protein. This protein content comes from the eggs and the buttermilk used in the recipe. While cupcakes are primarily a dessert, having some protein can help balance the sweetness and keep you feeling satisfied. Pairing your cupcake with a glass of milk can also boost the protein intake, making it a more balanced treat.
Sodium
The sodium content in each cupcake is approximately 200 milligrams. This amount is relatively moderate, especially considering that it comes from the baking soda and salt used in the recipe. If you’re watching your sodium intake, it’s always a good idea to enjoy these cupcakes as an occasional treat rather than a daily indulgence. Balancing your diet with plenty of fruits and vegetables can help maintain overall health.
FAQs about Easter Bunny Egg Cupcakes Recipe
Can I make the cupcakes ahead of time?
Absolutely! You can make the Easter Bunny Egg Cupcakes a day or two in advance. Just bake the cupcakes and let them cool completely. Store them in an airtight container at room temperature. When you’re ready to serve, frost them with the green frosting and add your decorations. This way, you can enjoy more time with your family and friends during the celebrations!
What can I use instead of eggs in the recipe?
If you’re looking for an egg substitute, there are several options you can use. For each egg, you can replace it with:
1/4 cup unsweetened applesauce
1/4 cup mashed banana
1 tablespoon ground flaxseed mixed with 2.5 tablespoons water (let it sit for a few minutes to thicken)
1/4 cup yogurt or buttermilk
These substitutes will help bind the ingredients together while keeping your cupcakes moist and delicious!
How do I store leftover cupcakes?
To keep your leftover Easter Bunny Egg Cupcakes fresh, store them in an airtight container at room temperature for up to 2 days. If you want to keep them longer, you can refrigerate them for up to a week. Just remember to let them come to room temperature before serving. This will help maintain their flavor and texture!
Can I freeze the Easter Bunny Egg Cupcakes?
Yes, you can freeze the Easter Bunny Egg Cupcakes! To do this, frost the cupcakes and then place them in a single layer on a baking sheet. Freeze them for about an hour until the frosting is firm. After that, wrap each cupcake tightly in plastic wrap and place them in a freezer-safe bag. They can be frozen for up to 3 months. When you’re ready to enjoy them, thaw the cupcakes in the fridge overnight and let them sit at room temperature for a bit before serving.
Conclusion on Easter Bunny Egg Cupcakes Recipe
In conclusion, the Easter Bunny Egg Cupcakes Recipe is a delightful way to celebrate the joy of Easter. These cupcakes not only bring a rich chocolate flavor but also a fun and festive appearance that will surely impress your family and friends. With their vibrant green frosting and playful decorations, they embody the spirit of the holiday, making them a perfect centerpiece for your Easter gatherings.
Whether you choose to stick to the classic chocolate version or explore the various flavor alternatives, the process of baking these cupcakes is enjoyable and rewarding. The recipe is simple enough for bakers of all skill levels, allowing everyone to join in on the fun. Plus, the flexibility in decoration means you can let your creativity shine, making each batch uniquely yours.
As you prepare to bake, remember the tips and tricks shared throughout this article. From accurate measurements to proper storage, these insights will help you create the perfect Easter Bunny Egg Cupcakes every time. So, gather your ingredients, invite your loved ones into the kitchen, and enjoy the process of baking together.
Finally, as you serve these delightful treats, take a moment to appreciate the joy they bring. Easter is about celebrating new beginnings, and what better way to do that than with delicious cupcakes that spread happiness? Enjoy your Easter Bunny Egg Cupcakes, and may your holiday be filled with love, laughter, and sweet memories!
Introduction to the Sausage and Rice Skillet Recipe
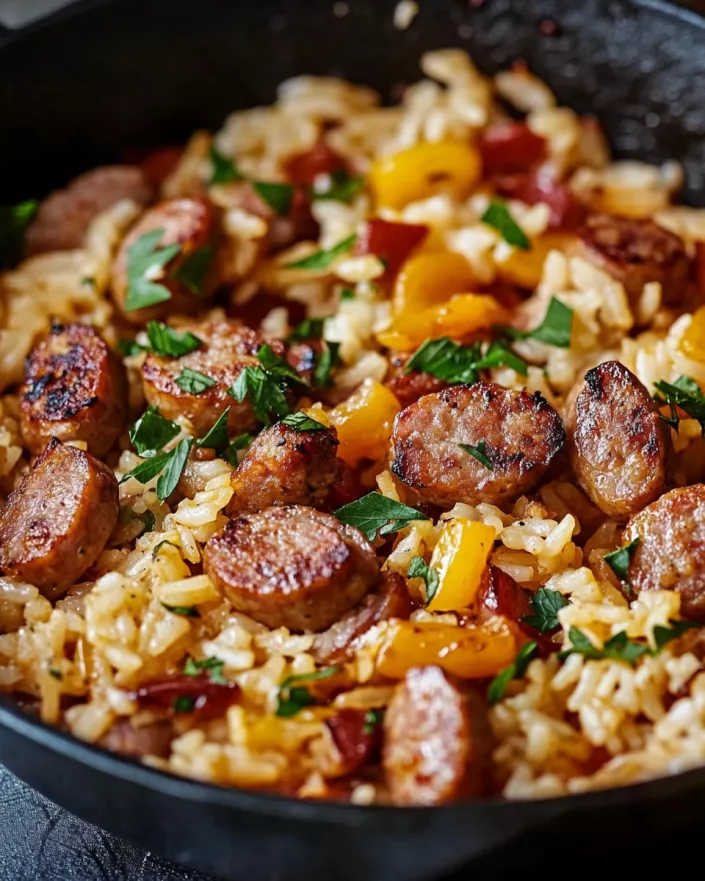
Welcome to the delightful world of the Sausage and Rice Skillet Recipe! This dish is not just a meal; it’s a comforting experience that brings warmth to your kitchen and joy to your table. Perfect for busy weeknights or casual gatherings, this recipe combines the rich flavors of smoked sausage with the wholesome goodness of rice and vegetables.
Imagine a one-pan wonder that cooks up in under 30 minutes, making it a go-to for families and individuals alike. The beauty of this dish lies in its simplicity and versatility. With just a handful of ingredients, you can create a hearty meal that satisfies everyone. Plus, it’s easy to customize based on your preferences or what you have on hand.
Whether you’re a seasoned cook or a beginner, this Sausage and Rice Skillet Recipe is straightforward and forgiving. The combination of spices, fresh vegetables, and savory sausage creates a symphony of flavors that will have your taste buds dancing. So, roll up your sleeves and get ready to whip up a delicious meal that’s sure to impress!
Ingredients for the Sausage and Rice Skillet Recipe
To create the perfect Sausage and Rice Skillet, you’ll need a selection of fresh and flavorful ingredients. Each component plays a vital role in building the dish’s rich taste and satisfying texture. Here’s what you’ll need:
2 tablespoons olive oil: This will be used for sautéing and adds a lovely flavor.
1 pound smoked sausage, sliced: Choose your favorite type, as this is the star of the dish.
1 medium onion, diced: Onions add sweetness and depth to the flavor.
1 bell pepper, diced: Any color works! This adds crunch and color.
2 cloves garlic, minced: Garlic brings a wonderful aroma and taste.
1 cup long-grain white rice: This is the base of the dish, soaking up all the flavors.
2 cups chicken broth: Broth enhances the rice and adds moisture.
1 can (14.5 ounces) diced tomatoes, undrained: Tomatoes add acidity and juiciness.
1 teaspoon paprika: This spice gives a warm, smoky flavor.
1 teaspoon dried oregano: Oregano adds an earthy taste.
Salt and pepper to taste: Essential for seasoning and enhancing flavors.
2 green onions, sliced (for garnish): These add a fresh, crisp finish to the dish.
Gathering these ingredients will set you on the path to creating a delicious Sausage and Rice Skillet. Each item contributes to the overall flavor, making this dish a delightful experience for your taste buds. Now that you have everything ready, let’s move on to the preparation steps!
Step-by-Step Preparation of the Sausage and Rice Skillet Recipe
Now that you have all your ingredients ready, it’s time to dive into the cooking process! This Sausage and Rice Skillet Recipe is simple and straightforward. Follow these steps to create a delicious meal that your family will love.
Step 1: Preparing the Ingredients
Before you start cooking, it’s important to prepare all your ingredients. Begin by slicing the smoked sausage into bite-sized pieces. Next, dice the onion and bell pepper. Mince the garlic cloves as well. Having everything prepped and ready to go will make the cooking process smooth and enjoyable. Plus, it helps you avoid any last-minute scrambling!
Step 2: Cooking the Sausage
Heat the olive oil in a large skillet over medium heat. Once the oil is hot, add the sliced sausage. Cook the sausage for about 5 minutes, stirring occasionally, until it’s nicely browned. This step is crucial as it enhances the flavor of the sausage. Once browned, remove the sausage from the skillet and set it aside. This will allow you to use the same skillet for the vegetables, capturing all those delicious flavors.
Step 3: Adding Vegetables and Spices
In the same skillet, add the diced onion and bell pepper. Sauté these vegetables for about 3-4 minutes until they become soft and fragrant. The aroma will fill your kitchen! After that, add the minced garlic and cook for an additional minute. Garlic cooks quickly, so keep an eye on it to prevent burning. This combination of vegetables will add a wonderful depth of flavor to your dish.
Step 4: Incorporating Rice and Liquid
Next, it’s time to add the rice to the skillet. Stir it in with the sautéed vegetables, allowing it to absorb some of the flavors. Then, pour in the chicken broth and the can of diced tomatoes (with their juice). Sprinkle in the paprika and oregano, mixing everything well. Bring the mixture to a boil. This step is essential as it helps the rice cook evenly and soak up all the delicious flavors.
Step 5: Simmering to Perfection
Once the mixture is boiling, reduce the heat to low. Cover the skillet with a lid and let it simmer for 15-20 minutes. During this time, the rice will cook and absorb the liquid, becoming tender and fluffy. Make sure to check occasionally to ensure it doesn’t stick to the bottom. When the rice is fully cooked, return the browned sausage to the skillet. Stir everything together and season with salt and pepper to taste. Your Sausage and Rice Skillet is almost ready!
Variation of the Sausage and Rice Skillet Recipe
The beauty of the Sausage and Rice Skillet Recipe lies in its versatility. You can easily adapt it to suit your taste or dietary needs. Here are some exciting variations to consider:
Alternative Proteins
If you’re looking to switch things up, consider using different proteins. While smoked sausage is delicious, you can try:
Chicken Sausage: A lighter option that still packs a punch of flavor.
Turkey Sausage: This is a great choice for a leaner meal without sacrificing taste.
Ground Beef or Turkey: Brown the meat before adding the vegetables for a hearty twist.
Vegetarian Sausage: Perfect for those who prefer a meatless option while still enjoying the same flavors.
Each of these alternatives will bring a unique taste to your skillet, making it a fun dish to experiment with!
Different Vegetable Combinations
Another way to customize your Sausage and Rice Skillet is by changing up the vegetables. Here are some ideas:
Zucchini: Adds a nice texture and absorbs flavors well.
Spinach: Stir in fresh spinach at the end for a pop of color and nutrients.
Carrots: Diced carrots can add sweetness and crunch.
Frozen Peas: These can be added during the last few minutes of cooking for a burst of color and flavor.
Feel free to mix and match based on what you have in your fridge. The possibilities are endless, and each variation will create a delightful twist on the classic Sausage and Rice Skillet Recipe!
Cooking Note for the Sausage and Rice Skillet Recipe
When preparing the Sausage and Rice Skillet Recipe, a few cooking notes can help ensure your dish turns out perfectly every time. First, it’s essential to use a large skillet with a lid. This allows for even cooking and helps trap steam, which is crucial for cooking the rice thoroughly.
Another important tip is to keep an eye on the heat. Cooking over medium heat is ideal for browning the sausage and sautéing the vegetables without burning them. If the heat is too high, the ingredients may cook unevenly or stick to the pan. Adjust the heat as needed to maintain a gentle simmer when you add the rice and liquids.
Also, remember to taste your dish as you go! This is a great way to adjust the seasoning. You might find that you want a little more salt, pepper, or even an extra sprinkle of paprika for added flavor. Each ingredient contributes to the overall taste, so don’t hesitate to make it your own.
Lastly, if you find that the rice is not fully cooked after the suggested simmering time, you can add a splash more chicken broth or water. Cover the skillet again and let it cook for a few more minutes. This will help the rice absorb the extra liquid and become tender.
By following these cooking notes, you’ll be well on your way to creating a delicious and satisfying Sausage and Rice Skillet that your family will love!
Serving Suggestions for the Sausage and Rice Skillet Recipe
Once your Sausage and Rice Skillet is ready, it’s time to serve it up! This dish is not only delicious but also visually appealing, making it perfect for any occasion. Here are some serving suggestions to enhance your meal experience:
Garnish with Fresh Herbs: Sprinkle some fresh parsley or cilantro on top for a burst of color and flavor. Fresh herbs can elevate the dish and add a refreshing touch.
Pair with a Side Salad: A light green salad with a tangy vinaigrette complements the richness of the skillet. Consider using mixed greens, cherry tomatoes, and cucumbers for a refreshing contrast.
Serve with Crusty Bread: A slice of warm, crusty bread is perfect for soaking up the flavorful juices. It adds a delightful texture and makes the meal even more satisfying.
Offer Hot Sauce: For those who enjoy a little heat, provide hot sauce on the side. This allows everyone to customize their spice level according to their taste.
Include a Side of Vegetables: Steamed or roasted vegetables can round out the meal. Broccoli, green beans, or asparagus are great options that add nutrition and color.
These serving suggestions will not only enhance the flavor of your Sausage and Rice Skillet but also create a well-rounded meal that everyone will enjoy. Whether it’s a family dinner or a gathering with friends, this dish is sure to impress!
Tips for Making the Best Sausage and Rice Skillet Recipe
Creating the perfect Sausage and Rice Skillet Recipe is all about attention to detail and a few handy tips. With these suggestions, you can elevate your dish and ensure it turns out delicious every time. Here are some tips to keep in mind:
Choose Quality Sausage: The type of sausage you use can greatly affect the flavor of your dish. Opt for high-quality smoked sausage for the best taste. You can also experiment with different flavors, such as garlic or spicy sausage, to add a unique twist.
Don’t Skip the Browning: Browning the sausage is crucial. It adds depth and richness to the dish. Make sure to cook it until it’s nicely caramelized before removing it from the skillet.
Use Fresh Ingredients: Fresh vegetables and herbs can make a big difference in flavor. Whenever possible, use fresh garlic, onions, and bell peppers. They will enhance the overall taste of your Sausage and Rice Skillet.
Adjust the Liquid: If you prefer a creamier texture, consider adding a splash of cream or a dollop of sour cream at the end. This will give your dish a rich, comforting feel.
Let It Rest: After cooking, let the skillet sit for a few minutes before serving. This allows the flavors to meld together and makes for a more cohesive dish.
Experiment with Spices: While paprika and oregano are classic choices, don’t hesitate to try other spices. A pinch of cumin or chili powder can add an exciting flavor profile to your skillet.
Make It a One-Pot Meal: To keep things simple, serve the Sausage and Rice Skillet as a complete meal. You can add beans or lentils for extra protein and fiber, making it even more filling.
Store Leftovers Properly: If you have leftovers, store them in an airtight container in the fridge. They can last for up to three days. Reheat gently on the stove or in the microwave, adding a splash of broth to keep it moist.
By following these tips, you’ll be well on your way to mastering the Sausage and Rice Skillet Recipe. Each suggestion is designed to enhance the flavors and make your cooking experience enjoyable. So, gather your ingredients and get ready to create a dish that will impress your family and friends!
Breakdown of Time for the Sausage and Rice Skillet Recipe
Understanding the time needed for each step of the Sausage and Rice Skillet Recipe can help you plan your cooking efficiently. Here’s a breakdown of the time required for preparation and cooking:
Prep Time
The prep time for this delicious dish is quite short. You’ll need about 10-15 minutes to gather and prepare all your ingredients. This includes slicing the sausage, dicing the onion and bell pepper, and mincing the garlic. Having everything ready will make the cooking process smooth and enjoyable!
Cooking Time
Once you start cooking, the total cooking time is approximately 20-25 minutes. This includes:
5 minutes for browning the sausage.
4-5 minutes for sautéing the vegetables.
15-20 minutes for simmering the rice and allowing it to absorb the flavors.
Total Time
In total, you can expect to spend about 30-40 minutes from start to finish. This makes the Sausage and Rice Skillet Recipe a quick and satisfying meal option for busy weeknights. With just a little bit of time, you can create a hearty dish that your family will love!
Nutritional Information for the Sausage and Rice Skillet Recipe
Understanding the nutritional content of your meals is essential for maintaining a balanced diet. The Sausage and Rice Skillet Recipe not only offers great flavor but also provides a satisfying nutritional profile. Here’s a breakdown of the key nutritional components per serving:
Calories
450 calories. This makes it a hearty meal that can keep you energized throughout the day. The combination of sausage, rice, and vegetables contributes to the overall calorie count, providing a filling dish that is perfect for lunch or dinner.
Protein
20 grams of protein. The smoked sausage is the primary source of protein, making this dish a great option for those looking to increase their protein intake. Pairing it with rice and vegetables creates a well-rounded meal that supports muscle health and keeps you feeling full.
Sodium
800 milligrams. This amount can vary based on the type of sausage used and whether you add extra salt. If you’re watching your sodium intake, consider using low-sodium chicken broth and a reduced-sodium sausage. This way, you can enjoy the flavors without compromising your health goals.
Overall, the Sausage and Rice Skillet Recipe is a nutritious option that balances calories, protein, and sodium. It’s a delicious way to enjoy a meal that satisfies your hunger while providing essential nutrients. Enjoy this dish knowing it’s not just tasty but also contributes to your overall well-being!
FAQs about the Sausage and Rice Skillet Recipe
Can I use brown rice instead of white rice in the Sausage and Rice Skillet Recipe?
Yes, you can use brown rice instead of white rice in the Sausage and Rice Skillet Recipe! However, keep in mind that brown rice takes longer to cook. You will need to adjust the cooking time and the amount of liquid. Typically, brown rice requires about 40-45 minutes to become tender. Make sure to add extra chicken broth or water to ensure the rice cooks properly. This substitution will give your dish a nuttier flavor and added fiber, making it a healthier option!
How can I make the Sausage and Rice Skillet Recipe spicier?
If you’re looking to add some heat to your Sausage and Rice Skillet Recipe, there are several ways to do so! Here are a few suggestions:
Add Red Pepper Flakes: A pinch of red pepper flakes can elevate the spice level without overwhelming the dish.
Use Spicy Sausage: Opt for a spicy smoked sausage or chorizo to infuse the dish with heat right from the start.
Incorporate Jalapeños: Diced jalapeños can add a fresh kick. Add them along with the onions and bell peppers.
Hot Sauce: Serve with your favorite hot sauce on the side, allowing everyone to customize their spice level.
These options will help you create a Sausage and Rice Skillet that packs a flavorful punch!
What type of sausage works best for the Sausage and Rice Skillet Recipe?
The type of sausage you choose can significantly impact the flavor of your Sausage and Rice Skillet Recipe. Here are some popular options:
Smoked Sausage: This is the classic choice, providing a rich, smoky flavor that complements the dish perfectly.
Andouille Sausage: If you enjoy a bit of spice, andouille sausage adds a zesty kick and is great for a Cajun twist.
Italian Sausage: Sweet or spicy Italian sausage can add a delicious herbaceous flavor to the skillet.
Chicken or Turkey Sausage: For a lighter option, these sausages are lower in fat but still provide great taste.
Ultimately, the best sausage for your skillet is one that you enjoy! Feel free to experiment with different types to find your favorite.
Can I prepare the Sausage and Rice Skillet Recipe in advance?
Absolutely! The Sausage and Rice Skillet Recipe can be prepared in advance, making it a convenient option for busy days. Here’s how to do it:
Cook and Store: You can cook the entire dish and store it in an airtight container in the refrigerator for up to three days.
Reheat: When you’re ready to eat, simply reheat the skillet on the stove over low heat. Add a splash of chicken broth to keep it moist.
Meal Prep: You can also prepare the ingredients ahead of time. Chop the vegetables and slice the sausage, then store them in the fridge until you’re ready to cook.
This makes the Sausage and Rice Skillet Recipe a fantastic option for meal prep, allowing you to enjoy a delicious homemade meal with minimal effort during the week!
Conclusion on the Sausage and Rice Skillet Recipe
In conclusion, the Sausage and Rice Skillet Recipe is a fantastic addition to any home cook’s repertoire. This dish is not only quick and easy to prepare, but it also delivers a hearty and satisfying meal that the whole family will love. With its rich flavors and comforting ingredients, it’s perfect for busy weeknights or casual gatherings with friends.
As we’ve explored, the versatility of this recipe allows you to customize it to your taste. Whether you choose different proteins, mix in various vegetables, or spice it up, the possibilities are endless. This adaptability makes it a great option for those who enjoy experimenting in the kitchen.
Moreover, the nutritional benefits of the Sausage and Rice Skillet cannot be overlooked. With a balanced combination of protein, carbohydrates, and essential vitamins, it provides a wholesome meal that fuels your body. Plus, it’s a great way to incorporate more vegetables into your diet.
So, gather your ingredients, follow the steps, and enjoy the delightful experience of cooking this Sausage and Rice Skillet Recipe. Whether you’re sharing it with family or savoring it solo, this dish is sure to bring warmth and satisfaction to your table. Happy cooking!
Introduction to One-Pan Lemon Garlic Salmon and Orzo
One-Pan Lemon Garlic Salmon and Orzo is a delightful dish that combines the rich flavors of salmon with the zesty brightness of lemon and the comforting texture of orzo pasta. This recipe is perfect for busy weeknights or special occasions when you want to impress your family and friends without spending hours in the kitchen.
Not only is this dish simple to prepare, but it also packs a nutritional punch. Salmon is known for its high protein content and omega-3 fatty acids, which are great for heart health. Meanwhile, orzo adds a satisfying bite, and the fresh vegetables like spinach and cherry tomatoes provide essential vitamins and minerals. Together, they create a balanced meal that is both tasty and wholesome.
One-Pan Lemon Garlic Salmon and Orzo is a breeze. So, roll up your sleeves and get ready to create a dish that will have everyone asking for seconds!
Ingredients for One-Pan Lemon Garlic Salmon and Orzo
One-Pan Lemon Garlic Salmon and Orzo, you’ll need a few simple ingredients. These items are easy to find and will help you whip up this delightful dish in no time. Here’s what you’ll need:
2 tablespoons olive oil
4 salmon fillets (about 6 ounces each)
Salt and pepper, to taste
1 teaspoon garlic powder
1 teaspoon onion powder
1 cup orzo pasta
2 cups vegetable or chicken broth
1 lemon, zested and juiced
1 cup cherry tomatoes, halved
1 cup fresh spinach
2 tablespoons fresh parsley, chopped
These ingredients come together to create a flavorful and satisfying meal. The olive oil adds richness, while the salmon provides a hearty source of protein. The orzo pasta serves as a wonderful base, soaking up all the delicious flavors from the broth and lemon. Fresh vegetables like cherry tomatoes and spinach not only enhance the taste but also add vibrant colors to your plate.
Before you start cooking, make sure you have everything on hand. This will make the cooking process smoother and more enjoyable. Now that you know what you need, let’s move on to the step-by-step preparation of this delightful dish!
Step-by-Step Preparation of One-Pan Lemon Garlic Salmon and Orzo
One-Pan Lemon Garlic Salmon and Orzo recipe is straightforward and fun. Follow these steps to create a delicious meal that will impress everyone at the table.
Step 1: Preparing the Ingredients
Start by gathering all your ingredients. This makes cooking easier and more enjoyable. First, rinse the salmon fillets under cold water and pat them dry with paper towels. This helps the seasonings stick better. Next, zest the lemon and then cut it in half to juice it. Set these aside. Finally, halve the cherry tomatoes and chop the fresh parsley. Having everything prepped will streamline your cooking process.
Step 2: Cooking the Orzo
In a large skillet, heat the olive oil over medium-high heat. Once the oil is hot, add the orzo pasta. Toast the orzo for about 1-2 minutes, stirring frequently. This step enhances the flavor of the pasta. After toasting, pour in the vegetable or chicken broth, along with the lemon zest and juice. Bring the mixture to a boil, then reduce the heat to low. Cover the skillet and let it simmer for about 10 minutes. The orzo will absorb the liquid and become tender during this time.
Step 3: Searing the Salmon
While the orzo is cooking, it’s time to prepare the salmon. Season the fillets with salt, pepper, garlic powder, and onion powder. Once the orzo is simmering, carefully add the salmon fillets to the skillet, skin-side down. Cook for about 4-5 minutes until the skin is crispy. Then, flip the fillets and cook for another 3-4 minutes until they are cooked through. The salmon should be flaky and tender. Once done, remove the salmon from the skillet and set it aside.
Step 4: Combining Ingredients
After the orzo is cooked and the salmon is set aside, it’s time to combine everything. In the same skillet, add the halved cherry tomatoes and fresh spinach to the orzo. Stir gently and cook for an additional 2-3 minutes. The spinach will wilt, and the tomatoes will soften, adding a burst of flavor to the dish. This step not only enhances the taste but also adds vibrant colors to your meal.
Step 5: Finishing Touches
One-Pan Lemon Garlic Salmon and Orzo is now ready to be enjoyed!
Variations of One-Pan Lemon Garlic Salmon and Orzo
One-Pan Lemon Garlic Salmon and Orzo is a delightful dish on its own, there are many ways to customize it to suit your taste or dietary needs. Here are some variations that can enhance your meal while keeping it simple and delicious.
Substituting Salmon with Other Fish
If you’re not a fan of salmon or simply want to try something different, you can easily substitute it with other types of fish. Options like cod, tilapia, or trout work wonderfully in this recipe. Each fish has its unique flavor and texture, but they all cook similarly to salmon. Just remember to adjust the cooking time slightly, as thinner fillets may require less time to cook. This way, you can enjoy a variety of flavors while still savoring the delicious orzo and lemon combination.
Adding Vegetables for Extra Nutrition
One-Pan Lemon Garlic Salmon and Orzo is by adding more vegetables. You can include bell peppers, zucchini, or asparagus for added color and nutrition. Simply chop the vegetables into bite-sized pieces and add them to the skillet along with the cherry tomatoes and spinach. This not only boosts the nutritional value of your meal but also makes it more visually appealing. Plus, the extra veggies will soak up the delicious flavors of the broth and lemon, making every bite even more enjoyable!
One-Pan Lemon Garlic Salmon and Orzo. Feel free to experiment and find the combination that you love the most!
Cooking Note for One-Pan Lemon Garlic Salmon and Orzo
One-Pan Lemon Garlic Salmon and Orzo, there are a few cooking notes to keep in mind. These tips will help ensure that your dish turns out perfectly every time. First, always use a large skillet to give the ingredients enough space to cook evenly. A crowded pan can lead to uneven cooking, especially for the salmon and orzo.
Next, pay attention to the heat settings. Cooking the orzo on medium-high heat initially helps to toast it, enhancing its flavor. However, once you add the broth, it’s crucial to reduce the heat to low. This allows the orzo to simmer gently, absorbing the liquid without becoming mushy. Stirring occasionally during this process can also help prevent sticking.
When searing the salmon, make sure the skillet is hot enough before adding the fillets. A hot skillet will create a nice sear, giving the salmon a crispy skin. If the salmon sticks to the pan, it may not be ready to flip yet. Patience is key here! Also, remember to let the salmon rest for a minute after cooking. This helps retain its moisture and flavor.
Lastly, feel free to adjust the seasoning to your taste. If you love garlic, add a bit more garlic powder. If you prefer a tangier flavor, increase the lemon juice. Cooking is all about personal preference, so don’t hesitate to make this dish your own!
One-Pan Lemon Garlic Salmon and Orzo. Enjoy the process and the delicious results!
Serving Suggestions for One-Pan Lemon Garlic Salmon and Orzo
One-Pan Lemon Garlic Salmon and Orzo, it’s time to think about how to serve it. Presentation can elevate your meal, making it even more enjoyable. Here are some delightful serving suggestions to enhance your dining experience.
First, consider using a large, shallow serving dish. This allows the vibrant colors of the salmon, orzo, and vegetables to shine. Arrange the salmon fillets on top of the orzo, and sprinkle the fresh parsley generously over the dish. This adds a pop of color and freshness, making it visually appealing.
For a complete meal, pair your dish with a light side salad. A simple green salad with mixed greens, cucumber, and a lemon vinaigrette complements the flavors of the salmon beautifully. The crispness of the salad balances the richness of the fish and orzo.
One-Pan Lemon Garlic Salmon and Orzo with crusty bread or garlic bread. This allows you to soak up any remaining broth and adds a satisfying crunch to your meal. You can also offer a side of roasted or steamed vegetables for extra nutrition. Broccoli, asparagus, or green beans work well and add more color to your plate.
If you’re hosting a dinner party, consider serving the dish family-style. Place the skillet directly on the table, allowing guests to help themselves. This creates a warm and inviting atmosphere, encouraging conversation and connection.
Lastly, don’t forget about beverages! A chilled glass of white wine, such as Sauvignon Blanc or Pinot Grigio, pairs wonderfully with the flavors of the salmon and lemon. For a non-alcoholic option, sparkling water with a slice of lemon is refreshing and complements the dish perfectly.
One-Pan Lemon Garlic Salmon and Orzo will not only taste amazing but also look stunning on the table. Enjoy your meal and the company of those you share it with!
Tips for Perfecting One-Pan Lemon Garlic Salmon and Orzo
One-Pan Lemon Garlic Salmon and Orzo truly shine, consider these helpful tips. They will guide you in achieving the best flavor and texture, ensuring that every bite is delightful.
First, always choose fresh salmon fillets. Fresh fish has a better flavor and texture than frozen. If you must use frozen salmon, make sure to thaw it completely before cooking. This helps it cook evenly and prevents it from becoming rubbery.
Next, don’t skip the seasoning! Properly seasoning the salmon with salt, pepper, garlic powder, and onion powder enhances its natural flavors. Feel free to experiment with other herbs and spices, like dill or paprika, to add your personal touch.
When cooking the orzo, keep an eye on the liquid level. If it seems too dry before the orzo is tender, add a splash more broth or water. This ensures the pasta cooks perfectly without becoming mushy.
Another tip is to let the salmon rest for a minute after cooking. This allows the juices to redistribute, making the fish more tender and flavorful. It’s a small step that makes a big difference!
For added brightness, consider squeezing extra lemon juice over the finished dish just before serving. This enhances the lemon flavor and adds a refreshing zing that complements the salmon beautifully.
Lastly, don’t be afraid to get creative with your vegetables. Adding seasonal veggies not only boosts nutrition but also adds variety to your dish. Try incorporating seasonal favorites like zucchini in the summer or Brussels sprouts in the fall.
One-Pan Lemon Garlic Salmon and Orzo to new heights. Enjoy the cooking process and the delicious results!
Breakdown of Time for One-Pan Lemon Garlic Salmon and Orzo
One-Pan Lemon Garlic Salmon and Orzo can help you plan your cooking efficiently. Here’s a breakdown of the time required for preparation and cooking, ensuring you can enjoy this delightful dish without any rush.
Prep Time
The prep time for this recipe is approximately 15 minutes. During this time, you will gather all your ingredients, wash and dry the salmon, zest and juice the lemon, and chop the vegetables. Having everything ready before you start cooking makes the process smoother and more enjoyable. It’s a great way to set yourself up for success!
Cooking Time
One-Pan Lemon Garlic Salmon and Orzo is about 20 minutes. This includes toasting the orzo, simmering it in broth, searing the salmon, and combining all the ingredients. Each step is designed to maximize flavor while keeping the cooking process efficient. You’ll be amazed at how quickly this delicious meal comes together!
Total Time
In total, you can expect to spend around 35 minutes from start to finish. This includes both prep and cooking time. With such a quick turnaround, this dish is perfect for busy weeknights or when you want to impress guests without spending hours in the kitchen. You’ll have a flavorful and nutritious meal ready in no time!
One-Pan Lemon Garlic Salmon and Orzo turns out perfectly every time. Happy cooking!
Nutritional Information for One-Pan Lemon Garlic Salmon and Orzo
One-Pan Lemon Garlic Salmon and Orzo not only delights your taste buds but also provides a variety of nutrients. Here’s a breakdown of the key nutritional information per serving, helping you make informed choices.
Calories
One-Pan Lemon Garlic Salmon and Orzo contains approximately 450 calories. This makes it a satisfying meal that can fit well into a balanced diet. The combination of salmon, orzo, and fresh vegetables provides a hearty yet healthy option for lunch or dinner.
Protein
Protein is vital for building and repairing tissues, and this dish delivers! Each serving offers about 30 grams of protein. The salmon is an excellent source of high-quality protein, which is essential for muscle health and overall well-being. Pairing it with orzo and vegetables ensures you get a complete meal that keeps you feeling full and energized.
Sodium
One-Pan Lemon Garlic Salmon and Orzo while keeping your sodium intake in check.
One-Pan Lemon Garlic Salmon and Orzo with confidence, knowing it’s a delicious and nutritious choice for any meal. Whether you’re cooking for yourself or for family and friends, this dish is sure to please!
FAQs about One-Pan Lemon Garlic Salmon and Orzo
Can I use frozen salmon for this recipe?
One-Pan Lemon Garlic Salmon and Orzo recipe! However, it’s important to thaw the salmon completely before cooking. You can do this by placing it in the refrigerator overnight or using the defrost setting on your microwave. Thawing ensures that the salmon cooks evenly and maintains its tender texture. Just remember to adjust the cooking time slightly, as frozen salmon may take a minute or two longer to cook through compared to fresh salmon.
What can I serve with One-Pan Lemon Garlic Salmon and Orzo?
One-Pan Lemon Garlic Salmon and Orzo is a complete meal on its own, but you can enhance your dining experience with some delicious sides. A light green salad with mixed greens, cucumber, and a lemon vinaigrette pairs beautifully with the dish. You can also serve it with crusty bread or garlic bread to soak up any remaining broth. For added nutrition, consider roasted or steamed vegetables like broccoli, asparagus, or green beans. These sides not only complement the flavors but also add more color and texture to your meal!
How do I store leftovers of One-Pan Lemon Garlic Salmon and Orzo?
One-Pan Lemon Garlic Salmon and Orzo is easy! Allow the dish to cool completely before transferring it to an airtight container. You can store it in the refrigerator for up to 3 days. When reheating, you can use the microwave or a skillet over low heat. If the orzo seems dry, add a splash of broth or water to help rehydrate it. Enjoy your leftovers as a quick and tasty meal!
Conclusion on One-Pan Lemon Garlic Salmon and Orzo
One-Pan Lemon Garlic Salmon and Orzo is a fantastic dish that brings together flavor, nutrition, and convenience. With its simple preparation and minimal cleanup, this recipe is perfect for anyone looking to enjoy a delicious meal without spending hours in the kitchen. The combination of tender salmon, zesty lemon, and hearty orzo creates a delightful experience for your taste buds.
Not only is this dish easy to make, but it also offers a wealth of nutritional benefits. Salmon is rich in omega-3 fatty acids, which are essential for heart health, while orzo provides a satisfying base that complements the fish beautifully. The addition of fresh vegetables like spinach and cherry tomatoes not only enhances the flavor but also boosts the overall nutritional value of the meal.
One-Pan Lemon Garlic Salmon and Orzo is sure to impress. Its versatility allows for various adaptations, making it easy to cater to different tastes and dietary preferences. From swapping out the salmon for another fish to adding extra vegetables, the possibilities are endless.
So, why not give this recipe a try? With its quick prep and cooking time, you can have a wholesome meal on the table in no time. Enjoy the delightful flavors and the satisfaction of creating a dish that is both healthy and delicious. Happy cooking!
Introduction to Creamy Ricotta Chicken Orzo Skillet
Creamy Ricotta Chicken Orzo Skillet is a dish that brings comfort and flavor to your dinner table. This one-pan meal is not only easy to prepare but also packed with nutrients. It combines tender chicken, creamy ricotta, and wholesome orzo pasta, making it a perfect choice for busy weeknights or special occasions.
Imagine a warm, creamy dish that fills your home with a delicious aroma. The blend of ricotta cheese and Parmesan creates a rich sauce that clings to the orzo, while the spinach adds a pop of color and nutrition. Plus, it’s a great way to sneak in some greens for the kids!
This recipe is versatile, allowing you to customize it to your taste. Whether you prefer a little extra garlic or want to add your favorite vegetables, the possibilities are endless. With just a few simple ingredients, you can create a meal that feels gourmet without spending hours in the kitchen.
Creamy Ricotta Chicken Orzo Skillet.
Ingredients for Creamy Ricotta Chicken Orzo Skillet
Creamy Ricotta Chicken Orzo Skillet, you’ll need a handful of simple yet flavorful ingredients. Each component plays a vital role in building the dish’s rich taste and creamy texture. Here’s what you’ll need:
2 tablespoons olive oil: This will be used for sautéing the chicken, adding a lovely flavor.
1 pound boneless, skinless chicken breasts: Cut into bite-sized pieces for quick cooking and easy eating.
1 teaspoon salt: Essential for enhancing the flavors of the dish.
1/2 teaspoon black pepper: Adds a mild kick to the overall taste.
1 teaspoon garlic powder: For that aromatic garlic flavor without the fuss of fresh garlic.
1/2 teaspoon onion powder: Complements the garlic and adds depth to the dish.
1 cup orzo pasta: This small pasta shape cooks quickly and absorbs the creamy sauce beautifully.
3 cups chicken broth: Provides moisture and a savory base for the orzo.
1 cup ricotta cheese: The star ingredient that makes this dish creamy and rich.
1 cup baby spinach: Adds a nutritious boost and a pop of color.
1/2 cup grated Parmesan cheese: For extra creaminess and a cheesy flavor.
1 tablespoon lemon juice: Brightens the dish and balances the richness.
1 teaspoon dried Italian herbs: A blend of herbs that enhances the overall flavor profile.
Fresh basil leaves for garnish (optional): Adds a fresh touch and beautiful presentation.
Creamy Ricotta Chicken Orzo Skillet, making it a dish that everyone will enjoy. Now, let’s move on to the preparation steps to bring this delicious meal to life!
Preparation of Creamy Ricotta Chicken Orzo Skillet
Creamy Ricotta Chicken Orzo Skillet. This process is straightforward and quick, making it perfect for a busy weeknight dinner. Follow these simple steps to create a delicious meal that your family will love!
Step 1: Preparing the Chicken
First, heat the olive oil in a large skillet over medium heat. Once the oil is hot, add the bite-sized chicken pieces. Sprinkle them with salt, black pepper, garlic powder, and onion powder. Cook the chicken for about 5-7 minutes, stirring occasionally. You want the chicken to be browned and cooked through. Once done, remove the chicken from the skillet and set it aside on a plate. This step ensures that the chicken stays juicy and flavorful.
Step 2: Cooking the Orzo
In the same skillet, add the orzo pasta and pour in the chicken broth. Bring the mixture to a boil, then reduce the heat to a simmer. Stir occasionally to prevent the orzo from sticking to the bottom of the pan. Cook for about 10-12 minutes, or until the orzo is tender and most of the liquid is absorbed. This step is crucial as it allows the orzo to soak up all the delicious flavors from the broth.
Step 3: Combining Ingredients
Once the orzo is cooked, it’s time to bring everything together. Stir in the ricotta cheese, baby spinach, grated Parmesan cheese, lemon juice, and dried Italian herbs. Make sure to mix everything well until the ricotta is fully incorporated and the spinach wilts. This combination creates a creamy and flavorful sauce that coats the orzo beautifully.
Step 4: Adding the Creamy Ricotta
Now, return the cooked chicken to the skillet. Gently fold it into the creamy mixture. Allow everything to cook together for an additional 2-3 minutes. This step ensures that the chicken is heated through and absorbs the flavors of the sauce. The creamy ricotta will create a luscious texture that makes this dish irresistible!
Step 5: Final Touches and Serving
Creamy Ricotta Chicken Orzo Skillet warm. For an extra touch, garnish with fresh basil leaves. This not only adds a pop of color but also a fresh aroma that elevates the dish. Enjoy your meal!
Variation of Creamy Ricotta Chicken Orzo Skillet
Creamy Ricotta Chicken Orzo Skillet is a versatile dish that can easily adapt to your preferences. Whether you want to switch up the protein or add more vegetables, there are plenty of ways to make this meal your own. Let’s explore some delicious variations!
Alternative Proteins
Creamy Ricotta Chicken Orzo Skillet, there are several tasty options. Here are a few ideas:
Turkey: Ground turkey is a lean alternative that works well in this dish. Just cook it until browned, similar to the chicken.
Shrimp: For a seafood twist, add shrimp. Cook them for just a few minutes until they turn pink and opaque.
Tofu: For a vegetarian option, use firm tofu. Cube it and sauté until golden brown before adding it to the skillet.
Beef: Ground beef can also be used. Cook it until browned, then follow the same steps as with chicken.
These alternative proteins will not only change the flavor but also add variety to your meals. Feel free to experiment with your favorite protein source!
Vegetable Additions
Creamy Ricotta Chicken Orzo Skillet is a fantastic way to boost nutrition and flavor. Here are some great options:
Bell Peppers: Diced bell peppers add sweetness and color. Sauté them with the chicken for extra flavor.
Mushrooms: Sliced mushrooms bring an earthy taste. Cook them until they’re tender before adding the orzo.
Zucchini: Chopped zucchini cooks quickly and adds a nice texture. Stir it in with the spinach for a fresh crunch.
Broccoli: Steamed or sautéed broccoli florets can be mixed in for added nutrition and a vibrant green color.
Creamy Ricotta Chicken Orzo Skillet!
Cooking Note for Creamy Ricotta Chicken Orzo Skillet
Creamy Ricotta Chicken Orzo Skillet, there are a few cooking notes to keep in mind. These tips will help ensure that your dish turns out perfectly every time. Let’s explore some essential points to consider while cooking!
First, make sure to use a large skillet. A spacious pan allows for even cooking and prevents overcrowding. This is especially important when browning the chicken. If the pan is too crowded, the chicken may steam instead of sear, resulting in less flavor.
Next, pay attention to the heat. Cooking over medium heat is ideal for browning the chicken without burning it. If the heat is too high, the outside may cook too quickly while the inside remains undercooked. Always check that the chicken is cooked through, reaching an internal temperature of 165°F (75°C).
When cooking the orzo, stirring occasionally is key. This prevents the pasta from sticking to the bottom of the skillet. If you notice that the liquid is evaporating too quickly, feel free to add a splash more chicken broth. This will keep the orzo creamy and prevent it from becoming dry.
Creamy Ricotta Chicken Orzo Skillet so delightful. Take your time to ensure everything is well combined.
By following these cooking notes, you’ll create a delicious and satisfying meal that your family will love. Enjoy the process and the wonderful aromas that fill your kitchen as you prepare this comforting dish!
Serving Suggestions for Creamy Ricotta Chicken Orzo Skillet
Creamy Ricotta Chicken Orzo Skillet is ready, it’s time to think about how to serve it. This dish is not only delicious but also visually appealing, making it perfect for any occasion. Here are some serving suggestions to enhance your dining experience:
Garnish with Fresh Herbs: A sprinkle of fresh basil or parsley on top adds a burst of color and freshness. It also enhances the flavor, making each bite even more delightful.
Pair with a Side Salad: A light side salad with mixed greens, cherry tomatoes, and a simple vinaigrette complements the creamy richness of the skillet. The crispness of the salad balances the dish perfectly.
Serve with Crusty Bread: A slice of warm, crusty bread is perfect for soaking up the creamy sauce. It adds a satisfying crunch and makes the meal feel more complete.
Offer a Side of Roasted Vegetables: Roasted vegetables, such as carrots, zucchini, or asparagus, can add a healthy touch. Their natural sweetness pairs well with the savory flavors of the skillet.
Include a Glass of Wine: For adults, a glass of white wine, like Chardonnay or Sauvignon Blanc, can elevate the meal. The wine’s acidity complements the creaminess of the dish beautifully.
Creamy Ricotta Chicken Orzo Skillet is sure to impress. Enjoy your delicious creation!
Tips for Perfecting Your Creamy Ricotta Chicken Orzo Skillet
Creamy Ricotta Chicken Orzo Skillet truly shine, consider these helpful tips. Each suggestion will enhance the flavors and textures, ensuring a delightful meal every time you prepare it. Let’s dive into some expert advice!
Use Fresh Ingredients: Whenever possible, opt for fresh herbs and vegetables. Fresh ingredients elevate the dish’s flavor and add vibrant colors. For instance, using fresh basil instead of dried can make a noticeable difference.
Don’t Overcook the Chicken: Keep an eye on the chicken while cooking. Overcooking can lead to dry, tough pieces. Aim for a golden brown color and ensure it reaches an internal temperature of 165°F (75°C).
Adjust the Creaminess: If you prefer a creamier dish, feel free to add more ricotta cheese or a splash of heavy cream. This will create an even richer sauce that clings beautifully to the orzo.
Experiment with Seasonings: Don’t hesitate to adjust the seasonings to your taste. Adding a pinch of red pepper flakes can introduce a nice heat, while a dash of smoked paprika can add depth.
Let It Rest: After cooking, let the skillet sit for a few minutes before serving. This allows the flavors to meld together, resulting in a more cohesive dish.
Save Some Cheese for Topping: Reserve a bit of grated Parmesan cheese to sprinkle on top just before serving. This adds a lovely finishing touch and enhances the dish’s presentation.
Store Leftovers Properly: If you have leftovers, store them in an airtight container in the fridge. Reheat gently on the stove with a splash of chicken broth to keep it creamy.
Creamy Ricotta Chicken Orzo Skillet. Each step will help you create a dish that’s not only delicious but also visually appealing. Enjoy the process and the wonderful flavors that come together in this comforting meal!
Breakdown of Time for Creamy Ricotta Chicken Orzo Skillet
Creamy Ricotta Chicken Orzo Skillet can help you plan your cooking efficiently. Here’s a simple breakdown of the time required for each step, ensuring you can enjoy this delicious meal without any rush.
Prep Time
The prep time for this dish is quite short. You’ll need about 10-15 minutes to gather and prepare all your ingredients. This includes cutting the chicken into bite-sized pieces, measuring out the orzo, and chopping any vegetables you wish to add. Having everything ready before you start cooking makes the process smoother and more enjoyable.
Cooking Time
Once you begin cooking, the total cooking time is approximately 20-25 minutes. This includes:
5-7 minutes for browning the chicken.
10-12 minutes for cooking the orzo in chicken broth.
2-3 minutes for combining all ingredients and allowing the flavors to meld.
Creamy Ricotta Chicken Orzo Skillet a fantastic option for busy weeknights when you want a hearty meal without spending hours in the kitchen.
Total Time
Creamy Ricotta Chicken Orzo Skillet!
Nutritional Information for Creamy Ricotta Chicken Orzo Skillet
Creamy Ricotta Chicken Orzo Skillet not only delights your taste buds but also provides a good mix of nutrients. Here’s a closer look at the nutritional information per serving, so you can enjoy this dish with confidence.
Calories
Creamy Ricotta Chicken Orzo Skillet contains approximately 450 calories. This makes it a satisfying meal that can fit well into a balanced diet. The combination of chicken, orzo, and creamy cheeses provides a hearty dish that keeps you full without going overboard on calories.
Protein
Protein is a vital nutrient for building and repairing tissues, and this dish delivers! Each serving offers about 30 grams of protein. The chicken and ricotta cheese are excellent sources of protein, making this skillet a great option for those looking to increase their protein intake. It’s perfect for active individuals or anyone needing a nutritious meal.
Sodium
Creamy Ricotta Chicken Orzo Skillet while keeping your health goals in check.
Creamy Ricotta Chicken Orzo Skillet is not only delicious but also provides a good balance of calories, protein, and sodium. It’s a meal that can nourish your body while satisfying your taste buds. Enjoy this delightful dish knowing it contributes positively to your dietary needs!
FAQs about Creamy Ricotta Chicken Orzo Skillet
Can I use other types of cheese in the Creamy Ricotta Chicken Orzo Skillet?
Absolutely! While ricotta cheese is the star of this dish, you can experiment with other cheeses to suit your taste. For a sharper flavor, try using feta or goat cheese. If you prefer a creamier texture, cream cheese can be a great substitute. Just remember that different cheeses will alter the flavor profile slightly, so choose one that complements your palate. Mixing cheeses can also create a delightful blend of flavors!
How can I make the Creamy Ricotta Chicken Orzo Skillet healthier?
Creamy Ricotta Chicken Orzo Skillet healthier is easy with a few simple adjustments. First, consider using whole grain orzo for added fiber. You can also reduce the amount of cheese or use low-fat versions to cut down on calories. Adding more vegetables, like broccoli or bell peppers, boosts the nutritional value without adding many calories. Lastly, using skinless chicken thighs instead of breasts can provide more flavor while still being a healthy option.
What can I serve with Creamy Ricotta Chicken Orzo Skillet?
This dish is delicious on its own, but pairing it with complementary sides can enhance your meal. A light side salad with mixed greens and a vinaigrette is a refreshing choice. You could also serve it with crusty bread to soak up the creamy sauce. For a heartier option, roasted vegetables or a side of garlic bread can add extra flavor and texture. Feel free to mix and match based on your preferences!
Can I prepare Creamy Ricotta Chicken Orzo Skillet in advance?
Creamy Ricotta Chicken Orzo Skillet in advance! To do this, cook the dish as directed, then let it cool completely before storing it in an airtight container in the refrigerator. It can be kept for up to three days. When you’re ready to enjoy it, simply reheat it on the stove over low heat, adding a splash of chicken broth to keep it creamy. This makes it a convenient option for meal prep or busy weeknights!
Conclusion on Creamy Ricotta Chicken Orzo Skillet
Creamy Ricotta Chicken Orzo Skillet is a delightful dish that combines simplicity with rich flavors. It’s perfect for families looking for a quick yet satisfying meal. With its creamy texture and nutritious ingredients, this recipe is sure to become a favorite in your household.
Not only is it easy to prepare, but it also allows for creativity. You can customize it with different proteins and vegetables, making it versatile for any occasion. Whether you’re cooking for a busy weeknight or a special gathering, this dish is sure to impress.
Creamy Ricotta Chicken Orzo Skillet, remember that cooking is about experimenting and having fun. Don’t hesitate to make it your own by adding your favorite ingredients or adjusting the seasonings to suit your taste.
Creamy Ricotta Chicken Orzo Skillet is more than just a dish; it’s a way to create lasting memories. Happy cooking!
Welcome to the delightful world of French Onion Chicken Rice! This dish combines the rich flavors of classic French onion soup with tender chicken and fluffy rice. It’s a comforting meal that’s perfect for family dinners or special occasions. The creamy sauce, infused with caramelized onions and melted Gruyère cheese, creates a mouthwatering experience that will leave everyone asking for seconds.
What makes this recipe truly special is its simplicity. With just a handful of ingredients, you can create a dish that feels gourmet. The combination of savory beef broth and heavy cream gives the sauce a luxurious texture, while the chicken remains juicy and flavorful. Plus, serving it over rice makes it a complete meal that’s both satisfying and nutritious.
Whether you’re a seasoned cook or a beginner in the kitchen, this French Onion Chicken Rice recipe is easy to follow. It’s a great way to impress your guests or treat your family to something special without spending hours in the kitchen. So, let’s dive into the ingredients and get started on this delicious culinary adventure!
Ingredients for French Onion Chicken Rice Recipe
To create the mouthwatering French Onion Chicken Rice, you’ll need a selection of fresh and flavorful ingredients. Here’s what you’ll need:
These ingredients come together to create a dish that is not only delicious but also visually appealing. The combination of tender chicken, sweet caramelized onions, and creamy sauce topped with melted cheese is sure to impress. Plus, the rice serves as a perfect base, soaking up all the wonderful flavors.
Feel free to customize the ingredients based on your preferences. For instance, you can use different types of cheese or even add vegetables to enhance the dish. Now that you have your ingredients ready, let’s move on to the preparation steps!
Preparation of French Onion Chicken Rice Recipe
Now that you have gathered all your ingredients, it’s time to prepare the French Onion Chicken Rice. This section will guide you through each step, ensuring that your dish turns out perfectly. Let’s get started!
Step 1: Preparing the Chicken
First, take the chicken breasts and season them with salt and black pepper. This simple seasoning enhances the chicken’s natural flavor. Next, heat the olive oil in a large skillet over medium-high heat. Once the oil is hot, carefully add the seasoned chicken breasts. Cook them for about 5-7 minutes on each side. You want them to be golden brown and fully cooked. Once done, remove the chicken from the skillet and set it aside on a plate. This step is crucial as it locks in the juices, keeping the chicken tender.
Step 2: Sautéing the Onions
In the same skillet, add the thinly sliced onion. The leftover oil and chicken juices will add extra flavor. Cook the onions over medium heat for about 10 minutes. Stir them occasionally to prevent burning. You want them to become caramelized and golden brown. This process brings out their natural sweetness. After the onions are caramelized, add the minced garlic and dried thyme. Cook for an additional minute until the garlic is fragrant. This step adds depth to the dish.
Step 3: Combining Ingredients
Now it’s time to bring everything together! Pour in the beef broth and heavy cream into the skillet with the onions. Stir well to combine all the ingredients. As the mixture heats up, it will start to simmer. Allow it to cook for about 5 minutes. This simmering will help the sauce thicken slightly, creating a rich and creamy texture. Make sure to scrape the bottom of the skillet to incorporate all the flavorful bits.
Step 4: Cooking the Rice
While the sauce is simmering, prepare your rice. If you haven’t cooked it yet, follow the package instructions for either white or brown rice. You can use leftover rice if you have it on hand. The rice will serve as a perfect base for the chicken and sauce, soaking up all the delicious flavors. Once the rice is cooked, set it aside and keep it warm.
Step 5: Final Assembly and Baking
Return the cooked chicken to the skillet, placing it right in the creamy sauce. Spoon some of the sauce over the chicken to ensure it’s well-coated. Next, sprinkle the shredded Gruyère cheese evenly over the top. Cover the skillet with a lid and let it cook for another 5 minutes. This will allow the cheese to melt and become bubbly. Once the cheese is melted, your French Onion Chicken is ready to be served!
Now, you can serve the chicken over a bed of warm rice. Don’t forget to garnish with fresh parsley for a pop of color and flavor. Enjoy your delicious creation!
Variation of French Onion Chicken Rice Recipe
While the classic French Onion Chicken Rice recipe is delicious as is, there are many ways to switch things up! Whether you want to try different ingredients or explore various cooking methods, these variations can add a unique twist to your meal. Let’s dive into some alternative ingredients and cooking methods that you can use to make this dish your own.
Alternative Ingredients
One of the best parts of cooking is experimenting with ingredients. Here are some alternatives you can consider:
Cheese Options: If Gruyère isn’t available, try Swiss, mozzarella, or even cheddar cheese. Each will give a different flavor profile.
Protein Substitutes: Instead of chicken, you can use turkey breasts or even tofu for a vegetarian option. Both will absorb the flavors beautifully.
Broth Variations: For a lighter taste, use chicken broth or vegetable broth instead of beef broth. This will change the flavor but still keep it delicious.
Vegetable Additions: Enhance the dish by adding sautéed mushrooms, spinach, or bell peppers to the onion mixture. These veggies will add extra nutrition and flavor.
Herb Swaps: Instead of thyme, try rosemary or oregano for a different herbal note. Fresh herbs can also elevate the dish.
Feel free to mix and match these alternatives based on your preferences. The goal is to create a dish that you and your loved ones will enjoy!
Different Cooking Methods
There are several ways to prepare French Onion Chicken Rice, depending on your kitchen tools and time constraints. Here are a few methods you can try:
Slow Cooker: For a hands-off approach, use a slow cooker. Sear the chicken first, then add all ingredients to the slow cooker. Cook on low for 6-8 hours or high for 3-4 hours. This method allows the flavors to meld beautifully.
Instant Pot: If you’re short on time, the Instant Pot is a great option. Sauté the chicken and onions using the sauté function, then add the remaining ingredients. Cook on high pressure for about 10 minutes, and you’ll have a quick and tasty meal.
Oven-Baked: After preparing the sauce, transfer everything to a baking dish. Top with cheese and bake at 375°F (190°C) for about 20 minutes. This method gives a nice, bubbly cheese topping.
Each cooking method offers a unique texture and flavor, so feel free to experiment and find your favorite way to make this dish!
Cooking Note for French Onion Chicken Rice Recipe
When preparing the French Onion Chicken Rice recipe, there are a few important cooking notes to keep in mind. These tips will help ensure that your dish turns out perfectly every time, enhancing both flavor and presentation.
First, the quality of your ingredients matters. Fresh, high-quality chicken and onions will significantly impact the taste of your dish. Opt for organic or free-range chicken if possible, as it tends to be more flavorful. Additionally, using fresh onions rather than pre-sliced ones will give you better caramelization and sweetness.
Next, pay attention to the cooking temperature. When sautéing the onions, medium heat is ideal. This allows them to caramelize slowly, bringing out their natural sugars without burning. Stir them occasionally to ensure even cooking. If they start to brown too quickly, lower the heat to avoid bitterness.
Another key point is to let the sauce simmer adequately. This step is crucial for thickening the sauce and melding the flavors together. If you find the sauce too thin, let it simmer a bit longer. Conversely, if it becomes too thick, you can add a splash of beef broth or water to reach your desired consistency.
Lastly, don’t rush the cheese melting process. Covering the skillet allows the cheese to melt evenly and become bubbly. If you prefer a golden crust, you can place the skillet under the broiler for a minute or two after cooking. Just keep a close eye on it to prevent burning!
By following these cooking notes, you’ll elevate your French Onion Chicken Rice recipe, making it a dish that’s not only delicious but also visually stunning. Happy cooking!
Serving Suggestions for French Onion Chicken Rice Recipe
Once your French Onion Chicken Rice is ready, it’s time to think about how to serve it! Presentation can elevate your dish, making it even more appealing. Here are some delightful serving suggestions to enhance your dining experience:
Garnish with Fresh Herbs: A sprinkle of freshly chopped parsley or chives adds a pop of color and freshness. It also complements the rich flavors of the dish.
Pair with a Side Salad: A light green salad with a tangy vinaigrette can balance the richness of the chicken and sauce. Consider using mixed greens, cherry tomatoes, and cucumbers for a refreshing contrast.
Serve with Crusty Bread: A slice of crusty baguette or sourdough bread is perfect for soaking up the creamy sauce. It adds a delightful texture and makes the meal feel more complete.
Offer a Variety of Rice: While the recipe calls for white or brown rice, consider serving it with flavored rice, such as garlic or herb-infused rice. This can add an extra layer of taste to your dish.
Include Seasonal Vegetables: Roasted or steamed seasonal vegetables, like asparagus or green beans, can add color and nutrition to your plate. They also provide a nice crunch that contrasts with the creamy chicken.
When serving, consider using shallow bowls or plates to showcase the layers of chicken, sauce, and rice. This not only looks appealing but also makes it easier for guests to enjoy every bite. With these serving suggestions, your French Onion Chicken Rice will be a hit at any table!
Tips for Perfecting Your French Onion Chicken Rice Recipe
To make your French Onion Chicken Rice truly unforgettable, consider these helpful tips. They will guide you in enhancing flavors, improving texture, and ensuring a delightful dining experience. Let’s explore some expert advice to elevate your dish!
Choose the Right Chicken: Opt for chicken breasts that are uniform in size. This ensures even cooking. If you prefer, you can also use chicken thighs for a juicier result.
Caramelize the Onions Slowly: Patience is key when caramelizing onions. Cook them on medium heat and stir frequently. This process can take up to 15 minutes, but the sweet, rich flavor is worth the wait!
Season the Sauce: Taste the sauce before serving. You may want to add a pinch of salt or a dash of pepper to enhance the flavors. A splash of Worcestershire sauce can also add depth.
Use Fresh Herbs: Fresh thyme or parsley can brighten the dish. Add them at the end of cooking for a burst of flavor. Dried herbs are fine, but fresh herbs elevate the taste.
Let It Rest: After cooking, let the dish sit for a few minutes before serving. This allows the flavors to meld together and makes it easier to serve.
Experiment with Cheese: While Gruyère is traditional, don’t hesitate to mix cheeses. A blend of mozzarella and Parmesan can create a delightful cheesy topping.
Make It Ahead: This dish can be made ahead of time. Prepare the chicken and sauce, then store them separately. Reheat before serving, adding the cheese just before serving for that melty goodness.
Adjust the Creaminess: If you prefer a lighter dish, substitute half of the heavy cream with low-fat milk or a plant-based alternative. This will still give you a creamy texture without the extra calories.
By following these tips, you’ll be well on your way to mastering the French Onion Chicken Rice recipe. Each suggestion is designed to enhance your cooking experience and ensure that every bite is packed with flavor. Enjoy your culinary journey!
Breakdown of Time for French Onion Chicken Rice Recipe
Understanding the time required for each step of the French Onion Chicken Rice recipe can help you plan your cooking efficiently. Here’s a detailed breakdown of the time you’ll need for preparation and cooking.
Prep Time
The prep time for this delicious dish is approximately 15-20 minutes. During this time, you will gather all your ingredients, season the chicken, slice the onions, and mince the garlic. Having everything ready before you start cooking will make the process smoother and more enjoyable.
Cooking Time
The cooking time for the French Onion Chicken Rice is about 30-35 minutes. This includes:
Cooking the chicken: 10-14 minutes
Sautéing the onions: 10 minutes
Simmering the sauce: 5 minutes
Melting the cheese: 5 minutes
Each step is essential for developing the rich flavors that make this dish so special. Be sure to keep an eye on the chicken and onions to prevent overcooking.
Total Time
In total, you can expect to spend about 45-55 minutes from start to finish. This includes both prep and cooking time. With this timeline, you can easily fit this recipe into your busy schedule, making it a perfect choice for a weeknight dinner or a weekend gathering.
Now that you have a clear understanding of the time involved, you can confidently prepare your French Onion Chicken Rice. Enjoy the process and the delicious results!
Nutritional Information for French Onion Chicken Rice Recipe
Understanding the nutritional content of your meals is essential for maintaining a balanced diet. The French Onion Chicken Rice recipe not only delights your taste buds but also provides a good amount of nutrients. Here’s a breakdown of the nutritional information per serving:
Calories
Each serving of the French Onion Chicken Rice contains approximately 550 calories. This calorie count includes the chicken, creamy sauce, and rice, making it a hearty meal. If you’re watching your calorie intake, consider adjusting portion sizes or substituting ingredients to fit your dietary needs.
Protein
This dish is a great source of protein, providing about 40 grams per serving. The chicken breasts contribute significantly to this protein content, making it an excellent choice for those looking to increase their protein intake. Protein is essential for muscle repair and overall health, so this dish can be a nutritious option for active individuals.
Sodium
The sodium content in each serving is approximately 800 milligrams. This amount can vary based on the type of broth used and any additional seasonings you may add. If you’re concerned about sodium levels, consider using low-sodium broth or reducing the amount of added salt. Balancing sodium intake is important for maintaining healthy blood pressure levels.
Overall, the French Onion Chicken Rice recipe offers a satisfying meal that is rich in flavor and nutrition. By being mindful of the ingredients and portion sizes, you can enjoy this dish while keeping your dietary goals in check.
FAQs about French Onion Chicken Rice Recipe
What can I substitute for rice in the French Onion Chicken Rice Recipe?
If you’re looking for alternatives to rice, there are several options you can try! Quinoa is a great substitute, offering a nutty flavor and extra protein. Cauliflower rice is another popular choice, especially for those seeking a low-carb option. You can also use couscous or orzo for a different texture. Each of these substitutes will pair well with the creamy sauce and chicken, making your meal just as delicious!
Can I make the French Onion Chicken Rice Recipe ahead of time?
Absolutely! This recipe is perfect for meal prep. You can prepare the chicken and sauce in advance and store them separately in the refrigerator. When you’re ready to eat, simply reheat the chicken and sauce together. Just remember to add the cheese right before serving to keep it melty and fresh. This makes it a convenient option for busy weeknights!
How do I store leftovers from the French Onion Chicken Rice Recipe?
Storing leftovers is easy! Allow the French Onion Chicken Rice to cool completely before transferring it to an airtight container. You can keep it in the refrigerator for up to 3-4 days. If you want to store it for a longer period, consider freezing it. Just make sure to use a freezer-safe container. When reheating, add a splash of broth or cream to restore the sauce’s creaminess.
Is the French Onion Chicken Rice Recipe suitable for meal prep?
Yes, this recipe is excellent for meal prep! The flavors meld beautifully when stored, making it even tastier the next day. You can portion out servings into individual containers for easy grab-and-go meals. Just reheat in the microwave or on the stovetop, and you’ll have a delicious, homemade meal ready in minutes!
Conclusion on French Onion Chicken Rice Recipe
In conclusion, the French Onion Chicken Rice recipe is a delightful dish that brings together rich flavors and comforting textures. With its creamy sauce, tender chicken, and fluffy rice, it’s a meal that can easily become a family favorite. The combination of caramelized onions and melted Gruyère cheese creates a unique taste that is both satisfying and indulgent.
This recipe is not only simple to prepare but also versatile. You can customize it with different ingredients and cooking methods to suit your preferences. Whether you choose to make it in a slow cooker, Instant Pot, or bake it in the oven, the end result will be a delicious meal that everyone will love.
Moreover, the nutritional benefits of this dish make it a great option for those looking to enjoy a hearty meal without compromising on health. With a good balance of protein, carbohydrates, and fats, it provides the energy needed for a busy day.
So, gather your ingredients and give this French Onion Chicken Rice recipe a try! Whether it’s for a weeknight dinner or a special occasion, this dish is sure to impress. Enjoy the process of cooking and the joy of sharing a delicious meal with your loved ones. Bon appétit!
Welcome to the delightful world of creamy chicken spaghetti! This dish is a comforting classic that brings together tender chicken, creamy sauces, and perfectly cooked spaghetti. It’s a meal that not only satisfies your hunger but also warms your heart. Whether you’re cooking for your family or hosting friends, this creamy chicken spaghetti recipe is sure to impress.
Imagine a plate filled with luscious spaghetti, enveloped in a rich, creamy sauce, topped with melted cheese, and bursting with flavors from fresh vegetables. It’s a dish that combines simplicity with deliciousness, making it perfect for any occasion. Plus, it’s easy to prepare, which means you can spend less time in the kitchen and more time enjoying your meal with loved ones.
This recipe is versatile, allowing you to customize it to your taste. You can add your favorite vegetables, switch up the protein, or even spice it up for a little kick. With just a few ingredients and simple steps, you can create a hearty meal that everyone will love.
So, roll up your sleeves and get ready to dive into this creamy chicken spaghetti recipe. Let’s make a dish that will become a staple in your home, bringing smiles and satisfaction to every table!
Ingredients for Creamy Chicken Spaghetti Recipe
To create the perfect creamy chicken spaghetti, you’ll need a selection of simple yet flavorful ingredients. Each component plays a vital role in building the rich taste and creamy texture that makes this dish so beloved. Here’s what you’ll need:
3 cups cooked spaghetti: This serves as the base of your dish, providing a hearty foundation.
2 cups cooked, shredded chicken: You can use rotisserie chicken for convenience or cook your own for a fresher taste.
1 can (10.5 ounces) cream of mushroom soup: This adds creaminess and a savory flavor.
1 can (10.5 ounces) cream of chicken soup: This enhances the overall richness of the sauce.
1 cup chicken broth: Use low-sodium broth for a healthier option, adding moisture and flavor.
1 cup shredded cheddar cheese: This melts beautifully on top, creating a deliciously cheesy layer.
1 cup diced bell peppers (red and green): These add color and a slight crunch to the dish.
1 cup diced onion: Onions provide a sweet and savory base flavor.
2 cloves garlic, minced: Garlic brings a wonderful aroma and depth of flavor.
1 teaspoon Italian seasoning: This blend of herbs enhances the overall taste.
1 teaspoon salt: Essential for bringing out the flavors of the other ingredients.
½ teaspoon black pepper: Adds a touch of heat and complexity.
½ teaspoon paprika: This gives a subtle smokiness and vibrant color.
1 tablespoon olive oil: Used for sautéing the vegetables, adding healthy fats.
Gather these ingredients, and you’re ready to embark on your creamy chicken spaghetti adventure. Each item contributes to the delightful taste and texture, ensuring that every bite is a comforting experience. Now, let’s move on to the preparation steps!
Step-by-Step Preparation of Creamy Chicken Spaghetti Recipe
Now that you have all your ingredients ready, it’s time to dive into the step-by-step preparation of your creamy chicken spaghetti recipe. Each step is simple and straightforward, ensuring that you can create this delicious dish with ease. Let’s get started!
Step 1: Preparing the Chicken
First, you need to prepare the chicken. If you’re using rotisserie chicken, simply shred it into bite-sized pieces. This saves time and adds great flavor. If you prefer to cook your own chicken, boil or bake it until fully cooked. Once done, let it cool slightly before shredding. This shredded chicken will be the star of your creamy chicken spaghetti!
Step 2: Cooking the Spaghetti
Next, it’s time to cook the spaghetti. Bring a large pot of salted water to a boil. Add the spaghetti and cook according to the package instructions until al dente. This usually takes about 8-10 minutes. Once cooked, drain the spaghetti and set it aside. Make sure not to rinse it, as you want the starch to help the sauce stick later.
Step 3: Making the Creamy Sauce
Now, let’s make the creamy sauce. In a large mixing bowl, combine the cream of mushroom soup, cream of chicken soup, and chicken broth. Stir well until the mixture is smooth. This creamy base will give your dish its rich flavor. Add in the Italian seasoning, salt, black pepper, and paprika. Mix everything together until well combined. This sauce is what makes your creamy chicken spaghetti so delicious!
Step 4: Combining Ingredients
It’s time to bring everything together! In the same large mixing bowl, add the cooked spaghetti and shredded chicken to the creamy sauce. Then, toss in the sautéed bell peppers, onions, and minced garlic. Stir gently until all the ingredients are well coated with the sauce. This step ensures that every bite is packed with flavor and creaminess.
Step 5: Final Touches
Finally, pour the combined mixture into a greased 9×13-inch baking dish. Spread it out evenly to ensure even cooking. Now, sprinkle the shredded cheddar cheese generously over the top. This will melt beautifully while baking, creating a deliciously cheesy crust. Your creamy chicken spaghetti is now ready for the oven!
Variations of Creamy Chicken Spaghetti Recipe
While the classic creamy chicken spaghetti recipe is already a hit, there are many ways to customize it to suit your taste. By adding different vegetables or swapping out proteins, you can create a unique dish every time. Let’s explore some delicious variations!
Adding Vegetables
Vegetables not only enhance the flavor but also boost the nutritional value of your creamy chicken spaghetti. Here are some great options to consider:
Spinach: Fresh or frozen spinach can be added for a pop of color and added nutrients. Just stir it in during the last few minutes of cooking.
Mushrooms: Sautéed mushrooms add an earthy flavor that pairs well with the creamy sauce. Use button or cremini mushrooms for the best results.
Zucchini: Diced zucchini can be mixed in for a light, fresh taste. It cooks quickly, so add it to the skillet with the other vegetables.
Broccoli: Steamed or sautéed broccoli florets add a nice crunch and vibrant color. They also provide a healthy dose of vitamins.
Feel free to mix and match these vegetables based on what you have on hand or your personal preferences. The more colorful your dish, the more appealing it will be!
Using Different Proteins
If you want to switch things up, consider using different proteins in your creamy chicken spaghetti. Here are some tasty alternatives:
Ground Turkey: For a leaner option, ground turkey can be used instead of chicken. Cook it in the skillet until browned before adding it to the sauce.
Shredded Pork: Pulled pork can add a smoky flavor to your dish. It pairs wonderfully with the creamy sauce.
Tofu: For a vegetarian option, use firm tofu. Press it to remove excess moisture, then cube and sauté it before mixing it in.
Seafood: Shrimp or crab meat can be a delightful twist. Just make sure to cook them until they are fully done before adding them to the dish.
These variations allow you to create a creamy chicken spaghetti recipe that suits your taste and dietary needs. Experimenting with different ingredients can lead to exciting new flavors and textures!
Cooking Note for Creamy Chicken Spaghetti Recipe
When preparing your creamy chicken spaghetti, there are a few important cooking notes to keep in mind. These tips will help ensure that your dish turns out perfectly every time, making it a delightful experience for you and your guests.
First, always use cooked spaghetti. This is crucial because uncooked pasta will not absorb the creamy sauce properly. If you have leftover spaghetti from a previous meal, feel free to use that! Just make sure to warm it up slightly before mixing it with the other ingredients.
Next, consider the texture of your sauce. If you prefer a thicker sauce, you can reduce the amount of chicken broth. Alternatively, if you like a creamier consistency, add a bit more broth or even a splash of heavy cream. Adjusting the liquid will help you achieve the perfect texture for your creamy chicken spaghetti.
Another important note is to sauté your vegetables until they are just tender. Overcooking can lead to mushy veggies, which may not provide the desired crunch and flavor. Aim for a vibrant color and slight crispness to enhance the overall dish.
Lastly, let your creamy chicken spaghetti cool for a few minutes after baking. This allows the cheese to set slightly, making it easier to serve. Plus, it gives the flavors a moment to meld together, enhancing the overall taste.
By keeping these cooking notes in mind, you’ll be well on your way to creating a delicious creamy chicken spaghetti recipe that everyone will love. Happy cooking!
Serving Suggestions for Creamy Chicken Spaghetti Recipe
Once your creamy chicken spaghetti is baked to perfection, it’s time to serve it up! This dish is not only delicious but also visually appealing, making it a great centerpiece for any meal. Here are some serving suggestions to elevate your dining experience:
Garnish with Fresh Herbs: A sprinkle of fresh parsley or basil on top adds a pop of color and freshness. It enhances the dish’s flavor and makes it look more inviting.
Pair with a Side Salad: A crisp green salad with a light vinaigrette complements the richness of the creamy chicken spaghetti. Consider adding cherry tomatoes, cucumbers, and a sprinkle of feta cheese for extra flavor.
Serve with Garlic Bread: Warm, buttery garlic bread is a classic side that pairs perfectly with this dish. It’s great for soaking up any leftover creamy sauce!
Offer a Variety of Toppings: Set up a toppings bar with options like crushed red pepper flakes, grated Parmesan cheese, or even a drizzle of balsamic glaze. This allows guests to customize their plates to their liking.
Accompany with Roasted Vegetables: Roasted vegetables, such as zucchini, bell peppers, or asparagus, can add a healthy touch to your meal. Their caramelized flavors will complement the creamy pasta beautifully.
These serving suggestions not only enhance the overall meal but also create a delightful dining experience for you and your guests. Whether it’s a family dinner or a gathering with friends, your creamy chicken spaghetti will surely be a hit!
Tips for Perfecting Your Creamy Chicken Spaghetti Recipe
To make your creamy chicken spaghetti truly unforgettable, consider these helpful tips. Each suggestion is designed to enhance the flavor, texture, and overall experience of this delightful dish. Let’s dive into some expert advice!
Use Quality Ingredients: The better the ingredients, the better your dish will taste. Opt for fresh vegetables and high-quality chicken broth. This will elevate the flavors and make your creamy chicken spaghetti even more delicious.
Don’t Overcook the Pasta: Cook your spaghetti until it’s al dente. This means it should still have a slight bite to it. Overcooked pasta can become mushy and won’t hold up well in the creamy sauce.
Experiment with Cheese: While cheddar cheese is a classic choice, feel free to mix it up! Try using mozzarella for a gooey texture or Parmesan for a sharper flavor. Mixing different cheeses can create a unique taste.
Adjust Seasonings: Taste your creamy sauce before combining it with the pasta. If you feel it needs more flavor, add extra Italian seasoning, garlic powder, or even a splash of lemon juice for brightness.
Let It Rest: After baking, allow your creamy chicken spaghetti to sit for about 5-10 minutes before serving. This resting time helps the flavors meld together and makes it easier to serve.
Make It Ahead: If you’re short on time, consider preparing the dish ahead of time. You can assemble everything in the baking dish, cover it, and refrigerate it. Just bake it when you’re ready to serve!
Store Leftovers Properly: If you have any leftovers, store them in an airtight container in the fridge. They can last for up to 3 days. Reheat gently in the oven or microwave, adding a splash of chicken broth to keep it creamy.
By following these tips, you’ll be well on your way to perfecting your creamy chicken spaghetti recipe. Each bite will be a delightful experience, filled with rich flavors and comforting textures. Enjoy your cooking adventure!
Breakdown of Time for Creamy Chicken Spaghetti Recipe
Understanding the time needed for each step in your creamy chicken spaghetti recipe can help you plan your cooking efficiently. Here’s a breakdown of the time required for preparation and cooking, ensuring you can enjoy this delicious dish without any rush.
Prep Time
The prep time for this creamy chicken spaghetti recipe is approximately 20 minutes. During this time, you will gather all your ingredients, cook the spaghetti, and prepare the chicken. If you’re using rotisserie chicken, this will save you some time. Chopping the vegetables and measuring out the ingredients can also be done quickly, making the process smooth and enjoyable.
Cooking Time
Once everything is prepped, the cooking time is about 30 minutes. This includes sautéing the vegetables, mixing the creamy sauce, and baking the dish in the oven. The baking time is crucial as it allows the cheese to melt and the flavors to meld together beautifully. Keep an eye on it to ensure it reaches that perfect bubbly state!
Total Time
In total, you can expect to spend around 50 minutes from start to finish. This includes both prep and cooking time. With just under an hour, you’ll have a hearty, comforting meal ready to serve. It’s a great option for busy weeknights or when you want to impress guests without spending all day in the kitchen.
Now that you know the time breakdown, you can easily fit this creamy chicken spaghetti recipe into your schedule. Enjoy the process and the delicious results!
Nutritional Information for Creamy Chicken Spaghetti Recipe
Understanding the nutritional information of your creamy chicken spaghetti recipe is essential for maintaining a balanced diet. This dish is not only delicious but also provides a good mix of nutrients. Here’s a closer look at the nutritional breakdown per serving:
Calories
Each serving of creamy chicken spaghetti contains approximately 350 calories. This makes it a satisfying meal without being overly heavy. The calorie count comes from the combination of pasta, chicken, and creamy sauces, providing energy to fuel your day. If you’re watching your calorie intake, consider pairing it with a light salad to balance your meal.
Protein
With about 25 grams of protein per serving, this dish is a great source of this essential nutrient. The protein primarily comes from the shredded chicken and cheese, which are vital for muscle repair and overall health. Including protein in your meals helps keep you feeling full longer, making this creamy chicken spaghetti a smart choice for lunch or dinner.
Sodium
The sodium content in each serving is approximately 800 milligrams. This is important to consider, especially for those monitoring their sodium intake. The sodium mainly comes from the cream soups and chicken broth. To reduce sodium levels, opt for low-sodium versions of these ingredients. This way, you can enjoy your creamy chicken spaghetti while keeping your health in check.
By being aware of the nutritional information, you can enjoy your creamy chicken spaghetti recipe while making informed choices about your diet. It’s a delicious meal that can fit into a healthy lifestyle with a few simple adjustments!
FAQs about Creamy Chicken Spaghetti Recipe
Can I make Creamy Chicken Spaghetti Recipe ahead of time?
Absolutely! Making creamy chicken spaghetti ahead of time is a great way to save time during busy days. You can prepare the entire dish, assemble it in the baking dish, and then cover it tightly with plastic wrap or aluminum foil. Store it in the refrigerator for up to 24 hours before baking. When you’re ready to serve, simply remove it from the fridge, let it sit at room temperature for about 15 minutes, and then bake as directed. This way, you can enjoy a delicious meal without the last-minute rush!
What can I substitute for cream in the Creamy Chicken Spaghetti Recipe?
If you’re looking for a substitute for cream in your creamy chicken spaghetti recipe, there are several options available. You can use Greek yogurt or sour cream for a tangy flavor and creamy texture. Just mix it in with the soups and broth. Another option is to use a combination of milk and cornstarch to create a creamy consistency. Simply mix 1 cup of milk with 1 tablespoon of cornstarch, and heat it until it thickens. This will give you a lighter alternative while still keeping the dish creamy and delicious!
How can I make Creamy Chicken Spaghetti Recipe healthier?
Making your creamy chicken spaghetti healthier is easy with a few simple adjustments. First, consider using whole wheat spaghetti instead of regular pasta for added fiber. You can also reduce the amount of cheese or use a lower-fat cheese option to cut down on calories. Adding more vegetables, like spinach or broccoli, not only boosts the nutritional value but also adds flavor and color. Lastly, opt for low-sodium versions of the cream soups and chicken broth to keep the sodium content in check. These small changes can make your creamy chicken spaghetti a healthier choice without sacrificing taste!
Conclusion on Creamy Chicken Spaghetti Recipe
In conclusion, the creamy chicken spaghetti recipe is a delightful dish that combines comfort and flavor in every bite. With its rich, creamy sauce and tender chicken, it’s a meal that can easily become a family favorite. The simplicity of the recipe makes it accessible for cooks of all skill levels, allowing anyone to create a delicious dinner without spending hours in the kitchen.
This recipe not only satisfies your taste buds but also offers versatility. You can customize it with various vegetables and proteins, making it suitable for different dietary preferences. Whether you choose to stick with the classic version or experiment with new ingredients, the creamy chicken spaghetti will always deliver a satisfying experience.
Moreover, the nutritional benefits of this dish, including its protein content and the ability to incorporate healthy ingredients, make it a smart choice for any meal. With just a few adjustments, you can enjoy a hearty meal that aligns with your health goals.
So, gather your ingredients, follow the steps, and enjoy the process of creating this comforting dish. Whether it’s a weeknight dinner or a special occasion, creamy chicken spaghetti is sure to bring smiles to the table. Happy cooking, and may your culinary adventures be filled with joy and deliciousness!
Introduction to Creamy Garlic Parmesan Chicken Pasta Recipe
Welcome to the delightful world of creamy garlic Parmesan chicken pasta! This dish is not just a meal; it’s an experience that brings comfort and joy to your dining table. With its rich flavors and creamy texture, it’s a favorite among families and friends alike. Whether you’re cooking for a special occasion or just a cozy night in, this recipe is sure to impress.
What Makes This Recipe Special?
What sets this creamy garlic Parmesan chicken pasta recipe apart is its simplicity and flavor. The combination of tender chicken, fresh spinach, and a luscious garlic cream sauce creates a dish that feels gourmet yet is easy to prepare. The star of the show, of course, is the Parmesan cheese, which adds a nutty richness that elevates the entire meal. Plus, the garlic brings a warm, aromatic touch that makes your kitchen smell heavenly!
Another special aspect is its versatility. You can easily customize this recipe to suit your taste. Want to add a bit of heat? Toss in some red pepper flakes. Prefer a lighter version? Substitute half-and-half for the heavy cream. The possibilities are endless, making it a go-to recipe for any home cook.
Perfect for Any Occasion
This creamy garlic Parmesan chicken pasta is perfect for any occasion. Planning a romantic dinner? This dish will surely impress your partner. Hosting a family gathering? It’s a crowd-pleaser that everyone will love. Even on busy weeknights, this recipe comes together quickly, making it ideal for a satisfying meal after a long day.
Moreover, it’s a great way to introduce kids to cooking. They can help with simple tasks like stirring the pasta or adding the spinach. Cooking together can create wonderful memories while enjoying a delicious meal. So, whether it’s a special celebration or a casual weeknight dinner, this recipe fits the bill perfectly!
Ingredients for Creamy Garlic Parmesan Chicken Pasta Recipe
Essential Ingredients
To create the perfect creamy garlic Parmesan chicken pasta, you’ll need a few essential ingredients. These items are the backbone of the dish, ensuring that every bite is packed with flavor. Here’s what you’ll need:
8 ounces of fettuccine or spaghetti: This will be the base of your dish, providing a hearty texture.
1 tablespoon of olive oil: This helps to cook the chicken and adds a rich flavor.
1 pound of boneless, skinless chicken breasts: Cut into bite-sized pieces, this protein is the star of the dish.
4 cloves of garlic: Minced garlic adds a wonderful aroma and taste.
1 cup of heavy cream: This creates the creamy sauce that makes the dish so indulgent.
1 cup of grated Parmesan cheese: The key ingredient that gives the dish its signature flavor.
1 teaspoon of Italian seasoning: A blend of herbs that enhances the overall taste.
Salt and pepper: To season the dish to your liking.
2 cups of fresh spinach: This adds color and nutrition to the meal.
1/4 cup of chopped fresh parsley: For garnish, adding a fresh touch to your plate.
Optional Ingredients for Extra Flavor
While the essential ingredients will create a delicious meal, you can elevate your creamy garlic Parmesan chicken pasta with a few optional ingredients. These additions can enhance the flavor and make the dish even more exciting:
Red pepper flakes: For those who enjoy a bit of heat, sprinkle some in for a spicy kick.
Broccoli or bell peppers: Adding these vegetables not only boosts nutrition but also adds vibrant colors.
Sun-dried tomatoes: These can provide a tangy sweetness that complements the creamy sauce.
Mushrooms: Sautéed mushrooms can add an earthy flavor that pairs well with the chicken.
Fresh basil or thyme: These herbs can add a fresh, aromatic touch to the dish.
Feel free to mix and match these optional ingredients based on your preferences. The beauty of this creamy garlic Parmesan chicken pasta recipe is its flexibility, allowing you to create a dish that’s uniquely yours!
Step-by-Step Preparation of Creamy Garlic Parmesan Chicken Pasta Recipe
Step 1: Preparing the Chicken
First, let’s get the chicken ready. Start by cutting the boneless, skinless chicken breasts into bite-sized pieces. This helps them cook evenly and makes them easy to eat. Next, season the chicken with salt and pepper. This simple step adds flavor right from the start. In a large skillet, heat 1 tablespoon of olive oil over medium heat. Once the oil is hot, add the chicken pieces. Cook them for about 5-7 minutes, stirring occasionally, until they are browned and cooked through. When done, remove the chicken from the skillet and set it aside. This will keep it warm while you prepare the rest of the dish.
Step 2: Cooking the Pasta
While the chicken is cooking, you can prepare the pasta. Bring a large pot of salted water to a boil. Add 8 ounces of fettuccine or spaghetti to the boiling water. Cook according to the package instructions until the pasta is al dente. This usually takes about 8-10 minutes. Once cooked, drain the pasta in a colander and set it aside. Remember, you want the pasta to be firm, as it will continue to cook when mixed with the sauce.
Step 3: Making the Creamy Garlic Sauce
Now, it’s time to create the creamy garlic sauce. In the same skillet where you cooked the chicken, add the minced garlic. Sauté the garlic for about 1 minute until it becomes fragrant. Be careful not to burn it, as burnt garlic can taste bitter. Next, pour in 1 cup of heavy cream and bring it to a gentle simmer. Stir in 1 cup of grated Parmesan cheese and 1 teaspoon of Italian seasoning. Mix everything together until the cheese melts and the sauce is smooth. This creamy sauce is what makes the dish so delicious!
Step 4: Combining Ingredients
Once your sauce is ready, it’s time to bring everything together. Add the cooked chicken back into the skillet along with 2 cups of fresh spinach. Stir until the spinach wilts, which should take just a minute. Then, add the drained pasta to the skillet. Toss everything together until the pasta is well coated with the creamy sauce. This is where the magic happens! Make sure every piece of pasta is enveloped in that rich, flavorful sauce.
Step 5: Final Touches and Serving
Finally, it’s time to serve your creamy garlic Parmesan chicken pasta! Taste the dish and adjust the seasoning with more salt and pepper if needed. Once you’re satisfied, plate the pasta and garnish it with 1/4 cup of chopped fresh parsley. This adds a lovely pop of color and freshness. Serve immediately while it’s hot and enjoy the delightful flavors of your homemade meal!
Variations of Creamy Garlic Parmesan Chicken Pasta Recipe
Adding Vegetables for a Healthier Twist
One of the best ways to enhance your creamy garlic Parmesan chicken pasta is by adding vegetables. Not only do they boost the nutritional value, but they also add vibrant colors and textures to your dish. Here are some great options:
Broccoli: This green vegetable is packed with vitamins. Simply steam or sauté it before adding it to the pasta.
Bell Peppers: Red, yellow, or green bell peppers add a sweet crunch. Sauté them with the garlic for a delicious flavor.
Zucchini: Sliced zucchini can be added for a light, fresh taste. Cook it until tender before mixing it in.
Mushrooms: Sautéed mushrooms bring an earthy flavor that pairs beautifully with the creamy sauce.
Cherry Tomatoes: Halved cherry tomatoes add a burst of sweetness. Toss them in just before serving for a fresh touch.
Feel free to mix and match these vegetables based on your preferences. Adding them not only makes the dish healthier but also creates a colorful and appealing plate. Plus, it’s a great way to sneak in some extra nutrients for kids and adults alike!
Substituting Proteins: Alternatives to Chicken
If you’re looking to switch things up, consider substituting the chicken with other proteins. This can cater to different dietary preferences or simply change the flavor profile of your dish. Here are some tasty alternatives:
Shrimp: Shrimp cooks quickly and adds a delightful seafood flavor. Sauté them until pink and tender before adding to the sauce.
Tofu: For a vegetarian option, use firm tofu. Press and cube it, then sauté until golden brown for a satisfying texture.
Turkey: Ground turkey is a leaner alternative to chicken. Cook it in the skillet until browned and fully cooked.
Salmon: Flaky salmon can be a luxurious addition. Bake or pan-sear it, then flake it into the pasta just before serving.
Italian Sausage: For a heartier dish, use Italian sausage. Remove the casing and cook it in the skillet until browned.
These protein options can transform your creamy garlic Parmesan chicken pasta into a new dish each time you make it. Experimenting with different proteins keeps the meal exciting and allows you to cater to various tastes and dietary needs!
Cooking Note for Creamy Garlic Parmesan Chicken Pasta Recipe
Tips for Achieving the Perfect Creamy Sauce
Creating the perfect creamy sauce is essential for your creamy garlic Parmesan chicken pasta recipe. A smooth, rich sauce can elevate your dish and make it truly memorable. Here are some helpful tips to ensure your sauce turns out just right:
Use Fresh Ingredients: Fresh garlic and high-quality Parmesan cheese make a big difference in flavor. Avoid pre-grated cheese, as it often contains anti-caking agents that can affect the sauce’s texture.
Control the Heat: When making the sauce, keep the heat at medium to low. High heat can cause the cream to separate, leading to a grainy texture. A gentle simmer is key to a smooth sauce.
Gradually Add Cheese: When adding the Parmesan cheese, do it gradually. Stir continuously to help it melt evenly into the cream. This prevents clumping and ensures a silky sauce.
Adjust Consistency: If your sauce is too thick, add a splash of pasta water or more cream to reach your desired consistency. The starchy pasta water can help bind the sauce to the pasta.
Season to Taste: Always taste your sauce before serving. Adjust the seasoning with salt and pepper as needed. A well-seasoned sauce enhances the overall flavor of the dish.
By following these tips, you’ll create a creamy garlic sauce that perfectly coats your pasta and chicken. The result will be a delicious, comforting meal that everyone will love!
Serving Suggestions for Creamy Garlic Parmesan Chicken Pasta Recipe
Ideal Pairings and Side Dishes
When it comes to serving your creamy garlic Parmesan chicken pasta, the right pairings can elevate your meal even further. Here are some ideal side dishes and accompaniments that complement the rich flavors of the pasta:
Garlic Bread: A classic choice! The crispy, buttery garlic bread is perfect for soaking up any leftover creamy sauce.
Caesar Salad: A fresh Caesar salad adds a crunchy texture and a tangy flavor that balances the richness of the pasta.
Steamed Vegetables: Lightly steamed vegetables like broccoli or green beans provide a healthy contrast and add color to your plate.
Caprese Salad: This salad, made with fresh tomatoes, mozzarella, and basil, offers a refreshing taste that pairs beautifully with the creamy dish.
Roasted Asparagus: The earthy flavor of roasted asparagus complements the creamy sauce and adds a gourmet touch to your meal.
These side dishes not only enhance the overall dining experience but also provide a well-rounded meal. Feel free to mix and match based on your preferences and what you have on hand!
Presentation Tips for a Beautiful Plate
Presentation is key when serving your creamy garlic Parmesan chicken pasta. A beautifully plated dish can make your meal feel extra special. Here are some tips to create an eye-catching presentation:
Use a Large Serving Bowl: Serve the pasta in a large, shallow bowl. This allows the creamy sauce to spread out and be visible, making it more appealing.
Garnish Generously: Sprinkle chopped fresh parsley or basil on top of the pasta for a pop of color. You can also add extra grated Parmesan for a touch of elegance.
Twirl the Pasta: When plating, use a fork to twirl the pasta into a neat mound. This creates height and makes the dish look more sophisticated.
Add a Lemon Wedge: Placing a lemon wedge on the side adds a splash of color and allows guests to add a hint of brightness to their dish.
Serve with a Side of Bread: If you’re including garlic bread, arrange it neatly on the side of the plate or in a small basket for a cozy touch.
By following these presentation tips, you’ll create a stunning plate that not only tastes delicious but also looks inviting. Your guests will be impressed, and you’ll feel proud to serve such a beautiful meal!
Tips for Perfecting Your Creamy Garlic Parmesan Chicken Pasta Recipe
Common Mistakes to Avoid
When making your creamy garlic Parmesan chicken pasta, avoiding common mistakes can make a big difference in the final dish. Here are some pitfalls to watch out for:
Overcooking the Chicken: Make sure to cook the chicken just until it’s no longer pink. Overcooked chicken can become dry and tough, ruining the dish’s texture.
Burning the Garlic: Garlic can turn bitter if cooked too long. Sauté it just until fragrant, about one minute, to keep its delicious flavor.
Using Low-Quality Cheese: Opt for fresh, high-quality Parmesan cheese. Pre-grated cheese often contains additives that can affect the sauce’s creaminess.
Not Tasting the Sauce: Always taste your sauce before serving. Adjust the seasoning with salt and pepper to ensure it’s flavorful and balanced.
Skipping the Pasta Water: If your sauce is too thick, don’t forget to add a splash of reserved pasta water. This starchy water helps the sauce cling to the pasta.
By being mindful of these common mistakes, you can create a creamy garlic Parmesan chicken pasta that’s both delicious and satisfying!
Storage and Reheating Tips
If you have leftovers of your creamy garlic Parmesan chicken pasta, proper storage and reheating can help maintain its flavor and texture. Here are some tips:
Storing Leftovers: Place any leftover pasta in an airtight container. It can be stored in the refrigerator for up to 3 days. Make sure to let it cool before sealing the container to avoid condensation.
Freezing Options: While it’s best enjoyed fresh, you can freeze the pasta for up to 2 months. However, the cream sauce may change in texture upon thawing.
Reheating: To reheat, place the pasta in a skillet over low heat. Add a splash of cream or milk to help revive the sauce. Stir gently until heated through.
Microwave Method: If using a microwave, place the pasta in a microwave-safe dish. Cover it with a damp paper towel and heat in short intervals, stirring in between.
Following these storage and reheating tips will ensure that your creamy garlic Parmesan chicken pasta remains delicious, even as leftovers!
Breakdown of Time for Creamy Garlic Parmesan Chicken Pasta Recipe
Prep Time
Preparing your creamy garlic Parmesan chicken pasta is quick and easy. The prep time for this recipe is approximately 15 minutes. During this time, you will gather all your ingredients, chop the chicken, mince the garlic, and measure out the necessary items. Having everything ready before you start cooking makes the process smoother and more enjoyable!
Cooking Time
The cooking time for this dish is about 20 minutes. This includes cooking the chicken, boiling the pasta, and making the creamy garlic sauce. Each step is straightforward and doesn’t take long, allowing you to whip up a delicious meal in no time. The key is to keep an eye on the chicken and pasta to ensure they are cooked perfectly.
Total Time
In total, you can expect to spend around 35 minutes from start to finish. This makes the creamy garlic Parmesan chicken pasta recipe a fantastic option for busy weeknights or when you want to impress guests without spending hours in the kitchen. With just a little time and effort, you’ll have a delightful meal ready to serve!
Nutritional Information for Creamy Garlic Parmesan Chicken Pasta Recipe
Calories and Macronutrients
Understanding the nutritional content of your creamy garlic Parmesan chicken pasta recipe is essential for maintaining a balanced diet. Each serving of this delicious dish contains approximately 590 calories. Here’s a breakdown of the macronutrients per serving:
Calories: 590
Net Carbs: 45g
Protein: 38g
Fat: 32g
This recipe provides a good balance of protein and carbohydrates, making it a satisfying meal. The protein from the chicken helps in muscle repair and growth, while the carbohydrates from the pasta provide energy. The fat content, primarily from the cream and cheese, contributes to the creamy texture and rich flavor of the dish.
Health Benefits of Key Ingredients
Not only is this creamy garlic Parmesan chicken pasta delicious, but it also offers several health benefits thanks to its key ingredients. Here’s a closer look at some of the main components:
Chicken: A great source of lean protein, chicken helps build and repair tissues. It’s also rich in essential vitamins and minerals, including B vitamins and selenium.
Spinach: This leafy green is packed with nutrients. It’s high in vitamins A, C, and K, as well as iron and calcium. Spinach is known for its antioxidant properties, which can help reduce inflammation.
Garlic: Garlic is not only flavorful but also has numerous health benefits. It contains compounds that may boost the immune system and lower blood pressure. Plus, it has antibacterial and antiviral properties.
Parmesan Cheese: This cheese is a good source of calcium and protein. It also contains probiotics, which can support gut health.
Olive Oil: A heart-healthy fat, olive oil is rich in monounsaturated fats and antioxidants. It can help reduce inflammation and lower the risk of chronic diseases.
By incorporating these nutritious ingredients, your creamy garlic Parmesan chicken pasta not only satisfies your taste buds but also contributes to your overall health. Enjoy this dish knowing that it’s both delicious and beneficial!
FAQs about Creamy Garlic Parmesan Chicken Pasta Recipe
Can I make this recipe ahead of time?
Yes, you can prepare parts of this creamy garlic Parmesan chicken pasta recipe ahead of time. You can cook the chicken and make the creamy sauce in advance. Store them separately in airtight containers in the refrigerator. When you’re ready to serve, simply reheat the chicken and sauce, cook the pasta, and combine everything. This way, you can enjoy a delicious meal without spending too much time in the kitchen on the day of serving!
What can I substitute for heavy cream?
If you want a lighter option, you can substitute heavy cream with half-and-half or whole milk. For a dairy-free alternative, consider using coconut cream or cashew cream. These options will still provide a creamy texture, although the flavor may vary slightly. Just keep in mind that using lower-fat options may result in a less rich sauce, so adjust the seasoning accordingly to enhance the flavor.
Is this recipe suitable for meal prep?
Absolutely! This creamy garlic Parmesan chicken pasta recipe is perfect for meal prep. You can make a large batch and divide it into individual portions. Store them in airtight containers in the refrigerator for up to three days. When you’re ready to eat, simply reheat in the microwave or on the stovetop. This makes it a convenient option for busy weekdays or quick lunches!
How can I make it gluten-free?
To make this creamy garlic Parmesan chicken pasta gluten-free, simply substitute regular pasta with gluten-free pasta. There are many options available, such as rice pasta or chickpea pasta, which work well in this recipe. Just be sure to follow the cooking instructions on the package, as gluten-free pasta may have different cooking times. Enjoy your delicious meal without worrying about gluten!
Conclusion on Creamy Garlic Parmesan Chicken Pasta Recipe
Recap of Key Points
In summary, the creamy garlic Parmesan chicken pasta recipe is a delightful dish that combines rich flavors and comforting textures. With simple ingredients like chicken, pasta, garlic, and Parmesan cheese, you can create a meal that feels gourmet yet is easy to prepare. The addition of fresh spinach not only enhances the dish’s nutrition but also adds a pop of color. Remember, you can customize this recipe by adding your favorite vegetables or substituting proteins to suit your taste.
We’ve also covered essential tips for achieving the perfect creamy sauce, serving suggestions, and how to avoid common mistakes. Whether you’re cooking for a special occasion or a busy weeknight, this recipe is sure to impress. Plus, with its nutritional benefits, you can enjoy a delicious meal that supports your health.
Encouragement to Try the Recipe
Now that you have all the information you need, it’s time to roll up your sleeves and try making this creamy garlic Parmesan chicken pasta! Don’t be afraid to experiment with different ingredients and flavors. Cooking is all about creativity and making it your own. Gather your loved ones, and enjoy the process of preparing this delightful dish together. We’re confident that once you try it, it will become a favorite in your household!
So, what are you waiting for? Grab your apron, and let’s get cooking! Your taste buds will thank you!