Beef and Broccoli Stir-Fry is a quick, tasty meal.

Introduction to Beef and Broccoli Stir-Fry Recipe

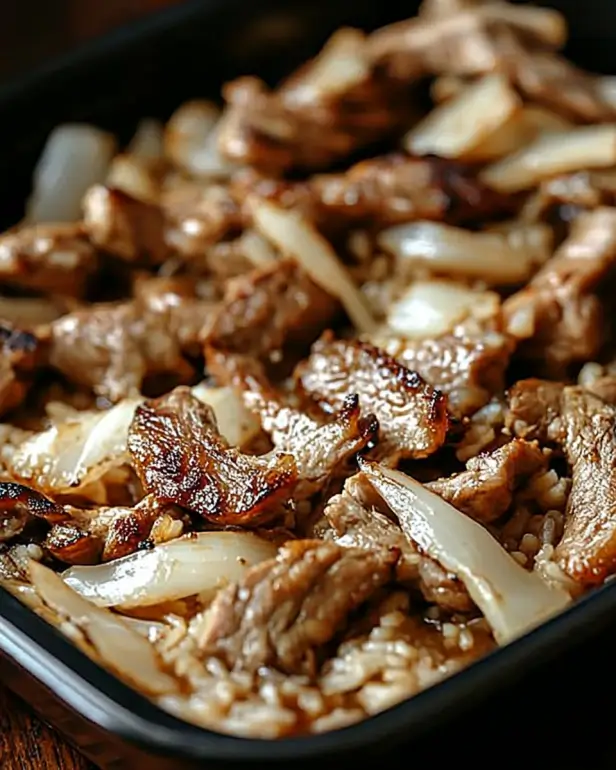
Beef and broccoli stir-fry is a classic dish that brings together tender beef and vibrant broccoli in a savory sauce. This dish is not only delicious but also quick to prepare, making it a favorite for busy weeknights. The combination of flavors and textures creates a satisfying meal that appeals to both kids and adults alike.

What Makes Beef and Broccoli Stir-Fry a Favorite Dish?

One of the reasons beef and broccoli stir-fry is so beloved is its simplicity. With just a few ingredients, you can whip up a meal that feels special. The tender flank steak pairs perfectly with the crisp broccoli, creating a delightful contrast. Moreover, the rich sauce, made from soy sauce and oyster sauce, adds depth and umami to the dish.

Another appealing aspect is its versatility. You can easily customize this recipe to suit your taste. Whether you prefer a bit of heat or want to switch up the protein, the options are endless. Plus, it’s a great way to sneak in some vegetables, making it a healthier choice for dinner.

In addition, beef and broccoli stir-fry is a fantastic option for meal prep. You can make a big batch and enjoy leftovers throughout the week. Serve it over rice or noodles, and you have a complete meal ready to go!

Overall, the beef and broccoli stir-fry recipe is a delightful dish that combines flavor, nutrition, and convenience. It’s no wonder it has become a staple in many households. Let’s dive into the ingredients and preparation steps to create this delicious meal!

Ingredients for Beef and Broccoli Stir-Fry Recipe

To create a mouthwatering beef and broccoli stir-fry, you’ll need a few key ingredients. Each component plays a vital role in building the dish’s flavor and texture. Here’s what you’ll need:

  • 1 pound flank steak: Thinly sliced against the grain for tenderness.
  • 2 cups broccoli florets: Fresh and vibrant, adding color and crunch.
  • 2 tablespoons vegetable oil: Divided for cooking the beef and vegetables.
  • 3 cloves garlic: Minced for a fragrant base.
  • 1 tablespoon fresh ginger: Minced to add warmth and spice.
  • 1/4 cup soy sauce: The main seasoning that brings umami flavor.
  • 2 tablespoons oyster sauce: Adds richness and depth to the sauce.
  • 1 tablespoon cornstarch: Helps thicken the sauce for a glossy finish.
  • 1/2 cup beef broth: Provides moisture and enhances the beef flavor.
  • 1 tablespoon sesame oil: Adds a nutty aroma and flavor.
  • 1 teaspoon sugar: Balances the savory flavors.
  • Salt and pepper: To taste, enhancing the overall flavor.
  • Cooked rice: For serving, making it a complete meal.

These ingredients come together to create a delicious and satisfying dish. The combination of tender beef, crisp broccoli, and a savory sauce makes this stir-fry a favorite for many. Now that you have your ingredients ready, let’s move on to the step-by-step preparation!

Step-by-Step Preparation of Beef and Broccoli Stir-Fry Recipe

Now that you have gathered all your ingredients, it’s time to dive into the preparation of your beef and broccoli stir-fry. This step-by-step guide will help you create a delicious meal that’s sure to impress. Let’s get started!

Step 1: Preparing the Ingredients

First, ensure all your ingredients are ready to go. Start by slicing the flank steak against the grain into thin strips. This technique helps keep the meat tender. Next, wash and cut the broccoli into bite-sized florets. Mince the garlic and ginger, as these will add a wonderful aroma to your dish. Having everything prepped in advance makes cooking much smoother!

Step 2: Marinating the Beef

In a medium bowl, combine the sliced flank steak with soy sauce, oyster sauce, cornstarch, and sugar. Mix everything well until the beef is evenly coated. This marinade not only flavors the meat but also helps tenderize it. Let the beef marinate for at least 15 minutes. If you have more time, marinating for up to an hour will enhance the flavors even more!

Step 3: Cooking the Broccoli

While the beef is marinating, heat 1 tablespoon of vegetable oil in a large skillet or wok over medium-high heat. Once the oil is hot, add the broccoli florets. Stir-fry them for about 2-3 minutes until they turn bright green and are tender-crisp. This quick cooking method keeps the broccoli vibrant and full of nutrients. Once done, remove the broccoli from the skillet and set it aside.

Step 4: Stir-Frying the Beef

In the same skillet, add the remaining tablespoon of vegetable oil. Once heated, add the marinated beef. Stir-fry for about 3-4 minutes until the beef is browned and cooked through. Make sure to keep the beef moving in the pan to ensure even cooking. Once browned, remove the beef from the skillet and set it aside with the broccoli.

Step 5: Combining Ingredients

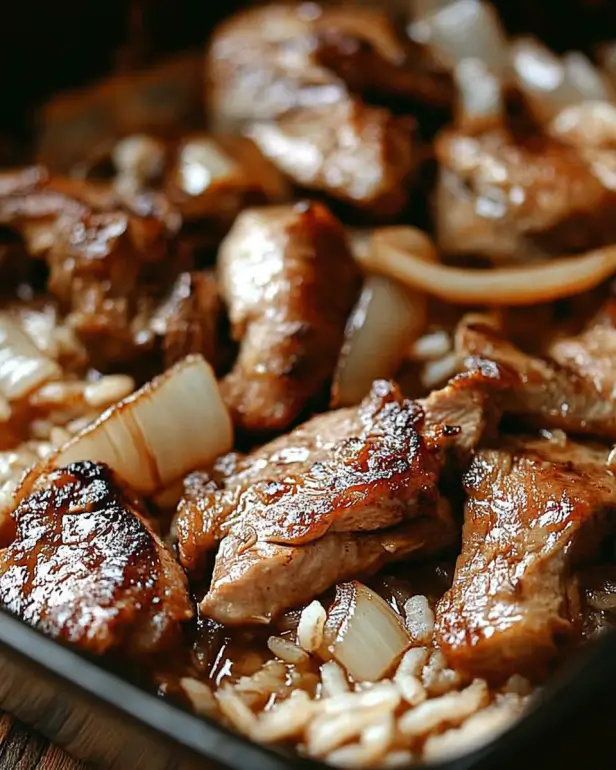
Now it’s time to bring everything together! In the same skillet, add the minced garlic and ginger. Stir-fry for about 30 seconds until fragrant. Then, return the cooked beef and broccoli to the skillet. Pour in the beef broth and sesame oil, stirring everything together. Cook for an additional 2-3 minutes until the sauce thickens slightly. Season with salt and pepper to taste. Your beef and broccoli stir-fry is now ready to be served!

With these simple steps, you can create a delicious beef and broccoli stir-fry that’s perfect for any night of the week. Enjoy it over a bed of fluffy rice for a complete meal!

Variations of Beef and Broccoli Stir-Fry Recipe

While the classic beef and broccoli stir-fry is a favorite, there are many ways to switch things up! You can easily customize this dish to suit your taste or dietary needs. Let’s explore some alternative proteins and different vegetables you can add to make this recipe your own.

Alternative Proteins to Use

If you’re looking to change the protein in your stir-fry, there are several delicious options. Here are a few alternatives:

  • Chicken: Thinly sliced chicken breast or thighs can be used instead of beef. Chicken cooks quickly and absorbs flavors well, making it a great substitute.
  • Tofu: For a vegetarian option, firm tofu is an excellent choice. Press and cube the tofu, then marinate it just like the beef. It will soak up the sauce beautifully.
  • Pork: Thinly sliced pork tenderloin or shoulder can add a different flavor profile. Pork pairs well with the savory sauce and adds a nice twist.
  • Shrimp: If you enjoy seafood, shrimp can be a quick-cooking alternative. Just be sure to adjust the cooking time, as shrimp cooks faster than beef.

These alternative proteins can provide new flavors and textures while keeping the essence of the dish intact. Feel free to experiment with your favorite protein!

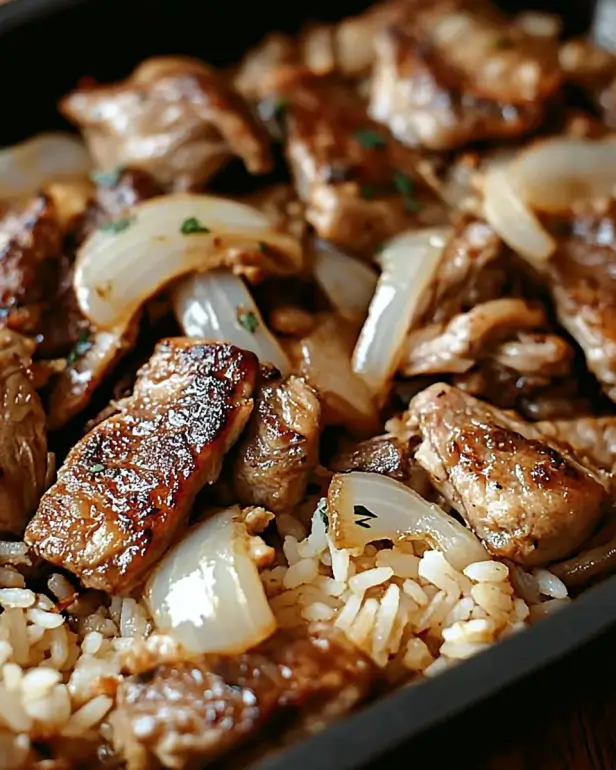
Different Vegetables to Add

In addition to broccoli, you can enhance your stir-fry by adding a variety of vegetables. Here are some tasty options:

  • Bell Peppers: Sliced bell peppers add a pop of color and sweetness. They cook quickly and complement the beef nicely.
  • Carrots: Thinly sliced or julienned carrots bring a crunchy texture and a hint of sweetness to the dish.
  • Snow Peas: These tender peas add a delightful crunch and a fresh flavor. Toss them in during the last few minutes of cooking.
  • Mushrooms: Sliced mushrooms can add an earthy flavor. They absorb the sauce well and add a nice umami touch.
  • Baby Corn: This adds a fun crunch and a unique flavor. It’s a great addition for a more colorful stir-fry.

Mixing and matching different vegetables not only enhances the flavor but also boosts the nutritional value of your meal. Feel free to get creative and use whatever you have on hand!

Cooking Note for Beef and Broccoli Stir-Fry Recipe

Cooking beef and broccoli stir-fry is a quick and enjoyable process, but there are a few important notes to keep in mind to ensure your dish turns out perfectly every time. Here are some tips to help you achieve the best results:

  • High Heat is Key: Stir-frying requires high heat to cook the ingredients quickly while retaining their texture and flavor. Make sure your skillet or wok is hot before adding the oil and ingredients.
  • Don’t Overcrowd the Pan: If you add too many ingredients at once, the temperature of the pan will drop. This can lead to steaming instead of stir-frying. Cook in batches if necessary.
  • Prep Ahead: Having all your ingredients prepped and ready to go will make the cooking process smoother. Stir-frying happens quickly, so you won’t have time to chop or measure once you start.
  • Use Fresh Ingredients: Fresh broccoli and high-quality beef will enhance the flavor of your stir-fry. Look for vibrant broccoli florets and tender cuts of meat for the best results.
  • Adjust the Sauce: Feel free to tweak the sauce to your liking. If you prefer a sweeter taste, add a bit more sugar. For a saltier flavor, increase the soy sauce. Taste as you go!
  • Let it Rest: After cooking, let the stir-fry sit for a minute before serving. This allows the flavors to meld together and makes for a more delicious dish.

By following these cooking notes, you can elevate your beef and broccoli stir-fry to new heights. Enjoy the process and savor the delightful flavors of this classic dish!

Serving Suggestions for Beef and Broccoli Stir-Fry Recipe

Once your beef and broccoli stir-fry is ready, it’s time to think about how to serve it! This dish is not only delicious but also versatile, allowing you to pair it with various sides and garnishes. Here are some serving suggestions to elevate your meal:

  • Over Steamed Rice: The classic way to serve beef and broccoli stir-fry is over a bed of fluffy steamed rice. The rice absorbs the savory sauce, making each bite delightful.
  • With Noodles: For a different twist, serve the stir-fry over cooked noodles. Egg noodles or rice noodles work well, adding a chewy texture that complements the dish.
  • On a Bed of Greens: For a lighter option, serve the stir-fry on a bed of fresh greens like spinach or mixed salad greens. This adds a refreshing crunch and makes the dish feel lighter.
  • With a Side of Spring Rolls: Pair your stir-fry with crispy spring rolls for a fun appetizer. The combination of flavors and textures will impress your guests!
  • Garnished with Sesame Seeds: Sprinkle toasted sesame seeds on top of your stir-fry before serving. This adds a nutty flavor and a nice visual appeal.
  • With a Side of Pickled Vegetables: Serve pickled vegetables on the side for a tangy contrast. They can balance the richness of the stir-fry and add an extra layer of flavor.

These serving suggestions can enhance your beef and broccoli stir-fry experience. Whether you stick to the classic rice or try something new, your meal is sure to be a hit. Enjoy your delicious creation!

Tips for Perfecting Your Beef and Broccoli Stir-Fry Recipe

Creating the perfect beef and broccoli stir-fry is all about technique and attention to detail. With a few helpful tips, you can elevate your dish to restaurant-quality right in your kitchen. Here are some essential tips to ensure your stir-fry turns out delicious every time:

  • Slice the Beef Thinly: For the best texture, slice the flank steak against the grain into thin strips. This helps the meat stay tender and easy to chew.
  • Marinate Longer for Flavor: While 15 minutes is sufficient, marinating the beef for up to an hour can deepen the flavors. If time allows, let it sit in the fridge longer.
  • Use a Hot Wok or Skillet: Preheat your skillet or wok until it’s very hot before adding oil. This high heat is crucial for achieving that perfect stir-fry sear.
  • Cook in Batches: If you have a lot of ingredients, consider cooking them in batches. This prevents overcrowding and ensures even cooking.
  • Don’t Overcook the Broccoli: Keep the broccoli bright and crisp by stir-frying it just until tender. It should still have a vibrant green color and a slight crunch.
  • Adjust the Sauce to Your Taste: Feel free to tweak the sauce ingredients. If you like it sweeter, add more sugar. For a saltier kick, increase the soy sauce. Always taste as you go!
  • Garnish for Extra Flavor: Consider garnishing your stir-fry with fresh herbs like cilantro or green onions. A sprinkle of sesame seeds can also add a nice crunch and flavor.
  • Serve Immediately: Stir-fry is best enjoyed fresh. Serve it right after cooking to maintain the texture and flavor. If you let it sit too long, it may become soggy.

By following these tips, you can perfect your beef and broccoli stir-fry recipe. Each step contributes to a dish that is not only tasty but also visually appealing. Enjoy the process and the delicious results!

Breakdown of Time for Beef and Broccoli Stir-Fry Recipe

Understanding the time needed for each step in your beef and broccoli stir-fry recipe can help you plan your cooking efficiently. Here’s a breakdown of the time required for preparation and cooking:

Prep Time

The prep time for this delicious dish is relatively short. You’ll need about 15-20 minutes to gather and prepare all your ingredients. This includes slicing the flank steak, washing and cutting the broccoli, and mincing the garlic and ginger. Having everything ready before you start cooking will make the process smoother and more enjoyable!

Cooking Time

Once you have everything prepped, the cooking time is quick! The actual stir-frying takes about 10-12 minutes. This includes cooking the broccoli, stir-frying the beef, and combining all the ingredients with the sauce. The high heat ensures that everything cooks quickly while retaining its flavor and texture.

Total Time

In total, you can expect to spend around 25-30 minutes from start to finish. This makes beef and broccoli stir-fry a fantastic option for a weeknight dinner when you want something delicious without spending hours in the kitchen. With just a little bit of prep and quick cooking, you’ll have a satisfying meal ready to enjoy!

Nutritional Information for Beef and Broccoli Stir-Fry Recipe

Understanding the nutritional content of your meals is essential for maintaining a balanced diet. The beef and broccoli stir-fry is not only delicious but also packed with nutrients. Here’s a closer look at the nutritional information for this dish:

Calories

Each serving of beef and broccoli stir-fry contains approximately 350 calories. This makes it a satisfying option for dinner without being overly heavy. The combination of protein from the beef and fiber from the broccoli helps keep you full and energized.

Protein Content

One of the standout features of this dish is its protein content. Each serving provides about 30 grams of protein. This is beneficial for muscle repair and growth, making it a great choice for active individuals. The flank steak is a lean source of protein, contributing to a healthy diet.

Sodium Levels

When it comes to sodium, each serving contains around 800 milligrams. While this is a reasonable amount for a flavorful dish, it’s important to be mindful of your overall sodium intake, especially if you are watching your salt consumption. You can reduce the sodium levels by using low-sodium soy sauce or adjusting the amount of sauce used in the recipe.

Overall, the beef and broccoli stir-fry is a nutritious meal option that provides a good balance of calories, protein, and essential nutrients. Enjoying this dish as part of a varied diet can contribute to your overall health and well-being!

FAQs about Beef and Broccoli Stir-Fry Recipe

Can I use frozen broccoli for the Beef and Broccoli Stir-Fry Recipe?

Yes, you can use frozen broccoli for your beef and broccoli stir-fry! However, there are a few things to keep in mind. First, make sure to thaw the broccoli before cooking. This helps it cook evenly and prevents excess water from being released into the stir-fry. You can quickly thaw it by placing it in a bowl of warm water for a few minutes or by microwaving it for a short time. Once thawed, you can stir-fry it just like fresh broccoli. Keep in mind that frozen broccoli may be slightly softer than fresh, so adjust your cooking time accordingly to maintain a nice texture.

What can I substitute for soy sauce in the Beef and Broccoli Stir-Fry Recipe?

If you need a substitute for soy sauce, there are several options available. One popular alternative is tamari, which is a gluten-free soy sauce. It has a similar flavor profile and works well in stir-fries. Another option is coconut aminos, which is a soy-free sauce made from coconut sap. It has a slightly sweeter taste but can be used in the same quantity as soy sauce. If you prefer a homemade option, you can mix equal parts of balsamic vinegar and water with a pinch of salt to mimic the flavor of soy sauce. These substitutes will help you achieve a delicious stir-fry without soy sauce!

How do I make the Beef and Broccoli Stir-Fry Recipe gluten-free?

Making your beef and broccoli stir-fry gluten-free is quite simple! First, ensure that you use gluten-free soy sauce or tamari instead of regular soy sauce. Additionally, check the oyster sauce label to confirm it is gluten-free, as some brands may contain gluten. You can also use cornstarch, which is naturally gluten-free, to thicken the sauce. Finally, serve your stir-fry over rice or gluten-free noodles to keep the entire meal gluten-free. With these adjustments, you can enjoy a delicious beef and broccoli stir-fry that fits your dietary needs!

Conclusion on Beef and Broccoli Stir-Fry Recipe

In conclusion, the beef and broccoli stir-fry is a delightful dish that combines flavor, nutrition, and convenience. This recipe is not only quick to prepare but also offers a satisfying meal that can please the whole family. With its tender beef, vibrant broccoli, and savory sauce, it’s no wonder this dish has become a favorite in many households.

Whether you stick to the classic version or explore the various alternatives and variations, the possibilities are endless. You can easily customize the recipe to suit your taste preferences or dietary needs. From swapping proteins to adding different vegetables, each variation brings a unique twist to this beloved dish.

Moreover, the nutritional benefits of beef and broccoli stir-fry make it a smart choice for a balanced meal. With a good amount of protein and fiber, it helps keep you full and energized. Plus, it’s a fantastic way to incorporate more vegetables into your diet.

So, the next time you’re looking for a quick and delicious dinner option, remember this beef and broccoli stir-fry recipe. With just a few simple ingredients and steps, you can create a meal that’s not only tasty but also healthy. Enjoy the process of cooking and savor the delightful flavors of this classic dish!

Philly Cheesesteak Sloppy Joe Recipe is a must-try!

Introduction to Philly Cheesesteak Sloppy Joe Recipe

Philly Cheesesteak Sloppy Joe Recipe combines two beloved comfort foods into one mouthwatering dish. Imagine the rich flavors of a classic Philly cheesesteak, all wrapped up in a messy, satisfying sloppy joe. This recipe is not just a meal; it’s an experience that brings joy to your dinner table.

What Makes This Recipe Unique?

This recipe stands out because it merges the best of both worlds. You get the savory, cheesy goodness of a Philly cheesesteak, paired with the easy-to-eat nature of a sloppy joe. The combination of ground beef, sautéed vegetables, and melted provolone cheese creates a hearty filling that is both comforting and flavorful. Plus, it’s quick to prepare, making it perfect for busy weeknights or casual gatherings with friends.

What’s more, this dish is versatile! You can easily customize it to suit your taste. Whether you prefer it spicy, cheesy, or even vegetarian, the options are endless. This unique twist on a classic will surely impress your family and friends, making it a go-to recipe for any occasion.

The Origin of Sloppy Joes and Philly Cheesesteaks

To truly appreciate this recipe, it’s essential to understand its roots. Sloppy Joes originated in the United States in the early 20th century. They are believed to have been created by a cook named Joe in a small café in Sioux City, Iowa. The dish quickly gained popularity for its simple ingredients and delicious flavor.

On the other hand, the Philly cheesesteak hails from Philadelphia, Pennsylvania. This iconic sandwich was invented in the 1930s and has since become a staple of American cuisine. It features thinly sliced beefsteak and melted cheese, typically served in a hoagie roll. The combination of these two classic dishes into one recipe is a celebration of culinary creativity, bringing together the best flavors from both worlds.

Now that you know what makes this recipe unique and its fascinating origins, let’s dive into the ingredients you’ll need to create this delightful dish!

Ingredients for Philly Cheesesteak Sloppy Joe Recipe

Essential Ingredients

Philly Cheesesteak Sloppy Joe Recipe, you’ll need a few key ingredients. These essentials create the base of your dish, ensuring it’s packed with flavor and satisfaction. Here’s what you’ll need:

  • 1 pound ground beef
  • 1 tablespoon olive oil
  • 1 medium onion, diced
  • 1 green bell pepper, diced
  • 2 cloves garlic, minced
  • 1 cup sliced mushrooms
  • 1 teaspoon Worcestershire sauce
  • 1 teaspoon soy sauce
  • 1 teaspoon salt
  • ½ teaspoon black pepper
  • 1 cup beef broth
  • 1 cup provolone cheese, shredded
  • 4 hamburger buns

These ingredients come together to create a rich and hearty filling. The ground beef provides protein, while the vegetables add texture and flavor. The provolone cheese melts beautifully, making every bite creamy and delicious.

Optional Ingredients for Extra Flavor

Philly Cheesesteak Sloppy Joe Recipe, consider adding some optional ingredients. These can enhance the taste and make your dish even more exciting:

  • Diced jalapeños for a spicy kick
  • A dash of hot sauce for extra heat
  • Chopped fresh parsley for a pop of color
  • Other cheese varieties like cheddar or mozzarella
  • Cooked bacon bits for added crunch and flavor

Feel free to mix and match these optional ingredients based on your preferences. The beauty of this recipe lies in its versatility, allowing you to create a dish that suits your taste buds perfectly. Now that you have all the ingredients ready, let’s move on to the step-by-step preparation!

Step-by-Step Preparation of Philly Cheesesteak Sloppy Joe Recipe

Step 1: Preparing the Meat

Philly Cheesesteak Sloppy Joe Recipe from becoming too greasy.

Step 2: Sautéing the Vegetables

Next, it’s time to add some flavor! In the same skillet, toss in the diced onion and green bell pepper. Sauté these vegetables for about 5 minutes, or until they become soft. Then, add 2 cloves of minced garlic and 1 cup of sliced mushrooms. Cook everything together for another 3 to 4 minutes. The aroma will be delightful! This step adds a wonderful depth of flavor to your sloppy joes.

Step 3: Combining Ingredients

Now that your meat and veggies are ready, it’s time to combine them. Add the browned ground beef back into the skillet with the sautéed vegetables. Stir in 1 teaspoon of Worcestershire sauce, 1 teaspoon of soy sauce, 1 teaspoon of salt, and ½ teaspoon of black pepper. Mix everything well to ensure the flavors meld together. This is where the magic happens!

Step 4: Simmering the Mixture

To bring it all together, pour in 1 cup of beef broth. This will help create a rich, savory sauce. Bring the mixture to a gentle simmer. Let it cook for about 10 minutes, stirring occasionally. This simmering time allows the flavors to deepen and the mixture to thicken slightly. You’ll notice how the sauce clings to the meat and veggies, making it even more delicious.

Step 5: Toasting the Buns

While your mixture is simmering, it’s a great time to prepare the buns. Take 4 hamburger buns and toast them lightly. You can do this in a toaster or on a skillet. Toasting the buns adds a nice crunch and helps them hold up against the juicy filling. Once toasted, they’ll be ready to hold all that cheesy goodness!

Philly Cheesesteak Sloppy Joe Recipe. Just imagine the melted provolone cheese mixed in with the savory beef and veggies, all nestled in a warm, toasted bun. It’s time to dig in!

Variations of Philly Cheesesteak Sloppy Joe Recipe

Vegetarian Version

Philly Cheesesteak Sloppy Joe Recipe. Instead of ground beef, use a combination of lentils, black beans, or even crumbled tempeh. These ingredients provide a hearty texture and are packed with protein. You can follow the same steps as the original recipe, sautéing the vegetables and adding your chosen meat substitute. For added flavor, consider incorporating some diced eggplant or zucchini. This way, you’ll still enjoy the rich, savory taste without the meat!

Spicy Twist

Philly Cheesesteak Sloppy Joe Recipe is a fantastic idea! Start by including diced jalapeños or serrano peppers when you sauté the vegetables. You can also mix in a dash of your favorite hot sauce during the combining step. If you want an extra kick, try using pepper jack cheese instead of provolone. This spicy variation will surely satisfy your cravings for something bold and exciting!

Cheese Variations

Philly Cheesesteak Sloppy Joe Recipe. While provolone is a classic choice, you can experiment with other types of cheese for different flavors. Cheddar cheese adds a sharpness that pairs well with the savory beef. Mozzarella provides a gooey, stretchy texture that is simply irresistible. For a gourmet touch, consider using blue cheese or gouda. Each cheese brings its unique flavor profile, allowing you to customize your sloppy joes to your liking!

Philly Cheesesteak Sloppy Joe Recipe for everyone!

Cooking Note for Philly Cheesesteak Sloppy Joe Recipe

Tips for Perfect Texture and Flavor

Philly Cheesesteak Sloppy Joe Recipe, consider these helpful tips. They will ensure your dish is not only delicious but also has the perfect texture and flavor.

  • Choose the Right Ground Beef: Opt for ground beef with a higher fat content, like 80/20. This will keep your mixture juicy and flavorful. Leaner beef can dry out during cooking.
  • Don’t Rush the Sautéing: Take your time when sautéing the vegetables. Allow them to soften and caramelize slightly. This step enhances their natural sweetness and adds depth to your dish.
  • Season Generously: Don’t be shy with your seasonings! The Worcestershire sauce and soy sauce add umami, but feel free to adjust the salt and pepper to your taste. A pinch of garlic powder or onion powder can also boost flavor.
  • Let It Simmer: Allow the mixture to simmer for the full 10 minutes. This helps the flavors meld together beautifully. The longer it simmers, the richer the taste will be.
  • Use Fresh Ingredients: Whenever possible, use fresh vegetables and high-quality cheese. Fresh ingredients make a noticeable difference in flavor and texture.
  • Experiment with Toppings: Consider adding toppings like pickled jalapeños, fresh herbs, or even a drizzle of ranch dressing. These can elevate your sloppy joes to a whole new level!

Philly Cheesesteak Sloppy Joe Recipe that is bursting with flavor and has the perfect texture. Your family and friends will be asking for seconds!

Serving Suggestions for Philly Cheesesteak Sloppy Joe Recipe

Best Side Dishes to Pair

Philly Cheesesteak Sloppy Joe Recipe, choosing the right side dishes can elevate your meal. Here are some delicious options that complement the rich flavors of your sloppy joes:

  • French Fries: Crispy, golden fries are a classic choice. They add a satisfying crunch and are perfect for dipping in any leftover sauce.
  • Coleslaw: A refreshing coleslaw provides a nice contrast to the savory filling. The crunchiness and tanginess balance the richness of the sloppy joes.
  • Potato Chips: For a quick and easy side, serve your sloppy joes with a side of potato chips. They add a delightful crunch and are great for snacking.
  • Pickles: Tangy pickles can cut through the richness of the dish. They add a burst of flavor and a nice crunch.
  • Sweet Potato Fries: For a healthier twist, try sweet potato fries. They offer a hint of sweetness that pairs well with the savory flavors of the sloppy joes.

These side dishes not only enhance your meal but also provide a variety of textures and flavors. Feel free to mix and match based on your preferences and what you have on hand!

Creative Serving Ideas

Philly Cheesesteak Sloppy Joe Recipe can be fun and creative! Here are some ideas to make your meal even more exciting:

  • Sloppy Joe Bar: Set up a sloppy joe bar for gatherings. Provide various toppings like jalapeños, cheese, and sauces. Let guests customize their sandwiches!
  • Stuffed Peppers: For a twist, use the cheesesteak mixture to stuff bell peppers. Bake them until tender for a delicious and colorful presentation.
  • Nachos: Transform your sloppy joe filling into nachos! Layer tortilla chips with the mixture, cheese, and toppings for a fun appetizer.
  • Wraps: Instead of buns, use large tortillas to create wraps. This makes for a portable meal that’s easy to enjoy on the go.
  • Mini Sliders: Make mini versions of your sloppy joes for parties. Serve them on small buns for a perfect bite-sized treat.

Philly Cheesesteak Sloppy Joe Recipe a memorable meal. Enjoy the deliciousness and have fun with your presentation!

Tips for Making the Best Philly Cheesesteak Sloppy Joe Recipe

Ingredient Substitutions

Philly Cheesesteak Sloppy Joe Recipe is all about flexibility. If you find yourself missing an ingredient, don’t worry! Here are some easy substitutions that can still deliver a delicious meal:

  • Ground Beef: If you prefer a leaner option, ground turkey or chicken works well. Just adjust the cooking time as needed to ensure it’s fully cooked.
  • Provolone Cheese: While provolone is a classic choice, feel free to swap it for mozzarella, cheddar, or even pepper jack for a spicy kick.
  • Beef Broth: If you don’t have beef broth, chicken broth or vegetable broth can be used. This will still keep your mixture flavorful.
  • Vegetables: You can mix in other vegetables like zucchini, spinach, or even corn. These add extra nutrients and flavor to your dish.
  • Buns: If you want a healthier option, consider using whole grain or gluten-free buns. Lettuce wraps are also a great low-carb alternative!

Philly Cheesesteak Sloppy Joe Recipe based on what you have at home. Don’t hesitate to get creative!

Storage and Reheating Tips

Philly Cheesesteak Sloppy Joe Recipe, you might have some leftovers. Here’s how to store and reheat them properly:

  • Storage: Allow the sloppy joe mixture to cool completely before transferring it to an airtight container. It can be stored in the refrigerator for up to 3 days.
  • Freezing: If you want to keep it longer, you can freeze the mixture. Place it in a freezer-safe container or bag, and it will last for up to 3 months. Just remember to label it with the date!
  • Reheating: To reheat, simply thaw the frozen mixture in the refrigerator overnight. Then, warm it in a skillet over medium heat until heated through. You can also microwave it in short intervals, stirring in between.
  • Fresh Buns: For the best experience, toast fresh buns when serving leftovers. This adds a nice crunch and makes the meal feel new again!

Philly Cheesesteak Sloppy Joe Recipe even after the first serving. It’s a great way to savor the flavors all over again!

Breakdown of Time for Philly Cheesesteak Sloppy Joe Recipe

Prep Time

Philly Cheesesteak Sloppy Joe Recipe is quick and easy! The prep time usually takes about 10 to 15 minutes. During this time, you’ll gather all your ingredients, chop the vegetables, and measure out the seasonings. Having everything prepped in advance makes the cooking process smoother and more enjoyable.

Cooking Time

The cooking time for this delicious recipe is approximately 20 to 25 minutes. This includes browning the ground beef, sautéing the vegetables, and simmering the mixture to let the flavors meld together. Each step is essential for creating that rich, savory taste that everyone loves. Plus, the time spent cooking is well worth it when you take that first bite!

Total Time

Philly Cheesesteak Sloppy Joe Recipe a fantastic option for busy weeknights or last-minute gatherings. With just a little time and effort, you’ll have a hearty meal that’s sure to please everyone at the table!

Nutritional Information for Philly Cheesesteak Sloppy Joe Recipe

Calories and Macronutrients

Philly Cheesesteak Sloppy Joe Recipe is essential for making informed choices. Each serving of this delicious dish contains approximately 450 calories. Here’s a breakdown of the macronutrients:

  • Calories: 450
  • Net Carbs: 30g
  • Protein: 30g
  • Fat: 25g

This recipe provides a balanced mix of protein, carbohydrates, and fats. The ground beef contributes a significant amount of protein, making it a filling option. The vegetables add fiber and essential nutrients, while the cheese provides a creamy texture and additional protein. Overall, this dish is not only satisfying but also offers a good nutritional profile.

Health Benefits of Ingredients

Philly Cheesesteak Sloppy Joe Recipe brings its own health benefits. Here’s a closer look at some of the key components:

  • Ground Beef: A great source of high-quality protein, iron, and zinc. These nutrients are vital for muscle growth, immune function, and overall health.
  • Vegetables (Onion, Bell Pepper, Mushrooms): Packed with vitamins and minerals, these veggies provide antioxidants that help fight inflammation. They also add fiber, which is important for digestive health.
  • Provolone Cheese: This cheese is a good source of calcium and protein. Calcium is essential for strong bones and teeth, while protein supports muscle repair and growth.
  • Olive Oil: A healthy fat that contains monounsaturated fats, which can help reduce bad cholesterol levels. It also has anti-inflammatory properties.
  • Worcestershire Sauce and Soy Sauce: These sauces add flavor without many calories. They can enhance the taste of your dish while keeping it low in added sugars.

Philly Cheesesteak Sloppy Joe Recipe not only satisfies your taste buds but also provides essential nutrients that contribute to a balanced diet. Enjoy this hearty meal knowing it’s both delicious and nutritious!

FAQs about Philly Cheesesteak Sloppy Joe Recipe

Can I make Philly Cheesesteak Sloppy Joes ahead of time?

Philly Cheesesteak Sloppy Joe Recipe ahead of time. Simply follow the recipe up to the point of simmering the mixture. Once it’s cooked, let it cool completely before storing it in an airtight container. You can keep it in the refrigerator for up to 3 days. When you’re ready to serve, just reheat it on the stove or in the microwave until warmed through. This makes it a great option for meal prep or busy weeknights!

What type of bread is best for this recipe?

Philly Cheesesteak Sloppy Joe Recipe. They hold the filling well and provide a nice contrast to the savory mixture. However, you can also try other types of bread. Hoagie rolls or even crusty baguettes work well if you prefer a different texture. If you’re looking for a healthier option, whole grain or gluten-free buns are great alternatives. Just make sure whatever bread you choose can handle the juicy filling!

Can I freeze Philly Cheesesteak Sloppy Joes?

Philly Cheesesteak Sloppy Joe Recipe! To do this, allow the mixture to cool completely, then transfer it to a freezer-safe container or bag. It can be frozen for up to 3 months. When you’re ready to enjoy it again, simply thaw it in the refrigerator overnight. Reheat it on the stove or in the microwave until hot. This makes for a quick and easy meal option when you’re short on time!

Conclusion on Philly Cheesesteak Sloppy Joe Recipe

Final Thoughts and Encouragement to Try the Recipe

Philly Cheesesteak Sloppy Joe Recipe is a delightful fusion of flavors that brings comfort and satisfaction to any meal. This dish is not only easy to prepare but also offers a unique twist on two classic favorites. With its savory ground beef, sautéed vegetables, and gooey provolone cheese, it’s sure to become a family favorite.

We encourage you to give this recipe a try! Whether you’re cooking for a busy weeknight dinner or hosting a casual gathering, these sloppy joes are a hit. Plus, the versatility of the recipe allows you to customize it to your liking. From adding spice to making it vegetarian, the possibilities are endless!

So gather your ingredients, roll up your sleeves, and dive into the delicious world of Philly Cheesesteak Sloppy Joes. Your taste buds will thank you, and your family will be asking for seconds. Enjoy the cooking process and the wonderful flavors that come together in this hearty dish. Happy cooking!

Savory One-Pot Chicken Rice Recipe is a must-try!

Introduction to the Savory One-Pot Chicken Rice Recipe

Welcome to the delightful world of the Savory One-Pot Chicken Rice Recipe! This dish is not just a meal; it’s a comforting experience that brings families together. With its rich flavors and simple preparation, it’s perfect for busy weeknights or cozy weekends. Let’s dive into what makes this recipe so special and explore the benefits of one-pot cooking.

What Makes This Recipe Special?

What sets the Savory One-Pot Chicken Rice Recipe apart is its incredible blend of flavors and textures. The tender chicken thighs, seasoned with paprika and thyme, create a mouthwatering base. Meanwhile, the rice absorbs all the delicious juices, making every bite a burst of flavor. Plus, the addition of peas and carrots not only adds color but also boosts the nutritional value. This recipe is a true crowd-pleaser, appealing to both kids and adults alike!

Benefits of One-Pot Cooking

One-pot cooking is a game-changer for many home cooks. First and foremost, it saves time. With everything cooked in one pot, you spend less time on cleanup. This method also allows flavors to meld beautifully, enhancing the overall taste of the dish. Additionally, it’s a fantastic way to prepare meals with minimal fuss. You can easily customize the recipe by adding your favorite vegetables or spices, making it versatile for any palate. Overall, one-pot meals like this chicken and rice recipe are not only convenient but also delicious!

Ingredients for the Savory One-Pot Chicken Rice Recipe

Gathering the right ingredients is key to making the Savory One-Pot Chicken Rice Recipe a success. Each component plays a vital role in creating a dish that is both flavorful and satisfying. Here’s what you’ll need:

  • 1 tablespoon olive oil: This adds richness and helps sauté the ingredients.
  • 1 medium onion, diced: Onions provide a sweet and savory base for the dish.
  • 3 cloves garlic, minced: Garlic adds a wonderful aroma and depth of flavor.
  • 1 pound boneless, skinless chicken thighs, cut into bite-sized pieces: Chicken thighs are juicy and tender, perfect for this recipe.
  • 1 teaspoon paprika: This spice gives the dish a warm color and a hint of smokiness.
  • 1 teaspoon dried thyme: Thyme adds an earthy flavor that complements the chicken.
  • 1 teaspoon salt: Salt enhances all the flavors in the dish.
  • ½ teaspoon black pepper: Black pepper adds a subtle kick.
  • 1 cup long-grain white rice: This type of rice cooks perfectly and absorbs flavors well.
  • 2 cups chicken broth: Broth adds moisture and richness to the rice.
  • 1 cup frozen peas and carrots: These vegetables add color, nutrition, and sweetness.
  • 2 tablespoons fresh parsley, chopped (for garnish): Fresh parsley brightens the dish and adds a pop of color.

With these ingredients on hand, you’re ready to create a delicious meal that everyone will love. The combination of chicken, rice, and vegetables makes this dish not only tasty but also balanced and nutritious. Let’s move on to the next step: preparing the chicken!

Step-by-Step Preparation of the Savory One-Pot Chicken Rice Recipe

Now that you have all your ingredients ready, it’s time to dive into the step-by-step preparation of the Savory One-Pot Chicken Rice Recipe. Each step is simple and straightforward, ensuring that you can create a delicious meal without any hassle. Let’s get started!

Step 1: Preparing the Chicken

First, take your boneless, skinless chicken thighs and cut them into bite-sized pieces. This helps them cook evenly and makes them easy to eat. Next, season the chicken with salt, black pepper, paprika, and dried thyme. This seasoning will infuse the chicken with flavor as it cooks. Set the seasoned chicken aside while you prepare the other ingredients.

Step 2: Sautéing the Aromatics

In a large pot or Dutch oven, heat the olive oil over medium heat. Once the oil is hot, add the diced onion. Sauté the onion for about 3-4 minutes until it becomes translucent. This step is crucial as it builds the flavor base for your dish. After the onion is ready, stir in the minced garlic and cook for an additional minute. The garlic will release a wonderful aroma, making your kitchen smell delightful!

Step 3: Adding the Rice and Broth

Now it’s time to add the seasoned chicken pieces to the pot. Cook the chicken for about 5-7 minutes, stirring occasionally, until it’s browned on all sides. This browning adds depth to the flavor. Once the chicken is cooked, add the long-grain white rice to the pot. Stir everything together, ensuring the rice is well-coated with the oil and spices. Then, pour in the chicken broth and bring the mixture to a boil. This step is essential as the broth will cook the rice and keep everything moist.

Step 4: Cooking the Chicken and Rice Together

Once the mixture reaches a boil, reduce the heat to low. Cover the pot with a lid and let it simmer for 15 minutes. This allows the rice to absorb the flavors and cook through. After 15 minutes, add the frozen peas and carrots to the pot. Gently stir them in, cover again, and cook for an additional 5-10 minutes. You’ll know it’s ready when the rice is tender and the liquid is absorbed.

Step 5: Final Touches and Serving

After cooking, remove the pot from heat and let it sit, covered, for 5 minutes. This resting time helps the rice become fluffy. Finally, fluff the rice with a fork and garnish with fresh parsley. This adds a lovely touch of color and freshness. Your Savory One-Pot Chicken Rice is now ready to be served!

Enjoy this delicious meal with your family and friends. It’s a perfect dish for any occasion, bringing warmth and comfort to your table.

Variations of the Savory One-Pot Chicken Rice Recipe

While the Savory One-Pot Chicken Rice Recipe is delicious as is, there are many ways to customize it. Adding different ingredients can enhance the flavor and nutrition of the dish. Here are some exciting variations to consider!

Adding Vegetables for Extra Nutrition

One of the best ways to boost the nutritional value of your meal is by adding more vegetables. You can include bell peppers, zucchini, or spinach. Simply chop them into bite-sized pieces and add them along with the peas and carrots. This not only adds color but also provides essential vitamins and minerals. Plus, it makes the dish even more filling!

Spicy Twist: Incorporating Hot Peppers

If you enjoy a bit of heat, consider adding hot peppers to your recipe. Jalapeños or crushed red pepper flakes can give your dish a spicy kick. You can add them when sautéing the onions or mix them in with the chicken. Adjust the amount based on your spice tolerance. This variation will surely excite your taste buds!

Herb Variations for Different Flavors

Herbs can transform the flavor profile of your dish. Instead of thyme, try using rosemary or oregano for a different taste. Fresh herbs like basil or cilantro can also be added just before serving for a burst of freshness. Experimenting with herbs allows you to create a unique version of the Savory One-Pot Chicken Rice Recipe that suits your preferences.

These variations not only make the dish more interesting but also allow you to cater to different dietary needs and preferences. Feel free to mix and match ingredients to create your perfect one-pot meal!

Cooking Note for the Savory One-Pot Chicken Rice Recipe

Cooking the Savory One-Pot Chicken Rice Recipe is straightforward, but a few tips can help ensure your dish turns out perfectly every time. First, always use a heavy-bottomed pot or Dutch oven. This type of cookware distributes heat evenly, preventing any burning or sticking. It also helps maintain a consistent temperature throughout the cooking process.

When sautéing the onions and garlic, keep an eye on them. You want them to be soft and fragrant, but not browned. Browning can lead to a bitter taste, which you want to avoid. If you notice they are cooking too quickly, simply lower the heat.

Another important note is to measure your rice and broth accurately. Using too much rice can lead to a dry dish, while too much broth can make it soupy. Stick to the recommended amounts for the best results. If you decide to substitute brown rice, remember that it requires a longer cooking time. Adjust the simmering time to about 40-45 minutes to ensure it cooks through properly.

Lastly, let the dish rest after cooking. This resting period allows the flavors to meld and the rice to firm up, making it easier to fluff. It’s a simple step that can make a big difference in the final texture of your meal. With these cooking notes in mind, you’re all set to create a delicious Savory One-Pot Chicken Rice that your family will love!

Serving Suggestions for the Savory One-Pot Chicken Rice Recipe

Once your Savory One-Pot Chicken Rice is ready, it’s time to think about how to serve it. This dish is hearty and satisfying on its own, but pairing it with the right side dishes can elevate your meal even further. Here are some great serving suggestions to consider!

Pairing with Side Dishes

When it comes to side dishes, you want to complement the flavors of the chicken and rice without overwhelming them. Here are a few ideas:

  • Simple Green Salad: A fresh salad with mixed greens, cherry tomatoes, and a light vinaigrette can add a refreshing crunch to your meal.
  • Garlic Bread: Warm, buttery garlic bread is a delightful addition. It’s perfect for soaking up any leftover juices from the chicken and rice.
  • Steamed Broccoli: Lightly steamed broccoli adds a pop of color and is packed with nutrients. It’s a great way to include more veggies in your meal.
  • Coleslaw: A tangy coleslaw can provide a nice contrast to the savory flavors of the chicken and rice, adding a bit of crunch and zest.

These side dishes not only enhance the meal but also make it more balanced and nutritious. Feel free to mix and match based on your family’s preferences!

Ideal Accompaniments for a Complete Meal

To create a complete dining experience, consider adding some accompaniments that can enhance the overall flavor profile of your meal:

  • Pickled Vegetables: A small serving of pickled vegetables can add a tangy bite that contrasts beautifully with the savory chicken and rice.
  • Yogurt Sauce: A dollop of yogurt sauce or tzatziki can provide a creamy texture and a refreshing taste, balancing the spices in the dish.
  • Fruit Chutney: A sweet fruit chutney, like mango or apple, can add a delightful sweetness that pairs well with the savory elements of the meal.
  • Herb-Infused Oil: Drizzling a bit of herb-infused oil over the dish before serving can enhance the flavors and add a gourmet touch.

These accompaniments not only add variety but also make your meal feel special. With these serving suggestions, your Savory One-Pot Chicken Rice will be a hit at the dinner table!

Tips for Perfecting the Savory One-Pot Chicken Rice Recipe

To make your Savory One-Pot Chicken Rice Recipe truly shine, a few tips can help you achieve the best results. From selecting the right rice to ensuring your chicken is flavorful, these suggestions will elevate your dish. Let’s explore how to perfect this delightful recipe!

Choosing the Right Rice

The type of rice you choose can significantly impact the texture and flavor of your dish. Long-grain white rice is ideal for this recipe as it cooks evenly and absorbs flavors well. However, if you prefer a healthier option, brown rice is a great substitute. Just remember, brown rice takes longer to cook. You’ll need to adjust the cooking time to about 40-45 minutes to ensure it becomes tender. Always rinse your rice before cooking to remove excess starch. This simple step helps prevent the rice from becoming sticky and clumpy.

Ensuring Flavorful Chicken

For the best flavor, marinating your chicken can make a big difference. Consider marinating the chicken in lemon juice, olive oil, and herbs for at least 30 minutes before cooking. This not only enhances the taste but also keeps the chicken juicy. Additionally, make sure to season the chicken well with salt, pepper, and spices. This will ensure that every bite is packed with flavor. Browning the chicken properly in the pot also adds depth to the overall taste, so don’t rush this step!

Storing Leftovers Properly

If you have leftovers, storing them correctly is essential to maintain freshness. Allow the dish to cool completely before transferring it to an airtight container. Store it in the refrigerator for up to 3-4 days. When reheating, add a splash of chicken broth or water to prevent the rice from drying out. You can also reheat it on the stovetop over low heat, stirring occasionally. This method helps retain the dish’s moisture and flavor. For longer storage, consider freezing the leftovers. They can last up to 2-3 months in the freezer. Just remember to thaw them in the refrigerator before reheating.

By following these tips, you’ll ensure that your Savory One-Pot Chicken Rice Recipe is not only delicious but also easy to prepare and enjoy later. Happy cooking!

Breakdown of Time for the Savory One-Pot Chicken Rice Recipe

Understanding the time needed for each step of the Savory One-Pot Chicken Rice Recipe can help you plan your cooking efficiently. Here’s a simple breakdown of the time required for preparation and cooking.

Prep Time

The prep time for this recipe is quite manageable. You’ll need about 10-15 minutes to gather and prepare all your ingredients. This includes chopping the onion, mincing the garlic, cutting the chicken, and measuring out the rice and broth. Having everything ready before you start cooking makes the process smoother and more enjoyable!

Cooking Time

Once you begin cooking, the total cooking time is approximately 30-35 minutes. This includes:

  • Sautéing the aromatics: About 5 minutes to cook the onion and garlic until fragrant.
  • Cooking the chicken: Around 5-7 minutes to brown the chicken pieces.
  • Simmering the rice: 15 minutes for the rice to absorb the broth and flavors.
  • Adding vegetables: An additional 5-10 minutes to cook the peas and carrots until tender.

Total Time

In total, you can expect the entire process, from prep to serving, to take about 45-50 minutes. This makes the Savory One-Pot Chicken Rice Recipe a quick and satisfying option for dinner. With minimal cleanup and a delicious meal ready in under an hour, it’s perfect for busy weeknights or when you want to impress guests without spending all day in the kitchen!

Nutritional Information for the Savory One-Pot Chicken Rice Recipe

Understanding the nutritional content of your meals is essential for maintaining a balanced diet. The Savory One-Pot Chicken Rice Recipe not only delights your taste buds but also provides a good mix of nutrients. Here’s a closer look at the nutritional information per serving:

Calories

Each serving of the Savory One-Pot Chicken Rice Recipe contains approximately 410 calories. This makes it a satisfying meal that can fit well into a variety of dietary plans. The calorie count is reasonable for a main dish, allowing you to enjoy a hearty meal without overindulging.

Protein Content

Protein is a vital nutrient for building and repairing tissues, and this recipe delivers! With about 30 grams of protein per serving, the chicken thighs provide a substantial amount of this essential nutrient. This high protein content helps keep you feeling full and satisfied, making it an excellent choice for those looking to maintain or build muscle.

Sodium Levels

When it comes to sodium, each serving contains around 800 milligrams. While this is a reasonable amount for a flavorful dish, it’s important to be mindful of your overall sodium intake throughout the day. If you’re watching your sodium levels, consider using low-sodium chicken broth or reducing the added salt in the recipe. This way, you can enjoy the delicious flavors without compromising your health goals.

Overall, the Savory One-Pot Chicken Rice Recipe is a nutritious option that balances calories, protein, and sodium. It’s a great meal choice for families looking to enjoy a wholesome dinner together!

FAQs about the Savory One-Pot Chicken Rice Recipe

Can I use brown rice instead of white rice?

Yes, you can definitely use brown rice instead of white rice in the Savory One-Pot Chicken Rice Recipe. However, keep in mind that brown rice takes longer to cook. You’ll need to adjust the cooking time to about 40-45 minutes to ensure it becomes tender. Brown rice is a healthier option, as it contains more fiber and nutrients. Just remember to rinse it before cooking to remove excess starch, which helps prevent stickiness.

How can I make this recipe gluten-free?

Making the Savory One-Pot Chicken Rice Recipe gluten-free is quite simple! The main ingredient to watch out for is the chicken broth. Ensure you use a gluten-free chicken broth or stock. Most brands offer gluten-free options, so check the label. Additionally, all the other ingredients in this recipe are naturally gluten-free, making it easy to enjoy a delicious meal without gluten. Just be sure to double-check any pre-packaged items for hidden gluten ingredients.

What are some good substitutes for chicken?

If you’re looking for substitutes for chicken in this recipe, there are several options. You can use turkey thighs or breasts, which have a similar texture and flavor. For a vegetarian option, consider using chickpeas or tofu. Both options will absorb the flavors of the dish beautifully. If you prefer seafood, shrimp can also be a delightful alternative. Just remember to adjust the cooking time accordingly, as shrimp cooks much faster than chicken.

Can I prepare this dish in advance?

Absolutely! The Savory One-Pot Chicken Rice Recipe can be prepared in advance, making it a great option for meal prep. You can cook the dish and store it in an airtight container in the refrigerator for up to 3-4 days. When you’re ready to eat, simply reheat it on the stovetop or in the microwave. If you want to prepare it even further in advance, consider freezing the leftovers. They can last up to 2-3 months in the freezer. Just remember to thaw them in the refrigerator before reheating for the best results!

Conclusion on the Savory One-Pot Chicken Rice Recipe

In conclusion, the Savory One-Pot Chicken Rice Recipe is a fantastic choice for anyone looking to create a delicious and satisfying meal with minimal effort. This dish combines tender chicken, flavorful rice, and vibrant vegetables, making it a well-rounded option for family dinners or gatherings with friends. The simplicity of one-pot cooking not only saves time but also allows for easy cleanup, making it a win-win for busy cooks.

As you’ve seen, this recipe is versatile. You can easily customize it with different vegetables, spices, or even protein substitutes to suit your taste preferences. Whether you’re adding a spicy twist or incorporating more greens, the possibilities are endless. Plus, with the nutritional benefits it offers, you can feel good about serving it to your loved ones.

So, why not give the Savory One-Pot Chicken Rice Recipe a try? With its rich flavors and comforting nature, it’s sure to become a favorite in your household. Gather your ingredients, follow the steps, and enjoy a delightful meal that brings everyone together. Happy cooking!

Cowboy Cornbread Casserole Recipe is a must-try dish!

Introduction to Cowboy Cornbread Casserole Recipe

What is Cowboy Cornbread Casserole?

Cowboy Cornbread Casserole is a delightful dish that combines the hearty flavors of the Southwest. This casserole features a savory mixture of ground beef, black beans, corn, and tomatoes, all topped with a fluffy cornbread layer. It’s a one-dish meal that’s perfect for family dinners or gatherings. The blend of spices and textures makes it a comforting choice for any occasion. Plus, it’s easy to prepare, making it a favorite among busy cooks!

Why You Should Try This Recipe

There are many reasons to try this Cowboy Cornbread Casserole Recipe. First, it’s packed with protein and fiber, thanks to the beef and beans. This makes it a filling meal that keeps you satisfied. Second, the recipe is versatile. You can easily customize it to suit your taste preferences. Want it spicier? Just add some jalapeños! Prefer a vegetarian option? Swap the beef for a plant-based alternative. Lastly, it’s a crowd-pleaser. Whether you’re serving it at a family gathering or a casual get-together, everyone will love this hearty dish. So, roll up your sleeves and get ready to enjoy a delicious slice of Cowboy Cornbread Casserole!

Ingredients for Cowboy Cornbread Casserole Recipe

To create a mouthwatering Cowboy Cornbread Casserole, you’ll need a variety of ingredients that come together to form a delicious meal. Here’s what you’ll need:

  • 1 pound ground beef: This is the main protein source, providing flavor and heartiness.
  • 1 small onion, diced: Adds sweetness and depth to the dish.
  • 1 can (15 ounces) black beans: Rinsed and drained, these beans add fiber and protein.
  • 1 can (15 ounces) corn: Sweet corn brings a nice texture and flavor contrast.
  • 1 can (10 ounces) diced tomatoes with green chilies: This adds a zesty kick to the casserole.
  • 1 packet (1 ounce) taco seasoning: A blend of spices that enhances the overall flavor.
  • 1 cup shredded cheddar cheese: Melts beautifully on top, adding richness.
  • 1 box (8.5 ounces) cornbread mix: The base for the cornbread topping.
  • 1 large egg: Binds the cornbread mix together.
  • 1/3 cup milk: Adds moisture to the cornbread batter.
  • 1 cup shredded mozzarella cheese: Provides a gooey, cheesy layer on top.
  • 1 tablespoon olive oil: Used for sautéing the onion and beef.
  • Salt and pepper to taste: Essential for seasoning the dish.

Gathering these ingredients will set you on the right path to making a delightful Cowboy Cornbread Casserole. Each component plays a vital role in creating a dish that is not only tasty but also satisfying. So, make sure you have everything ready before you start cooking!

Preparation of Cowboy Cornbread Casserole Recipe

Step 1: Preheat the Oven

Before you start cooking, it’s important to preheat your oven. Set it to 400°F (200°C). This ensures that your casserole bakes evenly and comes out perfectly golden brown. While the oven heats up, you can prepare the other ingredients. This step is crucial for achieving that delightful cornbread topping!

Step 2: Prepare the Meat Mixture

Next, grab a large skillet and heat 1 tablespoon of olive oil over medium heat. Once the oil is hot, add the diced onion. Sauté it for about 3-4 minutes until it becomes translucent. Then, add the pound of ground beef to the skillet. Use a spatula to break it apart as it cooks. Brown the beef for about 5-7 minutes. Make sure to drain any excess fat to keep your casserole from becoming greasy. This mixture is the heart of your Cowboy Cornbread Casserole!

Step 3: Make the Cornbread Batter

While the meat mixture is cooking, you can prepare the cornbread batter. In a separate bowl, combine the cornbread mix, 1 large egg, and 1/3 cup of milk. Stir until everything is well mixed. The batter should be smooth and ready to spread over the meat mixture later. This step adds a fluffy layer that complements the savory filling beautifully!

Step 4: Combine Ingredients

Once the meat mixture is ready, it’s time to combine everything. Stir in the black beans, corn, and diced tomatoes with green chilies into the skillet. Add the taco seasoning, salt, and pepper to taste. Cook this mixture for an additional 5 minutes. This allows all the flavors to meld together. After that, spread the beef mixture evenly in a greased 9×13-inch baking dish. Pour the cornbread batter over the beef mixture, gently spreading it to cover. Finally, sprinkle 1 cup of shredded mozzarella cheese on top. This will create a deliciously cheesy crust!

Step 5: Bake the Casserole

Now, it’s time to bake your Cowboy Cornbread Casserole! Place the baking dish in the preheated oven and bake for 25-30 minutes. You’ll know it’s done when the cornbread is golden brown and a toothpick inserted in the center comes out clean. Once baked, let the casserole cool for 5-10 minutes before serving. This cooling time helps the layers set, making it easier to cut and serve. Enjoy the delightful aroma as it fills your kitchen!

Variation of Cowboy Cornbread Casserole Recipe

Vegetarian Options

If you’re looking for a vegetarian twist on the Cowboy Cornbread Casserole Recipe, you’re in luck! You can easily swap out the ground beef for a plant-based meat alternative. Options like lentils, quinoa, or even crumbled tofu work wonderfully. These substitutes provide a hearty texture while keeping the dish satisfying. Additionally, you can add more vegetables to enhance the flavor and nutrition. Consider including bell peppers, zucchini, or mushrooms. These ingredients not only add color but also boost the overall taste of the casserole. With these adjustments, you can enjoy a delicious vegetarian version that everyone will love!

Spicy Additions

If you crave a little heat in your Cowboy Cornbread Casserole, there are several ways to spice things up! One simple method is to add diced jalapeños to the beef mixture. This will give your casserole a nice kick. Alternatively, you can use spicy taco seasoning instead of the regular kind. For an extra layer of flavor, consider mixing in some hot sauce or crushed red pepper flakes. These additions will elevate the dish and make it a hit for those who enjoy bold flavors. Just remember to adjust the spice level according to your taste preferences. With these spicy variations, your Cowboy Cornbread Casserole will be anything but ordinary!

Cooking Note for Cowboy Cornbread Casserole Recipe

When preparing the Cowboy Cornbread Casserole, there are a few cooking notes to keep in mind to ensure your dish turns out perfectly every time. First, always use a large skillet for the meat mixture. This allows for even cooking and prevents overcrowding, which can lead to uneven browning. Additionally, make sure to drain the excess fat from the ground beef. This step is crucial for keeping your casserole from becoming greasy and helps maintain a balanced flavor.

Another important tip is to let the casserole cool for a few minutes after baking. This cooling period allows the layers to set, making it easier to cut and serve. If you’re in a hurry, you can place the dish on a cooling rack to speed up the process. However, be cautious not to rush this step too much, as cutting into the casserole too soon can cause it to fall apart.

Lastly, feel free to experiment with the toppings! While mozzarella cheese is a great choice, you can also try adding other types of cheese, such as pepper jack for a spicy twist or a blend of Mexican cheeses for added flavor. Fresh herbs like cilantro or green onions can also be sprinkled on top just before serving for a burst of freshness. These small adjustments can elevate your Cowboy Cornbread Casserole and make it uniquely yours!

Serving Suggestions for Cowboy Cornbread Casserole Recipe

Pairing with Sides

When it comes to serving your Cowboy Cornbread Casserole, the right sides can enhance the meal and create a well-rounded dining experience. Here are some delicious side dishes that pair perfectly with this hearty casserole:

  • Fresh Salad: A crisp green salad with mixed greens, cherry tomatoes, and a light vinaigrette adds a refreshing contrast to the rich flavors of the casserole.
  • Guacamole and Chips: The creamy texture of guacamole alongside crunchy tortilla chips makes for a fun and tasty side. It complements the Southwestern flavors beautifully.
  • Coleslaw: A tangy coleslaw can provide a nice crunch and balance the richness of the casserole. The coolness of the slaw is a great contrast to the warm dish.
  • Steamed Vegetables: Lightly steamed vegetables, such as broccoli or green beans, add color and nutrition to your plate. They are a simple yet effective side.

These sides not only enhance the meal but also add variety to your dining experience. Feel free to mix and match based on your preferences and what you have on hand!

Ideal Occasions for Serving

Cowboy Cornbread Casserole is a versatile dish that fits perfectly into various occasions. Here are some ideal times to serve this delightful recipe:

  • Family Dinners: This casserole is a great choice for a cozy family dinner. It’s filling and can easily feed a crowd, making it perfect for busy weeknights.
  • Potlucks: If you’re invited to a potluck, this dish is sure to be a hit. It’s easy to transport and can be served warm or at room temperature.
  • Game Day: Hosting a game day gathering? Cowboy Cornbread Casserole is a fantastic option. It’s hearty and satisfying, perfect for enjoying while cheering on your favorite team.
  • Casual Gatherings: Whether it’s a barbecue or a casual get-together with friends, this casserole brings comfort food to the table, making it a crowd-pleaser.

With its delicious flavors and easy preparation, Cowboy Cornbread Casserole is a dish that can be enjoyed on many occasions. So, gather your loved ones and dig into this delightful meal!

Tips for Perfecting Cowboy Cornbread Casserole Recipe

Common Mistakes to Avoid

To ensure your Cowboy Cornbread Casserole turns out perfectly, it’s important to avoid some common mistakes. First, don’t skip the step of draining the excess fat from the ground beef. This can lead to a greasy casserole that lacks flavor balance. Second, be careful not to overmix the cornbread batter. Mixing too much can make the cornbread tough instead of fluffy. Just stir until the ingredients are combined.

Another mistake to watch out for is not allowing the casserole to cool before serving. Cutting into it too soon can cause the layers to fall apart, making it messy. Lastly, remember to taste your meat mixture before adding it to the baking dish. Adjust the seasoning as needed to ensure every bite is flavorful. By keeping these tips in mind, you’ll create a Cowboy Cornbread Casserole that’s both delicious and visually appealing!

Storage Tips

Storing your Cowboy Cornbread Casserole properly can help maintain its deliciousness for later enjoyment. If you have leftovers, allow the casserole to cool completely before storing. Place it in an airtight container and refrigerate. It can last for up to 3-4 days in the fridge. When you’re ready to enjoy it again, simply reheat individual portions in the microwave or warm the entire dish in the oven at 350°F (175°C) until heated through.

If you want to store the casserole for a longer period, consider freezing it. To do this, wrap the casserole tightly in plastic wrap and then in aluminum foil. This will help prevent freezer burn. It can be frozen for up to 2-3 months. When you’re ready to eat it, thaw it in the refrigerator overnight before reheating. With these storage tips, you can savor the flavors of your Cowboy Cornbread Casserole even after the first serving!

Breakdown of Time for Cowboy Cornbread Casserole Recipe

Prep Time

The prep time for the Cowboy Cornbread Casserole Recipe is approximately 15-20 minutes. This includes gathering all your ingredients, chopping the onion, and preparing the meat mixture. Having everything ready before you start cooking will make the process smoother and more enjoyable. So, take a moment to measure out your ingredients and get your workspace organized!

Cooking Time

Once you’ve prepped your ingredients, the cooking time is about 30-35 minutes. This includes browning the ground beef and sautéing the onions, as well as baking the casserole in the oven. The baking time is crucial for achieving that perfect golden-brown cornbread topping. Keep an eye on it during the last few minutes to ensure it doesn’t overcook!

Total Time

In total, you can expect the Cowboy Cornbread Casserole Recipe to take around 50-55 minutes from start to finish. This includes both prep and cooking time. With such a reasonable time commitment, you can whip up this delicious dish for a family dinner or a gathering without spending all day in the kitchen. Enjoy the process and the delightful aroma that fills your home as it bakes!

Nutritional Information for Cowboy Cornbread Casserole Recipe

Calories

When it comes to enjoying a hearty meal, knowing the calorie content is essential. Each serving of Cowboy Cornbread Casserole contains approximately 350 calories. This makes it a satisfying option for dinner without going overboard on calories. The combination of ingredients provides a balanced meal that keeps you full and energized.

Protein

Protein is a vital nutrient for our bodies, and this casserole delivers! Each serving offers about 24 grams of protein. The ground beef and black beans contribute significantly to this protein content. This makes the Cowboy Cornbread Casserole a great choice for those looking to increase their protein intake while enjoying a delicious meal.

Sodium

Sodium levels are also important to consider, especially for those monitoring their intake. Each serving of Cowboy Cornbread Casserole contains around 800 milligrams of sodium. This amount can vary based on the specific brands of ingredients used, especially the taco seasoning and canned goods. To reduce sodium, consider using low-sodium versions of canned beans and tomatoes. This way, you can enjoy the flavors without worrying too much about sodium levels.

FAQs about Cowboy Cornbread Casserole Recipe

Can I make Cowboy Cornbread Casserole ahead of time?

Absolutely! You can prepare the Cowboy Cornbread Casserole ahead of time. Simply follow the recipe up to the baking step. Once you’ve combined the meat mixture and cornbread batter in the baking dish, cover it tightly with plastic wrap or aluminum foil. Store it in the refrigerator for up to 24 hours. When you’re ready to bake, just remove the cover and pop it in the oven. You may need to add a few extra minutes to the baking time if it’s cold from the fridge. This makes it a great option for busy days or special occasions!

What can I substitute for cornbread mix?

If you don’t have cornbread mix on hand, you can easily make your own! Combine 1 cup of all-purpose flour, 1 cup of cornmeal, 1 tablespoon of baking powder, and a pinch of salt. Mix these dry ingredients together, then add 1 large egg and 1/3 cup of milk to create a batter similar to the store-bought mix. This homemade version will work just as well in your Cowboy Cornbread Casserole, giving you that delightful cornbread topping!

How do I store leftovers of Cowboy Cornbread Casserole?

Storing leftovers is simple! Allow the Cowboy Cornbread Casserole to cool completely before transferring it to an airtight container. It can be stored in the refrigerator for up to 3-4 days. When you’re ready to enjoy it again, reheat individual portions in the microwave or warm the entire dish in the oven at 350°F (175°C) until heated through. This way, you can savor the delicious flavors of your casserole even after the first serving!

Can I freeze Cowboy Cornbread Casserole?

Yes, you can freeze Cowboy Cornbread Casserole for later enjoyment! To do this, wrap the cooled casserole tightly in plastic wrap and then in aluminum foil to prevent freezer burn. It can be frozen for up to 2-3 months. When you’re ready to eat it, thaw it in the refrigerator overnight. After thawing, reheat it in the oven at 350°F (175°C) until it’s heated through. Freezing is a great way to have a delicious meal ready to go whenever you need it!

Conclusion on Cowboy Cornbread Casserole Recipe

In conclusion, the Cowboy Cornbread Casserole Recipe is a fantastic dish that brings together hearty ingredients and comforting flavors. It’s not just a meal; it’s an experience that can be enjoyed by family and friends alike. With its easy preparation and versatility, this casserole is perfect for any occasion, whether it’s a cozy family dinner or a lively potluck.

By following the steps outlined in this article, you can create a delicious casserole that is sure to impress. Remember, the beauty of this recipe lies in its adaptability. Feel free to experiment with different ingredients, spices, and toppings to make it your own. Whether you prefer a spicy kick or a vegetarian twist, the possibilities are endless!

As you gather around the table to enjoy your Cowboy Cornbread Casserole, you’ll not only savor the delightful flavors but also create lasting memories with your loved ones. So, don’t hesitate to whip up this comforting dish and share it with those who matter most. Happy cooking!

Mexican Chicken Casserole Recipe is a family favorite!

Introduction to Mexican Chicken Casserole Recipe

Are you looking for a delicious and easy meal that the whole family will love? Look no further than the Mexican Chicken Casserole Recipe! This dish combines the rich flavors of Mexican cuisine with the comfort of a warm casserole. It’s perfect for busy weeknights or cozy gatherings with friends. With just a few simple ingredients, you can create a hearty meal that is both satisfying and full of flavor.

What Makes the Mexican Chicken Casserole Recipe Special?

What sets this Mexican Chicken Casserole apart is its delightful blend of textures and tastes. The tender, shredded chicken pairs beautifully with the creamy sour cream and melted cheese. Meanwhile, the black beans and corn add a nutritious crunch. Plus, the spices like chili powder and cumin give it that authentic Mexican flair. This casserole is not just a meal; it’s an experience!

Another reason this recipe shines is its versatility. You can easily customize it to suit your taste. Whether you prefer it mild or spicy, vegetarian or meaty, this dish can adapt to your preferences. It’s also a great way to use up leftover chicken or other ingredients you have on hand. So, gather your loved ones and get ready to enjoy a comforting dish that brings everyone together!

Ingredients for Mexican Chicken Casserole Recipe

To create a mouthwatering Mexican Chicken Casserole, you’ll need a variety of ingredients that come together to form a delicious dish. Here’s a list of what you’ll need:

  • 2 cups cooked, shredded chicken
  • 1 can (15 ounces) black beans, drained and rinsed
  • 1 can (15 ounces) corn, drained
  • 1 can (10 ounces) diced tomatoes with green chilies
  • 1 cup salsa
  • 1 teaspoon chili powder
  • 1 teaspoon cumin
  • 1 teaspoon garlic powder
  • 1 cup sour cream
  • 2 cups shredded cheddar cheese
  • 1 cup crushed tortilla chips
  • 1/4 cup chopped fresh cilantro (optional)

These ingredients are not only easy to find but also work together to create a flavorful and satisfying meal. The combination of chicken, beans, and corn provides a hearty base, while the spices and salsa add a zesty kick. The creamy sour cream and melted cheese on top make every bite irresistible!

Feel free to adjust the quantities based on your family size or personal preferences. For instance, if you love cheese, you can add more cheddar. If you prefer a bit of heat, consider using spicy salsa or adding jalapeños. The beauty of this Mexican Chicken Casserole Recipe lies in its flexibility!

Step-by-Step Preparation of Mexican Chicken Casserole Recipe

Now that you have all your ingredients ready, it’s time to dive into the preparation of your Mexican Chicken Casserole. This step-by-step guide will help you create a delicious dish that everyone will love. Let’s get started!

Step 1: Prepping the Ingredients

First things first, gather all your ingredients on the counter. This makes the cooking process smoother. If you haven’t done so already, shred your cooked chicken. You can use rotisserie chicken for convenience. Next, drain and rinse the black beans and corn. This helps remove excess sodium and ensures a cleaner taste. Finally, chop your fresh cilantro if you plan to use it as a garnish. Having everything prepped will save you time and make the assembly easier!

Step 2: Cooking the Chicken

If you’re starting with raw chicken, you’ll need to cook it first. You can boil, bake, or sauté the chicken until it’s fully cooked. Boiling is quick; just place the chicken in a pot of water and let it simmer for about 15-20 minutes. Once cooked, let it cool slightly before shredding it with two forks. If you’re using leftover chicken, you can skip this step and move right to mixing!

Step 3: Assembling the Casserole

Now comes the fun part—assembling your casserole! In a large mixing bowl, combine the shredded chicken, black beans, corn, diced tomatoes, salsa, chili powder, cumin, and garlic powder. Stir everything together until well mixed. In a separate bowl, blend the sour cream with 1 cup of shredded cheddar cheese. This creamy mixture will add richness to your casserole.

Next, take a greased 9×13-inch baking dish and spread half of the chicken mixture evenly on the bottom. Then, spoon the sour cream and cheese mixture over this layer, spreading it out gently. Finally, top it off with the remaining chicken mixture. Don’t forget to sprinkle the crushed tortilla chips on top, followed by the last cup of cheddar cheese. This will create a deliciously cheesy crust!

Step 4: Baking the Casserole

With your casserole assembled, it’s time to bake! Preheat your oven to 350°F (175°C) if you haven’t already. Place the baking dish in the oven and let it bake for 25-30 minutes. You’ll know it’s ready when the cheese is melted and bubbly. Once done, remove it from the oven and let it cool for about 5 minutes. This cooling time helps the casserole set, making it easier to serve. If you like, garnish with chopped cilantro before serving. Enjoy your delicious Mexican Chicken Casserole!

Variations of Mexican Chicken Casserole Recipe

The beauty of the Mexican Chicken Casserole Recipe lies in its versatility. You can easily modify it to suit different dietary preferences or to simply mix things up. Here are some exciting variations to consider!

Vegetarian Options

If you’re looking for a vegetarian twist, you can easily swap out the chicken for a variety of plant-based ingredients. Consider using:

  • Chickpeas: These provide a hearty texture and are packed with protein.
  • Quinoa: This grain is not only nutritious but also adds a nice chewiness.
  • Grilled Vegetables: Bell peppers, zucchini, and mushrooms can add great flavor and texture.
  • Tofu: Firm tofu can be crumbled and seasoned to mimic the texture of chicken.

Mix these ingredients with the black beans, corn, and spices for a delicious vegetarian casserole. You can still use the sour cream and cheese, or opt for dairy-free alternatives to keep it vegan!

Spicy Additions

If you love a bit of heat, there are plenty of ways to spice up your Mexican Chicken Casserole. Here are some ideas:

  • Diced Jalapeños: Add them to the chicken mixture for a fresh kick.
  • Hot Salsa: Swap regular salsa for a spicier version to amp up the flavor.
  • Chipotle Peppers: These can add a smoky heat that enhances the overall taste.
  • Red Pepper Flakes: Sprinkle some on top before baking for an extra layer of spice.

These spicy additions will not only elevate the flavor but also make your casserole a hit among those who enjoy a little heat in their meals. Feel free to adjust the spice levels according to your taste!

Cooking Note for Mexican Chicken Casserole Recipe

When preparing your Mexican Chicken Casserole, there are a few important cooking notes to keep in mind. These tips will help ensure that your dish turns out perfectly every time. Let’s dive into some key points to consider!

First, always preheat your oven. This step is crucial for even cooking. If you place your casserole in a cold oven, it may not cook properly, leading to uneven textures. Preheating to 350°F (175°C) allows the cheese to melt beautifully and the flavors to meld together.

Next, consider the type of chicken you use. While shredded rotisserie chicken is convenient, you can also use grilled or baked chicken for a different flavor. Just make sure it’s fully cooked and shredded before mixing it with the other ingredients.

Another tip is to adjust the cooking time based on your oven. Every oven is unique, and some may cook faster than others. Keep an eye on your casserole as it bakes. You want the cheese to be melted and bubbly, but not burnt. If you notice the top browning too quickly, you can cover it with aluminum foil to prevent overcooking.

Lastly, let your casserole cool for a few minutes after baking. This cooling period helps the layers set, making it easier to serve. If you cut into it too soon, it may fall apart. Patience is key for a beautiful presentation!

By following these cooking notes, you’ll create a delicious Mexican Chicken Casserole that’s sure to impress your family and friends. Happy cooking!

Serving Suggestions for Mexican Chicken Casserole Recipe

Once your Mexican Chicken Casserole is baked to perfection, it’s time to serve it up! This dish is not only delicious but also visually appealing, making it a great centerpiece for any meal. Here are some serving suggestions to enhance your dining experience:

  • Garnish with Fresh Herbs: A sprinkle of chopped fresh cilantro or parsley adds a pop of color and freshness. It also complements the flavors beautifully.
  • Pair with a Side Salad: A light salad with mixed greens, tomatoes, and avocado can balance the richness of the casserole. A simple vinaigrette dressing works well.
  • Serve with Rice: For a heartier meal, consider serving the casserole alongside a bed of fluffy rice. Spanish rice or cilantro-lime rice are excellent choices.
  • Offer Toppings: Set up a toppings bar with options like sliced jalapeños, sour cream, guacamole, and salsa. This allows everyone to customize their servings to their liking.
  • Accompany with Tortillas: Warm corn or flour tortillas can be served on the side. They are perfect for scooping up the casserole or enjoying with the toppings.

These serving suggestions not only enhance the flavor but also create a fun and interactive dining experience. Whether it’s a family dinner or a gathering with friends, your Mexican Chicken Casserole will surely be a hit!

Tips for Perfecting Your Mexican Chicken Casserole Recipe

To make your Mexican Chicken Casserole truly shine, consider these helpful tips. They will guide you in creating a dish that is not only delicious but also visually appealing. Let’s explore some ways to elevate your casserole game!

First, use quality ingredients. Fresh vegetables and high-quality cheese can make a big difference in flavor. Opt for organic or locally sourced produce when possible. This ensures that your casserole is not only tasty but also nutritious.

Next, don’t skip the seasoning. While the recipe includes chili powder, cumin, and garlic powder, feel free to experiment with additional spices. A pinch of smoked paprika or oregano can add depth to the flavor. Taste as you go to find the perfect balance!

Another tip is to layer your ingredients thoughtfully. When assembling the casserole, ensure that each layer is evenly distributed. This helps in achieving a consistent flavor throughout the dish. It also makes for a more appealing presentation when served.

Consider adding a crunchy topping. While crushed tortilla chips are a great choice, you can also use panko breadcrumbs mixed with a bit of melted butter. This will create an extra crispy layer on top, adding texture to your casserole.

Lastly, let your casserole rest before serving. Allowing it to cool for about 5-10 minutes after baking helps the layers set. This makes it easier to cut and serve without falling apart. Plus, it allows the flavors to meld together even more!

By following these tips, you’ll be well on your way to creating a Mexican Chicken Casserole that is not only delicious but also a feast for the eyes. Enjoy the process and happy cooking!

Breakdown of Time for Mexican Chicken Casserole Recipe

Understanding the time needed for each step of the Mexican Chicken Casserole Recipe can help you plan your cooking better. Here’s a simple breakdown of the time involved in preparing this delicious dish.

Prep Time

The prep time for the Mexican Chicken Casserole is approximately 20-30 minutes. This includes gathering your ingredients, shredding the chicken, and mixing everything together. If you use pre-cooked chicken, you can save some time here. Having everything ready before you start cooking makes the process smoother and more enjoyable!

Cooking Time

Once your casserole is assembled, the cooking time is about 25-30 minutes. During this time, the casserole bakes in the oven at 350°F (175°C). You’ll want to keep an eye on it to ensure the cheese melts perfectly and the top gets a nice golden color. This is when the wonderful aromas fill your kitchen!

Total Time

In total, you can expect the entire process to take around 50-60 minutes from start to finish. This includes both prep and cooking time. It’s a quick and easy meal that’s perfect for busy weeknights or when you want to impress guests without spending hours in the kitchen. With this time breakdown, you can easily fit this delightful Mexican Chicken Casserole into your schedule!

Nutritional Information for Mexican Chicken Casserole Recipe

Understanding the nutritional content of your meals is essential for maintaining a balanced diet. The Mexican Chicken Casserole Recipe is not only delicious but also provides a good mix of nutrients. Here’s a breakdown of the nutritional information per serving:

Calories

Each serving of the Mexican Chicken Casserole contains approximately 350 calories. This makes it a satisfying meal option without being overly heavy. The combination of chicken, beans, and cheese contributes to the calorie count while providing essential nutrients.

Protein

Protein is a vital part of any meal, and this casserole delivers! With about 25 grams of protein per serving, it helps support muscle growth and repair. The shredded chicken and black beans are excellent sources of protein, making this dish a great choice for those looking to increase their protein intake.

Sodium

When it comes to sodium, each serving contains around 800 milligrams. While this is a reasonable amount for a hearty meal, it’s important to be mindful of your overall sodium intake throughout the day. To reduce sodium levels, consider using low-sodium canned beans and tomatoes. This small adjustment can make a big difference without sacrificing flavor!

By keeping track of the nutritional information, you can enjoy your Mexican Chicken Casserole while staying aligned with your dietary goals. It’s a delicious way to nourish your body and satisfy your taste buds!

FAQs about Mexican Chicken Casserole Recipe

Can I make the Mexican Chicken Casserole Recipe ahead of time?

Absolutely! Making the Mexican Chicken Casserole ahead of time is a great idea. You can prepare the casserole up to the point of baking. Simply assemble all the layers in your greased baking dish, cover it tightly with plastic wrap or aluminum foil, and store it in the refrigerator. It can be kept this way for up to 24 hours. When you’re ready to bake, just remove it from the fridge and let it sit at room temperature for about 15-20 minutes before placing it in the preheated oven. This helps ensure even cooking.

What can I substitute for chicken in the Mexican Chicken Casserole Recipe?

If you’re looking for alternatives to chicken, there are plenty of options! You can use cooked ground beef or turkey for a different flavor profile. For a vegetarian option, consider using chickpeas, quinoa, or even grilled vegetables. Tofu is another excellent substitute that can soak up the flavors of the spices. Just make sure to season your substitutes well to maintain the delicious taste of the casserole!

How do I store leftovers from the Mexican Chicken Casserole Recipe?

Storing leftovers from your Mexican Chicken Casserole is simple! Allow the casserole to cool completely before transferring it to an airtight container. You can keep it in the refrigerator for up to 3-4 days. If you want to store it for a longer period, consider freezing it. Just make sure to wrap it tightly in plastic wrap and then in aluminum foil or place it in a freezer-safe container. It can be frozen for up to 3 months. When you’re ready to enjoy it again, thaw it in the refrigerator overnight and reheat in the oven until warmed through.

Conclusion on Mexican Chicken Casserole Recipe

In conclusion, the Mexican Chicken Casserole Recipe is a delightful dish that brings together the vibrant flavors of Mexican cuisine in a comforting and easy-to-make casserole. With its combination of tender chicken, hearty beans, and creamy cheese, this recipe is sure to please everyone at the table. Whether you’re preparing it for a family dinner or a gathering with friends, it’s a meal that fosters togetherness and joy.

Moreover, the versatility of this casserole allows you to customize it to fit your taste preferences. From vegetarian options to spicy variations, the possibilities are endless. You can easily adapt the ingredients to use what you have on hand, making it a practical choice for any occasion.

As you embark on your cooking journey, remember the tips and tricks shared throughout this article. They will help you create a Mexican Chicken Casserole that not only tastes amazing but also looks beautiful on your dining table. So, gather your ingredients, follow the steps, and enjoy the process of making this delicious dish.

Finally, don’t forget to share your creation with family and friends. The joy of cooking is best experienced when shared with others. We hope this Mexican Chicken Casserole Recipe becomes a staple in your home, bringing warmth and happiness to your meals for years to come. Happy cooking!

Churro Cheesecake Bars are a must-try dessert today!

Introduction to Churro Cheesecake Bars

Are you ready to indulge in a delightful dessert that combines two beloved treats? Churro Cheesecake Bars are the perfect fusion of creamy cheesecake and the warm, cinnamon-sugar goodness of churros. This dessert is not only delicious but also easy to make, making it a fantastic choice for gatherings, parties, or simply a sweet treat at home.

Imagine biting into a rich, creamy cheesecake that melts in your mouth, with a crunchy graham cracker crust beneath it. The topping of cinnamon and sugar adds a delightful twist, reminiscent of the classic churro. These bars are sure to impress your family and friends, and they might just become your new favorite dessert!

Whether you’re a seasoned baker or a beginner, this recipe is straightforward and fun. Plus, it offers a unique way to enjoy cheesecake. So, gather your ingredients and let’s dive into the world of Churro Cheesecake Bars!

Ingredients for Churro Cheesecake Bars

To create these scrumptious Churro Cheesecake Bars, you’ll need a few simple ingredients. Each component plays a vital role in achieving that perfect balance of flavors and textures. Here’s what you’ll need:

  • 1 ½ cups graham cracker crumbs
  • ½ cup unsalted butter, melted
  • ¼ cup granulated sugar
  • 1 teaspoon ground cinnamon
  • 2 (8-ounce) packages cream cheese, softened
  • ¾ cup granulated sugar
  • 1 teaspoon vanilla extract
  • 2 large eggs
  • 1 cup sour cream
  • 1 tablespoon all-purpose flour
  • ½ teaspoon ground cinnamon (for topping)
  • 2 tablespoons granulated sugar (for topping)

These ingredients come together to create a rich and creamy cheesecake with a delightful churro-inspired twist. The graham cracker crumbs form a sturdy base, while the cream cheese filling provides that luscious texture we all love. The cinnamon and sugar topping adds a sweet crunch that perfectly complements the creamy filling.

Gather these ingredients, and you’ll be well on your way to making your very own Churro Cheesecake Bars. Let’s move on to the preparation steps to bring this delicious dessert to life!

Preparation of Churro Cheesecake Bars

Now that you have all your ingredients ready, it’s time to prepare your Churro Cheesecake Bars! This process is simple and fun. Follow these steps to create a delicious dessert that everyone will love.

Step 1: Preparing the Crust

First, let’s make the crust. In a medium bowl, combine the graham cracker crumbs, melted butter, ¼ cup of granulated sugar, and 1 teaspoon of ground cinnamon. Mix everything together until it’s well combined. The mixture should look like wet sand.

Next, press this mixture firmly into the bottom of your greased or lined 9×9-inch baking pan. Make sure it’s even and compact. This will create a sturdy base for your cheesecake filling. Once done, set it aside while you prepare the filling.

Step 2: Making the Cheesecake Filling

Now, let’s move on to the cheesecake filling. In a large mixing bowl, beat the softened cream cheese with ¾ cup of granulated sugar. Use an electric mixer on medium speed until the mixture is smooth and creamy. This step is crucial for a fluffy cheesecake.

After that, add in the vanilla extract and mix until combined. Then, add the eggs one at a time, mixing well after each addition. This helps to incorporate air into the mixture, making it light and airy.

Finally, stir in the sour cream and flour until just combined. Be careful not to overmix, as this can make the cheesecake dense. Your filling should be creamy and smooth, ready to pour over the crust.

Step 3: Assembling the Churro Cheesecake Bars

With the crust and filling ready, it’s time to assemble your Churro Cheesecake Bars. Pour the cheesecake filling over the prepared crust in the baking pan. Use a spatula to smooth the top, ensuring an even layer. This will help the bars bake evenly.

Now, your dessert is almost ready to bake! But first, let’s add a little extra flavor.

Step 4: Baking the Churro Cheesecake Bars

Preheat your oven to 325°F. Once it’s hot, place the baking pan in the oven. Bake the Churro Cheesecake Bars for 40-45 minutes. You’ll know they’re done when the edges are set, but the center is still slightly jiggly. This is normal and will firm up as it cools.

After baking, turn off the oven and leave the cheesecake inside for an additional 10 minutes. This gentle cooling helps prevent cracks on the surface. Once the time is up, remove the pan from the oven and let it cool to room temperature.

Step 5: Adding the Topping

While your cheesecake is cooling, let’s prepare the topping. In a small bowl, mix together the remaining ½ teaspoon of ground cinnamon and 2 tablespoons of granulated sugar. Once the cheesecake has cooled, sprinkle this mixture evenly over the top.

Now, refrigerate the cheesecake for at least 4 hours or overnight. This chilling time allows the flavors to meld and the texture to set perfectly. Once chilled, your Churro Cheesecake Bars will be ready to cut into squares and serve!

Variation of Churro Cheesecake Bars

If you love Churro Cheesecake Bars but have specific dietary needs, don’t worry! There are delicious variations you can try. Whether you’re looking for a gluten-free option or a vegan alternative, these adaptations will ensure everyone can enjoy this delightful dessert.

Gluten-Free Churro Cheesecake Bars

For those who need to avoid gluten, making gluten-free Churro Cheesecake Bars is simple. Start by using gluten-free graham cracker crumbs for the crust. Many brands offer gluten-free options that taste just as good as the traditional ones.

Next, ensure that your other ingredients, like the cream cheese and sour cream, are gluten-free. Most dairy products are naturally gluten-free, but it’s always good to check the labels. Follow the same preparation steps as the original recipe, and you’ll have a delicious gluten-free treat that everyone can enjoy!

Vegan Churro Cheesecake Bars

If you’re looking for a vegan version of Churro Cheesecake Bars, you can easily swap out the dairy ingredients. Instead of cream cheese, use a vegan cream cheese alternative. There are many brands available that provide a similar texture and taste.

For the eggs, you can use flax eggs or applesauce as a substitute. To make a flax egg, mix 1 tablespoon of ground flaxseed with 2.5 tablespoons of water. Let it sit for a few minutes until it thickens. For the sour cream, opt for a plant-based sour cream or make your own using blended silken tofu with a splash of lemon juice.

With these simple substitutions, you can create a delightful vegan version of Churro Cheesecake Bars that everyone will love. Enjoy the same creamy texture and sweet cinnamon flavor while sticking to your dietary preferences!

Cooking Note for Churro Cheesecake Bars

When making Churro Cheesecake Bars, a few cooking notes can help ensure your dessert turns out perfectly every time. These tips will guide you through the process and enhance your baking experience.

First, always use softened cream cheese. This is crucial for achieving a smooth and creamy filling. If your cream cheese is too cold, it can create lumps in your mixture. To soften it quickly, cut it into small cubes and let it sit at room temperature for about 30 minutes.

Next, be mindful of your oven temperature. Ovens can vary, so it’s a good idea to use an oven thermometer to ensure accuracy. If your oven runs hot, your cheesecake may bake too quickly, leading to cracks. If it runs cool, it may take longer to set. Adjust your baking time accordingly.

Additionally, avoid opening the oven door while baking. This can cause temperature fluctuations, which may affect the texture of your cheesecake. Instead, use the oven light to check on your dessert.

Once your Churro Cheesecake Bars are done baking, let them cool gradually. Rapid temperature changes can lead to cracks. After cooling at room temperature, refrigerate them for the best texture and flavor. The longer they chill, the better they will taste!

Lastly, when cutting your bars, use a sharp knife. For clean cuts, dip the knife in hot water and wipe it dry before slicing. This will help you achieve neat, beautiful squares that are perfect for serving.

By following these cooking notes, you’ll be well on your way to creating delicious Churro Cheesecake Bars that are sure to impress. Happy baking!

Serving Suggestions for Churro Cheesecake Bars

Once your Churro Cheesecake Bars are chilled and ready to serve, it’s time to think about how to present them. These bars are not only delicious but also visually appealing, making them perfect for any occasion. Here are some delightful serving suggestions to elevate your dessert experience:

  • Classic Presentation: Simply cut the bars into squares and arrange them on a beautiful serving platter. You can dust them with a little extra cinnamon and sugar for a lovely finishing touch.
  • With Whipped Cream: Serve the bars with a dollop of freshly whipped cream on top. The light and airy texture of the cream complements the rich cheesecake perfectly.
  • Chocolate Drizzle: For a chocolate twist, drizzle melted chocolate over the top of the bars before serving. This adds a decadent layer of flavor that chocolate lovers will adore.
  • Caramel Sauce: Drizzle warm caramel sauce over the bars for an extra touch of sweetness. The combination of caramel and cinnamon is simply irresistible!
  • Fresh Fruit: Pair the bars with fresh fruit, such as strawberries or raspberries. The tartness of the fruit balances the sweetness of the cheesecake, creating a delightful contrast.
  • Ice Cream: Serve the Churro Cheesecake Bars with a scoop of vanilla or cinnamon ice cream. The cold ice cream melts slightly on the warm bars, creating a deliciously creamy experience.
  • Mini Dessert Cups: For a fun twist, cut the bars into smaller pieces and layer them in dessert cups with whipped cream and fruit. This makes for an adorable and shareable treat!

These serving suggestions will not only enhance the flavor of your Churro Cheesecake Bars but also make them a standout dessert at any gathering. Whether it’s a birthday party, holiday celebration, or just a cozy night in, these bars are sure to impress your guests. Enjoy your delicious creation!

Tips for Perfect Churro Cheesecake Bars

Creating the perfect Churro Cheesecake Bars is all about attention to detail. With a few helpful tips, you can ensure that your dessert turns out delicious every time. Here are some essential tips to keep in mind:

  • Use Room Temperature Ingredients: Make sure your cream cheese, eggs, and sour cream are at room temperature. This helps them blend smoothly, resulting in a creamy filling without lumps.
  • Don’t Overmix: When mixing your cheesecake filling, mix just until combined. Overmixing can incorporate too much air, leading to cracks during baking.
  • Check for Doneness: Keep an eye on your cheesecake while it bakes. The edges should be set, but the center should still have a slight jiggle. This ensures a creamy texture once cooled.
  • Cool Gradually: After baking, let your cheesecake cool in the oven with the door slightly ajar. This gradual cooling helps prevent cracks from forming on the surface.
  • Chill for Flavor: Allow your Churro Cheesecake Bars to chill for at least 4 hours, or overnight if possible. This resting time enhances the flavors and improves the texture.
  • Use a Sharp Knife: When cutting your bars, use a sharp knife dipped in hot water. Wipe it dry between cuts for clean, neat squares.
  • Experiment with Toppings: Feel free to get creative with toppings! Try adding nuts, chocolate chips, or even a sprinkle of sea salt for a unique twist.
  • Store Properly: Keep your Churro Cheesecake Bars in an airtight container in the refrigerator. They can last up to a week, making them a great make-ahead dessert.

By following these tips, you’ll be well on your way to making Churro Cheesecake Bars that are not only delicious but also visually stunning. Enjoy the process and the delightful results!

Breakdown of Time for Churro Cheesecake Bars

Understanding the time needed to make Churro Cheesecake Bars can help you plan your baking session better. Here’s a simple breakdown of the time required for each step, so you know exactly what to expect.

Prep Time

The prep time for Churro Cheesecake Bars is approximately 20-30 minutes. This includes gathering your ingredients, preparing the crust, and mixing the cheesecake filling. Make sure to have everything ready before you start, as this will make the process smoother and more enjoyable.

Cooking Time

Once you’ve prepped your ingredients, the cooking time is about 40-45 minutes. During this time, the cheesecake will bake in the oven. Remember, it’s important to keep an eye on it to ensure it doesn’t overbake. After baking, let it cool in the oven for an additional 10 minutes to help prevent cracks.

Total Time

In total, you should plan for about 4 hours and 15 minutes to make Churro Cheesecake Bars. This includes the prep time, cooking time, and the minimum chilling time of 4 hours. For the best flavor and texture, consider refrigerating them overnight. This way, you can enjoy the full deliciousness of your Churro Cheesecake Bars!

Nutritional Information for Churro Cheesecake Bars

Understanding the nutritional content of your Churro Cheesecake Bars can help you enjoy them while keeping track of your dietary goals. Here’s a breakdown of the key nutritional information per serving, so you can indulge with confidence.

Calories

290 calories. This makes them a rich and satisfying dessert option. While they are indulgent, they can be enjoyed in moderation as part of a balanced diet.

Protein

5 grams. This protein content comes mainly from the cream cheese and eggs used in the recipe. While it’s not a high-protein dessert, it does contribute to your daily intake, especially when paired with other protein-rich foods.

Sodium

200 milligrams. This is relatively moderate, making it a suitable treat for most people. However, if you are watching your sodium intake, it’s always good to be mindful of portion sizes.

Overall, Churro Cheesecake Bars are a delightful dessert that can fit into various dietary plans. Enjoy them as a special treat, and remember that balance is key when it comes to enjoying sweet indulgences!

FAQs about Churro Cheesecake Bars

Can I make Churro Cheesecake Bars ahead of time?

Absolutely! Churro Cheesecake Bars are perfect for making ahead of time. In fact, they taste even better after chilling in the refrigerator for a few hours or overnight. This allows the flavors to meld beautifully. You can prepare them a day or two in advance, making them an excellent choice for parties or gatherings. Just remember to store them in an airtight container to keep them fresh!

How do I store leftover Churro Cheesecake Bars?

To store leftover Churro Cheesecake Bars, place them in an airtight container. Keep them in the refrigerator, where they can last for up to a week. If you want to keep them for a longer period, consider freezing them. Just make sure to wrap them tightly in plastic wrap or aluminum foil before placing them in a freezer-safe container. This will help prevent freezer burn and keep them tasting delicious!

Can I freeze Churro Cheesecake Bars?

Yes, you can freeze Churro Cheesecake Bars! Freezing is a great way to preserve their deliciousness for later. To freeze, cut the bars into squares and wrap each piece individually in plastic wrap. Then, place them in a freezer-safe container or bag. They can be frozen for up to three months. When you’re ready to enjoy them, simply thaw them in the refrigerator overnight before serving.

What can I substitute for cream cheese in Churro Cheesecake Bars?

If you need a substitute for cream cheese in Churro Cheesecake Bars, there are several options. For a dairy-free alternative, you can use vegan cream cheese, which is widely available. Another option is to use blended silken tofu, which provides a similar texture. You can also try using ricotta cheese for a different flavor profile. Just keep in mind that the taste and texture may vary slightly, but your bars will still be delicious!

Conclusion on Churro Cheesecake Bars

In conclusion, Churro Cheesecake Bars are a delightful dessert that brings together the best of both worlds: the creamy richness of cheesecake and the warm, comforting flavors of churros. This recipe is not only easy to follow but also allows for creativity with variations and toppings. Whether you’re making them for a special occasion or just to satisfy a sweet craving, these bars are sure to impress.

With their delicious cinnamon-sugar topping and smooth cheesecake filling, each bite is a little piece of heaven. Plus, the ability to customize them for dietary needs makes them accessible to everyone. From gluten-free options to vegan alternatives, there’s a way for everyone to enjoy this treat.

As you embark on your baking journey, remember the tips and tricks shared throughout this article. They will help you achieve the perfect texture and flavor, ensuring your Churro Cheesecake Bars are a hit every time. So, gather your ingredients, follow the steps, and get ready to indulge in a dessert that’s as fun to make as it is to eat!

We hope you enjoy making and sharing these Churro Cheesecake Bars with your friends and family. Happy baking!

Peanut Butter Cookie Recipe: Bake Delicious Treats Today!

Introduction to the Peanut Butter Cookie Recipe

Peanut butter cookies are a delightful treat that many people adore. Their rich, nutty flavor and soft texture make them a favorite among cookie lovers. Whether you enjoy them with a glass of milk or as a quick snack, these cookies are sure to satisfy your sweet tooth. The best part? They are incredibly easy to make!

The Allure of Peanut Butter Cookies

What makes peanut butter cookies so special? For starters, they combine the creamy goodness of peanut butter with just the right amount of sweetness. This perfect balance creates a cookie that is both comforting and indulgent. Plus, the aroma of freshly baked peanut butter cookies wafting through your kitchen is simply irresistible!

These cookies are not only delicious but also versatile. You can enjoy them plain or add your favorite mix-ins, like chocolate chips or nuts. They are perfect for any occasion, whether it’s a family gathering, a school bake sale, or just a cozy night at home. With just a few simple ingredients, you can whip up a batch in no time.

In this article, we will guide you through a simple peanut butter cookie recipe that is sure to impress. From gathering your ingredients to baking the perfect cookies, we’ll cover everything you need to know. So, let’s dive into the world of peanut butter cookies and discover how to make this classic treat!

Ingredients for the Peanut Butter Cookie Recipe

To create the perfect peanut butter cookies, you need just a handful of simple ingredients. Each one plays a vital role in achieving that delightful taste and texture. Here’s what you’ll need:

  • 1 cup creamy peanut butter: This is the star of the show! Creamy peanut butter gives the cookies their rich flavor and soft texture.
  • 1 cup granulated sugar: Sugar adds sweetness and helps the cookies to spread while baking.
  • 1 large egg: The egg acts as a binder, holding all the ingredients together.
  • 1 teaspoon vanilla extract: Vanilla enhances the flavor, making the cookies even more delicious.
  • ½ teaspoon baking soda: This ingredient helps the cookies rise and become fluffy.
  • ¼ teaspoon salt: A pinch of salt balances the sweetness and enhances the overall flavor.

These ingredients are easy to find and often already in your pantry. With just these six items, you can create a batch of mouthwatering peanut butter cookies that everyone will love. Now that you have your ingredients ready, let’s move on to the next step in our peanut butter cookie recipe!

Step-by-Step Preparation of the Peanut Butter Cookie Recipe

Now that you have all your ingredients ready, it’s time to get cooking! Follow these simple steps to prepare your peanut butter cookies. Each step is easy to follow, ensuring that you’ll have delicious cookies in no time.

Step 1: Gather Your Ingredients

Before you start baking, make sure you have everything you need. Gather your ingredients: creamy peanut butter, granulated sugar, a large egg, vanilla extract, baking soda, and salt. Having everything in one place will make the process smoother and more enjoyable. Plus, it’s always fun to see all the ingredients lined up, ready to create something delicious!

Step 2: Mix the Wet Ingredients

In a large mixing bowl, combine the creamy peanut butter and granulated sugar. Use a sturdy spoon or a hand mixer to blend them together until the mixture is smooth and creamy. Next, add the large egg and vanilla extract. Stir well until all the wet ingredients are fully incorporated. This step is crucial as it creates the base for your cookie dough.

Step 3: Combine the Dry Ingredients

In a separate bowl, mix the baking soda and salt. This combination will help your cookies rise and enhance their flavor. Once mixed, gradually add this dry mixture to the wet ingredients. Stir until everything is well combined. You should see a thick dough forming, which is a good sign that you’re on the right track!

Step 4: Form the Cookie Dough

Now it’s time to shape your cookie dough! Using a tablespoon, scoop out portions of the dough and roll them into balls. Aim for about 1 inch in diameter. Place these dough balls on your prepared baking sheet, making sure to space them about 2 inches apart. This spacing is important as the cookies will spread while baking, ensuring they don’t stick together.

Step 5: Shape and Bake the Cookies

To give your cookies that classic look, flatten each dough ball slightly with a fork. Create a crisscross pattern on top for a decorative touch. Once you’ve shaped all the cookies, it’s time to bake! Place the baking sheet in your preheated oven and bake for 10-12 minutes. Keep an eye on them; you want the edges to be lightly golden. When they’re done, remove them from the oven and let them cool on the baking sheet for about 5 minutes before transferring them to a wire rack to cool completely.

And there you have it! You’ve just made a batch of delicious peanut butter cookies. Enjoy the delightful aroma filling your kitchen as you wait for them to cool!

Variations of the Peanut Butter Cookie Recipe

While the classic peanut butter cookie recipe is a hit on its own, there are many fun variations to explore. Whether you have dietary restrictions or just want to try something new, these variations will keep your cookie game exciting. Let’s dive into two popular alternatives: gluten-free and vegan peanut butter cookies.

Gluten-Free Peanut Butter Cookie Recipe

If you’re looking for a gluten-free option, you’re in luck! Making gluten-free peanut butter cookies is simple and just as delicious. Here’s how to adapt the recipe:

  • Use gluten-free flour: Substitute the granulated sugar with a gluten-free flour blend. This will help maintain the texture while keeping the cookies gluten-free.
  • Check your peanut butter: Ensure that your peanut butter is labeled gluten-free. Most brands are, but it’s always good to double-check.
  • Follow the same steps: You can follow the original recipe steps without any major changes. Just mix, scoop, and bake as usual!

These gluten-free peanut butter cookies will be just as soft and tasty as the original. They’re perfect for anyone avoiding gluten but still craving that classic peanut butter flavor.

Vegan Peanut Butter Cookie Recipe

For those following a vegan diet, you can easily make peanut butter cookies without any animal products. Here’s how to create a delicious vegan version:

  • Replace the egg: Use a flax egg instead. To make one, mix 1 tablespoon of ground flaxseed with 2.5 tablespoons of water. Let it sit for about 5 minutes until it thickens.
  • Choose vegan-friendly sugar: Some sugars are processed with bone char, so opt for organic or coconut sugar to keep it vegan.
  • Follow the same mixing and baking instructions: Just like the original recipe, mix your ingredients, scoop, and bake!

These vegan peanut butter cookies are not only kind to animals but also packed with flavor. You won’t miss the egg at all!

With these variations, you can enjoy peanut butter cookies no matter your dietary needs. So, gather your ingredients and get ready to bake some delightful treats!

Cooking Note for the Peanut Butter Cookie Recipe

When it comes to baking peanut butter cookies, a few cooking notes can make a big difference in your results. These tips will help you achieve the best texture and flavor, ensuring your cookies turn out perfectly every time.

First, always preheat your oven. This step is crucial because it ensures that your cookies bake evenly. If you place the cookies in a cold oven, they may spread too much or not rise properly. So, set your oven to 350°F (175°C) and let it heat up while you prepare your dough.

Next, consider the type of peanut butter you use. Creamy peanut butter is ideal for a smooth texture, but if you prefer a bit of crunch, feel free to use crunchy peanut butter. Just remember that the texture will change slightly, giving your cookies a delightful surprise with every bite!

Another important note is to watch the baking time closely. Ovens can vary, so check your cookies a minute or two before the suggested time. You want the edges to be lightly golden, while the centers should still look soft. They will continue to firm up as they cool on the baking sheet.

Lastly, let your cookies cool properly. Allowing them to sit on the baking sheet for about 5 minutes before transferring them to a wire rack helps them set. This way, they won’t break apart when you move them. Patience is key to enjoying perfectly baked peanut butter cookies!

By keeping these cooking notes in mind, you’ll be well on your way to baking delicious peanut butter cookies that everyone will love. Happy baking!

Serving Suggestions for the Peanut Butter Cookie Recipe

Once your peanut butter cookies are baked and cooled, it’s time to enjoy them! These cookies are versatile and can be served in many delightful ways. Here are some serving suggestions to elevate your peanut butter cookie experience:

  • Classic Pairing: Enjoy your cookies with a tall glass of cold milk. The creamy texture of the milk complements the rich flavor of the cookies perfectly.
  • Ice Cream Sandwiches: For a fun twist, sandwich a scoop of your favorite ice cream between two cookies. This makes for a delicious dessert that’s perfect for warm days!
  • Chocolate Drizzle: Melt some chocolate and drizzle it over the cookies for an extra touch of sweetness. This adds a beautiful presentation and a delightful flavor combination.
  • Cookie Crumble: Crumble the cookies over yogurt or ice cream for a tasty topping. This adds a crunchy texture and enhances the overall flavor.
  • Gift Idea: Package your cookies in a decorative box or jar. They make a thoughtful gift for friends and family, especially during holidays or special occasions.

These serving suggestions will not only enhance your peanut butter cookie experience but also impress your guests. Whether you’re enjoying them solo or sharing with others, these cookies are sure to bring joy to any gathering. So, grab your cookies and get ready to indulge!

Tips for Perfecting Your Peanut Butter Cookie Recipe

To make the best peanut butter cookies, a few handy tips can elevate your baking game. These simple suggestions will help you achieve cookies that are soft, chewy, and bursting with flavor. Let’s explore some essential tips for perfecting your peanut butter cookie recipe!

  • Use Room Temperature Ingredients: For the best results, ensure your peanut butter and egg are at room temperature. This helps them blend more easily, creating a smooth and consistent dough.
  • Don’t Overmix: When combining your ingredients, mix just until everything is incorporated. Overmixing can lead to tough cookies, so be gentle!
  • Chill the Dough: If you have time, chill your cookie dough for about 30 minutes before baking. This helps the cookies maintain their shape and prevents excessive spreading.
  • Experiment with Sweetness: If you prefer a less sweet cookie, reduce the sugar slightly. You can also try using natural sweeteners like honey or maple syrup for a different flavor profile.
  • Check for Doneness: Keep an eye on your cookies as they bake. They should be lightly golden around the edges but still soft in the center. They will firm up as they cool, so don’t worry if they look a bit underbaked!
  • Store Properly: To keep your cookies fresh, store them in an airtight container at room temperature. They can last up to a week, but they’re usually gone much sooner!

By following these tips, you’ll be well on your way to baking the perfect peanut butter cookies every time. Enjoy the process and have fun experimenting with flavors and textures!

Breakdown of Time for the Peanut Butter Cookie Recipe

Understanding the time needed for each step in the peanut butter cookie recipe can help you plan your baking session better. Here’s a quick breakdown of the time involved, so you know exactly what to expect!

Prep Time

The prep time for this peanut butter cookie recipe is quite short. You’ll need about 10-15 minutes to gather your ingredients, mix them together, and form the cookie dough. This quick preparation makes it easy to whip up a batch of cookies whenever the craving strikes!

Cooking Time

Once your dough is ready, the cooking time is approximately 10-12 minutes. Keep an eye on your cookies as they bake. You want them to be lightly golden around the edges while still soft in the center. This ensures a chewy texture that everyone loves!

Total Time

In total, you can expect to spend about 20-30 minutes from start to finish. This includes both prep and cooking time. With such a quick turnaround, you can enjoy fresh, homemade peanut butter cookies in no time!

So, gather your ingredients and get ready to bake! With this time breakdown, you’ll be well-prepared to create delicious peanut butter cookies that are sure to impress.

Nutritional Information for the Peanut Butter Cookie Recipe

Understanding the nutritional content of your peanut butter cookies can help you enjoy them even more. Whether you’re counting calories or just curious about what’s in your treats, here’s a breakdown of the key nutritional information for this delicious peanut butter cookie recipe.

Calories

Each peanut butter cookie contains approximately 120 calories. This makes them a satisfying snack without being overly indulgent. If you’re watching your calorie intake, you can enjoy one or two cookies as a treat without feeling guilty. Just remember, moderation is key!

Protein

These cookies are not only tasty but also provide a good source of protein. Each cookie has about 4 grams of protein. This protein comes from the peanut butter and egg, making these cookies a great option for a quick energy boost. They can help keep you feeling full and satisfied, especially when paired with a glass of milk.

Sodium

In terms of sodium, each cookie contains around 70 milligrams. This is a relatively low amount, especially considering that sodium is often found in many processed snacks. The small pinch of salt in the recipe enhances the flavor without adding too much sodium. If you’re watching your sodium intake, these cookies can fit nicely into your diet.

Overall, these peanut butter cookies offer a delightful balance of flavor and nutrition. With their moderate calorie count, decent protein content, and low sodium levels, you can enjoy them as part of a balanced diet. So, go ahead and treat yourself to a delicious peanut butter cookie or two!

FAQs about the Peanut Butter Cookie Recipe

Can I use natural peanut butter in the Peanut Butter Cookie Recipe?

Yes, you can use natural peanut butter in your peanut butter cookie recipe! However, keep in mind that natural peanut butter tends to be more runny than creamy peanut butter. This can affect the texture of your cookies. To achieve the best results, stir the natural peanut butter well before measuring. If it’s too oily, you might want to add a little extra flour to balance the consistency. Overall, using natural peanut butter can give your cookies a delicious, authentic flavor!

How do I store leftover peanut butter cookies?

Storing your leftover peanut butter cookies is easy! Place them in an airtight container at room temperature. This will help keep them fresh and chewy. If you want to keep them for a longer time, you can also refrigerate them. Just make sure to separate layers with parchment paper to prevent sticking. Peanut butter cookies can last up to a week at room temperature or about two weeks in the fridge. If you want to enjoy them later, freezing is a great option!

Can I freeze the cookie dough from the Peanut Butter Cookie Recipe?

Absolutely! Freezing cookie dough is a fantastic way to have fresh cookies on hand whenever you want. To freeze the dough, scoop out the cookie balls and place them on a baking sheet lined with parchment paper. Freeze them for about an hour until firm, then transfer the dough balls to a freezer-safe bag or container. When you’re ready to bake, simply take out the desired number of cookie balls and bake them straight from the freezer. Just add a couple of extra minutes to the baking time, and you’ll have warm, delicious cookies in no time!

Conclusion on the Peanut Butter Cookie Recipe

In conclusion, the peanut butter cookie recipe is a delightful and simple way to satisfy your sweet cravings. With just a few ingredients, you can create a batch of cookies that are not only delicious but also versatile. Whether you enjoy them as a classic treat or experiment with variations, these cookies are sure to please everyone.

From the rich flavor of creamy peanut butter to the perfect balance of sweetness, each bite is a reminder of why these cookies are a beloved favorite. Plus, the ease of preparation makes them an ideal choice for both novice bakers and seasoned pros. You can whip them up for a family gathering, a cozy night in, or even as a thoughtful gift for friends.

As you explore the world of peanut butter cookies, remember to have fun with the process. Try out different mix-ins, experiment with textures, and enjoy the delightful aroma that fills your kitchen. With the tips and variations provided, you can customize your cookies to suit your taste and dietary needs.

So, gather your ingredients, preheat your oven, and get ready to bake some scrumptious peanut butter cookies. Whether you enjoy them fresh out of the oven or as part of a creative dessert, these cookies are bound to bring joy to your day. Happy baking!

One-Pot Mexican Rice Casserole Recipe is a must-try!

Introduction to One-Pot Mexican Rice Casserole Recipe

Are you looking for a delicious and easy meal that the whole family will love? Look no further than the One-Pot Mexican Rice Casserole Recipe! This dish is not only packed with flavor, but it also simplifies your cooking process. With just one pot, you can create a hearty meal that is both satisfying and nutritious. Plus, it’s perfect for busy weeknights or casual gatherings with friends.

What Makes One-Pot Mexican Rice Casserole Special?

What sets this casserole apart is its vibrant blend of ingredients. The combination of black beans, corn, and diced tomatoes creates a colorful and appetizing dish. Each bite is bursting with flavor, thanks to the spices like chili powder and cumin. Moreover, the melted cheddar cheese on top adds a creamy texture that ties everything together.

Another fantastic aspect of this recipe is its versatility. You can easily customize it to suit your taste preferences. Whether you want to keep it vegetarian or add some protein, the options are endless. This flexibility makes it a go-to recipe for any occasion.

Additionally, the One-Pot Mexican Rice Casserole is a time-saver. With minimal cleanup required, you can spend more time enjoying your meal and less time washing dishes. It’s a win-win situation!

In the following sections, we will dive into the ingredients, preparation steps, and tips to make your One-Pot Mexican Rice Casserole a hit. Get ready to impress your family and friends with this delightful dish!

Ingredients for One-Pot Mexican Rice Casserole Recipe

To create a mouthwatering One-Pot Mexican Rice Casserole, you’ll need a variety of fresh and pantry ingredients. Each component plays a vital role in building the flavors and textures of this dish. Here’s what you’ll need:

  • 2 tablespoons olive oil: This will help sauté the vegetables and add a rich flavor.
  • 1 medium onion, diced: Onions provide a sweet and savory base for the casserole.
  • 2 cloves garlic, minced: Garlic adds a wonderful aroma and depth of flavor.
  • 1 bell pepper, diced (any color): Choose your favorite color for a pop of brightness.
  • 1 cup uncooked long-grain white rice: This is the main ingredient that will absorb all the delicious flavors.
  • 1 can (15 ounces) black beans, drained and rinsed: Black beans add protein and a hearty texture.
  • 1 can (15 ounces) corn, drained: Sweet corn brings a delightful crunch and sweetness.
  • 1 can (14.5 ounces) diced tomatoes with green chilies: These tomatoes add moisture and a hint of spice.
  • 2 cups vegetable broth: This will cook the rice and infuse it with flavor.
  • 1 tablespoon chili powder: Chili powder gives the casserole its signature kick.
  • 1 teaspoon cumin: Cumin adds an earthy flavor that complements the other spices.
  • 1 teaspoon paprika: Paprika enhances the color and adds a mild sweetness.
  • Salt and pepper to taste: Seasoning is key to bringing out all the flavors.
  • 1 cup shredded cheddar cheese: This melty cheese on top makes the dish extra comforting.
  • Fresh cilantro, chopped (for garnish): A sprinkle of cilantro adds freshness and color.

With these ingredients on hand, you’re ready to embark on your cooking adventure. Each item contributes to the overall taste and makes this One-Pot Mexican Rice Casserole a delightful meal for any occasion. Let’s move on to the preparation steps to bring this dish to life!

Step-by-Step Preparation of One-Pot Mexican Rice Casserole Recipe

Now that you have all your ingredients ready, it’s time to dive into the cooking process! This One-Pot Mexican Rice Casserole is simple to prepare and requires just a few steps. Follow along to create a delicious meal that everyone will enjoy.

Step 1: Gather Your Ingredients

Before you start cooking, make sure you have all your ingredients laid out. This will make the cooking process smoother and more enjoyable. Check your pantry and fridge for the items listed in the ingredients section. Having everything ready will help you stay organized and focused.

Step 2: Prepare the Base

Begin by heating the olive oil in a large pot or Dutch oven over medium heat. Once the oil is hot, add the diced onion and bell pepper. Sauté these vegetables for about 5 minutes, or until they become soft and fragrant. Next, stir in the minced garlic and cook for an additional minute. This step builds a flavorful base for your casserole.

Step 3: Combine Ingredients

After the vegetables are ready, it’s time to add the uncooked rice. Stir the rice into the pot, allowing it to toast for about 2 minutes. This step enhances the flavor of the rice. Then, pour in the black beans, corn, and diced tomatoes (with their juices). Don’t forget to add the vegetable broth, chili powder, cumin, paprika, salt, and pepper. Mix everything well to ensure all ingredients are combined.

Step 4: Cook the Casserole

Bring the mixture to a boil, then reduce the heat to low. Cover the pot with a lid and let it simmer for 20-25 minutes. During this time, the rice will cook and absorb most of the liquid. Keep an eye on it to make sure it doesn’t stick to the bottom of the pot. The aroma will fill your kitchen, making it hard to wait!

Step 5: Let it Rest

Once the rice is cooked, remove the pot from heat. Stir in the shredded cheddar cheese until it melts and combines with the other ingredients. This adds a creamy texture that makes the casserole even more delicious. Let the casserole sit for about 5 minutes before serving. This resting time allows the flavors to meld together beautifully.

Now you’re ready to enjoy your One-Pot Mexican Rice Casserole! It’s a delightful dish that’s sure to please everyone at the table.

Variations of One-Pot Mexican Rice Casserole Recipe

The One-Pot Mexican Rice Casserole is a fantastic base recipe that you can easily modify to suit your taste. Whether you want to make it vegetarian, add protein, or adjust the spice level, there are plenty of options to explore. Let’s dive into some delicious variations!

Vegetarian Options

If you’re looking to keep your casserole vegetarian, you’re in luck! This recipe is already packed with plant-based ingredients. You can enhance it by adding more vegetables. Consider including zucchini, spinach, or mushrooms for added nutrition and flavor. You can also substitute the vegetable broth with a homemade vegetable stock for an even fresher taste. These additions will make your One-Pot Mexican Rice Casserole even more colorful and nutritious!

Protein Additions

For those who want to boost the protein content, there are several tasty options. You can mix in cooked shredded chicken or ground turkey right before serving. This not only adds protein but also makes the dish heartier. If you prefer a meatless protein, try adding cooked quinoa or lentils. These options will keep your casserole filling while still being delicious. Just remember to adjust the seasoning to complement the added ingredients!

Spice Level Adjustments

Do you love a little heat in your meals? You can easily spice up your One-Pot Mexican Rice Casserole! Add diced jalapeños or a splash of your favorite hot sauce to the mix. If you prefer a milder flavor, reduce the amount of chili powder or use a mild salsa instead of diced tomatoes with green chilies. This way, you can customize the spice level to fit your family’s taste preferences. Everyone can enjoy this dish, no matter how spicy they like it!

With these variations, your One-Pot Mexican Rice Casserole can be a new dish every time you make it. Feel free to experiment and find the perfect combination that your family will love!

Cooking Note for One-Pot Mexican Rice Casserole Recipe

When preparing the One-Pot Mexican Rice Casserole, there are a few important cooking notes to keep in mind. These tips will help ensure that your dish turns out perfectly every time. Let’s explore some key points to consider while cooking!

First, make sure to use a large pot or Dutch oven. This will give you enough space to combine all the ingredients without spilling. A heavy-bottomed pot is ideal, as it distributes heat evenly and prevents the rice from sticking to the bottom.

Next, pay attention to the cooking time. The rice should be tender and fluffy when done. If you find that the rice is still hard after the suggested cooking time, you can add a little more vegetable broth or water. Cover the pot and let it simmer for a few more minutes. This will help the rice absorb the extra liquid and finish cooking.

Additionally, stirring occasionally during the cooking process can help prevent the rice from sticking. However, be gentle when stirring to avoid breaking the rice grains. You want them to remain intact for the best texture.

Lastly, let the casserole rest after cooking. This step is crucial as it allows the flavors to meld together. It also helps the casserole set, making it easier to serve. If you’re in a hurry, you can skip this step, but the dish will taste even better if you let it sit for a few minutes.

By following these cooking notes, you’ll create a delicious One-Pot Mexican Rice Casserole that your family will love. Happy cooking!

Serving Suggestions for One-Pot Mexican Rice Casserole Recipe

Once your One-Pot Mexican Rice Casserole is ready, it’s time to think about how to serve it! This dish is not only delicious on its own, but it also pairs wonderfully with various sides and garnishes. Let’s explore some great serving suggestions to elevate your meal!

Pairing with Sides

To create a well-rounded meal, consider serving your casserole with some tasty sides. Here are a few ideas:

  • Fresh Salad: A crisp green salad with mixed greens, cherry tomatoes, and a light vinaigrette complements the casserole perfectly. The freshness of the salad balances the hearty flavors of the dish.
  • Guacamole and Chips: Serve some creamy guacamole with tortilla chips on the side. This adds a fun and interactive element to your meal, allowing everyone to enjoy dipping!
  • Sour Cream: A dollop of sour cream on top of the casserole adds a cool and creamy contrast to the spices. It’s a classic pairing that many people love.
  • Mexican Street Corn: Grilled corn on the cob, topped with lime, cheese, and chili powder, makes a delicious side that enhances the Mexican theme of your meal.

These sides not only complement the One-Pot Mexican Rice Casserole but also add variety to your dining experience. Feel free to mix and match based on your family’s preferences!

Garnishing Ideas

Garnishing your casserole can make it look even more appealing. Here are some simple yet effective garnishing ideas:

  • Chopped Cilantro: A sprinkle of fresh cilantro adds a burst of color and freshness. It also enhances the overall flavor of the dish.
  • Sliced Avocado: Adding slices of avocado on top or on the side provides a creamy texture that pairs well with the spices in the casserole.
  • Jalapeño Slices: For those who enjoy a bit of heat, garnish with thinly sliced jalapeños. This adds a nice kick and a pop of color.
  • Lime Wedges: Serve lime wedges on the side. A squeeze of lime juice over the casserole brightens the flavors and adds a zesty touch.

With these serving suggestions, your One-Pot Mexican Rice Casserole will not only taste amazing but also look inviting on the table. Enjoy your meal with family and friends!

Tips for Perfecting One-Pot Mexican Rice Casserole Recipe

To make your One-Pot Mexican Rice Casserole truly shine, consider these helpful tips. They will guide you in achieving the best flavor and texture, ensuring that your dish is a hit every time you prepare it.

First, always rinse your rice before cooking. This step removes excess starch, which can make the rice gummy. Rinsing helps achieve fluffy grains that absorb the flavors beautifully.

Next, don’t skip the toasting step! Toasting the rice in the pot with the vegetables enhances its nutty flavor. It also helps the rice maintain its shape during cooking.

When adding spices, feel free to adjust them to your taste. If you love bold flavors, increase the chili powder or cumin. On the other hand, if you prefer a milder dish, reduce the spices accordingly. Taste as you go to find the perfect balance!

For a creamier texture, consider adding a splash of cream or a dollop of sour cream just before serving. This addition will make your casserole even more comforting and rich.

Another great tip is to let your casserole sit for a few minutes after cooking. This resting time allows the flavors to meld together and makes it easier to serve. It also helps the casserole set, so it holds its shape on the plate.

Lastly, don’t hesitate to get creative with toppings! Besides cheese, you can add crushed tortilla chips for a crunchy texture or a sprinkle of queso fresco for a traditional touch. These little extras can elevate your dish and impress your guests.

By following these tips, you’ll be well on your way to mastering the One-Pot Mexican Rice Casserole Recipe. Enjoy the process and have fun experimenting with flavors!

Breakdown of Time for One-Pot Mexican Rice Casserole Recipe

Understanding the time required for each step of the One-Pot Mexican Rice Casserole Recipe can help you plan your cooking efficiently. Here’s a breakdown of the time you’ll need for preparation and cooking.

Prep Time

The prep time for this delicious casserole is quite short. You’ll need about 10-15 minutes to gather and prepare your ingredients. This includes dicing the onion and bell pepper, mincing the garlic, and measuring out the rice and spices. Having everything ready will make the cooking process smoother and more enjoyable.

Cooking Time

Once you start cooking, the actual cooking time is approximately 25-30 minutes. This includes sautéing the vegetables for about 5 minutes, toasting the rice for 2 minutes, and then simmering the casserole for 20-25 minutes. During this time, the rice will absorb all the flavors and become tender.

Total Time

In total, you can expect the One-Pot Mexican Rice Casserole to take around 35-45 minutes from start to finish. This includes both prep and cooking time. It’s a quick and easy meal that’s perfect for busy weeknights or when you want to impress guests without spending hours in the kitchen.

With this time breakdown, you can easily fit this delightful dish into your schedule. Enjoy the process and the delicious results!

Nutritional Information for One-Pot Mexican Rice Casserole Recipe

Understanding the nutritional content of your meals is essential for maintaining a balanced diet. The One-Pot Mexican Rice Casserole is not only delicious but also provides a good mix of nutrients. Here’s a closer look at the nutritional information for this hearty dish.

Calories

Each serving of the One-Pot Mexican Rice Casserole contains approximately 320 calories. This makes it a satisfying meal option without being overly heavy. The combination of rice, beans, and vegetables provides a good source of energy, making it perfect for lunch or dinner.

Protein

In terms of protein, this casserole offers about 12 grams per serving. The black beans and cheese contribute significantly to the protein content. If you choose to add chicken or turkey, you can easily increase the protein levels, making it an even more filling meal. This is especially beneficial for those looking to boost their protein intake.

Sodium

The sodium content in each serving is around 600 milligrams. This amount can vary based on the specific brands of canned ingredients you use, such as the diced tomatoes and vegetable broth. To reduce sodium, consider using low-sodium versions of these products. This way, you can enjoy the flavors without worrying about excessive salt intake.

Overall, the One-Pot Mexican Rice Casserole is a nutritious option that balances calories, protein, and sodium. It’s a great choice for families looking for a wholesome meal that doesn’t compromise on taste. Enjoy this delightful dish while keeping your nutritional goals in mind!

FAQs about One-Pot Mexican Rice Casserole Recipe

Can I make One-Pot Mexican Rice Casserole ahead of time?

Absolutely! You can prepare the One-Pot Mexican Rice Casserole ahead of time. Simply follow the recipe up to the point of cooking. After combining all the ingredients, cover the pot and refrigerate it for up to 24 hours. When you’re ready to cook, just bring it to a boil and then simmer as directed. This makes it a great option for meal prep or when hosting guests!

What can I substitute for rice in this recipe?

If you’re looking for a substitute for rice, there are several options you can try. Quinoa is a fantastic alternative that cooks similarly and adds a nutty flavor. You can also use cauliflower rice for a low-carb option. Just be sure to adjust the cooking time, as cauliflower rice cooks much faster than traditional rice. Another option is to use farro or barley for a different texture and taste.

How do I store leftovers of One-Pot Mexican Rice Casserole?

Storing leftovers is easy! Allow the One-Pot Mexican Rice Casserole to cool completely before transferring it to an airtight container. You can keep it in the refrigerator for up to 3-4 days. When you’re ready to enjoy it again, simply reheat in the microwave or on the stovetop until warmed through. This makes for a quick and convenient meal option!

Can I freeze One-Pot Mexican Rice Casserole?

Yes, you can freeze the One-Pot Mexican Rice Casserole! To do this, let it cool completely, then portion it into freezer-safe containers. It can be frozen for up to 2-3 months. When you’re ready to eat, thaw it in the refrigerator overnight and reheat it on the stove or in the microwave. Freezing is a great way to have a delicious meal ready to go for busy days!

Conclusion on One-Pot Mexican Rice Casserole Recipe

In conclusion, the One-Pot Mexican Rice Casserole Recipe is a delightful dish that brings together vibrant flavors and wholesome ingredients. It’s not just easy to prepare, but it also offers a comforting meal that can satisfy the whole family. With its colorful mix of black beans, corn, and spices, this casserole is sure to become a favorite in your household.

Moreover, the versatility of this recipe allows you to customize it to your liking. Whether you prefer it vegetarian, packed with protein, or with an extra kick of spice, the options are endless. This adaptability makes it perfect for any occasion, from casual weeknight dinners to festive gatherings.

As you explore the various serving suggestions and garnishing ideas, you’ll find that this dish can be as simple or as elaborate as you wish. Pair it with fresh salads, creamy guacamole, or zesty lime wedges to enhance the dining experience. Each bite will be a celebration of flavors that everyone will enjoy.

So, gather your ingredients, follow the steps, and get ready to impress your family and friends with this delicious One-Pot Mexican Rice Casserole. It’s a meal that not only nourishes the body but also warms the heart. Happy cooking!

Cottage Cheese Egg Muffins Recipe for a Healthy Breakfast

Introduction to Cottage Cheese Egg Muffins Recipe

What Are Cottage Cheese Egg Muffins?

Cottage Cheese Egg Muffins are a delightful and nutritious breakfast option. They combine the creamy texture of cottage cheese with the protein-packed goodness of eggs. These muffins are not only easy to make but also versatile. You can add various vegetables, spices, and even meats to suit your taste. Each muffin is a mini meal, perfect for busy mornings or a quick snack. They are baked to perfection, resulting in a fluffy and satisfying bite that everyone will love.

Why You Should Try This Recipe

There are many reasons to try this Cottage Cheese Egg Muffins Recipe. First, they are incredibly healthy. With low calories and high protein content, they make a great choice for anyone looking to maintain a balanced diet. Additionally, they are easy to prepare, taking only about 30 minutes from start to finish. This recipe is also highly customizable. You can mix in your favorite vegetables or spices, making it a fun way to experiment in the kitchen. Plus, they are perfect for meal prep! You can make a batch ahead of time and enjoy them throughout the week. So, whether you’re feeding a family or just yourself, these muffins are a fantastic option to consider.

Ingredients for Cottage Cheese Egg Muffins Recipe

To create delicious Cottage Cheese Egg Muffins, you will need a few simple ingredients. Each component plays a vital role in delivering flavor and nutrition. Here’s what you’ll need:

  • 1 cup cottage cheese
  • 6 large eggs
  • 1 cup spinach, chopped
  • 1/2 cup bell pepper, diced
  • 1/2 cup onion, diced
  • 1 cup shredded cheddar cheese
  • 1 teaspoon garlic powder
  • 1/2 teaspoon salt
  • 1/4 teaspoon black pepper
  • 1/4 teaspoon paprika
  • Cooking spray or oil for greasing the muffin tin

These ingredients come together to create a tasty and nutritious muffin. The cottage cheese adds creaminess, while the eggs provide structure and protein. Spinach, bell pepper, and onion contribute essential vitamins and minerals, making these muffins a wholesome choice. The cheddar cheese adds a delightful richness, and the spices enhance the overall flavor. Feel free to adjust the ingredients based on your preferences or dietary needs. For instance, you can swap out the spinach for kale or use a different type of cheese. The possibilities are endless!

Step-by-Step Preparation of Cottage Cheese Egg Muffins Recipe

Step 1: Preheat the Oven

First things first, you need to preheat your oven to 350°F. This step is crucial as it ensures that your muffins bake evenly. While the oven heats up, you can prepare the muffin tin and the ingredients. This way, you’ll save time and be ready to go once the oven reaches the right temperature.

Step 2: Prepare the Muffin Tin

Next, grab your 12-cup muffin tin. It’s important to grease it well with cooking spray or a little oil. This will prevent the muffins from sticking and make it easier to remove them later. You can use a paper towel to spread the oil evenly in each cup. Make sure every cup is coated, so your muffins come out perfectly!

Step 3: Mix the Ingredients

Now, it’s time to mix everything together. In a large mixing bowl, whisk together the cottage cheese and eggs until they are well combined. This mixture should be smooth and creamy. Then, add in the chopped spinach, diced bell pepper, diced onion, shredded cheddar cheese, garlic powder, salt, black pepper, and paprika. Stir everything together until all the ingredients are evenly distributed. The colors and textures will look amazing!

Step 4: Pour the Mixture into Muffin Tins

Once your mixture is ready, it’s time to fill the muffin tin. Carefully pour the mixture into each cup, filling them about 3/4 full. This allows room for the muffins to rise while baking. If you have a ladle or a measuring cup, it can help make this step easier and less messy. Make sure to distribute the mixture evenly among the cups for consistent baking.

Step 5: Bake the Muffins

Now, place the muffin tin in the preheated oven. Bake the muffins for 20-25 minutes. You’ll know they are done when they are set and lightly golden on top. Keep an eye on them towards the end of the baking time. Every oven is a little different, so you might need to adjust the time slightly. The smell will be irresistible!

Step 6: Cool and Serve

After baking, remove the muffin tin from the oven. Let the muffins cool for a few minutes. This cooling time helps them firm up a bit, making them easier to remove. Gently run a knife around the edges of each muffin to loosen them. Then, carefully lift them out of the tin. You can serve them warm or let them cool completely before storing. Enjoy your delicious Cottage Cheese Egg Muffins!

Variations of Cottage Cheese Egg Muffins Recipe

Adding Vegetables

One of the best things about Cottage Cheese Egg Muffins is their versatility. You can easily add a variety of vegetables to enhance both flavor and nutrition. For instance, consider adding diced tomatoes, zucchini, or mushrooms. These veggies not only add color but also provide extra vitamins. If you want a bit of crunch, try adding shredded carrots or even some corn. The key is to chop the vegetables into small pieces so they mix well with the egg mixture. This way, every bite is packed with goodness!

Cheese Options

While cheddar cheese is a classic choice, feel free to experiment with different types of cheese. You could use mozzarella for a milder flavor or feta for a tangy twist. If you love a bit of spice, pepper jack cheese can add a nice kick. For a dairy-free option, consider using plant-based cheese alternatives. These can provide a similar texture and flavor without the dairy. Mixing different cheeses can also create a unique taste that keeps your muffins exciting!

Spices and Herbs

Spices and herbs can elevate your Cottage Cheese Egg Muffins to a whole new level. Besides garlic powder, you might want to try adding onion powder or Italian seasoning for a burst of flavor. Fresh herbs like parsley, chives, or basil can also brighten up the muffins. If you enjoy a bit of heat, a pinch of red pepper flakes can do the trick. Don’t be afraid to get creative! Adjust the spices to match your taste preferences, making each batch uniquely yours.

Cooking Note for Cottage Cheese Egg Muffins Recipe

When making Cottage Cheese Egg Muffins, there are a few cooking notes to keep in mind to ensure the best results. First, always use fresh ingredients. Fresh eggs and vegetables will enhance the flavor and texture of your muffins. If you can, opt for organic or free-range eggs for a richer taste.

Another important tip is to avoid overmixing the egg mixture. While you want everything combined, overmixing can lead to denser muffins. Just mix until the ingredients are evenly distributed, and you’ll achieve that light and fluffy texture.

Additionally, if you’re using frozen spinach, make sure to thaw and drain it well before adding it to the mixture. Excess moisture can make your muffins soggy. If you prefer, you can also sauté fresh spinach briefly to reduce moisture before mixing it in.

Lastly, keep an eye on the baking time. Ovens can vary, so check your muffins a few minutes before the suggested baking time. You want them to be set in the center and lightly golden on top. If they are browning too quickly, you can cover them loosely with aluminum foil to prevent burning.

By following these cooking notes, you’ll create delicious Cottage Cheese Egg Muffins that are sure to impress!

Serving Suggestions for Cottage Cheese Egg Muffins Recipe

Serving Cottage Cheese Egg Muffins can be as fun and creative as making them! These muffins are not only delicious on their own but can also be paired with various sides and toppings to enhance your meal. Here are some delightful serving suggestions to consider:

  • Fresh Fruit: Pair your muffins with a side of fresh fruit. Slices of avocado, berries, or a fruit salad can add a refreshing touch. The sweetness of the fruit complements the savory muffins perfectly.
  • Yogurt: A dollop of Greek yogurt can add creaminess and a tangy flavor. You can also mix in some honey or granola for added texture and sweetness.
  • Hot Sauce: If you enjoy a bit of heat, drizzle some hot sauce over your muffins. This adds a spicy kick that many people love!
  • Salad: Serve your muffins alongside a light salad. A simple green salad with a vinaigrette dressing can balance the richness of the muffins and make for a complete meal.
  • Breakfast Sandwich: For a heartier option, use the muffins as a base for a breakfast sandwich. Add a slice of turkey bacon or a sausage patty, and top it with a slice of cheese and a fried egg.
  • Herb Garnish: Sprinkle some fresh herbs like parsley or chives on top of the muffins before serving. This not only adds a pop of color but also enhances the flavor.

These serving suggestions can elevate your Cottage Cheese Egg Muffins from a simple dish to a delightful meal. Whether you’re enjoying them for breakfast, lunch, or a snack, these ideas will make your muffins even more enjoyable. Feel free to mix and match based on your preferences and what you have on hand!

Tips for Perfect Cottage Cheese Egg Muffins Recipe

Creating the perfect Cottage Cheese Egg Muffins is all about attention to detail. Here are some helpful tips to ensure your muffins turn out delicious every time:

  • Use Room Temperature Ingredients: For the best results, let your eggs and cottage cheese sit at room temperature for about 30 minutes before mixing. This helps them blend more smoothly, resulting in a fluffier texture.
  • Don’t Overfill the Muffin Cups: When pouring the mixture into the muffin tin, fill each cup only about 3/4 full. This allows space for the muffins to rise without overflowing.
  • Experiment with Cooking Times: Every oven is different. Start checking your muffins a few minutes before the recommended baking time. They should be set in the center and lightly golden on top.
  • Let Them Cool: After baking, allow the muffins to cool in the tin for a few minutes. This helps them firm up and makes it easier to remove them without breaking.
  • Store Properly: If you have leftovers, store them in an airtight container in the fridge. They can last up to a week. For longer storage, consider freezing them.
  • Mix and Match Ingredients: Feel free to get creative! Try different vegetables, cheeses, or spices to find your favorite combination. This keeps the recipe exciting and tailored to your taste.
  • Use Fresh Herbs: Adding fresh herbs can enhance the flavor significantly. Consider using basil, cilantro, or dill for a fresh twist.
  • Check for Doneness: To ensure your muffins are fully cooked, insert a toothpick into the center. If it comes out clean, your muffins are ready!

By following these tips, you’ll be well on your way to making perfect Cottage Cheese Egg Muffins every time. Enjoy the process and have fun experimenting with different flavors!

Breakdown of Time for Cottage Cheese Egg Muffins Recipe

Prep Time

The prep time for Cottage Cheese Egg Muffins is quite short, making this recipe perfect for busy mornings. You can expect to spend about 10-15 minutes gathering your ingredients and mixing everything together. This includes chopping vegetables and whisking the eggs and cottage cheese. With a little organization, you can have everything ready in no time!

Cooking Time

Once your muffins are in the oven, the cooking time is approximately 20-25 minutes. During this time, the muffins will rise and become golden brown. It’s important to keep an eye on them, especially towards the end of the baking period. Every oven is different, so checking for doneness a few minutes early can help ensure they don’t overbake.

Total Time

In total, you’ll need about 30-40 minutes to make these delicious Cottage Cheese Egg Muffins from start to finish. This includes both prep and cooking time. With such a quick turnaround, you can easily whip up a batch for breakfast or meal prep for the week ahead. Enjoy the convenience and taste of these nutritious muffins!

Nutritional Information for Cottage Cheese Egg Muffins Recipe

Calories

Each Cottage Cheese Egg Muffin is a low-calorie delight, containing only 90 calories. This makes them an excellent choice for those watching their calorie intake. You can enjoy these muffins guilt-free, knowing they provide a nutritious option without excessive calories. Whether you’re having them for breakfast or as a snack, they fit well into a balanced diet.

Protein Content

Protein is essential for maintaining muscle and overall health, and these muffins deliver! Each muffin contains about 7 grams of protein. The combination of cottage cheese and eggs provides a rich source of this vital nutrient. This high protein content helps keep you feeling full and satisfied, making these muffins a great choice for a post-workout snack or a filling breakfast.

Sodium Levels

When it comes to sodium, each muffin has approximately 200 mg. This level is reasonable for a savory dish, especially considering the flavor from the added spices and cheese. If you’re watching your sodium intake, you can easily adjust the recipe. For instance, you can reduce the amount of salt or use low-sodium cheese. This way, you can enjoy your Cottage Cheese Egg Muffins while keeping your dietary needs in check.

FAQs About Cottage Cheese Egg Muffins Recipe

Can I make Cottage Cheese Egg Muffins ahead of time?

Absolutely! Cottage Cheese Egg Muffins are perfect for meal prep. You can make a batch ahead of time and store them in the fridge. They stay fresh for up to a week. Just reheat them in the microwave or oven when you’re ready to enjoy. This makes them a convenient option for busy mornings or quick snacks throughout the week.

How do I store leftover Cottage Cheese Egg Muffins?

To store leftover Cottage Cheese Egg Muffins, place them in an airtight container. This helps keep them fresh and prevents them from drying out. You can keep them in the refrigerator for up to a week. If you want to enjoy them later, consider freezing them for longer storage. Just make sure to separate each muffin with parchment paper to prevent sticking.

Can I freeze Cottage Cheese Egg Muffins?

Yes, you can freeze Cottage Cheese Egg Muffins! They freeze very well. To do this, let the muffins cool completely after baking. Then, place them in a freezer-safe container or bag. They can last for up to three months in the freezer. When you’re ready to eat them, simply thaw them in the fridge overnight and reheat in the microwave or oven.

What can I substitute for cottage cheese in this recipe?

If you don’t have cottage cheese or prefer a different option, there are several substitutes you can use. Greek yogurt is a great alternative, providing a similar creamy texture and protein content. You can also use ricotta cheese for a slightly different flavor. For a dairy-free option, consider using a plant-based yogurt or cheese alternative. Just keep in mind that the flavor and texture may vary slightly.

Conclusion on Cottage Cheese Egg Muffins Recipe

In conclusion, Cottage Cheese Egg Muffins are a fantastic addition to your meal repertoire. They are not only easy to prepare but also packed with nutrition. With their low calorie count and high protein content, these muffins make for a perfect breakfast or snack option. The versatility of this recipe allows you to customize it to your liking, whether you prefer adding different vegetables, cheeses, or spices.

Moreover, these muffins are ideal for meal prep. You can whip up a batch at the beginning of the week and enjoy them throughout. They store well in the fridge and even freeze beautifully, making them a convenient choice for busy days. Whether you’re rushing out the door or looking for a quick bite, Cottage Cheese Egg Muffins have got you covered.

So, why not give this recipe a try? With just a few simple ingredients and steps, you can create a delicious and nutritious meal that everyone will love. Enjoy the process of making them, and don’t hesitate to experiment with flavors. Your taste buds will thank you!

Savory Ham and Cheese Muffins are a delicious treat!

Introduction to Savory Ham and Cheese Muffins

Welcome to the delightful world of Savory Ham and Cheese Muffins! These tasty treats are not just your average breakfast option; they are a perfect blend of flavors and textures that can brighten up any meal. Whether you’re rushing out the door or enjoying a leisurely brunch, these muffins are a fantastic choice. They are easy to make, packed with protein, and can be customized to suit your taste.

What Makes Savory Ham and Cheese Muffins Special?

What sets Savory Ham and Cheese Muffins apart is their versatility. You can enjoy them warm or at room temperature, making them ideal for any occasion. The combination of fluffy eggs, savory ham, and melted cheese creates a satisfying bite that is hard to resist. Plus, they are a great way to sneak in some extra veggies if you choose to add bell peppers or green onions.

Another reason these muffins shine is their nutritional value. With a good balance of protein and healthy fats, they provide lasting energy without weighing you down. Each muffin is low in carbs, making them a smart choice for those watching their carbohydrate intake. They are also easy to prepare in advance, allowing you to have a quick breakfast option ready to go.

In summary, Savory Ham and Cheese Muffins are not only delicious but also practical. They can be enjoyed by everyone, from busy families to health-conscious individuals. So, let’s dive into the ingredients and preparation steps to create these delightful muffins!

Ingredients for Savory Ham and Cheese Muffins

To create the perfect batch of Savory Ham and Cheese Muffins, you’ll need a few simple ingredients. Each component plays a vital role in delivering that delicious flavor and texture. Here’s what you’ll need:

  • 6 large eggs: The base of our muffins, providing protein and structure.
  • 1 cup diced cooked ham: Adds a savory, meaty flavor that complements the eggs beautifully.
  • 1 cup shredded cheddar cheese: This brings a rich, creamy taste that melts perfectly.
  • 1/2 cup milk: Helps to create a fluffy texture in the muffins.
  • 1/2 teaspoon salt: Enhances the overall flavor of the muffins.
  • 1/4 teaspoon black pepper: Adds a subtle kick to the dish.
  • 1/4 teaspoon garlic powder: Infuses a warm, aromatic flavor.
  • 1/4 teaspoon onion powder: Complements the garlic and adds depth to the taste.
  • 1/2 cup diced bell pepper (optional): For a pop of color and extra nutrition.
  • 1/4 cup chopped green onions (optional): Adds freshness and a mild onion flavor.

These ingredients come together to create a delightful muffin that is both satisfying and nutritious. Feel free to mix and match based on your preferences. For instance, you can swap out the cheddar cheese for a different variety or add in your favorite vegetables. The possibilities are endless!

Now that you have your ingredients ready, let’s move on to the step-by-step preparation of these scrumptious Savory Ham and Cheese Muffins.

Step-by-Step Preparation of Savory Ham and Cheese Muffins

Now that you have gathered all your ingredients, it’s time to dive into the fun part: preparing your Savory Ham and Cheese Muffins! Follow these simple steps to create a batch of delicious muffins that everyone will love.

Step 1: Preheat the Oven

First things first, preheat your oven to 350°F (175°C). This step is crucial as it ensures that your muffins bake evenly. A hot oven helps them rise beautifully and develop that lovely golden color.

Step 2: Prepare the Muffin Tin

While the oven is heating up, take a moment to prepare your muffin tin. Grease it with cooking spray or line it with muffin liners. This will prevent the muffins from sticking and make cleanup a breeze. If you prefer, silicone muffin cups work great too!

Step 3: Mix Dry Ingredients

In a large mixing bowl, start by whisking together the dry ingredients. Combine the salt, black pepper, garlic powder, and onion powder. Mixing these spices together first helps distribute their flavors evenly throughout the muffins.

Step 4: Combine Wet Ingredients

Next, in another bowl, whisk together the eggs and milk until they are well combined. This mixture will add moisture and fluffiness to your muffins. Make sure to beat the eggs well to incorporate air, which helps the muffins rise.

Step 5: Fold in Ham and Cheese

Now, it’s time to bring everything together! Pour the wet mixture into the bowl with the dry ingredients. Gently fold in the diced ham and shredded cheddar cheese. If you’re using optional ingredients like bell peppers or green onions, add them in now. Be careful not to overmix; you want to keep the muffins light and airy.

Step 6: Fill Muffin Tin

Using a ladle or a measuring cup, pour the egg mixture into the prepared muffin tin. Fill each cup about 3/4 full. This allows enough room for the muffins to rise without overflowing. If you have any leftover mixture, you can bake it in a small ramekin!

Step 7: Bake the Muffins

Place the muffin tin in the preheated oven and bake for 18-20 minutes. You’ll know they’re done when the tops are lightly golden and a toothpick inserted in the center comes out clean. Keep an eye on them to avoid overbaking!

Step 8: Cool and Serve

Once baked, remove the muffins from the oven and let them cool in the tin for a few minutes. Then, gently remove them from the tin and place them on a wire rack to cool completely. These muffins can be enjoyed warm or at room temperature, making them perfect for any occasion!

Now that you’ve mastered the preparation of Savory Ham and Cheese Muffins, let’s explore some delicious variations to make them even more exciting!

Variations of Savory Ham and Cheese Muffins

While the classic Savory Ham and Cheese Muffins are already a hit, there are plenty of ways to mix things up! By adding different ingredients, you can create unique flavors that cater to your taste buds. Let’s explore some exciting variations that will keep your muffin game strong!

Adding Vegetables for Extra Flavor

One of the best ways to enhance your Savory Ham and Cheese Muffins is by incorporating vegetables. Not only do they add flavor, but they also boost the nutritional value. Here are some great options:

  • Spinach: Fresh or frozen spinach can be added for a pop of color and nutrients. Just make sure to squeeze out excess moisture if using frozen.
  • Mushrooms: Sautéed mushrooms bring an earthy flavor that pairs well with ham and cheese.
  • Zucchini: Grated zucchini adds moisture and a subtle sweetness. It’s a great way to sneak in some extra veggies!
  • Tomatoes: Diced tomatoes can add a juicy burst of flavor. Just be cautious with the amount to avoid making the muffins too wet.

Feel free to experiment with your favorite vegetables. The more colorful your muffins, the more appealing they will be!

Different Cheese Options

Cheese is a key ingredient in Savory Ham and Cheese Muffins, and switching it up can create a whole new experience. Here are some delicious cheese alternatives to consider:

  • Monterey Jack: This cheese melts beautifully and has a mild flavor that complements the ham.
  • Swiss Cheese: With its nutty taste, Swiss cheese adds a unique twist to your muffins.
  • Feta Cheese: Crumbled feta can introduce a tangy flavor that pairs well with spinach or tomatoes.
  • Pepper Jack: For those who enjoy a little heat, pepper jack cheese adds a spicy kick to the muffins.

Mixing different cheeses can also create a delightful flavor profile. Don’t hesitate to get creative and find the combination that you love the most!

With these variations, your Savory Ham and Cheese Muffins will never get boring. Now, let’s move on to some cooking notes to ensure your muffins turn out perfectly every time!

Cooking Note for Savory Ham and Cheese Muffins

When it comes to baking Savory Ham and Cheese Muffins, a few cooking notes can make a big difference in the final result. Here are some essential tips to keep in mind for perfect muffins every time:

  • Use Fresh Ingredients: Always opt for fresh eggs and high-quality cheese. Fresh ingredients enhance the flavor and texture of your muffins.
  • Don’t Overmix: When combining the wet and dry ingredients, mix just until combined. Overmixing can lead to dense muffins instead of light and fluffy ones.
  • Check for Doneness: Ovens can vary in temperature. To ensure your muffins are perfectly baked, use a toothpick to check for doneness. If it comes out clean, they’re ready!
  • Let Them Cool: Allow the muffins to cool in the tin for a few minutes before transferring them to a wire rack. This helps them set and makes them easier to remove.
  • Experiment with Cooking Times: If you’re using a different type of muffin tin, such as silicone or mini muffin tins, adjust the cooking time accordingly. Mini muffins will bake faster, so keep an eye on them!
  • Store Properly: If you have leftovers, store them in an airtight container in the refrigerator. This keeps them fresh and ready for your next meal.

By following these cooking notes, you’ll ensure that your Savory Ham and Cheese Muffins turn out delicious every time. Now that you’re equipped with these tips, let’s explore some serving suggestions that will elevate your muffin experience!

Serving Suggestions for Savory Ham and Cheese Muffins

Now that you’ve baked a batch of delicious Savory Ham and Cheese Muffins, it’s time to think about how to serve them! These muffins are versatile and can be enjoyed in various ways. Let’s explore some delightful serving suggestions that will enhance your muffin experience.

Pairing with Dips and Spreads

One of the best ways to elevate your Savory Ham and Cheese Muffins is by pairing them with tasty dips and spreads. Here are some delicious options:

  • Mustard: A tangy mustard can add a zesty kick. Try whole grain or honey mustard for a unique flavor.
  • Hummus: Creamy hummus pairs well with the savory flavors of the muffins. You can choose classic or flavored varieties like roasted red pepper.
  • Guacamole: The creamy texture of guacamole complements the muffins perfectly. It adds a fresh taste that balances the savory elements.
  • Yogurt Dip: A simple yogurt dip with herbs can provide a refreshing contrast. Mix plain yogurt with dill or chives for a tasty treat.

These dips not only enhance the flavor but also add a fun element to your meal. You can set up a small dipping station for a casual gathering or brunch!

Ideal Occasions for Serving

Savory Ham and Cheese Muffins are perfect for various occasions. Here are some ideal times to serve them:

  • Breakfast or Brunch: These muffins make a fantastic breakfast option. Serve them alongside fresh fruit or a light salad for a complete meal.
  • Picnics: Their portability makes them a great choice for picnics. Pack them in a cooler, and enjoy them outdoors with family and friends.
  • Potlucks: Bring a batch to your next potluck! They are sure to be a hit and can be enjoyed warm or at room temperature.
  • Game Day: Serve these muffins as a tasty snack during game day. Pair them with your favorite beverages for a fun gathering.

With these serving suggestions, your Savory Ham and Cheese Muffins will shine at any event. They are not only delicious but also adaptable to different occasions. Now, let’s move on to some helpful tips for perfecting your muffins!

Tips for Perfect Savory Ham and Cheese Muffins

Creating the perfect Savory Ham and Cheese Muffins is all about attention to detail. With a few simple tips, you can elevate your baking game and ensure that each muffin is a delightful treat. Here are some essential tips to keep in mind:

  • Use Room Temperature Ingredients: For the best results, let your eggs and milk sit at room temperature for about 30 minutes before mixing. This helps them blend more easily and creates a fluffier texture.
  • Chop Ingredients Evenly: When dicing your ham and vegetables, aim for uniform pieces. This ensures even cooking and a balanced flavor in every bite.
  • Don’t Skip the Seasoning: While the recipe includes salt and pepper, feel free to add your favorite herbs or spices. A pinch of paprika or Italian seasoning can add an extra layer of flavor.
  • Experiment with Add-Ins: Don’t hesitate to get creative! Consider adding cooked bacon, sausage, or even different types of cheese. Each variation can bring a new twist to your muffins.
  • Check for Doneness Early: Ovens can vary, so start checking your muffins a few minutes before the recommended baking time. This helps prevent overbaking and keeps them moist.
  • Let Them Rest: After baking, allow the muffins to cool in the tin for a few minutes. This helps them set and makes them easier to remove without falling apart.
  • Store Properly: To keep your muffins fresh, store them in an airtight container. If you plan to keep them for more than a few days, consider freezing them for longer shelf life.

By following these tips, you’ll be well on your way to baking perfect Savory Ham and Cheese Muffins every time. Each batch will be a delicious success, ready to impress your family and friends!

Breakdown of Time for Savory Ham and Cheese Muffins

Understanding the time required for each step in making Savory Ham and Cheese Muffins can help you plan your cooking efficiently. Here’s a simple breakdown of the time you’ll need for preparation and cooking.

Prep Time

The prep time for Savory Ham and Cheese Muffins is quite manageable. You’ll need about 15 minutes to gather your ingredients and prepare the muffin mixture. This includes:

  • Gathering all ingredients
  • Dicing the ham and any vegetables
  • Whisking the eggs and milk
  • Mixing the dry ingredients

With everything ready, you’ll be set to move on to the baking stage!

Cooking Time

Once your muffin mixture is prepared, the cooking time is straightforward. You’ll need to bake the muffins for about 18-20 minutes. During this time, the muffins will rise and develop a lovely golden color. Keep an eye on them, as ovens can vary in temperature.

Total Time

In total, you can expect to spend around 35-40 minutes from start to finish. This includes both the prep and cooking times. Here’s a quick summary:

  • Prep Time: 15 minutes
  • Cooking Time: 18-20 minutes
  • Total Time: 35-40 minutes

With this time breakdown, you can easily fit the preparation of Savory Ham and Cheese Muffins into your busy schedule. They make for a quick and delicious meal option that everyone will enjoy!

Nutritional Information for Savory Ham and Cheese Muffins

Understanding the nutritional content of your Savory Ham and Cheese Muffins is essential for making informed choices about your meals. These muffins are not only delicious but also provide a good balance of nutrients. Let’s break down the key nutritional components to see what makes these muffins a smart choice for any meal.

Calories

Each Savory Ham and Cheese Muffin contains approximately 120 calories. This makes them a great option for a light breakfast or snack. With a moderate calorie count, you can enjoy these muffins without feeling guilty. They provide energy to kickstart your day or keep you going during a busy afternoon.

Protein

Protein is an essential nutrient, and these muffins deliver! Each muffin contains about 10 grams of protein. This protein comes from the eggs and ham, making them a filling option that can help keep you satisfied. Including protein in your meals is important for muscle health and overall well-being.

Sodium

When it comes to sodium, each muffin has around 300 milligrams. While this is a reasonable amount, it’s always good to be mindful of your sodium intake, especially if you’re watching your salt consumption. You can reduce the sodium content by using low-sodium ham or cheese if desired. This way, you can enjoy your muffins while keeping your health goals in check.

In summary, Savory Ham and Cheese Muffins are a nutritious option that provides a good balance of calories, protein, and sodium. They are perfect for anyone looking to enjoy a tasty meal without compromising on nutrition. Now that you know the nutritional benefits, let’s move on to some frequently asked questions about these delightful muffins!

FAQs about Savory Ham and Cheese Muffins

Can I freeze Savory Ham and Cheese Muffins?

Absolutely! Freezing Savory Ham and Cheese Muffins is a great way to enjoy them later. To freeze, let the muffins cool completely after baking. Then, wrap each muffin tightly in plastic wrap or aluminum foil. Place them in a freezer-safe bag or container. They can be stored in the freezer for up to three months. When you’re ready to enjoy them, simply reheat in the microwave or oven until warmed through. This makes for a quick and convenient breakfast option!

How long do Savory Ham and Cheese Muffins last?

When stored properly, Savory Ham and Cheese Muffins can last in the refrigerator for up to five days. Keep them in an airtight container to maintain freshness. If you notice any changes in texture or smell, it’s best to discard them. For longer storage, consider freezing them as mentioned earlier. This way, you can always have a delicious muffin on hand whenever you need a quick meal!

Can I use other meats in Savory Ham and Cheese Muffins?

Yes, you can definitely use other meats in your Savory Ham and Cheese Muffins! Feel free to substitute diced cooked bacon, sausage, or even turkey for the ham. Each type of meat will bring its own unique flavor to the muffins. Just make sure the meat is fully cooked before adding it to the mixture. This allows you to customize the muffins to your taste preferences while still keeping them delicious!

What can I serve with Savory Ham and Cheese Muffins?

Savory Ham and Cheese Muffins are versatile and can be paired with a variety of sides. Here are some great options:

  • Fresh Fruit: Serve with a side of fresh fruit like berries, melon, or sliced apples for a refreshing contrast.
  • Salad: A light green salad with a tangy vinaigrette can complement the savory flavors of the muffins.
  • Yogurt: A dollop of yogurt can add creaminess and balance the savory taste. Consider flavored yogurt for an extra twist.
  • Soup: Pairing the muffins with a warm bowl of soup makes for a comforting meal, especially on chilly days.

These serving suggestions can enhance your meal and make it even more enjoyable. With so many options, you can easily create a well-rounded dining experience!

Conclusion on Savory Ham and Cheese Muffins

In conclusion, Savory Ham and Cheese Muffins are a delightful addition to any meal. Their combination of fluffy eggs, savory ham, and melted cheese creates a satisfying treat that is both nutritious and delicious. Whether you enjoy them for breakfast, brunch, or as a snack, these muffins are sure to please everyone at the table.

With their versatility, you can easily customize these muffins to suit your taste. From adding vegetables to experimenting with different cheeses, the possibilities are endless. Plus, they are simple to prepare, making them a perfect choice for busy mornings or casual gatherings.

Not only are Savory Ham and Cheese Muffins tasty, but they also offer a good balance of protein and healthy fats. With just 120 calories per muffin, they provide a guilt-free option that keeps you energized throughout the day. Whether you’re meal prepping for the week or looking for a quick snack, these muffins fit the bill.

So, gather your ingredients, follow the steps, and enjoy the wonderful flavors of Savory Ham and Cheese Muffins. They are sure to become a favorite in your household. Happy baking!