Savory Salisbury Steak with Mushroom Gravy Recipe delights!

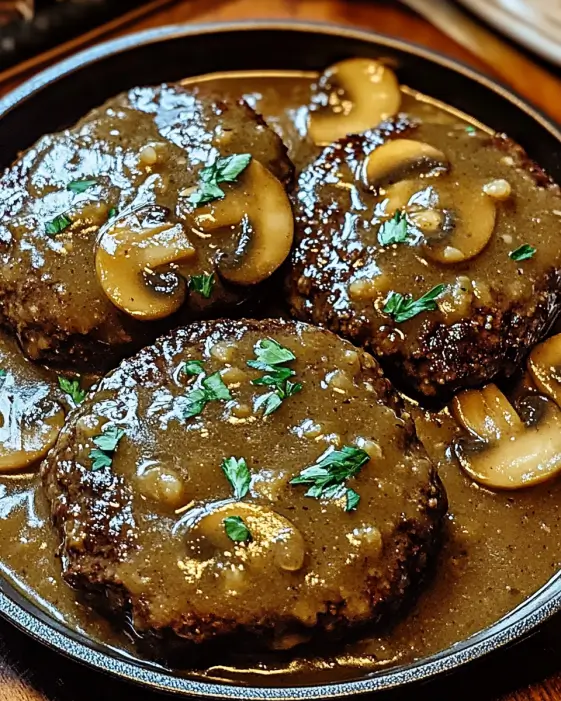
Introduction to Savory Salisbury Steak with Mushroom Gravy Recipe

What is Salisbury Steak?

Salisbury steak is a classic American dish that has been enjoyed for generations. It consists of seasoned ground beef shaped into patties, often served with a rich gravy. The dish is named after Dr. James H. Salisbury, who believed that a meat-based diet was beneficial for health. Traditionally, Salisbury steak is made with simple ingredients, making it a comforting and hearty meal. It’s often paired with mashed potatoes or rice, allowing the savory gravy to soak into the sides, enhancing the overall flavor.

The Appeal of Savory Salisbury Steak with Mushroom Gravy

The appeal of savory Salisbury steak with mushroom gravy lies in its delicious taste and ease of preparation. This dish is perfect for busy weeknights or family gatherings. The combination of tender beef patties and a creamy mushroom gravy creates a delightful experience for the taste buds. Plus, it’s a versatile recipe that can be adapted to suit various dietary preferences. Whether you’re a meat lover or looking for a lighter option, this dish can be tailored to meet your needs. The rich flavors and comforting textures make it a favorite among both kids and adults alike.

Ingredients for Savory Salisbury Steak with Mushroom Gravy Recipe

To create a mouthwatering savory Salisbury steak with mushroom gravy, you’ll need a selection of fresh and flavorful ingredients. Here’s what you’ll need:

  • 1 pound ground beef: This is the main ingredient, providing the rich flavor and protein.
  • 1/2 cup breadcrumbs: These help bind the patties together and add a nice texture.
  • 1/4 cup milk: Milk keeps the patties moist and tender.
  • 1 large egg: The egg acts as a binder, helping the patties hold their shape.
  • 1 teaspoon Worcestershire sauce: This adds a savory depth of flavor.
  • 1 teaspoon garlic powder: Garlic powder enhances the overall taste with its aromatic flavor.
  • 1 teaspoon onion powder: This adds a subtle sweetness and depth to the beef mixture.
  • Salt and pepper to taste: Essential for seasoning the patties to perfection.
  • 2 tablespoons olive oil: Used for cooking the patties, adding a healthy fat.
  • 1 medium onion, sliced: Onions provide sweetness and flavor to the gravy.
  • 8 ounces mushrooms, sliced: Mushrooms add earthiness and richness to the dish.
  • 2 cups beef broth: This forms the base of the gravy, giving it a hearty flavor.
  • 2 tablespoons all-purpose flour: Flour thickens the gravy, creating a luscious texture.
  • 1 tablespoon soy sauce: This adds umami and enhances the savory notes of the dish.
  • 1 tablespoon fresh parsley, chopped: For garnish, adding a pop of color and freshness.

With these ingredients, you’re well on your way to making a delicious savory Salisbury steak with mushroom gravy. Each component plays a vital role in creating a dish that is not only satisfying but also full of flavor. Gather your ingredients, and let’s move on to the next step in preparing this delightful meal!

Step-by-Step Preparation of Savory Salisbury Steak with Mushroom Gravy Recipe

Step 1: Preparing the Beef Mixture

To start, grab a large mixing bowl. Add the ground beef, breadcrumbs, and milk. Then, crack in the egg. Next, pour in the Worcestershire sauce, and sprinkle the garlic powder and onion powder. Don’t forget to add salt and pepper to taste! Now, use your hands to mix everything together. Make sure all the ingredients are well combined. This mixture is the heart of your savory Salisbury steak, so mix it thoroughly for the best flavor.

Step 2: Shaping the Patties

Once your beef mixture is ready, it’s time to shape it into patties. Divide the mixture into four equal portions. Roll each portion into a ball, then gently flatten it into an oval shape. Aim for about ¾ inch thick. This thickness helps the patties cook evenly. Place the shaped patties on a plate, and set them aside while you prepare to cook.

Step 3: Cooking the Patties

Now, heat the olive oil in a large skillet over medium heat. Once the oil is hot, carefully add the patties to the skillet. Cook them for about 4-5 minutes on each side. You want them to be nicely browned. This browning adds flavor to the patties. After they are cooked, remove them from the skillet and set them aside on a plate. Keep them warm while you make the gravy.

Step 4: Making the Mushroom Gravy

In the same skillet, add the sliced onions and mushrooms. Sauté them for about 5 minutes until they are softened and fragrant. The leftover bits from the patties will add extra flavor to the gravy. Next, sprinkle the flour over the vegetables and stir well to combine. Gradually pour in the beef broth and soy sauce, stirring constantly. This will help prevent lumps. Keep stirring until the mixture thickens, which should take about 3-4 minutes.

Step 5: Combining and Simmering

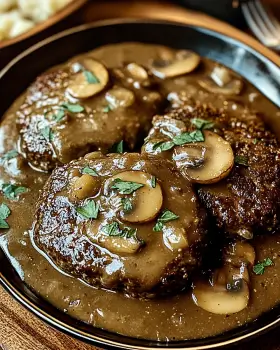
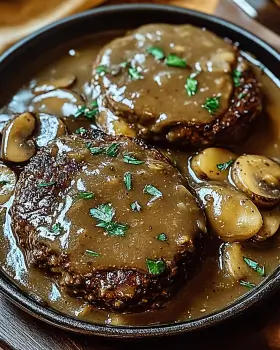
Now it’s time to bring everything together! Return the cooked patties to the skillet with the mushroom gravy. Make sure they are well coated in the sauce. Cover the skillet and let it simmer for about 10 minutes. This allows the flavors to meld beautifully. The patties will soak up the delicious gravy, making them even more savory. After simmering, your savory Salisbury steak with mushroom gravy is ready to serve!

Variations of Savory Salisbury Steak with Mushroom Gravy Recipe

Alternative Ingredients

While the classic savory Salisbury steak with mushroom gravy recipe is delightful, you can easily switch things up with alternative ingredients. For instance, if you want a lighter option, consider using ground turkey or chicken instead of beef. This change reduces the fat content while still providing a tasty meal.

If you’re looking for a gluten-free version, substitute breadcrumbs with gluten-free breadcrumbs or crushed gluten-free crackers. You can also use cornstarch instead of flour to thicken the gravy. This will keep the dish gluten-free while maintaining its delicious flavor.

For those who enjoy a bit of spice, add some diced jalapeños or a dash of hot sauce to the beef mixture. This will give your savory Salisbury steak a nice kick! Additionally, you can experiment with different types of mushrooms, such as shiitake or portobello, to enhance the earthy flavor of the gravy.

Different Cooking Methods

There are various cooking methods you can use to prepare your savory Salisbury steak with mushroom gravy. While the stovetop method is quick and easy, you can also try baking the patties. To do this, preheat your oven to 375°F (190°C). Place the shaped patties on a baking sheet and bake for about 20 minutes, flipping halfway through. After baking, you can prepare the gravy in a skillet as usual.

Another option is to use a slow cooker. Simply brown the patties in a skillet first, then transfer them to the slow cooker. Pour the mushroom gravy over the patties and cook on low for 4-6 hours. This method allows the flavors to develop even more, resulting in a tender and flavorful dish.

Lastly, for a quick meal, consider using an air fryer. Cook the patties in the air fryer at 375°F (190°C) for about 10-12 minutes, flipping halfway through. You can then prepare the gravy on the stovetop as described in the original recipe. Each of these methods offers a unique twist on the classic dish, making it easy to enjoy savory Salisbury steak with mushroom gravy in different ways!

Cooking Note for Savory Salisbury Steak with Mushroom Gravy Recipe

When preparing your savory Salisbury steak with mushroom gravy, a few cooking notes can help ensure your dish turns out perfectly every time. First, always use fresh ingredients. Fresh ground beef, mushrooms, and herbs will enhance the flavor significantly. If possible, choose high-quality beef for a richer taste.

Next, be mindful of the cooking temperature. Cooking the patties over medium heat allows them to brown nicely without burning. If the heat is too high, the outside may cook too quickly, leaving the inside undercooked. On the other hand, if the heat is too low, the patties may not develop that lovely golden crust.

Additionally, when making the mushroom gravy, stir constantly after adding the flour. This helps prevent lumps and ensures a smooth, creamy texture. If you find the gravy too thick, you can always add a little more beef broth to reach your desired consistency.

Lastly, let the patties simmer in the gravy for the full 10 minutes. This step is crucial as it allows the flavors to meld beautifully. The longer the patties sit in the gravy, the more they absorb the delicious flavors, making each bite even more savory.

By following these cooking notes, you’ll create a delightful savory Salisbury steak with mushroom gravy that your family will love. Enjoy the process, and don’t hesitate to make adjustments based on your taste preferences!

Serving Suggestions for Savory Salisbury Steak with Mushroom Gravy Recipe

Ideal Side Dishes

When it comes to serving your savory Salisbury steak with mushroom gravy, choosing the right side dishes can elevate your meal. Here are some ideal options:

  • Mashed Potatoes: A classic pairing, creamy mashed potatoes soak up the rich gravy beautifully. You can also try garlic mashed potatoes for an extra flavor boost.
  • Steamed Vegetables: Fresh steamed broccoli, green beans, or carrots add a pop of color and nutrition to your plate. They provide a nice contrast to the hearty steak.
  • Rice: Fluffy white or brown rice is another great option. It absorbs the gravy well, making each bite delicious.
  • Cauliflower Mash: For a low-carb alternative, consider serving the steak over mashed cauliflower. It’s creamy and pairs wonderfully with the mushroom gravy.
  • Salad: A light garden salad with a tangy vinaigrette can balance the richness of the steak. Fresh greens add a refreshing touch to your meal.

These side dishes not only complement the savory Salisbury steak but also create a well-rounded meal that everyone will enjoy. Feel free to mix and match based on your preferences and dietary needs!

Pairing with Beverages

Choosing the right beverage can enhance your dining experience. Here are some great options to pair with your savory Salisbury steak with mushroom gravy:

  • Red Wine: A medium-bodied red wine, like Merlot or Cabernet Sauvignon, pairs beautifully with the rich flavors of the steak and gravy.
  • Beer: A hearty lager or amber ale complements the savory notes of the dish. The carbonation can also cleanse your palate between bites.
  • Sparkling Water: For a non-alcoholic option, sparkling water with a slice of lemon or lime adds a refreshing touch without overpowering the meal.
  • Iced Tea: Unsweetened iced tea is another great choice. Its subtle flavor won’t compete with the savory steak, making it a perfect accompaniment.

By selecting the right side dishes and beverages, you can create a delightful dining experience that highlights the deliciousness of your savory Salisbury steak with mushroom gravy. Enjoy your meal with family and friends, and savor every bite!

Tips for Perfecting Savory Salisbury Steak with Mushroom Gravy Recipe

To ensure your savory Salisbury steak with mushroom gravy turns out perfectly every time, consider these helpful tips. They will enhance the flavor and texture of your dish, making it even more enjoyable for you and your loved ones.

Use Quality Ingredients

Start with high-quality ground beef. Look for meat that has a good fat content, around 80/20, for the best flavor and juiciness. Fresh mushrooms and onions also make a big difference. Fresh ingredients will elevate the overall taste of your dish.

Don’t Overmix the Beef

When mixing the beef mixture, be careful not to overmix. Overworking the meat can lead to tough patties. Mix just until everything is combined, and then shape your patties gently.

Let the Patties Rest

After shaping the patties, let them rest for about 10 minutes before cooking. This helps them hold their shape better during cooking and allows the flavors to meld.

Brown the Patties Well

When cooking the patties, make sure to brown them well on both sides. This caramelization adds depth of flavor to the dish. Don’t rush this step; a good sear is key to a delicious steak.

Adjust the Gravy Consistency

If your gravy is too thick, simply add a little more beef broth or water to reach your desired consistency. If it’s too thin, let it simmer a bit longer to thicken up. Stir constantly to avoid lumps.

Experiment with Seasonings

Feel free to experiment with different seasonings in the beef mixture. Adding herbs like thyme or rosemary can enhance the flavor profile. A dash of hot sauce can also add a nice kick if you enjoy a bit of spice.

Garnish for Presentation

Don’t forget to garnish your dish with fresh parsley before serving. This adds a pop of color and freshness, making your savory Salisbury steak with mushroom gravy look even more appetizing.

By following these tips, you’ll create a savory Salisbury steak with mushroom gravy that is not only delicious but also visually appealing. Enjoy the cooking process, and don’t hesitate to make it your own!

Breakdown of Time for Savory Salisbury Steak with Mushroom Gravy Recipe

Prep Time

Preparing your savory Salisbury steak with mushroom gravy is a straightforward process. The prep time typically takes about 15-20 minutes. During this time, you’ll gather all your ingredients, mix the beef mixture, and shape the patties. Having everything ready before you start cooking makes the process smoother and more enjoyable.

Cooking Time

The cooking time for this dish is approximately 25-30 minutes. This includes browning the patties, sautéing the onions and mushrooms, and simmering everything together in the gravy. Each step is essential for developing the rich flavors that make this dish so delightful. Patience is key, as allowing the patties to simmer in the gravy enhances their taste.

Total Time

In total, you can expect to spend about 40-50 minutes from start to finish. This includes both prep and cooking time. It’s a relatively quick meal to prepare, especially considering how satisfying and flavorful it is. Whether you’re cooking for a family dinner or a special occasion, this time investment is well worth it!

Nutritional Information for Savory Salisbury Steak with Mushroom Gravy Recipe

Calories

When it comes to enjoying a hearty meal, knowing the calorie content can help you make informed choices. Each serving of savory Salisbury steak with mushroom gravy contains approximately 350 calories. This makes it a satisfying option for dinner without going overboard on calories. The balance of protein and fat in this dish contributes to its overall caloric value, making it a filling meal that can keep you energized.

Protein

Protein is an essential nutrient that supports muscle growth and repair. In this savory Salisbury steak recipe, you’ll find about 28 grams of protein per serving. The ground beef is the primary source of protein, providing a substantial amount to help you feel full and satisfied. Including protein in your meals is important for maintaining a healthy diet, and this dish delivers it deliciously!

Sodium

Sodium is another important factor to consider, especially for those monitoring their intake. Each serving of savory Salisbury steak with mushroom gravy contains around 800 milligrams of sodium. This amount comes from the beef broth, Worcestershire sauce, and soy sauce used in the recipe. While sodium is necessary for bodily functions, it’s wise to enjoy this dish in moderation, especially if you are watching your salt intake.

Overall, this savory Salisbury steak with mushroom gravy recipe offers a balanced meal with a good mix of calories, protein, and sodium. It’s a comforting dish that can fit into a healthy eating plan when enjoyed as part of a varied diet. Remember to pair it with nutritious side dishes for a well-rounded meal!

FAQs about Savory Salisbury Steak with Mushroom Gravy Recipe

Can I make Savory Salisbury Steak with Mushroom Gravy ahead of time?

Absolutely! You can prepare the savory Salisbury steak with mushroom gravy ahead of time. Simply follow the recipe up to the point of simmering the patties in the gravy. Once cooked, let the dish cool completely, then store it in an airtight container in the refrigerator. It can be kept for up to three days. When you’re ready to serve, reheat it on the stovetop over low heat until warmed through. This makes it a great option for meal prep or busy weeknights!

What can I substitute for mushrooms in the gravy?

If you’re not a fan of mushrooms or have an allergy, there are several tasty substitutes you can use in the gravy. Consider using diced bell peppers or zucchini for a different texture and flavor. You could also try adding chopped spinach or kale for a nutritious boost. If you want a similar umami flavor, consider using soy sauce or miso paste in the gravy. These alternatives will still create a delicious sauce to accompany your savory Salisbury steak!

How do I store leftovers of Savory Salisbury Steak with Mushroom Gravy?

Storing leftovers is easy! Allow the savory Salisbury steak with mushroom gravy to cool to room temperature. Then, transfer it to an airtight container. It can be stored in the refrigerator for up to three days. When reheating, make sure to warm it gently on the stovetop or in the microwave. If you find the gravy has thickened, you can add a splash of beef broth or water to loosen it up. Enjoy your leftovers for a quick and satisfying meal!

Can I freeze Savory Salisbury Steak with Mushroom Gravy?

Yes, you can freeze savory Salisbury steak with mushroom gravy! To do this, let the dish cool completely after cooking. Then, place it in a freezer-safe container or a heavy-duty freezer bag. Make sure to remove as much air as possible to prevent freezer burn. It can be frozen for up to three months. When you’re ready to enjoy it, thaw it in the refrigerator overnight and reheat on the stovetop until heated through. This makes for a convenient meal option for busy days!

Conclusion on Savory Salisbury Steak with Mushroom Gravy Recipe

In conclusion, the savory Salisbury steak with mushroom gravy recipe is a delightful dish that brings comfort and satisfaction to the dinner table. With its rich flavors and tender patties, it’s no wonder this classic meal has stood the test of time. Whether you’re cooking for a family gathering or a cozy weeknight dinner, this recipe is sure to impress.

By following the simple steps outlined in this article, you can create a delicious meal that everyone will love. The versatility of this dish allows for various adaptations, whether you prefer a lighter version or want to experiment with different cooking methods. Plus, the nutritional information shows that you can enjoy a hearty meal without compromising your health goals.

Remember to pair your savory Salisbury steak with mushroom gravy with ideal side dishes and beverages for a complete dining experience. From creamy mashed potatoes to fresh salads, the options are endless. And don’t forget to garnish with fresh parsley for that extra touch of color and flavor!

So, gather your ingredients, roll up your sleeves, and get ready to enjoy a comforting plate of savory Salisbury steak with mushroom gravy. It’s a dish that not only nourishes the body but also warms the heart. Happy cooking!

Sour Cream Beef Noodle Casserole Recipe is a must-try!

Introduction to Sour Cream Beef Noodle Casserole Recipe

Sour Cream Beef Noodle Casserole Recipe is a dish that brings warmth and satisfaction to any table. This casserole is not just a meal; it’s a hug in a dish. With its creamy texture and hearty ingredients, it’s perfect for family dinners or gatherings with friends. Let’s dive into what makes this recipe so special!

What Makes Sour Cream Beef Noodle Casserole Special?

Sour Cream Beef Noodle Casserole apart from other casseroles? First, it combines the rich flavors of ground beef, savory tomato sauce, and creamy sour cream. This unique blend creates a comforting taste that is hard to resist. The addition of egg noodles makes it filling, while the melted cheddar cheese on top adds a delightful crunch.

Moreover, this recipe is incredibly versatile. You can easily customize it to suit your taste. Want a little heat? Just add some red pepper flakes! Prefer a lighter option? Swap the ground beef for turkey or chicken. The possibilities are endless, making it a go-to recipe for any occasion.

Not only is it delicious, but it’s also simple to prepare. With just a few ingredients and easy steps, you can whip up this casserole in no time. It’s perfect for busy weeknights or when you want to impress guests without spending hours in the kitchen.

In the following sections, we will explore the ingredients, preparation steps, and variations of this fantastic dish. Get ready to enjoy a meal that’s sure to become a family favorite!

Ingredients for Sour Cream Beef Noodle Casserole Recipe

Sour Cream Beef Noodle Casserole Recipe, you will need a few simple ingredients. Each component plays a vital role in building the rich flavors and creamy texture that make this dish so special. Here’s what you’ll need:

  • 1 pound ground beef: This is the main protein source, providing a hearty base for the casserole.
  • 1 medium onion, chopped: The onion adds sweetness and depth to the flavor.
  • 2 cloves garlic, minced: Garlic brings a wonderful aroma and enhances the overall taste.
  • 1 can (15 ounces) tomato sauce: This adds moisture and a tangy flavor to the dish.
  • 1 can (10.5 ounces) cream of mushroom soup: This ingredient contributes creaminess and a savory taste.
  • 1 cup sour cream: The star of the show! It adds richness and a slight tang.
  • 2 cups egg noodles, uncooked: These noodles provide a comforting texture and help to bind the casserole.
  • 1 cup shredded cheddar cheese: Cheese is essential for that gooey, melty topping.
  • 1 teaspoon Italian seasoning: This blend of herbs adds a lovely flavor profile.
  • Salt and pepper to taste: Essential for seasoning and enhancing all the flavors.
  • 1 tablespoon olive oil: Used for sautéing the onion and garlic, adding a touch of healthy fat.

Sour Cream Beef Noodle Casserole. Now, let’s move on to the step-by-step preparation to bring this dish to life!

Step-by-Step Preparation of Sour Cream Beef Noodle Casserole Recipe

Sour Cream Beef Noodle Casserole Recipe. Each step is simple and straightforward, ensuring that you can create this delicious dish with ease. Let’s get started!

Step 1: Prepping the Ingredients

First things first, let’s prep our ingredients. Start by chopping the onion and mincing the garlic. This will help release their flavors when cooked. Next, measure out the tomato sauce, cream of mushroom soup, and sour cream. Having everything ready will make the cooking process smoother and more enjoyable!

Step 2: Cooking the Beef

In a large skillet, heat the olive oil over medium heat. Once hot, add the chopped onion and minced garlic. Sauté them for about 3-4 minutes until the onion becomes translucent. Then, add the ground beef to the skillet. Use a spoon to break it apart as it cooks. Brown the beef for about 5-7 minutes, stirring occasionally. Once it’s fully cooked, drain any excess fat to keep the casserole from being greasy.

Step 3: Boiling the Noodles

While the beef is cooking, bring a large pot of water to a boil. Add a pinch of salt to the water for flavor. Once boiling, add the uncooked egg noodles. Cook them according to the package instructions until they are al dente. This usually takes about 7-9 minutes. After cooking, drain the noodles and set them aside.

Step 4: Mixing the Casserole Ingredients

Now it’s time to mix everything together! In the skillet with the cooked beef, stir in the tomato sauce, cream of mushroom soup, and sour cream. Add the Italian seasoning, salt, and pepper. Mix everything well until all the ingredients are combined and the mixture is creamy and smooth.

Step 5: Assembling the Casserole

In a large mixing bowl, combine the drained egg noodles with the beef mixture. Stir gently to ensure the noodles are evenly coated. Next, transfer this mixture into a greased 9×13-inch baking dish. Spread it out evenly. Finally, sprinkle the shredded cheddar cheese generously on top. This will create a deliciously cheesy crust when baked!

Step 6: Baking the Casserole

Sour Cream Beef Noodle Casserole!

Variations of Sour Cream Beef Noodle Casserole Recipe

Sour Cream Beef Noodle Casserole Recipe is a fantastic base that can be easily adapted to suit different dietary preferences and tastes. Whether you’re looking for vegetarian options or gluten-free alternatives, there are plenty of ways to enjoy this comforting dish. Let’s explore some delicious variations!

Vegetarian Options

Sour Cream Beef Noodle Casserole, you can easily substitute the ground beef with plant-based proteins. Here are some ideas:

  • Vegetarian Ground Meat: Use a store-bought meat substitute, like Beyond Meat or Impossible Burger. These products mimic the texture and flavor of ground beef.
  • Lentils: Cooked lentils are a great option. They add protein and a hearty texture. Use about 1.5 cups of cooked lentils in place of the beef.
  • Mushrooms: Chopped mushrooms can add a rich, umami flavor. Sauté about 2 cups of mushrooms with the onions and garlic for a delicious twist.

Feel free to mix in some chopped bell peppers, zucchini, or spinach for added nutrition and flavor. The creamy sauce and cheesy topping will still make this dish a hit!

Gluten-Free Alternatives

Sour Cream Beef Noodle Casserole Recipe without sacrificing taste. Here’s how:

  • Gluten-Free Pasta: Substitute regular egg noodles with gluten-free egg noodles or any gluten-free pasta of your choice. Cook them according to the package instructions.
  • Gluten-Free Cream of Mushroom Soup: Look for gluten-free versions of cream of mushroom soup at your local grocery store. You can also make your own using gluten-free flour.
  • Thickening Agents: If you want to thicken the sauce, consider using cornstarch or arrowroot powder instead of regular flour.

Sour Cream Beef Noodle Casserole without worrying about gluten!

Cooking Note for Sour Cream Beef Noodle Casserole Recipe

Sour Cream Beef Noodle Casserole Recipe, there are a few important cooking notes to keep in mind. These tips will help ensure that your casserole turns out perfectly every time, making it a delightful dish for you and your loved ones.

First, always taste your mixture before baking. This is a great way to adjust the seasoning. If you feel it needs more flavor, don’t hesitate to add a pinch more salt, pepper, or Italian seasoning. Remember, the flavors will meld together during baking, but starting with a well-seasoned mixture is key.

Next, consider the cooking time. Ovens can vary in temperature, so keep an eye on your casserole as it bakes. If you notice the cheese browning too quickly, you can cover it with foil to prevent burning while the rest of the casserole cooks through.

Also, let the casserole cool for a few minutes after baking. This allows the layers to set, making it easier to serve. If you cut into it right away, it may fall apart, and you want those beautiful layers to shine!

Sour Cream Beef Noodle Casserole is a perfect canvas for your culinary imagination.

By keeping these cooking notes in mind, you’ll be well on your way to creating a delicious and satisfying casserole that everyone will love. Happy cooking!

Serving Suggestions for Sour Cream Beef Noodle Casserole Recipe

Sour Cream Beef Noodle Casserole is baked to perfection, it’s time to serve it up! This dish is not only delicious but also versatile when it comes to pairing it with other foods. Here are some delightful serving suggestions to enhance your meal:

  • Fresh Salad: A crisp green salad is a perfect complement to the rich flavors of the casserole. Consider a simple mixed greens salad with a light vinaigrette. The freshness will balance the creaminess of the dish.
  • Garlic Bread: Serve warm garlic bread on the side for a comforting touch. The crunchy texture and buttery flavor will pair wonderfully with the creamy casserole.
  • Steamed Vegetables: Add some color and nutrition to your plate with steamed vegetables. Broccoli, green beans, or carrots are great choices that will add a healthy crunch.
  • Pickles or Olives: For a tangy contrast, consider serving pickles or olives on the side. Their briny flavor can cut through the richness of the casserole.
  • Hot Sauce: If you enjoy a bit of heat, offer hot sauce at the table. A few dashes can elevate the flavors and add a spicy kick!

Sour Cream Beef Noodle Casserole is hearty, so a small serving alongside a salad or vegetables is often enough to satisfy. You can also garnish the casserole with fresh herbs like parsley or chives for a pop of color and added flavor.

Sour Cream Beef Noodle Casserole is sure to be a hit, making mealtime a delightful experience.

Tips for Perfecting Your Sour Cream Beef Noodle Casserole Recipe

Sour Cream Beef Noodle Casserole Recipe truly shine, consider these helpful tips. Each suggestion will enhance the flavors and textures, ensuring that your casserole is a hit every time you serve it.

First, use high-quality ingredients. Fresh ground beef, ripe tomatoes, and creamy sour cream can make a big difference in taste. Opt for full-fat sour cream for a richer flavor, or try a low-fat version if you prefer a lighter dish.

Next, don’t skip the seasoning! While the recipe calls for salt, pepper, and Italian seasoning, feel free to experiment. Adding a pinch of smoked paprika or a dash of Worcestershire sauce can elevate the flavor profile. Always taste your mixture before baking to adjust the seasoning to your liking.

Another tip is to let the casserole sit for a few minutes after baking. This resting time allows the layers to set, making it easier to serve. If you cut into it too soon, it may fall apart, and you want those beautiful layers to hold together.

Consider adding a crunchy topping for extra texture. Before baking, sprinkle some crushed crackers or breadcrumbs mixed with melted butter on top of the cheese. This will create a delightful crispy layer that contrasts beautifully with the creamy filling.

Sour Cream Beef Noodle Casserole is a versatile dish. You can add different vegetables, such as spinach or zucchini, or even swap out the cheese for a different variety. Experimenting with flavors can lead to exciting new versions of this classic recipe.

Sour Cream Beef Noodle Casserole Recipe. Enjoy the process and have fun in the kitchen!

Breakdown of Time for Sour Cream Beef Noodle Casserole Recipe

Sour Cream Beef Noodle Casserole Recipe can help you plan your cooking efficiently. Here’s a detailed breakdown of the time required for preparation and cooking, ensuring you can enjoy this delicious dish without any rush.

Prep Time

Sour Cream Beef Noodle Casserole is approximately 15-20 minutes. During this time, you will gather all your ingredients, chop the onion, mince the garlic, and measure out the necessary components. Having everything ready will make the cooking process smoother and more enjoyable!

Cooking Time

The cooking time for this casserole is about 40-45 minutes. This includes:

  • Cooking the beef: About 5-7 minutes to brown the ground beef and sauté the onion and garlic.
  • Boiling the noodles: Approximately 7-9 minutes to cook the egg noodles until al dente.
  • Baking the casserole: 25 minutes covered with foil, followed by an additional 10-15 minutes uncovered to achieve that bubbly, golden cheese topping.

Total Time

Sour Cream Beef Noodle Casserole Recipe to take about 55-65 minutes from start to finish. This includes both prep and cooking time. It’s a quick and satisfying meal that’s perfect for busy weeknights or family gatherings!

With this time breakdown, you can easily fit this delicious casserole into your schedule. Enjoy the process and the wonderful aroma that fills your kitchen as it bakes!

Nutritional Information for Sour Cream Beef Noodle Casserole Recipe

Sour Cream Beef Noodle Casserole Recipe is essential for those who are mindful of their diet. This dish is not only delicious but also provides a good balance of nutrients. Here’s a breakdown of the key nutritional information you can expect from a serving of this comforting casserole.

Calories

Sour Cream Beef Noodle Casserole contains approximately 400 calories. This makes it a hearty meal that can satisfy your hunger without overwhelming your daily caloric intake. The combination of ground beef, egg noodles, and creamy ingredients contributes to this calorie count, providing energy for your day.

Protein

Protein is an essential nutrient, and this casserole delivers! Each serving contains about 25 grams of protein. The ground beef and cheese are excellent sources of protein, which is vital for muscle repair and overall health. Including protein in your meals can help keep you feeling full and satisfied longer.

Sodium

Sour Cream Beef Noodle Casserole has approximately 800 milligrams per serving. While sodium is necessary for bodily functions, it’s important to monitor your intake. If you’re watching your sodium levels, consider using low-sodium versions of the tomato sauce and cream of mushroom soup. This small adjustment can help reduce the overall sodium content without sacrificing flavor.

Sour Cream Beef Noodle Casserole Recipe offers a balanced meal with a good amount of calories, protein, and sodium. It’s a comforting dish that can fit into a variety of dietary plans, especially when you make mindful ingredient choices. Enjoy this delicious casserole while being aware of its nutritional benefits!

FAQs about Sour Cream Beef Noodle Casserole Recipe

Can I make Sour Cream Beef Noodle Casserole ahead of time?

Sour Cream Beef Noodle Casserole ahead of time. Simply follow the recipe up to the baking step. Once you’ve assembled the casserole, cover it tightly with plastic wrap or aluminum foil and store it in the refrigerator. It can be made a day in advance, making it a great option for busy weeknights or gatherings. When you’re ready to bake, just remove it from the fridge and let it sit at room temperature for about 30 minutes before placing it in the oven. This helps ensure even cooking.

What can I substitute for sour cream in this recipe?

Sour Cream Beef Noodle Casserole Recipe. Here are a few ideas:

  • Greek Yogurt: This is a popular substitute. It has a similar tangy flavor and creamy texture, making it a great alternative.
  • Cream Cheese: Soften cream cheese and mix it with a little milk to achieve a similar consistency to sour cream.
  • Buttermilk: This can add a nice tang, but you may want to reduce the amount slightly to avoid making the casserole too runny.

Feel free to experiment with these options to find the one that suits your taste best!

How do I store leftovers of Sour Cream Beef Noodle Casserole?

Sour Cream Beef Noodle Casserole is easy! Allow the casserole to cool completely before transferring it to an airtight container. You can store it in the refrigerator for up to 3-4 days. When you’re ready to enjoy it again, simply reheat individual portions in the microwave or warm the entire casserole in the oven at 350°F until heated through. Cover it with foil to prevent the cheese from burning.

Can I freeze Sour Cream Beef Noodle Casserole?

Sour Cream Beef Noodle Casserole for later enjoyment! To do this, prepare the casserole as directed but do not bake it. Instead, cover it tightly with plastic wrap and then aluminum foil to prevent freezer burn. It can be frozen for up to 2-3 months. When you’re ready to bake, thaw it in the refrigerator overnight and then bake as directed. This makes it a convenient meal option for busy days!

Conclusion on Sour Cream Beef Noodle Casserole Recipe

Sour Cream Beef Noodle Casserole Recipe is a delightful dish that combines comfort and flavor in every bite. Its creamy texture, hearty ingredients, and cheesy topping make it a favorite for family dinners and gatherings. Whether you’re cooking for a busy weeknight or a special occasion, this casserole is sure to impress.

With its simple preparation steps and versatile ingredients, you can easily customize the recipe to suit your taste. From vegetarian options to gluten-free alternatives, there’s a version for everyone. Plus, the ability to make it ahead of time or freeze it for later adds to its convenience, making it a practical choice for any home cook.

Sour Cream Beef Noodle Casserole is more than just a recipe; it’s an opportunity to share warmth, laughter, and delicious flavors with those you care about.

So, roll up your sleeves, gather your ingredients, and get ready to create a dish that will surely become a staple in your kitchen. Enjoy every moment of the cooking process and savor the delightful results. Happy cooking!

White Chocolate Strawberry Cupcakes Recipe for Delightful Treats

Introduction to White Chocolate Strawberry Cupcakes Recipe

The Perfect Treat for Any Occasion

White Chocolate Strawberry Cupcakes Recipe. These cupcakes are not just a treat; they are a celebration of flavors! The combination of sweet strawberries and creamy white chocolate creates a taste sensation that is hard to resist.

Whether it’s a birthday party, a picnic, or just a cozy evening at home, these cupcakes fit right in. They are light, fluffy, and bursting with fruity goodness. Plus, they are easy to make, which means you can whip them up in no time. Imagine the smiles on your friends’ and family’s faces when they take a bite of these delicious cupcakes!

In this recipe, we will guide you through each step to ensure your cupcakes turn out perfectly. From mixing the batter to frosting them with whipped cream, you’ll find that baking can be both fun and rewarding. So, roll up your sleeves and get ready to create a dessert that will impress everyone!

White Chocolate Strawberry Cupcakes.

Ingredients for White Chocolate Strawberry Cupcakes Recipe

White Chocolate Strawberry Cupcakes Recipe, you’ll need a few simple ingredients. Each component plays a vital role in achieving that perfect balance of sweetness and flavor. Here’s what you’ll need:

  • 1 ½ cups all-purpose flour
  • 1 cup granulated sugar
  • ½ cup unsalted butter, softened
  • 2 large eggs
  • 1 teaspoon vanilla extract
  • ½ cup milk
  • 1 ½ teaspoons baking powder
  • ¼ teaspoon salt
  • 1 cup fresh strawberries, diced
  • 4 ounces white chocolate, chopped
  • 1 cup heavy cream
  • 2 tablespoons powdered sugar
  • Fresh strawberries for garnish

These ingredients come together to create a moist and flavorful cupcake that everyone will love. The fresh strawberries add a burst of fruity flavor, while the white chocolate brings a creamy sweetness that complements the berries perfectly. Make sure to use fresh strawberries for the best taste!

Now that you have your ingredients ready, let’s move on to the step-by-step preparation of these delightful cupcakes.

Step-by-Step Preparation of White Chocolate Strawberry Cupcakes Recipe

Step 1: Preheat the Oven and Prepare the Baking Pan

First things first, preheat your oven to 350°F (175°C). This step is crucial as it ensures your cupcakes bake evenly. While the oven heats up, take a muffin tin and line it with cupcake liners. This will make it easy to remove the cupcakes later and keep them looking pretty!

Step 2: Mix the Dry Ingredients

In a separate bowl, whisk together the all-purpose flour, baking powder, and salt. Mixing these dry ingredients first helps to evenly distribute the baking powder and salt throughout the flour. This step is important for achieving a light and fluffy cupcake!

Step 3: Cream the Butter and Sugar

Now, grab a large mixing bowl. Here, you’ll cream together the softened butter and granulated sugar. Use an electric mixer or a whisk to beat them until the mixture is light and fluffy. This process incorporates air into the batter, which helps the cupcakes rise beautifully.

Step 4: Incorporate the Eggs and Vanilla

Next, add the eggs one at a time to the butter and sugar mixture. Make sure to mix well after each addition. Then, stir in the vanilla extract. The vanilla adds a lovely aroma and flavor that complements the strawberries and white chocolate perfectly!

Step 5: Combine the Wet and Dry Ingredients

Now it’s time to bring everything together! Gradually add the dry ingredients to the butter mixture, alternating with the milk. Start with a bit of the dry mix, then add some milk, and repeat until everything is combined. Be careful not to overmix; just mix until you see no more flour. This will keep your cupcakes tender!

Step 6: Fold in the White Chocolate and Strawberries

Gently fold in the diced strawberries and chopped white chocolate. Use a spatula to carefully mix them into the batter. This step is important because you want to keep the strawberries and chocolate pieces intact, ensuring they are evenly distributed throughout the cupcakes.

Step 7: Bake the Cupcakes

Now, it’s time to bake! Divide the batter evenly among the cupcake liners, filling each about two-thirds full. This allows room for the cupcakes to rise. Bake them in the preheated oven for 18-20 minutes. You’ll know they’re done when a toothpick inserted into the center comes out clean. The smell will be heavenly!

Step 8: Cool and Prepare the Frosting

Once baked, let the cupcakes cool in the pan for about 5 minutes. Then, transfer them to a wire rack to cool completely. While they cool, whip the heavy cream with powdered sugar until soft peaks form. This will be your delicious frosting! Once the cupcakes are cool, frost them generously with the whipped cream and top with fresh strawberries for a beautiful finish.

Variation of White Chocolate Strawberry Cupcakes Recipe

Alternative Ingredients for Different Dietary Needs

White Chocolate Strawberry Cupcakes Recipe. Luckily, there are plenty of alternative ingredients you can use to accommodate various dietary needs without sacrificing flavor!

If you or your guests are gluten-free, consider using a gluten-free all-purpose flour blend. Many brands offer blends that work well in baking, ensuring your cupcakes remain fluffy and delicious. Just make sure to check that the blend contains a binding agent, like xanthan gum, to help with texture.

For those who are dairy-free, you can easily substitute the unsalted butter with a dairy-free alternative, such as coconut oil or vegan butter. Additionally, replace the milk with almond milk, soy milk, or oat milk. These options will keep your cupcakes moist and tasty!

If you want to make the recipe vegan, you can replace the eggs with flaxseed meal or applesauce. For every egg, mix one tablespoon of flaxseed meal with three tablespoons of water and let it sit for a few minutes until it thickens. This will help bind the ingredients together just like eggs do.

When it comes to the white chocolate, look for dairy-free white chocolate chips or bars. Many brands now offer vegan chocolate options that taste just as good as traditional white chocolate. This way, everyone can enjoy the sweet, creamy flavor without any worries!

Lastly, if you want to cut down on sugar, consider using a sugar substitute like stevia or erythritol. These alternatives can help reduce the overall sugar content while still providing sweetness. Just be sure to follow the conversion guidelines on the package, as some substitutes are sweeter than regular sugar.

White Chocolate Strawberry Cupcakes Recipe that everyone can enjoy, regardless of their dietary needs. So, don’t hesitate to get creative and make these cupcakes your own!

Cooking Note for White Chocolate Strawberry Cupcakes Recipe

White Chocolate Strawberry Cupcakes Recipe. Here are some important cooking notes to keep in mind:

  • Room Temperature Ingredients: Ensure that your butter, eggs, and milk are at room temperature before you start. This helps them blend together smoothly, resulting in a better texture for your cupcakes.
  • Measuring Flour: When measuring flour, avoid scooping directly from the bag. Instead, spoon the flour into your measuring cup and level it off with a knife. This prevents packing and ensures you don’t use too much flour, which can lead to dense cupcakes.
  • Don’t Overmix: Once you combine the wet and dry ingredients, mix just until everything is incorporated. Overmixing can lead to tough cupcakes, so be gentle when folding in the strawberries and white chocolate.
  • Check for Doneness: Ovens can vary in temperature, so keep an eye on your cupcakes as they bake. Start checking for doneness a couple of minutes before the recommended baking time. A toothpick inserted into the center should come out clean or with a few moist crumbs.
  • Cooling Time: Allow the cupcakes to cool completely before frosting. If they are still warm, the frosting may melt and slide off, ruining the presentation.
  • Storage Tips: If you have leftovers, store the cupcakes in an airtight container at room temperature for up to three days. For longer storage, consider refrigerating them, but be aware that the texture may change slightly.

White Chocolate Strawberry Cupcakes that are sure to impress. Happy baking!

Serving Suggestions for White Chocolate Strawberry Cupcakes Recipe

Pairing with Beverages

White Chocolate Strawberry Cupcakes Recipe, the right beverage can elevate the experience. Here are some delightful pairings to consider:

  • Tea: A cup of herbal tea, like chamomile or peppermint, complements the sweetness of the cupcakes beautifully. The warm flavors of tea balance the rich white chocolate and fresh strawberries.
  • Coffee: For coffee lovers, a light roast coffee or a creamy latte pairs perfectly. The bitterness of coffee contrasts nicely with the sweetness of the cupcakes, creating a delightful balance.
  • Milk: You can never go wrong with a classic glass of milk! The creamy texture of milk enhances the flavors of the white chocolate and strawberries, making each bite even more enjoyable.
  • Fruit Juice: A refreshing glass of orange or apple juice adds a fruity twist. The acidity in the juice cuts through the sweetness, making it a refreshing choice for a warm day.

These beverage options not only enhance the flavors of your cupcakes but also create a delightful experience for your guests. So, whether you’re hosting a party or enjoying a quiet afternoon, consider these pairings for a perfect treat!

Presentation Ideas

White Chocolate Strawberry Cupcakes. A beautiful display can make your cupcakes even more enticing. Here are some creative ideas to consider:

  • Decorative Stands: Use a tiered cupcake stand to showcase your cupcakes. This adds height and elegance to your dessert table, making it a focal point at any gathering.
  • Garnish with Fresh Strawberries: Top each cupcake with a fresh strawberry or a slice of strawberry. This not only looks appealing but also hints at the delicious flavors inside.
  • Whipped Cream Swirls: Instead of simply frosting the cupcakes, create beautiful swirls with the whipped cream. Use a piping bag with a star tip for a professional touch.
  • Edible Flowers: For a touch of whimsy, consider adding edible flowers as a garnish. They add color and elegance, making your cupcakes look like they came from a bakery.
  • Personalized Toppers: Create custom cupcake toppers with messages or themes that match your event. This adds a personal touch and makes your cupcakes even more special.

White Chocolate Strawberry Cupcakes will not only taste amazing but also look stunning. Remember, a little creativity goes a long way in making your dessert memorable!

Tips for Perfecting Your White Chocolate Strawberry Cupcakes Recipe

White Chocolate Strawberry Cupcakes Recipe is all about attention to detail. Here are some helpful tips to ensure your cupcakes turn out delicious every time:

  • Use Fresh Ingredients: Always opt for fresh strawberries and high-quality white chocolate. Fresh ingredients enhance the flavor and texture of your cupcakes, making them taste even better.
  • Don’t Skip the Cooling: Allow your cupcakes to cool completely before frosting. If they are warm, the frosting will melt, leading to a messy presentation. Patience is key!
  • Experiment with Flavors: Feel free to add a twist to your cupcakes! A hint of almond extract or a sprinkle of lemon zest can elevate the flavor profile. Get creative and make it your own!
  • Check Your Oven Temperature: Ovens can vary, so it’s wise to use an oven thermometer. This ensures your cupcakes bake at the right temperature, preventing them from being undercooked or overbaked.
  • Use a Cookie Scoop: For even cupcake sizes, use a cookie scoop to portion the batter. This helps ensure that all your cupcakes bake evenly and look uniform.
  • Keep an Eye on Baking Time: Start checking your cupcakes a few minutes before the recommended baking time. This way, you can avoid overbaking and keep them moist.
  • Store Properly: If you have leftovers, store them in an airtight container. This keeps them fresh and prevents them from drying out. Enjoy them within a few days for the best taste!
  • Get Creative with Toppings: Besides fresh strawberries, consider adding chocolate shavings, sprinkles, or even a drizzle of white chocolate on top of the frosting for an extra special touch.

White Chocolate Strawberry Cupcakes Recipe. Each batch will be a delightful treat that everyone will love!

Breakdown of Time for White Chocolate Strawberry Cupcakes Recipe

Prep Time

White Chocolate Strawberry Cupcakes Recipe is a breeze! The prep time typically takes about 20-25 minutes. This includes gathering your ingredients, measuring them out, and mixing the batter. Make sure to have all your tools handy, like mixing bowls and measuring cups, to streamline the process. The more organized you are, the quicker you can whip up these delightful treats!

Cooking Time

Once your batter is ready, it’s time to bake! The cooking time for these cupcakes is around 18-20 minutes. Keep an eye on them as they bake, and start checking for doneness a couple of minutes before the timer goes off. You want them to be perfectly golden and fluffy, so a toothpick test is essential. If it comes out clean or with a few moist crumbs, they’re ready to come out of the oven!

Total Time

White Chocolate Strawberry Cupcakes ready to impress your family and friends!

Nutritional Information for White Chocolate Strawberry Cupcakes Recipe

Calories

White Chocolate Strawberry Cupcakes Recipe, it’s good to know what you’re consuming. Each cupcake contains approximately 220 calories. This makes them a delightful treat without being overly indulgent. Enjoying one or two cupcakes can fit nicely into a balanced diet, especially when shared with friends and family!

Protein

Each cupcake provides about 3 grams of protein. While this may not seem like a lot, it contributes to your daily intake, especially when paired with other protein-rich foods throughout the day. Protein is essential for muscle repair and growth, making these cupcakes a sweet way to enjoy a little boost!

Sodium

In terms of sodium, each cupcake contains roughly 150 milligrams. This is a moderate amount, especially considering that most people consume sodium throughout the day from various sources. Keeping an eye on your overall sodium intake is important, but these cupcakes can be enjoyed as part of a balanced diet without worry.

White Chocolate Strawberry Cupcakes mindfully. They are a delightful treat that can be enjoyed in moderation, making them perfect for any occasion!

FAQs about White Chocolate Strawberry Cupcakes Recipe

Can I use frozen strawberries in the recipe?

White Chocolate Strawberry Cupcakes Recipe. However, keep in mind that frozen strawberries may release more moisture when thawed. To prevent your cupcakes from becoming soggy, it’s best to thaw the strawberries first and pat them dry with a paper towel. This will help maintain the right texture in your cupcakes while still providing that delicious fruity flavor!

How can I make the cupcakes more chocolatey?

White Chocolate Strawberry Cupcakes, consider adding cocoa powder to the batter. Start with 2-3 tablespoons of unsweetened cocoa powder, and reduce the flour by the same amount to maintain the right consistency. You can also add chocolate chips or chunks to the batter for an extra chocolatey surprise in every bite. This will create a delightful contrast with the strawberries!

What is the best way to store leftover cupcakes?

White Chocolate Strawberry Cupcakes fresh, store them in an airtight container at room temperature for up to three days. If you want to keep them longer, you can refrigerate them for up to a week. Just remember that refrigeration may slightly change the texture. For the best taste, allow them to come to room temperature before enjoying. If you have frosted cupcakes, it’s best to place a piece of wax paper between the cupcakes to prevent the frosting from sticking.

Can I substitute white chocolate with another type of chocolate?

Absolutely! If you prefer a different flavor, you can substitute white chocolate with milk or dark chocolate. Just chop the chocolate into small pieces and fold it into the batter as you would with white chocolate. Keep in mind that using dark chocolate will give your cupcakes a richer flavor, while milk chocolate will add a sweeter touch. Feel free to experiment and find the chocolate that you love the most!

Conclusion on White Chocolate Strawberry Cupcakes Recipe

White Chocolate Strawberry Cupcakes Recipe is a delightful way to bring sweetness and joy to any occasion. With their light, fluffy texture and the perfect blend of fresh strawberries and creamy white chocolate, these cupcakes are sure to impress your family and friends. Whether you’re celebrating a special event or simply treating yourself, these cupcakes are a fantastic choice.

By following the step-by-step instructions and tips provided, you can create a batch of cupcakes that not only taste amazing but also look beautiful. Remember, baking is all about having fun and experimenting with flavors. Don’t hesitate to make variations that suit your taste or dietary needs!

White Chocolate Strawberry Cupcakes that will leave everyone asking for seconds!

Happy baking, and may your kitchen be filled with the sweet aroma of these delightful cupcakes!

Bakery-Style Blueberry Muffins are easy to make!

Introduction to Bakery-Style Blueberry Muffins Recipe

There’s something truly special about biting into a warm, fluffy blueberry muffin. The sweet burst of juicy blueberries combined with a soft, buttery texture makes for a delightful treat. Whether you enjoy them for breakfast, as a snack, or even as a dessert, bakery-style blueberry muffins are a favorite for many. This recipe brings the bakery experience right into your kitchen, allowing you to create delicious muffins that rival those from your local café.

Why Choose Bakery-Style Blueberry Muffins?

Choosing bakery-style blueberry muffins means opting for quality and flavor. These muffins are not only easy to make, but they also offer a comforting taste that can brighten any day. Here are a few reasons why you should try this recipe:

  • Fresh Ingredients: Using fresh blueberries ensures that each muffin is packed with flavor and nutrients. You can even use frozen blueberries if fresh ones aren’t available.
  • Customizable: This recipe allows for various adaptations. You can add lemon zest, mix in other berries, or even make them gluten-free!
  • Perfect for Any Occasion: Whether it’s a family breakfast, a picnic, or a cozy coffee date, these muffins fit right in.
  • Simple Steps: The step-by-step preparation is straightforward, making it easy for bakers of all skill levels to create these delightful treats.

So, roll up your sleeves and get ready to bake! With just a few simple ingredients and a little bit of time, you can enjoy the warm, comforting taste of homemade bakery-style blueberry muffins.

Ingredients for Bakery-Style Blueberry Muffins Recipe

To create the perfect bakery-style blueberry muffins, you’ll need a few simple ingredients. Each component plays a vital role in achieving that fluffy texture and delightful flavor. Here’s what you’ll need:

  • 2 cups all-purpose flour: This is the base of your muffins, providing structure and texture.
  • 1 cup granulated sugar: This adds sweetness and helps create a lovely golden crust.
  • 1 tablespoon baking powder: This leavening agent helps the muffins rise, making them light and fluffy.
  • 1/2 teaspoon baking soda: This works with the baking powder to give the muffins an extra lift.
  • 1/2 teaspoon salt: A pinch of salt enhances the flavors and balances the sweetness.
  • 1/2 cup unsalted butter, melted and slightly cooled: Butter adds richness and moisture to the muffins.
  • 1 cup buttermilk: This ingredient keeps the muffins tender and adds a slight tang.
  • 2 large eggs: Eggs provide structure and help bind the ingredients together.
  • 1 teaspoon vanilla extract: This adds a warm, sweet flavor that complements the blueberries.
  • 2 cups fresh blueberries: The star of the show! Fresh blueberries burst with flavor in every bite. You can also use frozen blueberries if you prefer.
  • 1 tablespoon coarse sugar (for topping): This gives the muffins a delightful crunch on top.

Gather these ingredients, and you’ll be well on your way to baking delicious bakery-style blueberry muffins. Each item contributes to the overall taste and texture, ensuring that your muffins are a hit with family and friends!

Step-by-Step Preparation of Bakery-Style Blueberry Muffins Recipe

Now that you have all your ingredients ready, it’s time to dive into the fun part: baking! Follow these simple steps to create your delicious bakery-style blueberry muffins. Each step is designed to ensure that your muffins turn out perfectly fluffy and bursting with flavor.

Step 1: Preheat the Oven

First things first, preheat your oven to 375°F (190°C). This step is crucial as it ensures that your muffins bake evenly. While the oven heats up, you can prepare your muffin tin. Line it with paper liners or lightly grease it to prevent sticking. This way, your muffins will come out easily and look great!

Step 2: Prepare the Muffin Batter

In a large mixing bowl, whisk together the dry ingredients. Combine 2 cups of all-purpose flour, 1 cup of granulated sugar, 1 tablespoon of baking powder, 1/2 teaspoon of baking soda, and 1/2 teaspoon of salt. Mix them well until they are fully combined. In another bowl, mix the wet ingredients. Combine 1/2 cup of melted butter, 1 cup of buttermilk, 2 large eggs, and 1 teaspoon of vanilla extract. Stir until the mixture is smooth and creamy.

Step 3: Fold in the Blueberries

Now, it’s time to bring the wet and dry ingredients together. Pour the wet mixture into the bowl with the dry ingredients. Gently stir until just combined. Remember, it’s okay if there are a few lumps! Overmixing can lead to tough muffins. Once combined, carefully fold in 2 cups of fresh blueberries. This step is important to ensure the blueberries are evenly distributed without breaking them apart.

Step 4: Fill the Muffin Tins

Next, it’s time to fill your muffin tins. Use a spoon or a scoop to divide the batter evenly among the muffin cups. Fill each cup about 3/4 full to allow room for rising. To add a little extra crunch, sprinkle 1 tablespoon of coarse sugar on top of each muffin. This will create a delightful sugary crust once baked!

Step 5: Bake the Muffins

Place the muffin tin in the preheated oven and bake for 18-22 minutes. Keep an eye on them! You’ll know they’re done when a toothpick inserted into the center comes out clean. The tops should be golden brown and slightly domed. The aroma of baking muffins will fill your kitchen, making it hard to wait!

Step 6: Cool and Serve

Once baked, remove the muffins from the oven and let them cool in the pan for about 5 minutes. This allows them to set and makes them easier to remove. After that, transfer the muffins to a wire rack to cool completely. Enjoy them warm or at room temperature. They’re perfect for breakfast, snacks, or even dessert!

Variations of Bakery-Style Blueberry Muffins Recipe

While the classic bakery-style blueberry muffins are delicious on their own, there are many fun ways to mix things up! Here are some tasty variations to consider. Each option allows you to customize your muffins to suit your taste or dietary needs.

Adding Different Fruits

One of the easiest ways to change up your blueberry muffins is by adding different fruits. You can create a delightful mixed berry muffin by substituting half of the blueberries with chopped strawberries or raspberries. This not only adds a pop of color but also introduces new flavors. Here are a few more fruit ideas:

  • Bananas: Mash one ripe banana and mix it into the batter for a moist, banana-blueberry muffin.
  • Peaches: Diced fresh peaches can add a sweet, summery twist.
  • Apples: Chopped apples with a sprinkle of cinnamon can create a delicious apple-blueberry combo.
  • Cranberries: Dried cranberries can add a tart flavor that pairs well with blueberries.

Feel free to experiment with your favorite fruits! Just remember to adjust the sugar if you’re using sweeter fruits.

Gluten-Free Options

If you or someone you know is gluten-sensitive, you can easily make these muffins gluten-free. Simply substitute the all-purpose flour with a gluten-free flour blend. Many blends work well in baking, but make sure to choose one that includes xanthan gum for the best texture. Here are some tips for gluten-free baking:

  • Check Labels: Always check that your baking powder and other ingredients are gluten-free.
  • Moisture Matters: Gluten-free muffins can sometimes be drier. Consider adding an extra egg or a bit more buttermilk to keep them moist.
  • Experiment: You can also try almond flour or coconut flour for a different flavor and texture.

With these variations, you can enjoy bakery-style blueberry muffins that cater to your preferences and dietary needs. Happy baking!

Cooking Note for Bakery-Style Blueberry Muffins Recipe

When it comes to baking, a few key tips can make all the difference in achieving the perfect bakery-style blueberry muffins. Here are some important cooking notes to keep in mind as you prepare your delicious treats:

  • Room Temperature Ingredients: For the best results, ensure that your eggs and buttermilk are at room temperature. This helps the ingredients blend more smoothly, resulting in a better texture.
  • Don’t Overmix: As mentioned earlier, overmixing the batter can lead to tough muffins. Mix until just combined, and don’t worry about a few lumps. This will keep your muffins light and fluffy.
  • Fresh Blueberries: If using fresh blueberries, rinse them gently and pat them dry before adding them to the batter. Excess moisture can affect the texture of your muffins.
  • Frozen Blueberries: If you opt for frozen blueberries, do not thaw them before mixing. Adding them straight from the freezer helps prevent the batter from turning blue and keeps the muffins looking beautiful.
  • Oven Thermometer: Ovens can vary in temperature. Using an oven thermometer can help ensure that your muffins bake at the correct temperature, leading to even baking.
  • Cooling Time: Allowing the muffins to cool in the pan for a few minutes before transferring them to a wire rack helps them set properly. This step is crucial for maintaining their shape.

By following these cooking notes, you’ll be well on your way to baking perfect bakery-style blueberry muffins every time. Enjoy the process, and don’t forget to share your delicious creations with family and friends!

Serving Suggestions for Bakery-Style Blueberry Muffins Recipe

Once your bakery-style blueberry muffins are baked to perfection, it’s time to think about how to serve them! These muffins are versatile and can be enjoyed in many delightful ways. Here are some serving suggestions to enhance your muffin experience:

  • With Butter: Spread a little butter on a warm muffin for a rich, creamy flavor. The butter melts into the muffin, making each bite even more delicious.
  • With Jam or Jelly: Pair your muffins with your favorite fruit jam or jelly. Blueberry jam complements the muffins beautifully, adding an extra layer of sweetness.
  • With Whipped Cream: For a special treat, top your muffins with a dollop of whipped cream. This is especially delightful if you’re serving them for dessert.
  • As a Breakfast Sandwich: Slice a muffin in half and fill it with cream cheese or a slice of cheese. This makes for a tasty breakfast sandwich that’s both filling and flavorful.
  • With Fresh Fruit: Serve your muffins alongside a bowl of fresh fruit. Slices of strawberries, bananas, or even more blueberries can create a colorful and healthy plate.
  • With Coffee or Tea: Enjoy your muffins with a warm cup of coffee or tea. The combination of flavors makes for a cozy morning or afternoon snack.

These serving suggestions can elevate your bakery-style blueberry muffins from a simple treat to a delightful experience. Whether you’re enjoying them alone or sharing with friends and family, these muffins are sure to impress!

Tips for Perfect Bakery-Style Blueberry Muffins Recipe

To achieve the ultimate bakery-style blueberry muffins, a few helpful tips can make all the difference. These simple suggestions will ensure your muffins are fluffy, flavorful, and simply irresistible. Let’s dive into some expert tips for perfecting your baking skills!

  • Measure Ingredients Accurately: Use a kitchen scale or measuring cups to ensure you have the right amounts. Too much flour can lead to dense muffins, while too little can make them fall flat.
  • Use Fresh Ingredients: Fresh blueberries and other ingredients will enhance the flavor of your muffins. Check the expiration dates on your baking powder and baking soda to ensure they are still active.
  • Chill the Batter: If you have time, let the batter sit in the fridge for about 30 minutes before baking. This can help the muffins rise better and create a more tender texture.
  • Don’t Skip the Topping: Sprinkling coarse sugar on top before baking adds a delightful crunch and sweetness. It gives your muffins that bakery-style finish!
  • Rotate the Muffin Tin: Halfway through baking, rotate the muffin tin. This helps ensure even baking, especially if your oven has hot spots.
  • Check for Doneness: Use a toothpick to test if the muffins are done. If it comes out clean or with a few crumbs, they’re ready! Avoid overbaking, as this can dry them out.
  • Store Properly: To keep your muffins fresh, store them in an airtight container at room temperature for up to three days. For longer storage, freeze them in a zip-top bag.

By following these tips, you’ll be well on your way to baking perfect bakery-style blueberry muffins every time. Enjoy the process, and don’t hesitate to share your delicious results with others!

Breakdown of Time for Bakery-Style Blueberry Muffins Recipe

Understanding the time needed for each step in the baking process can help you plan better. Here’s a simple breakdown of the time required to make your delicious bakery-style blueberry muffins. This will ensure you have everything ready and can enjoy your muffins without any rush!

Prep Time

The prep time for bakery-style blueberry muffins is approximately 15-20 minutes. During this time, you will gather your ingredients, preheat the oven, and mix the batter. It’s a straightforward process that allows you to get everything ready for baking. Make sure to measure your ingredients accurately to save time later!

Cooking Time

Once your muffins are in the oven, the cooking time is about 18-22 minutes. Keep an eye on them as they bake. The aroma will fill your kitchen, making it hard to wait! You’ll know they’re done when a toothpick inserted into the center comes out clean. This is the moment you’ve been waiting for!

Total Time

In total, you can expect to spend around 35-45 minutes from start to finish. This includes both prep and cooking time. With just a little bit of time, you can enjoy warm, fluffy bakery-style blueberry muffins right from your oven. It’s a quick and rewarding baking experience!

Nutritional Information for Bakery-Style Blueberry Muffins Recipe

Understanding the nutritional content of your bakery-style blueberry muffins can help you enjoy them even more. Whether you’re counting calories or just curious about what’s in your food, here’s a breakdown of the key nutritional information for each muffin. This will give you a better idea of how these delicious treats fit into your diet.

Calories

Each bakery-style blueberry muffin contains approximately 210 calories. This makes them a satisfying option for breakfast or a snack without being overly indulgent. The calorie count comes from a balance of carbohydrates, fats, and proteins, making these muffins a well-rounded treat.

Protein

In each muffin, you’ll find about 3 grams of protein. While this isn’t a high amount, it contributes to the overall nutritional value. Protein is essential for building and repairing tissues, and it can help keep you feeling full longer. Pairing your muffin with a source of protein, like yogurt or a glass of milk, can enhance your meal.

Sodium

The sodium content in each muffin is around 200 milligrams. This is a moderate amount, making these muffins a reasonable choice for most diets. Keeping an eye on sodium intake is important, especially for those with specific dietary restrictions. Enjoying these muffins in moderation can fit well into a balanced diet.

Overall, bakery-style blueberry muffins are a delightful treat that can be enjoyed without guilt. With their moderate calorie count, decent protein content, and reasonable sodium levels, they make for a tasty addition to your meal plan. Enjoy them fresh from the oven or as a snack throughout the day!

FAQs about Bakery-Style Blueberry Muffins Recipe

Can I use frozen blueberries in the Bakery-Style Blueberry Muffins Recipe?

Absolutely! You can use frozen blueberries in your bakery-style blueberry muffins. In fact, frozen blueberries can be a great option, especially when fresh ones are out of season. Just remember not to thaw them before adding them to the batter. This helps keep the muffins from turning blue and ensures that the blueberries maintain their shape. Plus, they’ll still burst with flavor when baked!

How do I store leftover Bakery-Style Blueberry Muffins?

Storing your leftover bakery-style blueberry muffins is easy! To keep them fresh, place them in an airtight container at room temperature. They should stay good for about three days. If you want to keep them longer, consider freezing them. Wrap each muffin in plastic wrap and then place them in a zip-top bag. They can be frozen for up to three months. When you’re ready to enjoy them, simply thaw at room temperature or warm them in the microwave for a few seconds!

Can I make Bakery-Style Blueberry Muffins Recipe ahead of time?

Yes, you can definitely make bakery-style blueberry muffins ahead of time! They are perfect for meal prep. You can bake them a day or two in advance and store them in an airtight container. If you want to prepare the batter ahead of time, you can mix the dry ingredients and wet ingredients separately. Just combine them right before baking. This way, you can enjoy fresh muffins whenever you want without much hassle!

Nutritional Information for Bakery-Style Blueberry Muffins Recipe

Understanding the nutritional content of your bakery-style blueberry muffins can help you enjoy them even more. Whether you’re counting calories or just curious about what’s in your food, here’s a breakdown of the key nutritional information for each muffin. This will give you a better idea of how these delicious treats fit into your diet.

Calories

Each bakery-style blueberry muffin contains approximately 210 calories. This makes them a satisfying option for breakfast or a snack without being overly indulgent. The calorie count comes from a balance of carbohydrates, fats, and proteins, making these muffins a well-rounded treat. Enjoying one muffin can provide a delightful energy boost to start your day!

Protein

In each muffin, you’ll find about 3 grams of protein. While this isn’t a high amount, it contributes to the overall nutritional value. Protein is essential for building and repairing tissues, and it can help keep you feeling full longer. Pairing your muffin with a source of protein, like yogurt or a glass of milk, can enhance your meal. This combination can make for a balanced breakfast that keeps you energized throughout the morning.

Sodium

The sodium content in each muffin is around 200 milligrams. This is a moderate amount, making these muffins a reasonable choice for most diets. Keeping an eye on sodium intake is important, especially for those with specific dietary restrictions. Enjoying these muffins in moderation can fit well into a balanced diet. If you’re watching your sodium, consider enjoying them as an occasional treat rather than a daily staple.

Overall, bakery-style blueberry muffins are a delightful treat that can be enjoyed without guilt. With their moderate calorie count, decent protein content, and reasonable sodium levels, they make for a tasty addition to your meal plan. Enjoy them fresh from the oven or as a snack throughout the day!

FAQs about Bakery-Style Blueberry Muffins Recipe

Can I use frozen blueberries in the Bakery-Style Blueberry Muffins Recipe?

Absolutely! You can use frozen blueberries in your bakery-style blueberry muffins. In fact, frozen blueberries can be a great option, especially when fresh ones are out of season. Just remember not to thaw them before adding them to the batter. This helps keep the muffins from turning blue and ensures that the blueberries maintain their shape. Plus, they’ll still burst with flavor when baked!

How do I store leftover Bakery-Style Blueberry Muffins?

Storing your leftover bakery-style blueberry muffins is easy! To keep them fresh, place them in an airtight container at room temperature. They should stay good for about three days. If you want to keep them longer, consider freezing them. Wrap each muffin in plastic wrap and then place them in a zip-top bag. They can be frozen for up to three months. When you’re ready to enjoy them, simply thaw at room temperature or warm them in the microwave for a few seconds!

Can I make Bakery-Style Blueberry Muffins Recipe ahead of time?

Yes, you can definitely make bakery-style blueberry muffins ahead of time! They are perfect for meal prep. You can bake them a day or two in advance and store them in an airtight container. If you want to prepare the batter ahead of time, you can mix the dry ingredients and wet ingredients separately. Just combine them right before baking. This way, you can enjoy fresh muffins whenever you want without much hassle!

Conclusion on Bakery-Style Blueberry Muffins Recipe

In conclusion, bakery-style blueberry muffins are a delightful treat that can easily be made at home. With their fluffy texture and sweet bursts of blueberries, they are perfect for any occasion. Whether you enjoy them for breakfast, as a snack, or even as a dessert, these muffins are sure to please everyone.

By following the simple steps outlined in this recipe, you can create muffins that rival those from your favorite bakery. The combination of fresh ingredients, easy preparation, and the ability to customize them makes this recipe a must-try. Plus, with variations like adding different fruits or making them gluten-free, there’s something for everyone!

Remember to keep the cooking notes and tips in mind to ensure your muffins turn out perfectly every time. From measuring ingredients accurately to not overmixing the batter, these small details can make a big difference in the final product.

So, gather your ingredients, preheat your oven, and get ready to enjoy the warm, comforting taste of homemade bakery-style blueberry muffins. They are not just a treat; they are a way to bring joy to your kitchen and share delicious moments with family and friends. Happy baking!

Levain-Style Chocolate Chip Cookies Recipe is irresistible!

Introduction to Levain-Style Chocolate Chip Cookies Recipe

Welcome to the delightful world of Levain-Style Chocolate Chip Cookies! If you’re a cookie lover, you’re in for a treat. These cookies are not just any ordinary cookies; they are thick, chewy, and packed with rich chocolate flavor. Originating from the famous Levain Bakery in New York City, these cookies have gained a cult following. Their unique texture and taste make them a favorite among many.

What Makes Levain-Style Cookies Unique?

So, what sets Levain-Style cookies apart from regular chocolate chip cookies? First, it’s all about the size and texture. These cookies are larger and thicker, giving them a satisfying bite. The outside is perfectly golden, while the inside remains soft and gooey. This contrast creates a delightful experience with every bite.

Another unique aspect is the use of high-quality ingredients. The combination of brown sugar and granulated sugar adds depth to the flavor. Plus, the generous amount of chocolate chips ensures that you get a burst of chocolate in every mouthful. Some recipes even include nuts, adding a crunchy texture that complements the softness of the cookie.

Moreover, the baking technique plays a crucial role. These cookies are often baked at a higher temperature for a shorter time. This method helps achieve that perfect golden edge while keeping the center soft and chewy. The result? A cookie that’s simply irresistible!

In this article, we’ll guide you through the ingredients, preparation steps, and tips to create your very own Levain-Style Chocolate Chip Cookies. Whether you’re baking for a special occasion or just treating yourself, these cookies are sure to impress. Let’s get started!

Ingredients for Levain-Style Chocolate Chip Cookies Recipe

To create the perfect Levain-Style Chocolate Chip Cookies, you’ll need a few key ingredients. Each one plays a vital role in achieving that delicious flavor and texture. Here’s what you’ll need:

  • 2 1/4 cups all-purpose flour: This is the base of your cookies, providing structure.
  • 1/2 teaspoon baking soda: This helps the cookies rise and become fluffy.
  • 1/2 teaspoon salt: A pinch of salt enhances the sweetness of the cookies.
  • 1 cup unsalted butter, softened: Butter adds richness and flavor. Make sure it’s at room temperature for easy mixing.
  • 3/4 cup brown sugar, packed: Brown sugar gives the cookies a chewy texture and deep flavor.
  • 3/4 cup granulated sugar: This adds sweetness and helps with the cookie’s crispiness.
  • 1 teaspoon vanilla extract: Vanilla adds a warm, sweet aroma that complements the chocolate.
  • 2 large eggs: Eggs bind the ingredients together and add moisture.
  • 2 cups semi-sweet chocolate chips: The star of the show! These provide that rich chocolatey goodness.
  • 1 cup chopped walnuts (optional): Nuts add a delightful crunch and flavor contrast.

Gathering these ingredients is the first step toward baking your delicious cookies. Make sure to use fresh ingredients for the best results. Now that you have everything ready, let’s move on to the preparation steps!

Step-by-Step Preparation of Levain-Style Chocolate Chip Cookies Recipe

Now that you have all your ingredients ready, it’s time to dive into the fun part: preparing your Levain-Style Chocolate Chip Cookies! Follow these simple steps to create cookies that are sure to impress.

Step 1: Prepping Your Ingredients

First things first, let’s get organized. Start by measuring out all your ingredients accurately. This ensures that your cookies turn out just right. In a medium bowl, whisk together the all-purpose flour, baking soda, and salt. This mixture is essential for the structure and flavor of your cookies. Set it aside for now.

Next, take your butter out of the fridge and let it soften at room temperature. Softened butter is key for creaming with the sugars. It should be soft enough to leave an imprint when pressed but not melted. This step is crucial for achieving that light and fluffy texture.

Step 2: Mixing the Dough

In a large mixing bowl, combine the softened butter, brown sugar, and granulated sugar. Using a hand mixer or a stand mixer, cream these ingredients together until the mixture is light and fluffy. This usually takes about 2-3 minutes. The air incorporated during this step helps your cookies rise beautifully.

Once your butter and sugars are well combined, add the vanilla extract and eggs, one at a time. Mix well after each addition. This helps to ensure that everything is evenly blended. After that, gradually add the dry ingredients to the wet mixture. Mix until just combined. Remember, overmixing can lead to tough cookies, so stop as soon as you see no dry flour.

Step 3: Chilling the Dough

For an even better cookie, consider chilling your dough. This step is optional but highly recommended. Chilling the dough for at least 30 minutes helps the flavors meld together and results in a chewier cookie. It also makes the dough easier to scoop. If you choose to chill, cover the bowl with plastic wrap or transfer the dough to an airtight container.

Step 4: Baking the Cookies

Once your dough is ready, preheat your oven to 350°F (175°C) and line two baking sheets with parchment paper. Using a large cookie scoop or a 1/4 cup measuring cup, scoop the dough onto the prepared baking sheets. Make sure to space them about 2 inches apart to allow for spreading.

Now, it’s time to bake! Place the baking sheets in the oven and bake for 12-15 minutes. Keep an eye on them; you want the edges to be golden brown while the centers remain slightly soft. This contrast is what makes Levain-Style cookies so special. Once baked, remove them from the oven and let them cool on the baking sheets for about 5 minutes. Then, transfer the cookies to a wire rack to cool completely.

And there you have it! Your Levain-Style Chocolate Chip Cookies are ready to be enjoyed. The aroma wafting through your kitchen will be irresistible. Let’s move on to some delicious variations you can try!

Variation of Levain-Style Chocolate Chip Cookies Recipe

While the classic Levain-Style Chocolate Chip Cookies are delicious on their own, experimenting with different ingredients can lead to exciting new flavors. Here are some alternative ingredients and options to consider for your next baking adventure!

Alternative Ingredients for Different Flavors

One of the best things about baking is the ability to customize recipes. Here are some fun alternatives to try:

  • Chocolate Varieties: Instead of using only semi-sweet chocolate chips, mix it up! Try using dark chocolate chips for a richer taste or white chocolate chips for a sweeter twist. You can even combine different types for a unique flavor profile.
  • Nut Options: If you love nuts, consider using pecans or macadamia nuts instead of walnuts. Each nut brings its own flavor and texture, enhancing the overall cookie experience.
  • Flavor Extracts: Besides vanilla extract, you can add almond extract or even orange zest for a refreshing citrus note. Just a little can go a long way in transforming the flavor.
  • Mix-Ins: Get creative with your mix-ins! Dried fruits like cranberries or cherries can add a chewy texture. You can also add coconut flakes for a tropical twist.

These alternatives can help you create a cookie that suits your taste preferences or the occasion. Don’t be afraid to experiment and find your perfect combination!

Gluten-Free and Vegan Options

If you or someone you know has dietary restrictions, you can still enjoy Levain-Style Chocolate Chip Cookies! Here are some tips for making gluten-free and vegan versions:

  • Gluten-Free: Substitute all-purpose flour with a gluten-free flour blend. Make sure it contains xanthan gum, which helps mimic the texture of regular flour. You can also use almond flour or oat flour for a different flavor.
  • Vegan: To make these cookies vegan, replace the butter with coconut oil or a vegan butter substitute. For the eggs, use flax eggs (1 tablespoon of ground flaxseed mixed with 2.5 tablespoons of water per egg) or applesauce. This will keep your cookies moist and delicious.

With these variations, everyone can enjoy the delightful taste of Levain-Style Chocolate Chip Cookies. Whether you’re baking for a special occasion or just for fun, these options will ensure that no one misses out on the joy of homemade cookies!

Cooking Note for Levain-Style Chocolate Chip Cookies Recipe

When it comes to baking Levain-Style Chocolate Chip Cookies, a few cooking notes can make a big difference in your results. These tips will help you achieve the best texture and flavor, ensuring your cookies are a hit every time.

First, always use room temperature ingredients. This includes your butter and eggs. Room temperature butter creams better with sugars, leading to a lighter cookie. Similarly, eggs at room temperature mix more evenly into the dough.

Next, pay attention to your oven temperature. Ovens can vary, so it’s a good idea to use an oven thermometer. This ensures that your cookies bake at the right temperature. If your oven runs hot, your cookies may bake too quickly, resulting in a dry texture.

Another important note is to avoid overbaking. The cookies should look slightly underbaked in the center when you take them out. They will continue to cook on the baking sheet as they cool. This step is crucial for achieving that soft, gooey center that makes Levain-Style cookies so special.

Lastly, let your cookies cool properly. Cooling them on the baking sheet for a few minutes allows them to set. After that, transferring them to a wire rack helps them cool evenly. This way, you’ll enjoy cookies that are perfectly chewy and delicious!

By following these cooking notes, you’ll be well on your way to baking the perfect Levain-Style Chocolate Chip Cookies. Happy baking!

Serving Suggestions for Levain-Style Chocolate Chip Cookies Recipe

Once your Levain-Style Chocolate Chip Cookies are baked to perfection, it’s time to think about how to serve them. These cookies are not only delicious but also versatile. Here are some delightful serving suggestions to enhance your cookie experience:

  • With a Glass of Milk: There’s nothing quite like enjoying a warm cookie with a cold glass of milk. The creamy texture of milk complements the rich chocolate and buttery flavor of the cookies perfectly.
  • Ice Cream Sandwiches: For a fun twist, turn your cookies into ice cream sandwiches. Simply place a scoop of your favorite ice cream between two cookies. This combination is sure to be a hit, especially on warm days!
  • On a Dessert Platter: Arrange your cookies on a beautiful dessert platter. Add some fresh fruits, like strawberries or raspberries, for a pop of color. This makes for an impressive presentation at parties or gatherings.
  • With Coffee or Tea: Pair your cookies with a warm cup of coffee or tea. The flavors of the cookies will complement the beverage, making for a cozy afternoon treat.
  • As a Gift: Pack your cookies in a decorative box or jar and give them as a gift. Homemade cookies are always appreciated, and this thoughtful gesture is sure to bring a smile to anyone’s face.

These serving suggestions can elevate your Levain-Style Chocolate Chip Cookies from a simple treat to a delightful experience. Whether you’re enjoying them solo or sharing with friends, these cookies are bound to be a crowd-pleaser!

Tips for Perfecting Your Levain-Style Chocolate Chip Cookies Recipe

To ensure your Levain-Style Chocolate Chip Cookies turn out perfectly every time, consider these helpful tips. Each suggestion is designed to enhance the flavor, texture, and overall enjoyment of your cookies. Let’s dive in!

  • Measure Ingredients Accurately: Baking is a science, so precise measurements are crucial. Use a kitchen scale for the best results, especially for flour. Too much flour can lead to dry cookies.
  • Use Quality Ingredients: The quality of your ingredients matters. Opt for high-quality chocolate chips and fresh butter. This will elevate the flavor of your cookies significantly.
  • Don’t Skip the Chilling: Chilling the dough is a game-changer. It helps the flavors develop and results in a chewier texture. If you have time, chill the dough for a few hours or even overnight.
  • Experiment with Baking Times: Every oven is different. Start checking your cookies a minute or two before the recommended baking time. You want them golden on the edges and soft in the center.
  • Rotate Your Baking Sheets: If you’re baking multiple trays, rotate them halfway through. This ensures even baking, especially if your oven has hot spots.
  • Let Them Cool: Allow your cookies to cool on the baking sheet for a few minutes before transferring them to a wire rack. This helps them set and prevents breakage.
  • Store Properly: To keep your cookies fresh, store them in an airtight container. You can also add a slice of bread to keep them soft. The bread will absorb excess moisture, keeping your cookies chewy.

By following these tips, you’ll be well on your way to mastering the art of baking Levain-Style Chocolate Chip Cookies. Each batch will be a delicious success, bringing joy to you and those you share them with!

Breakdown of Time for Levain-Style Chocolate Chip Cookies Recipe

Understanding the time needed for each step in the Levain-Style Chocolate Chip Cookies recipe can help you plan your baking session better. Here’s a detailed breakdown of the time you’ll need for preparation, cooking, and the total time involved.

Prep Time

The prep time for these delicious cookies is approximately 20-30 minutes. This includes measuring out your ingredients, mixing the dough, and chilling it if you choose to do so. Taking your time during this step ensures that everything is well-prepared for baking.

Cooking Time

Once your dough is ready, the cooking time is about 12-15 minutes. Keep an eye on your cookies as they bake. You want them to be golden brown on the edges while still soft in the center. This short baking time is what gives Levain-Style cookies their unique texture.

Total Time

In total, you can expect to spend around 35-45 minutes from start to finish, not including any chilling time. If you decide to chill the dough for 30 minutes or longer, factor that into your overall time. Regardless, the wait will be worth it when you bite into a warm, gooey cookie!

Nutritional Information for Levain-Style Chocolate Chip Cookies Recipe

Understanding the nutritional content of your Levain-Style Chocolate Chip Cookies can help you enjoy them mindfully. Here’s a breakdown of the key nutritional components per serving. This information is based on a standard serving size of one cookie, which is approximately 1/12 of the total recipe.

Calories

Each Levain-Style Chocolate Chip Cookie contains about 320 calories. This calorie count comes from the combination of sugars, butter, and chocolate chips, which contribute to the rich flavor and satisfying texture. While these cookies are a treat, enjoying them in moderation is key to maintaining a balanced diet.

Protein

In terms of protein, each cookie provides around 3 grams. The protein mainly comes from the eggs and the flour used in the recipe. While this isn’t a high-protein snack, it does contribute to the overall nutritional value of the cookie. Pairing your cookie with a glass of milk can boost your protein intake even more!

Sodium

Each cookie contains approximately 150 milligrams of sodium. This amount is relatively low, especially considering the overall serving size. The sodium primarily comes from the salt added to the dough, which enhances the sweetness and flavor of the cookies. If you’re watching your sodium intake, you can adjust the salt to suit your dietary needs.

By keeping these nutritional facts in mind, you can enjoy your Levain-Style Chocolate Chip Cookies while being aware of their impact on your diet. Remember, it’s all about balance and enjoying treats in moderation!

FAQs about Levain-Style Chocolate Chip Cookies Recipe

How do I store Levain-Style Chocolate Chip Cookies?

Storing your Levain-Style Chocolate Chip Cookies properly is essential to keep them fresh and delicious. To do this, place the cookies in an airtight container. This will help maintain their chewy texture and prevent them from becoming stale. If you want to keep them even fresher, consider adding a slice of bread to the container. The bread will absorb excess moisture, keeping your cookies soft and delightful!

Can I freeze Levain-Style Chocolate Chip Cookies?

Absolutely! Freezing your Levain-Style Chocolate Chip Cookies is a great way to enjoy them later. To freeze, let the cookies cool completely. Then, place them in a single layer on a baking sheet and freeze until solid. Once frozen, transfer the cookies to a freezer-safe bag or container. They can be stored in the freezer for up to three months. When you’re ready to enjoy them, simply thaw at room temperature or warm them in the oven for a few minutes.

What is the best way to reheat Levain-Style Chocolate Chip Cookies?

Reheating your Levain-Style Chocolate Chip Cookies can bring back that fresh-baked taste. The best way to do this is to preheat your oven to 350°F (175°C). Place the cookies on a baking sheet and warm them for about 5-7 minutes. This will help restore their soft, gooey center while keeping the edges slightly crisp. If you prefer, you can also microwave them for about 10-15 seconds, but be careful not to overheat, as this can make them tough.

How can I make Levain-Style Chocolate Chip Cookies less sweet?

If you find that the Levain-Style Chocolate Chip Cookies are a bit too sweet for your taste, there are a few simple adjustments you can make. First, reduce the amount of granulated sugar or brown sugar by 1/4 cup. You can also try using dark chocolate chips instead of semi-sweet, as they have a richer flavor and less sugar. Additionally, consider adding a pinch of sea salt to balance the sweetness. These changes will help create a cookie that’s still delicious but less sweet!

Conclusion on Levain-Style Chocolate Chip Cookies Recipe

In conclusion, baking Levain-Style Chocolate Chip Cookies is a delightful experience that brings joy to both the baker and those who enjoy the finished product. With their thick, chewy texture and rich chocolate flavor, these cookies are sure to become a favorite in your household. Whether you’re making them for a special occasion or simply to satisfy a sweet craving, the process is straightforward and rewarding.

By following the steps outlined in this article, you can create cookies that rival those from the famous Levain Bakery. Remember to use high-quality ingredients, measure accurately, and don’t skip the chilling step for that perfect chewy texture. With a little practice, you’ll master the art of baking these delicious cookies.

Moreover, the versatility of this recipe allows for endless variations. Feel free to experiment with different types of chocolate, nuts, or even gluten-free and vegan options. This way, everyone can enjoy the delightful taste of Levain-Style Chocolate Chip Cookies, regardless of dietary preferences.

So, gather your ingredients, preheat your oven, and get ready to indulge in the warm, gooey goodness of homemade cookies. Happy baking, and may your kitchen be filled with the sweet aroma of freshly baked Levain-Style Chocolate Chip Cookies!

Banana Pudding Cookies are a delightful treat to bake!

Introduction to Banana Pudding Cookies Recipe

Banana Pudding Cookies Recipe! If you love the classic flavors of banana pudding, you’re in for a treat. These cookies combine the rich, creamy taste of banana pudding with the comforting texture of a cookie. They are soft, chewy, and bursting with flavor, making them a perfect snack or dessert for any occasion.

What Makes Banana Pudding Cookies Unique?

What sets banana pudding cookies apart from regular cookies? It’s all about the unique ingredients! The addition of instant banana pudding mix gives these cookies a moist and tender texture. This mix not only enhances the banana flavor but also adds a delightful creaminess that melts in your mouth. Plus, the option to include mini chocolate chips or walnuts adds a fun twist, making each bite a surprise!

Another unique aspect is the versatility of this recipe. You can easily customize it to suit your taste. Whether you prefer a nutty crunch or a chocolatey sweetness, these cookies can be tailored to your liking. This adaptability makes them a favorite among bakers of all skill levels.

The Popularity of Banana Pudding Cookies

Banana pudding cookies have gained immense popularity in recent years. They are often shared at family gatherings, potlucks, and bake sales. Their nostalgic flavor reminds many of childhood desserts, making them a hit with both kids and adults. Social media has also played a role in their rise, with countless food bloggers and home bakers showcasing their delicious creations online.

Moreover, the ease of preparation makes these cookies a go-to recipe for busy bakers. With simple ingredients and straightforward steps, anyone can whip up a batch in no time. This combination of nostalgia, flavor, and convenience is why banana pudding cookies have become a beloved treat in many households.

Ingredients for Banana Pudding Cookies Recipe

Essential Ingredients

Banana Pudding Cookies Recipe, you’ll need a few essential ingredients. These components work together to give the cookies their unique flavor and texture. Here’s what you’ll need:

  • 1 cup unsalted butter, softened: This is the base of your cookies, providing richness and moisture.
  • 1 cup granulated sugar: This sweetener helps to create a lovely balance of sweetness.
  • 1 cup packed brown sugar: Brown sugar adds a hint of caramel flavor and moisture.
  • 2 large eggs: Eggs bind the ingredients together and contribute to the cookies’ structure.
  • 1 teaspoon vanilla extract: This adds a warm, inviting flavor that complements the banana.
  • 3 cups all-purpose flour: Flour is the main dry ingredient that gives the cookies their shape.
  • 1 teaspoon baking soda: This leavening agent helps the cookies rise and become fluffy.
  • 1/2 teaspoon salt: A pinch of salt enhances the overall flavor of the cookies.
  • 1 cup instant banana pudding mix: This is the star ingredient that gives the cookies their banana flavor and creamy texture.

Optional Ingredients for Extra Flavor

While the essential ingredients are crucial, you can also add some optional ingredients to elevate your banana pudding cookies. Here are a few ideas:

  • 1 cup chopped walnuts: For those who enjoy a nutty crunch, walnuts add texture and flavor.
  • 1 cup mini chocolate chips: These little morsels bring a delightful sweetness and chocolatey goodness.
  • Crushed vanilla wafers: Adding these can give your cookies a classic banana pudding twist, enhancing both flavor and texture.

Banana Pudding Cookies Recipe lies in its versatility, allowing you to create a cookie that’s uniquely yours!

Step-by-Step Preparation of Banana Pudding Cookies Recipe

Step 1: Prepping Your Ingredients

Banana Pudding Cookies Recipe without any hiccups. Don’t forget to preheat your oven to 350°F, so it’s hot and ready when your cookies are shaped!

Step 2: Mixing the Dry Ingredients

In a separate bowl, whisk together the flour, baking soda, salt, and banana pudding mix. This step is crucial as it ensures that the leavening agent is evenly distributed throughout the flour. Mixing these dry ingredients first helps prevent clumps and guarantees a consistent texture in your cookies. Set this bowl aside for now; you’ll combine it with the wet ingredients shortly.

Step 3: Creaming the Butter and Sugar

Now, it’s time to cream the softened butter with the granulated and brown sugars. In a large mixing bowl, use an electric mixer to beat them together until the mixture is light and fluffy. This process usually takes about 2-3 minutes. The air incorporated during this step will help your cookies rise and become soft. Once you achieve that fluffy texture, it’s time to add the eggs.

Step 4: Combining Wet and Dry Ingredients

Add the eggs one at a time to the creamed butter and sugar mixture. Mix well after each addition. Then, stir in the vanilla extract. After that, gradually add the dry ingredients to the wet mixture. Mix until just combined; be careful not to overmix, as this can lead to tough cookies. The dough should be soft and slightly sticky, perfect for shaping!

Step 5: Adding Banana Pudding Mix

Now comes the fun part! Fold in the instant banana pudding mix gently into the dough. This step is essential as it enhances the banana flavor and adds that creamy texture we love. If you’re using optional ingredients like walnuts or mini chocolate chips, now is the time to fold them in as well. This will ensure that every cookie has a delightful surprise in every bite!

Step 6: Shaping the Cookies

Using a tablespoon or a cookie scoop, drop rounded tablespoons of dough onto ungreased baking sheets. Make sure to space them about 2 inches apart. This spacing allows the cookies to spread without sticking together. If you want to make them look extra special, you can gently press down on the tops of the dough balls with a fork or your fingers.

Step 7: Baking the Cookies

Place the baking sheets in the preheated oven and bake for 10-12 minutes. Keep an eye on them! You want the edges to be lightly golden while the centers remain soft. Once they’re done, remove them from the oven and let them sit on the baking sheets for about 5 minutes. This resting time allows them to firm up a bit before transferring them to wire racks.

Step 8: Cooling and Storing

After the cookies have cooled on the baking sheets, carefully transfer them to wire racks to cool completely. This step is important as it helps maintain their soft texture. Once cooled, store your banana pudding cookies in an airtight container. They can last for several days, but we doubt they’ll last that long with how delicious they are!

Variations of Banana Pudding Cookies Recipe

Chocolate Chip Banana Pudding Cookies

If you’re a chocolate lover, you’ll adore the chocolate chip banana pudding cookies! To make this variation, simply add 1 cup of mini chocolate chips to the dough during the mixing process. The chocolate chips melt slightly while baking, creating gooey pockets of chocolate in every bite. This combination of banana and chocolate is a match made in dessert heaven. It’s a delightful twist that adds richness and sweetness, making these cookies even more irresistible!

Gluten-Free Banana Pudding Cookies

Banana Pudding Cookies Recipe. Substitute the all-purpose flour with a gluten-free flour blend. Make sure to choose a blend that includes xanthan gum, as this will help mimic the texture of regular flour. The rest of the ingredients remain the same, ensuring you still enjoy the delicious banana flavor. These gluten-free cookies will be just as soft and chewy, allowing everyone to indulge without worry!

Vegan Banana Pudding Cookies

Want to make a vegan version of these tasty cookies? It’s simple! Replace the eggs with flax eggs. To make a flax egg, mix 1 tablespoon of ground flaxseed with 2.5 tablespoons of water. Let it sit for about 5 minutes until it thickens. Additionally, swap the unsalted butter for coconut oil or vegan butter. The rest of the ingredients can stay the same. These vegan banana pudding cookies will still be soft, chewy, and full of flavor, making them a great treat for everyone!

Cooking Note for Banana Pudding Cookies Recipe

Tips for Perfectly Baked Cookies

Banana Pudding Cookies Recipe, a few tips can make all the difference. Here are some helpful hints to ensure your cookies turn out delicious every time:

  • Use Room Temperature Ingredients: Make sure your butter and eggs are at room temperature. This helps them blend better, resulting in a smoother dough.
  • Don’t Overmix: When combining the wet and dry ingredients, mix until just combined. Overmixing can lead to tough cookies, so be gentle!
  • Chill the Dough: If you have time, chill the dough for about 30 minutes before baking. This helps the cookies maintain their shape and enhances the flavors.
  • Check for Doneness: Keep an eye on your cookies as they bake. They should be lightly golden around the edges but still soft in the center. They will continue to firm up as they cool.
  • Use Parchment Paper: Lining your baking sheets with parchment paper can prevent sticking and make cleanup easier. It also helps the cookies bake evenly.
  • Experiment with Baking Times: Every oven is different. If your cookies are browning too quickly, reduce the baking time slightly. Conversely, if they’re not done after 12 minutes, add a minute or two.

By following these tips, you’ll be well on your way to baking the most scrumptious banana pudding cookies. Enjoy the process and happy baking!

Serving Suggestions for Banana Pudding Cookies Recipe

Pairing with Beverages

Banana Pudding Cookies Recipe, the right beverage can elevate the experience. Here are some delightful pairings to consider:

  • Milk: A classic choice! The creamy texture of milk complements the soft, chewy cookies perfectly. Whether you prefer whole, almond, or oat milk, it’s a match made in heaven.
  • Coffee: For adults, a warm cup of coffee can enhance the flavors of the cookies. The rich, bold taste of coffee balances the sweetness of the banana pudding cookies.
  • Tea: A soothing cup of herbal or chai tea can be a lovely pairing. The spices in chai tea, for example, can add a warm touch to your cookie experience.
  • Hot Chocolate: For a cozy treat, serve your cookies with a mug of hot chocolate. The chocolatey goodness pairs wonderfully with the banana flavor.

Feel free to experiment with different beverages to find your favorite combination. Each sip can bring out new flavors in your cookies, making every bite a delightful experience!

Creative Ways to Serve

Banana Pudding Cookies Recipe can be just as fun as baking them! Here are some creative ideas to impress your family and friends:

  • Cookie Sandwiches: Spread a layer of cream cheese frosting or banana cream between two cookies to create delicious cookie sandwiches. This adds an extra layer of flavor and makes for a fun treat!
  • Cookie Platter: Arrange your cookies on a decorative platter. Add some fresh banana slices and a sprinkle of powdered sugar for a beautiful presentation.
  • Ice Cream Topping: Crumble the cookies over a scoop of vanilla or banana ice cream. This adds a delightful crunch and enhances the banana flavor.
  • Gift Jars: Layer the dry ingredients in a mason jar, and attach the recipe card. This makes a thoughtful gift for friends or family who love to bake!

These serving suggestions can turn your banana pudding cookies into a memorable treat for any occasion. Enjoy sharing them with loved ones, and watch as they disappear in no time!

Tips for Making the Best Banana Pudding Cookies Recipe

Ingredient Substitutions

Banana Pudding Cookies Recipe on track:

  • Butter: If you’re out of unsalted butter, you can use margarine or coconut oil. Both will work well, but coconut oil will add a slight coconut flavor.
  • Granulated Sugar: You can replace granulated sugar with coconut sugar or honey. Just remember that honey is sweeter, so you might want to use a little less.
  • Brown Sugar: If you don’t have brown sugar, you can make your own by mixing granulated sugar with a bit of molasses. Use 1 cup of granulated sugar and 1 tablespoon of molasses for a similar flavor.
  • Eggs: For a vegan option, use flax eggs as mentioned earlier. One flax egg is made by mixing 1 tablespoon of ground flaxseed with 2.5 tablespoons of water.
  • Flour: If you need a gluten-free option, use a gluten-free flour blend. Just ensure it contains xanthan gum for the best texture.
  • Banana Pudding Mix: If you can’t find banana pudding mix, you can use vanilla pudding mix instead. It will still taste delicious, just with a different flavor profile.

These substitutions can help you whip up a batch of cookies even when you’re missing a few ingredients. Feel free to get creative and make the recipe your own!

Storage Tips for Freshness

Banana Pudding Cookies Recipe fresh and tasty, proper storage is key. Here are some tips to ensure your cookies stay delicious:

  • Cool Completely: Always let your cookies cool completely before storing them. This prevents moisture buildup, which can make them soggy.
  • Airtight Container: Store your cookies in an airtight container. This helps keep them soft and prevents them from drying out.
  • Layering with Parchment Paper: If you’re stacking cookies in a container, place parchment paper between layers. This prevents them from sticking together.
  • Room Temperature Storage: Keep your cookies at room temperature for up to a week. If you want to keep them longer, consider freezing them.
  • Freezing Cookies: To freeze, place the cookies in a single layer on a baking sheet. Once frozen, transfer them to a freezer-safe bag. They can last for up to three months!

By following these storage tips, you can enjoy your banana pudding cookies for days to come. They’ll be just as delightful as the day you baked them!

Breakdown of Time for Banana Pudding Cookies Recipe

Prep Time

Banana Pudding Cookies Recipe is a breeze! The prep time typically takes about 15-20 minutes. This includes gathering your ingredients, measuring them out, and mixing the wet and dry components. If you’re organized and have everything ready, you can even cut this time down a bit. Just remember, taking your time ensures a better outcome!

Cooking Time

Once your dough is ready, it’s time to bake! The cooking time for these cookies is around 10-12 minutes. Keep an eye on them as they bake. You want the edges to turn a lovely golden brown while the centers remain soft. This short baking time is what makes these cookies so quick and easy to prepare!

Total Time

In total, you’re looking at about 25-32 minutes from start to finish. This includes both prep and cooking time. With such a quick turnaround, you can enjoy fresh, warm banana pudding cookies in no time. Whether you’re baking for a special occasion or just a cozy night in, this recipe is perfect for satisfying your sweet tooth!

Nutritional Information for Banana Pudding Cookies Recipe

Calories and Macronutrients

Banana Pudding Cookies Recipe can help you enjoy them mindfully. Each cookie contains approximately 150 calories. Here’s a breakdown of the macronutrients per serving:

  • Calories: 150
  • Net Carbs: 20g
  • Protein: 2g
  • Fat: 7g

These cookies provide a delightful balance of carbohydrates, fats, and proteins. The combination of sugars and fats gives them a rich flavor, while the protein helps to keep you satisfied. If you’re looking to indulge without overdoing it, enjoying one or two cookies as a treat can be a great option!

Health Considerations

While banana pudding cookies are a delicious treat, it’s important to consider their nutritional impact. Here are a few health considerations to keep in mind:

  • Moderation is Key: With 150 calories per cookie, it’s best to enjoy them in moderation. Pairing them with a healthy beverage, like herbal tea or milk, can help balance your snack.
  • Ingredient Choices: You can make healthier choices by using whole grain flour or reducing the sugar content. Substituting half of the butter with unsweetened applesauce can also lower the fat content.
  • Allergies and Dietary Needs: If you have allergies or dietary restrictions, consider the ingredient substitutions mentioned earlier. Gluten-free and vegan options allow more people to enjoy these cookies without worry.
  • Adding Nutrients: Incorporating nuts or seeds can boost the nutritional value. Walnuts, for example, add healthy fats and protein, making your cookies a bit more wholesome.

Banana Pudding Cookies Recipe while still keeping your overall diet balanced. Happy baking!

FAQs about Banana Pudding Cookies Recipe

Can I use ripe bananas in the recipe?

Banana Pudding Cookies Recipe primarily uses instant banana pudding mix for flavor, you can certainly add ripe bananas for an extra banana kick. Just mash one or two ripe bananas and fold them into the dough. Keep in mind that this may slightly alter the texture, making the cookies a bit softer and more moist. It’s a delicious way to enhance the banana flavor!

How do I store leftover cookies?

To keep your banana pudding cookies fresh, store them in an airtight container. Make sure they are completely cooled before placing them in the container to prevent moisture buildup. You can keep them at room temperature for up to a week. If you want to enjoy them later, consider freezing them for longer storage. Just remember to layer them with parchment paper to avoid sticking!

Can I freeze banana pudding cookies?

Yes, you can freeze banana pudding cookies! To do this, place the cookies in a single layer on a baking sheet and freeze them until solid. Once frozen, transfer them to a freezer-safe bag or container. They can last for up to three months in the freezer. When you’re ready to enjoy them, simply thaw at room temperature or warm them in the oven for a few minutes for that fresh-baked taste!

What can I substitute for banana pudding mix?

If you can’t find banana pudding mix, don’t worry! You can substitute it with vanilla pudding mix. While it won’t have the same banana flavor, it will still provide a creamy texture and sweetness. Alternatively, you can make your own banana-flavored pudding by mixing cornstarch, sugar, and mashed bananas, but this may require some adjustments to the recipe. Feel free to experiment and find what works best for you!

Conclusion on Banana Pudding Cookies Recipe

Recap of the Recipe Benefits

Banana Pudding Cookies Recipe is a delightful treat that combines the beloved flavors of banana pudding with the comforting texture of cookies. These cookies are not only easy to make but also incredibly versatile. You can customize them with various add-ins like chocolate chips or nuts, making each batch unique. The use of instant banana pudding mix ensures a moist and tender cookie, while the simple ingredients make it accessible for bakers of all skill levels.

Moreover, the recipe allows for various adaptations, including gluten-free and vegan options, ensuring that everyone can enjoy these delicious cookies. With a quick prep and baking time, you can whip up a batch in no time, perfect for any occasion. Whether you’re hosting a gathering or simply craving a sweet snack, these cookies are sure to impress!

Encouragement to Try the Recipe

Banana Pudding Cookies Recipe a try! You’ll be amazed at how quickly they come together and how delicious they taste. Baking can be a fun and rewarding experience, especially when you share your creations with family and friends. Plus, the joy of biting into a soft, chewy cookie that tastes just like banana pudding is truly unbeatable.

Don’t forget to experiment with different variations and serving suggestions to make the recipe your own. Happy baking, and enjoy every delightful bite of your banana pudding cookies!

Strawberry Cheesecake Cinnabon Rolls Recipe is delightful!

Introduction to Strawberry Cheesecake Cinnabon Rolls Recipe

Welcome to the delightful world of Strawberry Cheesecake Cinnabon Rolls! If you love the sweet, creamy taste of cheesecake combined with the warm, fluffy goodness of cinnamon rolls, then you’re in for a treat. This recipe brings together the best of both worlds, creating a dessert that is not only delicious but also visually appealing.

Imagine biting into a soft, gooey roll filled with a luscious cheesecake mixture and fresh strawberries. The aroma of cinnamon wafting through your kitchen will make your mouth water. These rolls are perfect for breakfast, brunch, or even as a sweet snack. Plus, they are easy to make, so you can whip them up for family gatherings or special occasions.

In this article, we will guide you through each step of the Strawberry Cheesecake Cinnabon Rolls recipe. From gathering the ingredients to baking the rolls to perfection, you’ll find everything you need to create this scrumptious treat. So, roll up your sleeves and get ready to impress your friends and family with these delightful rolls!

Ingredients for Strawberry Cheesecake Cinnabon Rolls Recipe

To create the mouthwatering Strawberry Cheesecake Cinnabon Rolls, you’ll need a few simple ingredients. Each component plays a vital role in achieving that perfect blend of flavors and textures. Here’s what you’ll need:

  • 2 cups all-purpose flour
  • 2 tablespoons granulated sugar
  • 1 teaspoon instant yeast
  • 1/2 teaspoon salt
  • 3/4 cup warm milk (110°F)
  • 2 tablespoons unsalted butter, melted
  • 1 large egg
  • 1/2 cup cream cheese, softened
  • 1/4 cup powdered sugar
  • 1 teaspoon vanilla extract
  • 1 cup fresh strawberries, diced
  • 1/2 teaspoon cinnamon
  • 1/4 cup brown sugar
  • 1 tablespoon unsalted butter, softened (for spreading)
  • 1/2 cup powdered sugar (for glaze)
  • 2 tablespoons milk (for glaze)

These ingredients come together to create a delightful treat that is sure to please everyone. The combination of strawberries and cream cheese gives a refreshing twist to the classic cinnamon roll. Plus, the glaze adds a sweet finish that ties everything together beautifully.

Make sure to gather all your ingredients before you start. This will help streamline the process and ensure you don’t miss anything. Now that you have everything ready, let’s move on to the preparation of these delicious rolls!

Preparation of Strawberry Cheesecake Cinnabon Rolls Recipe

Now that you have all your ingredients ready, it’s time to dive into the preparation of your Strawberry Cheesecake Cinnabon Rolls. This process is simple and fun, allowing you to create a delightful treat that everyone will love. Let’s break it down step by step!

Step 1: Preparing the Dough

First, we need to make the dough. In a large mixing bowl, combine the all-purpose flour, granulated sugar, instant yeast, and salt. Mix these dry ingredients well to ensure even distribution. Next, in a separate bowl, whisk together the warm milk, melted butter, and egg. This mixture should be warm, around 110°F, to activate the yeast.

Once combined, pour the wet ingredients into the dry mixture. Stir until a dough begins to form. Then, transfer the dough to a lightly floured surface. Knead the dough for about 5 minutes until it becomes smooth and elastic. After kneading, place the dough in a greased bowl, cover it with a towel, and let it rise in a warm place for about 1 hour or until it doubles in size.

Step 2: Making the Cheesecake Filling

While the dough is rising, let’s prepare the cheesecake filling. In a medium bowl, combine the softened cream cheese, powdered sugar, and vanilla extract. Mix these ingredients until smooth and creamy. This filling will add a rich, sweet flavor to your rolls. If you want an extra touch, consider adding a teaspoon of almond extract for a delightful twist!

Step 3: Assembling the Rolls

Once the dough has risen, it’s time to assemble the rolls. Start by rolling the dough out into a rectangle, about 1/4 inch thick. Spread the softened butter evenly over the surface of the dough. Then, in a small bowl, mix the brown sugar and cinnamon together. Sprinkle this mixture evenly over the buttered dough.

Next, layer the diced strawberries on top of the cinnamon-sugar mixture. Finally, spread the cheesecake filling over the strawberries. Starting from one long side, carefully roll the dough into a tight log. Slice the log into 12 equal pieces and place them in a greased baking dish. Make sure to leave some space between each roll for rising.

Step 4: Baking the Rolls

Cover the rolls with a towel and let them rise for another 30 minutes. During this time, preheat your oven to 350°F. Once the rolls have risen, bake them in the preheated oven for 25-30 minutes or until they are golden brown. The smell of cinnamon and strawberries will fill your kitchen, making it hard to wait!

Step 5: Preparing the Strawberry Topping

While the rolls are baking, you can prepare the glaze. In a small bowl, mix the powdered sugar and milk until smooth. This glaze will add a sweet finish to your rolls. Once the rolls are out of the oven and slightly cooled, drizzle the glaze over the warm rolls. This final touch will make your Strawberry Cheesecake Cinnabon Rolls irresistible!

Now that you’ve prepared your rolls, they are ready to be enjoyed. The combination of flavors and textures will surely impress everyone at your table!

Variation of Strawberry Cheesecake Cinnabon Rolls Recipe

While the classic Strawberry Cheesecake Cinnabon Rolls are a delightful treat, there are many ways to switch things up! Variations can add new flavors and textures, making your rolls even more exciting. Here are some alternative fillings and toppings you can try:

Alternative Fillings and Toppings

  • Blueberry Cream Cheese Filling: Swap out the strawberries for fresh blueberries. The sweet and tart flavor of blueberries pairs wonderfully with the creamy filling.
  • Raspberry Swirl: Use raspberries instead of strawberries for a tangy twist. You can also swirl some raspberry jam into the cream cheese filling for added flavor.
  • Chocolate Hazelnut Spread: For a decadent treat, spread a layer of chocolate hazelnut spread over the dough before adding the cinnamon-sugar mixture. This will create a rich, chocolatey flavor.
  • Peach or Apricot Filling: Diced peaches or apricots can be a delicious alternative. Their sweetness will complement the cream cheese filling beautifully.
  • Nutty Topping: Add chopped nuts, like pecans or walnuts, to the cinnamon-sugar mixture for a crunchy texture. This will give your rolls an extra layer of flavor.
  • Maple Glaze: Instead of a powdered sugar glaze, try a maple glaze. Mix powdered sugar with maple syrup and a little milk for a unique twist.

Feel free to mix and match these ideas to create your own signature rolls! The possibilities are endless, and experimenting with different flavors can lead to delightful surprises. Whether you stick with the classic recipe or venture into new territory, your Strawberry Cheesecake Cinnabon Rolls will surely be a hit!

Cooking Note for Strawberry Cheesecake Cinnabon Rolls Recipe

When it comes to baking, a few key tips can make all the difference in achieving the perfect Strawberry Cheesecake Cinnabon Rolls. Here are some important cooking notes to keep in mind:

  • Ingredient Temperature: Ensure that your milk is warm, around 110°F, to activate the yeast properly. If it’s too hot, it can kill the yeast, and if it’s too cold, the dough won’t rise well.
  • Measuring Flour: When measuring flour, use the spoon-and-level method. This means spooning the flour into your measuring cup and leveling it off with a knife. This prevents packing, which can lead to dense rolls.
  • Kneading Technique: Knead the dough until it’s smooth and elastic. This usually takes about 5 minutes. Proper kneading develops gluten, which gives the rolls their fluffy texture.
  • Rising Time: Allow the dough to rise in a warm, draft-free area. If your kitchen is cool, you can place the dough in an oven that’s turned off but has the light on. This creates a warm environment for rising.
  • Don’t Overbake: Keep an eye on the rolls while they bake. They should be golden brown but not too dark. Overbaking can dry them out, so check them a few minutes before the suggested baking time.
  • Glazing Tips: Drizzle the glaze over the rolls while they are still warm. This allows the glaze to soak in slightly, enhancing the flavor and making them even more delicious.

By following these cooking notes, you’ll set yourself up for success in making these delightful Strawberry Cheesecake Cinnabon Rolls. Each step is crucial in creating a soft, fluffy, and flavorful treat that everyone will love. Happy baking!

Serving Suggestions for Strawberry Cheesecake Cinnabon Rolls Recipe

Once your Strawberry Cheesecake Cinnabon Rolls are baked and glazed, it’s time to serve them up! These rolls are not only delicious but also versatile, making them perfect for various occasions. Here are some delightful serving suggestions to enhance your experience:

  • Breakfast Delight: Serve the rolls warm for breakfast alongside a cup of coffee or tea. They make a sweet start to the day and pair wonderfully with a side of fresh fruit.
  • Brunch Treat: These rolls are a fantastic addition to any brunch spread. Arrange them on a platter with other brunch favorites like quiches, fruit salads, and yogurt parfaits for a colorful display.
  • With Ice Cream: For a decadent dessert, serve the rolls warm with a scoop of vanilla or strawberry ice cream on top. The combination of warm rolls and cold ice cream is simply irresistible!
  • Drizzle with Chocolate: For chocolate lovers, consider drizzling melted chocolate over the rolls before serving. This adds an extra layer of flavor and makes them even more indulgent.
  • Garnish with Fresh Berries: Top the rolls with additional fresh strawberries or other berries for a pop of color and freshness. This not only enhances the presentation but also adds a fruity burst with each bite.
  • Pair with Whipped Cream: Serve the rolls with a dollop of whipped cream on the side. This light and airy topping complements the rich flavors of the rolls beautifully.

These serving suggestions will elevate your Strawberry Cheesecake Cinnabon Rolls, making them a hit at any gathering. Whether it’s a cozy family breakfast or a festive brunch with friends, these rolls are sure to impress. Enjoy every bite!

Tips for Perfect Strawberry Cheesecake Cinnabon Rolls Recipe

Creating the perfect Strawberry Cheesecake Cinnabon Rolls is all about attention to detail. With a few helpful tips, you can ensure that your rolls turn out fluffy, flavorful, and utterly delicious. Here are some essential tips to keep in mind:

  • Use Fresh Ingredients: Always opt for fresh strawberries and high-quality cream cheese. Fresh ingredients enhance the flavor and texture of your rolls, making them taste even better.
  • Check Yeast Freshness: Before starting, make sure your instant yeast is fresh. If it’s expired, your dough may not rise properly. You can test it by mixing it with warm water and sugar; it should foam up within a few minutes.
  • Don’t Rush the Rising: Allow the dough to rise until it has doubled in size. This step is crucial for achieving soft and fluffy rolls. If your kitchen is cool, consider placing the dough in a warm spot, like near a sunny window.
  • Roll Evenly: When rolling out the dough, aim for an even thickness of about 1/4 inch. This ensures that the rolls bake evenly and have a consistent texture throughout.
  • Space the Rolls: When placing the sliced rolls in the baking dish, leave enough space between them. This allows for proper rising and prevents them from sticking together during baking.
  • Cool Before Glazing: Let the rolls cool for a few minutes after baking before drizzling the glaze. This prevents the glaze from melting away and allows it to set beautifully on top.
  • Experiment with Flavors: Don’t hesitate to try different flavor combinations! Adding spices like nutmeg or using flavored extracts can elevate your rolls to a whole new level.
  • Store Properly: If you have leftovers, store them in an airtight container at room temperature for up to two days. You can also refrigerate them for longer freshness, but be sure to warm them up before serving.

By following these tips, you’ll be well on your way to making the most delightful Strawberry Cheesecake Cinnabon Rolls. Each bite will be a perfect blend of sweetness and creaminess, leaving everyone wanting more!

Breakdown of Time for Strawberry Cheesecake Cinnabon Rolls Recipe

Understanding the time required for each step in the Strawberry Cheesecake Cinnabon Rolls recipe is essential for planning your baking session. Here’s a detailed breakdown of the time you’ll need to create these delicious rolls:

Prep Time

The prep time for this recipe is approximately 20 minutes. This includes gathering your ingredients, mixing the dough, and preparing the cheesecake filling. Make sure to have everything ready before you start to streamline the process. It’s a great way to keep things organized and efficient!

Cooking Time

Once your rolls are assembled, the cooking time is about 25-30 minutes. This is the time it takes for the rolls to bake in the oven until they are golden brown and fluffy. Keep an eye on them as they bake to ensure they don’t overcook. The delightful aroma will let you know they’re almost ready!

Total Time

In total, you can expect to spend around 1 hour and 50 minutes on this recipe. This includes the prep time, the first rise of the dough (1 hour), the second rise after assembling the rolls (30 minutes), and the baking time. While it may seem like a bit of a commitment, the end result is absolutely worth it!

By breaking down the time, you can better plan your baking session and enjoy the process of making these scrumptious Strawberry Cheesecake Cinnabon Rolls. Happy baking!

Nutritional Information for Strawberry Cheesecake Cinnabon Rolls Recipe

Understanding the nutritional content of your Strawberry Cheesecake Cinnabon Rolls is essential for those who are mindful of their diet. Each roll is a delightful treat, but it’s good to know what you’re indulging in. Here’s a breakdown of the key nutritional information per serving:

Calories

180 calories. This makes them a sweet yet manageable treat for breakfast or dessert. Enjoying one roll can satisfy your sweet tooth without overwhelming your daily calorie intake.

Protein

3 grams. While this isn’t a high-protein snack, it does contribute to your daily intake. Pairing these rolls with a protein-rich side, like yogurt or a glass of milk, can help balance your meal.

Sodium

150 mg. This is relatively low, making these rolls a suitable option for those watching their sodium intake. However, as with any treat, moderation is key to maintaining a balanced diet.

By keeping track of the nutritional information, you can enjoy your Strawberry Cheesecake Cinnabon Rolls while being mindful of your dietary goals. These rolls are a delightful indulgence that can fit into a healthy lifestyle when enjoyed in moderation!

FAQs about Strawberry Cheesecake Cinnabon Rolls Recipe

Can I make Strawberry Cheesecake Cinnabon Rolls ahead of time?

Absolutely! You can prepare the dough and filling ahead of time. After assembling the rolls, cover them tightly and refrigerate overnight. In the morning, let them sit at room temperature for about 30 minutes before baking. This way, you can enjoy fresh rolls without the morning rush!

How do I store leftover Strawberry Cheesecake Cinnabon Rolls?

To store leftover rolls, place them in an airtight container at room temperature for up to two days. If you want to keep them longer, refrigerate them for up to a week. Just remember to warm them up in the microwave or oven before serving to bring back their soft texture!

Can I use frozen strawberries in the recipe?

Yes, you can use frozen strawberries! Just make sure to thaw and drain them well before adding them to the rolls. This prevents excess moisture from making the dough soggy. Frozen strawberries can be a great alternative when fresh ones are out of season.

What can I substitute for cream cheese in the filling?

If you’re looking for a substitute for cream cheese, you can use mascarpone cheese or Greek yogurt. Both options will provide a creamy texture and delicious flavor. For a dairy-free option, consider using a vegan cream cheese alternative. Each substitute will give a unique twist to your rolls!

Conclusion on Strawberry Cheesecake Cinnabon Rolls Recipe

In conclusion, the Strawberry Cheesecake Cinnabon Rolls recipe is a delightful way to combine two beloved treats into one scrumptious dessert. With its soft, fluffy dough, creamy cheesecake filling, and fresh strawberries, this recipe is sure to impress anyone who takes a bite. Whether you’re making them for a special occasion or just to enjoy at home, these rolls are a fantastic choice.

As you’ve seen, the preparation process is straightforward and enjoyable. From mixing the dough to rolling it up with delicious fillings, each step brings you closer to a warm, gooey treat. Plus, the variations and tips provided allow you to customize the recipe to suit your taste preferences. You can easily switch up the fruits or add different flavors to make it your own!

Remember, the joy of baking lies not just in the final product but also in the experience of creating something special. So, gather your ingredients, invite your family or friends to join in, and make some wonderful memories in the kitchen. Your Strawberry Cheesecake Cinnabon Rolls will not only satisfy your sweet tooth but also bring smiles to everyone around the table.

So, what are you waiting for? Roll up your sleeves and get started on this delicious adventure. Happy baking!

Strawberry Brownies are a must-try dessert today!

Introduction to Strawberry Brownies Recipe

Strawberry Brownies Recipe. These brownies are not just your ordinary dessert; they bring a unique twist to the classic brownie, making them a perfect choice for any occasion. Whether you’re hosting a gathering or simply craving something sweet, these brownies will surely impress.

What Makes Strawberry Brownies Unique?

Strawberry brownies stand out because they blend the fudgy texture of traditional brownies with the juicy sweetness of strawberries. This combination creates a delightful contrast that tantalizes your taste buds. The strawberries add a burst of freshness, making each bite a little piece of heaven. Plus, the vibrant color of strawberries makes these brownies visually appealing, perfect for sharing with friends and family.

Unlike regular brownies, the addition of strawberries not only enhances the flavor but also adds a nutritional boost. Strawberries are packed with vitamins, antioxidants, and fiber, making these brownies a slightly healthier option. You can enjoy your dessert while feeling good about the ingredients!

Why You Should Try This Strawberry Brownies Recipe

Strawberry Brownies Recipe is simple and quick to prepare, making it ideal for both novice and experienced bakers. With just a handful of ingredients, you can whip up a batch in no time. The recipe is also versatile, allowing you to customize it to your liking. Want to add nuts or chocolate chips? Go for it! Prefer a gluten-free version? We’ve got you covered.

Moreover, these brownies are perfect for any occasion. They can be served at birthday parties, picnics, or even as a sweet treat after dinner. The delightful combination of chocolate and strawberries will leave everyone asking for seconds. So, why not give this recipe a try? You might just find your new favorite dessert!

Ingredients for Strawberry Brownies Recipe

Strawberry Brownies, you’ll need a few simple ingredients that are easy to find. Here’s what you’ll need:

  • 1 cup all-purpose flour
  • 1 cup granulated sugar
  • 1/2 cup unsweetened cocoa powder
  • 1/2 teaspoon baking powder
  • 1/4 teaspoon salt
  • 1/2 cup unsalted butter, melted
  • 2 large eggs
  • 1 teaspoon vanilla extract
  • 1 cup fresh strawberries, hulled and chopped
  • 1/2 cup chocolate chips (optional)

These ingredients come together to create a rich, fudgy brownie base that is perfectly complemented by the sweet, juicy strawberries. The chocolate chips are optional, but they add an extra layer of chocolatey goodness if you choose to include them. Make sure to use fresh strawberries for the best flavor and texture. Now that you have your ingredients ready, let’s move on to the step-by-step preparation!

Step-by-Step Preparation of Strawberry Brownies Recipe

Step 1: Preheat the Oven

First things first, you need to preheat your oven to 350°F (175°C). This step is crucial because it ensures that your brownies bake evenly. While the oven heats up, you can prepare the rest of your ingredients. It’s a great way to save time and get everything ready for baking!

Step 2: Prepare the Baking Dish

Next, grab an 8×8-inch baking pan. You can either grease it with a little butter or cooking spray, or line it with parchment paper. Lining the pan makes it super easy to remove the brownies later. Just lift the parchment paper, and voilà! Perfectly shaped brownies without any mess.

Step 3: Mix the Dry Ingredients

In a large mixing bowl, combine the dry ingredients. Whisk together 1 cup of all-purpose flour, 1 cup of granulated sugar, 1/2 cup of unsweetened cocoa powder, 1/2 teaspoon of baking powder, and 1/4 teaspoon of salt. Mixing these ingredients well ensures that your brownies have a consistent flavor and texture. Make sure there are no lumps in the cocoa powder!

Step 4: Combine the Wet Ingredients

In a separate bowl, mix the wet ingredients. Start by melting 1/2 cup of unsalted butter. Once melted, add 2 large eggs and 1 teaspoon of vanilla extract. Whisk these together until the mixture is smooth and creamy. This step is important because it helps to incorporate air into the batter, making your brownies light and fluffy.

Step 5: Fold in the Strawberries

Now, it’s time to bring everything together! Pour the wet ingredients into the bowl with the dry ingredients. Stir gently until just combined. Be careful not to overmix, as this can make your brownies tough. After that, fold in 1 cup of chopped fresh strawberries. If you’re using chocolate chips, add them in now too. The strawberries will add a burst of flavor, while the chocolate chips will give you that extra chocolatey goodness!

Step 6: Bake the Brownies

Pour the brownie batter into your prepared baking pan. Spread it evenly with a spatula. Now, place the pan in the preheated oven and bake for 25-30 minutes. To check if they’re done, insert a toothpick into the center. If it comes out with a few moist crumbs, your brownies are ready!

Step 7: Cool and Cut the Brownies

Strawberry Brownies!

Variations of Strawberry Brownies Recipe

Strawberry Brownies but want to try something a little different, you’re in luck! There are several variations you can explore. These adaptations allow you to cater to different dietary needs or simply to mix things up. Let’s dive into some exciting options!

Gluten-Free Strawberry Brownies

For those who are gluten-sensitive or prefer a gluten-free diet, making gluten-free strawberry brownies is easy! Simply swap out the all-purpose flour for a gluten-free flour blend. Many blends work well, but look for one that includes xanthan gum for better texture. The rest of the ingredients remain the same, ensuring you still get that delicious chocolate and strawberry flavor. Your friends and family won’t even notice the difference!

Vegan Strawberry Brownies

Craving a vegan version of these delightful brownies? No problem! To make vegan strawberry brownies, replace the eggs with flax eggs. To create a flax egg, mix 1 tablespoon of ground flaxseed with 2.5 tablespoons of water. Let it sit for about 5 minutes until it thickens. Additionally, use a plant-based butter or coconut oil instead of unsalted butter. This way, you can enjoy a rich, fudgy brownie that’s completely dairy-free!

Adding Nuts or Chocolate Chips

If you want to add a little crunch to your brownies, consider mixing in some nuts! Chopped walnuts or pecans pair wonderfully with the chocolate and strawberries. You can add about 1/2 cup of nuts to the batter when you fold in the strawberries. Alternatively, if you’re a chocolate lover, feel free to increase the amount of chocolate chips to 1 cup. This extra chocolate will make your brownies even more decadent!

Strawberry Brownies Recipe even more enjoyable!

Cooking Note for Strawberry Brownies Recipe

Strawberry Brownies Recipe. Here are some important cooking notes to keep in mind as you prepare your delicious treat:

First, always use fresh strawberries for the best flavor. Frozen strawberries can release excess moisture, which may affect the texture of your brownies. If you do choose to use frozen strawberries, make sure to thaw and drain them well before adding them to the batter.

Next, be mindful of your baking time. Ovens can vary in temperature, so it’s a good idea to start checking your brownies a few minutes before the recommended baking time. Insert a toothpick into the center; if it comes out with a few moist crumbs, your brownies are done. If it comes out wet with batter, give them a few more minutes.

Additionally, let your brownies cool completely before cutting them. This cooling period allows the brownies to set properly, making them easier to slice into neat squares. If you’re in a hurry, you can place the pan in the refrigerator for a quicker cool-down.

Strawberry Brownies Recipe is its versatility, so have fun with it!

By keeping these cooking notes in mind, you’ll be well on your way to creating a batch of strawberry brownies that are not only delicious but also perfectly textured and visually appealing. Happy baking!

Serving Suggestions for Strawberry Brownies Recipe

Pairing with Ice Cream

Strawberry Brownies Recipe is by pairing them with a scoop of ice cream. The creamy texture of ice cream complements the fudgy brownies perfectly. Vanilla ice cream is a classic choice, but feel free to get creative! Strawberry, chocolate, or even mint chocolate chip ice cream can add a delightful twist.

To serve, simply place a warm brownie on a plate and top it with a generous scoop of your favorite ice cream. Drizzle some chocolate or caramel sauce over the top for an extra touch of sweetness. This combination is sure to impress your guests and make for a memorable dessert experience!

Serving with Fresh Strawberries

Strawberry Brownies with additional fresh strawberries. This not only enhances the strawberry flavor but also adds a pop of color to your dessert plate. You can slice some strawberries and arrange them around the brownies or serve them on the side.

For an added flair, toss the fresh strawberries in a little sugar and let them sit for about 10 minutes. This will create a sweet syrup that can be drizzled over the brownies. The combination of warm brownies, fresh strawberries, and a hint of syrup creates a delightful contrast that is both refreshing and indulgent.

Strawberry Brownies Recipe but also make your dessert presentation look stunning. Whether you choose to pair them with ice cream or fresh strawberries, your brownies are sure to be a hit!

Tips for Perfect Strawberry Brownies Recipe

Choosing the Right Strawberries

Strawberry Brownies Recipe, selecting the right strawberries is key. Fresh, ripe strawberries will enhance the flavor and texture of your brownies. Look for strawberries that are bright red, firm, and free from blemishes. The sweeter the strawberries, the better your brownies will taste!

Try to buy strawberries that are in season, as they tend to be juicier and more flavorful. If you can, visit a local farmer’s market for the freshest options. If you can’t find fresh strawberries, frozen ones can work in a pinch. Just remember to thaw and drain them well to avoid excess moisture in your brownies.

Strawberry Brownies will be bursting with deliciousness!

Storing Leftover Brownies

Strawberry Brownies, you might have some leftovers. Storing them properly will keep them fresh and tasty for days. To store your brownies, first, let them cool completely. Once cooled, cut them into squares and place them in an airtight container.

For best results, layer the brownies with parchment paper to prevent them from sticking together. You can keep them at room temperature for up to three days. If you want to keep them longer, consider refrigerating them. They can last up to a week in the fridge.

Strawberry Brownies Recipe anytime you crave a sweet treat!

Breakdown of Time for Strawberry Brownies Recipe

Prep Time

Strawberry Brownies is a breeze! The prep time for this recipe is approximately 15 minutes. During this time, you’ll gather your ingredients, preheat the oven, and mix the dry and wet components. It’s a quick process that allows you to get right into the fun of baking!

Cooking Time

Once your batter is ready, it’s time to bake! The cooking time for these brownies is about 25-30 minutes. Keep an eye on them as they bake, and remember to check for doneness with a toothpick. This step is crucial to ensure your brownies are perfectly fudgy and not overcooked.

Total Time

Strawberry Brownies whenever the craving strikes. Plus, the delightful aroma that fills your kitchen while they bake is an added bonus!

Nutritional Information for Strawberry Brownies Recipe

Calories

Strawberry Brownies, it’s helpful to know the calorie content. Each serving of these brownies contains approximately 180 calories. This makes them a delightful option for satisfying your sweet tooth without going overboard. Enjoying a brownie as an occasional treat can fit nicely into a balanced diet!

Protein

Strawberry Brownies provides about 3 grams of protein. While this isn’t a high-protein dessert, it does contribute to your daily intake. Pairing your brownies with a glass of milk or a scoop of ice cream can boost the protein content even more!

Sodium

Strawberry Brownies contains approximately 100 milligrams of sodium. This is a relatively low amount, making these brownies a heart-friendly dessert option. As always, moderation is key, and enjoying these brownies as part of a varied diet is a great way to treat yourself!

FAQs about Strawberry Brownies Recipe

Can I use frozen strawberries in the Strawberry Brownies Recipe?

Strawberry Brownies Recipe. However, it’s important to thaw and drain them well before adding them to the batter. Frozen strawberries can release extra moisture, which may affect the texture of your brownies. If you follow these steps, you can still enjoy delicious brownies with a fruity twist!

How do I know when the brownies are done baking?

Strawberry Brownies are done baking, insert a toothpick into the center of the brownies. If it comes out with a few moist crumbs, they are ready! If the toothpick comes out wet with batter, give them a few more minutes in the oven. Remember, it’s better to underbake slightly than to overbake, as this keeps your brownies fudgy and delicious.

Can I substitute other fruits in the Strawberry Brownies Recipe?

Strawberry Brownies Recipe. Raspberries, blueberries, or even chopped cherries can work well. Each fruit will bring its unique flavor and sweetness, so feel free to experiment and find your favorite combination!

How should I store the Strawberry Brownies?

Strawberry Brownies fresh, let them cool completely before storing. Place them in an airtight container, and they can be kept at room temperature for up to three days. If you want to store them longer, refrigerate them for up to a week. For even longer storage, wrap each brownie individually in plastic wrap and freeze them for up to three months. Enjoy your brownies whenever you crave a sweet treat!

Conclusion on Strawberry Brownies Recipe

Strawberry Brownies Recipe is a delightful way to enjoy a classic dessert with a fruity twist. The combination of rich chocolate and fresh strawberries creates a treat that is not only delicious but also visually appealing. Whether you’re baking for a special occasion or just to satisfy a sweet craving, these brownies are sure to impress.

With simple ingredients and easy steps, this recipe is perfect for bakers of all skill levels. You can customize it to suit your taste, whether you prefer it gluten-free, vegan, or with added nuts. The versatility of this recipe means you can enjoy it in many ways, making it a staple in your dessert repertoire.

As you savor each bite of these fudgy brownies, remember that you’re indulging in a treat that also offers some nutritional benefits from the strawberries. So, go ahead and share them with friends and family, or keep them all to yourself—either way, you won’t be disappointed!

Strawberry Brownies that will leave everyone asking for more. Happy baking!

Classic Chocolate Chip Cookies Recipe for Everyone’s Delight

Introduction to Classic Chocolate Chip Cookies Recipe

The History of Chocolate Chip Cookies

Chocolate chip cookies have a delightful history that dates back to the 1930s. Ruth Wakefield, the inventor of this beloved treat, created them at her Toll House Inn in Massachusetts. She originally intended to make chocolate cookies but found herself out of baker’s chocolate. Instead, she chopped up a bar of semi-sweet chocolate, expecting it to melt into the dough. To her surprise, the chocolate held its shape, creating gooey pockets of chocolate in every bite. This happy accident led to the creation of the classic chocolate chip cookie we all adore today.

As word spread about these delicious cookies, they quickly gained popularity. In fact, Nestlé took notice and struck a deal with Wakefield to print her recipe on their chocolate bar packaging. This partnership helped chocolate chip cookies become a staple in American households. Today, they are enjoyed worldwide, often associated with warm memories of baking with family and friends.

Why This Classic Chocolate Chip Cookies Recipe Stands Out

This classic chocolate chip cookies recipe stands out for several reasons. First, it combines simple, high-quality ingredients that are easy to find. The balance of granulated and brown sugar gives the cookies a perfect sweetness and a chewy texture. Additionally, the use of unsalted butter enhances the flavor, making each bite rich and satisfying.

Moreover, this recipe is versatile. You can easily customize it by adding nuts, dried fruits, or even different types of chocolate. Whether you prefer a chewy or crispy cookie, this recipe allows for adjustments to suit your taste. Plus, it’s straightforward enough for beginners, yet satisfying for seasoned bakers. With just a few steps, you can create a batch of cookies that will impress everyone!

Ingredients for Classic Chocolate Chip Cookies Recipe

To make the perfect classic chocolate chip cookies, you need a few essential ingredients. Each component plays a vital role in achieving that delightful taste and texture. Here’s what you’ll need:

  • 2 1/4 cups all-purpose flour
  • 1 teaspoon baking soda
  • 1 teaspoon salt
  • 1 cup unsalted butter, softened
  • 3/4 cup granulated sugar
  • 3/4 cup packed brown sugar
  • 1 teaspoon vanilla extract
  • 2 large eggs
  • 2 cups semi-sweet chocolate chips
  • 1 cup chopped nuts (optional)

Each ingredient contributes to the overall flavor and texture of the cookies. The all-purpose flour provides structure, while the baking soda helps them rise. Salt enhances the sweetness, and the combination of granulated and brown sugar gives the cookies their signature chewiness. Unsalted butter adds richness, and the chocolate chips bring that irresistible sweetness we all love.

Feel free to experiment with the ingredients! For instance, you can substitute half of the chocolate chips with white chocolate chips or add dried fruits for a unique twist. The possibilities are endless, making this classic chocolate chip cookies recipe a favorite for bakers of all levels.

Step-by-Step Preparation of Classic Chocolate Chip Cookies Recipe

Step 1: Prepping Your Ingredients

Before you start baking, it’s essential to prep your ingredients. Gather all the items listed in the ingredients section. Measure out the flour, baking soda, and salt in one bowl. In another bowl, have your butter, sugars, and vanilla extract ready. This organization will make the mixing process smoother and more enjoyable. Remember, having everything at hand helps you focus on creating delicious cookies!

Step 2: Mixing the Dough

Now, let’s mix the dough! Start by creaming the softened butter in a large mixing bowl. Add the granulated sugar, brown sugar, and vanilla extract. Use an electric mixer or a wooden spoon to beat the mixture until it’s light and fluffy. This step is crucial as it incorporates air, making your cookies soft and chewy.

Next, add the eggs one at a time. Make sure to mix well after each addition. This ensures that the eggs are fully incorporated into the dough. Once the eggs are mixed in, gradually add the flour mixture. Stir until just combined. Be careful not to overmix, as this can lead to tough cookies.

Step 3: Chilling the Dough

Chilling the dough is an optional but beneficial step. If you want chewier cookies, consider chilling the dough for at least 30 minutes. This allows the flavors to meld and helps the cookies maintain their shape while baking. Simply cover the bowl with plastic wrap and place it in the refrigerator. If you’re short on time, you can skip this step, but the results may vary.

Step 4: Baking the Cookies

Once your dough is ready, it’s time to bake! Preheat your oven to 375°F (190°C) if you haven’t already. Line two baking sheets with parchment paper to prevent sticking. Using a spoon or cookie scoop, drop rounded tablespoons of dough onto the prepared sheets. Make sure to space them about 2 inches apart to allow for spreading.

Bake the cookies in the preheated oven for 9 to 11 minutes. Keep an eye on them! The edges should be golden brown, while the centers may look slightly underbaked. This is normal, as they will continue to cook as they cool.

Step 5: Cooling and Storing

After baking, remove the cookies from the oven and let them cool on the baking sheets for about 5 minutes. This allows them to set before transferring them to wire racks. Once they are cool, you can store them in an airtight container. They will stay fresh for several days, but we doubt they’ll last that long!

And there you have it! Following these steps will lead you to a batch of classic chocolate chip cookies that are sure to delight everyone. Enjoy the process and the delicious results!

Variations of Classic Chocolate Chip Cookies Recipe

Gluten-Free Classic Chocolate Chip Cookies Recipe

If you or someone you know has a gluten intolerance, don’t worry! You can still enjoy classic chocolate chip cookies. To make a gluten-free version, simply substitute the all-purpose flour with a gluten-free flour blend. Many brands offer blends that work well in baking, so choose one that you like.

Additionally, make sure that your baking soda and chocolate chips are gluten-free. Most brands are, but it’s always good to check the labels. Follow the same steps as the original recipe, and you’ll have delicious gluten-free cookies that everyone can enjoy. They’ll be just as chewy and chocolatey as the classic version!

Vegan Classic Chocolate Chip Cookies Recipe

For those following a vegan diet, you can still indulge in these delightful cookies! To create a vegan version, replace the eggs with flaxseed meal or applesauce. For flaxseed meal, mix 1 tablespoon of flaxseed with 2.5 tablespoons of water. Let it sit for about 5 minutes until it thickens. This mixture acts as a great egg substitute.

Next, swap the unsalted butter for a plant-based butter or coconut oil. Ensure that your chocolate chips are dairy-free as well. Follow the same mixing and baking instructions, and you’ll have a batch of vegan chocolate chip cookies that are just as tasty as the original. Everyone will love them, regardless of their dietary preferences!

Cooking Note for Classic Chocolate Chip Cookies Recipe

When it comes to baking classic chocolate chip cookies, a few cooking notes can make a big difference in your results. First, always use room temperature ingredients. This means letting your butter and eggs sit out for about 30 minutes before you start. Room temperature butter creams better with sugars, leading to a fluffier dough.

Next, be mindful of your oven temperature. Ovens can vary, so it’s a good idea to use an oven thermometer to ensure accuracy. If your oven runs hot, your cookies may bake too quickly, resulting in a dry texture. Conversely, if it’s too cool, they may spread too much and become flat.

Another tip is to rotate your baking sheets halfway through the baking time. This helps ensure even baking, especially if your oven has hot spots. Simply switch the sheets from top to bottom and front to back. This small adjustment can lead to perfectly baked cookies every time.

Lastly, don’t forget to keep an eye on the cookies as they bake. The edges should be golden brown, while the centers may look slightly underbaked. This is perfectly fine, as they will continue to firm up as they cool. Trust your instincts, and remember that practice makes perfect!

Serving Suggestions for Classic Chocolate Chip Cookies Recipe

When it comes to serving classic chocolate chip cookies, the options are endless! These cookies are not only delicious on their own, but they can also be paired with various treats and beverages to enhance your experience. Here are some delightful serving suggestions to consider:

  • With Milk: A classic pairing! Serve your warm cookies with a glass of cold milk. The creamy texture of milk complements the rich chocolate perfectly, making each bite even more enjoyable.
  • Ice Cream Sandwiches: For a fun twist, turn your cookies into ice cream sandwiches. Simply place a scoop of your favorite ice cream between two cookies. This combination is perfect for hot summer days!
  • With Coffee or Tea: Enjoy your cookies with a cup of coffee or tea. The warmth of the beverage pairs beautifully with the sweetness of the cookies, creating a cozy afternoon treat.
  • On a Dessert Platter: If you’re hosting a gathering, arrange your cookies on a dessert platter. Add some fresh fruit, brownies, or other baked goods for a delightful dessert spread that will impress your guests.
  • With Nut Butter: Spread a layer of peanut butter or almond butter on top of your cookie for an extra boost of flavor. The nutty taste adds a delicious twist that many will love.

These serving suggestions can elevate your classic chocolate chip cookies experience. Whether you’re enjoying them solo or sharing with friends, these ideas will surely make your cookie time even more special. So, grab a cookie, find your favorite pairing, and savor the moment!

Tips for Perfecting Your Classic Chocolate Chip Cookies Recipe

Perfecting your classic chocolate chip cookies recipe can be a delightful journey. With a few simple tips, you can elevate your baking game and create cookies that are soft, chewy, and bursting with flavor. Here are some helpful suggestions to ensure your cookies turn out just right:

  • Measure Ingredients Accurately: Use a kitchen scale for precise measurements. This ensures you have the right amount of flour, sugar, and other ingredients, leading to consistent results.
  • Don’t Overmix: When combining the wet and dry ingredients, mix until just combined. Overmixing can lead to tough cookies, so be gentle!
  • Use Quality Chocolate: The type of chocolate you use can make a big difference. Opt for high-quality semi-sweet chocolate chips or chunks for a richer flavor.
  • Experiment with Add-Ins: Feel free to get creative! Add-ins like nuts, dried fruits, or even a sprinkle of sea salt on top can enhance the flavor and texture of your cookies.
  • Chill the Dough: As mentioned earlier, chilling the dough can improve the texture. It helps the cookies maintain their shape and enhances the flavors.
  • Use Parchment Paper: Lining your baking sheets with parchment paper prevents sticking and promotes even baking. It’s a simple step that makes a big difference!
  • Keep an Eye on Baking Time: Every oven is different. Start checking your cookies a minute or two before the recommended baking time to avoid overbaking.
  • Let Them Cool: Allow your cookies to cool on the baking sheet for a few minutes before transferring them to a wire rack. This helps them set and prevents breakage.

By following these tips, you’ll be well on your way to mastering the classic chocolate chip cookies recipe. Each batch will be a delicious treat that you can share with family and friends. Happy baking!

Breakdown of Time for Classic Chocolate Chip Cookies Recipe

Prep Time

The prep time for this classic chocolate chip cookies recipe is approximately 15 to 20 minutes. During this time, you will gather your ingredients, measure them accurately, and mix the dough. It’s a good idea to have everything ready before you start baking. This way, you can enjoy the process without feeling rushed!

Cooking Time

Once your dough is ready, the cooking time is about 9 to 11 minutes. Keep an eye on your cookies as they bake. The edges should turn golden brown, while the centers may look slightly underbaked. This is perfectly normal, as they will continue to cook while cooling on the baking sheets.

Total Time

In total, you can expect the entire process to take around 30 to 40 minutes, not including any chilling time for the dough. If you choose to chill the dough for 30 minutes, the total time will extend to about 1 hour. Regardless of the time, the delicious aroma of freshly baked cookies will make it all worthwhile!

Nutritional Information for Classic Chocolate Chip Cookies Recipe

Calories

150 calories. This number can vary slightly based on the specific ingredients used and any variations you might add. While these cookies are a delightful treat, moderation is key to enjoying them as part of a balanced diet.

Protein

2 grams. While this isn’t a significant source of protein, it does contribute to your daily intake. Pairing these cookies with a glass of milk can enhance the protein content of your snack, making it a more satisfying option.

Sodium

100 milligrams of sodium. This amount is relatively low, especially when considering the overall daily recommended limit. However, if you’re watching your sodium for health reasons, it’s good to keep this in mind when enjoying your cookies.

Overall, while classic chocolate chip cookies are a delicious treat, being mindful of their nutritional information can help you enjoy them responsibly. Whether you savor them as an occasional indulgence or share them with friends and family, these cookies are sure to bring joy to any gathering!

FAQs about Classic Chocolate Chip Cookies Recipe

What makes a cookie chewy versus crispy?

The texture of a cookie can greatly depend on the ingredients and baking method used. Chewy cookies often contain more moisture, which can come from brown sugar or additional eggs. Brown sugar has more moisture than white sugar, contributing to a softer texture. Additionally, chilling the dough before baking can help create a chewier cookie by allowing the flavors to meld and the dough to firm up. On the other hand, crispy cookies usually have a higher ratio of white sugar and less moisture. They are often baked longer, allowing more moisture to evaporate, resulting in a crunchier texture.

Can I use brown sugar instead of white sugar in the Classic Chocolate Chip Cookies Recipe?

Absolutely! You can use brown sugar instead of white sugar in the classic chocolate chip cookies recipe. In fact, many bakers prefer to use a combination of both sugars. Brown sugar adds moisture and a rich flavor, while white sugar helps with spreading. If you choose to use only brown sugar, your cookies will be chewier and have a deeper flavor. Just keep in mind that the texture may vary slightly, but they will still be delicious!

How do I store leftover cookies?

Storing leftover cookies properly is key to keeping them fresh. Place your cookies in an airtight container at room temperature. This will help maintain their softness and prevent them from becoming stale. If you want to keep them for a longer period, you can also freeze them. Just make sure to separate layers with parchment paper to prevent sticking. When you’re ready to enjoy them, simply thaw at room temperature or warm them in the oven for a few minutes for that fresh-baked taste!

Can I freeze the dough for the Classic Chocolate Chip Cookies Recipe?

Yes, you can freeze the dough for the classic chocolate chip cookies recipe! This is a great way to have fresh cookies on hand whenever you want. To freeze the dough, scoop rounded tablespoons onto a baking sheet lined with parchment paper. Freeze until solid, then transfer the dough balls to a freezer-safe bag or container. When you’re ready to bake, simply preheat your oven and bake the frozen dough directly, adding a minute or two to the baking time. This way, you can enjoy warm cookies anytime!

Conclusion on Classic Chocolate Chip Cookies Recipe

In conclusion, the classic chocolate chip cookies recipe is a timeless treat that brings joy to many. With its rich history and simple ingredients, it’s no wonder these cookies have become a favorite in households around the world. Whether you’re baking for a special occasion or just to satisfy a sweet craving, this recipe is sure to deliver delicious results.

By following the steps outlined in this article, you can create cookies that are soft, chewy, and bursting with chocolatey goodness. Remember, the key to perfect cookies lies in the quality of your ingredients and the care you take during the mixing and baking process. Don’t hesitate to experiment with variations, such as gluten-free or vegan options, to cater to different dietary needs.

As you enjoy your freshly baked cookies, consider sharing them with family and friends. Baking is not just about the end product; it’s also about the memories created in the kitchen. So, gather your loved ones, roll up your sleeves, and embark on this delightful baking adventure together!

With this classic chocolate chip cookies recipe in your baking repertoire, you’re well-equipped to impress anyone with your culinary skills. Happy baking, and may your cookies always be warm and delicious!

Mini Cheesecakes with Berry Topping Recipe Delight!

Introduction to Mini Cheesecakes with Berry Topping Recipe

Mini Cheesecakes with Berry Topping Recipe is the perfect treat for any occasion. These little bites of heaven combine the creamy richness of cheesecake with the fresh, vibrant flavors of berries. They are not only delicious but also visually appealing, making them a hit at parties, family gatherings, or even a cozy night in.

What makes these mini cheesecakes so special? First, they are portioned perfectly, allowing everyone to enjoy their own little cheesecake without the guilt of a large slice. Plus, the berry topping adds a burst of color and flavor that complements the creamy filling beautifully. Whether you’re a cheesecake lover or just looking to try something new, this recipe is sure to satisfy your sweet tooth.

In this article, we will guide you through the ingredients, preparation steps, and even some fun variations to make your mini cheesecakes unique. So, roll up your sleeves and get ready to create a dessert that will leave everyone asking for seconds!

Ingredients for Mini Cheesecakes with Berry Topping Recipe

Mini Cheesecakes with Berry Topping Recipe, you will need a few simple ingredients. Each component plays a vital role in achieving that perfect balance of flavors and textures. Here’s what you’ll need:

  • 1 ½ cups graham cracker crumbs
  • ⅓ cup granulated sugar (for the crust)
  • ½ cup unsalted butter, melted
  • 16 ounces cream cheese, softened
  • ½ cup granulated sugar (for the filling)
  • 1 teaspoon vanilla extract
  • 2 large eggs
  • 1 cup mixed berries (such as strawberries, blueberries, and raspberries)
  • 2 tablespoons honey or maple syrup (for topping)

These ingredients are easy to find at your local grocery store. The graham cracker crumbs provide a crunchy base, while the cream cheese creates a rich and creamy filling. The mixed berries add a refreshing touch, making each bite a delightful experience. With these ingredients on hand, you’re all set to start your cheesecake adventure!

Step-by-Step Preparation of Mini Cheesecakes with Berry Topping Recipe

Mini Cheesecakes with Berry Topping Recipe. Follow these simple steps to create your delicious mini cheesecakes that everyone will love!

Step 1: Preparing the Crust

graham cracker crumbs, ⅓ cup of granulated sugar, and melted butter. Mix everything together until it resembles wet sand. This mixture will form the base of your cheesecakes.

1 tablespoon of the crust mixture and press it firmly into the bottom of each muffin liner. Make sure it’s packed tightly to create a sturdy crust. This step is crucial, as it will hold the cheesecake filling perfectly. Once done, set the muffin tin aside while you prepare the filling.

Step 2: Making the Cheesecake Filling

softened cream cheese with an electric mixer until it’s smooth and creamy. This should take about 2-3 minutes. Gradually add in the ½ cup of granulated sugar and vanilla extract, mixing until everything is well combined.

eggs one at a time. Mix just until incorporated after each addition. Be careful not to overmix, as this can make the cheesecakes dense. Your filling should be light and fluffy, ready to be spooned over the crusts!

Step 3: Baking the Mini Cheesecakes

325°F. Spoon the cream cheese mixture over the crusts in the muffin tin, filling each liner about ¾ full. This allows room for the cheesecakes to rise slightly while baking.

18-20 minutes. You’ll know they’re done when the centers are set but still slightly jiggly. Once baked, remove them from the oven and let them cool to room temperature. After that, refrigerate for at least 2 hours to allow them to set properly.

Step 4: Preparing the Berry Topping

mixed berries with 2 tablespoons of honey or maple syrup. Stir gently to coat the berries evenly. Allow the mixture to sit for about 10 minutes. This will help the berries release their juices, creating a delicious syrupy topping.

Step 5: Assembling the Mini Cheesecakes

Finally, it’s time to assemble your mini cheesecakes! Once the cheesecakes have chilled and set, take them out of the refrigerator. Carefully remove them from the muffin tin and peel off the paper liners.

Mini Cheesecakes with Berry Topping Recipe!

Variations of Mini Cheesecakes with Berry Topping Recipe

Mini Cheesecakes with Berry Topping Recipe is already a crowd-pleaser, there are many fun variations you can try. These tweaks can add new flavors and textures, making your mini cheesecakes even more exciting. Let’s explore some different berry options and alternative crust ideas!

Different Berry Options

When it comes to the berry topping, the possibilities are endless! You can mix and match different types of berries to create a unique flavor profile. Here are some berry options to consider:

  • Blackberries: These juicy berries add a slightly tart flavor that pairs well with the sweetness of the cheesecake.
  • Cherries: Fresh or even canned cherries can bring a delightful sweetness and a pop of color to your mini cheesecakes.
  • Peaches: Diced peaches can add a summery twist. Combine them with a bit of lemon juice for a refreshing topping.
  • Raspberries: Their bright color and tangy taste make raspberries a perfect choice for a vibrant topping.
  • Mixed Berries: Don’t hesitate to use a combination of your favorite berries! A mix of strawberries, blueberries, and raspberries creates a beautiful and delicious topping.

Feel free to experiment with different berry combinations. Each type of berry will bring its own unique flavor, making your cheesecakes even more delightful!

Alternative Crust Ideas

Mini Cheesecakes with Berry Topping Recipe. Here are some tasty alternatives:

  • Oreo Crust: Crush Oreo cookies instead of graham crackers for a chocolatey twist. This adds a rich flavor that pairs wonderfully with the creamy filling.
  • Almond Flour Crust: For a gluten-free option, use almond flour mixed with melted butter and a bit of sugar. This crust is nutty and delicious!
  • Shortbread Crust: Use crushed shortbread cookies for a buttery and sweet base. This adds a lovely texture to your mini cheesecakes.
  • Coconut Crust: Combine shredded coconut with melted butter and a bit of sugar for a tropical flair. This crust will give your cheesecakes a unique taste.

These alternative crust ideas can elevate your mini cheesecakes to a whole new level. Don’t be afraid to get creative and find the combination that you love the most!

Cooking Note for Mini Cheesecakes with Berry Topping Recipe

Mini Cheesecakes with Berry Topping Recipe, there are a few important cooking notes to keep in mind. These tips will help ensure that your mini cheesecakes turn out perfectly every time!

First, make sure your cream cheese is at room temperature. This step is crucial for achieving a smooth and creamy filling. If the cream cheese is too cold, it can create lumps in your mixture, making it difficult to blend smoothly. To speed up the process, you can cut the cream cheese into smaller pieces and let it sit out for about 30 minutes before mixing.

Next, avoid overmixing the cheesecake filling. While it’s important to combine the ingredients well, overmixing can introduce too much air into the batter. This can lead to cracks in your cheesecakes as they bake. Mix just until everything is incorporated, and you’ll have a lovely, creamy texture.

When baking, keep an eye on the mini cheesecakes. Ovens can vary, so check them a minute or two before the suggested baking time. You want the centers to be set but still slightly jiggly. This ensures they will firm up nicely as they cool.

Lastly, allow the cheesecakes to cool completely at room temperature before refrigerating. This helps prevent condensation from forming on the surface, which can affect the texture and appearance of your mini cheesecakes. Once they are chilled, they will be ready to top with your delicious berry mixture!

By following these cooking notes, you’ll be well on your way to creating delightful mini cheesecakes that are sure to impress your family and friends. Enjoy the process and the delicious results!

Serving Suggestions for Mini Cheesecakes with Berry Topping Recipe

Mini Cheesecakes with Berry Topping Recipe, it’s time to think about how to serve them! Presentation can elevate your dessert experience, making it even more enjoyable for you and your guests. Here are some delightful serving suggestions to consider:

  • Garnish with Mint: Add a fresh touch by garnishing each mini cheesecake with a sprig of mint. This not only enhances the visual appeal but also adds a refreshing flavor.
  • Drizzle with Chocolate: For chocolate lovers, a drizzle of melted chocolate over the berry topping can add a rich and indulgent twist. Use dark, milk, or white chocolate based on your preference.
  • Serve with Whipped Cream: A dollop of whipped cream on top of each mini cheesecake can make them even creamier. You can also sprinkle some crushed berries on the whipped cream for added flavor.
  • Use Decorative Plates: Present your mini cheesecakes on colorful or patterned plates. This can make your dessert table look more inviting and festive.
  • Pair with Beverages: Consider serving your mini cheesecakes with a refreshing drink. Iced tea, lemonade, or even a glass of dessert wine can complement the flavors beautifully.
  • Make a Cheesecake Platter: Arrange your mini cheesecakes on a large platter, mixing different berry toppings. This creates a beautiful display and allows guests to choose their favorite flavors.

Mini Cheesecakes with Berry Topping Recipe. Whether it’s a casual family dinner or a fancy gathering, these ideas will surely impress your guests and make your dessert the star of the show!

Tips for Perfect Mini Cheesecakes with Berry Topping Recipe

Mini Cheesecakes with Berry Topping Recipe can be a delightful experience. To ensure your mini cheesecakes turn out just right, here are some helpful tips to keep in mind:

  • Use Room Temperature Ingredients: Always start with room temperature cream cheese and eggs. This helps create a smooth filling without lumps. If you forget to take them out in advance, you can microwave the cream cheese for about 10-15 seconds to soften it.
  • Don’t Overmix: When mixing the filling, be careful not to overmix. Overmixing can introduce too much air, leading to cracks in your cheesecakes. Mix just until combined for a creamy texture.
  • Check for Doneness: Keep an eye on your mini cheesecakes while they bake. They should be set around the edges but still slightly jiggly in the center. This ensures they will firm up as they cool.
  • Cool Gradually: After baking, let the cheesecakes cool in the muffin tin for about 10 minutes before transferring them to a wire rack. This gradual cooling helps prevent cracks.
  • Chill Before Serving: Allow your mini cheesecakes to chill in the refrigerator for at least 2 hours. This helps them set properly and enhances the flavors.
  • Experiment with Toppings: Feel free to get creative with your berry toppings! You can add a sprinkle of powdered sugar, a drizzle of chocolate, or even a dollop of whipped cream for extra flair.
  • Use Quality Ingredients: The quality of your ingredients can make a big difference. Use fresh berries and high-quality cream cheese for the best flavor.
  • Make Ahead: These mini cheesecakes can be made a day in advance. Just store them in the refrigerator until you’re ready to serve. This makes them a great option for parties!

Mini Cheesecakes with Berry Topping Recipe. Enjoy the process and the delightful results!

Breakdown of Time for Mini Cheesecakes with Berry Topping Recipe

Mini Cheesecakes with Berry Topping Recipe can help you plan your baking session effectively. Here’s a detailed breakdown of the time you’ll need to create these delightful treats!

Prep Time

30 minutes. This includes gathering your ingredients, preparing the crust, and mixing the cheesecake filling. Make sure to set aside enough time to ensure everything is done properly. Rushing can lead to mistakes, and we want your mini cheesecakes to turn out perfectly!

Cooking Time

18-20 minutes. During this time, the mini cheesecakes will bake in the oven. Keep an eye on them to ensure they are set but still slightly jiggly in the center. This is crucial for achieving that creamy texture we all love!

Total Time

2 hours and 50 minutes to complete the entire process. This includes the prep time, cooking time, and the necessary chilling time of at least 2 hours after baking. The chilling step is essential for the cheesecakes to set properly, so don’t skip it!

Mini Cheesecakes with Berry Topping Recipe turns out deliciously every time. Happy baking!

Nutritional Information for Mini Cheesecakes with Berry Topping Recipe

Mini Cheesecakes with Berry Topping Recipe can help you enjoy them guilt-free. Here’s a breakdown of the key nutritional information per serving, so you can indulge while keeping track of your dietary needs.

Calories

210 calories. This makes them a satisfying yet manageable dessert option. The calorie count comes from the combination of the creamy filling, buttery crust, and the natural sweetness of the berries. Enjoying one or two of these mini treats can fit nicely into a balanced diet!

Protein

3 grams. The cream cheese and eggs contribute to this protein content, making these mini cheesecakes not only delicious but also a source of essential nutrients. While they are not a high-protein snack, they do offer a little boost, especially when paired with the healthy berries on top.

Sodium

150 milligrams of sodium. This amount is relatively low, making it a suitable dessert for those watching their sodium intake. The sodium primarily comes from the cream cheese and butter used in the recipe. Keeping an eye on sodium levels is important, but these mini cheesecakes can be enjoyed without worry!

Mini Cheesecakes with Berry Topping Recipe while being mindful of your dietary choices. Enjoy these delightful treats as part of a balanced lifestyle!

FAQs about Mini Cheesecakes with Berry Topping Recipe

Can I make Mini Cheesecakes with Berry Topping Recipe ahead of time?

Mini Cheesecakes with Berry Topping Recipe is that they can be made ahead of time. In fact, preparing them a day in advance can enhance their flavor as they chill in the refrigerator. Just follow the recipe as directed, and once they are baked and cooled, store them in an airtight container in the fridge. This way, they’ll be ready to serve when you need them, making your dessert planning a breeze!

What types of berries work best for the topping?

When it comes to choosing berries for your topping, the options are plentiful! You can use a variety of berries to create a colorful and flavorful topping. Some popular choices include:

  • Strawberries: Sweet and juicy, they add a lovely color and flavor.
  • Blueberries: These tiny berries are packed with antioxidants and provide a burst of sweetness.
  • Raspberries: Their tartness complements the creamy cheesecake perfectly.
  • Blackberries: These larger berries add a rich flavor and beautiful contrast.
  • Cherries: Fresh or canned, they can add a delightful sweetness and vibrant color.

Feel free to mix and match your favorite berries for a unique topping that suits your taste!

How do I store leftover Mini Cheesecakes with Berry Topping Recipe?

Mini Cheesecakes with Berry Topping Recipe is simple! First, make sure they are completely cooled and set. Then, place them in an airtight container. You can keep them in the refrigerator for up to 3-4 days. If you want to store them for a longer period, consider freezing them. To freeze, wrap each mini cheesecake tightly in plastic wrap and then place them in a freezer-safe container. They can be frozen for up to 2 months. When you’re ready to enjoy them, simply thaw them in the refrigerator overnight. This way, you can savor your delicious mini cheesecakes whenever you like!

Conclusion on Mini Cheesecakes with Berry Topping Recipe

Mini Cheesecakes with Berry Topping Recipe is a delightful dessert that combines simplicity with elegance. These mini treats are not only easy to prepare but also offer a burst of flavor that will leave your taste buds dancing. With their creamy filling and vibrant berry topping, they are perfect for any occasion, whether it’s a family gathering, a birthday party, or just a sweet treat for yourself.

By following the steps outlined in this article, you can create a dessert that is sure to impress. The variations and tips provided allow you to customize your mini cheesecakes to suit your preferences. Whether you choose to experiment with different berries or try out alternative crusts, the possibilities are endless!

Remember, the key to a successful cheesecake lies in the quality of your ingredients and the care you take during preparation. With a little patience and creativity, you can master this recipe and enjoy the delicious results. So, gather your ingredients, roll up your sleeves, and get ready to indulge in these scrumptious mini cheesecakes!

Mini Cheesecakes with Berry Topping Recipe. Happy baking!