Pistachio Pineapple Cake: A Slice of Nostalgia and Joy

A Sweet Memory Baked into Every Bite

The scent of vanilla and tropical fruit filled my grandmother’s kitchen every spring. It was a familiar, comforting aroma that signaled something special was about to be served. Growing up, I watched in awe as she prepared her famous Pistachio Pineapple Cake, a dessert that blended the nutty richness of pistachios with the bright, sweet tang of pineapple. It was a cake unlike any other—light yet indulgent, simple yet packed with deep flavor.

I remember the first time she let me help. My small hands stirred the batter while she told stories about how this cake had become a family favorite. It wasn’t a complicated recipe, she said, but it was one that had a way of bringing people together. Whether for birthdays, Sunday dinners, or just because, it became the kind of dessert that made its way onto the table without a special occasion.

Even now, as I bake it in my own kitchen, I can still hear her voice reminding me that the secret ingredient isn’t just pistachio pudding or pineapple—it’s the love and memories we bake into it. That’s what makes Pistachio Pineapple Cake so special.

Why This Cake is a Must-Try

Pistachio Pineapple Cake is more than just a delicious dessert—it’s a delightful fusion of flavors that strike the perfect balance between nutty, creamy, and fruity. Here’s why it stands out:

1. Unique Flavor Combination

Pistachios have a naturally sweet, nutty taste that pairs beautifully with the tropical tang of pineapple. The result is a cake that is refreshing and rich, without being overly sweet.

2. Incredibly Light and Fluffy

Thanks to the use of angel food cake mix, this dessert has an airy, melt-in-your-mouth texture. It feels indulgent without being heavy, making it perfect for warm weather gatherings.

3. A Foolproof Recipe

With simple ingredients and minimal prep time, this cake is accessible to both experienced bakers and beginners. The process is straightforward, yet the end result feels like something that took hours of effort.

4. Perfect for Any Occasion

Whether you’re hosting a spring brunch, a summer picnic, or simply craving something sweet, Pistachio Pineapple Cake fits any occasion. It’s light enough for an afternoon treat but decadent enough to serve as a celebration dessert.

Ingredients

For the Cake:

  • 1 package angel food cake mix
  • 1 package (3.4 oz) instant pistachio pudding mix
  • ½ cup vegetable oil
  • 3 large eggs
  • 1 can (20 oz) crushed pineapple (with juice)

For the Frosting:

  • 1 container (8 oz) whipped topping, thawed
  • ⅔ cup whole milk
  • 1 package (3.4 oz) instant pistachio pudding mix
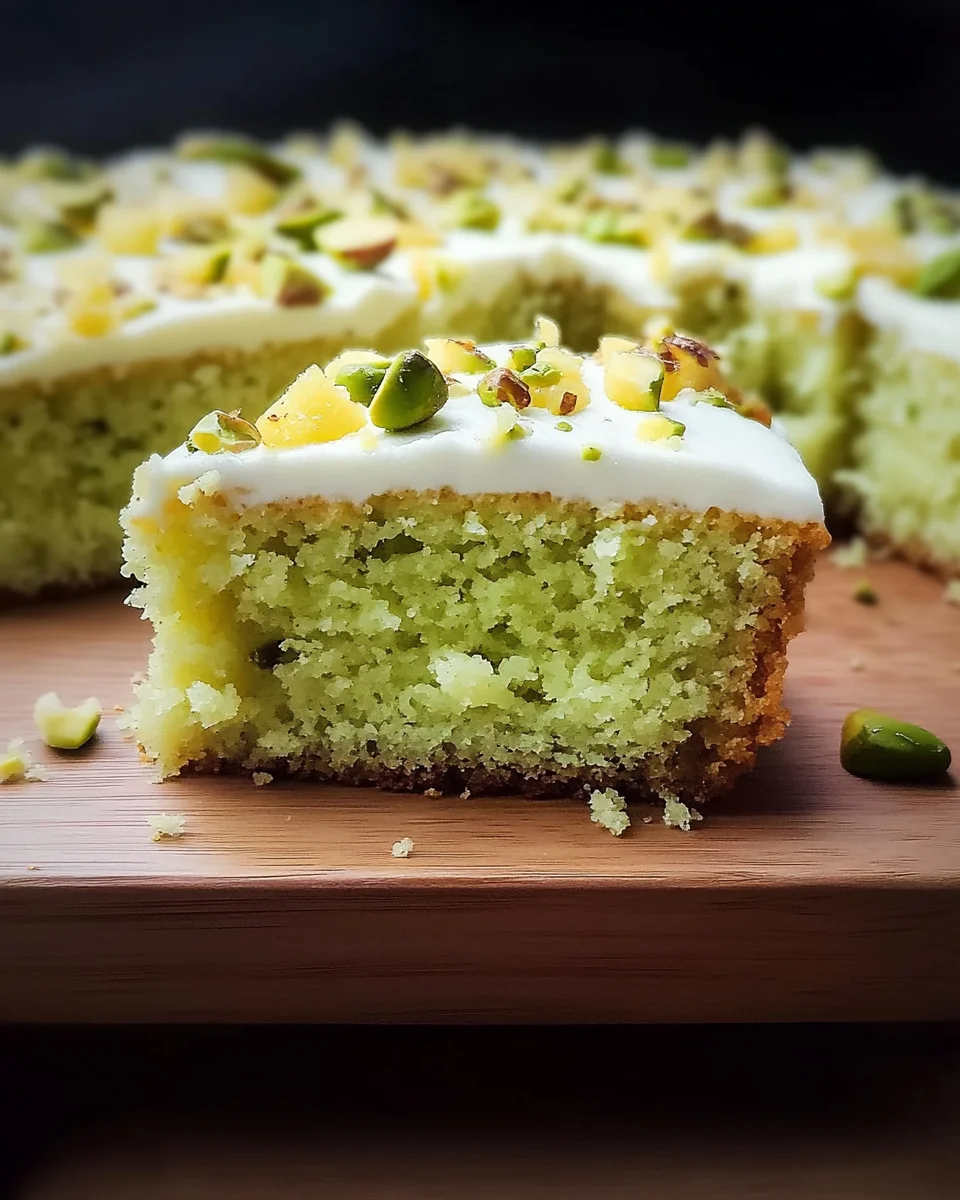
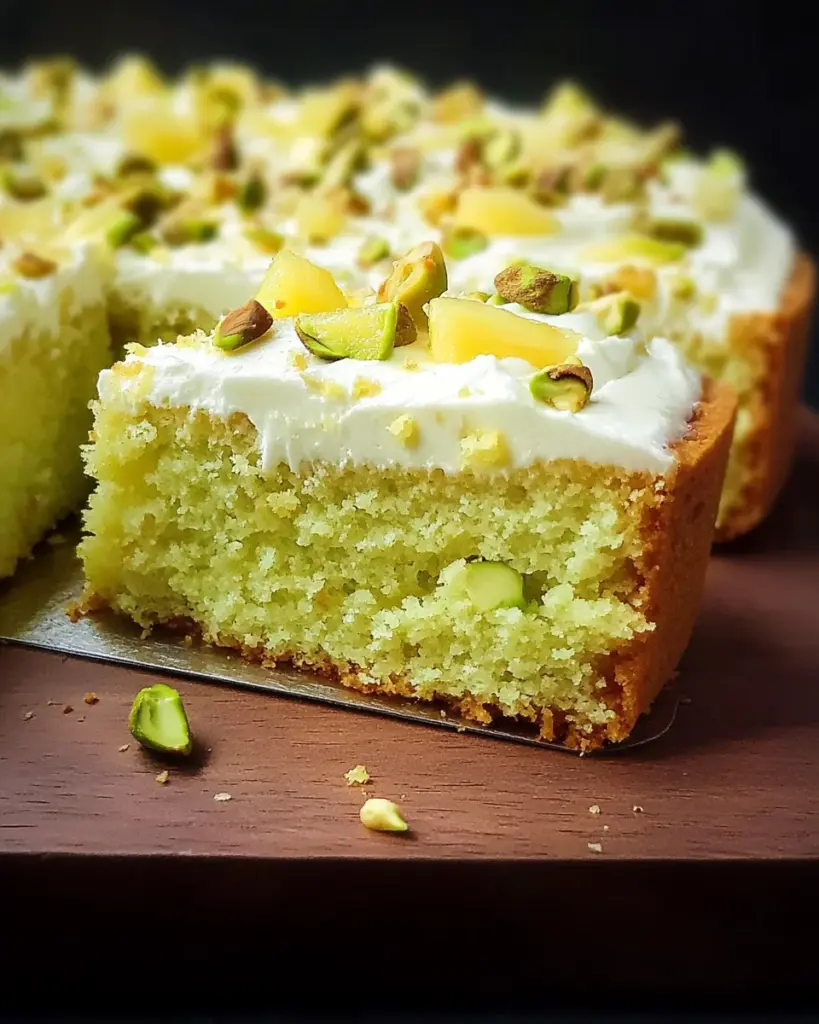
  • Chopped pistachios (for garnish)

Directions

1. Prepare the Cake Batter

Preheat the oven to 350°F (175°C) and lightly grease a 9×13-inch baking dish. In a large mixing bowl, combine the cake mix, pistachio pudding mix, vegetable oil, eggs, and the entire can of crushed pineapple (including the juice). Mix until fully combined.

2. Bake to Perfection

Pour the batter into the prepared baking dish, smoothing the top with a spatula. Bake for 30-35 minutes, or until a toothpick inserted in the center comes out clean. Let the cake cool completely.

3. Create the Frosting

In a separate bowl, whisk together the second package of pistachio pudding mix with milk until thickened. Gently fold in the thawed whipped topping until well incorporated.

4. Frost and Chill

Spread the frosting evenly over the cooled cake, ensuring full coverage. Refrigerate the cake for at least 2 hours to allow the flavors to meld and the frosting to set.

5. Garnish and Serve

Before serving, sprinkle chopped pistachios over the cake for added crunch and visual appeal. Slice and enjoy this tropical, nutty delight!

Nutritional Information (Per Serving, Approximate):

  • Calories: 280 kcal
  • Carbohydrates: 40g
  • Protein: 4g
  • Fat: 12g
  • Saturated Fat: 3g
  • Sugar: 25g
  • Fiber: 1g

The Magic Behind the Ingredients

Every ingredient in this cake plays an essential role in creating its unique taste and texture. Let’s take a closer look at what makes it work so well:

Angel Food Cake Mix

This cake mix forms the base of the recipe, providing a light, fluffy texture. The structure of angel food cake allows it to soak in the flavors of the pineapple while still maintaining a soft crumb.

Pistachio Pudding Mix

Instant pistachio pudding mix does more than add color—it infuses the cake with a subtle nuttiness and creamy texture. It also plays a role in the frosting, making it smooth and velvety.

Crushed Pineapple

Pineapple brings natural sweetness and a slight tartness that balances the richness of the pudding and cake mix. The juice from the pineapple helps keep the cake moist.

Whipped Topping

A light, creamy frosting made with whipped topping adds the perfect finishing touch. It enhances the airy texture of the cake without making it feel too heavy.

Chopped Pistachios

For an added crunch, chopped pistachios are sprinkled on top. They provide contrast to the soft cake and frosting while reinforcing the nutty theme.

Pro Tips for the Perfect Cake

Even though this recipe is simple, a few expert tips can make all the difference:

1. Don’t Overmix the Batter

Overmixing can lead to a denser cake. Stir until just combined to maintain the light, airy texture.

2. Let the Cake Cool Completely Before Frosting

If the cake is even slightly warm, the frosting will melt and become runny. Allow it to cool entirely for the best results.

3. Chill Before Serving

For the best flavor and texture, refrigerate the cake for at least two hours before serving. This allows the flavors to meld and the frosting to set properly.

4. Make It Your Own

Want to add a personal touch? Try folding in shredded coconut for extra texture or a splash of almond extract to enhance the nutty flavor.

FAQs: Answering Your Baking Questions

1. Can I use fresh pineapple instead of canned?

Yes! Fresh pineapple can be used, but make sure to finely crush it and retain some of the juice to maintain the cake’s moisture.

2. What if I don’t have pistachio pudding mix?

If you can’t find pistachio pudding mix, you can substitute vanilla pudding and add finely ground pistachios for flavor.

3. Can I make this cake ahead of time?

Absolutely! In fact, this cake tastes even better the next day as the flavors develop. Store it in the refrigerator and serve chilled.

4. How long does this cake last?

Kept in an airtight container in the fridge, this cake will stay fresh for up to five days. If you need to store it longer, freezing is an option!

5. Can I make this cake gluten-free?

Yes! Simply use a gluten-free angel food cake mix and double-check that your pudding mix is gluten-free.

The Final Bite: A Cake That Brings Joy

Some recipes are just recipes—simple lists of ingredients and steps to follow. But then there are the ones that mean something more. Pistachio Pineapple Cake isn’t just a dessert; it’s a reminder of family gatherings, warm spring days, and the joy that comes from sharing something homemade with loved ones.

It’s a cake that feels special without being complicated, a dessert that brings people together without requiring hours in the kitchen. Whether you make it for a holiday, a family get-together, or just because, one thing is certain: the moment you take a bite, you’ll understand why this cake has stood the test of time.

So go ahead—bake, share, and savor every bite. Because sometimes, the best memories are made with a slice of cake in hand.

The Heartwarming Tradition of Easter Cream Cheese Babka

For many, the Easter holiday is about much more than just chocolate eggs and bunny-shaped treats. It is a time to gather with loved ones, share memories, and continue family traditions that have been passed down through the generations. Growing up, Easter in my family was always about the warmth of our kitchen filled with the intoxicating aroma of freshly baked goods. The centerpiece of our holiday brunch was always a babka—rich, buttery, and braided with sweet, swirled cream cheese.

But this wasn’t just any babka; it was the Easter Cream Cheese Babka, a treat that combined the best of springtime flavors with the joy of shared family moments. As a child, I remember standing beside my grandmother in the kitchen as she prepared the dough, her hands moving expertly through the motions she had learned from her own grandmother. The way she gently braided the dough, the delicate pastel hues of the cream cheese filling, and the final touch of a sugar syrup glaze made this babka a true labor of love.

Now, as an adult, I cherish those memories even more. The tradition of baking this Easter Cream Cheese Babka has been passed down, and each year, as I prepare it, I can almost hear the laughter and stories shared around the kitchen table. There’s something magical about this bread, a tangible connection to the past, a symbol of family bonds that are strengthened in the kitchen.

The Allure of Babka: A Sweet and Beautiful Tradition

Babka is not just a dessert; it’s an experience. The dough, rich and soft like a perfect brioche, weaves together with the sweet, velvety cream cheese filling, creating layers of flavor and texture that are truly irresistible. While it may seem intricate to make, the process is therapeutic and deeply satisfying. The twisting and braiding of the dough is an art form in itself, and the colorful swirl of cream cheese brings a touch of whimsy that’s perfect for spring celebrations.

The pastel colors of the filling make this babka especially suited for Easter, evoking the soft hues of spring flowers, fresh grass, and the joy of renewal. But you can easily adjust the colors for any season or special occasion, making it versatile enough for any family gathering.

Ingredients:

For the Cream Cheese Filling:

  • 12 oz cream cheese (softened)
  • ¾ cup sugar
  • 1 tsp vanilla extract
  • ½ tsp almond extract
  • Food coloring (4 pastel colors, or colors of your choice)

For the Babka Dough:

  • 4 cups all-purpose flour
  • ⅓ cup sugar + 1 tsp sugar (divided)
  • 1 tsp kosher salt
  • 1 packet active dry yeast (about 2¼ tsp)
  • 1 cup milk (warmed to 100-110°F)
  • 2 eggs
  • 1 tsp vanilla extract
  • 10 tbsp unsalted butter (very soft and cubed)

For the Sugar Syrup:

  • ¼ cup sugar
  • ¼ cup water

Directions:

1. Prepare the Cream Cheese Filling:

  • Beat together the softened cream cheese, sugar, vanilla, and almond extract using an electric mixer until smooth and creamy.
  • Divide the mixture evenly into 4 bowls. Add food coloring to each bowl, adjusting the color as needed. Set aside and chill.

2. Make the Babka Dough:

  • In a bowl, whisk together the flour, ⅓ cup sugar, and salt.
  • Warm the milk in the microwave to about 100-110°F and add to the bowl of a stand mixer. Sprinkle the yeast over the milk and let it foam for about 5 minutes.
  • Add eggs, vanilla, and the flour mixture. Mix on low, then medium speed for about 5 minutes until smooth.
  • Gradually add soft butter and mix on medium-low for about 4 minutes until incorporated and sticky.
  • Cover and let rise for 1-1.5 hours in a warm place, until doubled. For overnight dough, refrigerate after this step.

3. Shape the Babka:

  • Punch down the dough and divide it into two equal parts. Roll each half into a 12×16-inch rectangle on a floured surface.
  • Lightly score the dough every 3 inches to create sections.
  • Spread each color of cream cheese filling into each section, leaving a small border.
  • Roll the dough tightly into a log, sealing the seam. Trim the ends and cut each log lengthwise.
  • Twist the two halves together, then place the dough into parchment-lined loaf pans. Let it rise again for about an hour.

4. Bake the Babka:

  • Preheat the oven to 350°F.
  • Bake the babka for 30-40 minutes, or until golden brown and a tester comes out clean.
  • Immediately brush with sugar syrup for a shiny finish.

5. Cool and Serve:

  • Allow the babka to cool slightly in the pans, then transfer to a wire rack.
  • Slice and serve once fully cooled. For longer storage, wrap tightly and refrigerate for up to 5 days or freeze for 1-2 months.

Nutritional Information (per serving, approx.):

  • Calories: 373 kcal
  • Servings: 2 loaves (12 slices per loaf)

The Secret to Perfect Babka: A Few Tips and Tricks

While the final result is undeniably impressive, making babka doesn’t have to be a daunting task. With the right technique and a little patience, you can create a show-stopping dessert that will be the highlight of your Easter brunch. Here are a few tips that will ensure your babka turns out perfectly every time:

  • Proof Your Yeast: Yeast is the star of the dough. Make sure to proof it by mixing it with warm milk and a little sugar before adding it to the rest of the ingredients. This ensures the yeast is active and helps the dough rise properly.
  • Use Soft Butter: Soft butter is key when making the dough. It integrates more easily into the mixture, ensuring a smooth, rich dough. If your butter is too cold, microwave it in short bursts to soften it without melting it.
  • Give Your Dough Time to Rise: Patience is crucial when making babka. After mixing the dough, let it rise for an hour to an hour and a half. If the dough feels too warm or sticky, refrigerate it for a short period before rolling it out. This will help firm it up and make it easier to handle.
  • Be Gentle with the Filling: When spreading the cream cheese filling, be sure to leave a small border at the top of each section. This will prevent the filling from spilling over as you roll up the dough. The result will be a neater, more aesthetically pleasing babka.
  • Twisting the Dough: One of the most satisfying parts of making babka is twisting the dough. Be sure to cut the dough in half lengthwise and then gently twist the two halves together, exposing the colorful filling. This creates the beautiful spiral effect that makes babka so visually appealing.
  • Sugar Syrup Glaze: The final touch of a sugar syrup glaze adds a beautiful sheen to the babka and helps lock in moisture. Don’t skip this step—it’s what gives the babka its glossy, irresistible finish.

FAQs: Everything You Need to Know About Making Easter Cream Cheese Babka

How long does babka last?

Because of the cream cheese filling, babka should be refrigerated to maintain its freshness. Properly wrapped in plastic wrap or foil, it will last about 4-5 days in the fridge. It also freezes beautifully—wrap it tightly in plastic and foil, and store it in a zip-top bag. It can last 1-2 months in the freezer, making it an excellent make-ahead treat for holidays or special occasions.

Can I make the dough ahead of time?

Yes! If you want to break up the work, you can prepare the dough the night before. After the first rise, simply cover the dough and refrigerate it overnight. The next day, bring it to room temperature before proceeding with shaping and baking. This not only saves time but also enhances the flavor of the dough.

Can I substitute instant yeast for active dry yeast?

Absolutely! If you have instant yeast on hand, you can skip the proofing step altogether. Just mix it directly into the dry ingredients, and proceed with the recipe as usual. Instant yeast doesn’t need to be activated in warm liquid like active dry yeast, which makes it a more convenient option for those in a pinch.

How can I adjust the cream cheese filling for different holidays or occasions?

While pastel colors are perfect for Easter, you can easily change the color of the filling to suit the season or theme of your celebration. For example, red, white, and blue hues could work for a patriotic holiday, while rich autumnal colors like deep orange or burgundy might suit a fall gathering.

Additionally, you could experiment with different flavorings for the cream cheese filling. Try adding a bit of lemon zest or cinnamon for an extra burst of flavor that complements the rich dough.

Is it possible to make babka by hand?

While using a stand mixer with a dough hook is definitely the easiest way to make babka dough, you can certainly make it by hand. Just be prepared for a bit of a workout! You’ll need to knead the dough for about 10-12 minutes until it’s smooth and elastic. The key is patience and persistence.

Conclusion: A Tradition Worth Passing Down

Making Easter Cream Cheese Babka is more than just a culinary activity; it’s a way of connecting with generations of bakers who have come before us. The intricate braiding, the delicate swirls of cream cheese, and the satisfying aroma as it bakes—this bread represents love, tradition, and family. Whether it’s for Easter, a family gathering, or just a special treat, this babka is sure to leave a lasting impression.

The best part? It’s a recipe that you can pass down to future generations, just as it was passed down to you. With each slice of this tender, flavorful bread, you’re not just enjoying a delicious dessert—you’re also sharing a piece of your own family history. So, take your time, savor the process, and most importantly, share it with those you love.

Enjoy baking your Easter Cream Cheese Babka, and may it bring warmth and sweetness to your table this holiday season.

Easter Bunny Spinach Dip: A Whimsical Delight for Spring

The Magic of Spring Celebrations

Every year as Easter approaches, my thoughts drift toward gathering with loved ones, celebrating new beginnings, and, of course, indulging in delicious dishes that fill the table with warmth. As a child, Easter was always a time for family and tradition. One of the most cherished parts of the celebration was the food. The smell of fresh-baked goodies, savory appetizers, and rich, creamy dips seemed to invite everyone to the table with the promise of good conversation and even better bites.

One year, in particular, I remember my mother and grandmother working together to prepare a feast that would leave everyone’s stomachs full and hearts light. Their love for cooking was evident in every dish, but there was one recipe that stole the show. It was a spinach dip, served in a shape that made it both adorable and irresistible: a bunny.

This Easter Bunny Spinach Dip is my modern twist on that memory. It’s a festive and fun way to bring a little bit of magic to the holiday table. Combining the creamy goodness of spinach artichoke dip with the fluffiness of crescent dough, this dip is both a feast for the eyes and the taste buds.

Ingredients for a Bunny’s Delight

  • Refrigerated Crescent Dough Sheets – The easy-to-use base for this delightful creation.
  • Frozen Spinach (1 cup, thawed) or Fresh Baby Spinach (2 cups) – The greenery of spring to bring a fresh flavor.
  • Artichoke Hearts (½ cup) – Roughly chopped for a subtle, earthy flavor.
  • Jalapeños (2 tablespoons, jarred, diced) – A mild kick of spice.
  • Cream Cheese (8 oz) – The creamy texture that holds it all together.
  • Unsalted Butter (1 tablespoon) – To sauté and enhance the flavors.
  • Minced Garlic (2 teaspoons) – Adds depth to the dip.
  • Salt & Coarsely Ground Black Pepper – To taste, balancing the flavors.
  • Mayo (¼ cup, reduced-fat olive oil mayo recommended) – For a creamy consistency.
  • Greek Yogurt (¼ cup, or sour cream) – A tangy contrast to the richness of the dip.
  • Freshly Grated Parmesan Cheese (¼ cup) – Adds that perfect salty and nutty flavor.
  • Shredded Mozzarella Cheese (1 cup, divided) – For that gooey, melty texture.

Instructions for Shaping the Bunny

  1. Preheat the Oven: Start by heating your oven to 375°F (190°C) and lining a baking sheet with parchment paper.
  2. Make the Spinach Artichoke Dip: In a skillet, melt butter over medium heat and sauté the garlic for about a minute. Then, add the cream cheese, spinach, artichokes, and jalapeños, mixing until everything is melted and well-incorporated. Stir in salt, pepper, mayo, Greek yogurt (or sour cream), parmesan, and half of the mozzarella. Mix until smooth.
  3. Prepare the Crescent Dough: Open the crescent dough, but instead of unrolling, roll it into two 18-inch ropes and cut each rope into 12 equal pieces. You’ll have 24 pieces in total.
  4. Shape the Bunny: Use one piece of dough for the center of the head, then surround with six pieces. Create the bunny’s ears with four pieces of dough, rolling them slightly and pinching the ends. Use the remaining dough pieces to form the bunny’s body. Scoop the dip into the body and ears, topping with the remaining mozzarella.
  5. Bake the Bunny: Place your shaped bunny on the baking sheet and bake for 15-16 minutes or until the croissants are golden brown, and the mozzarella is melted and slightly browned.
  6. Serve: Once baked, remove from the oven, and serve immediately while it’s hot and gooey.

Nutritional Information
Per serving (based on 8 servings):

  • Calories: 321 kcal
  • Carbohydrates: 26 g
  • Protein: 8 g
  • Fat: 22 g
    • Saturated Fat: 8 g
    • Polyunsaturated Fat: 7 g
    • Monounsaturated Fat: 4 g
  • Trans Fat: 0.01 g
  • Cholesterol: 17 mg
  • Sodium: 917 mg
  • Potassium: 109 mg
  • Fiber: 1 g
  • Sugar: 7 g
  • Vitamin A: 2457 IU
  • Vitamin C: 6 mg
  • Calcium: 135 mg
  • Iron: 1 mg

The Charm of Crescent Dough: A Simple Yet Elegant Base

What makes this Easter Bunny Spinach Dip stand out isn’t just its playful bunny shape but also the surprisingly simple ingredients. The centerpiece of this dish is refrigerated crescent dough sheets, which create a tender, flaky backdrop for the creamy spinach and artichoke dip nestled in the middle. If you’ve ever felt intimidated by complicated recipes, this one will ease your worries. It’s all about creating something that looks complicated but is actually quite simple.

The crescent dough, when formed into the shape of a bunny, adds a golden brown crust that perfectly complements the warm, gooey spinach artichoke dip inside. The beauty of this recipe lies in its ability to combine store-bought ingredients with homemade love, turning a regular appetizer into something special for your family gatherings.

Spinach and Artichoke Dip: A Classic with a Twist

Spinach artichoke dip is a beloved classic for a reason. The creaminess of cream cheese, the subtle richness of mozzarella, and the slight tang of Greek yogurt make it a flavor-packed combination. Add to this the hearty texture of artichoke hearts and the pop of flavor from jalapenos, and you’ve got a dip that’s as addictive as it is delicious.

Whether you’re enjoying it on a chilly spring afternoon or serving it at a grand Easter feast, this spinach dip is a crowd-pleaser that’s sure to keep everyone coming back for more. The beauty of this recipe is in its versatility. You can easily adjust the ingredients to your liking, such as substituting bacon for the jalapenos if you’re not a fan of a bit of heat.

The Secret to Perfecting This Bunny-Shaped Dip

The key to the whimsical appearance of this dish is the careful shaping of the crescent dough. Don’t worry if you’ve never shaped dough before; it’s easier than it seems. By rolling the dough into long ropes and strategically placing them on the baking sheet, you can create a delightful bunny shape that will leave your guests in awe. The dough is pliable, making it easy to mold, and the final result looks like it belongs on a holiday dinner table.

It’s worth noting that while the appearance of the bunny is charming, it’s the golden crust and melty cheese that truly makes this dish a hit. The combination of the warm dip with the perfectly baked crescent dough is simply irresistible.

FAQs: Answering Your Burning Questions

1. Can I make this dish ahead of time?

Yes! If you want to save time on the day of your event, you can prepare the dip mixture in advance and store it in the fridge. When you’re ready to serve, simply assemble the bunny shape with the dough and bake it. This makes for an easy, stress-free addition to your holiday spread.

2. Can I substitute fresh spinach for frozen spinach?

Absolutely! If you prefer fresh spinach, you can use 2 cups of fresh spinach leaves. Just make sure to sauté the spinach until it wilts before adding it to the dip mixture. Both fresh and frozen spinach work beautifully in this recipe.

3. What if I don’t have crescent dough sheets?

No worries! You can use regular crescent roll dough, but keep in mind that it may require a little more shaping to form the bunny. Crescent dough sheets, however, are the most seamless option, as they don’t have perforations that could complicate the bunny shape.

4. Can I freeze the dip for later use?

While the spinach artichoke dip mixture can be frozen, it’s best to bake the crescent dough fresh. Freezing the entire assembled bunny shape may alter the texture of the dough once baked. If you choose to freeze the dip, be sure to let it thaw fully before baking.

5. How do I store leftovers?

If you have any leftovers (though they’re unlikely!), store the dip in an airtight container in the refrigerator for up to 5 days. You can reheat it in the oven or microwave, but be aware that the dough may lose some of its flakiness when reheated.

6. Can I add other ingredients to the dip?

Yes, you can customize the dip to your liking! Consider adding some crumbled bacon, sun-dried tomatoes, or even a handful of chopped herbs like parsley or basil to enhance the flavor. This recipe is versatile and allows you to get creative.

Serving Suggestions: What to Pair with the Easter Bunny Spinach Dip

While this Easter Bunny Spinach Dip is perfect on its own, you can also serve it with an array of dippables. Try it with crispy crackers, fresh veggies like celery, carrot sticks, or cucumber slices. If you’re looking for a heartier option, warm pita bread or baguette slices would also work wonderfully.

For a more elaborate spread, consider pairing it with other Easter appetizers like deviled eggs, roasted vegetables, or a tangy salad. The vibrant, spring-like flavor of this dip complements a variety of dishes, making it a versatile addition to any celebration.

Conclusion: A Delicious Tradition in the Making

Food has a magical way of connecting us to memories and traditions, and this Easter Bunny Spinach Dip is no exception. It brings together the charm of a childhood memory with the flavors of today’s favorites, making it the perfect appetizer for your next family gathering or holiday feast.

Whether you’re hosting Easter brunch or simply celebrating the joys of spring, this dip is sure to be a hit with its whimsical bunny shape and deliciously creamy center. Easy to make and delightful to eat, this dish is a reminder that the best meals are those shared with loved ones, surrounded by laughter and joy.

The Heartwarming Story Behind the Peanut Crockpot Stir Fry

Sometimes, the best recipes are the ones that find you unexpectedly, in the middle of a busy week when you least expect to make anything extraordinary. I remember the first time I tried making Peanut Crockpot Stir Fry—it was one of those days when my to-do list seemed endless, and cooking felt like the last thing on my mind. But I needed something wholesome, satisfying, and easy. So, I threw together a handful of ingredients into my trusty Crockpot, and before I knew it, a fragrant, mouth-watering dish was ready.

The simplicity of it all was like a comforting hug from the inside out. As the aroma filled my kitchen, I couldn’t help but feel grateful for the beauty of slow cooking—something about it felt like taking the time to care for myself, even on the busiest of days. That first bite was a revelation: crunchy, savory, a touch of sweetness, and that irresistible peanut flavor that just wraps everything together. It became one of my go-to meals—one that I can always rely on, whether I’m feeding a crowd or simply making a quick dinner for myself after a hectic day.

The best part? It’s versatile. You can add more vegetables, swap out the proteins, and customize the flavors to your liking. The Crockpot Stir Fry became more than just a recipe—it was a way to show myself that even on the busiest of days, I could take a moment to enjoy something nourishing. Now, whenever I make this dish, it reminds me of the joy that simplicity and comfort can bring.

Why You’ll Love Peanut Crockpot Stir Fry

  1. Effortless Yet Flavorful: The beauty of this recipe lies in how simple it is to prepare. Unlike other stir fry recipes that require constant attention on the stove, the Crockpot does all the work for you. You get all the delicious flavors without the hustle and bustle of traditional stir-frying.
  2. Customizable: Whether you’re vegetarian, gluten-free, or looking for a protein-packed meal, this dish can be tailored to suit your dietary needs. Add more veggies, use tofu for a plant-based option, or throw in chicken or beef for extra protein. The peanut sauce complements whatever you add, making it a versatile meal that works for anyone.
  3. Make-Ahead Convenience: If you’re someone who loves to meal prep, this recipe is ideal. You can prepare it in advance, store it in the fridge, and have it ready to eat for a few days. The flavors deepen over time, making it a great option for leftovers.
  4. Kid-Friendly: Kids love this dish because it’s both nutritious and packed with flavors they enjoy, like peanut butter. The sweet and savory combo is always a hit with little ones, making it a meal that pleases both adults and kids alike.

Tantalizing Ingredients

  • For the Chicken:
    • 1.5 lb chicken breasts
    • 1 red bell pepper (diced)
    • ½ large yellow onion (diced)
    • 2 garlic cloves (chopped)
  • For the Peanut Sauce:
    • ½ cup peanut butter (creamy, or use crunchy but with minimal ingredients)
    • ½ cup chicken broth
    • ¼ cup soy sauce
    • 1 tablespoon honey
    • 1 teaspoon sesame oil
    • 1 teaspoon chili garlic paste
    • 1 tablespoon lime juice
    • 2 tablespoons cilantro (chopped)

Easy Steps to Deliciousness

  1. Prep the Veggies and Chicken:
    • Add the diced bell pepper, onion, and garlic to the bottom of your slow cooker.
    • Lay the chicken breasts over the top of the veggies.
  2. Whisk the Peanut Sauce:
    • In a separate bowl, whisk together peanut butter, chicken broth, soy sauce, honey, sesame oil, and chili garlic paste until smooth and well combined.
  3. Pour and Cook:
    • Pour the peanut sauce over the chicken in the slow cooker.
    • Cover the slow cooker with its lid and cook on HIGH for 2-3 hours or on LOW for 4-5 hours.
  4. Garnish and Serve:
    • Once the chicken is fully cooked, remove the lid, stir in lime juice and cilantro.
    • Serve over rice or noodles, and garnish with more cilantro or peanuts for added texture.

Nutritional Information

Per Serving:

  • Calories: 439 kcal
  • Carbohydrates: 17g
  • Protein: 46g
  • Fat: 22g
    • Saturated Fat: 4g
    • Polyunsaturated Fat: 5g
    • Monounsaturated Fat: 10g
    • Trans Fat: 0.02g
  • Cholesterol: 109mg
  • Sodium: 1257mg
  • Potassium: 949mg
  • Fiber: 3g
  • Sugar: 10g
  • Vitamin A: 1001 IU
  • Vitamin C: 43mg
  • Calcium: 38mg
  • Iron: 2mg

Common Questions About Peanut Crockpot Stir Fry

Q: Can I make this dish gluten-free? Yes! To make Peanut Crockpot Stir Fry gluten-free, simply swap out the soy sauce for a gluten-free tamari or coconut aminos. The peanut sauce is naturally gluten-free, so this adjustment ensures the dish stays within your dietary needs.

Q: How do I store leftovers? Once cooked, you can store leftover Peanut Crockpot Stir Fry in an airtight container in the refrigerator for up to 3-4 days. It reheats beautifully in the microwave, and the flavors continue to meld together, making it even better on day two.

Q: Can I freeze this dish? Yes, this stir fry can be frozen! Allow it to cool completely before transferring it to a freezer-safe container. It can be stored in the freezer for up to 2-3 months. To reheat, let it thaw in the refrigerator overnight, then reheat in the microwave or on the stovetop until warm.

Q: What protein can I add to the Peanut Crockpot Stir Fry? You can add a variety of proteins, depending on your preferences. Chicken, beef, or shrimp are all great options. Alternatively, for a vegetarian or vegan option, tofu works wonderfully. Just make sure to adjust the cooking time depending on the protein you choose.

Q: What other vegetables can I add? Feel free to experiment with different vegetables! Some great options include broccoli, bell peppers, zucchini, snap peas, or baby corn. The key is to use vegetables that hold up well to the slow cooking process, so you get a tender yet slightly crisp texture.

Q: Can I adjust the spice level? Absolutely! If you prefer a spicier stir fry, you can add chili flakes, Sriracha, or even a dash of hot sauce to the peanut sauce to elevate the heat. If you like things mild, you can reduce or omit any spicy ingredients.

Tips for Perfecting Your Peanut Crockpot Stir Fry

  1. Don’t Overcrowd the Crockpot: If you’re cooking for a large group, it might be tempting to pile in tons of ingredients. However, to ensure everything cooks evenly, try not to overcrowd the Crockpot. If needed, cook the stir fry in batches to maintain that perfect balance of flavors.
  2. Use Natural Peanut Butter: For the best peanut sauce, choose a natural peanut butter with no added sugar or preservatives. This will give the sauce a rich, authentic flavor that pairs beautifully with the soy sauce and other ingredients.
  3. Add Fresh Garnishes: While the Crockpot will do most of the work, fresh garnishes like chopped peanuts, green onions, or cilantro can add a burst of freshness and crunch, elevating the dish to the next level.
  4. Balance Sweet and Savory: If you feel that the dish needs more sweetness or saltiness, adjust the soy sauce or brown sugar as needed. The goal is to create a balance that works for your palate.

The Health Benefits of Peanut Crockpot Stir Fry

While Peanut Crockpot Stir Fry is a comfort food, it’s also packed with nutrients. The combination of vegetables provides fiber, vitamins, and minerals, while the peanuts offer healthy fats and protein. The slow cooking method helps retain more of the vegetables’ nutrients, so you get all the benefits of your ingredients in every bite.

Moreover, the dish is relatively low in calories (depending on your protein choice) and can be customized to suit various dietary preferences. If you’re looking to add more plant-based meals to your routine, using tofu or tempeh as a protein source can make it a wholesome, vegan-friendly option.

Conclusion: A Meal That Comforts the Soul

Peanut Crockpot Stir Fry is more than just a recipe—it’s a reminder of the joy and simplicity that food can bring. Whether you’re making it for a busy weeknight dinner or serving it to family and friends, it’s a dish that brings people together. The beauty of this recipe lies in its ability to adapt to your personal preferences, making it a go-to comfort meal that never disappoints.

At its core, this dish is about taking time for yourself, nourishing your body, and enjoying the little things in life. The slow cooker does the hard work, leaving you with a flavorful and comforting meal that’s ready to be savored. So, the next time life gets busy, reach for your Crockpot and make this dish—you’ll find that even on the most hectic days, a good meal can make everything feel just a little bit easier.

A Heartwarming Journey: Greek Lemon Chicken Soup

There are some recipes that bring people together—not just through their flavors, but through their memories. Greek Lemon Chicken Soup (also known as Avgolemono) is one such dish. I’ll never forget the first time I tasted it. It was in a cozy little Greek taverna tucked away in the streets of Athens. The rain was softly tapping against the windows, and the rich aroma of slow-cooked chicken and lemon filled the air.

The waiter brought a steaming bowl of soup to our table. I hadn’t ordered it—my friend had—but the moment I tasted that creamy, tangy soup, something shifted inside me. The warmth spread through my chest, and I instantly felt like I was wrapped in a comforting blanket. That was the magic of Avgolemono—it wasn’t just a soup; it was an experience.

I took the recipe home with me, in my mind and in my heart. Over time, I adapted and perfected it in my kitchen, but that original version in Athens is always in the back of my mind when I make it. Every bowl I serve reminds me of that rainy day in Greece, the laughter around the table, and the way a good meal can transport you to another place entirely.

Whether you’re sitting down to share it with family, or enjoying a quiet bowl on your own, Greek Lemon Chicken Soup is more than just a dish—it’s a story. It’s about warmth, comfort, and the joy of sharing something truly special with those you love.

The Magic of Avgolemono: A Taste of Greece

At first glance, Greek Lemon Chicken Soup might seem like a simple dish. But in its simplicity lies its genius. The soup is a comforting blend of tender chicken, rice, and a broth that’s infused with the unmistakable tang of fresh lemon. The true magic of Avgolemono lies in the silky texture, achieved by tempering egg yolks into the broth. This technique gives the soup a creamy richness without the heaviness of cream.

The bright citrusy flavor of the lemon cuts through the richness, creating a perfect balance. It’s a dance of flavors—savory chicken, creamy egg yolks, and zesty lemon—that makes each spoonful a small but unforgettable moment.

But Greek Lemon Chicken Soup is not just about the taste; it’s about tradition. It’s a dish that has been passed down through generations, comforting families and bringing them together around the table. The eggs in the soup are symbolic of new beginnings, and the soup itself is often served at celebratory meals, making it a dish for both ordinary days and special occasions.

Ingredients to Warm Your Soul

Soup Base:

  • 8 cups chicken broth
  • ½ cup fresh lemon juice
  • ½ cup shredded carrots
  • ½ cup finely chopped onion
  • ½ cup finely chopped celery
  • 6 tablespoons chicken soup base (or bouillon)
  • ¼ teaspoon ground white pepper
  • ¼ cup margarine
  • ¼ cup all-purpose flour

Rich and Creamy Texture:

  • 8 egg yolks (these will create the signature creamy texture)
  • 1 cup cooked white rice
  • 1 cup diced cooked chicken (preferably shredded or cubed)

Garnish:

  • 16 lemon slices (for a refreshing citrus burst)

Directions to Create Greek Magic

  1. Start the Base:
    In a large pot, combine the chicken broth, fresh lemon juice, shredded carrots, chopped onion, chopped celery, chicken soup base, and ground white pepper. Bring everything to a boil over high heat. Once boiling, reduce the heat and let it simmer for 15–20 minutes, or until the vegetables are tender and the flavors meld together.
  2. Thicken the Soup:
    In a small bowl, create a smooth paste by blending margarine and flour. Gradually add this mixture into the simmering broth. Stir frequently for 8–10 minutes until the soup thickens slightly.
  3. Temper the Egg Yolks:
    In a separate bowl, beat the egg yolks until they are light in color. Gradually whisk in some of the hot soup to temper the eggs. Be sure to add the hot liquid slowly while whisking continuously to avoid curdling. Once the egg mixture is warmed up, pour it gently back into the pot while stirring continuously. Heat through but do not let it boil—this ensures the egg yolks maintain their silky texture.
  4. Add the Final Touches:
    Stir in the cooked rice and diced chicken. Let the soup cook gently for a few more minutes until everything is heated through and the ingredients are well combined.
  5. Serve and Enjoy:
    Ladle the soup into serving bowls and garnish with lemon slices for a burst of fresh citrus. The lemon not only adds flavor but also makes the presentation pop with a beautiful splash of color.

Nutritional Breakdown

This Greek Lemon Chicken Soup is both comforting and nutritious. Here’s an approximate nutrient breakdown per serving (based on 6 servings):

  • Calories: 330 kcal
  • Protein: 25g
  • Carbohydrates: 23g
  • Fat: 18g
  • Fiber: 1g
  • Sodium: 750mg (may vary based on broth and soup base used)

FAQs: All You Need to Know About Greek Lemon Chicken Soup

1. Can I make this soup ahead of time?
Absolutely! Greek Lemon Chicken Soup is an excellent make-ahead dish. You can prepare the soup base, cook the chicken, and add the rice a day ahead. When you’re ready to serve, simply reheat the soup and then add the egg mixture. This method also allows the flavors to deepen and meld together, making it taste even better the next day.

2. How do I get the soup to have that creamy texture without curdling the eggs?
The key to achieving the smooth, creamy texture in Avgolemono is tempering the eggs. To do this, beat the egg yolks and then slowly add hot soup to the eggs while whisking constantly. This gradual process helps prevent the eggs from cooking too quickly and curdling. Once the eggs are tempered, you can add them back into the soup without worry.

3. Can I use chicken breasts instead of thighs?
Yes, you can substitute chicken breasts for chicken thighs, though thighs are traditionally used because they have more flavor and tenderness. If you opt for chicken breasts, just be sure not to overcook them, as they can dry out more easily than thighs.

4. What if I don’t have rice—can I use pasta instead?
Definitely! While rice is the traditional choice for Avgolemono, small pasta like orzo or acini di pepe can also work wonderfully. These pasta shapes will absorb the broth, adding texture to the soup while still allowing the lemon and chicken to shine.

5. Is there a way to make this soup vegetarian or vegan?
Yes, you can make a vegetarian version by using vegetable broth instead of chicken broth and substituting the chicken with tofu or a hearty vegetable like zucchini. For the egg yolks, you can experiment with a vegan egg substitute or use a cashew cream to achieve a creamy texture without the eggs.

6. How long will this soup last in the fridge?
The soup will stay fresh in the fridge for up to 3 days. However, because of the egg content, it’s best to consume it within that time frame. To reheat, do so gently on the stovetop, being careful not to bring it to a boil, as this can affect the texture of the egg.

7. Can I freeze Greek Lemon Chicken Soup?
Although Avgolemono is not the best soup to freeze due to the egg and creaminess, you can freeze the broth and chicken portion without the eggs. To enjoy it later, simply defrost and add the egg mixture and rice once you’re ready to serve.

8. What should I serve with this soup?
Greek Lemon Chicken Soup is a hearty meal on its own, but you can serve it with a side of crusty bread or a Greek salad to complete the meal. The fresh, tangy flavors of the salad pair beautifully with the rich, lemony soup. If you want to get really fancy, a drizzle of good-quality olive oil over the soup just before serving can elevate the flavors even more.

Why Greek Lemon Chicken Soup is More Than Just a Meal

In today’s world, where meals are often rushed and eaten on the go, there’s something so deeply comforting about sitting down to a bowl of homemade Greek Lemon Chicken Soup. The process of making it—taking the time to prepare the broth, cook the chicken, and slowly temper the eggs—is an act of care, a gift to yourself and your loved ones.

It’s not just a dish to fill your stomach; it’s a dish to fill your soul. Whether you’re in need of comfort during a cold winter’s day, seeking the warmth of tradition, or simply craving something with depth and flavor, Greek Lemon Chicken Soup checks all the boxes. The combination of tangy lemon, rich chicken, and creamy texture creates a soup that’s both refreshing and satisfying, offering the perfect balance between light and hearty.

The soup also brings people together. It’s a perfect meal to serve at family gatherings or to bring to a friend in need. Avgolemono isn’t just a recipe—it’s a reflection of the culture that brought it to life: simple, honest, and full of heart.

Conclusion: A Timeless Classic with a Personal Touch

There’s something about Greek Lemon Chicken Soup that makes it more than just a dish. It’s a memory, a tradition, and a little piece of Greece on your table. Every time I make it, I’m reminded of that rainy day in Athens, of the laughter, and of the timeless tradition of sitting down with family to share a good meal.

Whether you’ve made it a hundred times or this will be your first attempt, Avgolemono has a way of becoming part of your own story. It’s a soup that grows with you—comforting you on chilly nights, celebrating the simple joys of life, and offering solace during tough times. There’s a reason this soup has been a staple in Greek kitchens for generations, and once you taste it, you’ll understand why.

So, take your time with it. Savor every bite. And remember: the best meals aren’t just about what’s on the plate—they’re about the memories, the connections, and the love that goes into every dish.

The Flavors of Home: A Personal Journey with Peruvian Chicken & Rice

It’s often said that the best meals are the ones that come from the heart, and for me, Peruvian Chicken and Rice with Green Sauce is a dish that not only satisfies the taste buds but also carries memories. I first encountered this dish years ago when I traveled to Peru. What was supposed to be a short trip for sightseeing turned into a gastronomic adventure as I found myself in a small, family-owned restaurant in Lima.

The moment the steaming plate of arroz con pollo (chicken with rice) arrived at our table, something magical happened. The bright green sauce that accompanied the dish smelled of fresh cilantro, garlic, and a hint of spice. As I took my first bite, it was as if the flavors of Peru had enveloped me. The chicken was juicy, the rice tender with a slight sweetness, and the green sauce tied everything together in a way that felt both comforting and invigorating.

I came back from that trip with a deep appreciation for the rich flavors of Peruvian cuisine, and I was determined to recreate that unforgettable meal in my own kitchen. Over the years, I have perfected my version of Peruvian Chicken and Rice with Green Sauce, bringing a little piece of Peru into my home. This dish is not just a recipe; it’s a connection to the memories, the people, and the vibrant culture that made me fall in love with it in the first place. Every time I make it, I’m reminded of that initial experience—the way food can transport us to another place, another time, and evoke emotions that words can hardly express.

A Taste of Peru: Why This Dish is So Special

Peruvian Chicken and Rice with Green Sauce, or Arroz con Pollo con Salsa Verde, is a dish that beautifully captures the essence of Peruvian home cooking. It’s a simple yet flavorful combination of tender, seasoned chicken paired with a fragrant rice dish, all enhanced by the bold, creamy green sauce made from cilantro, jalapeños, and garlic. The rice is typically infused with turmeric or saffron, giving it a vibrant yellow hue and a subtle earthiness. The chicken, marinated in spices and often grilled or roasted, takes on a rich flavor that complements the freshness of the rice and sauce.

The magic of this dish lies in the green sauce. Known as Ají Verde, this sauce is a Peruvian staple—served with everything from grilled meats to sandwiches. Its creaminess comes from a combination of mayonnaise and sour cream, while the heat is balanced by fresh cilantro, garlic, and a touch of lemon or lime. The result is a tangy, zesty accompaniment that adds a layer of depth to the dish, making it truly unforgettable.

The Cultural Roots of Peruvian Chicken and Rice

Peruvian cuisine is a beautiful blend of indigenous ingredients and influences from immigrant populations. The flavors are bold and varied, ranging from the coastal ceviche to the rich, hearty stews of the highlands. Arroz con Pollo, a dish loved throughout Latin America, is particularly significant in Peru. It’s a comforting, family-oriented dish that brings together the flavors of the country’s diverse regions—an embodiment of Peru’s cultural fusion.

The addition of green sauce, however, is what truly sets Peruvian Chicken and Rice apart from other variations of arroz con pollo. While the chicken and rice are commonly found throughout Latin America, the tangy, spicy green sauce has become a hallmark of Peruvian cooking. It’s a testament to the country’s unique approach to blending bold, fresh flavors with its rich culinary traditions.

Ingredients:

For the Chicken Marinade:

  • 1.5-2 pounds of chicken (thighs, breasts, or any cut)
  • 2-3 cloves garlic, minced
  • 2 tablespoons lime juice or white vinegar
  • 2 tablespoons oil of choice
  • 1 tablespoon ground cumin
  • 1 teaspoon smoked paprika
  • 1 teaspoon kosher salt
  • ½ teaspoon freshly ground black pepper

For the Green Sauce (Ají Verde):

  • 1 cup fresh cilantro leaves
  • ½ cup mayonnaise
  • ¼ cup sour cream
  • 2 jalapeño chiles, roughly chopped
  • 2 cloves garlic
  • 1 tablespoon olive oil
  • 1 tablespoon fresh lemon or lime juice
  • Kosher salt and freshly ground black pepper to taste

For the Peruvian Yellow Rice:

  • 1 cup jasmine rice (or basmati)
  • 1 tablespoon butter or oil
  • ¼ cup onion, diced
  • 2-3 garlic cloves, minced
  • 1 teaspoon turmeric
  • ¼ teaspoon each of cumin, onion powder, salt, and pepper
  • 2 cups chicken stock
  • 1 cup frozen peas (optional)

Directions:

1. Marinate the Chicken:

  • In a medium bowl, mix together the ingredients for the chicken marinade. Reserve ¼ of the mixture and set it aside for basting. Coat the chicken with the marinade and refrigerate for at least 1 hour (overnight for best results).

2. Cook the Chicken:

  • Grill: Preheat your grill to medium-high. Grill the chicken for 5-7 minutes per side, basting with the reserved marinade halfway through, until the chicken reaches 165°F internal temperature.
  • Bake: Preheat your oven to 450°F. Arrange the chicken on a foil-lined sheet and bake for 30 minutes, basting with the reserved marinade halfway through.

3. Prepare the Rice:

  • Rinse the rice until the water runs clear and soak for 10-15 minutes before draining. In a pot, sauté diced onion and garlic in butter or oil until softened. Add the rice and spices, and stir for 1 minute. Pour in the chicken stock, bring to a boil, cover, and reduce the heat to low. Cook for 15 minutes, then stir in peas, cover, and let it rest for 5-10 minutes.

4. Make the Green Sauce:

  • Combine all the green sauce ingredients in a blender or food processor. Blend until smooth and creamy. Taste and adjust seasoning with salt and pepper.

5. Serve:

  • Serve the rice as a base, top with the grilled or baked chicken, and drizzle with the green sauce.

Nutritional Information (per serving):

  • Calories: 655 kcal
  • Carbohydrates: 51g
  • Protein: 46g
  • Fat: 28g
    • Saturated Fat: 6g
    • Polyunsaturated Fat: 7g
    • Monounsaturated Fat: 13g
  • Cholesterol: 126mg
  • Sodium: 1036mg
  • Potassium: 1029mg
  • Fiber: 4g
  • Sugar: 5g
  • Vitamin A: 968 IU
  • Vitamin C: 22mg
  • Calcium: 81mg
  • Iron: 3mg

Frequently Asked Questions (FAQs) About Peruvian Chicken and Rice with Green Sauce

1. Can I use other cuts of chicken for this recipe?
While bone-in, skin-on chicken thighs are traditionally used for their juicy, tender texture, you can also use boneless chicken breasts or even chicken wings. Just keep in mind that the cooking times will vary depending on the cut. The key is to ensure the chicken is thoroughly cooked and marinated for maximum flavor.

2. Is Peruvian Chicken and Rice with Green Sauce spicy?
The level of spiciness in this dish largely depends on how much jalapeño you add to the green sauce. For a milder version, you can reduce the amount of jalapeño or remove the seeds. On the other hand, if you like a bit of heat, feel free to add more jalapeños or even a dash of hot sauce.

3. Can I make the green sauce ahead of time?
Yes, you can! In fact, making the green sauce ahead of time can enhance its flavor as it allows the ingredients to meld together. Simply store it in an airtight container in the refrigerator for up to 3 days. It’s a great sauce to have on hand for other dishes, too—perfect for grilled meats or even as a dip for vegetables.

4. How can I make the rice more flavorful?
To enhance the flavor of the rice, you can sauté the garlic and onions in oil before adding the rice. This helps release their flavors and adds richness to the dish. Additionally, using chicken stock instead of water will infuse the rice with even more savory depth. If you want to elevate it further, you can also add a few sprigs of fresh herbs like thyme or bay leaves while cooking.

5. Can I make this dish in advance?
While it’s best enjoyed fresh, you can make the rice and chicken in advance. Store the chicken and rice separately in airtight containers in the fridge for up to 3 days. When ready to serve, simply reheat in a covered dish in the oven or on the stovetop. The green sauce can also be made ahead of time and stored in the fridge.

6. Is this dish gluten-free?
Yes! Peruvian Chicken and Rice with Green Sauce is naturally gluten-free as long as the ingredients, such as mayonnaise and sour cream, do not contain gluten. Just be sure to check labels if you’re purchasing store-bought condiments.

7. Can I substitute the chicken with something else?
If you prefer a vegetarian option, you can substitute the chicken with tofu, tempeh, or even roasted vegetables. These alternatives will absorb the flavors of the rice and green sauce, making for a delicious plant-based version of the dish.

8. What should I serve this dish with?
Peruvian Chicken and Rice is a one-pot meal, but it pairs beautifully with a light salad, like a simple cucumber or tomato salad, to balance the richness of the chicken and rice. For a more traditional Peruvian meal, serve it with a side of yuca fries or a chilled chicha morada (Peruvian purple corn drink) for a truly authentic experience.

Why You Should Try This Recipe: A Dish That Brings People Together

Peruvian Chicken and Rice with Green Sauce isn’t just a meal; it’s an invitation to explore the flavors of Peru. It’s a dish that brings warmth, comfort, and depth to the table. Whether you’re hosting a dinner party, enjoying a weeknight meal with family, or making it just for yourself, this recipe has a way of making you feel like you’re experiencing a bit of the world’s richness without ever leaving home.

What makes it truly special is its ability to unite people through flavor. The combination of savory chicken, aromatic rice, and vibrant green sauce creates a well-rounded dish that excites the senses. It’s a perfect example of how food can be more than just sustenance—it can be a celebration of culture, tradition, and personal memory.

Conclusion: More Than Just a Recipe

Each time I make Peruvian Chicken and Rice with Green Sauce, it’s a reminder of the transformative power of food. It brings me back to that small restaurant in Lima, the comforting taste of cilantro and spice, and the joy of discovering something new. Whether you’re making it for the first time or have already fallen in love with this dish, it’s a recipe that has the power to become part of your own story.

So, if you’re looking for a dish that is vibrant, flavorful, and full of heart, give this Peruvian classic a try. It might just become your new favorite comfort food, with a dash of adventure thrown in. And who knows? It might even take you on a journey of your own, just like it did for me.

A Taste of Tradition: Hibachi Zucchini and the Warmth of Home Cooking

It was a rainy Sunday afternoon when I first tried making hibachi zucchini at home. The kind of afternoon where you’re craving comfort, yet looking for something light and satisfying. My partner and I had spent years enjoying the zesty, tender vegetables at our favorite Japanese steakhouse, their hibachi zucchini always served with that perfect blend of garlic, soy sauce, and sesame oil. But with no chance of dining out due to the weather, I decided to recreate that dish in the comfort of our kitchen.

The experience of cooking it was more than just following a recipe. It was a journey into nostalgia, a way to bring back the moments of clinking chopsticks, the aroma of sizzling vegetables, and the warm laughter of good company. As I heard the hiss of the zucchini hitting the hot pan, it was as if the familiar smell of a Japanese steakhouse was filling our home, reminding me that good food is not just about what’s on your plate, but also about the memories and emotions it stirs.

That first bite was a revelation: a perfect balance of savory, nutty, and umami flavors, tender yet crisp zucchini paired with the slight bite of sesame seeds. The best part? It was so easy to recreate. No need to book a reservation or brave the storm outside. I had all the ingredients in my pantry and felt like I was able to bring a bit of that dining-out magic right to our kitchen. Since then, hibachi zucchini has become one of our go-to side dishes—a reminder that sometimes, the simplest things can bring the greatest joy.

Why Hibachi Zucchini Is the Ultimate Comfort Food

There’s something undeniably comforting about hibachi-style vegetables, and zucchini, in particular, hits all the right notes. It’s a versatile vegetable that absorbs the flavors around it, becoming tender yet maintaining that perfect bite. When combined with the fragrant soy sauce, ginger, and sesame oil, zucchini transforms into a savory delight that can be served as a side dish or enjoyed on its own.

But it’s not just about taste. Hibachi zucchini brings a sense of authenticity to any meal. If you’ve ever been to a Japanese steakhouse and watched the chef prepare vegetables on a hot griddle, you know there’s a bit of a theatrical experience that comes with it. The sizzle, the aroma, and the impressive skill of the chef all combine to make the meal more memorable. When you prepare hibachi zucchini at home, you’re not just cooking; you’re creating an experience—one that takes you away from the mundane and transports you to a table at your favorite restaurant, even if you’re in the comfort of your own home.

Ingredients You’ll Need

  • 2 medium zucchinis
  • 1 medium onion
  • 1 teaspoon garlic, minced
  • 1 teaspoon ginger, minced
  • 1 tablespoon vegetable oil
  • 2 tablespoons soy sauce
  • 1 tablespoon sesame oil
  • 1 tablespoon sesame seeds
  • ½ teaspoon salt
  • ¼ teaspoon black pepper

Cooking Instructions: A Step-by-Step Guide

  1. Prepare the Vegetables
    Slice the zucchinis into sticks (½ inch thick and 2-3 inches long). Cut the onion into quarters and then slice into ½-inch pieces.
  2. Heat the Pan
    Preheat a sauté pan or wok over medium-high heat. Add the vegetable oil and let it heat for about 30 seconds to 1 minute until it shimmers.
  3. Cook the Onion
    Add the sliced onion to the pan. Stir occasionally and cook for 2 minutes until it softens.
  4. Add Aromatics
    Stir in the minced garlic and ginger, cooking for 30 seconds to release their fragrance.
  5. Cook the Zucchini
    Add the zucchini sticks to the pan. Stir every minute and let them cook for 4-5 minutes. Allow them to brown slightly for enhanced flavor.
  6. Season the Zucchini
    Pour in the soy sauce and sesame oil. Sprinkle with salt, black pepper, and sesame seeds. Sauté for an additional minute, ensuring the zucchini is tender-crisp and coated with the savory sauce.
  7. Serve and Enjoy
    Serve your hibachi zucchini with fried rice and grilled protein for an authentic Japanese steakhouse meal. Enjoy with a side of yum yum sauce for extra flavor!

Nutritional Breakdown: What You’re Getting

Though exact nutrition is not provided on the recipe page, here’s a quick overview of the key nutrients from this dish:

  • Zucchini provides fiber, vitamin C, and antioxidants.
  • Sesame oil is a healthy fat source rich in antioxidants.
  • Soy sauce offers sodium, so consider adjusting if you’re watching salt intake.
  • Sesame seeds add a bit of protein, healthy fats, and minerals like calcium.

This dish is low in calories and a great way to enjoy nutrient-dense vegetables with a savory kick!

The Perfect Side Dish for Any Meal

One of the reasons hibachi zucchini is so loved is its versatility. It pairs beautifully with a variety of main dishes, making it an excellent option for almost any meal. Whether you’re serving it alongside a juicy grilled steak, a piece of grilled chicken, or even a plant-based protein like tofu, hibachi zucchini complements whatever you put on the table. Its subtle flavor is bold enough to stand on its own, but it doesn’t overwhelm the other dishes.

For a complete hibachi experience, serve it with fried rice and grilled meat or seafood, just like you’d find at a Japanese steakhouse. The beauty of hibachi zucchini lies in its simplicity—when done right, it doesn’t need to be complicated to be absolutely delicious.

Frequently Asked Questions (FAQs) About Hibachi Zucchini

1. Can I make hibachi zucchini with other vegetables?
Absolutely! While zucchini is the star of the dish, you can easily add or substitute other vegetables to suit your tastes. Mushrooms, yellow squash, and bell peppers are excellent additions. You can also make a vegetable medley for a more colorful and flavorful dish.

2. Is hibachi zucchini gluten-free?
If you’re looking to make this dish gluten-free, you can easily swap out regular soy sauce for tamari or coconut aminos. Both are gluten-free alternatives that will still provide that salty umami flavor we all love.

3. How can I make hibachi zucchini spicier?
If you prefer a bit of heat, add a pinch of red pepper flakes or a splash of sriracha sauce to the soy sauce. This will give the dish a nice kick without overpowering the other flavors. You can also toss in some chopped fresh chili peppers for an extra burst of spice.

4. Can I use frozen zucchini for hibachi zucchini?
Fresh zucchini works best for this recipe, as frozen zucchini tends to become watery when cooked, which could lead to a soggy texture. However, if frozen zucchini is all you have, make sure to thoroughly drain it and pat it dry before cooking to avoid excess moisture.

5. How do I store leftovers?
If you have any leftovers, place them in an airtight container and store them in the fridge for up to 3-4 days. Hibachi zucchini can be easily reheated in a skillet over medium heat for 2-3 minutes or in the microwave in 30-second intervals. It will lose a little bit of its crispness but will still taste great!

6. Can I make hibachi zucchini in advance?
You can prep the zucchini and aromatics (garlic and ginger) ahead of time, but for the best texture and flavor, it’s best to cook the zucchini just before serving. The zucchini will lose its crispness if it sits too long after being cooked.

7. What other seasonings can I add to hibachi zucchini?
While the basic recipe calls for soy sauce, sesame oil, and garlic, you can experiment with other seasonings to suit your preferences. A splash of rice vinegar can add a nice tang, or you could try adding a little bit of hoisin sauce for sweetness. Some people even enjoy adding a drizzle of teriyaki sauce for an extra layer of flavor.

8. Can I make hibachi zucchini on the grill?
For a smoky twist, you can absolutely make hibachi zucchini on the grill. Simply toss the zucchini sticks in olive oil and seasonings, then grill them on medium heat until they’re tender and slightly charred. This method gives the zucchini an added smoky flavor that enhances the dish even more.

Creating a Hibachi Experience at Home

Cooking hibachi zucchini is not just about the food; it’s about creating an experience. While you may not have the flashy knives or the teppanyaki grill in your kitchen, you can still bring that Japanese steakhouse experience home with a few key touches. Set the mood by dimming the lights, playing some soft music in the background, and, of course, enjoying the cooking process as the vegetables sizzle in the pan.

The beauty of hibachi cooking is in the simplicity of the ingredients and the joy of sharing a meal with loved ones. Whether it’s just you and a close friend, or a bustling family gathering, hibachi zucchini brings people together. It encourages conversation, laughter, and the joy of enjoying food in its purest form—simple, flavorful, and made with care.

A Final Thought: Why This Recipe Will Become a Staple in Your Kitchen

Hibachi zucchini is more than just a side dish; it’s a reminder of the beauty of simplicity and the joy of sharing a delicious meal with those you care about. In a world that’s constantly on the move, cooking and sharing meals like this can be a grounding experience—a reminder that the best moments in life are often the ones that don’t need to be complicated.

The next time you’re craving something savory, tender, and easy to make, consider trying hibachi zucchini. It’s a dish that invites you to take your time, savor each bite, and enjoy the warmth of good food shared with good company.

A Family Tradition: Rediscovering Simplicity in a Healthy Dish

The kitchen is the heart of any home. It’s where we connect with each other, whether it’s over a family dinner or while sharing stories from the day. For me, one of the most vivid memories of my childhood was the smell of my mother’s cooking filling the house as the family gathered around the table. Her meals always had this magical ability to bring everyone together, no matter the chaos happening around us.

As I grew older and started cooking for my own family, I realized that food wasn’t just about sustenance—it was about creating moments, memories, and connections. The dish I’m sharing today, Healthy Sesame Chicken with Green Beans and Rice, is one of those recipes that has become a favorite in our household. It’s simple yet satisfying, packed with flavor, and most importantly, it’s nourishing for the body and soul.

This recipe brings together tender chicken, lightly caramelized in a savory sesame sauce, paired with the crispness of fresh green beans and fluffy rice. It’s a perfect example of how food can be both wholesome and indulgent. It has become a weeknight staple in our home—a dish that is not only delicious but also easy to prepare, making it ideal for busy families looking to eat well without spending hours in the kitchen.

The Healing Power of Food: Why We Need Dishes Like This

In today’s fast-paced world, we’re constantly on the go. We juggle work, school, and countless responsibilities, often finding ourselves turning to takeout or pre-packaged meals that promise convenience but fall short in the nutrition department. But sometimes, the simplest meals are the ones that offer the most comfort. Healthy Sesame Chicken with Green Beans and Rice is the perfect antidote to the chaos of daily life. It’s an antidote to the processed, unhealthy food options that too often make their way into our homes.

What makes this recipe truly special is its balance of flavors and nutrients. The sesame sauce, rich in umami, coats the chicken perfectly, while the green beans add a fresh crunch, and the rice serves as a neutral, grounding base. This combination of protein, vegetables, and carbohydrates not only satisfies hunger but also fuels the body in the best possible way.

This dish has become a family favorite, largely because it checks all the boxes—tasty, nutritious, and simple to make. Whether we’re in the middle of a busy workweek or on a lazy Sunday, this meal has the ability to make us pause, take a breath, and appreciate the beauty of cooking with wholesome ingredients.

Ingredients:

  • Chicken: 1 lb boneless, skinless chicken breasts, cut into 1-inch cubes
  • Rice: 1 cup cooked white rice
  • Cooking Oil: 1/2 tablespoon avocado oil
  • Green Beans: 2 cups, steamed

For the Sauce:

  • 1/4 cup coconut aminos
  • 1 tablespoon honey
  • 1 tablespoon toasted sesame oil
  • 1/2 teaspoon ground ginger
  • 1 tablespoon garlic, minced
  • 2 tablespoons rice vinegar
  • 1/4 teaspoon black pepper
  • 1 teaspoon lime zest (from 1 lime)
  • 1 tablespoon lime juice (from 1 lime)
  • 1 tablespoon sesame seeds (for garnish)

Directions: From Pan to Plate in 30 Minutes

  1. Cook the Chicken:
    Heat avocado oil over medium heat in a large skillet or pan. Add chicken cubes and sauté, turning occasionally, until golden brown on all sides, approximately 10–12 minutes.
  2. Prepare the Sauce:
    While the chicken is cooking, whisk together the coconut aminos, honey, sesame oil, ginger, minced garlic, rice vinegar, black pepper, lime zest, and lime juice in a small bowl. Set aside.
  3. Combine Sauce and Chicken:
    Once the chicken is fully cooked, remove it from the pan and set it aside. Pour the prepared sauce mixture into the same pan. Cook over medium heat, stirring constantly, until the sauce thickens and begins to bubble, about 3–5 minutes.
  4. Toss Chicken in Sauce:
    Return the cooked chicken to the pan, tossing it in the bubbling sauce until it is fully coated.
  5. Serve:
    Divide the cooked rice and steamed green beans onto plates. Top with the sesame-coated chicken and garnish with sesame seeds. Serve immediately for a fresh, flavorful meal.

Nutritional Benefits: Light and Nourishing

This Healthy Sesame Chicken is not only delicious but also packed with nutrition:

  • Chicken Breast provides a lean source of protein, helping to build and repair muscles.
  • Coconut Aminos is a soy-free alternative to traditional soy sauce, offering a slightly sweeter flavor with fewer preservatives.
  • Green Beans are rich in vitamins A and C, fiber, and antioxidants that support immune health and digestion.
  • Sesame Seeds contribute healthy fats, calcium, and magnesium, supporting heart health and bone strength.

The dish is also naturally gluten-free when using coconut aminos or tamari, and can be easily customized with alternative protein sources like tofu or shrimp.

FAQ: Everything You Need to Know About Healthy Sesame Chicken with Green Beans and Rice

Q1: Can I substitute chicken for another protein?
Absolutely! While chicken breast is used in this recipe for its lean protein and versatility, you can easily swap it for other proteins like tofu, turkey breast, or even shrimp. If you’re going for a vegetarian version, tofu or tempeh are fantastic alternatives, providing a great source of plant-based protein. Just be sure to adjust the cooking time depending on the protein you choose.

Q2: Can I make this dish gluten-free?
Yes, this dish can be made gluten-free with a few simple adjustments. Instead of using traditional soy sauce, you can substitute it with gluten-free tamari or coconut aminos. Both of these alternatives offer a similar savory flavor without the gluten content. If you’re using store-bought sesame oil, just double-check the label to make sure it’s gluten-free, as some brands may include traces of gluten.

Q3: What other vegetables can I use in place of green beans?
If you’re not a fan of green beans or want to switch things up, there are plenty of other vegetables that would pair wonderfully with this dish. You can try broccoli, snow peas, asparagus, or spinach. Each of these vegetables offers a unique flavor and texture that will complement the sesame chicken perfectly.

Q4: Can I prepare this meal ahead of time?
This recipe is ideal for meal prep! You can cook the chicken and sauce in advance and store it in an airtight container in the fridge for up to 3 days. The green beans can be steamed or blanched ahead of time as well. When you’re ready to serve, simply reheat the chicken and sauce, and serve over freshly made rice. It’s a time-saving solution for those hectic days when you don’t have the time to cook from scratch.

Q5: Is there a way to reduce the sweetness in the sauce?
Yes, if you prefer a less sweet sauce, you can cut down on the amount of honey used. You can also opt for a more savory balance by increasing the amount of sesame oil or adding a splash of rice vinegar for extra tanginess. The beauty of this recipe lies in its flexibility, so feel free to adjust the flavors to your preference.

Q6: How can I make the chicken crispy?
If you prefer your chicken to have a crispy texture, you can pan-sear it in a little oil before adding the sesame sauce. After cooking the chicken through, remove it from the pan and set it aside. Then, make the sauce in the same pan and toss the crispy chicken in the sauce for a final coating. This gives the chicken a crispy exterior with a flavorful sesame glaze.

Q7: Can I use brown rice instead of white rice?
Yes, brown rice is a great alternative to white rice if you’re looking for added fiber and a more hearty texture. It’s a healthier option that will give the dish a bit more substance. Just keep in mind that brown rice takes longer to cook than white rice, so plan accordingly. The nutty flavor of brown rice pairs nicely with the savory sesame chicken and green beans.

The Health Benefits: More Than Just a Delicious Meal

One of the reasons I love this recipe is because it’s packed with nutrients that are both satisfying and good for you. Sesame oil, used in both the sauce and as a garnish, is known for its heart-healthy properties. It’s rich in antioxidants, particularly sesamin, which can help lower cholesterol and protect against inflammation.

Chicken breast, the main protein in this dish, is an excellent source of lean protein, which is essential for muscle repair and overall body function. It’s low in fat and high in amino acids, making it an ideal choice for anyone looking to maintain a balanced diet.

Green beans, the vegetable of choice in this recipe, are high in fiber, vitamins A, C, and K, and various antioxidants that help support immune health, improve digestion, and reduce inflammation. Together with the rice, which provides essential carbohydrates, this dish becomes a well-rounded meal that fuels your body with the nutrients it needs to thrive.

Why Healthy Sesame Chicken with Green Beans and Rice is Perfect for Any Family Table

In our fast-paced world, we often find ourselves rushing from one task to the next, leaving little time to enjoy home-cooked meals. But meals like Healthy Sesame Chicken with Green Beans and Rice serve as a reminder that even on the busiest of days, we can still create delicious, nourishing meals. This dish brings comfort without compromising on health, making it a perfect choice for families looking to prioritize both nutrition and flavor.

Every time we sit down to this meal, it’s not just about the food—it’s about the memories we’re creating around the table. It’s about taking a moment to pause, enjoy each other’s company, and savor a meal that nourishes the body and soul. Whether it’s a quiet weeknight or a weekend dinner with friends, this recipe has a way of turning ordinary moments into something special.

Conclusion: More Than Just a Meal, It’s a Memory in the Making

Food has an incredible power to bring us together, to create memories, and to nourish us. Healthy Sesame Chicken with Green Beans and Rice is more than just a meal—it’s an experience. It’s a dish that speaks to the power of simplicity, where every bite reminds us that eating well doesn’t have to be complicated. It’s easy, healthy, and deeply satisfying—a perfect dish for anyone who wants to enjoy a flavorful meal without the hassle.

So, the next time you’re looking for a dish that checks all the boxes—taste, health, and ease—give this recipe a try. It’s a meal that will not only fill your stomach but also create lasting memories with those you love.

Hungarian Chicken Paprikash: A Creamy Delight Awaits!

gutenberg

Introduction to Hungarian Chicken Paprikash

Hungarian Chicken Paprikash is a creamy, comforting dish that will transport your taste buds straight to Hungary! Tender chicken is simmered in a rich, flavorful paprika-infused sauce, creating a velvety texture that’s both savory and slightly smoky. With a dollop of sour cream to finish, this dish is the perfect balance of spices and creaminess. Traditionally served over dumplings or egg noodles, it’s a hearty and satisfying meal that’s sure to impress. Ready to experience the creamy delight of this classic dish? Let’s get cooking!

Why You’ll Love This Hungarian Chicken Paprikash

This Hungarian Chicken Paprikash is a lifesaver for busy days. It’s not only easy to make, but it also delivers a burst of flavor that will have your family asking for seconds. The creamy sauce is rich and comforting, perfect for chilly evenings. Plus, it’s a one-pot wonder, which means less cleanup for you! What’s not to love about a dish that’s both delicious and simple?

Ingredients for Hungarian Chicken Paprikash

Gathering the right ingredients is key to making a delicious Hungarian Chicken Paprikash. Here’s what you’ll need:

  • Bone-in, skin-on chicken thighs: These are juicy and flavorful, perfect for absorbing the rich sauce.
  • Olive oil: A healthy fat for sautéing the aromatics and browning the chicken.
  • Onion: Finely chopped, it adds sweetness and depth to the dish.
  • Garlic: Minced for that aromatic kick that makes everything better.
  • Sweet paprika: The star of the show! It gives the dish its signature flavor and vibrant color.
  • Salt and black pepper: Essential for seasoning and enhancing the overall taste.
  • Cayenne pepper: Optional, but it adds a nice touch of heat if you like a little spice.
  • Chicken broth: This forms the base of the sauce, adding moisture and flavor.
  • Sour cream: This is what makes the sauce creamy and rich, balancing the spices beautifully.
  • All-purpose flour: Used to thicken the sauce, giving it that luscious texture.
  • Lemon juice: A splash of acidity to brighten the flavors.
  • Fresh parsley: Chopped for garnish, it adds a pop of color and freshness.

For those looking to lighten things up, consider using skinless chicken breasts and reducing the sour cream. You can also toss in bell peppers or mushrooms for extra flavor and nutrition. If you’re curious about exact measurements, they’re available at the bottom of the article for easy printing!

How to Make Hungarian Chicken Paprikash

Now that you have all your ingredients ready, let’s dive into making this delightful Hungarian Chicken Paprikash. Follow these simple steps, and you’ll have a comforting meal on the table in no time!

Step 1: Sauté the Aromatics

Start by heating the olive oil in a large skillet or Dutch oven over medium heat. Once the oil is shimmering, add the finely chopped onion. Sauté it for about 5 minutes until it becomes translucent and fragrant. Then, toss in the minced garlic and cook for another minute. The aroma will fill your kitchen, making everyone curious about dinner!

Step 2: Brown the Chicken

Next, season the chicken thighs with salt, black pepper, and cayenne pepper if you’re feeling adventurous. Place the chicken in the skillet, skin-side down. Let it brown for about 5-7 minutes on each side. This step is crucial as it locks in the juices and adds a beautiful color to the chicken.

Step 3: Add Paprika and Simmer

Once the chicken is nicely browned, sprinkle the sweet paprika over it. Stir gently to coat the chicken evenly. Now, pour in the chicken broth, bringing the mixture to a gentle simmer. Cover the skillet and let it cook for about 30 minutes. This allows the chicken to become tender and soak up all those delicious flavors.

Step 4: Create the Creamy Sauce

In a small bowl, whisk together the sour cream, flour, and lemon juice until smooth. Gradually stir this mixture into the skillet, ensuring it blends well with the broth. Cook for an additional 5 minutes, allowing the sauce to thicken slightly. This creamy sauce is what makes Hungarian Chicken Paprikash so irresistible!

Step 5: Serve and Enjoy

Finally, taste the sauce and adjust the seasoning if needed. Serve the chicken paprikash hot, garnished with freshly chopped parsley. It pairs beautifully with egg noodles or rice, soaking up that luscious sauce. Enjoy every bite of this comforting dish!

Tips for Success

  • Always brown the chicken well; it enhances the flavor.
  • Use fresh paprika for the best taste; it makes a difference!
  • Don’t rush the simmering process; let the chicken become tender.
  • Adjust the sour cream to your liking for creaminess.
  • Garnish with parsley just before serving for a fresh touch.

Equipment Needed

  • Large skillet or Dutch oven: Essential for browning the chicken and simmering the sauce.
  • Wooden spoon: Perfect for stirring and scraping up those delicious bits.
  • Measuring cups and spoons: Handy for accurate ingredient measurements.
  • Whisk: Useful for blending the sour cream mixture smoothly.

Variations of Hungarian Chicken Paprikash

  • Vegetarian Option: Substitute chicken with hearty vegetables like eggplant, zucchini, or chickpeas for a delicious meatless version.
  • Spicy Twist: Add diced jalapeños or a splash of hot sauce for an extra kick that spice lovers will adore.
  • Herb Infusion: Experiment with fresh herbs like thyme or dill to elevate the flavor profile and add freshness.
  • Smoky Flavor: Incorporate smoked paprika instead of sweet paprika for a deeper, smoky taste that’s simply irresistible.
  • Low-Carb Version: Serve over cauliflower rice or zucchini noodles instead of traditional egg noodles or rice for a lighter meal.

Serving Suggestions for Hungarian Chicken Paprikash

  • Egg Noodles: Serve the chicken paprikash over buttery egg noodles to soak up the creamy sauce.
  • Rice: Fluffy white or brown rice makes a great base for this dish.
  • Crusty Bread: A side of crusty bread is perfect for dipping into the sauce.
  • Wine Pairing: A glass of dry white wine complements the flavors beautifully.
  • Garnish: Fresh parsley adds a pop of color and freshness to your plate.

FAQs about Hungarian Chicken Paprikash

As you embark on your culinary journey with Hungarian Chicken Paprikash, you might have a few questions. Here are some common queries that I’ve encountered, along with helpful answers to guide you along the way!

Can I use chicken breasts instead of thighs?


Absolutely! While I love the richness of chicken thighs, skinless chicken breasts can work too. Just remember, they may cook faster, so keep an eye on them to avoid drying out.


What can I serve with Hungarian Chicken Paprikash?


This dish pairs wonderfully with egg noodles, rice, or even crusty bread. Each option soaks up that creamy sauce beautifully, making every bite a delight!


Can I make this dish ahead of time?


Yes! Hungarian Chicken Paprikash can be made ahead and stored in the fridge for a couple of days. Just reheat gently on the stove, adding a splash of broth if needed to loosen the sauce.


Is Hungarian Chicken Paprikash spicy?


It can be! The cayenne pepper is optional, so you can adjust the heat level to your preference. If you’re serving picky eaters, feel free to leave it out entirely.


Can I freeze Hungarian Chicken Paprikash?


Yes, this dish freezes well! Just let it cool completely before transferring it to an airtight container. When you’re ready to enjoy it again, thaw in the fridge and reheat on the stove.

Final Thoughts

Cooking Hungarian Chicken Paprikash is more than just preparing a meal; it’s about creating memories around the dinner table. The creamy sauce and tender chicken bring warmth and comfort, making it a dish that everyone will love. I cherish the moments when my family gathers to enjoy this delightful recipe, sharing stories and laughter. Whether it’s a busy weeknight or a special occasion, this dish never fails to impress. So, roll up your sleeves, embrace the joy of cooking, and let Hungarian Chicken Paprikash become a cherished part of your culinary adventures!

“`

Print
clock clock iconcutlery cutlery iconflag flag iconfolder folder iconinstagram instagram iconpinterest pinterest iconfacebook facebook iconprint print iconsquares squares iconheart heart iconheart solid heart solid icon
Hungarian Chicken Paprikash

Hungarian Chicken Paprikash: A Creamy Delight Awaits!


5 Stars 4 Stars 3 Stars 2 Stars 1 Star

No reviews

  • Author: Isabella
  • Total Time: 55 minutes
  • Yield: 4 servings 1x
  • Diet: Gluten Free

Description

Hungarian Chicken Paprikash is a creamy and flavorful dish made with tender chicken thighs, sweet paprika, and a rich sour cream sauce.


Ingredients

Scale
  • 2 pounds bone-in, skin-on chicken thighs
  • 1 tablespoon olive oil
  • 1 medium onion, finely chopped
  • 2 cloves garlic, minced
  • 2 tablespoons sweet paprika
  • 1 teaspoon salt
  • 1/2 teaspoon black pepper
  • 1/2 teaspoon cayenne pepper (optional for heat)
  • 1 cup chicken broth
  • 1 cup sour cream
  • 2 tablespoons all-purpose flour
  • 1 tablespoon lemon juice
  • Fresh parsley, chopped (for garnish)

Instructions

  1. In a large skillet or Dutch oven, heat the olive oil over medium heat. Add the chopped onion and sauté until translucent, about 5 minutes. Add the minced garlic and cook for an additional minute until fragrant.
  2. Season the chicken thighs with salt, black pepper, and cayenne pepper (if using). Add the chicken to the skillet, skin-side down, and brown for about 5-7 minutes on each side.
  3. Once the chicken is browned, sprinkle the paprika over the chicken and stir to coat. Pour in the chicken broth, bringing the mixture to a simmer. Cover and cook for about 30 minutes, or until the chicken is cooked through and tender.
  4. In a small bowl, whisk together the sour cream, flour, and lemon juice until smooth. Gradually stir this mixture into the skillet, ensuring it combines well with the broth. Cook for an additional 5 minutes, allowing the sauce to thicken slightly.
  5. Taste and adjust seasoning if necessary. Serve the chicken paprikash hot, garnished with chopped parsley over egg noodles or rice.

Notes

  • For a lighter version, use skinless chicken breasts and reduce the amount of sour cream.
  • Add bell peppers or mushrooms to the skillet for extra flavor and nutrition.
  • Prep Time: 10 minutes
  • Cook Time: 45 minutes
  • Category: Main Course
  • Method: Stovetop
  • Cuisine: Hungarian

Nutrition

  • Serving Size: 1 serving
  • Calories: 450
  • Sugar: 0g
  • Sodium: 1000mg
  • Fat: 30g
  • Saturated Fat: 10g
  • Unsaturated Fat: 20g
  • Trans Fat: 0g
  • Carbohydrates: 8g
  • Fiber: 0g
  • Protein: 30g
  • Cholesterol: 120mg

Baileys Irish Cream Bundt Cake: A Rich and Indulgent Dessert

A Boozy, Decadent Cake for Any Occasion

Few things are as delightful as a moist, rich cake infused with the creamy warmth of Baileys Irish Cream. This Baileys Irish Cream Bundt Cake is a luxurious dessert that blends buttery sweetness, a hint of cocoa, and the smooth, velvety notes of Irish cream liqueur. Perfect for St. Patrick’s Day, holiday celebrations, or any special occasion, this cake is guaranteed to impress guests and satisfy even the most discerning sweet tooth.

What makes this Bundt cake special isn’t just its tender crumb and deep flavor, but also the luscious Baileys-infused cream cheese frosting that drapes over the top, creating a stunning finish. The addition of sour cream and Baileys ensures that every bite is incredibly moist, with a soft, melt-in-your-mouth texture.

Whether you’re baking this for a festive gathering or as an indulgent treat alongside a cup of coffee, this cake delivers pure decadence in every slice.

Why You’ll Love This Baileys Bundt Cake

1. A Rich and Moist Cake with a Boozy Twist

The combination of butter, sour cream, and Baileys Irish Cream ensures that this cake stays moist and flavorful. Unlike other liqueur-based cakes, this one balances sweet, creamy, and cocoa notes without being overpowering.

2. The Perfect St. Patrick’s Day Dessert

With its smooth Baileys flavor and festive cream cheese frosting, this Bundt cake is an ideal treat for St. Patrick’s Day celebrations. Add a sprinkle of gold sugar or green sprinkles for a holiday-ready look.

3. Elegant and Easy to Make

Despite its sophisticated flavor profile, this cake is incredibly easy to make. The Bundt pan gives it an elegant shape with minimal effort, and the frosting is simply piped or drizzled over the top for a gorgeous presentation.

4. A Crowd-Pleaser at Any Gathering

Whether served at a dinner party, brunch, holiday event, or casual get-together, this cake always gets rave reviews. The familiar flavor of Baileys Irish Cream paired with a rich, chocolatey Bundt cake makes it a universal favorite.

5. Pairs Perfectly with Coffee or Irish Coffee

If you’re a fan of Baileys in your coffee, you’ll love how this cake complements a warm drink. Serve it with a cup of coffee or an Irish coffee for an indulgent dessert pairing.

Ingredients: A Rich and Indulgent Blend

For the Bundt Cake:

  • Butter for a rich, moist base
  • Sugar for sweetness and balance
  • Eggs to provide structure and texture
  • Sour cream for extra moisture and tenderness
  • Vanilla extract for depth of flavor
  • All-purpose flour for stability
  • Cocoa powder for a hint of chocolatey depth
  • Baking powder and baking soda for leavening
  • Salt to enhance flavors
  • Baileys Irish Cream for a smooth, creamy touch

For the Baileys Cream Cheese Frosting:

  • Cream cheese for a smooth, tangy base
  • Butter for extra richness
  • Powdered sugar for sweetness and consistency
  • Baileys Irish Cream for a flavorful kick
  • Festive sprinkles for decoration

Directions: Crafting the Ultimate Boozy Bundt Cake

  1. Prepare the Cake Batter: Cream butter and sugar, then incorporate eggs, sour cream, vanilla, and Baileys. Mix with dry ingredients until smooth.
  2. Bake to Perfection: Pour into a prepared bundt pan and bake at 350°F for 50 minutes, or until a toothpick comes out with moist crumbs. Let cool completely.
  3. Make the Frosting: Beat cream cheese, butter, and Baileys until smooth. Gradually add powdered sugar until creamy.
  4. Frost and Decorate: Pipe the frosting over the cooled cake and top with festive sprinkles for a finishing touch.

Nutritional Highlights: A Luxurious Treat

  • Calories: ~350 per slice
  • Carbohydrates: ~40g
  • Fat: ~18g
  • Sugar: ~28g
  • Protein: ~4g

Expert Tips for the Best Baileys Bundt Cake

1. Use Room Temperature Ingredients

For the best texture, make sure your butter, eggs, and sour cream are at room temperature before mixing. This ensures even blending and a smooth, lump-free batter.

2. Don’t Overmix the Batter

To keep the cake light and tender, mix the ingredients until just combined. Overmixing can develop too much gluten, leading to a dense and tough cake.

3. Grease the Bundt Pan Well

A Bundt cake’s beautiful shape can be ruined if the cake sticks to the pan. To prevent this:

  • Use baking spray with flour or a butter and flour combination to coat every crevice.
  • Let the cake cool slightly before attempting to remove it from the pan.

4. Allow the Cake to Rest for Maximum Flavor

This cake tastes even better the next day as the flavors have time to develop. If possible, bake it a day in advance, wrap it tightly, and let it sit overnight before frosting.

5. Adjust the Frosting Consistency

  • If you prefer a thicker frosting, add more powdered sugar.
  • For a drizzling glaze, increase the amount of Baileys or add a splash of milk to thin it out.

Fun Ways to Customize This Cake

1. Make It a Layer Cake

Instead of a Bundt cake, bake the batter in two 9-inch round cake pans and layer them with Baileys frosting in between for an impressive tiered dessert.

2. Add a Chocolate Ganache Drizzle

For an extra decadent touch, drizzle the finished cake with a Baileys-spiked chocolate ganache. Simply melt dark chocolate with a bit of heavy cream and Baileys, then pour over the cake.

3. Turn It into Cupcakes or Mini Bundt Cakes

Divide the batter into cupcake tins or mini Bundt pans for individual-sized treats—perfect for serving at parties or gifting to friends.

4. Add a Crunchy Topping

Sprinkle chopped toasted pecans, chocolate shavings, or crushed toffee over the frosting for an added layer of texture and flavor.

5. Serve with a Scoop of Ice Cream

A warm slice of Baileys Bundt Cake with vanilla or coffee ice cream takes this dessert to another level of indulgence.

Frequently Asked Questions (FAQs)

1. Does This Cake Contain Alcohol?

Yes, Baileys Irish Cream is used in both the cake batter and frosting. However, the alcohol in the batter bakes off in the oven, leaving only the flavor behind. The frosting, however, still contains a small amount of alcohol.

If serving to kids or those avoiding alcohol, you can substitute Baileys coffee creamer or a mix of heavy cream and vanilla extract instead.

2. How Long Does This Cake Last?

  • At room temperature: Store in an airtight container for up to 3 days.
  • In the refrigerator: Keep covered for up to 5 days—bring to room temperature before serving.
  • In the freezer: Wrap tightly in plastic wrap and freeze for up to 3 months. Thaw overnight in the fridge before serving.

3. Can I Use a Different Liqueur?

Absolutely! Try swapping Baileys for:

  • Kahlúa for a coffee-infused cake
  • Amaretto for a nutty twist
  • RumChata for a cinnamon-vanilla flavor

4. Can I Make This Cake Gluten-Free?

Yes! Use a 1:1 gluten-free baking flour blend in place of regular flour. The cake may have a slightly different texture but will still be delicious.

5. Can I Make This Cake Dairy-Free?

For a dairy-free version:

  • Use dairy-free butter and sour cream in the cake.
  • Swap Baileys for a dairy-free Irish cream alternative (like Baileys Almande).
  • Use vegan cream cheese and butter for the frosting.

6. What’s the Best Way to Frost This Cake?

For a classic Bundt cake look, pipe the frosting in lines over the top using a piping bag or a Ziploc bag with the corner snipped off. If you prefer a more rustic look, spread it generously with a spatula.

Final Thoughts: A Cake Worth Celebrating

Baileys Irish Cream Bundt Cake is the perfect blend of rich flavors, velvety texture, and indulgent frosting. Whether you’re making it for St. Patrick’s Day, a holiday party, or a cozy night in, this cake is sure to impress.

With its deep, buttery richness, subtle cocoa undertones, and smooth Baileys-infused frosting, every bite is pure indulgence. Plus, with endless ways to customize and serve it, you’ll find yourself coming back to this recipe again and again.

So why wait? Pour yourself a glass of Baileys, preheat the oven, and bake a cake that’s guaranteed to be the highlight of any celebration!