Spumoni Cake: A Nostalgic Twist on an Italian Classic

A Cake That Tells a Story

Every family has a dessert that brings back memories of special occasions, and for mine, it was always spumoni. Growing up, spumoni ice cream was a treat we reserved for birthdays, holidays, and family get-togethers. The combination of cherry, chocolate, and pistachio flavors—each distinct yet perfectly harmonious—felt like a celebration in itself.

My first experience with spumoni wasn’t actually at home, but at an old-school Italian restaurant where it was served as a special dessert at the end of the meal. One bite of the creamy layers, studded with nuts and cherries, and I was hooked. It was rich yet refreshing, familiar yet exciting, and ever since that moment, spumoni became more than just ice cream—it became a tradition.

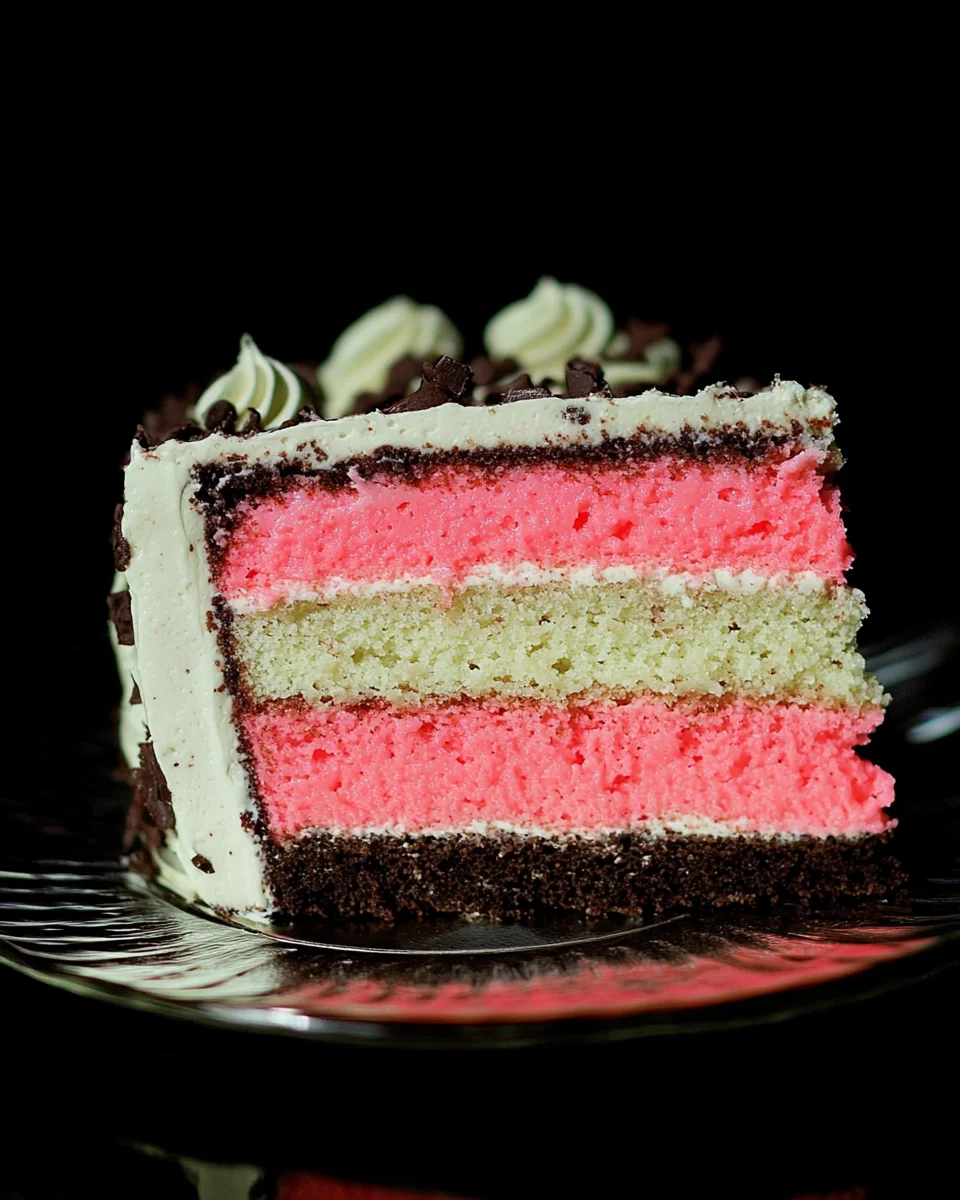
So, when I started baking, I wanted to capture that same magic in cake form. A dessert that wasn’t just about flavor but also about the feeling of nostalgia, the joy of sharing something special, and the excitement of slicing into something beautifully layered. Spumoni Cake was my answer—a dessert that takes the classic flavors of spumoni ice cream and transforms them into a moist, decadent cake with layers of cherry and chocolate, frosted with a luscious pistachio buttercream.

If you’ve ever loved the taste of spumoni, or if you’re looking for a cake that’s both elegant and fun, this is the perfect recipe to try.

What Makes Spumoni Cake Special?

1. Inspired by a Timeless Dessert

Spumoni is more than just a flavor; it’s a tradition. Originating in Italy as a molded gelato with layers of fruit and nuts, spumoni evolved into an ice cream favorite in the United States. This cake honors that history while giving it a fresh, baked spin.

2. A Perfect Balance of Flavors

  • The cherry cake layer is subtly sweet, with bits of maraschino cherries adding bursts of fruitiness.
  • The chocolate cake layer brings a deep, fudgy richness, enhanced by a hint of coconut and hazelnuts.
  • The pistachio buttercream is smooth, nutty, and slightly sweet, tying everything together in a velvety finish.

3. Visually Stunning

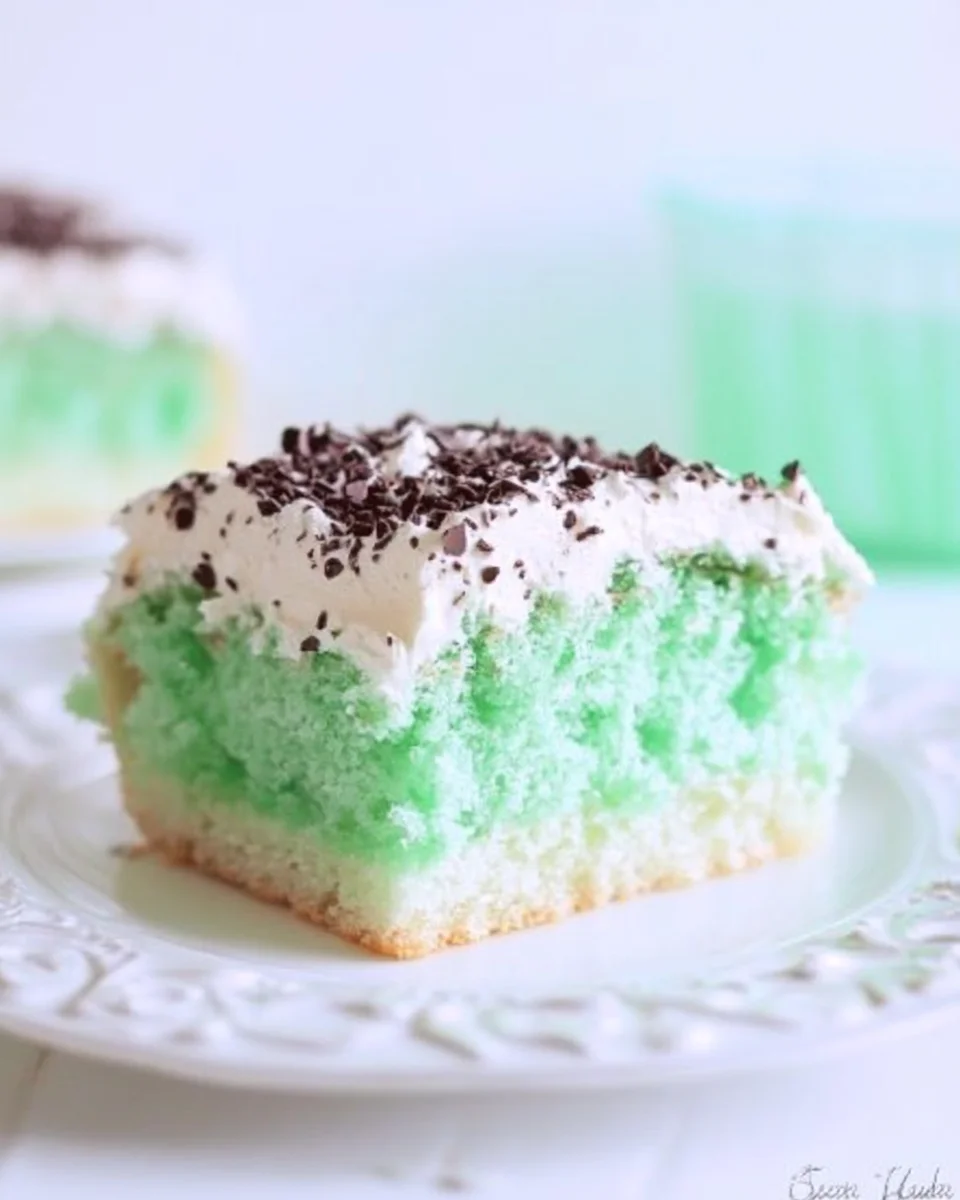
With its contrasting cake layers and pastel green frosting, this cake is as beautiful as it is delicious. It’s a showstopper that looks as good on a holiday table as it does at a casual family gathering.

4. A Crowd-Pleasing Dessert

Even if you’re serving people who have never tried spumoni before, this cake is a guaranteed hit. The combination of flavors is familiar yet unique, making it the perfect dessert for those who love a little variety in each bite.

What You’ll Need (Ingredients)

For the Cake Layers:

  • 3 cups cake flour
  • 2 ¼ cups granulated sugar
  • 2 tbsp baking powder
  • 1 ½ tsp salt
  • 1 package (3.2 oz) instant vanilla pudding mix
  • 1 ¼ cups water, divided
  • 6 large eggs
  • 1 ½ cups butter, melted
  • ¼ cup cocoa powder
  • 1 tbsp pure vanilla extract
  • ½ cup hazelnuts, chopped (or slivered almonds)
  • ¼ cup maraschino cherry juice
  • ½ cup maraschino cherries, finely chopped
  • 2 tsp almond extract
  • Red food coloring

For the Pistachio Buttercream:

  • 1 batch Swiss meringue buttercream
  • 3 tbsp pistachio butter (or finely ground pistachios)
  • 1 cup chopped pistachios
  • Green food coloring (optional)

How to Make It (Directions)

Step 1: Bake the Cake Layers

  1. Prepare the batter by mixing the dry ingredients with eggs, melted butter, and water.
  2. Divide into two bowls: one for cherry flavor (with cherry juice and chopped cherries) and the other for chocolate flavor (with cocoa powder, vanilla, and hazelnuts).
  3. Bake the layers at 350°F (180°C) for 45-60 minutes, then let them cool overnight for the best texture.

Step 2: Make the Pistachio Buttercream

  1. Prepare Swiss meringue buttercream and blend in pistachio butter and chopped pistachios.
  2. Add a drop of green food coloring if desired.

Step 3: Assemble the Cake

  1. Slice each cake into two layers, creating four total layers.
  2. Alternate cherry and chocolate layers, spreading pistachio buttercream between each one.
  3. Frost the entire cake with the remaining buttercream and garnish with extra chopped pistachios.

Nutritious Bites (Nutritional Info per Serving)

  • Calories: 456 kcal
  • Carbohydrates: 56g
  • Protein: 7g
  • Fat: 24g
  • Saturated Fat: 11g
  • Cholesterol: 95mg
  • Sodium: 547mg
  • Fiber: 2g
  • Sugar: 36g

Best Ways to Serve and Enjoy Spumoni Cake

1. With a Scoop of Ice Cream

Since spumoni originated as an ice cream flavor, why not pair it with a scoop? Vanilla, pistachio, or cherry ice cream would complement this cake beautifully.

2. With a Drizzle of Chocolate Ganache

For an extra indulgent touch, drizzle warm chocolate ganache over the cake before serving. It enhances the chocolate layer while making each bite even more decadent.

3. Paired with Coffee or Dessert Wine

This cake’s rich and nutty flavors go beautifully with a strong espresso, cappuccino, or a glass of dessert wine like Vin Santo or Moscato.

4. Topped with Crushed Pistachios and Chocolate Shavings

A sprinkle of pistachios and dark chocolate shavings adds texture and makes the cake even more eye-catching.

5. Served at Room Temperature for Best Texture

Since this cake has butter in the frosting and a rich crumb, it’s best enjoyed at room temperature, which allows all the flavors to shine.

Frequently Asked Questions (FAQs)

1. What Is Spumoni, and How Is It Different from Neapolitan?

While both spumoni and Neapolitan ice cream are layered desserts, Neapolitan typically features chocolate, vanilla, and strawberry, while spumoni includes chocolate, cherry, and pistachio with added mix-ins like nuts or candied fruit.

2. Do I Have to Use Food Coloring?

Not at all! The food coloring is optional and mainly for aesthetics. If you prefer a more natural look, you can skip it—the flavors will still be just as delicious.

3. Can I Use a Different Type of Nut?

Yes! While pistachios and hazelnuts are traditionally used, you can substitute them with:

  • Almonds for a more classic Italian flavor
  • Walnuts for a softer texture
  • Pecans if you want a slightly buttery, richer taste

4. Can I Make This Cake in Advance?

Absolutely! In fact, Spumoni Cake tastes even better the next day as the flavors have time to meld. Just store it covered in the refrigerator for up to 3 days and bring it to room temperature before serving.

5. Can I Use a Different Frosting?

While pistachio buttercream is what gives this cake its signature flavor, you can also try:

  • Whipped mascarpone frosting for a lighter, Italian-inspired topping
  • Chocolate ganache frosting for a richer, more indulgent cake
  • Cherry-flavored buttercream if you want to switch up the traditional layering

6. Can I Make This Cake Without Nuts?

Yes! Simply omit the hazelnuts and pistachios, and the cake will still be delicious. You may lose a bit of texture and nutty flavor, but it will still be a delightful dessert.

7. Can I Make a Gluten-Free Version?

Definitely! Just swap the cake flour for a gluten-free blend, ensuring it contains xanthan gum for proper texture.

8. How Should I Store Leftovers?

Keep the cake in an airtight container in the refrigerator for up to 5 days. If you need to store it longer, freeze individual slices and thaw them in the fridge before serving.

9. Can I Make Spumoni Cake as Cupcakes?

Yes! Divide the batter into a lined cupcake tin and bake at 350°F for 18-22 minutes. Pipe pistachio buttercream on top for the perfect bite-sized treat.

10. What’s the Best Occasion for Spumoni Cake?

This cake is perfect for:

  • Christmas (its colors fit the holiday perfectly!)
  • Birthdays for those who love fun, nostalgic flavors
  • Weddings as an elegant Italian-inspired dessert
  • Casual family gatherings when you want something unique but easy to serve

Conclusion: A Cake That Blends Tradition with Creativity

Spumoni Cake is more than just a dessert—it’s a celebration of flavors, colors, and heritage. It takes the beloved elements of classic Italian spumoni ice cream and transforms them into a visually stunning, utterly delicious cake that’s perfect for any occasion.

Whether you’re reminiscing about childhood trips to the ice cream parlor, creating a new tradition for your family, or simply looking for a cake that’s as fun as it is flavorful, this recipe is a must-try.

So, next time you’re looking for a dessert that’s a little different, a little nostalgic, and absolutely irresistible, whip up a Spumoni Cake—it’s sure to become a favorite in your home, just like it is in mine.

Fudgy Grasshopper Cake: A Mint Chocolate Lover’s Dream

The Dessert That Brings Back Holiday Memories

Growing up, there was always one flavor combination that signaled the start of the holiday season—chocolate and mint. My grandmother had a tradition of making her famous grasshopper pie every Christmas, a dessert that combined a smooth, minty filling with a crunchy chocolate crust. It was cool, creamy, and utterly irresistible.

As I got older and started baking on my own, I wanted to recreate that nostalgic flavor but with a modern twist. That’s when I discovered Fudgy Grasshopper Cake—a decadent chocolate cake layered with rich fudge, topped with fluffy mint whipped cream, and garnished with chopped Andes Mints. The first time I made it, I knew I had found my own signature holiday dessert.

This cake isn’t just about taste—it’s about texture, color, and the perfect balance of indulgence and refreshment. The deep, fudgy layer melts into the light and airy mint cream, while the hint of green adds a festive touch. Whether it’s for a holiday party, a birthday, or just a cozy night in, this cake is guaranteed to impress.

Why This Cake Is a Must-Try

1. A Decadent Chocolate-Mint Combination

Chocolate and mint are a match made in dessert heaven. The richness of the chocolate fudge balances the refreshing coolness of the mint, making every bite smooth and satisfying.

2. An Easy Yet Impressive Dessert

This cake may look fancy, but it’s surprisingly easy to make. Since it starts with a cake mix, most of the hard work is already done for you. With simple layering and a few finishing touches, you can create a bakery-worthy cake at home.

3. Perfect for Holidays and Special Occasions

With its festive green swirls and creamy topping, this cake is an excellent choice for Christmas, St. Patrick’s Day, birthdays, or any time you want a fun and indulgent treat.

4. A Make-Ahead Friendly Recipe

If you’re planning a gathering, this cake is the perfect dessert to prepare in advance. The flavors meld beautifully after chilling, and it stays fresh for days.

5. A Crowd-Pleaser for All Ages

Whether you’re serving this to kids or adults, everyone loves the classic combination of chocolate and mint. It’s a fun and nostalgic treat that will have people asking for seconds.

What You’ll Need (Ingredients)

For the Cake:

  • 1 box white cake mix (plus the ingredients required on the package)
  • 1 ½ tsp peppermint extract
  • 3-4 drops green food coloring

For the Fudge Layer:

  • 1 can sweetened condensed milk
  • 1 ½ cups semi-sweet chocolate chips
  • ¼ cup milk

For the Mint Whipped Cream Topping:

  • 1 cup whipping cream
  • ⅓ cup powdered sugar
  • ½ tsp peppermint extract
  • 1 drop green food coloring
  • Andes Mints (for garnish, optional)

How to Make It (Directions)

Step 1: Prepare the Cake Batter

  1. Prepare the cake batter according to package directions, adding peppermint extract.
  2. Pour all but 1 cup of the batter into a greased 9×13″ pan.
  3. Mix green food coloring into the reserved batter and drop spoonfuls onto the white batter.
  4. Swirl with a knife to create a marbled effect and bake as directed on the box. Let cool.

Step 2: Make the Fudge Layer

  1. In a microwave-safe bowl, combine sweetened condensed milk, chocolate chips, and milk.
  2. Microwave in 30-second intervals, stirring until smooth.
  3. Let cool slightly before spreading over the cooled cake.

Step 3: Prepare the Mint Whipped Cream

  1. Whip heavy cream until soft peaks form.
  2. Add powdered sugar, peppermint extract, and green food coloring, then beat until smooth.
  3. Spread the whipped topping over the chocolate fudge layer.

Step 4: Final Touches

  1. Garnish with chopped Andes Mints or chocolate shavings.
  2. Chill for at least 30 minutes before serving to allow the flavors to meld.

Nutritious Bites (Nutritional Info per Serving)

  • Calories: 147 kcal
  • Total Fat: 10g
  • Saturated Fat: 5g
  • Carbohydrates: 16g
  • Sugar: 13g
  • Protein: 1g
  • Sodium: 30mg

Creative Ways to Serve and Customize This Cake

1. Add a Cookie Crunch

For extra texture, sprinkle crushed Oreo cookies or chocolate wafer cookies over the whipped topping. This gives the cake a delightful crunch with every bite.

2. Turn It Into a Layer Cake

Instead of making this in a sheet pan, divide the batter into two round cake pans and stack the layers with fudge and mint cream between each one.

3. Use a Brownie Base Instead of Cake

If you love extra fudgy desserts, swap the white cake mix for a brownie mix to create a denser, richer dessert.

4. Make Mini Grasshopper Cupcakes

Turn this recipe into individual cupcakes by baking the batter in a muffin tin. Top each cupcake with fudge, mint whipped cream, and a small Andes Mint for a bite-sized treat.

5. Serve with a Scoop of Ice Cream

A slice of this cake pairs beautifully with vanilla bean or mint chocolate chip ice cream.

6. Drizzle with Extra Chocolate

For an even more indulgent presentation, drizzle melted chocolate over the whipped topping before serving.

Frequently Asked Questions (FAQs)

1. What Is a Grasshopper Cake?

Grasshopper Cake is inspired by the classic Grasshopper Pie, which combines chocolate and mint flavors. The name comes from its signature green color, which resembles the bright hue of a grasshopper.

2. Do I Have to Use Green Food Coloring?

No, the food coloring is optional! It’s used to enhance the visual appeal, but the cake will taste just as delicious without it.

3. Can I Make This Cake Ahead of Time?

Yes! In fact, this cake tastes even better the next day as the flavors have time to meld. Just keep it covered in the refrigerator until you’re ready to serve.

4. How Do I Store Leftovers?

Store leftovers in an airtight container in the refrigerator for up to 4 days. If you need to store it longer, you can freeze individual slices for up to a month.

5. Can I Use a Different Type of Chocolate?

Yes! While semi-sweet chocolate chips are commonly used in the fudge layer, you can also try:

  • Dark chocolate chips for a richer, less sweet taste
  • Milk chocolate chips for a creamier, lighter flavor
  • White chocolate chips for a fun variation

6. What’s the Best Way to Cut This Cake Neatly?

For clean slices, use a sharp knife dipped in hot water. Wipe the knife clean between cuts for perfectly smooth edges.

7. Can I Use Store-Bought Whipped Topping Instead of Making My Own?

Yes! If you’re short on time, you can use Cool Whip or another store-bought whipped topping instead of making homemade whipped cream.

8. How Can I Make This Cake More Minty?

If you love a stronger mint flavor, try adding an extra ½ teaspoon of peppermint extract to the cake batter or fudge layer. You can also sprinkle crushed peppermint candies on top for an extra burst of freshness.

9. Can I Make a Gluten-Free Version?

Yes! Just use a gluten-free cake mix to make this recipe completely gluten-free.

10. What Can I Use Instead of Andes Mints for Garnish?

If you don’t have Andes Mints, you can use:

  • Chocolate curls or shavings
  • Mini chocolate chips
  • Crushed peppermint candies
  • Thin Mint cookies, crushed

Conclusion: A Cake That Delivers on Flavor and Fun

This Fudgy Grasshopper Cake is a dessert that delivers on every level—it’s rich, creamy, refreshing, and visually stunning. Whether you’re making it for a holiday, birthday, or a simple weekend treat, it’s a showstopper that’s guaranteed to impress.

The combination of deep chocolate fudge and cool mint cream is one that never goes out of style. It’s nostalgic yet timeless, indulgent yet refreshing. And best of all, it’s easy to make but looks like something straight from a bakery.

If you’re a fan of chocolate and mint, this cake needs to be in your recipe collection. So go ahead, whip up this delicious treat, share it with family and friends, and watch as it disappears in no time!

Easter No-Bake Cheesecake: A Colorful Treat for Spring Celebrations

A Sweet Easter Tradition That Brings Families Together

Growing up, Easter was always a day filled with excitement. The morning would start with an Easter egg hunt in the backyard, where my siblings and I raced to find the most colorful eggs. After the fun and games, the entire family would gather around for a big Easter dinner, complete with all the traditional favorites. But the one thing we always looked forward to the most? Dessert.

In my grandmother’s kitchen, dessert was never just a sweet ending to a meal—it was an experience. While she loved baking classic cheesecakes, Easter was the one time of year she opted for something a little different: a vibrant, no-bake cheesecake that was as beautiful as it was delicious. With its pastel-colored layers and rich, creamy filling, this dessert became a staple at our Easter gatherings. Not only was it easy to make, but it also allowed us to spend more time together instead of being stuck in the kitchen.

Now, as I continue the tradition with my own family, this Easter No-Bake Cheesecake remains a favorite. It’s light, refreshing, and requires no oven time—perfect for when you’re juggling multiple dishes for a holiday feast. Whether you’re making it for a family dinner, a church potluck, or just because you love cheesecake, this dessert will bring a pop of color and joy to your table.

Why You’ll Love This No-Bake Cheesecake

1. Perfect for Busy Easter Celebrations

With everything that goes into preparing Easter dinner, the last thing you need is a complicated dessert. This no-bake cheesecake requires minimal effort, freeing up oven space and saving time for what matters most—spending the day with loved ones.

2. A Beautifully Festive Dessert

This cheesecake is a feast for the eyes. With pastel-colored layers and a fluffy whipped topping, it looks just as stunning as it tastes. It’s a dessert that makes a statement, whether served at a large Easter gathering or a simple family dinner.

3. A Creamy and Light Alternative to Traditional Cheesecake

Unlike a classic baked cheesecake, which can be dense and heavy, this no-bake version is light, airy, and refreshing. It has the perfect balance of sweetness and creaminess without being overwhelming.

4. Fun for Kids and Adults Alike

Because of its playful colors and easy preparation, this cheesecake is a fantastic dessert to make with kids. Let them help mix the batter, layer the colors, or decorate the top with sprinkles and Easter candy.

5. Easily Customizable for Any Occasion

While this cheesecake is designed for Easter, it can be adapted for any holiday or celebration. Change the colors, switch up the toppings, or experiment with different flavors to make it your own.

Ingredients: The Base for a No-Bake Wonder

Creating a memorable dessert doesn’t need to be complicated. Here’s what you’ll need for this festive treat:

  • Graham Cracker Crust
    The foundation of any cheesecake! Crumbled graham crackers combined with sugar and butter bring that perfect crunch and balance the creaminess of the cheesecake.
  • Cream Cheese Filling
    The heart of the cheesecake: full-fat cream cheese, whipped to perfection for that rich, smooth texture. You can substitute low-fat options if preferred, but I always go for the full-fat cream cheese for the best flavor.
  • Whipped Topping
    To add lightness to the cheesecake filling, the whipped topping provides a fluffy texture that’s crucial to the no-bake nature of this dessert.
  • Food Coloring & Sprinkles
    Bring on the vibrant Easter colors with a few drops of food coloring. Top it off with a rainbow of sprinkles and candies for a festive touch that the kids (and adults) will love.

Directions: No Oven, No Problem

  1. Prepare the Crust
    In a large mixing bowl, combine graham cracker crumbs, sugar, and melted butter. Stir until everything is well combined and crumbly. Press the mixture into a 10-inch springform pan, forming an even base. Refrigerate the crust while you prepare the filling.
  2. Make the Cheesecake Filling
    In a separate mixing bowl, beat the softened cream cheese and sugar until smooth and creamy. Add the vanilla extract and whipped topping, mixing until fully incorporated.
  3. Color the Filling
    Divide the cheesecake filling into three separate bowls. Add a few drops of pink, yellow, and green food coloring to each bowl, stirring until you achieve the desired shades.
  4. Layer the Colors
    Gently layer each colored filling on top of the graham cracker crust, one color at a time. Use a spatula to smooth the layers and create a nice gradient effect.
  5. Refrigerate and Set
    Cover the cheesecake and refrigerate for at least four hours (or overnight). This allows the cheesecake to set and the flavors to meld together.
  6. Decorate and Serve
    When ready to serve, pipe a bit of extra whipped topping on top of the cheesecake. Decorate with sprinkles, and finish with small Easter candies like M&Ms or mini Cadbury eggs.

Nutritional Information: Sweet Treat with a Touch of Indulgence

Here’s an estimated breakdown of the nutrition per serving:

  • Calories: 350
  • Fat: 20g
  • Carbohydrates: 40g
  • Protein: 4g
  • Sugar: 30g

How to Serve and Elevate This Cheesecake

1. Pair with a Fresh Spring Beverage

A slice of this cheesecake pairs beautifully with a light, citrusy drink like:

  • Sparkling lemonade for a zesty contrast
  • Iced hibiscus tea for a floral touch
  • A classic vanilla milkshake for extra indulgence

2. Add Extra Layers of Flavor

If you want to elevate the cheesecake even more, consider:

  • A drizzle of white chocolate or caramel sauce over the top
  • Fresh berries for a fruity contrast
  • A crunchy graham cracker or Oreo crust for added texture

3. Serve with a Side of Easter Cookies

For a full dessert spread, serve this cheesecake alongside Easter sugar cookies, bunny-shaped shortbread, or mini carrot cake cupcakes. The variety will make for a stunning Easter dessert table.

Frequently Asked Questions (FAQs)

1. Do I Need to Bake the Graham Cracker Crust?

Nope! The great thing about this cheesecake is that the graham cracker crust sets perfectly in the refrigerator without needing to be baked. Simply press the mixture into the pan and let it chill while preparing the filling.

2. How Far in Advance Can I Make This Cheesecake?

This cheesecake can be made one to two days in advance, making it a great option for stress-free holiday prep. Just be sure to store it in an airtight container in the refrigerator to keep it fresh.

3. Can I Use Different Colors or Flavors?

Absolutely! While pastel pink, yellow, and green are perfect for Easter, you can use any food coloring to match different themes. You can also experiment with different flavors by adding lemon zest, almond extract, or a hint of cocoa powder to the filling.

4. What’s the Best Way to Store Leftovers?

Leftover cheesecake should be stored in the refrigerator in an airtight container. It will stay fresh for up to 5 days. If you have a lot left over, you can also freeze individual slices for later enjoyment.

5. Can I Make This Without a Springform Pan?

Yes! While a springform pan makes it easier to remove and serve, you can also make this cheesecake in a regular pie dish or a 9×9-inch square pan. Just be sure to slice carefully when serving.

6. Can I Make a Dairy-Free Version?

Yes! To make a dairy-free version, use:

  • Vegan cream cheese
  • Coconut whipped topping
  • A dairy-free butter alternative for the crust

7. Can I Make This into Mini Cheesecakes?

Yes! Instead of making one large cheesecake, divide the mixture into muffin tins or mini cheesecake cups for an adorable, individual-sized dessert. This is perfect for serving at parties or large gatherings.

8. What Can I Use Instead of Graham Crackers for the Crust?

If you want to switch up the crust, try:

  • Oreo crumbs for a chocolatey base
  • Crushed shortbread cookies for a buttery, slightly sweet crust
  • Vanilla wafers for a lighter alternative

9. Can I Use Fresh Whipped Cream Instead of Store-Bought Whipped Topping?

Yes! If you prefer homemade whipped cream, simply beat heavy cream with powdered sugar and vanilla extract until stiff peaks form. This will give the cheesecake an even fresher flavor.

10. What If My Cheesecake Doesn’t Set?

If your cheesecake is too soft, it may need more chilling time. Make sure to refrigerate it for at least 4 hours, or overnight for best results. If it still isn’t firm enough, you may need to adjust the cream-to-cream cheese ratio next time.

Conclusion: A Must-Have Dessert for Easter and Beyond

The Easter No-Bake Cheesecake is more than just a dessert—it’s a tradition, a centerpiece, and a guaranteed way to bring joy to your table. Its vibrant pastel colors, creamy texture, and effortless preparation make it the perfect Easter treat, while its customizable flavors allow you to adapt it for any celebration.

For families with young children, it’s a fun and interactive way to get them involved in the kitchen. For busy hosts, it’s a stress-free, make-ahead dessert that looks impressive without requiring hours of work. And for anyone with a sweet tooth, it’s simply a delicious, melt-in-your-mouth treat that will have guests asking for seconds.

So whether you’re celebrating Easter, a spring birthday, or just the beauty of the season, this no-bake cheesecake is a must-try. Whip it up, add your favorite toppings, and enjoy a slice of sweet, creamy perfection with the ones you love.

Easter Poke Cake: A Sweet Tradition of Celebration

Easter is a time for family, friends, and, of course, delicious food. For me, it’s always been about gathering around the table, sharing stories, and creating memories. One of the desserts that always takes center stage at our Easter celebrations is the Easter Poke Cake. It’s not just a dessert; it’s a tradition that has passed down through generations in my family. I remember my grandmother making it every Easter, and as a child, I couldn’t wait to dig my spoon into the colorful, creamy cake. It wasn’t just about the taste; it was about the joy of being together, of laughing, of sharing a meal that felt as comforting as being wrapped in a warm blanket.

This cake isn’t just for Easter, though—it’s the perfect treat for any festive occasion. Whether you’re hosting a holiday gathering, a birthday, or just a simple spring celebration, this cake will brighten up your table. The rainbow layers, the creamy pudding filling, and the whipped topping make this dessert both eye-catching and delicious. Let’s dive into why this Easter Poke Cake has become a beloved recipe in so many homes, and how you can make it a part of your own culinary tradition.

The Origins of Poke Cake: A Classic Revisited

The concept of a “poke cake” is a simple yet genius idea that originated in the 1970s. It’s said that the cake was first introduced to the mainstream by Betty Crocker in an attempt to make cakes more interesting and flavorful. The process involves poking holes in a cake after it has been baked and filling those holes with a flavorful liquid, usually a pudding, Jell-O, or sweetened condensed milk. This technique infuses the cake with extra flavor and moisture, making every bite a burst of deliciousness.

The Easter Poke Cake, however, adds an extra layer of fun and festivity. With the use of pastel food coloring, it takes on a light, playful appearance that perfectly reflects the spirit of Easter. Its vibrant colors, fluffy texture, and creamy filling have made it a beloved choice for springtime celebrations. What makes it even more special is the versatility of the recipe—it can be customized with different flavors of pudding and cake, allowing you to personalize it for any occasion.

Why This Cake is Perfect for Easter and Other Celebrations

The Vibrancy of Spring in a Cake

One of the things that make the Easter Poke Cake so special is its beautiful, vibrant colors. Easter is a celebration of renewal and new life, and the colors in this cake reflect that theme perfectly. The pastel pinks, blues, yellows, and greens bring to mind blooming flowers, fresh grass, and the warm, welcoming sunshine of spring. For families with young children, it’s an excellent way to get them involved in the kitchen and share the excitement of creating something visually stunning.

The act of poking holes in the cake, filling it with pudding, and topping it with whipped cream makes for an interactive experience. It’s an activity that children (and adults!) can enjoy, while also teaching them the joy of creating something from scratch. The layers of color and texture are a visual delight, and they make the cake feel like a true celebration on the table.

The Perfect Make-Ahead Dessert

Another great thing about Easter Poke Cake is that it can be made ahead of time. This is especially helpful when you have a lot of cooking and baking to do for your holiday meal. You can bake the cake the day before, poke the holes, and fill it with the pudding. Once the cake is covered with whipped cream and topped with sprinkles or other decorations, it’s ready to be stored in the refrigerator until you’re ready to serve. This not only saves time but also allows the flavors to meld together, creating a richer and more indulgent dessert.

A Fun Twist on Tradition

If you’re tired of making the same old desserts year after year, the Easter Poke Cake offers a fun, modern twist on traditional cakes. With its customizable layers, different pudding flavors, and whipped topping, it’s a fresh and creative way to celebrate Easter. You can even experiment with different types of cake mix (chocolate, strawberry, or lemon, for example) to match your theme or personal taste.

Ingredients:

  • White Cake Mix: 15.25 oz package (plus the ingredients listed on the package: eggs, oil, water, etc.)
  • Food Coloring: Pink, blue, green, and yellow (for creating festive Easter colors)
  • Instant White Chocolate Pudding: Two 3.3 oz boxes
  • Milk: 3 ½ cups
  • Heavy Cream: 2 cups (for the whipped topping)
  • Powdered Sugar: ¼ cup (to sweeten the whipped topping)
  • Vanilla Extract: 1 tsp (for flavor in the whipped cream)
  • Sprinkles: Easter-themed, for decoration

How to Create the Perfect Easter Poke Cake

Step 1: Prepping the Cake

  • Preheat the oven and prepare a 9×13 baking dish with non-stick cooking spray.
  • Follow the instructions on the cake mix box and divide the batter into four bowls.
  • Add food coloring to each bowl (pink, blue, green, yellow) and stir until desired shades are achieved. Carefully spoon alternating colors into the baking dish.
  • Tap the dish to even out the batter and lightly swirl the colors with a toothpick.
  • Bake according to the package instructions. Let the cake cool for about 10 minutes, then poke holes evenly across the cake using the end of a wooden spoon.

Step 2: Preparing the Pudding Layer

  • In a bowl, whisk together the dry pudding mix and milk until smooth. Carefully pour the pudding over the cake, spreading it into the holes.
  • Refrigerate the cake for 30 minutes, allowing the pudding to set.

Step 3: Making the Whipped Topping

  • Beat heavy cream with vanilla extract until soft peaks form. Gradually add powdered sugar and continue to mix until stiff peaks are formed.
  • Spread the whipped cream over the pudding layer, covering the entire cake.

Step 4: Final Touches

  • Top the cake with Easter-themed sprinkles for a colorful, festive look.

Nutritional Information per Serving:

  • Calories: 264 kcal
  • Carbohydrates: 36g
  • Protein: 4g
  • Fat: 12g
  • Saturated Fat: 7g
  • Cholesterol: 35mg
  • Sodium: 670mg
  • Potassium: 135mg
  • Fiber: 0.3g
  • Sugar: 17g
  • Vitamin A: 547 IU
  • Calcium: 150mg
  • Iron: 1mg

Frequently Asked Questions About Easter Poke Cake

1. Can I use a different type of cake mix?

Absolutely! While the traditional recipe calls for a white cake mix, you can easily swap it out for other cake mixes depending on your preference. A lemon cake mix would be a great choice for a zesty twist, or a chocolate cake mix would complement the white chocolate pudding filling beautifully. The possibilities are endless, so don’t be afraid to experiment.

2. How do I store Easter Poke Cake?

Easter Poke Cake needs to be stored in the refrigerator due to the creamy pudding filling and whipped topping. Make sure the cake is covered tightly with plastic wrap or aluminum foil. It will keep for about 3-4 days, though it’s best enjoyed within the first couple of days when the cake is freshest.

3. Can I make this cake gluten-free?

Yes, you can easily make this cake gluten-free by using a gluten-free cake mix. There are many great gluten-free cake mixes available on the market, and they perform just as well as traditional cake mixes. Just ensure that all the other ingredients (like the pudding mix) are gluten-free as well.

4. How can I make this cake less sweet?

If you prefer a less sweet cake, you can reduce the amount of sugar in the whipped cream topping or even use a sugar-free pudding mix. You can also skip the sprinkles or use a more minimal topping to keep the cake from becoming overly sweet.

5. Can I use homemade whipped cream instead of the store-bought version?

Yes, you can definitely make your own whipped cream from scratch. Just be sure to whip the heavy cream to stiff peaks before adding the powdered sugar, and be careful not to overwhip it into butter. Freshly made whipped cream adds a luxurious texture to the cake and can elevate its flavor.

Conclusion: Creating Lasting Memories with Easter Poke Cake

The Easter Poke Cake isn’t just a dessert; it’s an experience that brings people together. Whether you’re creating it for your family, your friends, or as part of your annual Easter tradition, it’s a treat that embodies the joy of the season. Its vibrant colors, indulgent flavors, and easy preparation make it the perfect choice for anyone looking to add a little extra fun and sweetness to their celebration.

As I reflect on the memories of Easters gone by, I think about how this cake has been a part of so many special moments. It’s more than just sugar, cake, and pudding—it’s about the laughter shared around the table, the love that goes into creating something for those you care about, and the simple pleasure of a good meal. This Easter Poke Cake is more than just a dessert—it’s a reminder that life’s sweetest moments are often those shared with others.

So, the next time you’re looking for a festive dessert to bring to your table, think about the Easter Poke Cake. It’s not just a recipe; it’s a tradition waiting to be started in your home. Happy baking, and may your Easter (or any celebration) be filled with love, joy, and lots of sweet treats!

Creamy Pepperoncini Chicken Skillet: A Comforting, Flavor-Packed Meal

A Dish That Brings Back Warm Memories

Some recipes are more than just meals—they’re experiences that bring comfort, nostalgia, and warmth to the table. For me, creamy skillet dishes always remind me of my childhood. My mother had a way of turning simple ingredients into rich, satisfying meals that felt like a hug in every bite.

One evening, as I was experimenting in the kitchen, I wanted to create a dish that blended bold flavors with creamy indulgence, something that could be both hearty and refreshing. That’s when I discovered the magic of pepperoncini peppers. Their tangy, slightly spicy kick perfectly balanced the richness of a creamy, garlic-infused sauce, and when paired with tender, pan-seared chicken, the result was absolutely irresistible.

From the very first bite, I knew this dish would become a regular in my home. It had layers of flavor—savory, tangy, and creamy—all in one pan, making it the perfect meal for busy weeknights or even a cozy weekend dinner. Now, whenever I make this Creamy Pepperoncini Chicken Skillet, it brings back that feeling of warmth and home, and I know it will do the same for you.

Why This Dish Is a Must-Try

1. A Unique Combination of Flavors

The pepperoncini peppers give this dish a tangy, slightly spicy edge, while the creamy sauce smooths everything out. It’s a perfect balance of bold and comforting flavors.

2. One-Pan Convenience

Nobody loves doing dishes, which is why this one-skillet meal is a lifesaver. Everything comes together in a single pan, making cleanup effortless.

3. Versatile and Customizable

Whether you prefer chicken breasts, thighs, or even shrimp, this recipe is highly adaptable. Plus, you can tweak the spice level to suit your preferences.

4. A Meal That Feels Special but Is Easy to Make

Despite its rich, restaurant-quality flavors, this dish comes together in under 30 minutes, making it perfect for both weeknights and special occasions.

What You’ll Need (Ingredients)

For the Chicken Skillet:

  • 4 boneless, skinless chicken breasts
  • 1 tbsp olive oil
  • 1 white onion, thinly sliced
  • 4 cloves garlic, minced
  • ½ cup roasted red peppers, sliced
  • ½ cup pepperoncini peppers, sliced
  • ½ cup chicken broth
  • 1 cup heavy cream
  • ½ cup parmesan cheese, shredded
  • 1 tbsp Italian seasoning
  • Salt and pepper, to taste
  • 2 tbsp butter

How to Make It (Directions)

Step 1: Sear the Chicken

  1. Heat olive oil in a large skillet over medium-high heat.
  2. Season chicken with salt and pepper, then sear 5 minutes per side until golden brown. Remove and set aside.

Step 2: Build the Flavorful Sauce

  1. In the same skillet, melt butter and sauté onions and garlic.
  2. Add roasted red peppers and pepperoncini peppers, cooking for 2 minutes.
  3. Pour in chicken broth, scraping up browned bits.

Step 3: Make It Creamy & Finish Cooking

  1. Stir in heavy cream and parmesan cheese, whisking until smooth.
  2. Return chicken to the skillet and simmer for 10 minutes until cooked through.
  3. Sprinkle with Italian seasoning, adjust seasoning, and garnish with fresh parsley.

Step 4: Serve & Enjoy

  1. Pair with steamed rice, mashed potatoes, or roasted vegetables for a complete meal.

Nutritious Bites (Nutritional Info per Serving)

  • Calories: 320 kcal
  • Protein: 25g
  • Fat: 20g
  • Carbohydrates: 8g
  • Fiber: 2g

How to Serve This Creamy Pepperoncini Chicken Skillet

1. Over a Bed of Rice or Pasta

Let the creamy, tangy sauce soak into fluffy rice or al dente pasta, creating a comforting, satisfying meal.

2. With Garlic Mashed Potatoes

A plate of buttery mashed potatoes makes the perfect base for the chicken and sauce, giving you a rich, hearty meal.

3. Paired with Roasted Vegetables

If you prefer a lighter, low-carb option, serve this dish with roasted vegetables like zucchini, asparagus, or Brussels sprouts.

4. With Warm, Crusty Bread

A loaf of fresh, crusty bread is perfect for soaking up every last drop of the creamy sauce.

5. As a Low-Carb or Keto Option

For a keto-friendly meal, swap out the heavy cream for full-fat coconut milk and serve the chicken over cauliflower rice or sautéed spinach.

Frequently Asked Questions (FAQs)

1. What Are Pepperoncini Peppers?

Pepperoncini peppers are mild, slightly tangy, and slightly sweet chili peppers often used in Mediterranean and Italian dishes. They add flavorful acidity to balance out rich ingredients.

2. Can I Make This Dish Spicier?

Yes! If you like heat, you can:

  • Add extra pepperoncini peppers
  • Sprinkle in crushed red pepper flakes
  • Stir in a dash of hot sauce for more intensity

3. Can I Use Chicken Thighs Instead of Breasts?

Absolutely! Boneless, skinless chicken thighs work beautifully in this recipe, staying juicier and more flavorful. Just adjust the cooking time slightly, as thighs may take a little longer to cook.

4. Can I Make This Dish Ahead of Time?

Yes! You can:

  • Prepare the sauce in advance and store it in the fridge for up to 2 days.
  • Cook the chicken ahead of time, then reheat it in the sauce before serving.

5. Is This Dish Gluten-Free?

Yes, as long as you use gluten-free chicken broth. If serving over pasta, opt for gluten-free noodles.

6. Can I Use a Different Type of Cream?

If you’re looking for alternatives to heavy cream, you can try:

  • Coconut milk (for a dairy-free version)
  • Greek yogurt (for a tangier, protein-rich alternative)
  • Half-and-half (for a lighter option)

7. Can I Freeze Leftovers?

While you can freeze this dish, the cream sauce may separate when reheated. If freezing, try:

  • Storing the cooked chicken separately from the sauce.
  • Reheating slowly on low heat, stirring well to recombine.

8. What Other Proteins Can I Use?

If you want to switch things up, try this dish with:

  • Shrimp – Just sauté quickly before adding to the sauce.
  • Pork chops – A great alternative to chicken.
  • Tofu – For a vegetarian version, use firm tofu and sauté until golden brown.

9. How Long Does This Dish Last in the Fridge?

It stays fresh for up to 3 days in an airtight container. To reheat, warm on the stovetop over medium heat, adding a splash of broth if needed.

10. Can I Make This Dish Dairy-Free?

Yes! Simply replace the heavy cream with coconut milk or a dairy-free cream alternative.

Conclusion: A Dish That Will Become a Household Favorite

This Creamy Pepperoncini Chicken Skillet is more than just a meal—it’s a perfect balance of rich, tangy, and savory flavors that come together effortlessly in one pan. Whether you’re cooking for a family dinner, meal prepping for the week, or entertaining guests, this dish is sure to impress.

The tender chicken, creamy sauce, and zesty pepperoncini peppers make every bite irresistible, and the best part? It’s easy to customize based on your preferences. From spicier variations to low-carb alternatives, this recipe is as flexible as it is delicious.

So next time you’re looking for a quick, comforting, and flavor-packed dish, give this Creamy Pepperoncini Chicken Skillet a try. It’s a meal that warms the soul, satisfies the taste buds, and brings a little extra joy to the dinner table.

Teriyaki Chicken Tacos: A Sweet and Savory Fusion That Brings People Together

The Unexpected Recipe That Became a Family Favorite

Some of the best recipes are born out of spontaneity. That’s exactly how these Teriyaki Chicken Tacos came to be. It was one of those nights where the fridge looked uninspiring—just a few chicken thighs, cucumbers, and some leftover tortillas. I had originally planned to make tacos, but the ingredients weren’t exactly traditional. Then, an idea struck: Why not blend two of my favorite cuisines—Asian flavors and Mexican street food?

I marinated the chicken in teriyaki sauce, then slow-cooked it until it was tender enough to shred. But it needed something more. I wanted crunch, freshness, and contrast. That’s when I turned to the cucumbers, slicing them thin and tossing them with a creamy sesame dressing. The result? A crispy, caramelized chicken taco topped with a cool, tangy slaw that balanced out the sweet and savory flavors perfectly.

The first bite was an instant hit. The chicken had that sticky, smoky glaze, the cucumbers were creamy yet refreshing, and the tortillas pulled everything together in a way that made it feel both comforting and exciting. It wasn’t just a meal—it was an experience. Now, these Teriyaki Chicken Tacos have become a go-to dish for family dinners, potlucks, and even meal prep.

If you love bold flavors, satisfying textures, and a little creative fusion in your cooking, this recipe is one you’ll want to make again and again.

Why You’ll Love These Teriyaki Chicken Tacos

1. A Perfect Sweet-Savory Balance

Teriyaki sauce brings a deep, rich umami flavor with just the right amount of sweetness, while the creamy sesame cucumbers add freshness and acidity, creating a perfect contrast.

2. Crispy, Caramelized Chicken

After being slow-cooked or pressure-cooked, the shredded chicken is broiled to create crispy, caramelized edges, adding texture and depth to each taco.

3. A Refreshing Twist on Tacos

Instead of the usual toppings like lettuce and cheese, these tacos feature a creamy cucumber slaw, inspired by Asian flavors, giving them a cool, crisp bite that complements the warm chicken.

4. Quick and Easy to Make

With minimal prep and simple ingredients, this dish is perfect for busy weeknights, meal prep, or hosting a casual gathering.

5. Highly Versatile and Customizable

These tacos are great as is, but you can also:

  • Make them gluten-free by using corn tortillas and a gluten-free teriyaki sauce.
  • Swap proteins by using shrimp, tofu, or even shredded beef.
  • Turn them into rice bowls if you prefer skipping the tortillas.

What You’ll Need (Ingredients)

For the Creamy Sesame Cucumbers:

  • ¼ cup plain Greek yogurt
  • 2 tbsp mayonnaise
  • 2 tbsp rice vinegar
  • 1 tbsp sweet chili sauce
  • 1 tsp toasted sesame oil
  • 1 tsp chili crunch (optional, for spice)
  • ¼ tsp salt
  • 1 cup fresh herbs, finely chopped (cilantro, green onions, mint)
  • ½ tsp sesame seeds
  • 1 large English cucumber or 3–4 Persian cucumbers, thinly sliced

For the Teriyaki Chicken:

  • 1 lb boneless, skinless chicken thighs
  • Salt and pepper, to taste
  • ⅓ cup teriyaki sauce (plus ¼ cup for later)
  • 2 tbsp sweet chili sauce

For Serving:

  • 8 small flour tortillas (6-inch size), warmed
  • 1 avocado, sliced
  • ¼ cup crushed peanuts
  • Sesame seeds for garnish

How to Make It (Directions)

Step 1: Cook the Chicken

  1. Season the chicken thighs with salt and pepper.
  2. Cook in an Instant Pot, slow cooker, oven, or stovetop until tender.
  3. Shred the chicken and toss with extra teriyaki and sweet chili sauce.
  4. Broil in the oven for 3-6 minutes to achieve crispy edges.

Step 2: Make the Creamy Sesame Cucumbers

  1. Whisk together Greek yogurt, mayo, rice vinegar, sesame oil, sweet chili sauce, chili crunch, and salt.
  2. Toss the dressing with sliced cucumbers and fresh herbs.

Step 3: Assemble the Tacos

  1. Char the tortillas over an open flame or warm them in a skillet.
  2. Layer with crispy teriyaki chicken, creamy cucumber slaw, avocado slices, and a sprinkle of crushed peanuts and sesame seeds.

Nutritious Bites (Nutritional Info per Serving – 2 Tacos)

  • Calories: 523 kcal
  • Protein: 35g
  • Carbohydrates: 46.6g
  • Fat: 22.1g
  • Sugar: 8.9g
  • Fiber: 3.5g
  • Sodium: 1636mg

How to Serve These Teriyaki Chicken Tacos

While these tacos are incredible on their own, pairing them with the right sides and toppings can elevate the experience even further.

1. Serve with a Crunchy Slaw or Fresh Salad

A light Asian slaw with shredded cabbage, carrots, and a sesame dressing can add even more crunch and balance out the sweetness of the teriyaki.

2. Pair with a Side of Coconut Rice or Garlic Fried Rice

For a heartier meal, serve these tacos with coconut-infused jasmine rice or garlicky fried rice—both of which complement the teriyaki flavors beautifully.

3. Add a Spicy Kick with Chili Sauce or Sriracha Mayo

Drizzle a little spicy sriracha mayo or chili crisp on top for extra heat and complexity.

4. Serve with Pickled Vegetables

Quick-pickled onions, radishes, or jalapeños add a tangy punch that enhances the overall balance of flavors.

5. Refreshing Drink Pairings

These tacos go great with iced green tea, a citrusy margarita, or a crisp lager to round out the flavors.

Frequently Asked Questions (FAQs)

1. What Makes Teriyaki Chicken Tacos Different from Traditional Tacos?

These tacos combine Asian-inspired teriyaki flavors with the handheld appeal of Mexican street tacos. Instead of using a salsa or traditional toppings, they’re topped with a creamy sesame cucumber slaw, making them both refreshing and indulgent.

2. Can I Use Store-Bought Teriyaki Sauce?

Yes! A good store-bought teriyaki sauce saves time and still delivers great flavor. Some popular brands include Soy Vay Veri Veri Teriyaki and Kikkoman Teriyaki Marinade. You can also make a homemade version by combining soy sauce, brown sugar, garlic, and ginger.

3. How Do I Get Crispy Chicken in This Recipe?

After shredding the chicken, spread it out on a baking sheet and broil it for 3-6 minutes. This helps caramelize the edges, giving it a crispy, carnitas-like texture.

4. Can I Make These Tacos Ahead of Time?

Absolutely! For the best results:

  • Cook and shred the chicken in advance and store it in the fridge.
  • Prepare the cucumber slaw ahead of time but keep it separate until serving.
  • Warm the tortillas just before assembling to keep them soft and pliable.

5. Can I Make These Tacos Gluten-Free?

Yes! Just be sure to:

  • Use a gluten-free teriyaki sauce (some brands contain soy sauce with wheat).
  • Swap the flour tortillas for corn tortillas or lettuce wraps.

6. Can I Use Chicken Breasts Instead of Thighs?

Yes, but chicken thighs stay juicier and more flavorful due to their higher fat content. If using chicken breasts, be careful not to overcook them, as they can dry out faster.

7. What Other Toppings Can I Add?

While the creamy sesame cucumbers are a standout topping, you can also try:

  • Sliced avocado or guacamole for extra creaminess.
  • Crushed peanuts or cashews for added crunch.
  • Pickled red onions for tang and color.
  • Chopped fresh cilantro and scallions for freshness.

8. What’s the Best Way to Store Leftovers?

  • Store the chicken and cucumber slaw separately in airtight containers in the fridge.
  • The chicken will keep for up to 4 days, while the slaw is best eaten within 2 days to maintain its crunch.
  • Reheat the chicken in a skillet or oven to crisp it up again before serving.

9. Can I Cook the Chicken Without an Instant Pot?

Yes! Here are some alternative cooking methods:

  • Slow Cooker: Cook on low for 4-5 hours or high for 2-3 hours before shredding.
  • Oven: Bake at 400°F for 35 minutes, then shred and broil for crispy edges.
  • Stovetop: Simmer in a covered pan for 15-20 minutes, then shred.

10. Can I Make This Recipe Vegetarian?

Yes! Substitute the chicken with crispy tofu, jackfruit, or portobello mushrooms. Marinate them in teriyaki sauce and pan-fry or roast until caramelized.

Conclusion: A Fusion Taco Worth Repeating

These Teriyaki Chicken Tacos are a testament to how unexpected ingredient pairings can create something truly special. The sticky-sweet chicken, creamy sesame cucumber slaw, and warm tortillas come together in a way that feels both comforting and exciting.

Whether you’re making them for a weeknight dinner, a summer cookout, or meal prep, these tacos deliver big flavors with minimal effort. They’re easy to customize, quick to prepare, and guaranteed to impress anyone at the table.

So next time you’re craving something different, skip the takeout and try these sweet, savory, and slightly spicy tacos. You might just discover your new favorite go-to meal.

Golden Pan-Fried Tilapia with Lemon Butter Sauce: A Simple Yet Elegant Dish

A Dish That Feels Like Home

Growing up, fish was always a staple in our home. Whether it was a simple weeknight dinner or a special gathering, my family loved seafood in all forms. My grandmother had a way of making even the simplest dishes feel like an occasion, and one of her most-loved recipes was pan-fried fish with a bright, buttery sauce.

I remember standing beside her in the kitchen as she seasoned each fillet, patiently waiting for the sizzling sound when the fish hit the hot pan. The golden crust that formed was my favorite part, and when she drizzled a warm lemon butter sauce over the top, the whole kitchen smelled like comfort.

Now, whenever I make this pan-fried tilapia with lemon butter sauce, I’m reminded of those moments—simple, full of warmth, and always satisfying. The beauty of this dish is in its balance: a crisp, golden crust paired with a velvety sauce that’s both rich and bright with fresh lemon. It’s a meal that feels restaurant-worthy yet is easy enough for a busy weeknight.

If you’re looking for a dish that’s quick, flavorful, and effortlessly elegant, this is it.

Why You’ll Love This Pan-Fried Tilapia

1. Quick and Easy, Yet Impressive

With just a few simple ingredients and less than 30 minutes, this dish delivers restaurant-quality flavor without hours in the kitchen.

2. A Perfectly Balanced Sauce

The lemon butter sauce is the heart of this dish—buttery and rich, yet bright and refreshing. It elevates the mild tilapia, making every bite irresistible.

3. Crispy, Golden Perfection

Pan-frying the fish in a hot skillet ensures a crispy, golden crust, locking in moisture while giving it that delicious, slightly crunchy texture.

4. A Healthy, Light Option

Tilapia is a lean source of protein, and this dish keeps it light yet satisfying, making it a great low-carb, high-protein meal.

5. Versatile and Customizable

This recipe can be adapted to different flavor profiles by swapping out ingredients or adding extra spices. Whether you prefer a spicier kick, extra herbs, or a bit of crunch, there are endless ways to make it your own.

This Golden Pan-Fried Tilapia with Lemon Butter Drizzle is a quick, elegant, and flavor-packed dish perfect for busy weeknights or special occasions. The lightly seasoned, crispy fillets pair beautifully with a rich, buttery sauce infused with fresh lemon and garlic, making each bite bright, savory, and melt-in-your-mouth delicious.

What You’ll Need (Ingredients)

For the Pan-Fried Tilapia:

  • 4 tilapia fillets (about 6 oz each)
  • ½ tsp garlic powder
  • 1 tsp sea salt
  • ¼ tsp black pepper
  • 2 tbsp olive oil

For the Lemon Butter Sauce:

  • ½ cup salted butter
  • 2 tbsp fresh lemon juice (from 1 lemon)
  • ½ tsp garlic powder

How to Make It (Directions)

Step 1: Prepare & Season the Fish

  1. Pat tilapia fillets dry with paper towels to ensure a crispy sear.
  2. Season both sides with garlic powder, sea salt, and black pepper.

Step 2: Pan-Fry the Tilapia

  1. Heat olive oil in a skillet over medium-high heat.
  2. Place the fillets in a single layer and cook for 3-4 minutes until golden brown.
  3. Flip carefully and cook for another 2-4 minutes until fully cooked.
  4. Transfer to a plate and cover to keep warm.

Step 3: Make the Lemon Butter Sauce

  1. Lower the heat and melt butter in the same pan.
  2. Stir in lemon juice and garlic powder, cooking until smooth and slightly thickened.

Step 4: Serve & Enjoy

  1. Drizzle a little sauce on the plate, place the tilapia on top, and pour more sauce over the fillets.
  2. Serve immediately with your favorite sides.

Nutritious Bites (Nutritional Info per Serving)

  • Calories: 320 kcal
  • Protein: 28g
  • Fat: 22g
  • Carbohydrates: 2g
  • Sodium: 470mg

The Best Sides to Pair with This Dish

While this pan-fried tilapia with lemon butter sauce is incredible on its own, the right sides can make it a complete and well-rounded meal.

1. Light and Fresh Options

  • Steamed Asparagus or Broccoli – Their mild flavor lets the tilapia shine.
  • Crisp Green Salad – A simple salad with mixed greens, cucumbers, and a light vinaigrette offsets the richness of the butter sauce.
  • Lemon-Herb Quinoa – Adds texture and a nutty contrast.

2. Comforting and Hearty Pairings

  • Garlic Mashed Potatoes – Creamy potatoes soak up the delicious sauce beautifully.
  • Parmesan Roasted Brussels Sprouts – The caramelized edges add depth to the meal.
  • Wild Rice or Brown Rice – A great way to add a bit more substance.

3. The Ultimate Side: Crusty Bread

A warm slice of crusty bread or dinner rolls is perfect for soaking up every last drop of the buttery, lemon-infused sauce.

Frequently Asked Questions (FAQs)

1. What Makes Pan-Fried Tilapia So Good?

Pan-frying is one of the best methods for cooking tilapia because:

  • It gives the fish a crispy, golden-brown exterior while keeping the inside moist.
  • It’s quick and easy, requiring minimal effort.
  • The mild flavor of tilapia pairs beautifully with rich, buttery sauces like this one.

2. Can I Use Another Type of Fish?

Absolutely! While tilapia is a great mild, budget-friendly fish, you can also use:

  • Cod – Slightly firmer with a mild, flaky texture.
  • Haddock – A little sweeter than tilapia but just as delicious.
  • Flounder – A delicate fish that works well with buttery sauces.
  • Salmon – If you want a richer flavor, pan-seared salmon with this sauce is a great alternative.

3. What’s the Secret to Getting a Crispy Crust?

For the best crispy, golden-brown sear, follow these tips:

  • Pat the fish completely dry before seasoning. Moisture prevents browning.
  • Use a hot pan with enough oil to coat the surface.
  • Don’t move the fish too soon—let it sear for a few minutes before flipping.

4. Can I Bake Instead of Pan-Fry?

Yes! If you prefer a lighter version, you can bake the tilapia at 375°F (190°C) for 12-15 minutes. It won’t be as crispy, but it will still be moist and flavorful.

5. Can I Make This Dish Ahead of Time?

Yes, but it’s best served fresh. However:

  • You can prep the lemon butter sauce ahead of time and store it in the fridge.
  • Leftover fish can be stored in an airtight container for up to 2 days.
  • Reheat in a low-heat skillet with a little butter to keep it from drying out.

6. How Can I Make This Dish Spicier?

For a bit of heat, try:

  • Adding red pepper flakes to the lemon butter sauce.
  • Sprinkling paprika or cayenne on the fish before cooking.
  • Mixing in a dash of hot sauce to the sauce.

7. Can I Make This Dairy-Free?

Yes! Substitute butter with olive oil or dairy-free butter alternatives to keep the sauce rich and flavorful.

8. What’s the Best Way to Store and Reheat Leftovers?

  • Store: Keep leftovers in the fridge in an airtight container for up to 3 days.
  • Reheat: Warm in a skillet over low heat with a little butter or olive oil. Avoid microwaving, as it can make the fish rubbery.

9. Can I Use Frozen Tilapia?

Yes! Just make sure to thaw it completely and pat it dry before cooking to prevent excess moisture.

10. How Do I Know When Tilapia Is Fully Cooked?

Tilapia is ready when:

  • The flesh is opaque and flakes easily with a fork.
  • The internal temperature reaches 145°F (63°C).

Conclusion: A Simple Dish with Big Flavor

This Pan-Fried Tilapia with Lemon Butter Sauce proves that you don’t need a long list of ingredients or hours in the kitchen to create a meal that’s both elegant and deeply satisfying.

The crispy, golden crust of the tilapia combined with the rich, citrusy butter sauce makes this dish a perfect balance of indulgence and freshness. Whether you’re making it for a quick weeknight dinner or a special meal to impress guests, it’s a foolproof recipe that delivers on flavor every time.

So the next time you’re looking for something quick, flavorful, and a little fancy, grab a few simple ingredients, heat up a skillet, and make this golden pan-fried tilapia. It just might become one of your favorite go-to seafood dishes.

Crispy Salmon Cakes: A Comforting Classic with a Modern Twist

A Recipe That Brings Back Memories

There’s something special about a dish that carries the warmth of family traditions. For me, salmon cakes were always a staple at our Sunday brunches. My grandmother, a woman who never let a good meal go to waste, would take leftover salmon from dinner and turn it into golden, crispy patties that disappeared from the plate faster than she could fry them. The scent of garlic, herbs, and sizzling salmon filled the kitchen, calling everyone to the table before she even had a chance to announce that breakfast was ready.

She made them simple yet flavorful—a delicate balance of flaked salmon, breadcrumbs, fresh herbs, and a squeeze of lemon to brighten everything up. I remember how she served them with a homemade tartar sauce, or sometimes just a dollop of sour cream. Even as a child, I knew this was a recipe worth remembering.

Now, as an adult, I find myself making salmon cakes whenever I need a meal that feels both comforting and satisfying. They’re crispy on the outside, tender on the inside, and incredibly versatile. Whether served as an appetizer, packed into a sandwich, or paired with a fresh salad, these salmon cakes are a timeless favorite that deserves a spot in every kitchen.

Why These Salmon Cakes Are a Must-Try

1. A Quick and Easy Meal

These salmon cakes come together in under 30 minutes, making them a perfect go-to meal when you need something delicious but don’t have hours to cook.

2. Crispy, Golden, and Packed with Flavor

A perfectly crisp crust gives way to a tender, flaky inside that’s bursting with the savory goodness of salmon, herbs, and a touch of Dijon mustard.

3. A Versatile Dish for Any Occasion

  • Serve them as appetizers with a dipping sauce.
  • Enjoy them in a sandwich with lettuce and tomato.
  • Toss them over a fresh green salad for a light meal.
  • Pair them with roasted vegetables or mashed potatoes for a satisfying dinner.

4. Great for Meal Prep

Make a batch ahead of time and store them in the fridge or freezer for an easy meal whenever you need it.

5. Healthy and Nutritious

Salmon is rich in protein and omega-3 fatty acids, making this dish not only delicious but also good for your heart and brain health.

What You’ll Need (Ingredients)

For the Salmon Cakes:

  • 1 can (14.75 oz) salmon, drained and flaked (or 1 cup cooked salmon)
  • ½ cup breadcrumbs (panko or regular)
  • ¼ cup mayonnaise
  • ¼ cup green onions, finely chopped
  • 2 tbsp fresh parsley, chopped
  • 1 large egg
  • 1 tsp Dijon mustard
  • 1 tsp lemon juice
  • Salt and pepper, to taste
  • Olive oil, for frying

How to Make It (Directions)

Step 1: Mix the Ingredients

  1. In a large bowl, combine salmon, breadcrumbs, mayonnaise, green onions, parsley, egg, Dijon mustard, lemon juice, salt, and pepper.
  2. Mix until well combined, then shape into patties (about 3 inches in diameter).

Step 2: Pan-Fry to Perfection

  1. Heat olive oil in a skillet over medium heat.
  2. Add the salmon cakes and cook for 4-5 minutes per side, until golden brown and crispy.
  3. Transfer to a paper towel-lined plate to drain excess oil.

Step 3: Serve & Enjoy

  1. Serve with lemon wedges, tartar sauce, or a side salad for a fresh, flavorful meal.

Nutritious Bites (Nutritional Info per Serving)

  • Calories: 220 kcal
  • Protein: 22g
  • Fat: 10g
  • Carbohydrates: 12g
  • Fiber: 1g

Serving Ideas for Salmon Cakes

1. Classic with a Twist

Serve with homemade tartar sauce, garlic aioli, or lemon-dill yogurt sauce for an elevated flavor.

2. Make It a Meal

Pair salmon cakes with:

  • Garlic mashed potatoes and roasted asparagus for a hearty dinner.
  • Cucumber and tomato salad for a light summer meal.
  • Quinoa or brown rice for an extra dose of fiber.

3. The Perfect Brunch Addition

Top a salmon cake with a poached egg and hollandaise sauce for a twist on eggs Benedict.

4. Healthy Low-Carb Option

Enjoy salmon cakes wrapped in butter lettuce or collard greens instead of bread.

5. Turn It Into a Sandwich

Stack a salmon cake in a brioche bun with lettuce, tomato, and a spicy mayo for the ultimate seafood burger.

Frequently Asked Questions (FAQs)

1. Can I Use Fresh Salmon Instead of Canned?

Absolutely! Freshly cooked salmon works beautifully. Simply flake it into small pieces before mixing it with the other ingredients.

2. How Do I Keep Salmon Cakes from Falling Apart?

If your patties are too crumbly, try these tips:

  • Chill the mixture for 20-30 minutes before forming patties.
  • Make sure you’re using enough binding ingredients (like egg and breadcrumbs).
  • Avoid overmixing, which can make the cakes too loose.

3. Can I Make These Ahead of Time?

Yes! You can:

  • Prepare the mixture and refrigerate it for up to 24 hours before cooking.
  • Form and freeze the patties for later use (see freezing instructions below).

4. Can I Bake Salmon Cakes Instead of Frying?

Yes! To bake, place the cakes on a lined baking sheet and bake at 400°F (200°C) for 15-20 minutes, flipping halfway through for even browning.

5. What’s the Best Way to Freeze Salmon Cakes?

  • Uncooked: Place the patties on a baking sheet and freeze until firm. Then transfer them to an airtight container or freezer bag and freeze for up to 3 months.
  • Cooked: Allow the salmon cakes to cool completely, then freeze them in a single layer before stacking them with parchment paper in between.

6. How Should I Reheat Salmon Cakes?

  • From the fridge: Heat in a skillet over medium heat for 2-3 minutes per side until crispy again.
  • From the freezer: Bake at 375°F (190°C) for 10-15 minutes, or pan-fry until warmed through.

7. Can I Make These Gluten-Free?

Yes! Simply replace the breadcrumbs with gluten-free panko or crushed gluten-free crackers.

8. What Can I Use Instead of Mayonnaise?

If you want a mayo-free version, try substituting:

  • Greek yogurt for a tangy, high-protein alternative.
  • Mashed avocado for a creamy, dairy-free option.

9. Can I Use Other Types of Fish?

Yes! While salmon is classic, you can also use tuna, crab, or white fish like cod or halibut.

10. What Herbs Work Best in Salmon Cakes?

  • Dill gives a fresh, bright flavor.
  • Parsley adds a mild, herby touch.
  • Cilantro brings in a zesty, citrusy element.

Conclusion: A Dish That Brings Comfort and Flavor Together

Few dishes are as simple, satisfying, and versatile as these crispy homemade salmon cakes. Whether you’re cooking for a special occasion or just looking for an easy weeknight meal, this recipe delivers big flavor with minimal effort.

The beauty of salmon cakes lies in their perfect balance of textures and flavors—a golden, crunchy exterior with a tender, flaky inside, packed with fresh herbs and a hint of lemon. They’re easy to make, great for meal prep, and endlessly adaptable.

If you’ve never made salmon cakes before, now is the perfect time to start. They’re a timeless dish that will bring warmth and comfort to any table, just like they did in my grandmother’s kitchen all those years ago.

Creamy Peri-Peri Chicken with Savory Rice: A Bold & Comforting Meal

The Dish That Brings Back Warm Memories

Growing up, my family had a love for bold, flavorful food. While some preferred mild, comforting meals, I was always drawn to dishes that packed a punch—spices that tingled on the tongue, sauces that made you reach for another bite despite the heat, and meals that left you feeling completely satisfied.

One of the first meals that truly introduced me to bold flavors and creamy textures was a spicy, creamy peri-peri chicken dish I had while visiting a close friend’s home. The smell alone was enough to make my stomach growl—garlicky, smoky, with a hint of citrus cutting through the air. The first bite was a perfect combination of heat, creaminess, and deep, layered flavors.

I went home determined to recreate that meal. After multiple experiments in my kitchen, I finally found the perfect balance—tender, juicy chicken marinated in smoky spices, paired with a rich and creamy peri-peri sauce, and served over fluffy, golden-hued rice infused with garlic, bell peppers, and a hint of turmeric.

Now, every time I make this dish, it reminds me of that first moment of discovering just how incredible simple ingredients can become when combined in the right way. Whether you’re cooking for family, meal-prepping for the week, or just looking to treat yourself to something truly indulgent, this Creamy Peri-Peri Chicken with Savory Rice is a game-changer.

Why This Dish Stands Out

1. The Perfect Balance of Heat & Creaminess

The peri-peri sauce brings the heat, but the addition of heavy cream smooths it out, creating a rich and velvety sauce that complements the smoky, spiced chicken beautifully.

2. Juicy, Flavor-Packed Chicken

Marinating the chicken allows the flavors to soak in, making every bite juicy and tender. The combination of garlic, smoked paprika, and lemon juice ensures that the chicken is both deeply seasoned and incredibly moist.

3. Fragrant, Golden-Hued Rice

The savory rice in this dish isn’t just a side—it’s an essential part of the meal. Cooked with garlic, onions, bell peppers, turmeric, and chicken broth, it absorbs all the delicious flavors, making it a perfect base for the creamy peri-peri chicken.

4. A Versatile & Customizable Dish

This meal is incredibly adaptable. You can:

  • Adjust the heat level by adding more or less peri-peri sauce.
  • Swap the chicken for shrimp, tofu, or paneer for a vegetarian version.
  • Use different grains like quinoa or cauliflower rice for a healthier twist.

5. Great for Meal Prep

This dish stores well and actually tastes even better the next day as the flavors deepen. If you’re looking for a meal-prep-friendly dish that reheats beautifully, this is it.

What You’ll Need (Ingredients)

For the Peri-Peri Chicken:

  • 1 lb (500g) boneless, skinless chicken thighs
  • 3 tbsp olive oil
  • 2 tbsp fresh lemon juice
  • 3 garlic cloves, crushed
  • 2 tsp smoked paprika
  • 1 tsp oregano
  • 2 tsp salt
  • 1 tsp black pepper
  • ½ cup peri-peri sauce (store-bought or homemade)
  • ¾ cup heavy cream

For the Savory Rice:

  • 1 onion, finely chopped
  • 1 red bell pepper, diced
  • 1 yellow bell pepper, diced
  • 4 garlic cloves, minced
  • 1 tsp turmeric
  • 2 cups jasmine rice
  • 4 cups chicken broth or water
  • 2 tsp salt
  • 2 cups frozen corn

How to Make It (Directions)

Step 1: Marinate the Chicken

  1. Mix olive oil, lemon juice, garlic, paprika, oregano, salt, and pepper.
  2. Coat chicken in the marinade and refrigerate for at least 30 minutes (overnight for best results).

Step 2: Cook the Rice

  1. Sauté onions, bell peppers, and garlic until fragrant.
  2. Stir in turmeric, rice, and chicken broth, then simmer until tender.
  3. Add corn and steam for 10 minutes before fluffing.

Step 3: Grill the Chicken

  1. Cook marinated chicken on a grill, grill pan, or air fryer until golden brown and fully cooked.

Step 4: Make the Peri-Peri Cream Sauce

  1. Simmer peri-peri sauce with heavy cream, lemon juice, and salt until thick and smooth.

Step 5: Assemble & Serve

  1. Serve grilled chicken over the savory rice, drizzling with peri-peri cream sauce.

Nutritious Bites (Nutritional Info per Serving)

  • Calories: 564 kcal
  • Carbohydrates: 67g
  • Protein: 29g
  • Fat: 19g
  • Sodium: 3243mg
  • Fiber: 3g

Serving Suggestions

While this Creamy Peri-Peri Chicken with Savory Rice is satisfying on its own, you can take it to the next level with these pairings:

1. A Crisp, Fresh Side Salad

A light arugula or cucumber salad with a lemon vinaigrette helps cut through the richness of the creamy peri-peri sauce.

2. Roasted Vegetables

Roasted zucchini, cauliflower, or asparagus bring a bit of caramelized depth to the meal.

3. A Side of Warm, Buttery Flatbread

For those who love to soak up extra sauce, a side of warm naan or crusty bread is a must.

4. A Cooling Yogurt-Based Sauce

A simple garlic or cucumber yogurt sauce can help balance the heat from the peri-peri sauce, making it more approachable for those who prefer milder flavors.

Frequently Asked Questions (FAQs)

1. What is Peri-Peri Sauce?

Peri-peri sauce is a spicy, tangy, and garlicky chili sauce that originates from Portuguese and African cuisine. It is made with African Bird’s Eye chili peppers, lemon, garlic, and a blend of warm spices. It has both heat and citrusy brightness, making it an incredible marinade and sauce.

2. Can I Use Store-Bought Peri-Peri Sauce?

Yes! Nando’s peri-peri sauce is one of the most well-known brands and works beautifully in this recipe. However, if you prefer a homemade version, you can blend:

  • Red chilies
  • Garlic
  • Lemon juice
  • Vinegar
  • Smoked paprika
  • Olive oil

3. How Spicy Is This Dish?

The spice level depends on the peri-peri sauce you use. If you love heat, opt for a hot peri-peri sauce and add an extra pinch of cayenne. If you prefer a milder version, use a mild peri-peri sauce and balance it out with extra cream.

4. Can I Make This Dish Ahead of Time?

Absolutely! This dish is perfect for meal prep. Store the chicken, rice, and sauce in separate containers and reheat just before serving. The chicken can also be marinated up to 24 hours in advance for even deeper flavor.

5. What’s the Best Way to Cook the Chicken?

While grilling is the best way to achieve charred, smoky flavor, you can also:

  • Cook it in a cast-iron skillet for a crispy sear.
  • Bake it in the oven at 375°F (190°C) for 20-25 minutes.
  • Use an air fryer at 400°F (205°C) for 15-20 minutes, flipping halfway.

6. Can I Use Chicken Breasts Instead of Thighs?

Yes, but chicken breasts can dry out faster. If using chicken breasts, marinate them for at least 2 hours, and cook until they reach 165°F (74°C) internally.

7. How Long Does This Dish Last in the Fridge?

Stored in an airtight container, this dish lasts for up to 3 days. For best results, reheat in a pan with a splash of water or cream to refresh the sauce.

8. Can I Freeze This Dish?

Yes! Freeze the marinated raw chicken for up to 3 months, and cook when needed. The rice and sauce can also be frozen separately—just thaw in the fridge overnight before reheating.

9. Can I Make This Dairy-Free?

To make this dish dairy-free, substitute heavy cream with full-fat coconut milk. It will add a slightly tropical undertone but will still be delicious.

10. What Other Proteins Work with This Recipe?

This creamy peri-peri sauce pairs well with:

  • Shrimp for a seafood twist
  • Tofu or paneer for a vegetarian version
  • Lamb or beef strips for a richer, heartier meal

Conclusion: A Meal That Brings Comfort & Excitement to the Table

This Creamy Peri-Peri Chicken with Savory Rice is more than just a meal—it’s an experience. It’s the perfect balance of heat, creaminess, and comfort, wrapped up in a beautifully spiced, vibrant dish that can be enjoyed on a cozy weeknight or as the star of a special gathering.

Whether you’re a fan of spicy food or just looking for a unique, satisfying dinner, this recipe delivers on all levels. The smoky grilled chicken, creamy peri-peri sauce, and aromatic golden rice create a meal that’s both bold and comforting—one that will have everyone coming back for seconds.

So next time you’re in the mood for something rich, flavorful, and packed with personality, give this dish a try. It’s a recipe that will stay in your rotation for years to come.

Pistachio Macarons: A Delicate Treat with a Story to Tell

A Bite-Sized Memory from Paris

There’s something undeniably magical about the first bite of a macaron. The delicate shell shatters just slightly before melting into a soft, chewy interior. The filling—smooth, creamy, and packed with flavor—ties everything together, leaving behind a sweetness that lingers. For me, that moment always brings back memories of my first trip to Paris.

I remember wandering through the cobbled streets of Montmartre, passing by tiny patisseries with colorful displays of macarons arranged like works of art. I had read about them, seen pictures, and even attempted to make them at home, but nothing prepared me for the first bite of an authentic French macaron. The one I chose that day was pistachio, a flavor I had always loved but never truly appreciated until that moment. It was nutty yet sweet, crisp yet soft, and so beautifully balanced that I immediately knew I had to learn how to make them myself.

Years later, after many failed attempts, cracked shells, and underbaked batches, I finally perfected my Pistachio Macarons. They have since become my signature treat—one I bake for special occasions, gift to friends, and enjoy with a cup of coffee on quiet afternoons. The best part? They are just as delightful to make as they are to eat.

Why Pistachio Macarons Are Worth the Effort

Macarons have a reputation for being tricky, but don’t let that intimidate you. With the right technique and a little patience, anyone can master them. Pistachio macarons, in particular, are a must-try for any baking enthusiast, and here’s why:

1. A Perfect Balance of Flavors

Pistachios have a natural, subtle sweetness that pairs beautifully with the light crispness of the macaron shells. When combined with a creamy pistachio filling, the result is a dessert that is nutty, slightly sweet, and irresistibly rich.

2. A Sophisticated and Elegant Dessert

There’s something inherently elegant about macarons. Their smooth, shiny shells, delicate feet, and perfectly piped filling make them look like a bakery masterpiece. They’re the kind of treat that elevates any dessert table, making them perfect for celebrations, gifts, or even an indulgent afternoon snack.

3. A Fun Challenge for Home Bakers

While macarons do require precision, they are also incredibly rewarding to make. Watching the shells rise in the oven and develop their signature “feet” is a moment of pure joy. And once you nail the technique, the possibilities for flavors and fillings are endless.

Ingredients

For the Macaron Shells:

  • Almond flour
  • Pistachio flour
  • Powdered sugar
  • Large egg whites
  • Cream of tartar
  • Granulated sugar
  • Vanilla extract
  • Almond extract
  • Green food coloring

For the Filling:

  • Unsalted butter (softened)
  • Powdered sugar
  • Pistachio paste
  • Milk (if needed)

Directions

1. Prepare the Macaron Batter

Sift together the almond flour, pistachio flour, and powdered sugar. In another bowl, whisk the egg whites until foamy, then add cream of tartar. Gradually whisk in the sugar until stiff peaks form. Fold in the dry ingredients, vanilla extract, almond extract, and green food coloring until the batter flows smoothly.

2. Pipe the Macarons

Transfer the batter to a piping bag and pipe small circles onto a parchment-lined baking sheet. Tap the sheet firmly to release air bubbles. Let the macarons rest for 30 minutes until a thin skin forms.

3. Bake to Perfection

Preheat the oven to 300°F (150°C). Bake the macarons for 15-20 minutes, rotating the tray halfway through. Let them cool completely before handling.

4. Make the Filling

Beat softened butter until creamy, then gradually add powdered sugar and pistachio paste. Mix until smooth, adding milk if necessary.

5. Assemble the Macarons

Pair up the cooled macaron shells by size. Pipe a small dollop of filling onto one shell and gently press another shell on top to create a sandwich.

Nutritional Information (Per Macaron, Approximate):

  • Calories: 100 kcal
  • Carbohydrates: 12g
  • Protein: 2g
  • Fat: 5g
  • Sugar: 10g

The Science Behind a Perfect Macaron

Baking macarons isn’t just about mixing ingredients—it’s about understanding the science behind them. Each step plays a crucial role in achieving that perfect texture and structure.

The Role of Almond and Pistachio Flour

Traditional macarons use almond flour, which gives them their signature chewy texture. For pistachio macarons, a small amount of pistachio flour is added to enhance the flavor without altering the delicate consistency of the shells.

The Importance of Stiff Peaks

Beating the egg whites until they form stiff peaks is crucial for giving macarons their structure. Under-whipped meringue can lead to flat macarons, while over-whipped meringue can cause them to be hollow.

The Resting Period

Letting piped macarons sit before baking is a step that should never be skipped. This allows the tops to dry slightly, which helps form the smooth shells and signature ruffled feet.

Temperature and Baking Time Matter

Macarons need to be baked at just the right temperature. Too hot, and they crack. Too low, and they won’t develop feet. A consistent 300°F (150°C) is the sweet spot for most ovens, but every baker should experiment based on their own kitchen setup.

Common Mistakes and How to Avoid Them

Even experienced bakers have had their fair share of macaron mishaps. Here are some common problems and how to fix them:

1. Hollow Shells

If your macarons look beautiful on the outside but have an empty pocket inside, your batter may have been overmixed or your oven temperature was too high. Try folding the batter fewer times and baking at a slightly lower temperature.

2. Cracked Shells

Cracking can occur if the shells didn’t rest long enough before baking or if the oven temperature fluctuated. Make sure to let them sit for at least 30 minutes before baking, and use an oven thermometer for accuracy.

3. No “Feet” Development

The little ruffled edge at the base of a macaron shell is called its “feet.” If your macarons don’t develop feet, it could be due to under-whipped egg whites or an oven that’s too cool. Ensure your meringue is properly whipped and that your oven is preheated correctly.

FAQs: Everything You Need to Know

1. Can I make macarons without a kitchen scale?

While it’s possible, using a kitchen scale is highly recommended. Macarons require precise measurements, and even a small variation in ingredient ratios can affect the final result.

2. Do I really need to sift the dry ingredients?

Yes! Sifting ensures that your macaron batter is smooth and free of clumps. This helps achieve that beautiful, glossy finish.

3. Can I substitute almond flour with all-purpose flour?

No, almond flour is essential for macarons. All-purpose flour has gluten, which would make the macarons too dense and ruin their delicate texture.

4. How long do pistachio macarons last?

Macarons taste best after 24 hours in the refrigerator, allowing the flavors to meld. They can be stored in an airtight container in the fridge for up to 5 days or frozen for up to 3 months.

5. Can I use store-bought pistachio paste?

Yes! Store-bought pistachio paste is a great time-saver, but if you prefer a homemade version, you can blend roasted pistachios with a bit of sugar and oil to create your own.

A Sweet Ending: Why You Should Try Making Pistachio Macarons

Baking macarons is more than just following a recipe—it’s about patience, precision, and a little bit of magic. Each batch teaches you something new, and the moment you finally achieve those perfect, footed shells is worth every failed attempt.

Pistachio macarons, in particular, are a delight. They bring together the nuttiness of pistachios with the delicate crispness of a classic macaron, creating a dessert that is as beautiful as it is delicious. Whether you make them for a special occasion or simply to enjoy with a cup of tea, these little green gems are bound to impress.

So, the next time you’re in the kitchen, don’t be afraid to take on the challenge. Embrace the process, enjoy the journey, and, most importantly, savor every bite. Because once you master pistachio macarons, there’s no going back—you’ll be hooked for life.