Easter Sugar Cookie Cake: A Festive Springtime Delight

Baking Up Easter Memories: A Sweet Tradition

Easter has always been one of my favorite holidays—not just because of the egg hunts or the colorful baskets filled with chocolate, but because it was a time for family baking traditions. Growing up, my mother and I would spend the afternoon in the kitchen, mixing, decorating, and sneaking bites of cookie dough when no one was looking.

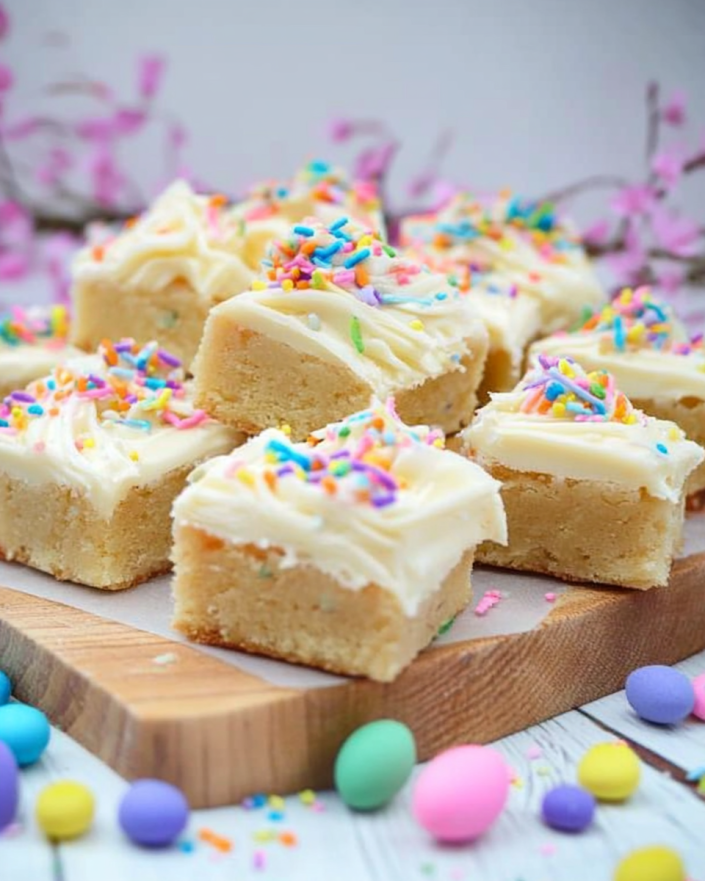
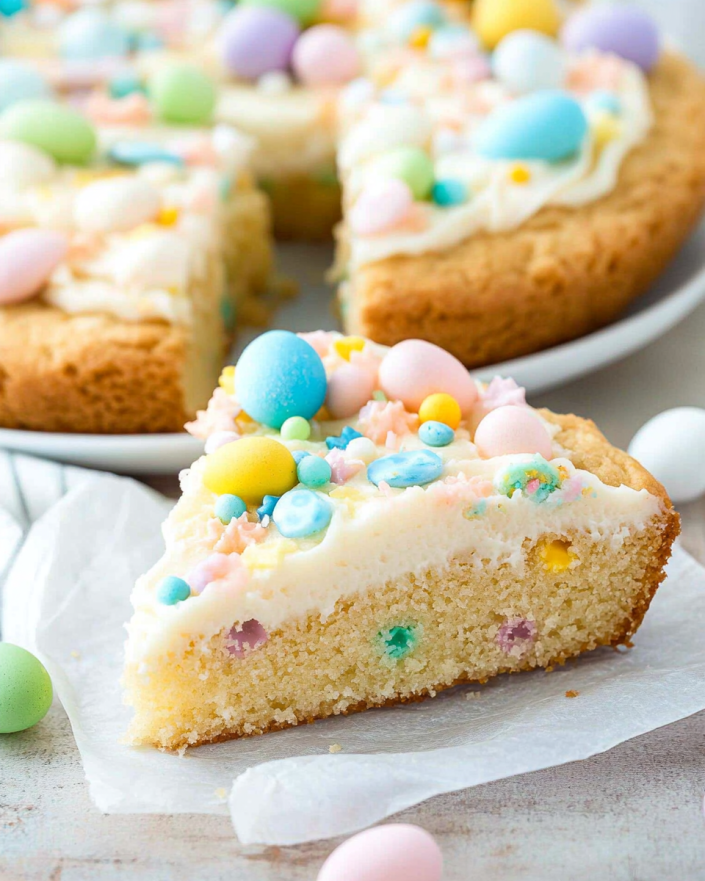
One year, instead of rolling out individual sugar cookies, we decided to bake one giant cookie cake. It was an experiment, inspired by our love for soft, chewy sugar cookies and the convenience of a one-pan dessert. The result? A thick, buttery cookie with crisp edges and a soft center, studded with pastel M&Ms and topped with fluffy swirls of vanilla buttercream.

Now, this Easter Sugar Cookie Cake has become a holiday tradition in my home. It’s the perfect dessert for those who love sugar cookies but want something a little easier and more festive. Whether you’re hosting an Easter brunch, attending a family gathering, or just want to make something special for the season, this cookie cake will bring a touch of springtime magic to your table.

Why This Sugar Cookie Cake is the Perfect Easter Dessert

This Easter Sugar Cookie Cake combines the best of both worlds: the soft chewiness of a sugar cookie and the thickness of a cake. It’s a simple yet stunning dessert that’s sure to impress with its bright colors, festive sprinkles, and rich buttercream frosting.

1. No Chilling Required

Unlike traditional sugar cookies, which often require chilling the dough, this cookie cake goes straight from mixing to baking. That means less waiting and more time enjoying the final product!

2. One Pan, No Rolling or Cutting

Skip the hassle of rolling out individual cookies—just press the dough into a cake pan and bake. It’s a fantastic time-saving option for busy bakers.

3. Customizable for Any Occasion

While this version is decorated for Easter, you can easily swap out the M&Ms and sprinkles to match any holiday or celebration. Think red and green for Christmas, orange and black for Halloween, or red, white, and blue for the Fourth of July.

4. Soft, Chewy, and Perfectly Sweet

Thanks to a touch of cream of tartar, this cookie cake has a soft, melt-in-your-mouth texture while still holding its shape. The buttery flavor and vanilla undertones make it incredibly satisfying.

5. A Crowd-Pleaser for All Ages

Kids and adults alike will love this festive treat! It’s a great way to get children involved in baking—let them help mix the dough, press in the candy, or decorate with sprinkles.

Gather Your Ingredients: A Festive Fusion of Flavors

For the Cookie Cake:

  • ¾ cup unsalted butter, softened
  • ¾ cup granulated sugar
  • 1 large egg
  • 1 tsp vanilla extract
  • ½ tsp baking soda
  • ½ tsp salt
  • ½ tsp cream of tartar
  • 2 cups all-purpose flour
  • 1 cup spring-colored M&Ms
  • ½ cup Easter sprinkles

For the Buttercream Frosting:

  • 3 tbsp unsalted butter, softened
  • 1 ½ cups powdered sugar
  • 1 tsp vanilla extract
  • ⅛ tsp salt
  • 2 tbsp heavy whipping cream (or milk)

Directions: Crafting the Ultimate Easter Cookie Cake

Step 1: Preheat and Prep

Preheat the oven to 350°F (175°C). Line a 9-inch round cake pan with foil and lightly spray with nonstick cooking spray.

Step 2: Mix the Dough

In a large bowl, beat butter and sugar until creamy. Add egg and vanilla, then mix in baking soda, salt, and cream of tartar. Gradually incorporate flour, then fold in M&Ms and sprinkles.

Step 3: Bake to Perfection

Press the dough evenly into the prepared pan. Press a few extra M&Ms on top for decoration. Bake for 19-22 minutes, or until the edges turn light golden brown. Let cool completely.

Step 4: Prepare the Buttercream Frosting

Beat butter until smooth, then gradually mix in powdered sugar until crumbly. Add salt, vanilla, and heavy cream, beating until smooth and fluffy.

Step 5: Frost and Decorate

Scoop frosting into a piping bag with a 1M tip and pipe decorative swirls around the edges. Top with more sprinkles and M&Ms.

Nutritional Breakdown: A Sweet Indulgence

  • Calories: 641 kcal
  • Carbohydrates: 89g
  • Protein: 4g
  • Fat: 29g
  • Saturated Fat: 16g
  • Cholesterol: 85mg
  • Sodium: 320mg
  • Sugar: 58g
  • Fiber: 2g

Expert Tips for the Best Sugar Cookie Cake

1. Use High-Quality Butter

Since butter is one of the main ingredients, using a high-quality, unsalted butter will give the best flavor and texture.

2. Don’t Overbake

The secret to a soft and chewy cookie cake is to slightly underbake it. The center should still look slightly soft when you take it out of the oven—it will continue to cook as it cools.

3. Line the Pan for Easy Removal

Lining the pan with foil or parchment paper makes it easy to lift the cookie cake out after baking, ensuring clean and even slices.

4. Get Creative with the Frosting

While vanilla buttercream is classic, you can try chocolate frosting, cream cheese frosting, or even a drizzle of white chocolate for a different twist.

5. Add a Flavor Boost

For extra depth of flavor, add ½ teaspoon of almond extract along with the vanilla. It enhances the overall sweetness without overpowering the cookie.

Best Ways to Serve and Enjoy This Cookie Cake

This Easter Sugar Cookie Cake is incredibly versatile—serve it at a holiday gathering, enjoy it as an afternoon snack, or even wrap slices as homemade Easter gifts.

1. Serve with Ice Cream

A warm slice of cookie cake with a scoop of vanilla, strawberry, or caramel ice cream takes this dessert to the next level.

2. Pair with Coffee or Tea

The sweet, buttery flavors of this cookie cake make it a great companion to a cup of coffee, cappuccino, or chamomile tea.

3. Decorate for Any Occasion

Swap out the Easter-colored M&Ms and sprinkles to match any theme or holiday:

  • Birthday Party: Bright rainbow sprinkles and colorful frosting
  • Christmas: Red and green M&Ms with peppermint-flavored frosting
  • Valentine’s Day: Pink and white decorations with heart sprinkles

Storage and Make-Ahead Tips

1. Storing at Room Temperature

Keep the cookie cake loosely covered at room temperature for up to 2 days. This keeps it soft and chewy.

2. Refrigerating for a Longer Shelf Life

For longer storage, place the cake in an airtight container and refrigerate for up to 5 days. Let it come to room temperature before serving.

3. Freezing for Later

You can freeze the whole cake or individual slices:

  • Wrap in plastic wrap, then place in a sealed freezer bag
  • Freeze for up to 3 months
  • Thaw at room temperature before eating

FAQs: Your Sugar Cookie Cake Questions Answered

1. Can I Use Different Candy Instead of M&Ms?

Yes! You can use chocolate chips, white chocolate chips, Reese’s Pieces, or chopped candy bars for a different twist.

2. Can I Make This Recipe in a Different Pan?

Absolutely! You can bake this as cookie bars in a 9×13-inch pan—just adjust the baking time slightly.

3. What If I Don’t Have Cream of Tartar?

Cream of tartar helps create a soft, chewy texture, but if you don’t have it, you can replace both the cream of tartar and baking soda with 1 teaspoon of baking powder.

4. Can I Skip the Frosting?

Of course! This cookie cake is delicious on its own, but the frosting adds a decorative and flavorful touch. You can also just dust it with powdered sugar for a simpler presentation.

5. How Do I Keep My Cookie Cake from Drying Out?

Make sure to slightly underbake it and store it in an airtight container to maintain moisture.

Conclusion: A Fun and Festive Dessert for Every Occasion

Baking this Easter Sugar Cookie Cake isn’t just about creating a dessert—it’s about making memories. From mixing the dough to decorating with colorful sprinkles, this recipe brings joy and creativity into the kitchen.

Whether you’re celebrating Easter with family, surprising friends with a homemade treat, or just indulging in a sweet craving, this cookie cake is sure to impress. Its soft texture, festive appearance, and customizable flavors make it a go-to dessert for any occasion.

So grab your ingredients, preheat your oven, and get ready to bake up a little slice of Easter happiness!

Frosted Easter Blondies: A Sweet Springtime Celebration

A Family Tradition Baked into Every Bite

Growing up, Easter was always a time of excitement in our home. It wasn’t just about the egg hunts or the beautifully decorated baskets—it was about the baking. My mother and I would spend the afternoon in the kitchen, the scent of vanilla and butter filling the air, as we mixed, poured, and spread colorful sprinkles over our latest Easter creations.

Of all the desserts we made, blondies were always my favorite. They were the perfect in-between treat—not quite cookies, not quite cake, but something uniquely their own. Soft, buttery, and rich, they provided the perfect base for an indulgent layer of frosting. And of course, no Easter blondie was complete without a sprinkle of pastel-colored decorations.

Now, as I pass this tradition on to my own children, I find that these Frosted Easter Blondies are more than just a dessert. They are a memory, a celebration, and a little taste of childhood nostalgia. Whether you’re making them for a family gathering, a festive dessert table, or simply because you love a good blondie, this recipe brings warmth, joy, and sweetness to any occasion.

What Makes These Easter Blondies So Special?

Blondies are often compared to brownies, but instead of cocoa and deep chocolate flavors, they focus on vanilla, butter, and brown sugar, giving them a rich caramel-like taste. When paired with a creamy vanilla frosting and festive sprinkles, they become an Easter dessert that’s not only delicious but visually stunning.

1. A Perfect Texture Balance

These blondies strike the ideal balance between chewy and soft. The slightly crisp edges contrast beautifully with the moist, buttery center, making every bite melt-in-your-mouth delicious.

2. Simple Yet Flavorful

With a buttery base and hints of vanilla, these blondies are the kind of treat that doesn’t need a long list of ingredients to shine. They let simple flavors do the talking, making them a go-to recipe for bakers of all skill levels.

3. A Customizable Canvas

While they are perfect as-is, these blondies are also incredibly easy to customize. You can add:

  • White chocolate chips for an extra creamy sweetness
  • Chopped nuts for a bit of crunch
  • Swirls of pastel-colored frosting to match your Easter decor

4. A Dessert That Feels Like a Celebration

Topped with colorful Easter sprinkles, these blondies are not just a treat—they’re a centerpiece. Whether they’re served at brunch, packed into a festive dessert box, or shared at an Easter gathering, they bring a sense of joy and fun to any table.

Gather Your Ingredients: A Blend of Buttery Goodness

For the Blondies:

  • 1 ½ cups unsalted butter, softened
  • 2 cups granulated sugar
  • 1 cup light brown sugar
  • 2 large eggs
  • 2 large egg yolks
  • 1 tbsp pure vanilla extract
  • 4 ¼ cups all-purpose flour
  • 1 tsp baking soda
  • 1 tsp kosher salt

For the Vanilla Buttercream Frosting:

  • 1 cup unsalted butter, softened
  • 4 cups powdered sugar
  • 1 tbsp pure vanilla extract
  • ¼ cup heavy whipping cream
  • Easter-themed sprinkles for decoration

Directions: Baking the Perfect Easter Blondies

Step 1: Preheat and Prep

Preheat the oven to 350°F (175°C). Line a 9×13-inch baking pan with parchment paper for easy removal.

Step 2: Mixing the Blondie Dough

Using a standing mixer, beat the butter, sugar, brown sugar, eggs, and vanilla until creamy and fully combined. In a separate bowl, whisk together the flour, baking soda, and salt. Gradually add the dry ingredients to the wet ingredients and mix until a thick dough forms.

Step 3: Bake to Golden Perfection

Press the dough evenly into the prepared pan. Bake for 35-45 minutes, or until lightly golden brown. Allow the blondies to cool completely before frosting.

Step 4: Whipping Up the Frosting

In a standing mixer, beat the butter, powdered sugar, vanilla, and heavy whipping cream until smooth and fluffy, forming stiff peaks.

Step 5: Frost and Decorate

Scoop the frosting into a piping bag with a large star tip. Pipe a zigzag pattern across the cooled blondies, then top with Easter-themed sprinkles for a festive touch. Let the frosting firm before slicing and serving.

Nutritional Breakdown: Indulgence in Every Bite

  • Calories: 1144 kcal
  • Carbohydrates: 154g
  • Protein: 9g
  • Fat: 56g
  • Saturated Fat: 35g
  • Cholesterol: 225mg
  • Sodium: 416mg
  • Sugar: 108g
  • Fiber: 2g
  • Calcium: 61mg
  • Iron: 3mg

Tips for the Best Frosted Blondies

While this recipe is straightforward, a few expert tips can help ensure that your blondies turn out bakery-perfect every time.

1. Use Room Temperature Ingredients

Butter, eggs, and heavy cream should be at room temperature before mixing. This ensures a smooth batter and a fluffy frosting.

2. Don’t Overmix the Dough

Overmixing can lead to dense blondies. Mix the ingredients just until they come together to keep the texture light and chewy.

3. Watch the Baking Time

Blondies should be slightly underbaked in the center when removed from the oven. They will continue to set as they cool, keeping them moist and tender.

4. Let the Blondies Cool Before Frosting

If you spread frosting onto warm blondies, it will melt and lose its fluffy consistency. Let them cool completely before adding the frosting.

5. Have Fun with the Frosting

Instead of keeping it plain, try:

  • Tinting the frosting with pastel colors for a festive look
  • Swirling multiple colors together for a marbled effect
  • Piping decorative patterns instead of spreading it with a spatula

Perfect Pairings: What to Serve with Easter Blondies

These blondies are fantastic on their own, but pairing them with the right drinks and desserts can elevate your Easter spread.

1. Pair with a Cup of Tea or Coffee

The buttery richness of blondies pairs beautifully with a warm drink. Try serving them with:

  • Earl Grey or Chamomile Tea for a delicate flavor contrast
  • A creamy latte to complement the vanilla notes
  • Iced coffee for a refreshing, slightly bitter balance

2. Serve with a Scoop of Ice Cream

Warm blondies with a scoop of vanilla or caramel ice cream create an indulgent dessert that melts in your mouth.

3. Add to a Dessert Platter

For a stunning Easter dessert spread, arrange blondie squares alongside:

  • Lemon bars for a bright, citrusy contrast
  • Mini cheesecakes for a creamy, tangy addition
  • Chocolate-dipped strawberries for a fresh, fruity touch

How to Store and Keep Blondies Fresh

1. Room Temperature Storage

Store blondies in an airtight container at room temperature for up to 5-7 days. If they start to dry out, place a slice of bread in the container—it helps keep them soft.

2. Refrigerating for a Longer Shelf Life

For longer storage, refrigerate blondies for up to 10 days. Just make sure to let them come to room temperature before serving for the best texture.

3. Freezing for Future Enjoyment

Blondies freeze beautifully! To freeze:

  • Wrap each blondie individually in plastic wrap
  • Place them in a sealed freezer bag
  • Store for up to 3 months
  • Thaw at room temperature before serving

FAQs: Answering Your Blondie Baking Questions

1. Can I Use a Different Type of Frosting?

Yes! While vanilla buttercream is classic, you can also try:

  • Cream cheese frosting for a tangy balance
  • White chocolate ganache for a silky finish
  • Lemon glaze for a citrusy twist

2. Can I Make These Blondies Gluten-Free?

Absolutely! Simply swap out the all-purpose flour for a 1:1 gluten-free flour blend.

3. Why Did My Blondies Turn Out Dry?

Blondies can become dry if:

  • They are overbaked—always check for a slightly soft center before removing them from the oven
  • Too much flour was used—be sure to measure flour correctly using the spoon-and-level method

4. Can I Add Mix-Ins to the Blondie Batter?

Yes! Some delicious mix-in options include:

  • White or milk chocolate chips
  • Chopped pecans or walnuts
  • Shredded coconut for extra texture

5. Can I Make These Blondies in Advance?

Yes! You can bake them a day or two ahead, store them at room temperature, and frost them just before serving for the freshest taste.

Conclusion: A Dessert That Brings Easter Joy

Frosted Easter Blondies are more than just a dessert—they are a celebration in every bite. With their buttery richness, chewy texture, and smooth frosting, they bring both flavor and festivity to any Easter gathering.

Whether you make them for family, for friends, or simply for yourself, these blondies are a reminder that sometimes, the best holiday memories are made in the kitchen, surrounded by love, laughter, and sprinkles.

So go ahead—bake, frost, and enjoy a sweet taste of Easter joy!

Italian Easter Knot Cookies: A Sweet Tradition Passed Through Generations

A Taste of Childhood and Celebration

Easter has always been a time of joy, family, and the irresistible aroma of freshly baked treats filling the house. As a child, I remember waking up on Easter morning to the sight of my grandmother standing by the kitchen counter, her hands dusted with flour, rolling out delicate ropes of dough with practiced ease. She would hum softly as she worked, shaping each cookie into a perfect knot before carefully placing them onto a baking sheet.

These Italian Easter Knot Cookies, or Uncinetti, were more than just a dessert. They were a symbol of family, tradition, and love—passed down from one generation to the next. My grandmother would always tell me how these cookies were a staple in Southern Italian households, particularly in Calabria, where they were prepared for Palm Sunday and Easter celebrations. She spoke of how they were given as gifts, a small yet meaningful token of affection among friends and family.

Today, whenever I bake these lemon-glazed cookies, I feel a connection to my roots. The gentle citrus aroma, the lightly sweet taste, and the crisp yet delicate texture remind me of those cherished moments spent in the kitchen, learning, laughing, and creating something truly special. Whether you have Italian heritage or simply appreciate a delicious homemade treat, these cookies will bring a little piece of tradition into your home.

What Makes These Italian Easter Cookies Special?

Italian baking is known for its balance—never overly sweet but always satisfying. These Easter Knot Cookies embody that principle perfectly. Unlike modern sugar-laden treats, Uncinetti have a subtle sweetness, a light crumb, and a refreshing citrus glaze that makes them perfect for pairing with a cup of coffee or tea.

1. The Meaning Behind the Knot Shape

The name “Uncinetti” translates to “crochet” in Italian, a nod to the intricate knot shape of these cookies. The twisted design symbolizes unity, faith, and continuity, making them a fitting treat for Easter, a time of renewal and togetherness.

2. A Perfectly Balanced Texture

Unlike soft, chewy cookies, these Italian Easter treats have a lightly crisp exterior with a slightly tender inside. The absence of excessive sugar allows the flavors of lemon zest, butter, and vanilla to shine through, making them a delightful contrast to richer Easter desserts.

3. The Refreshing Citrus Glaze

The powdered sugar lemon glaze is what truly sets these cookies apart. The tartness of the lemon juice balances out the mild sweetness of the dough, giving each bite a burst of brightness that lingers on the palate.

4. A Nostalgic and Meaningful Treat

These cookies aren’t just about flavor—they’re about heritage and history. In many Italian households, baking Uncinetti is a family activity, with multiple generations coming together to roll, shape, and glaze these delicate knots.

Gather Your Ingredients: A Taste of Italy

For the Cookies:

  • 1 ½ cups + 2 tbsp all-purpose flour (200g)
  • 3 ¼ tbsp granulated sugar
  • 1 tsp baking powder
  • 1 pinch salt (or ¼ tsp if using unsalted butter)
  • Zest of 1 lemon
  • 1 large egg
  • ¼ cup melted and cooled butter
  • 4 tbsp milk (2% recommended)

For the Lemon Glaze:

  • 1 ½ – 2 cups powdered sugar
  • 1 tbsp lemon juice (adjust as needed)
  • 1 tbsp milk (adjust as needed)

Directions: Baking the Perfect Easter Cookies

Step 1: Prepare Your Baking Essentials

Preheat the oven to 300°F (150°C) and line a baking sheet with parchment paper.

Step 2: Mixing the Dough

In a large bowl, whisk together flour, sugar, baking powder, salt, and lemon zest. Make a well in the center and add the egg, melted butter, and milk. Use a fork to combine, then transfer to a flat surface and knead gently until a smooth dough forms.

Step 3: Shaping the Cookies

Divide the dough into pieces and roll them into thin ropes 5-6 inches (13-16 cm) long. Shape them into knots or circles.

Step 4: Baking to Perfection

Place the shaped cookies on the prepared baking sheet and bake for 15-18 minutes, or until lightly golden. Let them cool before glazing.

Step 5: Preparing the Lemon Glaze

In a small bowl, mix sifted powdered sugar with lemon juice and milk. Adjust the consistency to your preference by adding more milk if needed.

Step 6: Finishing Touches

Drizzle or dip the cooled cookies in the lemon glaze, or simply dust them with powdered sugar. Let them set before serving.

Nutritional Breakdown: A Light and Sweet Treat

  • Calories: 76 kcal
  • Carbohydrates: 9g
  • Protein: 2g
  • Fat: 4g
  • Saturated Fat: 2g
  • Cholesterol: 23mg
  • Sodium: 38mg
  • Potassium: 51mg
  • Fiber: 1g
  • Vitamin A: 121 IU
  • Vitamin C: 1mg
  • Calcium: 22mg
  • Iron: 1mg

Tips for Making the Best Italian Easter Knot Cookies

While these cookies are easy to make, a few tips can help ensure they turn out authentic and delicious every time.

1. Don’t Overwork the Dough

The key to a light, delicate texture is to knead the dough just until it comes together. Overmixing can make the cookies too dense or tough.

2. Keep the Ropes Thin for a Perfect Shape

When rolling the dough into ropes, make sure they are thin enough (about ¼ inch thick) so that the cookies keep their knot shape when baked.

3. Bake Until Lightly Golden

Unlike some cookies that should be deeply browned, these should have a pale, golden color. Overbaking can make them too hard.

4. Adjust the Glaze to Your Liking

If you prefer a thicker glaze, use less milk. For a more transparent, lightly coated look, add a little more milk or lemon juice to thin it out.

5. Experiment with Flavors

While lemon is the traditional flavor, you can try using orange zest, almond extract, or even a hint of anise for a different twist.

Serving and Pairing Suggestions

These cookies may be small, but they are incredibly versatile. Whether you’re serving them as part of an Easter feast or enjoying them with a quiet afternoon coffee, they always bring a touch of old-world charm to the table.

1. Serve with Coffee or Tea

In true Italian fashion, these cookies are perfect alongside a cup of espresso, cappuccino, or black tea. Their mild sweetness makes them an excellent complement to a strong, bold drink.

2. Pair with Other Easter Desserts

For an authentic Italian Easter dessert table, serve these cookies alongside:

  • Pastiera Napoletana – A traditional ricotta and grain pie from Naples
  • Colomba di Pasqua – An Easter dove-shaped sweet bread
  • Chocolate Easter Eggs – A modern but beloved tradition

3. Use Them as Edible Gifts

These cookies make beautiful homemade gifts. Place them in a decorative tin or wrap them in parchment paper with a ribbon for an elegant Easter present.

How to Store and Keep Your Cookies Fresh

1. Room Temperature Storage

  • Keep the cookies in an airtight container at room temperature for up to one week.
  • Store them in a cool, dry place to prevent them from getting too soft or stale.

2. Freezing the Dough

  • You can freeze the dough before baking by wrapping it in plastic wrap and placing it in a freezer bag.
  • It will stay fresh for up to three months. Simply thaw it in the refrigerator overnight before shaping and baking.

3. Freezing the Baked Cookies

  • If you want to make the cookies ahead of time, they freeze well after baking too.
  • Store them in a freezer-safe container and thaw at room temperature before serving.

FAQs: Answering Your Baking Questions

1. Can I Make These Cookies Without the Glaze?

Yes! If you prefer, you can dust them lightly with powdered sugar instead of glazing them. They will have a more delicate sweetness.

2. Can I Substitute the Lemon with Another Flavor?

Absolutely. Orange zest and juice work beautifully, as does almond extract or vanilla for a different take on the traditional recipe.

3. Why Are My Cookies Too Hard?

If the cookies turn out too firm, they may have been overbaked or the dough was overworked during mixing. Try baking them for a shorter time or ensuring the dough remains soft and pliable.

4. Can I Make These Cookies Vegan?

Yes! You can substitute the butter with light olive oil and use a plant-based milk alternative. For the egg, try using a flaxseed egg or a commercial egg replacer.

5. Can I Add Sprinkles to These Cookies?

Definitely! Many Italian families decorate their Easter Knot Cookies with colorful sprinkles, especially for children. Simply add them immediately after glazing so they stick.

Conclusion: A Tradition Worth Keeping

Italian Easter Knot Cookies (Uncinetti) are more than just a delicious treat—they are a symbol of heritage, family, and celebration. Whether you grew up eating them or are trying them for the first time, they bring a touch of Italy’s rich culinary tradition into your home.

With their light, citrusy flavor and delicate texture, they are the perfect cookie to enjoy with loved ones during Easter—or any time you want to add a little sweetness to your day.

So gather your ingredients, roll out your dough, and create a new tradition in your kitchen. These cookies are more than just food—they are memories in the making.

Mushroom Swiss Cheese Meatloaf: A Gourmet Take on a Comfort Food Classic

A Dish That Feels Like Home

There’s something about the smell of meatloaf baking in the oven that instantly transports me back to my childhood. It was the dish my mother made when she wanted to bring the family together, a recipe passed down from my grandmother, who had perfected it over decades.

I remember coming home after long days at school, the crisp autumn air biting at my cheeks, and stepping inside to the comforting aroma of roasted meat, warm spices, and melted cheese. Those nights were special. We would sit around the dinner table, my father telling stories, my siblings sneaking bites before the plates were even served, and my mother proudly slicing into the meatloaf she had worked so hard to perfect.

As I grew older, I started experimenting in the kitchen, always looking for ways to elevate the dishes I grew up with. Meatloaf, while delicious, often had a reputation for being dry or uninspired. That’s when I discovered the magic of mushrooms and Swiss cheese. By incorporating these two simple yet flavorful ingredients, I transformed a traditional meatloaf into something rich, moist, and deeply satisfying.

This Mushroom Swiss Cheese Meatloaf is a recipe I hold close to my heart. It takes everything I love about the comforting dish of my childhood and enhances it with bold flavors and creamy textures. Whether you’re making this for a family dinner, a special gathering, or simply because you crave a homemade meal, this dish will bring warmth to your table and memories to your heart.

What Makes This Meatloaf Special?

Traditional meatloaf is often made with a simple blend of ground beef, breadcrumbs, eggs, and seasonings, sometimes topped with a layer of ketchup for added flavor. But this recipe takes it to another level by incorporating earthy mushrooms and creamy Swiss cheese, creating a meatloaf that is not only juicy but bursting with umami flavor.

1. Mushrooms: The Secret to Moisture and Depth

Mushrooms are the unsung hero of this recipe. Many people shy away from adding mushrooms to their meat dishes, but they bring a natural umami depth that enhances the overall taste of the meatloaf. Additionally, mushrooms help retain moisture, ensuring that every bite is tender and juicy.

Beyond their flavor-enhancing abilities, mushrooms also provide an array of health benefits:

  • Rich in antioxidants that help fight inflammation
  • A great source of vitamins like B vitamins and vitamin D
  • High in fiber, which aids digestion and promotes gut health

2. Swiss Cheese: A Creamy, Nutty Surprise

Swiss cheese melts beautifully into the meatloaf, adding a smooth, velvety texture and a subtle nuttiness that complements the beef and mushrooms perfectly. Unlike sharp cheeses that might overpower the dish, Swiss cheese brings balance, enhancing the flavors without overshadowing them.

It also has nutritional benefits:

  • Packed with protein for muscle health
  • High in calcium, essential for strong bones and teeth
  • Lower in sodium compared to other cheeses, making it a heart-friendlier option

3. The Perfect Blend of Meats for the Ideal Texture

While some meatloaf recipes rely solely on ground beef, using a combination of beef and pork gives this dish a tender, juicy consistency. The pork adds a slightly richer flavor and helps keep the meatloaf from drying out.

Gather Your Ingredients: The Ultimate Flavor Fusion

  • 1 lb ground beef
  • ½ lb ground pork
  • 1 cup breadcrumbs
  • ½ cup milk
  • ½ cup grated Parmesan cheese
  • ½ cup finely chopped onions
  • 1 cup finely chopped mushrooms
  • 4 slices bacon, cooked and crumbled
  • 1 cup shredded Swiss cheese
  • 2 large eggs
  • 1 tbsp Worcestershire sauce
  • 1 tbsp ketchup
  • 1 tsp garlic powder
  • 1 tsp dried thyme
  • ½ tsp salt
  • ½ tsp black pepper
  • ½ cup ketchup (for topping)

Mastering the Method: Step-by-Step Directions

Step 1: Preheat and Prepare

Preheat your oven to 375°F (190°C). Cook the bacon until crispy, then crumble it. In the same pan, sauté chopped onions and mushrooms until soft. Set aside to cool.

Step 2: Mix with Care

In a large bowl, combine ground beef, ground pork, breadcrumbs, milk, Parmesan cheese, cooked bacon, Swiss cheese, and the sautéed mushrooms and onions. Add eggs, Worcestershire sauce, 1 tbsp of ketchup, garlic powder, thyme, salt, and pepper. Mix until just combined, being careful not to overwork the meat.

Step 3: Shape the Loaf

Place half of the meat mixture into a greased loaf pan, pressing it evenly. Sprinkle a layer of Swiss cheese on top, then add the remaining meat mixture, sealing the cheese inside.

Step 4: Bake to Perfection

Spread ½ cup of ketchup evenly over the top. Bake for 60-70 minutes, or until the internal temperature reaches 160°F (71°C).

Step 5: Rest and Serve

Let the meatloaf rest for 10 minutes before slicing. This ensures a juicy and flavorful bite.

Nutritional Breakdown: What’s in Every Bite

  • Calories: 350
  • Protein: 25g
  • Carbohydrates: 10g
  • Fat: 25g
  • Fiber: 1g
  • Sugar: 2g
  • Sodium: 480mg

How to Make Sure Your Meatloaf Turns Out Perfect

Even with the best ingredients, meatloaf can go wrong if you don’t follow certain techniques. Here are a few expert tips to ensure that your Mushroom Swiss Cheese Meatloaf turns out perfect every time.

1. Avoid Overmixing the Meat

One of the biggest mistakes people make when preparing meatloaf is overmixing the ingredients. While it’s important to evenly distribute the mushrooms, cheese, and seasonings, overworking the mixture can lead to a dense, tough texture. The key is to mix everything gently—just enough to combine.

2. Layer the Cheese for a Melty Center

Instead of just mixing the Swiss cheese into the meat, try layering it within the loaf. This creates a creamy, gooey center that makes every bite irresistible. When baked, the cheese melts into the meat, infusing it with extra richness.

3. Use Fresh Breadcrumbs for Better Texture

While store-bought breadcrumbs work fine, using fresh breadcrumbs (made from day-old bread) results in a lighter, fluffier meatloaf. They absorb moisture better, preventing the meatloaf from becoming too dry or compact.

4. Let It Rest Before Slicing

As tempting as it is to slice into the meatloaf immediately after taking it out of the oven, letting it rest for at least 10 minutes is crucial. This allows the juices to redistribute, keeping the meatloaf moist and flavorful.

Best Side Dishes to Serve with Mushroom Swiss Cheese Meatloaf

This meatloaf is a star on its own, but pairing it with the right side dishes can elevate the entire meal. Here are some perfect accompaniments that complement its rich, savory flavors.

1. Garlic Mashed Potatoes

Creamy, buttery mashed potatoes are the ultimate comfort food, and when infused with a touch of roasted garlic, they pair beautifully with the meatloaf’s deep flavors.

2. Roasted Vegetables

A mix of roasted carrots, Brussels sprouts, or asparagus adds a sweet, caramelized contrast to the savory meatloaf.

3. Classic Green Salad

For a refreshing contrast, a simple green salad with a light vinaigrette balances out the meal’s richness.

4. Buttery Dinner Rolls

Warm, buttery rolls are perfect for scooping up extra meatloaf juices or spreading with a touch of butter.

Storage and Leftovers: How to Keep It Fresh

Meatloaf makes fantastic leftovers, and with the right storage methods, you can enjoy it for days.

Refrigeration

  • Store leftover meatloaf in an airtight container in the refrigerator for up to 3-4 days.
  • Reheat slices in the oven at 300°F (150°C), covered with foil to retain moisture.

Freezing

  • Slice the meatloaf and wrap each piece individually in plastic wrap.
  • Place the slices in a freezer bag and freeze for up to 3 months.
  • Thaw overnight in the refrigerator before reheating.

FAQs: Answering Common Questions

1. Can I Use a Different Cheese Instead of Swiss?

Yes! Cheddar, gouda, or gruyere work well as substitutes, each adding its own unique flavor.

2. What Kind of Mushrooms Work Best?

Button or cremini mushrooms offer the best balance of flavor and texture, but portobello mushrooms can add a bolder taste.

3. Can I Make This Recipe Gluten-Free?

Absolutely! Simply substitute regular breadcrumbs with gluten-free breadcrumbs, almond flour, or crushed gluten-free crackers.

4. Can I Prepare This in Advance?

Yes! You can assemble the meatloaf a day ahead, refrigerate it, and bake it when ready.

Conclusion: A Dish That Brings People Together

This Mushroom Swiss Cheese Meatloaf is more than just a meal—it’s an experience. It blends comfort and gourmet flavors, making it perfect for a cozy family dinner or a special gathering with friends.

With its juicy, tender texture, earthy mushroom notes, and gooey Swiss cheese, every bite delivers warmth and nostalgia. Whether you’re making it as a nod to tradition or trying it for the first time, this meatloaf is bound to become a staple at your table.

So gather your ingredients, fire up the oven, and prepare to enjoy a dish that is as soul-satisfying as it is delicious.

Mushroom Swiss Cheese Meatloaf: A Comforting Classic with a Gourmet Twist

A Taste of Home: Memories in Every Bite

Growing up, meatloaf was more than just a meal in my family—it was a tradition. I can still remember coming home from school on cold winter evenings, the air filled with the warm, rich aroma of my grandmother’s signature meatloaf baking in the oven. It was a dish that brought us together, a reminder that even on the busiest of days, there was always time to sit around the table and share a meal.

But as I grew older, I found myself wanting to elevate this classic. I wanted something that still carried the nostalgia of home-cooked goodness but also had a gourmet touch—something that felt just as comforting but with a bit more depth. That’s when I discovered the magic of mushrooms and Swiss cheese. Their combination added an earthy richness and creamy texture that transformed an already beloved dish into something truly special.

This Mushroom Swiss Cheese Meatloaf is my tribute to those cherished family dinners. It’s a recipe that takes the best of tradition and gives it a deliciously modern twist. Whether you’re looking for a hearty family meal, a nostalgic bite of the past, or a new way to enjoy an old favorite, this meatloaf is guaranteed to satisfy.

The Magic of Mushrooms and Swiss Cheese: Why This Meatloaf Stands Out

While traditional meatloaf can sometimes be dry or lacking in complexity, this version is anything but ordinary. The addition of sautéed mushrooms brings a deep umami flavor, keeping the meatloaf moist and tender. Meanwhile, Swiss cheese melts beautifully within the layers, infusing every bite with a nutty, creamy richness. The result? A meatloaf that is not just comforting, but downright irresistible.

Why Mushrooms?

Mushrooms are one of the most underrated ingredients when it comes to enhancing the flavor of ground meats. Their natural earthiness and meaty texture make them a perfect complement to beef and pork. Plus, they are packed with health benefits, including:

  • Being rich in antioxidants that help protect your cells
  • Providing important nutrients like vitamin D and B vitamins
  • Supporting digestion with their fiber content

The Power of Swiss Cheese

Swiss cheese isn’t just there for its gooey goodness—it also enhances the overall balance of flavors. Unlike sharper cheeses, Swiss has a mild nuttiness that pairs perfectly with mushrooms, while its lower sodium content keeps the dish from becoming overly salty.

This pairing ensures that every forkful of meatloaf is bursting with rich, savory flavors while maintaining a perfectly moist texture.

Gather Your Ingredients: Flavor-Packed Essentials

  • 1 lb ground beef
  • ½ lb ground pork
  • 1 cup breadcrumbs
  • ½ cup milk
  • ½ cup grated Parmesan cheese
  • ½ cup finely chopped onions
  • 1 cup finely chopped mushrooms
  • 4 slices bacon, cooked and crumbled
  • 1 cup shredded Swiss cheese
  • 2 large eggs
  • 1 tbsp Worcestershire sauce
  • 1 tbsp ketchup
  • 1 tsp garlic powder
  • 1 tsp dried thyme
  • ½ tsp salt
  • ½ tsp black pepper
  • ½ cup ketchup (for topping)

Crafting the Perfect Loaf: Step-by-Step Directions

Step 1: Prep Work Begins

Preheat your oven to 375°F (190°C). Cook the bacon until crispy, then crumble it. In the same pan, sauté chopped onions and mushrooms until soft. Set aside to cool.

Step 2: Mix & Mingle the Ingredients

In a large bowl, combine ground beef, ground pork, breadcrumbs, milk, Parmesan cheese, bacon, Swiss cheese, and the sautéed mushrooms and onions. Add eggs, Worcestershire sauce, 1 tbsp of ketchup, garlic powder, thyme, salt, and pepper. Mix gently—avoid overmixing to keep the meatloaf tender.

Step 3: Shape & Layer

Transfer half of the mixture to a greased loaf pan, pressing it evenly. Sprinkle a layer of Swiss cheese over it, then add the remaining meat mixture on top. Smooth it out, ensuring the cheese is sealed inside.

Step 4: Bake to Perfection

Spread ½ cup of ketchup evenly over the top. Bake for 60-70 minutes, or until the internal temperature reaches 160°F (71°C).

Step 5: Rest & Serve

Let the meatloaf rest for 10 minutes before slicing—this keeps the juices locked in for a moist, flavorful bite.

Fuel Your Body: Nutritional Breakdown

  • Calories: 350
  • Protein: 25g
  • Carbohydrates: 10g
  • Fat: 25g
  • Fiber: 1g
  • Sugar: 2g
  • Sodium: 480mg

Tips for the Perfect Meatloaf: Avoiding Common Mistakes

Even the best recipes can go wrong if certain steps aren’t followed. Here are some essential tips to ensure your Mushroom Swiss Cheese Meatloaf turns out perfect every time:

1. Don’t Overmix the Meat

One of the biggest mistakes people make when preparing meatloaf is overmixing the meat mixture. While it’s important to combine the ingredients well, excessive mixing can lead to a dense, tough meatloaf. The key is to gently mix everything until just combined—this keeps the texture light and tender.

2. Choose the Right Meat Ratio

For a meatloaf that’s juicy but not greasy, an 80/20 blend of ground beef works best. Too much fat can make the loaf fall apart, while too little can result in dryness. Adding ground pork helps balance out the texture and adds extra flavor.

3. Layering the Cheese for Maximum Flavor

Rather than just mixing the Swiss cheese into the meat, layering it within the loaf creates melty pockets of cheesy goodness throughout. This ensures that every slice has a bit of that creamy texture.

4. Don’t Skip the Resting Time

Once the meatloaf is out of the oven, it’s tempting to slice into it immediately. However, letting it rest for at least 10 minutes allows the juices to redistribute, keeping the meatloaf moist and flavorful.

Pairing the Perfect Sides: What to Serve with Mushroom Swiss Cheese Meatloaf

A great meatloaf deserves equally delicious side dishes. Here are some ideal pairings to make your meal even more satisfying:

1. Creamy Garlic Mashed Potatoes

Nothing complements a rich, cheesy meatloaf better than buttery mashed potatoes. A touch of garlic and cream makes them the ultimate comfort food side.

2. Roasted Vegetables

Oven-roasted carrots, Brussels sprouts, or green beans add a touch of sweetness and a hint of crunch, balancing out the savory richness of the meatloaf.

3. Simple Green Salad

A fresh green salad with a light vinaigrette provides a refreshing contrast to the hearty meatloaf, making for a well-rounded meal.

4. Buttery Dinner Rolls

Soft, warm dinner rolls are perfect for soaking up any extra juices or sauce from the meatloaf.

Storage and Leftovers: Making the Most of Your Meatloaf

Refrigeration

Store leftover meatloaf in an airtight container in the refrigerator for 3-4 days. Reheat slices in the oven at 300°F (150°C) covered with foil to maintain moisture.

Freezing for Later

Meatloaf is freezer-friendly! Slice it into portions, wrap each slice in plastic wrap, and store in a freezer bag for up to 3 months. Thaw overnight in the refrigerator before reheating.

FAQs: Your Questions Answered

1. Can I Use a Different Cheese Instead of Swiss?

Absolutely! While Swiss cheese adds a creamy, nutty flavor, you can substitute it with cheddar, gruyere, or mozzarella for a different taste profile.

2. What Kind of Mushrooms Work Best?

Button mushrooms and cremini mushrooms are the best choices for their mild, earthy flavor. For a more intense taste, portobello mushrooms can also be used.

3. How Can I Make This Meatloaf Gluten-Free?

Swap out the breadcrumbs for a gluten-free alternative like almond flour, crushed gluten-free crackers, or even rolled oats.

4. Can I Prepare This Meatloaf in Advance?

Yes! You can assemble the meatloaf a day ahead and keep it refrigerated until you’re ready to bake. You can also freeze it uncooked, then bake it straight from the freezer with an additional 15-20 minutes of cook time.

5. How Can I Keep My Meatloaf from Falling Apart?

Make sure to use enough binding ingredients like eggs and breadcrumbs. Also, letting the meatloaf rest before slicing helps it hold its shape.

Conclusion: A New Classic Worth Savoring

There’s something truly special about Mushroom Swiss Cheese Meatloaf—it takes a humble, familiar dish and transforms it into something extraordinary. With its layers of savory mushrooms, gooey Swiss cheese, and perfectly seasoned meat, this recipe delivers the warmth of a traditional meatloaf with an elevated, gourmet flair.

Whether you’re making it for a cozy family dinner, a potluck gathering, or simply craving a meal that feels like home, this meatloaf is sure to impress. Serve it up with your favorite sides, enjoy the leftovers the next day, and most importantly—share it with those you love. Because at the end of the day, the best meals are the ones that bring people together.

Hearty Deep-Dish Pizza Pie – A Comforting Classic in Every Bite

A Slice of Home and Nostalgia

There’s something about pizza that brings people together. Whether it’s a Friday night tradition, a game-day favorite, or the comfort food we turn to after a long day, pizza has a way of making any meal feel special. But when I think about the most satisfying pizza experience, I always go back to the deep-dish pizza pie—a thick, hearty, and fully loaded masterpiece that feels more like a meal than just a snack.

My first introduction to deep-dish pizza wasn’t in a restaurant—it was in my grandmother’s kitchen. Unlike the thin, foldable slices I was used to, this pizza was different. It had a golden, buttery crust that stood tall, holding layers of gooey cheese, seasoned meat, and rich tomato sauce. It was baked in a deep pan, allowing every ingredient to meld together into a single, glorious bite.

What made this pizza special wasn’t just the flavors—it was the experience. I remember sitting at the kitchen table, watching the steam rise as we sliced into it, the cheese stretching endlessly before snapping back onto the plate. Every bite was warm, rich, and comforting. It wasn’t just food—it was tradition, love, and home.

Now, every time I make deep-dish pizza, I feel a connection to those moments. It’s the kind of dish that makes an ordinary night feel like a celebration. Whether you’re making it for a family dinner, a gathering with friends, or just to satisfy a serious pizza craving, this Hearty Deep-Dish Pizza Pie is guaranteed to be a hit.

Why You’ll Love This Deep-Dish Pizza Pie

1. More Than Just a Pizza – It’s a Meal

Unlike thin-crust pizzas that leave you reaching for another slice, this deep-dish version is thick, cheesy, and packed with toppings, making it a full meal in itself.

2. Customizable to Your Taste

The best thing about this pizza is that you can switch up the fillings and toppings to suit your preferences. From classic pepperoni to a fully loaded supreme version, the possibilities are endless.

3. A Crowd-Pleaser for Any Occasion

Whether you’re hosting a game night, a birthday party, or a cozy family dinner, this pizza pie is guaranteed to impress. Its deep, layered structure makes it perfect for slicing and sharing.

4. The Perfect Balance of Crisp and Chewy

With a thick, buttery crust that holds its shape and a gooey, cheesy center, this pizza gives you the perfect combination of textures in every bite.

5. Great for Leftovers

If you manage to have leftovers (which is rare!), this pizza reheats beautifully and tastes just as good the next day.

Ingredients – A Perfect Balance of Crust, Sauce, and Toppings

For the Crust:

  • 2 ½ cups all-purpose flour
  • 1 teaspoon sugar
  • 1 teaspoon salt
  • 1 cup warm water
  • 2 ¼ teaspoons active dry yeast
  • 2 tablespoons olive oil

For the Filling:

  • 1 lb ground beef or Italian sausage
  • 1 cup pizza sauce
  • 1 cup shredded mozzarella cheese
  • ½ cup cheddar cheese (optional)
  • ½ cup sliced mushrooms
  • ½ cup sliced green bell peppers or jalapeños
  • Pepperoni slices

For the Toppings:

  • Additional shredded mozzarella
  • Extra pepperoni and vegetables for garnish

Directions – Crafting the Ultimate Deep-Dish Experience

Step 1: Prepare the Dough

  1. Mix warm water and yeast, letting it sit until foamy.
  2. Combine flour, sugar, and salt, then add the yeast mixture and olive oil.
  3. Knead the dough until smooth and let it rise for one hour.

Step 2: Cook the Filling

  1. Brown the ground beef or sausage, then stir in pizza sauce and simmer.

Step 3: Assemble the Pizza Pie

  1. Preheat the oven to 375°F (190°C).
  2. Roll out the dough and press it into a deep baking pan.
  3. Layer mozzarella, meat filling, mushrooms, peppers, and additional cheese.
  4. Top with extra mozzarella and pepperoni slices.

Step 4: Bake to Perfection

  1. Bake for 25-30 minutes until golden and bubbly.
  2. Let it cool before slicing.

Step 5: Serve and Enjoy

  1. Slice into generous portions and serve warm with a fresh salad or garlic bread.

Nutritional Breakdown – A Satisfying and Hearty Meal

  • Calories per slice: 420 kcal
  • Protein: 22g
  • Fat: 15g
  • Carbohydrates: 50g

Tips for Making the Perfect Deep-Dish Pizza Pie

1. Let the Dough Rise for Maximum Flavor

A good crust is the foundation of any great pizza. Letting the dough rise properly ensures that it is light, airy, and flavorful rather than dense and heavy.

2. Use a Deep Baking Pan

Unlike a traditional pizza, this version needs a deep, round baking dish or springform pan to hold all the delicious layers.

3. Layer Ingredients Strategically

To prevent a soggy crust, start with a thin layer of cheese before adding the sauce. This creates a barrier that keeps the crust crisp.

4. Don’t Overload with Sauce

Too much sauce can make the pizza messy and overpower the other flavors. A moderate amount ensures a perfect balance between the toppings and crust.

5. Experiment with Different Cheeses

While mozzarella is a classic choice, mixing in cheddar, provolone, or gouda can add depth and richness to the pizza.

6. Let It Rest Before Slicing

After baking, allow the pizza to rest for a few minutes before cutting. This helps the cheese set and prevents the toppings from sliding off.

FAQs – Everything You Need to Know About Deep-Dish Pizza Pie

1. Can I Use Store-Bought Dough?

Yes! While homemade dough gives the best flavor, store-bought pizza dough works well if you’re short on time. Just make sure to let it come to room temperature before rolling to avoid tearing.

2. What’s the Best Meat to Use?

Ground beef, Italian sausage, and pepperoni are all great options. If you want something lighter, try ground turkey or shredded chicken.

3. Can I Make This Pizza Vegetarian?

Absolutely! Swap out the meat for sautéed mushrooms, bell peppers, spinach, onions, or even roasted eggplant for a delicious veggie-packed version.

4. How Do I Prevent the Crust from Getting Soggy?

  • Sprinkle a thin layer of shredded cheese on the crust before adding the sauce.
  • Drain any excess grease from cooked meats before layering.
  • Avoid adding too many watery vegetables without cooking them first.

5. How Long Does Leftover Deep-Dish Pizza Last?

  • In the fridge: Up to 3 days in an airtight container.
  • In the freezer: Wrapped tightly in foil, it can last up to 2 months.

6. How Do I Reheat It Without Losing Crispiness?

For best results, reheat slices in the oven at 350°F for about 10 minutes. Avoid microwaving, as it can make the crust soggy.

7. Can I Make This Ahead of Time?

Yes! You can prepare the dough and assemble the pizza up to 24 hours in advance, keeping it in the fridge until you’re ready to bake.

8. Can I Make Mini Deep-Dish Pizzas?

Definitely! Use muffin tins or small ramekins to make individual-sized portions—perfect for serving at parties or for meal prepping.

How to Serve Deep-Dish Pizza Pie

Pair this rich and hearty pizza pie with some light and refreshing sides:

  • A crisp green salad to balance the richness of the pizza.
  • Garlic bread or breadsticks for an extra indulgent meal.
  • A side of marinara sauce for dipping.
  • A cold beer or glass of red wine to complement the bold flavors.

Final Thoughts – A Dish Worth Every Bite

Deep-dish pizza isn’t just a meal—it’s an experience. It’s the kind of dish that makes you slow down and savor every bite, that fills your home with the mouthwatering aroma of baked cheese and herbs, and that brings people together around the table.

Whether you’re making this for a special occasion, a family dinner, or just because you love pizza, this recipe is one that never disappoints. It’s rich, cheesy, comforting, and endlessly customizable—everything a perfect pizza should be.

So roll up your sleeves, get your favorite toppings ready, and prepare to fall in love with deep-dish pizza all over again. Because once you taste a homemade pizza pie, you’ll never go back to ordinary takeout again.

Happy baking!

Crispy Reuben Balls – A Crunchy, Cheesy Twist on a Classic Favorite

A Bite-Sized Nostalgic Comfort

There’s something about a Reuben sandwich that feels like home. The combination of tender corned beef, tangy sauerkraut, creamy Swiss cheese, and bold mustard brings back memories of family gatherings, Sunday lunches, and trips to the local deli. It’s one of those timeless flavors—hearty, comforting, and perfectly balanced.

Growing up, my grandfather had a deep love for Reuben sandwiches. Every weekend, we’d sit in a cozy diner, watching the world go by through fogged-up windows while he savored every bite of his favorite sandwich. But as much as I adored the flavors, I always found the sandwich a bit overwhelming—the layers stacked high, the bread sometimes too thick.

That’s where these Crispy Reuben Balls come in. They capture everything I love about a traditional Reuben but in a bite-sized, crispy, golden package. They are the perfect fusion of comfort food and party snack—easy to eat, packed with flavor, and impossible to stop at just one. Whether you’re making them for a game day spread, a family get-together, or just to satisfy a craving, these crispy, cheesy bites will quickly become a household favorite.

Why You’ll Love These Reuben Balls

1. All the Classic Flavors in One Bite

These crispy bites deliver the perfect balance—the saltiness of corned beef, the tang of sauerkraut, the richness of Swiss cheese, and the hint of spice from mustard.

2. A Fun, Handheld Appetizer

Forget the mess of a sandwich. These easy-to-eat bites are perfect for parties, potlucks, or snacking while watching a game.

3. Crispy on the Outside, Gooey on the Inside

With a crunchy breadcrumb coating and a melty, cheesy center, every bite is an explosion of texture and flavor.

4. Easy to Make Ahead

You can prepare these in advance, store them in the fridge or freezer, and fry or bake them fresh when needed.

5. A Great Way to Use Leftover Corned Beef

If you have extra corned beef from St. Patrick’s Day or a weekend roast, these bites are the perfect way to repurpose leftovers into something exciting.

Ingredients – A Perfect Fusion of Flavor and Texture

For the Filling:

  • 2 cups cooked corned beef, shredded
  • 1 cup sauerkraut, drained and chopped
  • 1 cup shredded Swiss cheese
  • ½ cup cream cheese, softened
  • 1 tablespoon Dijon mustard
  • 1 teaspoon garlic powder
  • 1 teaspoon onion powder
  • ½ teaspoon black pepper

For the Breading:

  • 1 cup breadcrumbs
  • ½ cup all-purpose flour
  • 2 large eggs, beaten
  • Oil for frying (vegetable or canola)

Directions – From Mixing to Crunchy Perfection

Step 1: Prepare the Filling

  1. Mix corned beef, sauerkraut, Swiss cheese, cream cheese, Dijon mustard, garlic powder, onion powder, and black pepper in a bowl until well combined.

Step 2: Shape the Balls

  1. Roll the mixture into 1-inch balls and place them on a parchment-lined baking sheet.

Step 3: Set Up the Breading Station

  1. In separate dishes, prepare flour, beaten eggs, and breadcrumbs.

Step 4: Coat and Fry

  1. Roll each ball in flour, dip in beaten eggs, then coat in breadcrumbs.
  2. Fry in hot oil for 3-4 minutes per side until golden brown.

Step 5: Serve and Enjoy

  1. Drain on paper towels and serve warm with Dijon mustard or Thousand Island dressing.

Nutritional Breakdown – A Savory Indulgence

  • Calories per serving: 320 kcal
  • Protein: 14g
  • Fat: 20g
  • Carbohydrates: 18g

Tips for Making the Perfect Reuben Balls

1. Drain the Sauerkraut Well

Sauerkraut adds great tang, but too much moisture can make the filling soggy. Squeeze out as much liquid as possible before mixing it into the filling.

2. Chill Before Frying

Once you roll the balls, let them chill in the fridge for at least 30 minutes. This helps them hold their shape and prevents them from falling apart in the oil.

3. Use Panko for an Extra Crispy Coating

Regular breadcrumbs work fine, but panko breadcrumbs give a lighter, crispier texture that makes every bite more satisfying.

4. Keep the Oil at the Right Temperature

Frying at medium heat (about 350°F) ensures the outside gets golden brown while the inside stays warm and gooey. If the oil is too hot, the outside will burn before the cheese melts.

5. Serve with the Perfect Dip

These Reuben Balls are delicious on their own, but a good dip makes them even better. Try:

  • Thousand Island dressing for that classic Reuben sandwich flavor.
  • Dijon mustard for a bold, tangy kick.
  • Horseradish cream for a little extra spice.

FAQs – Everything You Need to Know

1. Can I Bake These Instead of Frying?

Yes! Preheat your oven to 400°F, place the balls on a greased baking sheet, and bake for 15-20 minutes until golden brown. For extra crispiness, lightly spray them with cooking oil before baking.

2. Can I Make These Ahead of Time?

Absolutely. You can:

  • Refrigerate uncooked balls for up to 24 hours before frying or baking.
  • Freeze them for longer storage—just add a couple of extra minutes to the cooking time when frying or baking.

3. What Can I Use Instead of Swiss Cheese?

If Swiss cheese isn’t your favorite, try:

  • Gruyère for a richer, nuttier flavor.
  • Monterey Jack for a milder, creamy taste.
  • Mozzarella for extra gooeyness.

4. How Do I Prevent the Filling from Leaking?

Make sure the filling is well mixed and properly chilled before rolling the balls. When breading, press the breadcrumbs firmly to create a sealed crust.

5. What’s the Best Oil for Frying?

Use a neutral oil with a high smoke point, like vegetable, canola, or peanut oil. Avoid olive oil, as it has a lower smoke point and can burn easily.

6. Can I Make a Healthier Version?

Yes! Instead of frying, bake them or air fry at 375°F for 12-15 minutes. You can also use low-fat cheese and whole wheat breadcrumbs for a lighter option.

7. Can I Make a Vegetarian Version?

Definitely! Swap out the corned beef for:

  • Chopped mushrooms and caramelized onions for a rich, umami flavor.
  • Jackfruit or tempeh for a plant-based alternative.
  • Spinach and feta for a Mediterranean twist.

How to Serve These Reuben Balls

These crispy bites are incredibly versatile and pair well with different sides and dips. Here are some serving ideas:

  • Classic Appetizer Platter: Arrange them with other small bites like pretzels, stuffed mushrooms, and jalapeño poppers.
  • With a Light Salad: The richness of the Reuben Balls pairs beautifully with a simple green salad or coleslaw.
  • As a Sandwich Alternative: Serve them with mini rye bread slices and extra Thousand Island dressing for a deconstructed Reuben experience.
  • With a Side of Fries or Sweet Potato Wedges: Perfect for a pub-style meal at home.

Final Thoughts – Why You Need to Try These Reuben Balls

Some recipes just hit the spot, and this is one of them. These Crispy Reuben Balls are everything you love about a Reuben sandwich but in a fun, crunchy, bite-sized form. They’re easy to make, packed with flavor, and perfect for any occasion—whether you’re hosting a party, looking for a creative way to use up leftovers, or simply craving something indulgent.

Once you try them, you’ll understand why they’ve become a go-to appetizer in my kitchen. They bring together rich, savory corned beef, creamy melted cheese, tangy sauerkraut, and a crispy golden coating into one irresistible bite.

So gather your ingredients, roll up your sleeves, and get ready to enjoy a snack that’s both nostalgic and exciting. Because sometimes, the best flavors come in the smallest, crispiest packages.

Happy cooking!

Crispy Ham and Cheese Sticks – A Savory, Cheesy Delight

A Snack That Brings Back Memories of Home

There are certain flavors that transport you straight back to childhood. For me, the combination of buttery pastry, melted cheese, and smoky ham is one of them. I still remember my mother pulling a tray of golden, flaky pastry sticks from the oven, the kitchen filled with the rich, comforting aroma of warm cheese and toasted ham.

These Ham and Cheese Sticks became a staple in our home—not just as a snack but as a way to bring people together. Whether it was a lazy Sunday afternoon, a family game night, or an unexpected gathering of friends, this was the go-to treat that everyone loved. They were simple to make, but their crispy, golden layers made them feel special.

Now, as I bake them in my own kitchen, I find the same joy in watching the pastry puff up in the oven, turning into crisp, golden perfection. It’s a recipe that proves some of the best foods are the simplest ones, and that a little bit of cheese and ham wrapped in flaky pastry can bring a whole lot of happiness.

Why You’ll Love These Ham and Cheese Sticks

1. Quick and Easy to Make

With just a handful of ingredients and minimal prep time, these cheese sticks are perfect for busy days when you need a quick snack or appetizer.

2. The Perfect Crunch and Melt

The flaky, golden layers of puff pastry combined with the gooey, melted cheese and savory ham make for an irresistible combination of textures.

3. Great for Any Occasion

Whether you’re serving them at a party, packing them for lunch, or enjoying them with a glass of wine, these ham and cheese sticks always fit the moment.

4. Customizable to Your Taste

You can get creative by switching up the cheese, adding herbs, or even making a spicy version with jalapeños or pepper jack cheese.

5. A Fun and Kid-Friendly Snack

Kids love these! The crispy texture and cheesy center make them a fun alternative to traditional sandwiches.

Ingredients – A Perfect Blend of Flaky, Cheesy Goodness

For the Pastry Sticks:

  • 1 sheet of puff pastry, thawed
  • 6 oz sliced ham (deli ham or preferred variety)
  • 6 oz shredded cheese (cheddar, Swiss, or your choice)
  • 1 egg (for egg wash)
  • 1 tablespoon mustard (optional)
  • Salt and black pepper, to taste
  • Sesame seeds or poppy seeds (optional, for topping)

Directions – From Prep to Perfection

Step 1: Preheat and Prep

  1. Preheat oven to 400°F (200°C) and line a baking sheet with parchment paper.

Step 2: Prepare the Pastry and Layer Ingredients

  1. Roll out puff pastry on a lightly floured surface. Cut into 1-inch wide, 6-inch long strips.
  2. Spread a thin layer of mustard on each strip (if using).
  3. Place a slice of ham and a sprinkle of cheese on one end of each strip.

Step 3: Roll and Bake

  1. Roll each strip tightly from the ham and cheese end, forming a stick.
  2. Place seam-side down on the baking sheet.
  3. Beat the egg and brush over the tops of the sticks. Sprinkle sesame or poppy seeds if desired.
  4. Bake for 15-20 minutes, or until golden brown and puffed.

Step 4: Cool and Serve

  1. Let cool slightly before serving. Enjoy warm for the best taste!

Nutritional Breakdown – A Guilt-Free Savory Snack

  • Calories per stick: ~220 kcal
  • Carbohydrates: ~14g
  • Protein: ~9g
  • Fat: ~14g
  • Sodium: ~300mg

Tips for Making the Best Ham and Cheese Sticks

1. Use High-Quality Puff Pastry

A good-quality buttery puff pastry will make all the difference. If possible, use an all-butter pastry for the flakiest and most flavorful result.

2. Don’t Overload with Fillings

While it’s tempting to stuff as much ham and cheese as possible, too much filling can cause the pastry to become soggy or burst open while baking. A moderate amount ensures a good balance between crisp pastry and gooey center.

3. Brush with Egg Wash for a Golden Finish

Brushing the tops with a beaten egg gives the pastry that gorgeous, bakery-style golden brown color. For extra flavor, you can even mix in a bit of garlic powder or paprika into the egg wash.

4. Add Toppings for Extra Crunch

A sprinkle of sesame seeds, poppy seeds, or even parmesan cheese before baking adds another layer of flavor and texture.

5. Serve Warm for the Best Texture

These are best enjoyed straight from the oven, while the cheese is still melted and the pastry is at its crispiest.

FAQs – Everything You Need to Know

1. Can I Make These Ahead of Time?

Yes! You can prepare the ham and cheese sticks in advance and store them in the refrigerator unbaked for up to 24 hours. Simply bake them fresh when needed.

2. Can I Freeze Them?

Absolutely! Freeze unbaked sticks on a tray, then transfer them to an airtight container. When ready to bake, pop them straight into the oven from frozen—just add a couple of extra minutes to the baking time.

3. What Cheese Works Best?

While cheddar and Swiss are great choices, you can experiment with:

  • Mozzarella for a gooey, stretchy center.
  • Gruyère for a rich, nutty flavor.
  • Pepper Jack for a spicy kick.

4. How Can I Make These Spicier?

For a spicy twist, try:

  • Adding a pinch of red pepper flakes to the cheese.
  • Using spicy mustard or hot sauce instead of regular mustard.
  • Mixing in jalapeños or diced chorizo for an extra kick.

5. Can I Make a Healthier Version?

Yes! To lighten up this recipe:

  • Use whole wheat puff pastry for added fiber.
  • Swap out processed ham for lean turkey or roasted chicken.
  • Use reduced-fat cheese for a lower-calorie option.

6. Can I Make a Vegetarian Version?

Absolutely! Instead of ham, try filling them with:

  • Spinach and feta for a Mediterranean flavor.
  • Sautéed mushrooms and caramelized onions for a rich, savory alternative.
  • Roasted bell peppers and goat cheese for a tangy twist.

7. How Do I Keep Them Crispy After Baking?

If you need to store them for later, reheat in the oven at 350°F for a few minutes instead of microwaving to maintain their crisp texture.

Serving Suggestions – How to Enjoy These Delicious Sticks

These ham and cheese sticks are so versatile that you can serve them in many ways:

  • As an appetizer – Arrange them on a platter with dipping sauces like honey mustard, garlic aioli, or marinara.
  • For breakfast or brunch – Pair them with scrambled eggs and fresh fruit for a balanced meal.
  • With soup – Serve them alongside a bowl of tomato soup or creamy potato soup for a comforting meal.
  • For a party snack – These are a great addition to any game day or holiday spread.

Final Thoughts – A Snack Worth Making Again and Again

There’s something incredibly satisfying about biting into a warm, flaky ham and cheese stick. It’s simple yet indulgent, crispy yet gooey, and packed with flavors that never get old. Whether you’re making them for a quick snack, a party appetizer, or just to satisfy a craving, they’re sure to be a hit every time.

The best part? They’re endlessly adaptable. You can play around with fillings, toppings, and seasonings to create your own signature version. Once you make them, they’re bound to become a go-to recipe in your kitchen—just like they have in mine.

So next time you’re looking for a foolproof, crowd-pleasing snack, give these ham and cheese sticks a try. They might just become your new favorite!

Happy baking!

Golden Cruffins – A Buttery, Flaky Masterpiece

A Bite of Nostalgia and Comfort

There’s something truly magical about the smell of fresh pastries filling the kitchen early in the morning. Growing up, Sunday mornings were always a time for baking in my family. My grandmother, with flour-dusted hands, would roll out delicate layers of pastry while I eagerly watched, waiting for that first warm bite. While she specialized in croissants and muffins, I never imagined that one day, these two pastries would be combined into something as delightful as cruffins—a hybrid that brings the best of both worlds into a single, flaky bite.

The first time I tried a cruffin, it was love at first taste. The crisp, golden layers of a croissant combined with the soft, tender texture of a muffin made it an instant favorite. But what made it even better was the versatility—plain, filled with jam, dusted with cinnamon sugar, or even turned into a savory treat with cheese and herbs. Each bite was an experience, a delicate balance between lightness and richness.

Now, making cruffins at home has become a cherished tradition. Whether you’re baking them for a weekend breakfast, a special gathering, or just to treat yourself, these pastries offer a bakery-style indulgence that’s worth every step.

Why You’ll Love This Recipe

1. A Perfect Texture Combination

Cruffins combine the flakiness of a croissant with the softness of a muffin, giving you layers of buttery goodness in every bite.

2. Customizable to Suit Any Taste

You can fill cruffins with Nutella, jam, custard, lemon curd, or even savory ingredients like cheese and garlic butter. The possibilities are endless!

3. A Show-Stopping Pastry

Their elegant, spiral shape makes them a beautiful addition to any brunch table or pastry spread. They look like they came straight from a high-end bakery!

4. A Fun and Rewarding Baking Experience

Though they require a few steps, making cruffins at home is a deeply satisfying process. The moment you pull them out of the oven, golden and perfectly crisp, is worth every minute spent rolling, layering, and shaping.

5. Fresh, Homemade Goodness

Unlike store-bought pastries, homemade cruffins allow you to control the ingredients, sweetness, and flavors, ensuring a fresher and healthier treat.

Ingredients – The Perfect Blend of Soft and Crisp

For the Dough:

  • 2 ½ cups (315g) all-purpose flour
  • 1 teaspoon salt
  • 2 tablespoons granulated sugar
  • 1 packet (2 ¼ teaspoons) active dry yeast
  • ¾ cup warm milk
  • ½ cup unsalted butter, softened (plus extra for greasing)

For the Topping and Fillings (Optional):

  • Powdered sugar (for dusting)
  • Jam, Nutella, or custard (for filling)

Directions – Crafting the Perfect Cruffin

Step 1: Prepare the Dough

  1. Combine warm milk and yeast, letting it sit until frothy.
  2. Add sugar, salt, and flour, then knead into a smooth dough.
  3. Cover and let the dough rise until it doubles in size (about 1 hour).

Step 2: Roll and Layer

  1. Divide dough into 8-10 portions and roll each into a thin rectangle.
  2. Spread softened butter evenly across each piece.
  3. Roll each rectangle into a tight log, then slice lengthwise to reveal the layers.

Step 3: Shape and Bake

  1. Coil each sliced log into a muffin tin, layering the cut edges upward.
  2. Let proof for another 30 minutes while preheating the oven to 375°F (190°C).
  3. Bake for 20-25 minutes until golden brown and crisp.

Step 4: Add Fillings and Serve

  1. Once cooled, use a piping bag to fill cruffins with jam or custard if desired.
  2. Dust with powdered sugar for a finishing touch.

Nutritional Breakdown – A Decadent Indulgence

  • Calories per cruffin: ~250 kcal
  • Carbohydrates: ~30g
  • Protein: ~4g
  • Fat: ~12g
  • Sugar: ~5g

The Secrets to Perfect Cruffins

1. Keep the Butter Cold

The key to achieving flaky layers is using cold butter. When the dough bakes, the butter melts slowly, creating pockets of air that give the cruffins their signature crispness. If the butter is too soft, the layers may blend together, resulting in a dense texture.

2. Rolling the Dough Extra Thin

For the most beautiful layers, roll out your dough as thin as possible before spreading butter and rolling it into logs. This ensures maximum flakiness in the final product.

3. Proofing for the Right Amount of Time

Letting the cruffins rise properly before baking is essential for a light and airy texture. A second rise in the muffin tin allows the dough to expand, creating that perfect balance of crispiness and softness.

4. Choosing the Right Filling

While cruffins are delicious on their own, adding a filling elevates their flavor. Some great options include:

  • Sweet: Jam, custard, Nutella, cinnamon sugar, or cream cheese frosting.
  • Savory: Cheese, pesto, sun-dried tomatoes, or ham and mustard.

5. Baking at the Perfect Temperature

Cruffins bake best at 375°F (190°C). This allows them to develop a golden, crisp exterior while keeping the inside tender and flaky. If baked at too high a temperature, they may brown too quickly without cooking through.

FAQs – Everything You Need to Know About Cruffins

1. Can I Use Store-Bought Croissant Dough Instead of Homemade Dough?

Yes! If you’re short on time, store-bought croissant dough can be used as a shortcut. While homemade dough provides the best flavor and texture, pre-made dough will still give you a flaky and delicious result.

2. How Do I Get the Layers to Be Extra Flaky?

To maximize flakiness:

  • Roll the dough as thin as possible before layering it.
  • Use cold butter and chill the dough before baking.
  • When slicing the dough to shape the cruffins, cut carefully to reveal the layers.

3. Can I Prepare Cruffins in Advance?

Yes! You can prepare the dough and refrigerate it overnight, then roll and shape the cruffins the next day. You can also freeze unbaked cruffins and bake them fresh when needed.

4. How Should I Store Cruffins?

  • At room temperature: Store in an airtight container for up to 2 days.
  • For longer storage: Wrap tightly and freeze for up to 2 months.
  • To reheat: Warm in the oven at 350°F (175°C) for 5-7 minutes to restore crispness.

5. Can I Make a Healthier Version?

Yes! For a lighter take:

  • Use whole wheat flour instead of all-purpose flour.
  • Reduce the butter quantity slightly.
  • Use sugar-free fillings like fresh fruit puree instead of jam or Nutella.

6. What’s the Best Way to Serve Cruffins?

Cruffins are best served warm and fresh, paired with:

  • Coffee or tea for a classic breakfast treat.
  • A dusting of powdered sugar or a drizzle of honey for extra sweetness.
  • Fresh fruit or whipped cream for a balanced dessert.

7. Can I Make Savory Cruffins?

Absolutely! Some delicious savory options include:

  • Garlic butter and parmesan
  • Spinach and feta
  • Ham and cheese
  • Pesto and sun-dried tomatoes

Final Thoughts – Why You Need to Bake Cruffins Today

Baking cruffins is more than just making a pastry—it’s about creating an experience. The joy of watching the dough transform into crispy, golden layers, the excitement of choosing fillings, and the satisfaction of biting into a warm, buttery pastry make it one of the most rewarding treats to bake at home.

These beautiful, flaky pastries are perfect for any occasion—whether you’re hosting a brunch, treating your family, or simply indulging in a well-earned moment of sweetness. Their elegant shape and rich flavor make them feel like something straight out of a Parisian bakery, yet they’re made right in your own kitchen.

So, if you’re looking for a baking project that is both fun and delicious, cruffins are the answer. Once you’ve mastered them, you’ll find yourself making them again and again, experimenting with different flavors and enjoying every perfect, flaky bite.

Happy baking!

Lucky Green Dunkaroo Dip: A St. Patrick’s Day Classic

A Sweet Bite of Nostalgia

Growing up in the ‘90s, there was nothing quite as exciting as opening my lunchbox and seeing a pack of Dunkaroos tucked inside. The combination of soft, sweet cookies and that creamy, cake-flavored frosting felt like a celebration in every bite. It was a childhood favorite that made snack time extra special.

Fast forward to adulthood, and while those little packets of joy may no longer be a grocery store staple, the nostalgia for them lives on. That’s where homemade Dunkaroo Dip comes in—a fun, festive way to recreate that same experience, but in a way that’s even better because it’s made for sharing.

This Lucky Green Dunkaroo Dip is my go-to St. Patrick’s Day party treat. It’s quick, easy, and brings a pop of festive green to the dessert table. Whether you’re making it for a school party, a family gathering, or just to indulge in a little childhood nostalgia, this dip is guaranteed to be a hit. With its fluffy, cake-flavored goodness and fun sprinkles, it’s a dessert that makes everyone feel like a kid again.

Why This Dip is a St. Patrick’s Day Essential

1. No-Bake and Ready in Minutes

If you’re short on time but still want to impress, this dip is your best friend. It comes together in just minutes, making it the perfect last-minute party dish.

2. A Nostalgic Favorite with a Holiday Twist

Dunkaroo Dip brings back childhood memories, and with its lucky green color and festive sprinkles, it’s perfect for celebrating St. Patrick’s Day.

3. Light, Fluffy, and Irresistible

The combination of vanilla Greek yogurt, whipped topping, and cake mix creates a creamy, dreamy texture that pairs perfectly with cookies and crackers.

4. Customizable for Any Celebration

This recipe is easy to adjust for different holidays by changing the food coloring and sprinkles. Use red and pink for Valentine’s Day, pastels for Easter, or orange and black for Halloween.

5. A Crowd-Pleasing Treat for All Ages

Whether you’re hosting a kids’ party or an adults-only St. Paddy’s bash, this dip is a guaranteed hit. It’s simple, sweet, and fun to eat.

Ingredients: A Sweet and Festive Trio

  • 1 box white cake mix
  • 1 cup vanilla Greek yogurt
  • 1 tub whipped topping, thawed
  • Green food coloring
  • St. Patrick’s Day sprinkles (for garnish)
  • Nilla Wafers, animal crackers, or pretzels (for dipping)

Directions: Whip Up This Easy, No-Bake Treat

  1. Mix the Base:
    • In a large bowl, combine white cake mix, whipped topping, and Greek yogurt. Mix until smooth.
  2. Add the Festive Color:
    • Stir in green food coloring a few drops at a time until you reach the perfect shade.
  3. Decorate and Serve:
    • Transfer to a serving dish and top with St. Patrick’s Day sprinkles.
    • Serve with Nilla Wafers, animal crackers, or pretzels for dipping.

Nutritional Highlights (Per Serving, Approximate)

  • Calories: 191
  • Carbohydrates: 36g
  • Protein: 3g
  • Fat: 3g
  • Sugar: 21g
  • Calcium: 92mg

The Best Dippers for Dunkaroo Dip

Pairing the right dippers with this creamy, cake-batter-inspired dip takes it to the next level. Here are some favorites:

  • Nilla Wafers – A classic, soft cookie that complements the creamy dip.
  • Graham Crackers – Adds a crunchy texture and a hint of honey flavor.
  • Animal Crackers – Brings back childhood memories and is sturdy enough for dipping.
  • Mini Chocolate Chip Cookies – For an extra indulgent treat.
  • Pretzels – A salty-sweet combination that’s hard to resist.
  • Strawberries or Apple Slices – A fresh, juicy option for a slightly lighter pairing.

For an extra festive presentation, arrange the dippers around the bowl in a rainbow shape, leading to the “pot of gold” (the dip)!

Creative Ways to Customize Your Dunkaroo Dip

1. Make it Extra Fun with Mix-Ins

  • Mini marshmallows for a fluffier texture.
  • Crushed Golden Oreos for extra vanilla flavor.
  • White chocolate chips for a creamy bite.

2. Try Different Cake Mix Flavors

  • Funfetti cake mix for an added burst of sprinkles.
  • Lemon cake mix for a zesty twist.
  • Chocolate cake mix for a rich, indulgent version (though it won’t be green).

3. Make it Extra Fancy with Toppings

  • Whipped cream swirls for extra fluffiness.
  • Edible gold glitter for a true St. Patrick’s Day touch.
  • Lucky Charms marshmallows for a whimsical Irish-themed look.

4. Create a Healthier Version

  • Swap the cake mix for almond flour and a dash of vanilla extract.
  • Use sugar-free whipped topping and low-fat Greek yogurt.

Frequently Asked Questions

1. Do I Have to Use White Cake Mix?

No, but white cake mix provides the best base for customizing the color with food coloring. Other flavors like yellow or Funfetti work well, but chocolate will not turn green.

2. Can I Freeze Dunkaroo Dip?

It’s best enjoyed fresh, but if needed, you can freeze it in an airtight container for up to one month. Just thaw in the refrigerator and stir before serving.

3. How Long Does It Last in the Fridge?

If stored in an airtight container, it will last up to 5 days, though it’s best within the first 24 hours when the texture is at its fluffiest.

4. Can I Use Sugar-Free Cake Mix?

Yes! You can swap in sugar-free cake mix for a lower-sugar version without sacrificing flavor.

5. What if My Dip is Too Thick?

Simply add a splash of milk or extra yogurt to thin it out to your desired consistency.

6. Can I Make This Dip Dairy-Free?

Absolutely! Just use dairy-free whipped topping and plant-based yogurt to make it completely dairy-free.

7. Can I Make This Dip Vegan?

Yes! Use vegan cake mix, coconut-based whipped topping, and dairy-free yogurt to keep it vegan-friendly.

The Perfect Sweet Ending to Any St. Patrick’s Day Celebration

There’s something special about a dessert that’s both nostalgic and festive. Lucky Green Dunkaroo Dip is the ultimate St. Patrick’s Day treat, bringing together childhood memories with a fun, party-ready twist. It’s a recipe that’s impossibly easy, endlessly customizable, and always a crowd-pleaser.

What makes this dip truly special isn’t just its fluffy texture, sweet cake-batter flavor, or festive green hue—it’s the way it brings people together. Whether you’re dipping cookies with your kids, sharing laughs with friends at a party, or indulging in a quiet moment of nostalgia, this dip captures the joy of celebrating with food.

So this St. Patrick’s Day, whip up a batch of Lucky Green Dunkaroo Dip, grab your favorite dippers, and enjoy a sweet little taste of childhood. Because sometimes, the best way to celebrate is with a little bit of fun and a whole lot of sprinkles.