Easter Cake Mix Cookie Bars: A Festive and Foolproof Sweet Treat

A Bite of Easter Nostalgia

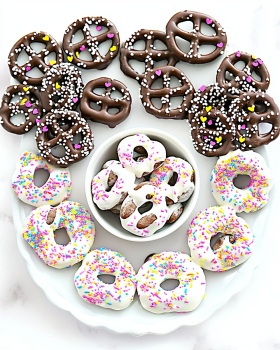
Easter has always been a time of joy, renewal, and of course, sweet treats. As a child, I remember the excitement of waking up on Easter morning, rushing outside to hunt for brightly colored eggs, and then eagerly anticipating the desserts that would follow our family meal. Among the traditional treats like chocolate bunnies and pastel candies, there was always one homemade dessert that stood out—cookie bars packed with colorful M&M candies and gooey chocolate chips.

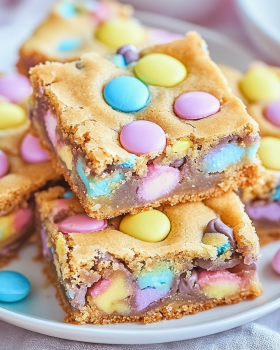
My grandmother, who had a knack for making desserts that were as beautiful as they were delicious, would whip up a batch of soft and chewy cookie bars that felt like pure magic. She made them with cake mix—a shortcut that ensured they were always light, fluffy, and incredibly easy to prepare. They became a staple in our Easter celebrations, a tradition that carried through the years.

Now, I love making these Easter Cake Mix Cookie Bars not just because they are incredibly delicious, but because they remind me of those warm family gatherings, laughter around the dinner table, and the simple joys of celebrating together. Whether you’re making them for a holiday party, an Easter basket treat, or just to satisfy a sweet tooth, these bars are a fun and festive way to add a little extra sweetness to your spring celebrations.

Why You’ll Love These Easter Cookie Bars

1. Quick and Easy with Minimal Ingredients

This recipe is perfect for beginner bakers or anyone short on time. Since it uses cake mix as a base, there’s no need to measure out flour, sugar, or leavening agents—everything comes together in a single bowl with just a few simple mix-ins.

2. Soft, Chewy, and Packed with Flavor

Unlike traditional cookies, which can sometimes turn out too crisp or dense, these bars are perfectly soft and chewy with just the right amount of sweetness. The combination of vanilla cake flavor, melted chocolate chips, and crunchy M&Ms makes every bite irresistible.

3. Festive and Fun for Any Occasion

The pastel M&Ms make these bars perfect for Easter, but you can easily switch up the colors and candies for any holiday. Think red and green for Christmas, orange and black for Halloween, or even rainbow sprinkles for a birthday celebration.

4. A Great Make-Ahead Dessert

Since these bars stay fresh for several days, they’re a great choice if you’re looking to prepare a dessert ahead of time. They can be stored at room temperature or even frozen for later enjoyment.

5. Kid-Friendly and Perfect for Baking Together

If you’re looking for a fun baking activity with your kids, this is the one! Little hands will love mixing the batter, sprinkling in the M&Ms, and helping to press everything into the pan before baking. It’s a great way to create memories in the kitchen.

Ingredients: A Festive Blend of Flavors

For the Cookie Bars:
  • 1 box yellow cake mix (15.25 oz)
  • 2 eggs
  • ⅓ cup vegetable oil
  • 1 teaspoon vanilla extract
  • 1 cup Easter M&M candies
  • 1 cup semi-sweet chocolate chips

Directions: Baking Up a Bite of Spring

  1. Preheat & Prepare – Set the oven to 350°F and grease a 9×13-inch baking dish.
  2. Mix the Dough – Combine cake mix, eggs, vegetable oil, and vanilla extract until well blended. Fold in Easter M&M candies and chocolate chips.
  3. Bake to Perfection – Spread the dough evenly in the baking dish and bake for 20-25 minutes.
  4. Cool & Slice – Allow the bars to cool completely before cutting into squares and serving.

Nutritional Breakdown: A Sweet Indulgence

  • Calories: ~200-250 per serving
  • Fat: ~10-12g
  • Saturated Fat: ~5-6g
  • Carbohydrates: ~30-35g
  • Sugar: ~20-25g
  • Protein: ~3-4g
  • Sodium: ~150-200mg

Common Mistakes to Avoid

Even though this recipe is simple, there are a few common pitfalls that can affect the texture and flavor of your cookie bars. Here’s how to get them perfect every time.

1. Overbaking the Bars

Since these bars continue to set as they cool, it’s important to take them out of the oven as soon as the edges turn golden brown. If they seem slightly underdone in the center, don’t worry—they’ll firm up as they sit. Overbaking will make them dry instead of soft and chewy.

2. Not Spreading the Batter Evenly

Because cake mix batter is thicker than traditional cookie dough, it’s essential to spread it evenly in the baking dish before putting it in the oven. A rubber spatula works best for getting an even layer.

3. Using Too Many or Too Few Mix-Ins

While it’s tempting to go heavy on the M&Ms and chocolate chips, adding too many can make the bars fall apart or become overly sweet. Stick to about one cup of mix-ins to maintain the perfect balance of flavor and texture.

4. Cutting Too Soon

Let the bars cool completely before slicing them. Cutting while they’re still warm can cause them to crumble, making it harder to get those nice, clean squares.

5. Using the Wrong Cake Mix

While yellow cake mix is the classic choice for this recipe, some people use white, vanilla, or funfetti cake mix for a different twist. Just make sure you avoid cake mixes with pudding already added, as they can make the bars too dense.

FAQs: Everything You Need to Know

1. Can I Make These Bars Ahead of Time?

Yes! These cookie bars stay fresh for up to 3 days at room temperature in an airtight container. If you want to keep them longer, you can freeze them for up to 3 months. Just thaw at room temperature before serving.

2. Can I Use a Different Flavor of Cake Mix?

Absolutely! While yellow cake mix is the traditional choice, you can try:

  • Chocolate cake mix for a richer, brownie-like version
  • Funfetti cake mix for extra colorful fun
  • Strawberry or lemon cake mix for a fruity twist

3. What Other Mix-Ins Can I Use?

Beyond Easter M&Ms and chocolate chips, you can experiment with:

  • Chopped nuts (pecans, walnuts, or almonds)
  • Sprinkles for extra color
  • White chocolate chips for a creamier flavor
  • Coconut flakes for a tropical touch

4. Can I Make These Gluten-Free?

Yes! Simply substitute a gluten-free cake mix and check that your mix-ins (like M&Ms and chocolate chips) are also gluten-free.

5. How Do I Store Leftovers?

  • Room Temperature: Store in an airtight container for up to 3 days.
  • Refrigerator: If you like firmer cookie bars, you can store them in the fridge for up to a week.
  • Freezer: Wrap individual bars in plastic wrap and freeze for up to 3 months.

6. Can I Use Oil Substitutes?

Yes! If you prefer a healthier option, you can replace vegetable oil with:

  • Melted butter for a richer taste
  • Unsweetened applesauce for a lower-fat version

7. Can I Make These Bars Thicker?

If you want thicker bars, use a smaller baking dish (such as an 8×8 pan) instead of a 9×13. Just be sure to increase the baking time by a few minutes to ensure they cook through.

Why These Easter Cookie Bars Deserve a Spot on Your Dessert Table

  • They’re incredibly easy to make – No complicated steps, no rolling dough, just mix and bake!
  • They look as good as they taste – The colorful M&Ms make them a perfect Easter-themed treat.
  • They’re perfect for sharing – Whether you’re bringing them to a party or adding them to Easter baskets, these bars are always a crowd-pleaser.
  • They’re customizable – Switch up the flavors and mix-ins to suit any occasion.

Conclusion: A Dessert That’s as Fun to Make as It Is to Eat

Few desserts are as effortless, festive, and delicious as Easter Cake Mix Cookie Bars. Whether you’re baking them as a family tradition, bringing them to a gathering, or just looking for a quick and foolproof sweet treat, these bars never disappoint.

The combination of soft, chewy texture, bursts of chocolate, and festive colors makes them an Easter favorite year after year. So grab a box of cake mix, some colorful candies, and get ready to bake up a batch of pure happiness in cookie bar form!

White Chocolate Easter Bark: A Sweet Tradition to Share

A Treat That Brings Back the Magic of Easter

Easter has always been a holiday filled with joy, color, and of course, sweets. As a child, I remember waking up to the sight of a beautifully arranged Easter basket, brimming with pastel-colored candies, chocolate bunnies, and tiny speckled eggs. But among all those treats, there was one that always stood out—homemade Easter bark.

It was a tradition in our family to make a big batch of it the night before Easter. My siblings and I would gather in the kitchen, eagerly watching as the creamy white chocolate melted into a smooth, glossy pool. We’d scatter handfuls of candy across the surface, each of us trying to create the perfect blend of colors and textures. There was laughter, there were sticky fingers, and in the end, there was a tray of beautifully imperfect chocolate bark that felt uniquely ours.

Now, as an adult, I still make White Chocolate Easter Bark every year. It’s a simple recipe, yet it carries so much nostalgia. It reminds me that sometimes, the best moments in life are the simplest ones—melting chocolate, sprinkling candy, and sharing a homemade treat with the people you love.

Why This White Chocolate Bark Is the Ultimate Easter Treat

1. Quick, Easy, and No-Bake

One of the best things about this recipe is that it requires no baking at all. In just a few simple steps—melting, decorating, and setting—you’ll have a stunning Easter dessert that looks like it took hours to make.

2. A Perfect Blend of Creamy and Crunchy

White chocolate is luxuriously smooth, and when paired with crispy candies, crunchy nuts, or chewy fruit, it creates an irresistible combination of textures. Every bite is a mix of creamy sweetness and satisfying crunch.

3. A Fun and Creative Activity for All Ages

This is the kind of recipe that kids and adults alike will enjoy making. There are no complicated techniques—just melting, pouring, and decorating. It’s the perfect way to bring the family together for some hands-on Easter fun.

4. Completely Customizable

While pastel Easter candies are the classic topping, you can make this recipe your own by adding different flavors, colors, and textures. Whether you prefer a fruity twist, a salty crunch, or a bit of extra chocolate, this bark is a blank canvas for your creativity.

5. A Beautiful Homemade Gift

Wrapped in clear cellophane bags and tied with a festive ribbon, Easter bark makes a thoughtful homemade gift. It’s an easy way to spread a little extra holiday cheer to family, friends, or neighbors.

Ingredients: A Celebration of Flavor and Crunch

For the Chocolate Base:
  • 2 pounds white chocolate, chopped (such as Ghirardelli or Lindt bars)
For the Toppings:
  • 1+ cup small Easter candies (e.g., M&M’s, mini Robin Eggs)
  • Assorted Easter sprinkles

Directions: Creating the Ultimate Easter Treat

  1. Melt the Chocolate – Microwave the chopped white chocolate in 30-second intervals, stirring between each, until smooth.
  2. Prepare the Base – Line a baking sheet with parchment paper and spread the melted chocolate evenly to about ¼-inch thickness.
  3. Add Festive Toppings – Sprinkle the Easter candies and sprinkles on top, pressing them lightly into the chocolate.
  4. Let It Set – Allow the bark to cool at room temperature for 2 hours or refrigerate for a quicker setting time.
  5. Break and Enjoy – Once solid, break into irregular pieces and serve or store.

Nutritional Breakdown: A Sweet Treat with a Crunch

  • Calories: ~383 per serving
  • Total Fat: ~19g
  • Saturated Fat: ~12g
  • Carbohydrates: ~50g
  • Sugar: ~45g
  • Protein: ~4g

Common Mistakes to Avoid

Even though this recipe is easy, there are a few things to watch out for to ensure your Easter bark turns out smooth, creamy, and picture-perfect.

1. Overheating the White Chocolate

White chocolate is more delicate than dark or milk chocolate, which means it can burn or seize if overheated. To avoid this, melt it slowly and gently—either in short bursts in the microwave or using a double boiler.

2. Using Low-Quality Chocolate

Not all white chocolate is created equal. Some brands contain stabilizers that make them harder to melt smoothly. For the best texture and flavor, use high-quality white chocolate bars instead of chips.

3. Not Lining the Baking Sheet

Skipping the parchment paper or silicone mat will make it difficult to remove the bark once it sets. Always line your baking sheet to ensure easy cleanup and smooth removal.

4. Adding Toppings Too Late

For the toppings to properly stick to the bark, they need to be sprinkled on while the chocolate is still warm. If you wait too long, they may just sit on the surface instead of adhering.

5. Refrigerating for Too Long

While chilling can speed up the setting process, leaving the bark in the fridge for too long can cause condensation, leading to a sticky surface. Let it set at room temperature for the best texture.

FAQs: Everything You Need to Know

1. Can I Use Almond Bark Instead of White Chocolate?

Yes! Almond bark is a great alternative as it melts easily and sets well. However, white chocolate has a richer, creamier flavor, so if taste is your priority, go for high-quality white chocolate.

2. What If My White Chocolate Seizes While Melting?

If your chocolate becomes thick and grainy, it has either overheated or come into contact with water. Try stirring in a teaspoon of vegetable oil or coconut oil to help smooth it out. If that doesn’t work, you may need to start over with a fresh batch.

3. Can I Use Chocolate Chips Instead of Chocolate Bars?

Chocolate chips contain stabilizers that make them harder to melt smoothly. If using them, add a teaspoon of coconut oil or shortening to help improve the consistency.

4. How Can I Make This Bark Dairy-Free?

Yes! Use dairy-free white chocolate, such as brands made with cocoa butter and coconut milk. Many specialty stores carry vegan-friendly alternatives that taste just as delicious.

5. What Other Candies Work Well in Easter Bark?

Beyond pastel M&M’s and mini eggs, try:

  • Jelly beans for a fruity pop of color
  • Mini marshmallows for extra chewiness
  • Chopped chocolate bars for a rich twist
  • Gummy bunnies for a playful Easter theme

6. How Long Does White Chocolate Bark Last?

Stored in an airtight container at room temperature, it will stay fresh for up to a week. If your kitchen is warm, you can refrigerate it, but bring it to room temperature before serving to avoid condensation.

7. Can I Freeze Easter Bark?

Yes! Store it in a freezer-safe bag or container for up to three months. To serve, let it thaw at room temperature for the best texture.

8. What Are Some Creative Ways to Serve Easter Bark?

  • Crushed over ice cream for a festive sundae
  • Mixed into popcorn for a sweet and salty snack
  • As a cupcake topper for an extra decorative touch
  • Served in an Easter basket as an edible gift

Why You’ll Want to Make This Every Year

  • It’s foolproof – No baking, no complicated techniques, just melt and decorate.
  • It’s a family-friendly activity – Kids and adults alike love making and eating it.
  • It’s stunning to look at – The pastel colors make it a perfect centerpiece for Easter.
  • It’s completely customizable – You can switch up the flavors, colors, and toppings to fit any occasion.

Conclusion: A Simple Treat That Sparks Joy

There’s something undeniably special about making White Chocolate Easter Bark. It’s not just about the flavors—it’s about the memories it creates. Whether you’re making it with family, gifting it to loved ones, or simply treating yourself to something sweet, this festive bark is a little piece of happiness in every bite.

So grab your favorite candies, melt some chocolate, and let your creativity shine. Because sometimes, the simplest treats are the ones that bring the most joy.

Easter Dirt Cake Casserole: A Whimsical Treat for Spring Celebrations

A Sweet Tradition That Brings Back Childhood Memories

Some desserts aren’t just about taste—they’re about nostalgia, laughter, and the simple joy of celebrating with loved ones. Easter Dirt Cake Casserole is one of those desserts. It’s fun, festive, and full of playful elements that make it perfect for spring gatherings.

Growing up, Easter was always a magical time in my family. We’d wake up early, put on our pastel-colored outfits, and rush outside for the annual egg hunt. But the best part of the day wasn’t just finding the hidden treasures—it was the dessert table that awaited us after. My grandmother always made a version of dirt cake, layering creamy pudding with crushed cookies to create a “garden” effect. She’d top it with colorful candies, chocolate eggs, and even tiny marshmallow Peeps, transforming it into an edible Easter masterpiece.

Now, as an adult, I love carrying on that tradition. Easter Dirt Cake Casserole is more than just a dessert—it’s a centerpiece of childhood joy. It’s the kind of dish that brings kids and adults together, sparking conversation, laughter, and the undeniable delight of digging into a dessert that looks like a mini springtime garden.

If you’re looking for a no-bake, easy-to-make dessert that wows a crowd, this is it. Let’s dive into why this casserole-style dirt cake is a must-have for your Easter celebration.

Why This Easter Dirt Cake Is a Must-Try

1. A No-Bake Dessert That Saves Time

Spring is a busy season, especially when planning Easter gatherings. This dessert requires zero baking, making it a stress-free option when you need something quick and easy.

2. Layers of Texture and Flavor

The combination of creamy pudding, crushed cookies, and whipped topping creates the perfect balance of textures—smooth, crunchy, and airy all in one bite.

3. A Festive and Fun Presentation

With its edible grass, chocolate eggs, and colorful candies, this dessert is a showstopper on any Easter table. Kids love decorating it, and adults appreciate the nostalgic charm.

4. Easily Customizable

This recipe is incredibly versatile. You can switch up the pudding flavors, use different candies, or make individual servings for a personal touch.

5. Perfect for Kids and Adults Alike

Whether you’re making this for a children’s Easter party or a family gathering, everyone loves dirt cake. It’s fun to assemble, delicious to eat, and always a conversation starter.

Ingredients: A Sweet Combination of Crunch and Cream

For the Pudding Mixture:
  • 1 package (8 oz) cream cheese, softened
  • ½ cup unsalted butter, softened
  • 1 cup powdered sugar
  • 2 packages (3.4 oz each) instant vanilla pudding mix
  • 3 cups cold milk
  • 1 container (8 oz) whipped topping (e.g., Cool Whip), thawed
For the Dirt Layers:
  • 1 package (14 oz) chocolate sandwich cookies (e.g., Oreos), crushed
For Decoration:
  • 1 cup shredded coconut
  • Green food coloring
  • Easter candies (e.g., chocolate eggs, jellybeans, Peeps)
  • Miniature chocolate bunnies (optional)

Directions: Layering the Magic of Easter

  1. Prepare the Pudding Mixture – Beat cream cheese, butter, and powdered sugar until smooth. Whisk the pudding mix with cold milk until thickened, then fold it into the cream cheese mixture along with the whipped topping.
  2. Make the “Dirt” – Crush the chocolate sandwich cookies into fine crumbs.
  3. Assemble the Casserole – Layer pudding mixture and crushed cookies in a casserole dish, finishing with a cookie crumb topping.
  4. Create the “Grass” – Dye shredded coconut with green food coloring and sprinkle over the top.
  5. Decorate – Arrange Easter candies, chocolate eggs, Peeps, and chocolate bunnies for a festive touch.
  6. Chill & Serve – Refrigerate for at least 2 hours before serving for the best texture.

Nutritional Breakdown: A Sweet Delight

  • Calories: ~350 per serving
  • Carbohydrates: ~45g
  • Fat: ~18g
  • Protein: ~4g
  • Sugar: ~30g

Common Mistakes to Avoid

Even though this recipe is simple, a few common mistakes can affect the final result. Here’s how to make sure your Easter Dirt Cake Casserole turns out perfect every time.

1. Not Crushing the Cookies Properly

The cookies should be crushed into fine crumbs to resemble real “dirt.” If the pieces are too large, they won’t create that signature smooth layering effect.

2. Using Warm Ingredients

For the best consistency, make sure your whipped topping and pudding are fully chilled before assembling. Warm ingredients can cause the layers to become runny.

3. Skipping the Chill Time

Refrigerating the dessert for at least two hours allows the layers to set properly, preventing it from becoming too soft or messy when serving.

4. Adding Decorations Too Early

If you’re using Peeps, chocolate eggs, or other candies, wait until just before serving to add them. This prevents them from sinking or getting soggy.

5. Overloading on Decorations

It’s easy to get carried away with the fun toppings, but too many can overpower the creamy base and make the dessert overly sweet. A balance of textures and colors works best.

FAQs: Everything You Need to Know

1. Can I Make This Dessert in Advance?

Yes! In fact, making it a day ahead enhances the flavors and allows the pudding mixture to fully set. Just wait to add decorations until right before serving.

2. What Can I Use Instead of Vanilla Pudding?

You can switch up the pudding flavors to suit your preference. Chocolate, white chocolate, or cheesecake pudding all work well for different variations.

3. How Do I Crush the Cookies Without a Food Processor?

If you don’t have a food processor, place the cookies in a zip-top bag and crush them with a rolling pin. This method works just as well!

4. Can I Use Homemade Whipped Cream Instead of Cool Whip?

Absolutely! If you prefer a homemade touch, whip 1½ cups of heavy cream with 2 tablespoons of sugar until soft peaks form. Use it in place of Cool Whip.

5. How Do I Prevent the Cookies from Getting Soggy?

For the best texture, serve the dessert within 24 hours of making it. The cookies will soften slightly but should still provide a good crunch.

6. Can I Make This Dessert Gluten-Free?

Yes! Simply use gluten-free sandwich cookies instead of regular Oreos to make this a gluten-free Easter treat.

7. How Can I Add a Fruity Twist?

For a refreshing contrast, add sliced strawberries, raspberries, or bananas between the pudding layers.

8. What Are Some Creative Presentation Ideas?

Instead of a casserole dish, try making individual servings in mason jars, cupcake liners, or mini flower pots for a cute and personalized touch.

9. Can I Freeze Easter Dirt Cake Casserole?

Freezing is not recommended, as the pudding and whipped topping can separate when thawed. Refrigeration is the best storage method.

10. What Other Toppings Can I Use?

Get creative! Besides Easter candies, try:

  • Gummy worms for a garden effect
  • Crushed graham crackers for a “sand” look
  • Toasted coconut for added texture
  • Sprinkles or edible glitter for extra color

Why You’ll Love Making This Every Year

  • It’s incredibly easy – No baking required, and it comes together in minutes.
  • It’s a kid-friendly favorite – Letting little ones decorate makes it even more special.
  • It’s a perfect holiday tradition – A sweet way to bring family and friends together.
  • It’s endlessly customizable – You can tweak it to fit any occasion, from birthdays to spring parties.

Conclusion: A Dessert That’s as Fun to Make as It Is to Eat

Easter Dirt Cake Casserole is more than just a dessert—it’s a celebration of spring, family, and childhood memories. Its creamy, crunchy, chocolatey layers combined with festive decorations make it the perfect sweet treat for any Easter gathering. Whether you’re making it for kids, guests, or just yourself, this no-bake dessert is guaranteed to bring smiles to the table.

So go ahead—grab a spoon, dig in, and enjoy the simple joys of Easter in every bite!

Crab and Shrimp Seafood Bisque: A Luxurious Bowl of Comfort

A Taste of the Coast in Every Spoonful

There’s something special about seafood bisque. It’s rich, velvety, and packed with the deep, briny flavors of the ocean. Every spoonful feels like a warm embrace, perfect for chilly evenings, special occasions, or simply when you crave a restaurant-quality dish at home.

For me, seafood bisque has always been associated with family gatherings and celebrations. I still remember the first time I had a bowl of it at a small coastal restaurant. It was a cool autumn evening, and the scent of the sea mixed with the comforting aroma of butter and garlic. As soon as I took my first bite, I was hooked—the silky broth, the tender chunks of shrimp and crab, and the perfect balance of seasoning made it unforgettable.

Since then, I’ve been on a mission to recreate that experience at home. This Crab and Shrimp Seafood Bisque is the result—deeply flavorful, smooth, and indulgent, yet simple enough to make in your own kitchen. Whether you’re preparing it for a romantic dinner, a holiday feast, or just a cozy night in, this bisque is sure to impress.

Why This Seafood Bisque Is a Must-Try

1. Rich, Creamy, and Full of Flavor

A good bisque should be smooth and velvety without being overly heavy. The combination of shrimp and crab creates a perfect balance of sweetness and brininess, while heavy cream adds that signature luxurious texture.

2. A Restaurant-Quality Dish at Home

There’s no need to spend a fortune at a seafood restaurant when you can make this bisque in your own kitchen. It’s easier than you think, and the result is just as good—if not better—than anything you’d get dining out.

3. Perfect for Special Occasions

This bisque isn’t just another soup—it’s elevated comfort food. It makes an ideal starter for holiday meals, dinner parties, or any time you want to treat yourself to something extra special.

4. Simple Yet Elegant

Despite its rich flavor, this bisque comes together with basic ingredients like shrimp, crab, broth, cream, and a few key seasonings. It’s proof that sometimes, the simplest ingredients can create the most extraordinary dishes.

Ingredients: A Symphony of Seafood and Cream

For the Bisque:
  • ½ lb cooked shrimp, peeled, deveined, and chopped
  • ½ lb cooked crab meat, shells removed
  • 1 tbsp olive oil
  • ¼ cup finely chopped celery
  • ¼ cup finely diced carrot
  • ½ cup finely chopped onion
  • 2 cloves garlic, minced
  • 1 tsp paprika
  • ¼ tsp cayenne pepper (optional for heat)
  • ¼ cup all-purpose flour
  • 2 tbsp tomato paste
  • 4 cups seafood or chicken broth
  • 1 cup heavy cream
  • 2 tbsp sherry (optional for depth of flavor)
  • Salt and black pepper to taste
  • Fresh parsley, chives, or dill for garnish

Directions: Crafting the Perfect Seafood Bisque

  1. Sauté the Aromatics – Cook celery, carrot, and onion in olive oil until softened, then add garlic.
  2. Build the Base – Stir in tomato paste, paprika, and cayenne, letting the flavors deepen.
  3. Thicken the Bisque – Sprinkle in flour and stir before slowly adding broth, whisking to avoid lumps.
  4. Simmer to Perfection – Let the soup thicken, then add sherry (if using) for an extra layer of flavor.
  5. Add the Seafood – Lower the heat, stir in heavy cream, then gently fold in shrimp and crab, cooking until warmed through.
  6. Final Touches – Season to taste and serve garnished with fresh herbs for a burst of color and freshness.

Nutritional Breakdown: A Decadent Delight

  • Calories: 360 per serving
  • Protein: 25g
  • Carbohydrates: 18g
  • Fat: 22g
  • Sodium: Varies depending on broth choice

Common Mistakes to Avoid

Even though this bisque is relatively easy to make, there are a few things to keep in mind to ensure the best results.

1. Overcooking the Seafood

Shrimp and crab are delicate proteins that can become rubbery and tough if overcooked. Since they don’t need much time to heat through, always add them toward the end of cooking to maintain their tender texture.

2. Not Thickening the Bisque Properly

A good bisque should have a smooth, slightly thickened consistency. If it’s too thin, it can feel watery. A light roux (a mixture of flour and butter) or a splash of cream helps achieve that perfect texture.

3. Skipping the Sauté Step

The foundation of any bisque is flavor, and that starts with sautéing aromatics like onions, garlic, and celery. Skipping this step can lead to a soup that lacks depth. Take your time to let these ingredients develop their full flavor.

4. Not Using the Right Broth

Seafood broth enhances the oceanic depth of the bisque. If you don’t have seafood broth, chicken broth is an acceptable substitute, but you may need to adjust the seasoning to maintain that rich seafood essence.

5. Forgetting to Strain for Extra Smoothness

For an extra silky bisque, use an immersion blender to puree the base before adding the seafood. If you prefer an ultra-smooth texture, you can also strain the soup through a fine-mesh sieve.

FAQs: Everything You Need to Know

1. Can I Use Frozen Shrimp and Crab?

Yes! Just be sure to thaw them completely before adding them to the bisque. Patting them dry with a paper towel helps prevent excess water from diluting the soup’s flavor.

2. What’s the Best Type of Crab for Bisque?

Fresh lump crab meat is ideal for the best flavor and texture, but canned or imitation crab can work as budget-friendly alternatives. If using canned crab, be sure to drain and rinse it first.

3. How Can I Make This Bisque Healthier?

If you want a lighter version, you can:

  • Use half-and-half instead of heavy cream.
  • Replace some of the cream with pureed cauliflower for a creamy texture with fewer calories.
  • Reduce the amount of butter and use olive oil instead.

4. What If My Bisque Is Too Thin?

If the bisque isn’t thick enough, try one of these fixes:

  • Simmer longer to reduce excess liquid.
  • Stir in a slurry (1 tablespoon of flour mixed with 2 tablespoons of cold water).
  • Blend a portion of the bisque to naturally thicken it.

5. Can I Add Other Seafood?

Absolutely! This bisque is versatile. You can add lobster, scallops, or even clams for a seafood medley. Just be sure to add them at the right time to avoid overcooking.

6. How Do I Store Leftovers?

  • Refrigerate: Store in an airtight container for up to 2 days.
  • Reheat: Warm gently over low heat on the stovetop, stirring often. Avoid boiling, as this can cause the cream to separate.
  • Freeze: Bisque with cream doesn’t always freeze well, but you can freeze the broth before adding the cream and then finish the soup when reheating.

7. What Can I Serve with Seafood Bisque?

This bisque is rich, so it pairs well with lighter sides:

  • Crusty bread or oyster crackers for dipping
  • A fresh green salad with lemon vinaigrette
  • Grilled asparagus or roasted vegetables for balance

Why You’ll Love This Recipe

  • Easy but impressive – Looks and tastes gourmet but is simple to prepare.
  • Rich and creamy – The perfect balance of velvety smoothness and seafood flavor.
  • Perfect for any occasion – Whether it’s a date night, holiday dinner, or just a cozy meal at home, this bisque is always a good idea.

Conclusion: A Dish Worth Savoring

Few dishes can rival the elegance and comforting warmth of a Crab and Shrimp Seafood Bisque. It’s luxurious yet simple, decadent yet approachable, and always a crowd-pleaser. Whether you’re making it to impress guests or just treating yourself, this bisque is a timeless classic that belongs in every home cook’s repertoire.

So the next time you’re craving something warm, creamy, and full of seafood goodness, give this recipe a try. It’s a taste of the coast in every spoonful.

Copycat Costco Chicken Bake: The Ultimate Homemade Comfort Food

A Food Court Favorite Turned Homemade Classic

There are some foods that immediately take you back to a certain place and time. For many of us, the Costco Chicken Bake is one of those iconic foods. It’s impossible to walk into a Costco without noticing the unmistakable aroma of freshly baked, golden-brown crusts filled with melty cheese, savory chicken, and smoky bacon. Whether you grabbed one on a busy shopping day or made a special stop at the food court just for that warm, cheesy goodness, the Chicken Bake has been a longtime favorite.

For me, it was a post-shopping tradition. As a kid, I’d tag along with my parents on their bulk-buying adventures, navigating oversized shopping carts and towering stacks of goods. The best part of the trip wasn’t the free samples or the endless aisles—it was that reward at the end: a warm, cheesy, handheld masterpiece known as the Chicken Bake. It was everything I loved in one bite—crispy on the outside, creamy and savory on the inside.

Now, as an adult, I wanted to recreate that experience at home. Not just because I don’t always have time to swing by Costco, but because homemade is always better. This recipe is everything you love about the original, with a few tweaks to make it even more flavorful. Best of all, you can enjoy it fresh from your own oven, any time the craving hits.

What Makes This Homemade Version Better?

1. Customizable and Fresh Ingredients

While the Costco version is delicious, making it at home means you control the quality. From the cheese blend to the type of bacon, everything can be adjusted to your taste.

2. A Crispier, Flakier Crust

By using high-quality pizza dough and brushing it with egg wash before baking, this version achieves a perfect golden brown crust that’s crisp on the outside while staying soft inside.

3. More Flavor in Every Bite

The homemade Chicken Bake allows you to season the chicken to your liking and use freshly cooked bacon for extra crunch. The result? A filling that’s packed with even more bold and satisfying flavors.

4. Perfect for Meal Prep

These can be made ahead, stored, and reheated easily, making them a great option for grab-and-go lunches or quick dinners.

Ingredients: The Perfect Blend of Flavors

For the Chicken Bake:
  • 1 lb prepared pizza dough
  • 3 boneless, skinless chicken breasts
  • 1 tsp kosher salt
  • ½ tsp freshly ground black pepper
  • 1 tsp garlic powder
  • 1 ½ tbsp olive oil
  • ¾ cup water
  • ½ cup creamy Caesar dressing
  • 6 slices bacon, cooked and crumbled
  • 2 green onions, thinly sliced
  • 1 cup shredded Italian cheese blend (mozzarella and provolone), divided
  • ¾ cup shredded Parmesan cheese, divided
  • 1 tbsp all-purpose flour (for dusting)
  • 1 large egg, beaten

Directions: Bringing the Costco Classic to Your Kitchen

  1. Prep the Dough & Bacon – Let the pizza dough rest for an hour at room temperature. Meanwhile, bake the bacon until crispy, then crumble and set aside.
  2. Cook the Chicken – Season the chicken and sear it in a skillet until golden brown. Add water and transfer to the oven to finish cooking. Once done, let it cool and chop into small pieces.
  3. Assemble the Bakes – Roll out the dough into 12-inch circles, spread Caesar dressing, sprinkle cheese, and add the chicken, bacon, and green onions.
  4. Roll & Seal – Fold the edges slightly over the filling, roll tightly into a log, and pinch the ends to seal.
  5. Brush & Bake – Brush the tops with beaten egg, sprinkle with Parmesan, and bake at 400°F until golden brown (about 20 minutes).
  6. Enjoy! – Let cool slightly before serving for the ultimate crispy, cheesy experience.

Nutritional Breakdown: A Hearty Indulgence

  • Calories: 573 per serving
  • Protein: 35g
  • Carbohydrates: 39g
  • Fat: 30g
  • Sodium: 1194mg

Common Mistakes to Avoid When Making Chicken Bakes

Even though this recipe is simple, a few small mistakes can change the outcome. Here’s how to avoid the pitfalls and get the perfect bake every time.

1. Not Letting the Dough Rest

Pizza dough is stretchy and elastic, which means it needs time to relax at room temperature before rolling it out. If you try to roll it while it’s too cold, it will spring back and resist shaping. Letting it rest for an hour makes it easier to work with and creates a fluffier crust.

2. Using Pre-Cooked Chicken Without Seasoning

While rotisserie chicken is a great shortcut, it’s important to season it properly. A little garlic powder, salt, and pepper can go a long way in making sure your chicken is flavorful enough to shine in the filling.

3. Overstuffing the Dough

It’s tempting to load up on the filling, but too much can make it difficult to roll and cause the dough to split while baking. Stick to a balanced amount of filling for the best texture.

4. Skipping the Egg Wash

Brushing the top with egg wash before baking isn’t just for looks—it helps create that signature golden, glossy crust. If you skip this step, your bake may look pale and dry.

5. Not Letting It Cool Before Cutting

Right out of the oven, the Chicken Bake will be piping hot, and the filling needs a few minutes to set. Cutting too soon can lead to melted cheese and dressing spilling out before it has a chance to firm up. Let it rest for 5 minutes before slicing for the best results.

FAQs: Everything You Need to Know

1. Can I Use Store-Bought Dough?

Absolutely! While homemade pizza dough works great, store-bought dough is a huge time saver. Just make sure to let it sit at room temperature for at least an hour before rolling it out.

2. What’s the Best Cheese for a Chicken Bake?

The classic Costco version uses a blend of mozzarella and provolone, but you can experiment with other cheeses. Parmesan adds a nutty sharpness, while cheddar gives it an extra creamy bite.

3. Can I Make These Ahead of Time?

Yes! Chicken Bakes can be assembled and stored in the refrigerator for up to 24 hours before baking. Just brush on the egg wash right before placing them in the oven.

4. How Do I Store and Reheat Leftovers?

  • Fridge: Store in an airtight container for up to 3 days.
  • Freezer: Wrap tightly in plastic wrap and freeze for up to 3 months.
  • Reheat: Bake in the oven at 350°F for 10-15 minutes or until heated through.

5. Can I Air Fry Chicken Bakes Instead of Baking?

Yes! If you want an extra crispy crust, air fry at 375°F for 10-12 minutes or until golden brown and heated through.

6. What Are Some Fun Variations?

If you want to mix things up, try these creative takes:

  • Buffalo Chicken Bake: Toss the chicken in buffalo sauce before assembling.
  • BBQ Chicken Bake: Swap out the Caesar dressing for barbecue sauce and use smoked gouda cheese.
  • Veggie Chicken Bake: Add sautéed mushrooms, bell peppers, or spinach for extra texture and flavor.

7. Can I Make a Healthier Version?

Yes! Here are a few simple swaps:

  • Use whole wheat pizza dough instead of regular dough.
  • Swap out regular bacon for turkey bacon.
  • Use a light Caesar dressing or Greek yogurt-based dressing.
  • Add extra vegetables for more fiber and nutrients.

Why This Homemade Chicken Bake Will Be Your New Favorite

  • It’s incredibly easy to make. No complicated steps, just simple rolling and baking.
  • It’s packed with flavor. The homemade version gives you full control over the seasonings and ingredients.
  • It’s perfect for meal prep. Make a batch and enjoy all week.
  • It’s even better than the original. A crispier crust, fresher ingredients, and customizable fillings make this an upgrade from the food court version.

Conclusion: A Comfort Food Classic, Made Better at Home

Recreating the Costco Chicken Bake at home is more than just a way to satisfy cravings—it’s a way to bring a little nostalgia into your own kitchen. This homemade version captures everything that makes the original great while giving you the freedom to customize it to your taste.

Whether you’re making them for a family dinner, prepping ahead for lunches, or serving them at a gathering, these cheesy, crispy, flavor-packed Chicken Bakes are guaranteed to be a hit. Once you try making them at home, you may never go back to the food court again.

So grab some dough, fire up your oven, and get ready to enjoy the ultimate homemade Chicken Bake experience!

Slow Cooker French Dip Sandwiches: A Comforting Classic

A Meal That Brings People Together

Some meals aren’t just about the flavors—they’re about the experience. Slow Cooker French Dip Sandwiches are one of those meals. There’s something special about gathering around the table with family or friends, each person dipping their warm, cheesy sandwich into a rich, flavorful au jus. It’s the kind of dish that makes you slow down and savor the moment.

For me, this sandwich brings back memories of long Sunday afternoons at my grandmother’s house. She had a way of turning simple ingredients into something extraordinary, and her slow-cooked beef was no exception. She’d let it simmer all day, filling the house with an irresistible aroma. By dinnertime, the beef was so tender it practically fell apart, and the broth was so rich and flavorful that we couldn’t wait to dip our sandwiches into it.

Now, every time I make these Slow Cooker French Dip Sandwiches, it takes me right back to those cozy family dinners. It’s one of those recipes that feels gourmet but is incredibly simple to make. Whether you’re preparing it for a family meal, game day, or a casual gathering, this dish is sure to impress.

Why These French Dip Sandwiches Are a Must-Try

Unbelievably Tender Beef

Cooking the chuck roast low and slow allows the meat to become fork-tender, making it perfect for piling high on a sandwich. The long cooking time also infuses the beef with deep, rich flavors that can’t be rushed.

A Dipping Sauce You Can’t Resist

The magic of a French dip sandwich is in the au jus. Made from the slow-cooked beef drippings, red wine, and beef broth, this warm, savory dipping sauce is the perfect complement to the sandwich. Every bite soaked in the broth is packed with flavor.

Buttery, Toasted Rolls with Melted Cheese

Instead of just using plain bread, this recipe takes it up a notch by brushing the rolls with garlic butter and lightly toasting them. Adding melted provolone or Swiss cheese on top of the beef gives the sandwich the perfect balance of crispy, creamy, and savory flavors.

Effortless Cooking with Maximum Flavor

This recipe requires minimal effort. The slow cooker does most of the work, making it a stress-free meal for busy days. Once the meat is done, all that’s left is shredding it, toasting the rolls, and assembling the sandwiches.

Ingredients: Building the Ultimate French Dip

For the Beef & Au Jus:
  • 2.5 to 3 lbs boneless chuck roast
  • 1 tbsp vegetable oil
  • 1 large onion, sliced
  • 2 cloves garlic, smashed
  • 1 cup red wine (or additional beef broth)
  • 2 cups low-sodium beef broth
  • 1 bay leaf
  • Kosher salt and freshly ground black pepper
For the Sandwiches:
  • 6 sandwich or hoagie rolls
  • 6 slices provolone or Swiss cheese
  • 3 tbsp butter, melted
  • ½ tsp garlic powder
  • Fresh parsley, chopped (for garnish)

Directions: The Path to Sandwich Bliss

  1. Sear & Slow Cook – Sear the chuck roast on both sides, then sauté onions. Deglaze the pan with red wine and transfer everything to a slow cooker with beef broth, garlic, and a bay leaf. Cook on low for 8 hours or high for 6 hours.
  2. Shred the Beef – Remove the beef, shred with a fork, and strain the au jus for dipping.
  3. Prepare the Rolls – Brush rolls with garlic butter, toast in the oven, and broil shredded beef with cheese until melted.
  4. Assemble & Serve – Sprinkle with fresh parsley and serve with warm au jus for dipping.

Nutritional Breakdown: A Hearty Indulgence

  • Calories: 675 per serving
  • Protein: 49g
  • Carbohydrates: 34g
  • Fat: 35g
  • Sodium: 752mg

Common Mistakes to Avoid

Even though this recipe is simple, there are a few things to watch out for to make sure your Slow Cooker French Dip Sandwiches turn out perfect every time.

1. Skipping the Searing Step

It’s tempting to just throw everything in the slow cooker and walk away, but searing the beef first adds an incredible depth of flavor. Browning the meat caramelizes the surface and locks in those rich, savory juices.

2. Using the Wrong Cut of Meat

Chuck roast is the best choice for this recipe because it has the right balance of fat and connective tissue. If you use a leaner cut, the beef may turn out dry instead of juicy and tender.

3. Not Letting the Au Jus Rest

After the beef is cooked, the au jus may have excess fat. To remove it, let the liquid sit for a few minutes, then skim off the fat from the top. This ensures a cleaner, more flavorful broth.

4. Overloading the Sandwiches

It’s tempting to pile on as much beef as possible, but too much can make the sandwich difficult to dip and eat. Stick to a balanced ratio of meat, cheese, and bread for the perfect bite.

5. Using Soft, Untoasted Rolls

Skipping the toasting step can lead to soggy sandwiches when dipping into the au jus. Lightly toasting the bread creates a crisp barrier that holds up against the broth, making every bite satisfying.

FAQs: Everything You Need to Know

1. Can I Make This Recipe Without a Slow Cooker?

Yes! If you don’t have a slow cooker, you can make this in a Dutch oven or an oven-safe pot. Simply sear the meat, add the ingredients, cover, and bake at 300°F (150°C) for 3-4 hours until the beef is fork-tender.

2. What Is the Best Bread for French Dip Sandwiches?

A sturdy roll works best for this sandwich. Hoagie rolls, baguettes, or ciabatta rolls hold up well to dipping without getting too soggy. Soft sandwich bread is not recommended.

3. Can I Make This Recipe Ahead of Time?

Absolutely! This recipe is great for meal prep. You can cook the beef a day ahead, store it in the refrigerator, and reheat it when ready to serve. Just warm the meat and au jus in a saucepan over low heat before assembling the sandwiches.

4. Can I Freeze the Leftover Beef?

Yes! Store the shredded beef and au jus in separate airtight containers and freeze for up to 3 months. Thaw in the refrigerator overnight and reheat on the stove or in the slow cooker.

5. What Cheese Works Best for This Sandwich?

Provolone and Swiss cheese are the most popular choices. Provolone melts beautifully, while Swiss adds a slightly nutty flavor. If you prefer a more intense cheese, Gruyère is another excellent option.

6. Can I Add Extra Seasonings or Herbs?

Yes! While the classic recipe is simple, you can add depth by including:

  • Rosemary or thyme for an herbal touch
  • Worcestershire sauce for added umami flavor
  • A splash of balsamic vinegar for slight acidity

7. What Can I Serve with French Dip Sandwiches?

These sandwiches are delicious on their own, but if you want to round out the meal, here are a few great side options:

  • Crispy French fries or sweet potato fries
  • A simple green salad with a light vinaigrette
  • Coleslaw for a fresh, crunchy contrast
  • Roasted vegetables like asparagus or Brussels sprouts

Why You’ll Want to Make This Again and Again

  • It’s incredibly easy. The slow cooker does most of the work for you.
  • It’s packed with flavor. Tender beef, melty cheese, and rich au jus make every bite irresistible.
  • It’s great for feeding a crowd. Perfect for game nights, gatherings, or family dinners.
  • It reheats beautifully. Leftovers taste just as good (if not better) the next day.

Conclusion: A Sandwich Worth Savoring

There’s a reason why Slow Cooker French Dip Sandwiches have stood the test of time. They’re the perfect combination of simplicity and indulgence, with every bite delivering a rich, savory experience.

Whether you’re making them for a busy weeknight dinner, a cozy weekend meal, or a special gathering, this dish is sure to become a favorite. So go ahead—dip, savor, and enjoy a sandwich that’s as comforting as it is delicious.

Creamy Crack Chicken Gnocchi: A Bowl of Comfort and Flavor

A Meal That Feels Like Home

There’s something about a warm, creamy bowl of food that just makes everything feel better. I first made this Creamy Crack Chicken Gnocchi on a chilly evening after a long, exhausting day. I needed something easy, something comforting, and most importantly, something that felt like a hug in a bowl.

Gnocchi has always been one of my favorite comfort foods—those little pillowy bites of potato dough soak up flavors in the most satisfying way. Pair them with tender chicken, smoky bacon, melted cheese, and a rich, garlicky cream sauce, and you have a dish that feels indulgent yet completely effortless. The first time I made this, my family scraped their plates clean, and my husband (who swore he didn’t like gnocchi) asked if we could have it again the next night. That’s when I knew I had found a winner.

Now, this dish has become a staple in our home. It’s the meal I turn to when I want to treat my family without spending hours in the kitchen. It’s quick, easy, and packed with flavor—the perfect recipe for busy weeknights, cozy weekends, or any time you need a little extra comfort in your life.

Why This Dish is a Must-Try

The Ultimate Comfort Food

If you’re a fan of rich, creamy dishes that warm your soul, this recipe is for you. The gnocchi becomes soft and pillowy, soaking up all the cheesy, garlicky goodness of the sauce. The chicken adds heartiness, while the bacon provides a smoky, salty crunch.

A One-Pan Wonder

Who doesn’t love a one-pan meal? This dish comes together in a single skillet, meaning fewer dishes and less cleanup. Everything cooks together, allowing the flavors to meld into a beautifully cohesive dish.

A Family Favorite

Even picky eaters can’t resist this one. If your kids aren’t big fans of gnocchi, just wait until they try it smothered in creamy sauce and cheese. This meal has a way of turning skeptics into believers.

Perfect for Meal Prep

If you love having leftovers that taste just as good (if not better) the next day, this recipe is a great choice. Store it in the fridge, and you’ll have a delicious, ready-to-eat meal that heats up beautifully.

Easily Customizable

Want to add some veggies? Toss in spinach, mushrooms, or even sun-dried tomatoes. Looking for a bit of spice? A dash of red pepper flakes can give it a nice kick. This recipe is versatile and can be adapted to suit your taste.

Ingredients: A Symphony of Rich Flavors

Main Ingredients:
  • 1 lb (450g) chicken breast, diced
  • 1 tbsp olive oil
  • 1 yellow onion, finely chopped
  • 2 cloves garlic, minced
  • 1 cup (240ml) chicken broth
  • 1 cup (240ml) heavy cream
  • 1 (10 oz) can cream of chicken soup
  • 1 tsp ranch seasoning mix
  • 1 lb (450g) potato gnocchi
  • 1 cup (100g) shredded cheddar cheese
  • ½ cup (80g) cooked and crumbled bacon
  • Fresh parsley, chopped (for garnish)
  • Salt and pepper, to taste

Directions: Crafting a Dish of Pure Indulgence

  1. Sear the Chicken – Heat olive oil in a skillet over medium heat. Add diced chicken, season with salt and pepper, and cook until no longer pink (5-7 minutes). Remove and set aside.
  2. Sauté the Aromatics – In the same skillet, cook chopped onion until translucent (3-4 minutes). Add minced garlic and sauté for another minute.
  3. Build the Creamy Base – Pour in chicken broth, deglazing the skillet. Stir in heavy cream, cream of chicken soup, and ranch seasoning, mixing until smooth.
  4. Incorporate the Gnocchi & Chicken – Add the cooked chicken back to the skillet along with the gnocchi. Simmer for 5-7 minutes until the gnocchi is tender.
  5. Bake to Perfection – Preheat oven to 375°F (190°C). Transfer the mixture to a baking dish, top with shredded cheddar and bacon, and bake for 15-20 minutes until golden and bubbly.
  6. Final Touches – Let it cool slightly, then sprinkle with fresh parsley before serving.

Nutritional Breakdown: A Balanced Indulgence

  • Calories: ~450 per serving
  • Protein: ~28g
  • Carbohydrates: ~35g
  • Fat: ~22g
  • Fiber: ~2g

Common Mistakes to Avoid

Even though this recipe is incredibly simple, there are a few things to keep in mind to make sure it turns out perfect every time.

1. Overcooking the Chicken

Chicken breast cooks quickly, and if overcooked, it can become dry and chewy. To keep it juicy, cook it just until it’s no longer pink, then remove it from the heat while preparing the rest of the dish.

2. Using the Wrong Gnocchi

While you can use shelf-stable gnocchi, fresh or refrigerated gnocchi gives the best texture. It cooks faster and absorbs the flavors of the sauce more effectively.

3. Not Deglazing the Pan

After cooking the chicken, don’t forget to scrape up the browned bits from the bottom of the pan when you add the broth. These bits add depth and richness to the sauce.

4. Skipping the Cheese Topping

The baked cheese topping isn’t just for looks—it adds an incredible layer of flavor and texture. Don’t skip it!

5. Forgetting to Let It Rest

Letting the dish sit for a few minutes before serving allows the sauce to thicken slightly, ensuring every bite is perfectly creamy.

FAQs: Everything You Need to Know

1. Can I Make This Dish Ahead of Time?

Absolutely! You can prepare the dish up to the point of baking, then cover and refrigerate it for up to 24 hours. When ready to eat, just pop it in the oven and bake as directed.

2. Can I Use a Different Protein?

Yes! While chicken works beautifully, you can also use turkey, Italian sausage, or even shrimp for a different flavor profile.

3. What’s the Best Way to Store Leftovers?

Store leftovers in an airtight container in the refrigerator for up to 3 days. To reheat, warm it on the stovetop over low heat, adding a splash of milk or broth to loosen up the sauce.

4. Can I Freeze This Dish?

While you can freeze it, the texture of the gnocchi may change slightly. If you do freeze it, store it in a freezer-safe container for up to 2 months and thaw overnight in the fridge before reheating.

5. What Can I Serve with This?

This dish is hearty on its own, but if you want to round out the meal, here are some great pairings:

  • A simple side salad with a light vinaigrette
  • Garlic bread for scooping up the extra sauce
  • Steamed or roasted vegetables like asparagus or broccoli

6. Can I Make This Lighter?

For a healthier version, you can:

  • Use half-and-half instead of heavy cream
  • Swap regular bacon for turkey bacon
  • Use a low-fat cheese blend
  • Add extra vegetables for more fiber and nutrients

Why You’ll Want to Make This Again and Again

There are some recipes that are good, and then there are the ones that become part of your regular rotation. This Creamy Crack Chicken Gnocchi falls into the second category. It’s one of those meals that feels like a treat but is easy enough to make anytime.

  • It’s rich, creamy, and completely satisfying.
  • It’s simple and comes together in under 30 minutes.
  • It’s a crowd-pleaser that even picky eaters will love.
  • It’s versatile—you can tweak it to suit your personal taste.

Conclusion: A Dish Worth Savoring

There’s a reason this Creamy Crack Chicken Gnocchi has become one of my go-to meals. It’s effortless yet indulgent, simple yet impressive. Whether you’re making it for your family, a cozy date night, or just to treat yourself, it delivers pure comfort in every bite.

Try it once, and I guarantee you’ll find yourself making it again and again. And who knows? Maybe it will become your new favorite comfort food tradition—just like it did for me.

Million Dollar Chicken Casserole: Easy, Tasty, and Quick!

Million Dollar Chicken Casserole

Introduction to Million Dollar Chicken Casserole

There’s something undeniably comforting about a dish that lives up to a name like Million Dollar Chicken Casserole. Creamy, cheesy, and bursting with flavor, this recipe brings together simple ingredients in a way that tastes like pure indulgence—but with none of the fuss. It’s the kind of meal you can throw together on a busy evening yet serve proudly at a family dinner. From the first bite, you’ll understand why it’s earned such a lavish title—because it feels rich, tastes divine, and leaves everyone asking for seconds. Perfect for potlucks, weeknight dinners, or just when you need something reliably satisfying, this casserole is about to become your go-to favorite.

Why You’ll Love This Million Dollar Chicken Casserole

This Million Dollar Chicken Casserole is a dream come true for busy families. It’s incredibly easy to prepare, taking just 15 minutes of your time. The creamy, savory flavors meld beautifully, making every bite a delight. Plus, it’s a one-dish wonder, which means less cleanup for you! Whether it’s a weeknight dinner or a potluck, this casserole is sure to impress and satisfy everyone at the table.

Ingredients for Million Dollar Chicken Casserole

Gathering the right ingredients is key to making this Million Dollar Chicken Casserole a hit. Here’s what you’ll need:

  • Cooked chicken: Shredded chicken is the star of this dish. You can use rotisserie chicken for convenience or leftover chicken from a previous meal.
  • Cream of chicken soup: This adds creaminess and flavor. If you prefer a healthier option, look for low-sodium varieties or make your own.
  • Sour cream: It brings a tangy richness to the casserole. Greek yogurt can be a great substitute if you want a lighter version.
  • Shredded cheddar cheese: This cheesy goodness melts beautifully, adding a savory depth. Feel free to experiment with other cheeses like Monterey Jack or pepper jack for a kick.
  • Crushed buttery crackers: Think Ritz or similar brands. They create a delightful crunchy topping. You can also use panko breadcrumbs for a different texture.
  • Milk: This helps to thin out the mixture, making it creamy. Almond or oat milk can be used for a dairy-free option.
  • Green onions: Chopped green onions add a fresh, mild onion flavor. You can also use chives if you prefer.
  • Garlic powder: A little sprinkle enhances the overall flavor. Fresh minced garlic can be used for a more robust taste.
  • Black pepper and salt: Essential seasonings that elevate the dish. Adjust to your taste preferences.
  • Melted butter: This helps the cracker topping become golden and crispy. You can use olive oil for a healthier alternative.

For exact measurements, check the bottom of the article where you can find everything available for printing. Happy cooking!

How to Make Million Dollar Chicken Casserole

Now that you have all your ingredients ready, let’s dive into making this Million Dollar Chicken Casserole. Follow these simple steps, and you’ll have a delicious meal on the table in no time!

Step 1: Preheat the Oven

Start by preheating your oven to 350°F (175°C). This ensures it’s hot and ready for baking when your casserole is assembled. Trust me, a preheated oven makes all the difference!

Step 2: Mix the Chicken and Sauces

In a large mixing bowl, combine the shredded chicken, cream of chicken soup, sour cream, milk, garlic powder, black pepper, and salt. Mix until everything is well combined. This creamy mixture is the heart of your casserole, so make sure it’s blended nicely!

Step 3: Add Cheese and Onions

Next, stir in the shredded cheddar cheese and chopped green onions. These ingredients add a burst of flavor and texture. The cheese will melt beautifully, creating that gooey goodness we all love!

Step 4: Prepare the Baking Dish

Pour the chicken mixture into a greased 9×13-inch baking dish, spreading it evenly. This step is crucial for even cooking. You want every bite to be just as delicious as the last!

Step 5: Make the Cracker Topping

In a separate bowl, combine the crushed crackers and melted butter. Mix until the crackers are well coated. This topping is what gives your casserole that delightful crunch. It’s like a little surprise in every bite!

Step 6: Assemble the Casserole

Sprinkle the cracker mixture evenly over the chicken mixture in the baking dish. Make sure to cover it well. This crunchy layer is what makes the Million Dollar Chicken Casserole truly special!

Step 7: Bake the Casserole

Bake in the preheated oven for 30-35 minutes, or until the casserole is bubbly and the topping is golden brown. The aroma will fill your kitchen, making it hard to wait!

Step 8: Cool and Serve

Let it cool for about 5 minutes before serving. This allows the flavors to settle and makes it easier to serve. Trust me, the wait will be worth it!

Tips for Success

  • Prep your ingredients ahead of time to save precious minutes during cooking.
  • Use leftover chicken or a rotisserie chicken for a quick shortcut.
  • Don’t skip the cooling time; it helps the casserole set and makes serving easier.
  • Feel free to customize with your favorite veggies for added nutrition.
  • Store leftovers in an airtight container for up to three days.

Equipment Needed

  • Mixing bowl: A large bowl for combining ingredients. A sturdy pot can work in a pinch.
  • Baking dish: A 9×13-inch dish is ideal. Any similar-sized oven-safe dish will do.
  • Measuring cups: For accurate ingredient portions. You can use a regular cup if needed.
  • Spatula: Great for mixing and spreading. A wooden spoon is a good alternative.

Variations

  • Vegetable Boost: Add steamed broccoli, spinach, or bell peppers for extra nutrition and color.
  • Spicy Kick: Mix in diced jalapeños or a dash of hot sauce for a zesty twist.
  • Cheesy Delight: Experiment with different cheeses like mozzarella or pepper jack for a unique flavor profile.
  • Gluten-Free Option: Use gluten-free crackers or breadcrumbs to make this casserole suitable for gluten-sensitive diets.
  • Herb Infusion: Add fresh herbs like thyme or parsley to elevate the flavor and freshness of the dish.

Serving Suggestions

  • Fresh Salad: Pair your casserole with a crisp green salad for a refreshing contrast.
  • Garlic Bread: Serve with warm garlic bread to soak up the creamy goodness.
  • Wine Pairing: A chilled white wine, like Chardonnay, complements the flavors beautifully.
  • Presentation: Garnish with fresh parsley or additional green onions for a pop of color.

FAQs about Million Dollar Chicken Casserole

As you embark on your culinary adventure with this Million Dollar Chicken Casserole, you might have a few questions. Here are some common queries I’ve encountered, along with helpful answers to guide you!

Can I use frozen chicken for this recipe?


Absolutely! Just make sure to cook the chicken thoroughly before shredding it. You can also use pre-cooked frozen chicken to save time.


How can I make this casserole ahead of time?


You can prepare the casserole up to the baking step, cover it tightly, and refrigerate it for up to 24 hours. Just add a few extra minutes to the baking time if it’s cold from the fridge.


What can I serve with Million Dollar Chicken Casserole?


This dish pairs wonderfully with a fresh salad or some garlic bread. The creamy casserole and crunchy topping make a delightful contrast to lighter sides.


Can I make this casserole dairy-free?


Yes! Substitute the sour cream with dairy-free yogurt and use a dairy-free cheese alternative. Almond or oat milk can replace regular milk for a complete dairy-free version.


How do I store leftovers?


Store any leftovers in an airtight container in the fridge for up to three days. Reheat in the oven or microwave until warmed through. Enjoy your delicious meal again!

Final Thoughts

Cooking the Million Dollar Chicken Casserole is more than just preparing a meal; it’s about creating moments of joy and connection around the dinner table. This dish brings comfort and satisfaction, making it perfect for busy nights or special gatherings. The creamy filling and crunchy topping are a delightful combination that will have your family asking for seconds. Plus, it’s so easy to make that you’ll find yourself returning to this recipe time and again. I hope it becomes a cherished part of your family’s culinary adventures, just as it has in mine!

“`

Print
clock clock iconcutlery cutlery iconflag flag iconfolder folder iconinstagram instagram iconpinterest pinterest iconfacebook facebook iconprint print iconsquares squares iconheart heart iconheart solid heart solid icon
Million Dollar Chicken Casserole

Million Dollar Chicken Casserole: Easy, Tasty, and Quick!


5 Stars 4 Stars 3 Stars 2 Stars 1 Star

4.6 from 5 reviews

  • Author: Isabella
  • Total Time: 50 minutes
  • Yield: 6 servings 1x

Description

A delicious and easy-to-make casserole featuring shredded chicken, creamy soup, and a crunchy cracker topping.


Ingredients

Scale
  • 2 cups cooked chicken, shredded
  • 1 can (10.5 ounces) cream of chicken soup
  • 1 cup sour cream
  • 1 cup shredded cheddar cheese
  • 1 cup crushed buttery crackers (like Ritz)
  • 1/2 cup milk
  • 1/4 cup green onions, chopped
  • 1/4 teaspoon garlic powder
  • 1/4 teaspoon black pepper
  • 1/2 teaspoon salt
  • 1/2 cup melted butter

Instructions

  1. Preheat your oven to 350°F (175°C).
  2. In a large mixing bowl, combine the shredded chicken, cream of chicken soup, sour cream, milk, garlic powder, black pepper, and salt. Mix until well combined.
  3. Stir in the shredded cheddar cheese and chopped green onions.
  4. Pour the chicken mixture into a greased 9×13-inch baking dish, spreading it evenly.
  5. In a separate bowl, combine the crushed crackers and melted butter. Mix until the crackers are well coated.
  6. Sprinkle the cracker mixture evenly over the chicken mixture in the baking dish.
  7. Bake in the preheated oven for 30-35 minutes, or until the casserole is bubbly and the topping is golden brown.
  8. Let it cool for about 5 minutes before serving.

Notes

  • For a healthier option, substitute Greek yogurt for sour cream.
  • Add vegetables like broccoli or spinach for extra nutrition and flavor.
  • Prep Time: 15 minutes
  • Cook Time: 35 minutes
  • Category: Casserole
  • Method: Baking
  • Cuisine: American

Nutrition

  • Serving Size: 1 serving
  • Calories: 350
  • Sugar: 2g
  • Sodium: 800mg
  • Fat: 20g
  • Saturated Fat: 10g
  • Unsaturated Fat: 5g
  • Trans Fat: 0g
  • Carbohydrates: 15g
  • Fiber: 1g
  • Protein: 25g
  • Cholesterol: 80mg

Creamy Irish Seafood Chowder: A Taste of Comfort!

Creamy Irish Seafood Chowder

Introduction to Creamy Irish Seafood Chowder

Creamy Irish Seafood Chowder is the ultimate comfort in a bowl, bringing the flavors of the coast straight to your table! This rich and velvety chowder is packed with tender seafood, including salmon, cod, and shrimp, simmered in a creamy broth with potatoes, leeks, and a hint of fresh dill. It’s the perfect dish to warm you up on a chilly day, offering a comforting balance of savory and creamy goodness. Whether you’re enjoying it as a hearty lunch or a cozy dinner, this seafood chowder will take your taste buds on a flavorful journey. Ready to indulge in a bowl of comfort? Let’s get cooking!

Why You’ll Love This Creamy Irish Seafood Chowder

This Creamy Irish Seafood Chowder is a delightful blend of flavors that comes together effortlessly. It’s perfect for busy evenings when you crave something hearty yet quick to prepare. The creamy texture and fresh seafood create a taste that feels indulgent, but it’s surprisingly simple to make. Plus, it’s a fantastic way to sneak in some nutritious ingredients, making it a win-win for both you and your family!

Ingredients for Creamy Irish Seafood Chowder

Gathering the right ingredients is key to making a delicious Creamy Irish Seafood Chowder. Here’s what you’ll need:

  • Unsalted butter: This adds richness and depth to the chowder.
  • Onion: Diced onion brings a sweet, aromatic base to the dish.
  • Garlic: Minced garlic enhances the flavor with its savory notes.
  • Carrots: Diced carrots add a touch of sweetness and color.
  • Celery: This crunchy vegetable contributes a fresh, earthy flavor.
  • Potatoes: Peeled and cubed, they provide heartiness and creaminess.
  • Fish stock or clam juice: This is the flavorful liquid that forms the chowder’s base.
  • Heavy cream: For that luscious, creamy texture that makes this chowder irresistible.
  • Whole milk: It lightens the chowder while keeping it rich.
  • White fish fillets: Fresh fish like cod or haddock adds a delicate flavor.
  • Shrimp: Peeled and deveined, they bring a sweet, briny taste.
  • Mussels: Cleaned and debearded, they add a touch of the sea.
  • Dried thyme: This herb infuses the chowder with a warm, earthy aroma.
  • Salt and black pepper: Essential for seasoning and enhancing all the flavors.
  • Fresh parsley: Chopped for garnish, it adds a pop of color and freshness.

For those who like a little heat, consider adding a pinch of red pepper flakes or a dash of hot sauce. You can also swap out the seafood for your favorites, like scallops or crab, to create a unique twist. Exact quantities for each ingredient are available at the bottom of the article for easy printing!

How to Make Creamy Irish Seafood Chowder

Step 1: Sauté the Vegetables

Start by melting the unsalted butter in a large pot over medium heat. Once it’s bubbly, toss in the diced onion, minced garlic, carrots, and celery. Sauté these aromatic veggies for about five minutes. You want them softened and fragrant, creating a beautiful base for your Creamy Irish Seafood Chowder. The colors will brighten, and your kitchen will smell heavenly!

Step 2: Add the Potatoes

Next, stir in the cubed potatoes. Cook them for about two minutes, allowing them to soak up the flavors from the sautéed vegetables. This step is crucial for that creamy texture we all love!

Step 3: Pour in the Stock

Now it’s time to add the fish stock or clam juice. Pour it in and bring the mixture to a boil. Once boiling, reduce the heat and let it simmer for about 15 minutes. You want the potatoes to become tender, which will help thicken your chowder. The aroma will be irresistible, drawing everyone to the kitchen!

Step 4: Mix in Cream and Seasonings

After the potatoes are tender, it’s time to add the heavy cream and whole milk. Stir in the dried thyme, salt, and black pepper. This combination creates that rich, creamy texture that makes this chowder so comforting. Make sure everything is well combined, and let it simmer for a few more minutes.

Step 5: Add the Seafood

Gently fold in the white fish, shrimp, and mussels. Cook for an additional 5 to 7 minutes, or until the seafood is cooked through and the mussels have opened. This is where the magic happens! The seafood will infuse the chowder with its briny goodness, making every bite a delight.

Step 6: Final Touches

Before serving, taste your chowder and adjust the seasoning if needed. Once it’s just right, ladle it into bowls and garnish with fresh parsley. Serve hot, and watch your family dig in with smiles on their faces!

Tips for Success

  • Prep your ingredients ahead of time to save precious minutes during cooking.
  • Use fresh seafood for the best flavor; frozen can work in a pinch.
  • Don’t skip the sautéing step; it builds a rich flavor base.
  • Adjust the thickness by adding more stock or cream to your liking.
  • For leftovers, store in an airtight container and reheat gently.

Equipment Needed

  • Large pot: A heavy-bottomed pot works best for even cooking.
  • Wooden spoon: Perfect for stirring without scratching your pot.
  • Measuring cups: Essential for accurate ingredient portions.
  • Cutting board and knife: For chopping vegetables and seafood.
  • Soup ladle: Ideal for serving your delicious chowder.

Variations

  • Spicy Twist: Add a pinch of cayenne pepper or a splash of hot sauce for a kick of heat.
  • Vegetarian Option: Substitute seafood with hearty vegetables like mushrooms and zucchini for a meatless chowder.
  • Herb Infusion: Experiment with fresh herbs like dill or basil for a unique flavor profile.
  • Low-Fat Version: Use low-fat milk and reduce the amount of heavy cream for a lighter chowder.
  • Seafood Medley: Mix in different types of seafood, such as scallops or crab, for a delightful variety.

Serving Suggestions

  • Crusty Bread: Serve with a warm, crusty baguette or sourdough for dipping.
  • Salad: Pair with a light green salad dressed in lemon vinaigrette for a refreshing contrast.
  • Wine: Enjoy with a chilled glass of white wine, like Sauvignon Blanc, to complement the seafood.
  • Presentation: Serve in rustic bowls and sprinkle extra parsley for a pop of color.

FAQs about Creamy Irish Seafood Chowder

Can I use frozen seafood for this chowder?

Absolutely! While fresh seafood is ideal, frozen seafood can work just as well. Just make sure to thaw it properly before adding it to your Creamy Irish Seafood Chowder to ensure even cooking.

How can I make this chowder dairy-free?

To create a dairy-free version, substitute the heavy cream and whole milk with coconut milk or a plant-based cream. This will still give you a creamy texture without the dairy.

What can I serve with this chowder?

This chowder pairs beautifully with crusty bread or a light salad. A chilled glass of white wine also complements the flavors perfectly, making for a delightful meal.

How do I store leftovers?

Store any leftover Creamy Irish Seafood Chowder in an airtight container in the refrigerator. It should last for about 2-3 days. Reheat gently on the stovetop to maintain its creamy texture.

Can I add more vegetables to the chowder?

Definitely! Feel free to add your favorite vegetables like corn, peas, or bell peppers. They’ll add extra flavor and nutrition to your chowder, making it even more satisfying.

Final Thoughts

Making Creamy Irish Seafood Chowder is more than just cooking; it’s about creating a warm, inviting experience for your family. Each spoonful is a reminder of cozy evenings spent together, sharing stories and laughter. This chowder is not only delicious but also a canvas for your culinary creativity. Whether you stick to the classic recipe or add your personal twist, it’s sure to become a cherished dish in your home. So, gather your loved ones, serve up a bowl of this comforting chowder, and enjoy the joy it brings to your table!

“`

Print
clock clock iconcutlery cutlery iconflag flag iconfolder folder iconinstagram instagram iconpinterest pinterest iconfacebook facebook iconprint print iconsquares squares iconheart heart iconheart solid heart solid icon
Creamy Irish Seafood Chowder

Creamy Irish Seafood Chowder: A Taste of Comfort!


5 Stars 4 Stars 3 Stars 2 Stars 1 Star

No reviews

  • Author: Isabella
  • Total Time: 45 minutes
  • Yield: 6 servings 1x

Description

A comforting and creamy seafood chowder featuring a blend of fresh fish, shrimp, and mussels, perfect for a cozy meal.


Ingredients

Scale
  • 2 tablespoons unsalted butter
  • 1 medium onion, diced
  • 2 cloves garlic, minced
  • 2 medium carrots, diced
  • 2 stalks celery, diced
  • 1 pound potatoes, peeled and cubed
  • 4 cups fish stock or clam juice
  • 1 cup heavy cream
  • 1 cup whole milk
  • 8 ounces white fish fillets (such as cod or haddock), cut into bite-sized pieces
  • 8 ounces shrimp, peeled and deveined
  • 8 ounces mussels, cleaned and debearded
  • 1 teaspoon dried thyme
  • 1 teaspoon salt
  • 1/2 teaspoon black pepper
  • 1 tablespoon fresh parsley, chopped (for garnish)

Instructions

  1. In a large pot, melt the butter over medium heat. Add the diced onion, garlic, carrots, and celery. Sauté for about 5 minutes, or until the vegetables are softened.
  2. Stir in the cubed potatoes and cook for another 2 minutes.
  3. Pour in the fish stock or clam juice and bring to a boil. Reduce heat and let simmer for about 15 minutes, or until the potatoes are tender.
  4. Add the heavy cream, whole milk, thyme, salt, and pepper. Stir well to combine.
  5. Gently add the white fish, shrimp, and mussels to the pot. Cook for an additional 5-7 minutes, or until the seafood is cooked through and the mussels have opened.
  6. Taste and adjust seasoning if necessary.
  7. Serve hot, garnished with fresh parsley.

Notes

  • For a spicier chowder, add a pinch of red pepper flakes or a dash of hot sauce.
  • Substitute the seafood with your favorites, such as scallops or crab, for a different flavor profile.
  • Prep Time: 15 minutes
  • Cook Time: 30 minutes
  • Category: Soup
  • Method: Stovetop
  • Cuisine: Irish

Nutrition

  • Serving Size: 1 bowl
  • Calories: 350
  • Sugar: 3g
  • Sodium: 800mg
  • Fat: 18g
  • Saturated Fat: 10g
  • Unsaturated Fat: 8g
  • Trans Fat: 0g
  • Carbohydrates: 20g
  • Fiber: 2g
  • Protein: 25g
  • Cholesterol: 100mg

Easter Bunny Pretzel Treats: A Sweet and Salty Delight for Spring Celebrations

A Nostalgic Easter Treat That Brings Joy to Every Bite

Easter has always been one of my favorite holidays, not just for the baskets filled with chocolate and the egg hunts in the backyard, but for the special homemade treats that became a tradition in our family. Among them, these chocolate-covered Easter pretzels hold a special place in my heart.

I still remember the first time my mom and I made these together. We spent the afternoon dipping pretzels into melted chocolate, giggling as we attempted to create tiny bunny faces with candy eyes and pink sprinkle noses. Some looked perfect, while others ended up looking more like silly cartoon characters—but that was part of the fun.

Now, I make these pretzel treats every Easter, not just because they are adorable and delicious, but because they remind me of those simple, happy moments spent in the kitchen with loved ones. The combination of crunchy pretzels, smooth chocolate, and a touch of festive sprinkles makes them the perfect balance of salty and sweet, and they never fail to bring a smile to everyone’s face.

Whether you’re making these for an Easter gathering, a springtime snack, or a fun baking project with kids, these pretzel treats are guaranteed to add joy and a touch of whimsy to your celebration.

Why These Easter Pretzels Are a Must-Make Treat

Easter pretzels are more than just a snack—they’re a fun, hands-on experience that anyone can enjoy. Here’s why they deserve a spot on your Easter table:

  • Simple Yet Festive – These pretzels look like they came from a gourmet candy shop but are super easy to make at home.
  • Perfectly Balanced Flavor – The salty crunch of the pretzel pairs beautifully with the sweetness of the chocolate, making them irresistible.
  • Great for Gifting – Package them in clear cellophane bags with pastel ribbons for Easter baskets, care packages, or party favors.
  • Kid-Friendly and Fun to Make – Let kids decorate their own bunnies and sheep, making for a creative and tasty Easter activity.
  • Lasts for Weeks – These treats stay fresh for up to two weeks, making them perfect for make-ahead holiday prep.

If you’re looking for a festive, no-bake Easter treat that’s both delicious and delightful, these Easter Bunny Pretzel Treats are the perfect choice.

How to Serve These Chocolate Easter Pretzels

These cute and crunchy pretzels are versatile and easy to serve, whether you’re adding them to an Easter spread or gifting them to loved ones.

For an Easter Dessert Table:

  • Arrange them on a colorful platter alongside Easter cupcakes, shortbread cookies, and chocolate eggs.
  • Serve them in pastel-colored bowls for a festive display.
  • Place them in a decorative Easter basket for guests to grab as they mingle.

For a Spring-Themed Snack:

  • Pair them with fresh fruit, yogurt, or granola for a light yet satisfying treat.
  • Add them to a charcuterie board with nuts, dried fruit, and a variety of chocolates.
  • Serve them with a warm cup of tea or coffee for an afternoon pick-me-up.

For Gift-Giving and Party Favors:

  • Package small batches in clear cellophane bags with Easter ribbon for a festive touch.
  • Fill mason jars with a mix of bunny, sheep, and sprinkle-covered pretzels for a beautiful homemade gift.
  • Add them to Easter baskets along with candy, small toys, and handwritten notes.

No matter how you serve them, these chocolate-covered Easter pretzels are sure to bring smiles and sweeten any celebration.

Ingredients

For the Chocolate-Coated Pretzels:
  • 48 mini pretzel twists – The perfect balance of salty and crunchy
  • 1 cup white chocolate melting discs – Smooth and creamy coating
  • 1 cup dark chocolate melting discs – Rich contrast to the white chocolate
  • 2 tablespoons pastel sprinkles – Adds a festive, colorful touch
For the Easter-Themed Designs:
  • 3 tablespoons white nonpareil sprinkles – Gives a “fluffy” texture to the sheep pretzels
  • 24 candy eyes (3/16″ size) – Essential for creating cute faces
  • 12 pink heart sprinkles – For the bunny noses
  • 24 black or navy nonpareil sprinkles – To create facial details for the rabbits

Directions: Transforming Simple Pretzels into Easter Magic

  1. Melt the Chocolate: Microwave white and dark chocolate discs separately, stirring until smooth.
  2. Coat the Pretzels: Dip pretzels in melted chocolate, letting excess drip off before placing them on a parchment-lined tray.
  3. Create the Bunny Faces: Pipe white chocolate into the bottom opening of a pretzel and add candy eyes and a heart sprinkle nose. Chill until set.
  4. Make the Sheep Pretzels: Dip pretzels in white chocolate and immediately coat with white nonpareil sprinkles. Pipe dark chocolate into the top opening to create a face and add candy eyes. Chill again.
  5. Decorate the Classic Chocolate Pretzels: Dip in dark or white chocolate, add pastel sprinkles or a drizzle of colored white chocolate, and let set.
  6. Serve or Package: Enjoy as a festive treat, or store in airtight containers for up to two weeks.

Nutritional Breakdown (Per Pretzel – Approximate Values)

  • Calories: ~44 kcal
  • Carbohydrates: ~5g
  • Protein: ~1g
  • Fat: ~3g
  • Sugar: ~4g
  • Sodium: ~3mg

Frequently Asked Questions (FAQs)

1. Can I make these ahead of time?

Yes! These pretzels stay fresh for up to two weeks when stored in an airtight container at room temperature. Make them a few days before Easter for stress-free holiday prep.

2. What’s the best type of chocolate to use?

For the best results, use:

  • White chocolate melting discs or candy melts for a smooth, glossy finish.
  • Dark or milk chocolate melting discs for a rich, deep flavor.
  • Almond bark as a budget-friendly alternative that melts easily.

Avoid using chocolate chips, as they don’t melt as smoothly and can be harder to work with.

3. Can I use different types of pretzels?

Yes! Mini twist pretzels work best for creating bunny and sheep shapes, but you can also use:

  • Pretzel rods for dipping and decorating with pastel-colored chocolate.
  • Mini pretzel sticks to create “Easter nests” when arranged in clusters.
  • Large pretzels for a more substantial treat.

4. Can I make these without dairy?

Yes! To make dairy-free Easter pretzels:

  • Use dairy-free chocolate melts or vegan white chocolate.
  • Check that your sprinkles are dairy-free, as some brands contain milk ingredients.

5. How can I add more color to these pretzels?

  • Use pastel-colored candy melts instead of white chocolate.
  • Drizzle them with colored chocolate in pink, purple, or yellow for a festive look.
  • Add edible glitter or shimmer dust for an extra touch of magic.

6. Can I freeze these pretzels?

It’s not recommended, as freezing can cause the chocolate to develop a white “bloom” and change texture. However, they store well at room temperature in an airtight container.

7. What’s the best way to keep the chocolate coating smooth?

  • Melt chocolate at 50% power in the microwave, stirring every 15-30 seconds.
  • Add a teaspoon of vegetable oil or coconut oil for a smoother consistency.
  • Work in small batches to keep the melted chocolate from hardening too quickly.

Creative Variations to Try

Want to add a personal twist to these festive pretzels? Try these fun variations:

1. Carrot Pretzels

  • Dip pretzels in orange-colored candy melts to resemble carrots.
  • Top with green icing or edible grass for a fun finishing touch.

2. Easter Egg Pretzels

  • Use round pretzels and dip them in pastel-colored chocolate.
  • Decorate with zigzag and polka-dot patterns to mimic Easter eggs.

3. Peanut Butter Chocolate Pretzels

  • Spread peanut butter between two pretzels before dipping in chocolate.
  • Sprinkle with crushed peanuts or sea salt for extra crunch.

4. Springtime Confetti Pretzels

  • Dip pretzels in white chocolate and cover with colorful confetti sprinkles.
  • Drizzle with neon pink, blue, or yellow chocolate for a playful look.

5. S’mores Pretzels

  • Dip in chocolate, then coat with crushed graham crackers.
  • Top with a mini marshmallow and toast lightly with a kitchen torch.

These variations make it easy to customize the recipe for any occasion, ensuring your Easter pretzels are always a hit.

Final Thoughts: A Sweet Tradition Worth Sharing

Easter Bunny Pretzel Treats are more than just a delicious snack—they’re a celebration of spring, family, and the joy of making something special together.

Whether you’re crafting them for an Easter gathering, a homemade gift, or simply to indulge in a festive treat, these chocolate-covered pretzels bring happiness in every bite.

So this Easter, gather your loved ones, melt some chocolate, and have fun decorating these adorable, crunchy, and sweet little delights. They might just become your new favorite Easter tradition!