“Chicken Caesar Pasta Salad is a must-try recipe!”

Introduction to Chicken Caesar Pasta Salad Recipe

Are you looking for a delightful dish that combines the classic flavors of Caesar salad with the heartiness of pasta? Look no further! The Chicken Caesar Pasta Salad Recipe is a perfect blend of creamy, savory, and fresh ingredients. This dish is not only easy to prepare but also a crowd-pleaser, making it ideal for family dinners, potlucks, or even a quick lunch. With its vibrant colors and delicious taste, it’s sure to become a favorite in your household.

What Makes Chicken Caesar Pasta Salad Special?

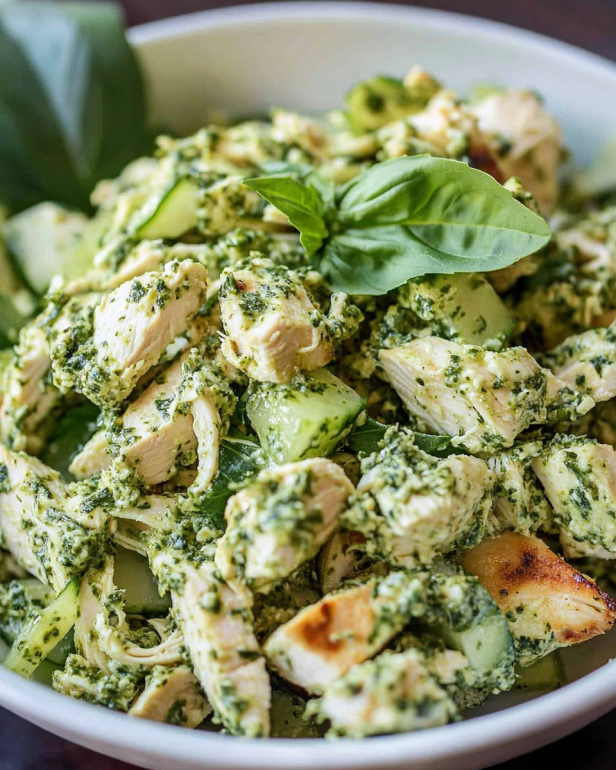
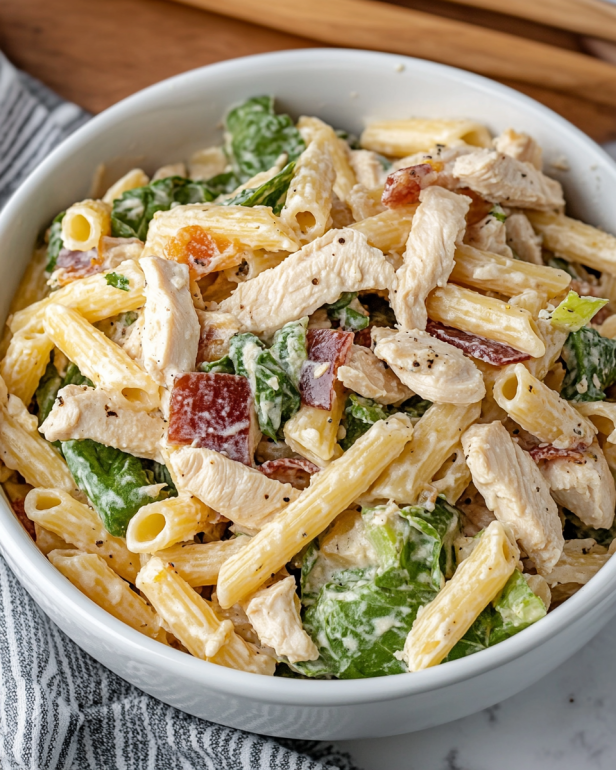
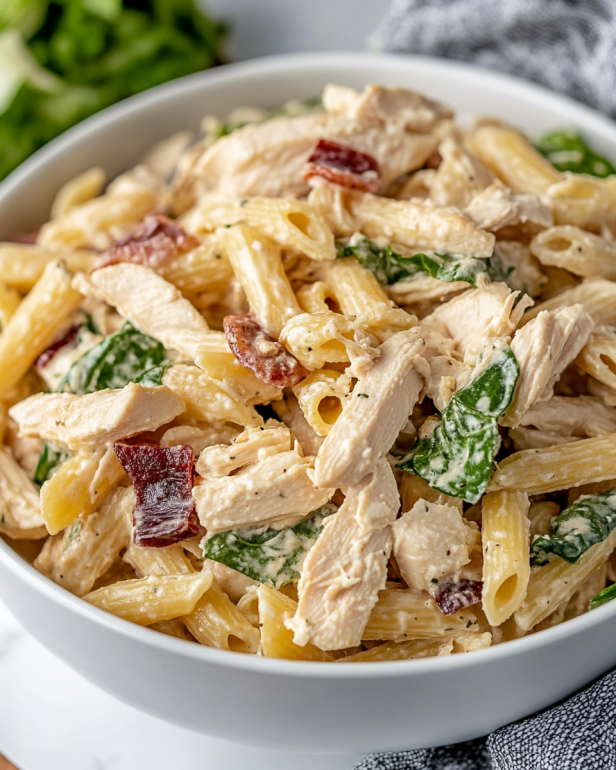
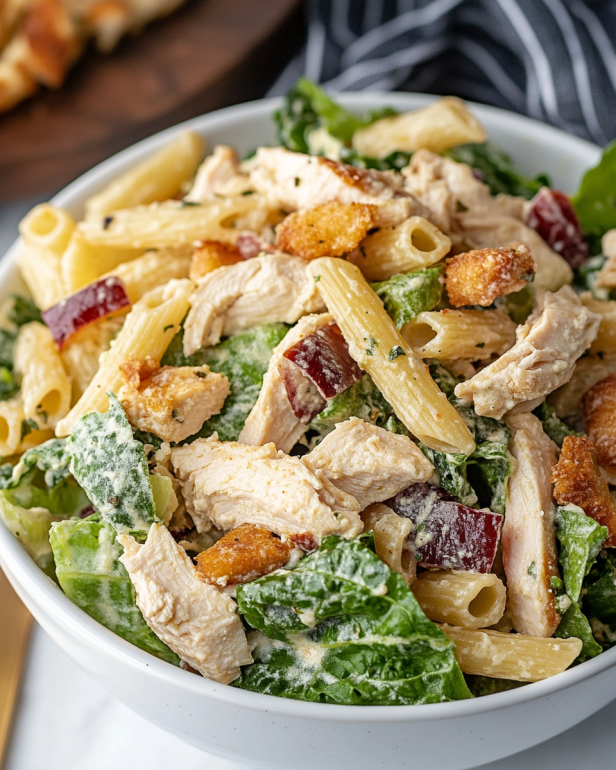
What sets this Chicken Caesar Pasta Salad apart is its unique combination of textures and flavors. The fusilli pasta provides a delightful chewiness, while the shredded rotisserie chicken adds protein and richness. Fresh grape tomatoes and crisp iceberg lettuce bring a burst of freshness, making each bite enjoyable. The creamy Caesar dressing ties everything together, creating a luscious coating that enhances the overall taste.

Moreover, this recipe is versatile. You can easily customize it by adding your favorite vegetables or swapping out the chicken for another protein. Whether you’re in the mood for a light meal or a hearty side dish, this Chicken Caesar Pasta Salad Recipe fits the bill. Plus, it’s quick to prepare, allowing you to spend more time enjoying your meal and less time in the kitchen.

So, gather your ingredients and get ready to whip up this delicious Chicken Caesar Pasta Salad. It’s a dish that promises satisfaction and smiles all around!

Ingredients for Chicken Caesar Pasta Salad Recipe

To create the delightful Chicken Caesar Pasta Salad, you’ll need a selection of fresh and flavorful ingredients. Here’s what you’ll need:

  • 8 ounces fusilli pasta: This spiral-shaped pasta holds the dressing well, making each bite flavorful.
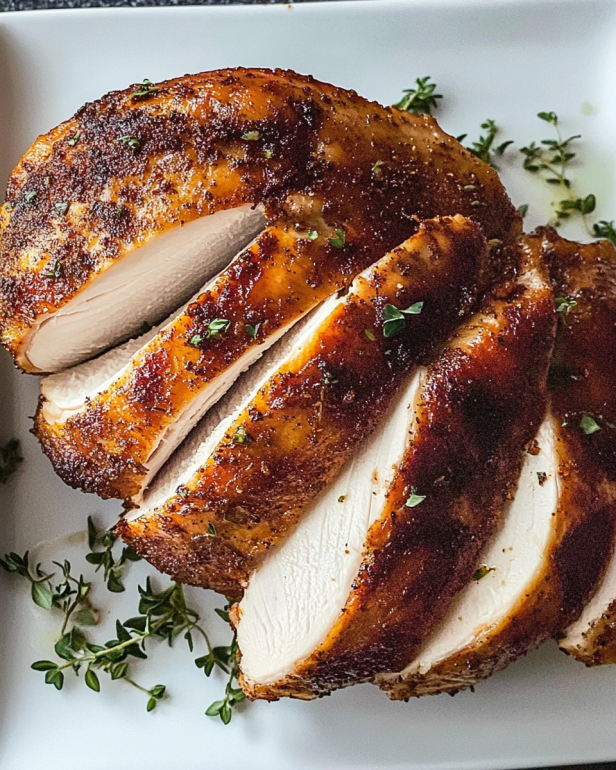
  • 2 cups shredded rotisserie chicken: Using rotisserie chicken saves time and adds a savory depth to the salad.
  • 1 cup halved grape tomatoes: These sweet tomatoes add a pop of color and freshness.
  • 1 cup chopped iceberg lettuce: Crisp and refreshing, iceberg lettuce provides a nice crunch.
  • 1/2 cup creamy Caesar dressing: This dressing is the star of the show, bringing all the flavors together.
  • 1/4 cup shredded Pecorino Romano cheese: This cheese adds a salty, nutty flavor that enhances the dish.
  • 1/4 teaspoon freshly ground black pepper: A touch of pepper adds a hint of spice.
  • 1/4 teaspoon onion powder: This ingredient gives a subtle onion flavor without overpowering the dish.
  • 1/4 teaspoon sea salt: A little salt enhances all the flavors in the salad.
  • 1/4 cup garlic-flavored croutons (optional): For those who love crunch, croutons add a delightful texture.

These ingredients come together to create a delicious and satisfying meal. Feel free to adjust the quantities based on your preferences or dietary needs. Now that you have everything ready, let’s move on to the preparation steps!

Step-by-Step Preparation of Chicken Caesar Pasta Salad Recipe

Now that you have all your ingredients ready, it’s time to dive into the preparation of your Chicken Caesar Pasta Salad. Follow these simple steps to create a delicious dish that everyone will love!

Step 1: Cook the Pasta

Start by boiling a large pot of salted water. Once the water is bubbling, add the fusilli pasta. Cook it according to the package instructions until it reaches an al dente texture. This usually takes about 8 to 10 minutes. Remember, you want the pasta to be firm yet tender. After cooking, drain the pasta in a colander and rinse it under cold water. This stops the cooking process and helps cool the pasta down quickly.

Step 2: Prepare the Chicken

While the pasta is cooking, shred your rotisserie chicken. You can use your hands or two forks to pull the chicken apart into bite-sized pieces. If you prefer, you can also chop the chicken into cubes. The shredded chicken adds a savory flavor and protein to your salad, making it hearty and satisfying.

Step 3: Make the Caesar Dressing

In a small bowl, combine the creamy Caesar dressing with freshly ground black pepper, onion powder, and sea salt. Whisk these ingredients together until they are smooth and well blended. This dressing is what brings all the flavors together, so make sure it’s mixed thoroughly. If you like a little extra kick, feel free to add more pepper or even a dash of hot sauce!

Step 4: Combine Ingredients

In a large mixing bowl, combine the cooled fusilli pasta, shredded chicken, halved grape tomatoes, and chopped iceberg lettuce. Pour the prepared Caesar dressing over the top. Gently toss everything together until all the ingredients are evenly coated with the dressing. This step is crucial, as you want every bite to be flavorful and delicious!

Step 5: Chill and Serve

Once everything is mixed, it’s time to let the flavors meld together. Cover the bowl with plastic wrap or a lid and place it in the refrigerator for about 30 minutes. This chilling time enhances the flavors and makes the salad even more refreshing. When you’re ready to serve, sprinkle the shredded Pecorino Romano cheese on top and add garlic-flavored croutons for that extra crunch. Enjoy your Chicken Caesar Pasta Salad!

Variations of Chicken Caesar Pasta Salad Recipe

While the classic Chicken Caesar Pasta Salad is delicious on its own, there are many ways to customize it. Adding different ingredients can enhance the flavor and texture, making it even more enjoyable. Here are some variations to consider:

Adding Vegetables for Extra Crunch

Incorporating additional vegetables can elevate your Chicken Caesar Pasta Salad. Here are some great options:

  • Diced Cucumbers: These add a refreshing crunch and a cool flavor.
  • Sweet Bell Peppers: Chopped red, yellow, or orange bell peppers bring sweetness and vibrant color.
  • Shredded Carrots: Adding shredded carrots introduces a slight sweetness and a pop of color.
  • Radishes: Thinly sliced radishes provide a peppery bite and a lovely crunch.

Feel free to mix and match these vegetables based on your preferences. They not only add flavor but also boost the nutritional value of your salad!

Alternative Proteins for Chicken Caesar Pasta Salad Recipe

If you want to switch things up, consider using different proteins in your Chicken Caesar Pasta Salad. Here are some tasty alternatives:

  • Grilled Shrimp: For a seafood twist, grilled shrimp adds a delicious flavor and pairs well with the Caesar dressing.
  • Tofu: For a vegetarian option, cubed and marinated tofu can provide protein and absorb the dressing’s flavors.
  • Turkey: Shredded turkey is a great substitute for chicken, especially after the holidays.
  • Chickpeas: For a plant-based protein, add canned chickpeas for a hearty and filling option.

These alternatives can make your Chicken Caesar Pasta Salad unique and cater to different dietary needs. Experiment with these variations to find your favorite combination!

Cooking Note for Chicken Caesar Pasta Salad Recipe

When preparing your Chicken Caesar Pasta Salad, there are a few important cooking notes to keep in mind. These tips will help ensure that your dish turns out perfectly every time, enhancing both flavor and texture.

First, always remember to cook the pasta al dente. This means it should be firm to the bite. Overcooked pasta can become mushy and lose its appealing texture. Rinsing the pasta under cold water after cooking not only stops the cooking process but also helps cool it down quickly, making it easier to mix with the other ingredients.

Next, using rotisserie chicken is a fantastic time-saver. It adds a rich flavor without the need for cooking chicken from scratch. However, if you prefer, you can grill or bake your chicken. Just make sure to season it well to enhance the overall taste of the salad.

When it comes to the Caesar dressing, feel free to adjust the amount based on your taste preferences. If you love a creamier salad, add a bit more dressing. On the other hand, if you prefer a lighter version, use less. You can also experiment with different brands of Caesar dressing to find one that you enjoy the most.

Lastly, don’t skip the chilling step! Allowing the salad to sit in the refrigerator for about 30 minutes helps the flavors meld together beautifully. This resting time makes each bite even more delicious. So, be patient and let your Chicken Caesar Pasta Salad chill before serving!

By following these cooking notes, you’ll create a Chicken Caesar Pasta Salad that is not only tasty but also visually appealing. Enjoy the process and the delightful results!

Serving Suggestions for Chicken Caesar Pasta Salad Recipe

When it comes to serving your Chicken Caesar Pasta Salad, presentation and pairing can elevate the dining experience. Here are some delightful serving suggestions to consider:

  • Chilled Bowls: Serve the salad in chilled bowls to keep it refreshing. This is especially nice on warm days.
  • Garnish with Fresh Herbs: A sprinkle of fresh parsley or basil on top adds a pop of color and enhances the flavor.
  • Accompany with Bread: Pair the salad with crusty bread or garlic bread for a satisfying meal. The bread can be used to scoop up the salad, making it fun to eat!
  • Serve as a Side Dish: This pasta salad works wonderfully as a side dish for grilled meats or fish. It complements the flavors beautifully.
  • Individual Portions: For gatherings, consider serving the salad in individual cups or jars. This makes it easy for guests to grab and enjoy.

Additionally, you can enhance the meal by offering a variety of dressings on the side. This allows guests to customize their salads according to their taste preferences. Whether they prefer extra Caesar dressing or a light vinaigrette, having options can make the meal more enjoyable.

Lastly, don’t forget to enjoy your Chicken Caesar Pasta Salad with a refreshing drink. A chilled lemonade or iced tea pairs perfectly with the creamy flavors of the salad. With these serving suggestions, your Chicken Caesar Pasta Salad will not only taste great but also look appealing on the table!

Tips for Perfecting Your Chicken Caesar Pasta Salad Recipe

Creating the perfect Chicken Caesar Pasta Salad is all about attention to detail. Here are some helpful tips to ensure your dish turns out delicious every time:

  • Use Fresh Ingredients: Fresh ingredients make a big difference in flavor. Choose ripe grape tomatoes and crisp lettuce for the best taste and texture.
  • Don’t Overcook the Pasta: Remember to cook the fusilli pasta until it’s al dente. This keeps it firm and prevents it from becoming mushy when mixed with the dressing.
  • Chill Before Serving: Allowing the salad to chill for at least 30 minutes enhances the flavors. It also makes the salad more refreshing, especially on warm days.
  • Adjust the Dressing: Feel free to modify the amount of Caesar dressing based on your preference. If you like it creamier, add more. For a lighter version, use less.
  • Experiment with Cheese: While Pecorino Romano is delicious, you can also try Parmesan or even feta cheese for a different flavor profile.
  • Mix in Herbs: Fresh herbs like parsley or basil can elevate the taste. They add a burst of freshness that complements the creamy dressing.
  • Top with Crunch: Adding croutons just before serving ensures they stay crispy. This adds a delightful crunch to each bite.
  • Make it Ahead: If you’re preparing for a gathering, you can make the salad a few hours in advance. Just keep it covered in the fridge until you’re ready to serve.

By following these tips, you’ll create a Chicken Caesar Pasta Salad that’s not only tasty but also visually appealing. Enjoy the process of making this delightful dish, and watch as it becomes a favorite among family and friends!

Breakdown of Time for Chicken Caesar Pasta Salad Recipe

Understanding the time needed to prepare your Chicken Caesar Pasta Salad can help you plan your meal better. Here’s a simple breakdown of the time required for each step:

Prep Time

The prep time for this Chicken Caesar Pasta Salad is approximately 15 minutes. This includes gathering your ingredients, shredding the rotisserie chicken, and chopping the vegetables. Having everything ready before you start cooking makes the process smoother and more enjoyable.

Cooking Time

Cooking the fusilli pasta takes about 10 minutes. You’ll want to boil it until it reaches that perfect al dente texture. Remember, timing is key! After cooking, you’ll need a few extra minutes to drain and rinse the pasta under cold water.

Total Time

In total, you can expect to spend around 30 to 35 minutes preparing your Chicken Caesar Pasta Salad. This includes both the prep and cooking time. If you factor in the chilling time of 30 minutes, the overall time from start to serving is about 1 hour. This makes it a quick and easy dish to whip up, perfect for busy weeknights or last-minute gatherings!

Nutritional Information for Chicken Caesar Pasta Salad Recipe

Understanding the nutritional content of your Chicken Caesar Pasta Salad is essential for making informed choices about your meals. This dish is not only delicious but also provides a good balance of nutrients. Here’s a breakdown of the key nutritional information per serving:

Calories

Each serving of Chicken Caesar Pasta Salad contains approximately 450 calories. This makes it a satisfying meal option that can fit into a balanced diet. The combination of pasta, chicken, and fresh vegetables provides energy and nourishment, perfect for a busy day.

Protein

With about 30 grams of protein per serving, this salad is a great source of this essential nutrient. The shredded rotisserie chicken contributes significantly to the protein content, helping to keep you full and satisfied. Protein is vital for muscle repair and overall health, making this dish a smart choice for active individuals.

Sodium

The sodium content in each serving is approximately 800 milligrams. While this is a reasonable amount for a meal, it’s important to be mindful of your overall sodium intake throughout the day. If you’re watching your sodium levels, consider using low-sodium Caesar dressing or reducing the amount of added salt in the recipe.

By keeping these nutritional facts in mind, you can enjoy your Chicken Caesar Pasta Salad while also being aware of its health benefits. This dish is not only tasty but also provides a good mix of calories, protein, and other nutrients to support your dietary needs!

FAQs about Chicken Caesar Pasta Salad Recipe

Can I make Chicken Caesar Pasta Salad ahead of time?

Absolutely! Making Chicken Caesar Pasta Salad ahead of time is a great idea. In fact, letting it sit in the refrigerator for a few hours or even overnight allows the flavors to meld beautifully. Just prepare the salad as directed, cover it tightly, and store it in the fridge. When you’re ready to serve, give it a gentle toss and add any crunchy toppings, like croutons, just before serving. This way, they stay crispy and delicious!

What type of pasta is best for Chicken Caesar Pasta Salad Recipe?

Fusilli pasta is an excellent choice for Chicken Caesar Pasta Salad. Its spiral shape holds onto the creamy dressing, ensuring every bite is flavorful. However, you can also use other pasta types like rotini, penne, or farfalle. Just make sure to cook the pasta until it’s al dente for the best texture. The key is to choose a pasta that can hold up to the dressing and mix well with the other ingredients.

How can I make Chicken Caesar Pasta Salad Recipe healthier?

There are several ways to make your Chicken Caesar Pasta Salad healthier without sacrificing flavor. Here are some tips:

  • Swap the Dressing: Replace half of the creamy Caesar dressing with plain Greek yogurt. This adds creaminess while reducing calories and fat.
  • Add More Veggies: Incorporate a variety of colorful vegetables like bell peppers, cucumbers, or spinach. This boosts the nutritional value and adds crunch.
  • Use Whole Wheat Pasta: Opt for whole wheat fusilli or another whole grain pasta. This increases fiber content and keeps you feeling full longer.
  • Reduce Cheese: Use less cheese or choose a lower-fat cheese option. This can help cut down on calories while still providing flavor.
  • Limit Sodium: Use low-sodium Caesar dressing and reduce added salt to keep sodium levels in check.

By making these simple adjustments, you can enjoy a healthier version of Chicken Caesar Pasta Salad that still tastes fantastic!

Conclusion on Chicken Caesar Pasta Salad Recipe

In conclusion, the Chicken Caesar Pasta Salad is a delightful dish that brings together the best of both worlds: the classic flavors of Caesar salad and the heartiness of pasta. This recipe is not only easy to prepare but also offers a satisfying meal that can be enjoyed at any time. Whether you’re serving it at a family gathering, a picnic, or simply enjoying it for lunch, this salad is sure to impress.

With its creamy dressing, tender chicken, and fresh vegetables, each bite is a burst of flavor. Plus, the versatility of this dish allows you to customize it to your liking. You can add extra veggies, swap proteins, or even adjust the dressing to suit your taste. The possibilities are endless!

Moreover, the nutritional benefits of this Chicken Caesar Pasta Salad make it a smart choice for those looking to maintain a balanced diet. With a good amount of protein and essential nutrients, it’s a meal that keeps you energized and satisfied.

So, why not give this recipe a try? Gather your ingredients, follow the simple steps, and enjoy the deliciousness of Chicken Caesar Pasta Salad. It’s a dish that promises to bring smiles to your table and create wonderful memories with family and friends. Happy cooking!

Greek Chicken Meatball Bowl Recipe for a Healthy Meal

Introduction to the Greek Chicken Meatball Bowl Recipe

Welcome to a delightful culinary journey with the Greek Chicken Meatball Bowl Recipe! This dish is not just a meal; it’s a celebration of flavors and textures that will transport your taste buds straight to the Mediterranean. Imagine juicy chicken meatballs, perfectly seasoned and baked to golden perfection, served over a bed of wholesome farro and fresh vegetables. It’s a bowl of goodness that’s both nutritious and satisfying.

Whether you’re looking for a quick weeknight dinner or a dish to impress your guests, this recipe fits the bill. It’s easy to prepare and packed with protein, making it a great choice for anyone seeking a healthy yet delicious meal. Plus, the vibrant colors of the ingredients make it visually appealing, ensuring that it’s as pleasing to the eyes as it is to the palate.

In this recipe, we’ll guide you through each step, from mixing the meatball ingredients to assembling your bowl. You’ll also discover some handy tips and variations to customize your dish. So, roll up your sleeves and get ready to create a Mediterranean masterpiece that everyone will love!

Ingredients for the Greek Chicken Meatball Bowl Recipe

To create the delicious Greek Chicken Meatball Bowl, you’ll need a variety of fresh and flavorful ingredients. Each component plays a vital role in bringing this dish to life. Here’s what you’ll need:

  • 1 pound ground chicken: This is the star of the dish, providing a lean source of protein.
  • 1/2 cup panko breadcrumbs: These breadcrumbs add a delightful crunch to the meatballs.
  • 1/4 cup grated Pecorino cheese: This cheese adds a salty, savory flavor that enhances the meatballs.
  • 1/4 cup finely chopped fresh cilantro: Fresh herbs brighten the dish and add a burst of flavor.
  • 1 clove garlic, minced: Garlic brings a wonderful aroma and depth to the meatballs.
  • 1 teaspoon dried thyme: This herb adds an earthy note that complements the chicken.
  • 1/2 teaspoon sea salt: Salt is essential for enhancing all the flavors in the dish.
  • 1/4 teaspoon freshly ground black pepper: A touch of pepper adds a mild heat.
  • 1 large egg: The egg acts as a binder, helping the meatballs hold their shape.
  • 2 tablespoons extra virgin olive oil: This oil adds richness and helps the meatballs brown nicely.
  • 2 cups cooked farro: Farro serves as a hearty base, providing fiber and nutrients.
  • 1 cup halved grape tomatoes: These sweet tomatoes add freshness and color to the bowl.
  • 1 cucumber, diced: Crunchy cucumber adds a refreshing element.
  • 1/2 red bell pepper, thinly sliced: This pepper contributes sweetness and vibrant color.
  • 1/2 cup crumbled goat cheese: Creamy goat cheese adds a tangy flavor that pairs well with the other ingredients.
  • 1/4 cup tzatziki sauce: This sauce is the perfect finishing touch, adding creaminess and a hint of coolness.

Gather these ingredients, and you’ll be well on your way to creating a delicious Greek Chicken Meatball Bowl that’s sure to impress!

Preparation of the Greek Chicken Meatball Bowl Recipe

Now that you have all your ingredients ready, it’s time to dive into the preparation of the Greek Chicken Meatball Bowl. This process is simple and fun, allowing you to create a delicious meal that everyone will love. Let’s break it down into three easy steps.

Step 1: Preparing the Chicken Meatballs

First, grab a large mixing bowl. In this bowl, combine the ground chicken, panko breadcrumbs, grated Pecorino cheese, chopped cilantro, minced garlic, dried thyme, sea salt, black pepper, and the egg. Use your hands or a spoon to mix everything together until it’s well blended. Make sure not to overmix, as this can make the meatballs tough.

Once your mixture is ready, it’s time to shape the meatballs. Take a small amount of the mixture and roll it into a ball about 1 inch in diameter. Place each meatball on a baking sheet lined with parchment paper. This will help prevent sticking and make cleanup easier.

Step 2: Cooking the Chicken Meatballs

Next, preheat your oven to 400°F (200°C). While the oven is heating, lightly brush the meatballs with extra virgin olive oil. This will help them brown nicely while baking. Once the oven is ready, place the baking sheet in and bake the meatballs for 20-25 minutes. You’ll know they’re done when they are golden brown and fully cooked through.

While the meatballs are baking, you can cook the farro according to the package directions. This usually takes about 20 minutes, so it’s a great time to multitask!

Step 3: Assembling the Greek Chicken Meatball Bowl

After the meatballs are cooked and the farro is ready, it’s time to assemble your bowl. Start by creating a base with the cooked farro in a large serving bowl. Then, add the halved grape tomatoes, diced cucumber, and sliced red bell pepper on top of the farro. These fresh vegetables will add color and crunch to your dish.

Finally, place the baked chicken meatballs on top of the salad. To finish, drizzle a generous amount of tzatziki sauce over everything. This creamy sauce adds a refreshing touch that ties all the flavors together. Your Greek Chicken Meatball Bowl is now ready to serve!

Variation of the Greek Chicken Meatball Bowl Recipe

One of the best things about the Greek Chicken Meatball Bowl Recipe is its versatility. You can easily customize it to suit your taste or dietary needs. Let’s explore some alternative ingredients and different serving styles that can elevate your dish even further.

Alternative Ingredients for the Greek Chicken Meatball Bowl Recipe

Feel free to get creative with the ingredients in your Greek Chicken Meatball Bowl. Here are some tasty alternatives:

  • Ground Turkey or Beef: If you prefer a different protein, ground turkey or beef can be used instead of chicken. Each option brings its unique flavor.
  • Quinoa or Bulgur: Swap out farro for quinoa or bulgur for a different texture. Both grains are nutritious and add a lovely chewiness.
  • Fresh Herbs: Instead of cilantro, try using parsley or dill. These herbs can give your meatballs a fresh twist.
  • Feta Cheese: If goat cheese isn’t your favorite, crumbled feta cheese is a great alternative. It adds a salty, tangy flavor that complements the dish.
  • Vegetables: Mix in other vegetables like spinach, zucchini, or olives. These can enhance the flavor and add more nutrients to your bowl.

By experimenting with these alternative ingredients, you can create a Greek Chicken Meatball Bowl that’s uniquely yours!

Different Serving Styles for the Greek Chicken Meatball Bowl Recipe

How you serve your Greek Chicken Meatball Bowl can also change the dining experience. Here are some fun serving styles to consider:

  • Wrap It Up: Instead of a bowl, use pita bread to wrap the meatballs and veggies. This makes for a delicious handheld meal.
  • Layered Salad: For a lighter option, layer the ingredients in a mason jar. Start with the farro, then add the veggies, meatballs, and top with tzatziki. This is perfect for meal prep!
  • Grain Bowl: Serve the meatballs over a bed of mixed greens instead of farro. This adds freshness and makes it a lighter dish.
  • Skewers: For a fun twist, thread the meatballs and veggies onto skewers and grill them. This adds a smoky flavor and makes for a great party dish.

These serving styles not only make the meal more exciting but also allow you to enjoy the Greek Chicken Meatball Bowl in different ways. So, don’t hesitate to mix things up!

Cooking Note for the Greek Chicken Meatball Bowl Recipe

Cooking is an art, and every dish has its unique nuances. The Greek Chicken Meatball Bowl Recipe is no exception. Here are some essential cooking notes to ensure your meatballs turn out perfectly every time.

First, when mixing the meatball ingredients, be gentle. Overmixing can lead to tough meatballs. Aim for a light touch, just enough to combine everything well. This will keep your meatballs tender and juicy.

Next, consider the size of your meatballs. Keeping them uniform, about 1 inch in diameter, ensures even cooking. If you make them too large, they may not cook through properly, while smaller ones can dry out quickly.

When baking the meatballs, make sure to space them out on the baking sheet. This allows hot air to circulate around each meatball, promoting even browning. If they are too close together, they may steam instead of bake, affecting their texture.

Don’t forget to check the internal temperature of the meatballs. They should reach 165°F (75°C) to be safe for consumption. Using a meat thermometer can help you avoid any guesswork.

Lastly, feel free to adjust the cooking time based on your oven. Every oven is different, and some may cook faster than others. Keep an eye on your meatballs as they bake, and remove them once they are golden brown and cooked through.

By following these cooking notes, you’ll create a Greek Chicken Meatball Bowl that’s not only delicious but also a joy to prepare. Happy cooking!

Serving Suggestions for the Greek Chicken Meatball Bowl Recipe

When it comes to serving the Greek Chicken Meatball Bowl, presentation and pairing can elevate your dining experience. Here are some delightful serving suggestions that will make your meal even more enjoyable.

  • Garnish with Fresh Herbs: A sprinkle of fresh herbs like parsley or dill on top of your bowl adds a pop of color and enhances the flavor. It’s a simple touch that makes a big difference!
  • Serve with Warm Pita Bread: Accompany your bowl with warm pita bread. This is perfect for scooping up the meatballs and veggies, making each bite even more satisfying.
  • Pair with a Side Salad: A light Greek salad with cucumbers, tomatoes, olives, and feta complements the meatball bowl beautifully. The freshness of the salad balances the richness of the meatballs.
  • Offer Extra Tzatziki: Serve additional tzatziki sauce on the side. This creamy sauce is not only delicious but also adds a refreshing element to each bite.
  • Include a Lemon Wedge: A squeeze of fresh lemon juice over the bowl brightens the flavors. It adds a zesty kick that enhances the overall taste of the dish.
  • Make it a Family Style Meal: For gatherings, consider serving the meatballs and toppings in separate bowls. This allows everyone to customize their own Greek Chicken Meatball Bowl, making it a fun and interactive meal.

These serving suggestions not only enhance the flavor but also create a visually appealing meal. Whether you’re hosting a dinner party or enjoying a cozy night in, these ideas will make your Greek Chicken Meatball Bowl a hit!

Tips for Perfecting the Greek Chicken Meatball Bowl Recipe

Creating the perfect Greek Chicken Meatball Bowl is all about attention to detail and a few handy tips. With these suggestions, you can elevate your dish and impress your family and friends. Let’s dive into some essential tips for perfecting this delightful recipe!

  • Use Fresh Ingredients: Fresh herbs and vegetables make a significant difference in flavor. Whenever possible, opt for fresh cilantro, ripe tomatoes, and crisp cucumbers. They will enhance the overall taste of your bowl.
  • Don’t Skip the Tzatziki: Tzatziki sauce is a key component of this dish. Its creamy texture and refreshing taste balance the savory meatballs perfectly. Consider making your own for an extra touch of freshness!
  • Experiment with Spices: Feel free to add your favorite spices to the meatball mixture. A pinch of cumin or paprika can add a unique twist to the flavor profile. Just be careful not to overpower the dish.
  • Chill the Mixture: If you have time, chill the meatball mixture for about 30 minutes before shaping. This helps the flavors meld together and makes the mixture easier to handle.
  • Check for Doneness: Always use a meat thermometer to ensure your meatballs are cooked through. They should reach an internal temperature of 165°F (75°C) for safe consumption.
  • Customize Your Bowl: Don’t hesitate to personalize your Greek Chicken Meatball Bowl. Add your favorite toppings, such as olives, artichokes, or even a drizzle of balsamic glaze for a unique flavor.
  • Make Ahead: If you’re short on time, consider preparing the meatballs in advance. You can store them in the fridge for up to a day or freeze them for later use. This makes meal prep a breeze!
  • Serve Warm: For the best experience, serve your Greek Chicken Meatball Bowl warm. The warmth enhances the flavors and makes the dish more comforting.

By following these tips, you’ll be well on your way to creating a Greek Chicken Meatball Bowl that’s not only delicious but also a joy to share. Enjoy the process and happy cooking!

Breakdown of Time for the Greek Chicken Meatball Bowl Recipe

Understanding the time needed for each step of the Greek Chicken Meatball Bowl Recipe can help you plan your cooking efficiently. Here’s a detailed breakdown of the time required for preparation and cooking.

Prep Time for the Greek Chicken Meatball Bowl Recipe

The prep time for this delicious Greek Chicken Meatball Bowl is approximately 20-25 minutes. During this time, you will gather all your ingredients, mix the meatball mixture, and shape the meatballs. It’s a straightforward process that allows you to get everything ready without feeling rushed. Make sure to have all your ingredients measured and chopped before you start, as this will make the prep even smoother!

Cooking Time for the Greek Chicken Meatball Bowl Recipe

Once your meatballs are shaped, the cooking time is about 20-25 minutes. Preheat your oven to 400°F (200°C) while you prepare the meatballs. After placing them in the oven, you can use this time to cook the farro. This multitasking helps you maximize your efficiency in the kitchen. Just keep an eye on the meatballs to ensure they reach that perfect golden brown color!

Total Time for the Greek Chicken Meatball Bowl Recipe

In total, you can expect the entire process to take around 45-50 minutes from start to finish. This includes both prep and cooking time. It’s a quick and easy meal that’s perfect for busy weeknights or when you want to impress guests without spending hours in the kitchen. With this time breakdown, you can plan your cooking session effectively and enjoy a delicious Greek Chicken Meatball Bowl in no time!

Nutritional Information for the Greek Chicken Meatball Bowl Recipe

Understanding the nutritional content of your meals is essential for maintaining a balanced diet. The Greek Chicken Meatball Bowl is not only delicious but also packed with nutrients. Let’s break down the key nutritional information for this delightful dish.

Calories in the Greek Chicken Meatball Bowl Recipe

Each serving of the Greek Chicken Meatball Bowl contains approximately 450 calories. This calorie count makes it a satisfying meal that can fit well into a healthy eating plan. The combination of lean protein from the chicken, healthy fats from olive oil and cheese, and carbohydrates from farro ensures that you’re getting a well-rounded meal.

Protein Content in the Greek Chicken Meatball Bowl Recipe

Protein is vital for muscle repair and overall health. Each serving of this Greek Chicken Meatball Bowl provides about 30 grams of protein. This high protein content comes primarily from the ground chicken and the addition of cheese. It makes this dish an excellent choice for those looking to increase their protein intake, whether for fitness goals or general health.

Sodium Levels in the Greek Chicken Meatball Bowl Recipe

When it comes to sodium, each serving contains around 600 milligrams. While this is a reasonable amount for a meal, it’s always good to be mindful of your overall sodium intake throughout the day. To reduce sodium levels, consider using low-sodium versions of ingredients like cheese or tzatziki sauce. This way, you can enjoy your Greek Chicken Meatball Bowl while keeping your sodium levels in check.

In summary, the Greek Chicken Meatball Bowl is a nutritious option that offers a good balance of calories, protein, and sodium. It’s a meal that not only satisfies your taste buds but also supports your health goals. Enjoy this delicious bowl knowing you’re making a smart choice for your body!

FAQs about the Greek Chicken Meatball Bowl Recipe

What can I substitute for chicken in the Greek Chicken Meatball Bowl Recipe?

If you’re looking for alternatives to chicken in the Greek Chicken Meatball Bowl Recipe, you’re in luck! Ground turkey is a popular substitute that offers a similar texture and flavor. You can also use ground beef or lamb for a richer taste. For a vegetarian option, consider using lentils or chickpeas. Just mash them up and mix with breadcrumbs and spices to form meatballs. Each of these substitutes will give your bowl a unique twist while still keeping it delicious!

Can I make the Greek Chicken Meatball Bowl Recipe ahead of time?

Absolutely! The Greek Chicken Meatball Bowl Recipe is perfect for meal prep. You can prepare the meatballs in advance and store them in the refrigerator for up to a day before baking. Alternatively, you can bake the meatballs and store them in an airtight container in the fridge for up to three days. Just reheat them in the oven or microwave when you’re ready to serve. The farro and veggies can also be prepped ahead of time, making it easy to assemble your bowl when you’re ready to eat!

How do I store leftovers from the Greek Chicken Meatball Bowl Recipe?

Storing leftovers from your Greek Chicken Meatball Bowl is simple! Place any uneaten meatballs, farro, and vegetables in separate airtight containers. This helps maintain their freshness and texture. You can keep them in the refrigerator for up to three days. When you’re ready to enjoy your leftovers, simply reheat the meatballs and farro in the microwave or oven. For the best taste, add fresh veggies and tzatziki sauce just before serving!

Conclusion on the Greek Chicken Meatball Bowl Recipe

In conclusion, the Greek Chicken Meatball Bowl Recipe is a delightful and nutritious meal that brings the vibrant flavors of the Mediterranean right to your table. With its combination of juicy chicken meatballs, wholesome farro, and fresh vegetables, this dish is not only satisfying but also visually appealing. It’s a perfect option for busy weeknights or special gatherings, allowing you to impress your family and friends with minimal effort.

As you’ve seen, this recipe is versatile, allowing for various ingredient substitutions and serving styles. Whether you choose to wrap the meatballs in pita, layer them in a mason jar, or serve them over a bed of greens, the possibilities are endless. Plus, with the tips and variations provided, you can easily customize the dish to suit your taste preferences and dietary needs.

Moreover, the nutritional benefits of this bowl make it a smart choice for anyone looking to maintain a balanced diet. With a good amount of protein, healthy fats, and fiber, it’s a meal that fuels your body while satisfying your cravings.

So, gather your ingredients, roll up your sleeves, and get ready to create a Greek Chicken Meatball Bowl that will surely become a favorite in your household. Enjoy the process, share it with loved ones, and savor every delicious bite. Happy cooking!

Cobb Salad with Avocado Dressing Recipe is Delicious!

Introduction to Cobb Salad with Avocado Dressing Recipe

What is a Cobb Salad?

A Cobb salad is a classic American dish that combines a variety of fresh ingredients. Typically, it features chopped greens, grilled chicken, crispy bacon, hard-boiled eggs, and a mix of colorful vegetables. The salad is often topped with a rich dressing, making it a hearty meal. Its origins trace back to the 1930s, when it was created at the Brown Derby restaurant in Hollywood. Today, it remains a popular choice for those seeking a nutritious and satisfying meal.

Why Choose Avocado Dressing?

Avocado dressing is a fantastic choice for a Cobb salad. Not only does it add a creamy texture, but it also brings a wealth of health benefits. Avocados are packed with healthy fats, vitamins, and minerals. They can help improve heart health and provide a good source of fiber. Plus, the natural flavor of avocado complements the other ingredients beautifully. By using avocado dressing, you can create a delicious and nutritious salad that everyone will love!

Ingredients for Cobb Salad with Avocado Dressing Recipe

To create a delightful Cobb salad with avocado dressing, you’ll need a variety of fresh ingredients. Each component adds its unique flavor and texture, making the salad both delicious and nutritious. Here’s what you’ll need:

  • 2 cups chopped romaine lettuce
  • 1 cup diced grilled chicken
  • 1/2 cup halved grape tomatoes
  • 1/2 cup crumbled crispy bacon
  • 1/4 cup crumbled feta cheese
  • 1/4 cup thinly sliced scallions
  • 1 ripe avocado, peeled and pitted
  • 2 tablespoons extra virgin olive oil
  • 1 tablespoon fresh lime juice
  • Salt and freshly ground black pepper to taste

These ingredients come together to create a colorful and satisfying meal. The romaine lettuce serves as a crisp base, while the grilled chicken adds protein. The bacon provides a savory crunch, and the feta cheese introduces a tangy flavor. The avocado dressing ties everything together, making each bite a delightful experience. Feel free to adjust the quantities based on your preferences or dietary needs!

Step-by-Step Preparation of Cobb Salad with Avocado Dressing Recipe

Step 1: Prepare the Ingredients

Before diving into the cooking process, it’s essential to prepare all your ingredients. Start by washing the romaine lettuce thoroughly. Then, chop it into bite-sized pieces. Next, dice the grilled chicken into small cubes. Halve the grape tomatoes and slice the scallions thinly. Finally, crumble the crispy bacon and feta cheese. Having everything ready will make the assembly process smooth and enjoyable!

Step 2: Cook the Chicken

If you haven’t cooked the chicken yet, now is the time! You can grill, bake, or pan-sear the chicken breast. Season it with salt and pepper for added flavor. Cook until the chicken is no longer pink in the center, which usually takes about 6-7 minutes per side on the grill. Once cooked, let it rest for a few minutes before dicing it into cubes. This step ensures the chicken remains juicy and tender.

Step 3: Assemble the Salad

Now that your ingredients are prepped, it’s time to assemble the salad. In a large mixing bowl, combine the chopped romaine lettuce, diced grilled chicken, halved grape tomatoes, crumbled bacon, feta cheese, and sliced scallions. Gently toss everything together to ensure an even distribution of flavors. This step is crucial for a well-balanced salad!

Step 4: Make the Avocado Dressing

Creating the avocado dressing is simple and quick. In a separate bowl, take your ripe avocado and mash it with a fork until it’s smooth. Then, add the extra virgin olive oil, fresh lime juice, salt, and pepper. Mix everything together until you achieve a creamy consistency. Taste the dressing and adjust the seasoning if needed. This dressing will add a rich, creamy layer to your salad!

Step 5: Combine and Serve

Finally, pour the avocado dressing over the salad mixture. Carefully fold everything together until all the ingredients are well-coated with the dressing. This step ensures that every bite is bursting with flavor. Serve the salad immediately for the freshest taste, or let it chill in the refrigerator for about 20 minutes. This chilling time allows the flavors to meld beautifully. Enjoy your delicious Cobb salad with avocado dressing!

Variations of Cobb Salad with Avocado Dressing Recipe

Vegetarian Options

If you’re looking for a vegetarian twist on the classic Cobb salad, there are plenty of delicious options! You can easily replace the grilled chicken with roasted chickpeas. They add a nice crunch and are packed with protein. Additionally, swap out the crispy bacon for crispy coconut flakes or tempeh bacon for a savory flavor. You can also include more colorful vegetables like diced bell peppers, cucumbers, or even roasted sweet potatoes. These additions not only enhance the taste but also make the salad visually appealing. With these changes, you’ll have a vibrant and satisfying vegetarian Cobb salad that everyone can enjoy!

Protein Alternatives

For those who want to explore different protein sources, there are several tasty alternatives to chicken. Grilled shrimp or salmon can be a fantastic choice, adding a seafood twist to your salad. If you prefer plant-based options, consider using tofu or tempeh. Both can be marinated and grilled for extra flavor. Another great option is to add hard-boiled eggs, which are a classic ingredient in many Cobb salads. These protein alternatives will keep your salad hearty and fulfilling while still allowing you to enjoy the creamy avocado dressing. Feel free to mix and match these proteins to find your perfect combination!

Cooking Note for Cobb Salad with Avocado Dressing Recipe

When preparing your Cobb salad with avocado dressing, there are a few important cooking notes to keep in mind. First, freshness is key. Always use fresh ingredients for the best flavor and texture. This is especially true for the romaine lettuce and avocado. Wilted greens can make your salad less appealing, while a ripe avocado will ensure a creamy dressing.

Next, consider the cooking method for your chicken. Grilling is a popular choice as it adds a smoky flavor. However, baking or pan-searing can also yield delicious results. Just make sure to cook the chicken until it reaches an internal temperature of 165°F (75°C) for safety. Letting the chicken rest before dicing helps retain its juices, making it more tender.

Another tip is to prepare the avocado dressing just before serving. Avocado can brown quickly when exposed to air. To prevent this, you can add a bit more lime juice to the dressing, which helps slow down the oxidation process. If you need to make the dressing ahead of time, store it in an airtight container and press plastic wrap directly onto the surface to minimize air exposure.

Lastly, feel free to customize your salad based on your preferences. You can add or remove ingredients as you see fit. The beauty of a Cobb salad lies in its versatility. Whether you prefer more veggies or different proteins, the avocado dressing will tie everything together beautifully. Enjoy the process of making this delightful dish!

Serving Suggestions for Cobb Salad with Avocado Dressing Recipe

When it comes to serving your Cobb salad with avocado dressing, presentation and pairing can elevate the dining experience. Here are some delightful serving suggestions to consider:

  • Chilled Plates: Serve the salad on chilled plates. This keeps the ingredients fresh and crisp, enhancing the overall taste.
  • Garnish with Fresh Herbs: Add a sprinkle of fresh herbs like cilantro or parsley on top for a pop of color and flavor. This simple touch can make your salad look even more appealing.
  • Accompany with Whole Grain Bread: Pair the salad with slices of whole grain bread or a warm baguette. This adds a nice crunch and makes the meal more filling.
  • Serve with a Side of Soup: For a complete meal, consider serving the Cobb salad alongside a light soup, such as tomato basil or a vegetable broth. This combination is comforting and satisfying.
  • Offer Extra Dressing: Place extra avocado dressing on the side for those who love a little more creaminess. This allows guests to customize their salad to their liking.
  • Make it a Wrap: For a fun twist, serve the salad in a whole wheat wrap. This makes it easy to eat on the go and adds a different texture to the meal.

These serving suggestions not only enhance the visual appeal of your Cobb salad but also provide options for different tastes and preferences. Whether you’re hosting a gathering or enjoying a quiet meal at home, these ideas will help you create a memorable dining experience. Enjoy your delicious Cobb salad with avocado dressing!

Tips for Perfecting Your Cobb Salad with Avocado Dressing Recipe

Creating the perfect Cobb salad with avocado dressing is all about attention to detail. Here are some helpful tips to ensure your salad is not only delicious but also visually appealing:

  • Choose Ripe Avocados: The key to a creamy dressing is using ripe avocados. Look for avocados that yield slightly to gentle pressure. This ensures a smooth texture for your dressing.
  • Balance Flavors: Aim for a balance of flavors in your salad. The saltiness of the bacon and feta should complement the creaminess of the avocado dressing. Taste as you go to find the right mix!
  • Chill Ingredients: For a refreshing salad, chill your ingredients before assembling. Cold lettuce and chicken enhance the overall experience, making each bite crisp and refreshing.
  • Layer Ingredients: When assembling, consider layering the ingredients instead of mixing them all at once. This allows for a beautiful presentation and lets guests enjoy the different flavors in each bite.
  • Experiment with Textures: Incorporate a variety of textures to keep things interesting. Add crunchy nuts or seeds, like walnuts or sunflower seeds, for an extra layer of flavor and crunch.
  • Use Fresh Herbs: Fresh herbs can elevate your salad. Consider adding chopped basil, cilantro, or dill to enhance the flavor profile of your Cobb salad.
  • Adjust the Dressing: If you prefer a thinner dressing, add a splash of water or more lime juice. This can help achieve your desired consistency without sacrificing flavor.
  • Serve Immediately: For the best taste and texture, serve your salad right after mixing. If you need to prepare it ahead of time, keep the dressing separate until just before serving.

By following these tips, you can create a Cobb salad with avocado dressing that is not only delicious but also visually stunning. Enjoy the process of making this delightful dish, and don’t hesitate to get creative with your ingredients!

Breakdown of Time for Cobb Salad with Avocado Dressing Recipe

Prep Time

Preparing your Cobb salad with avocado dressing is a breeze! The prep time typically takes about 15 to 20 minutes. This includes washing and chopping the romaine lettuce, dicing the grilled chicken, halving the grape tomatoes, and slicing the scallions. Additionally, you’ll need a few minutes to crumble the bacon and feta cheese. Having everything ready will make the assembly process smooth and enjoyable!

Cooking Time

If you need to cook the chicken, this step will take around 15 to 20 minutes, depending on your cooking method. Grilling is a popular choice, as it adds a delicious smoky flavor. If you opt for baking or pan-searing, ensure the chicken reaches an internal temperature of 165°F (75°C). Once cooked, let the chicken rest for a few minutes before dicing it into cubes. This resting time helps keep the chicken juicy and tender.

Total Time

In total, you can expect to spend about 30 to 40 minutes preparing and cooking your Cobb salad with avocado dressing. This includes both the prep and cooking times. Once everything is ready, you can assemble the salad and enjoy a delightful meal. Whether you’re making it for a family dinner or a gathering with friends, this time-efficient recipe is sure to impress!

Nutritional Information for Cobb Salad with Avocado Dressing Recipe

Calories

When it comes to enjoying a delicious Cobb salad with avocado dressing, understanding the calorie content is essential. Each serving of this delightful salad contains approximately 360 calories. This makes it a satisfying yet light meal option. The combination of fresh ingredients and healthy fats from the avocado ensures that you’re not only enjoying a tasty dish but also fueling your body with nutritious components.

Protein

Protein is a vital part of any meal, and this Cobb salad delivers! Each serving provides around 27 grams of protein. The grilled chicken and feta cheese contribute significantly to this protein content, making it an excellent choice for those looking to maintain or build muscle. Additionally, the protein helps keep you feeling full and satisfied, making this salad a great option for lunch or dinner.

Sodium

While enjoying your Cobb salad, it’s also important to be mindful of sodium intake. Each serving contains approximately 800 milligrams of sodium. This amount can vary based on the specific brands of ingredients you use, especially the bacon and feta cheese. If you’re watching your sodium levels, consider using low-sodium bacon or feta cheese. This way, you can still enjoy the flavors without compromising your dietary needs.

Overall, the Cobb salad with avocado dressing is a nutritious choice that balances calories, protein, and sodium. It’s a meal that not only tastes great but also supports a healthy lifestyle. Enjoy this salad as part of a balanced diet, and feel good about the ingredients you’re putting into your body!

FAQs about Cobb Salad with Avocado Dressing Recipe

Can I make the avocado dressing ahead of time?

Yes, you can make the avocado dressing ahead of time! However, avocados tend to brown quickly when exposed to air. To keep your dressing fresh, store it in an airtight container. You can also press plastic wrap directly onto the surface of the dressing to minimize air exposure. If you want to prepare it a day in advance, adding a bit more lime juice can help slow down the oxidation process. Just give it a good stir before serving to restore its creamy texture!

What can I substitute for chicken in the Cobb salad?

If you’re looking for alternatives to chicken in your Cobb salad, there are plenty of delicious options! For a vegetarian version, consider using roasted chickpeas or grilled tofu. Both options provide a good source of protein. If you prefer seafood, grilled shrimp or salmon can add a delightful twist. You can also include hard-boiled eggs, which are a classic ingredient in many Cobb salads. Feel free to mix and match these proteins to suit your taste!

How long does the Cobb salad last in the fridge?

Your Cobb salad with avocado dressing is best enjoyed fresh. However, if you have leftovers, you can store them in the refrigerator for up to 2 days. Keep in mind that the avocado dressing may cause the salad to become soggy over time. To maintain the best texture, consider storing the dressing separately and adding it just before serving. This way, you can enjoy a fresh-tasting salad even after a day or two!

Is Cobb salad healthy?

Yes, a Cobb salad can be a very healthy meal option! It is packed with fresh vegetables, lean protein, and healthy fats from the avocado. The combination of ingredients provides essential nutrients, including vitamins, minerals, and fiber. However, be mindful of the sodium content, especially if you use bacon and feta cheese. You can make it even healthier by opting for low-sodium versions of these ingredients or adding more veggies. Overall, a Cobb salad with avocado dressing is a nutritious choice that supports a balanced diet!

Conclusion on Cobb Salad with Avocado Dressing Recipe

In conclusion, the Cobb salad with avocado dressing is a delightful and nutritious meal that brings together a variety of flavors and textures. This recipe not only showcases the classic elements of a traditional Cobb salad but also elevates it with the creamy goodness of avocado dressing. Whether you’re preparing it for a family dinner, a picnic, or a gathering with friends, this salad is sure to impress.

By using fresh ingredients, you can create a vibrant dish that is both satisfying and healthy. The combination of protein from the chicken, the crunch of bacon, and the creaminess of avocado makes each bite a delicious experience. Plus, with the flexibility to customize the salad based on your dietary preferences, you can easily make it vegetarian or explore different protein options.

Remember to follow the tips provided to perfect your salad, from choosing ripe avocados to balancing flavors. With a little attention to detail, you can create a stunning presentation that will wow your guests. So, gather your ingredients, roll up your sleeves, and enjoy the process of making this delightful Cobb salad with avocado dressing!

As you savor each bite, you’ll appreciate not only the taste but also the health benefits that come with it. This salad is a wonderful addition to your meal rotation, offering a satisfying option that supports a healthy lifestyle. Enjoy your culinary adventure with this delicious recipe, and don’t hesitate to share it with family and friends!

Pesto Chicken Salad Recipe: A Flavorful Delight Awaits!

Introduction to Pesto Chicken Salad Recipe

Pesto Chicken Salad Recipe is a fantastic choice for lunch or dinner. This dish combines tender chicken with vibrant ingredients, creating a delightful medley that’s both satisfying and nutritious.

What makes this salad stand out is the rich basil pesto. It adds a burst of flavor that elevates the entire dish. Plus, the creamy Greek yogurt and mayonnaise blend perfectly, giving the salad a smooth texture. With fresh vegetables like cherry tomatoes and cucumbers, you’ll enjoy a refreshing crunch in every bite.

This recipe is not only simple to prepare but also versatile. You can easily customize it to suit your taste. Whether you’re serving it at a picnic, a family gathering, or just for yourself, this salad is sure to impress. It’s a great way to use leftover chicken, making it a practical choice for busy weeknights.

Pesto Chicken Salad Recipe a hit. So, let’s dive in and discover how to create this delightful dish!

Ingredients for Pesto Chicken Salad Recipe

Pesto Chicken Salad Recipe, you’ll need a variety of fresh and flavorful ingredients. Here’s what you’ll need:

  • 2 cups shredded or diced cooked chicken
  • 1/2 cup basil pesto
  • 1/2 cup plain Greek yogurt
  • 1/4 cup creamy mayonnaise
  • 1 cup halved cherry tomatoes
  • 1/2 cup diced cucumber
  • 1/4 cup finely chopped red onion
  • Salt and freshly ground pepper to taste
  • 2 tablespoons fresh lemon juice
  • 1/4 cup toasted pine nuts (optional)
  • Fresh basil leaves for garnish (optional)

These ingredients come together to create a salad that is not only delicious but also nutritious. The chicken provides a good source of protein, while the vegetables add vitamins and minerals. The basil pesto brings a unique flavor that ties everything together, making each bite a delight.

Pesto Chicken Salad Recipe lies in its flexibility!

Preparation of Pesto Chicken Salad Recipe

Pesto Chicken Salad Recipe. This process is simple and quick, making it perfect for any occasion. Let’s break it down into easy steps.

Step 1: Preparing the Chicken

First, you need to prepare the chicken. If you have leftover cooked chicken, that’s great! Just shred or dice it into bite-sized pieces. If you’re starting with raw chicken, you can boil or grill it until fully cooked. Once it’s ready, let it cool before adding it to the salad. This step is crucial because warm chicken can make the salad soggy.

Step 2: Making the Pesto

Pesto Chicken Salad Recipe.

Step 3: Combining Ingredients

In a large mixing bowl, combine the shredded chicken with the basil pesto, Greek yogurt, and mayonnaise. Mix well until the chicken is fully coated. Next, add the halved cherry tomatoes, diced cucumber, and finely chopped red onion. Season with salt and pepper to taste. Finally, drizzle the fresh lemon juice over the mixture. Gently fold everything together to ensure an even distribution of flavors.

Step 4: Chilling the Salad

Pesto Chicken Salad Recipe. When you’re ready to serve, give it a quick stir and adjust the seasoning if needed.

Now that your salad is prepared, you’re one step closer to enjoying a delicious meal!

Variation of Pesto Chicken Salad Recipe

Pesto Chicken Salad Recipe is its versatility. You can easily switch up the ingredients to suit your taste or dietary needs. Let’s explore some alternative ingredients and different serving styles that can make your salad even more exciting!

Alternative Ingredients to Consider

Feel free to get creative with your salad! Here are some alternative ingredients you might want to try:

  • Avocado: Adding diced avocado gives a creamy texture and healthy fats.
  • Bell Peppers: Chopped red, yellow, or orange bell peppers add a sweet crunch and vibrant color.
  • Spinach or Arugula: Mixing in fresh greens can boost the nutritional value and add a peppery flavor.
  • Feta Cheese: Crumbled feta adds a tangy taste that pairs well with the pesto.
  • Olives: Sliced olives can introduce a briny flavor that complements the other ingredients.

Pesto Chicken Salad Recipe. You can mix and match based on what you have on hand or what you enjoy most!

Different Serving Styles

How you serve your salad can make a big difference in presentation and enjoyment. Here are some fun serving styles to consider:

  • On a Bed of Greens: Serve the salad over a bed of mixed greens for a fresh and colorful presentation.
  • In Lettuce Wraps: Use large lettuce leaves to create wraps filled with the salad for a low-carb option.
  • Stuffed in Pitas: Fill whole wheat pitas with the salad for a portable and tasty meal.
  • As a Sandwich: Spread the salad between slices of whole grain bread for a delicious sandwich.
  • In a Bowl: Simply serve it in a bowl, garnished with fresh basil leaves for a rustic look.

Pesto Chicken Salad Recipe more appealing and fun to eat. Whether you’re hosting a gathering or enjoying a quiet meal at home, these variations will surely impress!

Cooking Note for Pesto Chicken Salad Recipe

Pesto Chicken Salad Recipe, there are a few cooking notes to keep in mind. These tips will help ensure that your salad turns out perfectly every time.

First, always use cooked chicken. You can use leftover chicken from a previous meal, or you can cook fresh chicken specifically for this recipe. If you opt for raw chicken, make sure to cook it thoroughly. You can boil, grill, or bake it until it reaches an internal temperature of 165°F (75°C). This step is crucial for food safety.

Next, consider the quality of your ingredients. Fresh basil pesto will elevate the flavor of your salad. If you’re using store-bought pesto, choose a high-quality brand for the best taste. Additionally, fresh vegetables like cherry tomatoes and cucumbers should be firm and vibrant. This ensures that your salad is not only tasty but also visually appealing.

Another important note is to adjust the seasoning to your liking. Everyone has different preferences when it comes to salt and pepper. Start with a little, and you can always add more later. The fresh lemon juice also adds a nice zing, so don’t skip it!

Lastly, remember that chilling the salad is key. Allowing it to sit in the refrigerator for at least 30 minutes helps the flavors meld together beautifully. If you have time, letting it chill for a few hours or even overnight can enhance the taste even more.

Pesto Chicken Salad Recipe that everyone will love!

Serving Suggestions for Pesto Chicken Salad Recipe

Pesto Chicken Salad Recipe, it’s time to think about how to serve it. The way you present your salad can enhance the dining experience and make it even more enjoyable. Here are some creative serving suggestions to consider:

  • Chilled on a Platter: Serve the salad on a large platter for a family-style meal. This allows everyone to help themselves and makes for a beautiful presentation.
  • In Individual Bowls: For a more personal touch, serve the salad in individual bowls. This is perfect for gatherings or picnics, making it easy for guests to enjoy.
  • With Whole Grain Crackers: Pair the salad with whole grain crackers for a crunchy side. This adds texture and makes for a delightful snack.
  • As a Side Dish: Serve the salad as a side dish alongside grilled meats or fish. Its fresh flavors complement a variety of main courses.
  • On a Bed of Quinoa: For a heartier meal, serve the salad over a bed of cooked quinoa. This adds extra protein and fiber, making it even more filling.

Pesto Chicken Salad Recipe and make it suitable for any occasion. Whether it’s a casual lunch or a festive dinner, these ideas will impress your family and friends!

Tips for Perfecting Your Pesto Chicken Salad Recipe

Pesto Chicken Salad Recipe truly shine, consider these helpful tips. They will ensure that your salad is not only delicious but also visually appealing and satisfying.

First, always use fresh ingredients. Fresh vegetables like cherry tomatoes and cucumbers not only taste better but also add vibrant colors to your salad. When selecting your ingredients, look for firm and bright produce. This will enhance both the flavor and presentation of your dish.

Next, don’t rush the chilling process. Allowing your salad to chill for at least 30 minutes helps the flavors meld together beautifully. If you can, let it sit in the fridge for a few hours or even overnight. This extra time allows the ingredients to absorb the flavors of the pesto and seasonings, making each bite more delicious.

Pesto Chicken Salad Recipe.

Consider adding a variety of textures. For example, if you like a bit of crunch, include toasted pine nuts or chopped nuts. These elements can elevate your salad and make it more enjoyable to eat. Plus, they add healthy fats and protein!

Lastly, don’t be afraid to experiment! The beauty of this recipe lies in its versatility. Try different herbs, spices, or even proteins. You can swap out chicken for turkey or add beans for a vegetarian option. The possibilities are endless, and experimenting can lead to delightful new flavors.

Pesto Chicken Salad Recipe that’s not only tasty but also a hit at any gathering. Enjoy the process and have fun with your cooking!

Breakdown of Time for Pesto Chicken Salad Recipe

Pesto Chicken Salad Recipe can help you plan your meal better. Here’s a simple breakdown of the time required for each step, so you can enjoy this delicious dish without any stress.

Prep Time

The prep time for this salad is quite short. You’ll need about 15 to 20 minutes to gather your ingredients and prepare them. This includes shredding or dicing the cooked chicken, chopping the vegetables, and mixing the dressing components. If you’re using leftover chicken, this step will be even quicker!

Cooking Time

Since this recipe uses cooked chicken, there’s no additional cooking time required. However, if you need to cook fresh chicken, you should allow about 20 to 30 minutes for that. Boiling or grilling the chicken until it reaches the safe internal temperature of 165°F (75°C) is essential for food safety.

Total Time

Pesto Chicken Salad Recipe. This includes the prep time and any cooking time if you’re starting with raw chicken. Plus, don’t forget to factor in the chilling time of at least 30 minutes. This step is crucial for allowing the flavors to meld together beautifully, making your salad even more delicious!

Pesto Chicken Salad Recipe will be ready to impress!

Nutritional Information for Pesto Chicken Salad Recipe

Pesto Chicken Salad Recipe not only tastes great but also offers a variety of nutrients. Here’s a closer look at the nutritional information per serving:

Calories

Each serving of this delicious salad contains approximately 320 calories. This makes it a satisfying option for lunch or dinner without being overly heavy. The combination of chicken, vegetables, and creamy ingredients provides a well-rounded meal that keeps you energized throughout the day.

Protein

Pesto Chicken Salad Recipe is its high protein content. Each serving delivers about 30 grams of protein. This is primarily due to the chicken, which is an excellent source of lean protein. Protein is vital for muscle repair and growth, making this salad a great choice for active individuals.

Sodium

Pesto Chicken Salad Recipe while keeping your health goals in mind.

Overall, this salad is not only delicious but also packed with nutrients that support a healthy lifestyle. Enjoying it as part of a balanced diet can help you feel your best!

FAQs about Pesto Chicken Salad Recipe

Can I use store-bought pesto for this recipe?

Pesto Chicken Salad Recipe. Just make sure to choose a high-quality pesto for the best flavor. If you prefer, you can also mix in some fresh herbs to give it a personal touch!

How long can I store the pesto chicken salad?

Pesto Chicken Salad Recipe in an airtight container in the refrigerator for up to 3 days. However, for the best taste and texture, it’s recommended to enjoy it within the first 1 to 2 days. The longer it sits, the more the ingredients may lose their freshness. If you notice any changes in smell or appearance, it’s best to discard it.

What can I serve with pesto chicken salad?

This salad pairs wonderfully with various sides! You can serve it with whole grain crackers, fresh bread, or a light soup. For a heartier meal, consider serving it alongside quinoa or brown rice. You can also enjoy it on a bed of greens or in a wrap for a delicious lunch option. The possibilities are endless!

Is this recipe suitable for meal prep?

Pesto Chicken Salad Recipe is perfect for meal prep! It stores well in the refrigerator and can be made in advance for busy days. Just prepare the salad, portion it into containers, and you’ll have a quick and nutritious meal ready to go. Just remember to keep the salad chilled until you’re ready to eat!

Conclusion on Pesto Chicken Salad Recipe

Pesto Chicken Salad Recipe is a delightful dish that combines flavor, nutrition, and versatility. With its creamy texture and vibrant ingredients, this salad is perfect for any occasion, whether it’s a casual lunch or a festive dinner. The rich basil pesto elevates the taste, while the fresh vegetables add a satisfying crunch.

Not only is this recipe easy to prepare, but it also allows for plenty of customization. You can mix in your favorite ingredients or adjust the seasonings to suit your taste. Plus, it’s a fantastic way to use leftover chicken, making it a practical choice for busy weeknights.

Pesto Chicken Salad Recipe, remember the tips and variations shared throughout this article. They will help you create a dish that’s not only delicious but also visually appealing. Whether you serve it on a bed of greens, in a wrap, or as a side dish, this salad is sure to impress your family and friends.

Pesto Chicken Salad Recipe is bound to become a favorite in your meal rotation. Enjoy every bite!

Herb-Infused Slow Cooker Turkey Breast is a must-try!

Introduction to Herb-Infused Slow Cooker Turkey Breast

Herb-Infused Slow Cooker Turkey Breast is a fantastic dish that combines tender turkey with a medley of aromatic herbs. This recipe is perfect for family gatherings, holiday feasts, or even a cozy weeknight dinner. With minimal effort, you can create a mouthwatering meal that will impress everyone at the table.

Using a slow cooker allows the turkey to cook slowly, ensuring it remains juicy and flavorful. The blend of herbs, including thyme, rosemary, and sage, infuses the meat with a delightful taste that will have your taste buds dancing. Plus, the addition of lemon juice adds a refreshing zing that brightens the dish.

Not only is this recipe simple, but it also offers a healthy option for those looking to enjoy lean protein. With just a few ingredients, you can whip up a satisfying meal that is both nutritious and delicious. So, roll up your sleeves and get ready to savor the delightful flavors of herb-infused turkey!

In the following sections, we will guide you through the ingredients, preparation steps, and tips to make your turkey breast truly shine. Let’s dive into the world of slow-cooked goodness!

Ingredients for Herb-Infused Slow Cooker Turkey Breast

Herb-Infused Slow Cooker Turkey Breast, you will need a selection of fresh and dried ingredients that work together to enhance the flavor of the turkey. Here’s what you’ll need:

  • 2 to 3 pounds boneless turkey breast
  • 1 tablespoon extra virgin olive oil
  • 1 teaspoon sea salt
  • 1 teaspoon freshly ground black pepper
  • 1 teaspoon garlic granules
  • 1 teaspoon onion flakes
  • 1 teaspoon dried thyme leaves
  • 1 teaspoon dried rosemary needles
  • 1 teaspoon dried sage leaves
  • 1 cup low-sodium chicken stock
  • 1 tablespoon fresh lemon juice
  • Chopped fresh parsley, for garnish (optional)

These ingredients come together to create a flavorful and aromatic dish. The boneless turkey breast serves as a lean protein base, while the olive oil helps to keep it moist during cooking. The combination of sea salt, black pepper, garlic granules, and onion flakes adds depth to the flavor profile. Meanwhile, the dried herbs—thyme, rosemary, and sage—bring a wonderful earthiness that complements the turkey beautifully.

Don’t forget the chicken stock and lemon juice! The stock provides a savory base for the turkey to cook in, while the lemon juice adds a bright, zesty note that balances the richness of the meat. Finally, a sprinkle of fresh parsley not only enhances the presentation but also adds a pop of color and freshness to the dish.

Gather these ingredients, and you’re ready to embark on a culinary adventure that will result in a delightful meal for you and your loved ones!

Preparation of Herb-Infused Slow Cooker Turkey Breast

Herb-Infused Slow Cooker Turkey Breast. This section will guide you through each step, ensuring your turkey turns out perfectly tender and flavorful. Let’s get started!

Step 1: Preparing the Turkey Breast

First, rinse the boneless turkey breast under cold running water. This step is important to remove any residue. After rinsing, gently pat the turkey dry with a clean kitchen towel. Drying the meat helps the seasoning stick better, enhancing the flavor.

Step 2: Creating the Herb Infusion

In a mixing bowl, combine the sea salt, black pepper, garlic granules, onion flakes, thyme, rosemary, and sage. Mix these ingredients well until they are evenly blended. This herb mixture is the key to infusing your turkey with rich flavors. The combination of herbs will create a delightful aroma as it cooks.

Step 3: Combining Ingredients in the Slow Cooker

Next, drizzle the extra virgin olive oil over the turkey breast. Make sure to coat it evenly. Then, take the herb mixture and generously sprinkle it all over the turkey. Don’t be shy! Massage the herbs into the meat to ensure every bite is packed with flavor.

Now, transfer the seasoned turkey breast into the slow cooker. Carefully pour the low-sodium chicken stock and fresh lemon juice around the turkey. This liquid will keep the turkey moist and add even more flavor as it cooks.

Step 4: Cooking the Turkey Breast

Once everything is in the slow cooker, secure the lid tightly. Set your slow cooker to cook on low heat for 6 to 8 hours or on high heat for 3 to 4 hours. The turkey is ready when it reaches an internal temperature of 165°F. This slow cooking method allows the flavors to meld beautifully, resulting in a tender and juicy turkey.

After the cooking time is complete, carefully remove the turkey from the slow cooker. Let it rest for about 10 minutes before slicing. This resting period helps the juices redistribute, making each slice even more delicious!

Variation of Herb-Infused Slow Cooker Turkey Breast

Herb-Infused Slow Cooker Turkey Breast recipe is delightful on its own, there are many ways to customize it. You can experiment with different herbs and spices or even try alternative cooking methods. Let’s explore some exciting variations!

Alternative Herbs and Spices

Feel free to get creative with the herbs and spices you use. Here are some alternatives that can add unique flavors to your turkey:

  • Basil: This herb adds a sweet and slightly peppery flavor, perfect for a Mediterranean twist.
  • Oregano: Known for its robust taste, oregano pairs well with turkey and gives it an Italian flair.
  • Paprika: For a smoky flavor, sprinkle some paprika over the turkey. It adds a beautiful color too!
  • Cumin: This spice brings a warm, earthy flavor that can give your turkey a hint of the Southwest.
  • Herbes de Provence: This blend of herbs, including lavender, adds a fragrant touch that elevates the dish.

Mix and match these herbs and spices to create your own signature flavor profile. The beauty of this recipe is its versatility, allowing you to tailor it to your taste preferences.

Different Cooking Methods

While the slow cooker is a fantastic way to prepare turkey, you can also try other cooking methods for a different experience:

  • Oven Roasting: Preheat your oven to 350°F. After seasoning the turkey, place it in a roasting pan and cover it with foil. Roast for about 1.5 to 2 hours, basting occasionally, until it reaches the desired temperature.
  • Grilling: For a smoky flavor, grill the turkey breast. Marinate it with the herb mixture and cook on medium heat for about 20-30 minutes, turning occasionally until fully cooked.
  • Instant Pot: If you’re short on time, use an Instant Pot. Sear the turkey first, then add the stock and lemon juice. Cook on high pressure for about 25 minutes, followed by a natural release.

Each method brings out different flavors and textures in the turkey. Choose the one that best fits your schedule and taste preferences!

Cooking Note for Herb-Infused Slow Cooker Turkey Breast

Herb-Infused Slow Cooker Turkey Breast, there are a few important cooking notes to keep in mind. These tips will help ensure that your turkey turns out perfectly every time, making your meal a delightful experience.

First, always check the size of your turkey breast. If you’re using a larger piece, you may need to adjust the cooking time. A 3-pound turkey breast may require a bit more time than a 2-pound one. Always use a meat thermometer to check for doneness. The turkey should reach an internal temperature of 165°F to ensure it is safe to eat.

Next, consider the quality of your ingredients. Fresh herbs can elevate the flavor of your dish significantly. If you have access to fresh thyme, rosemary, or sage, feel free to use them instead of dried herbs. Just remember to use about three times the amount of fresh herbs compared to dried ones.

Another tip is to avoid lifting the lid of the slow cooker during cooking. Each time you open the lid, heat escapes, which can extend the cooking time. Trust the process and let the slow cooker do its magic!

Lastly, if you want to add a bit of sweetness, consider including a tablespoon of honey or maple syrup to the chicken stock. This addition can create a lovely balance with the savory herbs and enhance the overall flavor profile.

Herb-Infused Slow Cooker Turkey Breast that your family and friends will love!

Serving Suggestions for Herb-Infused Slow Cooker Turkey Breast

Herb-Infused Slow Cooker Turkey Breast is ready, it’s time to think about how to serve it. The right side dishes and presentation can elevate your meal, making it even more enjoyable. Here are some ideas to help you create a delightful dining experience!

Side Dishes to Pair

Choosing the right side dishes can complement the flavors of your turkey beautifully. Here are some tasty options:

  • Garlic Mashed Potatoes: Creamy mashed potatoes with a hint of garlic make a perfect pairing. They soak up the savory broth from the turkey, creating a comforting dish.
  • Roasted Vegetables: A mix of seasonal vegetables, such as carrots, Brussels sprouts, and sweet potatoes, roasted until tender adds color and nutrition to your plate.
  • Green Beans Almondine: Sautéed green beans with toasted almonds provide a crunchy texture that contrasts nicely with the tender turkey.
  • Quinoa Salad: A light quinoa salad with fresh herbs, cherry tomatoes, and a lemon vinaigrette offers a refreshing side that balances the richness of the turkey.
  • Cranberry Sauce: A tangy cranberry sauce adds a sweet and tart flavor that pairs wonderfully with turkey, enhancing the overall taste.

Feel free to mix and match these sides based on your preferences and the season. Each option brings its own unique flavor, making your meal more exciting!

Presentation Tips

Herb-Infused Slow Cooker Turkey Breast:

  • Slice Neatly: Use a sharp knife to slice the turkey breast into even pieces. This not only looks better but also ensures that each slice is tender and juicy.
  • Use a Platter: Arrange the turkey slices on a large serving platter. This creates a beautiful centerpiece for your table.
  • Drizzle with Broth: Pour some of the savory broth from the slow cooker over the turkey slices. This adds moisture and enhances the flavor while making the dish look more appetizing.
  • Garnish with Fresh Herbs: Sprinkle chopped fresh parsley or thyme over the turkey for a pop of color. This simple touch makes the dish look fresh and inviting.
  • Serve with Colorful Sides: Arrange your side dishes around the turkey on the platter. The variety of colors will make your meal visually appealing and inviting.

Herb-Infused Slow Cooker Turkey Breast. Enjoy your meal with family and friends!

Tips for Perfect Herb-Infused Slow Cooker Turkey Breast

Herb-Infused Slow Cooker Turkey Breast, consider these helpful tips. They will guide you in creating a dish that is not only flavorful but also perfectly cooked. Let’s dive into some expert advice!

First, always use a meat thermometer. This tool is essential for ensuring your turkey reaches the safe internal temperature of 165°F. It helps prevent overcooking, which can lead to dry meat. Insert the thermometer into the thickest part of the turkey breast for an accurate reading.

Next, marinate the turkey overnight if you have time. This allows the herbs and spices to penetrate the meat deeply, enhancing the flavor. Simply coat the turkey with the herb mixture and olive oil, then cover and refrigerate it. The longer it marinates, the more flavorful it will be!

Another tip is to add vegetables to the slow cooker. Carrots, onions, and celery not only add flavor but also create a delicious base for the turkey. They absorb the savory broth and herbs, making them a tasty side dish.

Consider using a slow cooker liner for easy cleanup. These disposable liners make it simple to remove the turkey and clean the pot afterward. It saves you time and effort, allowing you to enjoy your meal without worrying about the mess.

Lastly, let the turkey rest after cooking. This step is crucial for juicy meat. Allowing it to rest for about 10 minutes before slicing helps the juices redistribute throughout the turkey. This way, every bite will be tender and moist.

Herb-Infused Slow Cooker Turkey Breast that will impress your family and friends. Happy cooking!

Breakdown of Time for Herb-Infused Slow Cooker Turkey Breast

Herb-Infused Slow Cooker Turkey Breast is essential for a smooth cooking experience. Here’s a detailed breakdown of the time you’ll need for preparation and cooking.

Prep Time

The prep time for this delicious turkey dish is quite minimal. You can expect to spend about 15 to 20 minutes getting everything ready. This includes rinsing and drying the turkey breast, mixing the herbs and spices, and coating the turkey with olive oil and the herb mixture. It’s a quick process that allows you to get the turkey into the slow cooker without much hassle.

Cooking Time

Once your turkey is prepped and in the slow cooker, the cooking time will vary based on your settings. If you choose to cook on low heat, it will take approximately 6 to 8 hours. On the other hand, if you opt for high heat, the cooking time will be around 3 to 4 hours. Regardless of the method, always ensure the turkey reaches an internal temperature of 165°F for safe consumption.

Total Time

In total, you should plan for about 6 hours and 15 minutes to 8 hours and 20 minutes from start to finish. This includes both the prep time and the cooking time. The slow cooker does all the hard work, allowing you to relax while your turkey cooks to perfection. With this time breakdown, you can easily fit this recipe into your day, making it a convenient option for any meal!

Nutritional Information for Herb-Infused Slow Cooker Turkey Breast

Herb-Infused Slow Cooker Turkey Breast is essential for maintaining a balanced diet. This dish is not only delicious but also packed with nutrients. Here’s a breakdown of the key nutritional components you can expect from a serving of this turkey dish.

Calories

Herb-Infused Slow Cooker Turkey Breast contains approximately 200 to 250 calories. This makes it a great option for those looking to enjoy a hearty meal without consuming too many calories. The lean protein from the turkey breast helps keep you full and satisfied, making it an excellent choice for lunch or dinner.

Protein

Turkey is known for being a fantastic source of protein. In each serving, you can expect to find around 30 to 35 grams of protein. This high protein content is beneficial for muscle repair and growth, making it a great option for active individuals or anyone looking to maintain a healthy lifestyle.

Sodium

The sodium content in this recipe is relatively low, especially since we use low-sodium chicken stock. Each serving contains about 300 to 400 milligrams of sodium. This makes it a heart-healthy choice, especially when compared to many processed foods. However, if you are watching your sodium intake, you can further reduce it by using homemade chicken stock or adjusting the amount of added salt.

Herb-Infused Slow Cooker Turkey Breast is a nutritious and satisfying meal option. With its balanced calories, high protein, and moderate sodium levels, it fits well into a healthy eating plan. Enjoy this delightful dish knowing it supports your health and wellness!

FAQs about Herb-Infused Slow Cooker Turkey Breast

Can I use frozen turkey breast for this recipe?

Herb-Infused Slow Cooker Turkey Breast recipe! However, it’s important to thaw the turkey completely before cooking. Cooking frozen turkey directly in the slow cooker can lead to uneven cooking and may not reach the safe internal temperature of 165°F. To thaw, place the turkey in the refrigerator for 24 hours or use the cold water method, changing the water every 30 minutes until thawed. Once thawed, follow the recipe as usual for delicious results!

How do I store leftover herb-infused turkey breast?

Herb-Infused Slow Cooker Turkey Breast is easy! First, let the turkey cool to room temperature. Then, slice it into portions and place it in an airtight container. You can store it in the refrigerator for up to 3 to 4 days. If you want to keep it longer, consider freezing the turkey. Wrap it tightly in plastic wrap or aluminum foil, then place it in a freezer-safe bag. Frozen turkey can last for up to 3 months. When ready to eat, thaw it in the refrigerator overnight and reheat gently in the oven or microwave.

What are the best herbs to use for infusion?

The best herbs for infusing your turkey breast depend on your flavor preferences. Classic choices include thyme, rosemary, and sage, which pair beautifully with turkey. You can also experiment with basil, oregano, or even a blend like Herbes de Provence for a unique twist. Fresh herbs can enhance the flavor even more, so feel free to use them if available. The key is to choose herbs that you enjoy, as they will greatly influence the taste of your dish!

Can I make this recipe ahead of time?

Herb-Infused Slow Cooker Turkey Breast is perfect for making ahead of time. You can prepare the turkey and season it the night before, then store it in the refrigerator. In the morning, simply place it in the slow cooker and let it cook throughout the day. This makes it a convenient option for busy schedules or special occasions. Additionally, leftovers can be stored and enjoyed later, making it a versatile dish for meal prep!

Conclusion on Herb-Infused Slow Cooker Turkey Breast

Herb-Infused Slow Cooker Turkey Breast is a delightful dish that combines simplicity with rich flavors. This recipe is perfect for anyone looking to create a satisfying meal with minimal effort. The slow cooking method ensures that the turkey remains juicy and tender, while the blend of herbs infuses it with a wonderful aroma and taste.

Whether you’re preparing a family dinner, hosting a holiday gathering, or simply enjoying a cozy night in, this turkey breast is sure to impress. The versatility of the recipe allows you to customize it with your favorite herbs and spices, making it a dish that can be enjoyed time and time again.

Moreover, the nutritional benefits of turkey make it a healthy choice for any meal. With its high protein content and low sodium levels, you can feel good about serving this dish to your loved ones. Plus, the ease of preparation means you can spend more time enjoying your meal and less time in the kitchen.

Herb-Infused Slow Cooker Turkey Breast. We hope this recipe becomes a staple in your home, bringing joy and satisfaction to your dining table. Happy cooking!

Turkey Cheddar and Bacon Sliders on Hawaiian Rolls delight!

Introduction to Turkey Cheddar Bacon Sliders on Hawaiian Rolls

Are you ready to elevate your snack game? Turkey Cheddar Bacon Sliders on Hawaiian Rolls are the perfect blend of savory and sweet. These delightful sliders are not just a treat for your taste buds; they are also easy to make and perfect for any occasion. Whether you’re hosting a party, enjoying a family dinner, or just craving a delicious bite, these sliders will surely impress.

Imagine biting into a warm, soft Hawaiian roll filled with juicy turkey patties, crispy bacon, and melted cheddar cheese. The combination of flavors is simply irresistible! Plus, the zesty mayonnaise spread adds a delightful twist that takes these sliders to the next level. With just a few simple ingredients, you can create a dish that feels gourmet yet is incredibly approachable.

In this article, we will guide you through the process of making these scrumptious Turkey Cheddar Bacon Sliders. From gathering your ingredients to serving suggestions, we’ve got you covered. So, roll up your sleeves and get ready to whip up a batch of these mouthwatering sliders that everyone will love!

Ingredients for Turkey Cheddar Bacon Sliders on Hawaiian Rolls

To create the delicious Turkey Cheddar Bacon Sliders on Hawaiian Rolls, you’ll need a few key ingredients. Each component plays a vital role in building the flavor and texture of these sliders. Here’s what you’ll need:

  • 1 pound ground turkey: This is the main protein for your sliders. Ground turkey is lean and flavorful, making it a great choice.
  • 8 slices sharp cheddar cheese: The sharpness of the cheddar adds a rich flavor that pairs perfectly with the turkey.
  • 8 strips crispy bacon, crumbled: Bacon brings a delightful crunch and smoky taste to the sliders.
  • 12 sweet Hawaiian rolls: These soft, sweet rolls are the perfect vessel for your sliders, adding a touch of sweetness.
  • 1/4 cup creamy mayonnaise: This will serve as a base for your zesty spread.
  • 1 tablespoon whole grain mustard: Adds a tangy kick to the mayonnaise mixture.
  • 1 tablespoon maple syrup: A hint of sweetness that balances the savory flavors.
  • 1 teaspoon garlic powder: Enhances the overall flavor of the turkey patties.
  • 1 teaspoon onion powder: Adds depth and sweetness to the turkey mixture.
  • Salt and freshly ground black pepper to taste: Essential for seasoning your patties.
  • 1 tablespoon melted unsalted butter: This will be brushed on top of the rolls for a golden finish.
  • 1 teaspoon sesame seeds (optional): For a little extra crunch and visual appeal.

Gather these ingredients, and you’ll be well on your way to making a batch of Turkey Cheddar Bacon Sliders that everyone will rave about. The combination of flavors and textures will make these sliders a hit at any gathering!

Step-by-Step Preparation of Turkey Cheddar Bacon Sliders on Hawaiian Rolls

Now that you have all your ingredients ready, it’s time to dive into the step-by-step preparation of your Turkey Cheddar Bacon Sliders on Hawaiian Rolls. This process is simple and fun, making it a great activity for the whole family. Let’s get started!

Step 1: Preparing the Ingredients

First things first, let’s prepare our ingredients. Start by measuring out the ground turkey. Place it in a large mixing bowl. Next, add the garlic powder, onion powder, salt, and freshly ground black pepper. Use your hands or a spoon to mix everything together until well combined. This step is crucial as it ensures that every bite of your turkey patties is packed with flavor.

Once your turkey mixture is ready, shape it into 12 small patties. Make sure they are evenly sized for consistent cooking. You can use your hands or a burger press for this. Set the patties aside while you prepare the other components.

Step 2: Assembling the Sliders

Now it’s time to assemble your sliders! Start by carefully slicing the sweet Hawaiian rolls in half. Keep the top and bottom halves together to make assembly easier. In a separate bowl, whisk together the creamy mayonnaise, whole grain mustard, and maple syrup. This zesty spread will add a delicious flavor to your sliders.

Spread a generous amount of the mayonnaise mixture over the bottom half of the rolls. This will not only add flavor but also help keep the rolls moist. Next, layer the cooked turkey patties on top of the spread. Follow this with the crumbled bacon and slices of sharp cheddar cheese. Finally, place the top half of the rolls back on, creating a complete slider.

Step 3: Cooking the Sliders

With your sliders assembled, it’s time to cook them! Heat a skillet over medium heat. Once hot, add the turkey patties to the skillet. Cook them for about 4-5 minutes on each side. Make sure they reach an internal temperature of 165°F to ensure they are fully cooked. The patties should be golden brown and juicy.

While the patties are cooking, you can prepare your oven for baking. Preheat it to 350°F if you haven’t done so already. This will ensure that your sliders bake evenly and come out perfectly golden.

Step 4: Melting the Cheese

After cooking the patties, it’s time to melt the cheese and finish off your sliders. Preheat your oven to 350°F if you haven’t done so yet. Brush the top of the assembled sliders with melted unsalted butter for a beautiful golden finish. If you like, sprinkle sesame seeds on top for added crunch and visual appeal.

Cover the assembled sliders with aluminum foil and place them in the oven. Bake for 15 minutes, then remove the foil and continue baking for an additional 5 minutes. This will allow the cheese to melt and become bubbly, while the tops of the rolls turn lightly golden. Once done, take them out of the oven and let them cool for a few minutes before slicing into individual sliders.

Now, you’re ready to enjoy your delicious Turkey Cheddar Bacon Sliders on Hawaiian Rolls! They are perfect for sharing or enjoying all by yourself.

Variation of Turkey Cheddar Bacon Sliders on Hawaiian Rolls

While the classic Turkey Cheddar Bacon Sliders on Hawaiian Rolls are undeniably delicious, there are many ways to switch things up! Whether you want to cater to dietary preferences or simply try something new, these variations will keep your sliders exciting and fresh. Let’s explore some alternative ingredients and different cooking methods that can enhance your slider experience.

Alternative Ingredients

Changing a few ingredients can create a whole new flavor profile for your sliders. Here are some ideas:

  • Ground Chicken or Beef: If you prefer a different protein, ground chicken or beef can be used instead of turkey. Each option brings its unique taste and texture.
  • Different Cheeses: Swap out sharp cheddar for other cheeses like pepper jack for a spicy kick or mozzarella for a milder flavor.
  • Vegetarian Option: For a meatless version, use black bean patties or portobello mushrooms. They provide a hearty texture and are packed with flavor.
  • Spicy Additions: Add jalapeños or hot sauce to the turkey mixture for a spicy twist. This will give your sliders an extra zing!
  • Herbs and Spices: Experiment with fresh herbs like parsley or cilantro, or spices like cumin and paprika to enhance the flavor of your patties.

These alternative ingredients can help you customize your sliders to suit your taste or dietary needs, making them even more enjoyable!

Different Cooking Methods

Besides the traditional skillet and oven method, there are other ways to cook your Turkey Cheddar Bacon Sliders. Here are a few options:

  • Grilling: For a smoky flavor, grill your turkey patties on an outdoor grill or a stovetop grill pan. This method adds a delicious char and enhances the overall taste.
  • Air Frying: If you have an air fryer, this is a great option! Cook the patties at 375°F for about 10-12 minutes, flipping halfway through. This method keeps them juicy while giving a crispy exterior.
  • Slow Cooking: For a hands-off approach, you can use a slow cooker. Place the patties in the slow cooker with some broth and cook on low for 4-6 hours. This method makes the turkey incredibly tender.
  • Broiling: After assembling the sliders, place them under the broiler for a few minutes. This will melt the cheese quickly and give the tops a nice golden color.

Trying out these different cooking methods can add variety to your meal prep and make your Turkey Cheddar Bacon Sliders even more delightful!

Cooking Note for Turkey Cheddar Bacon Sliders on Hawaiian Rolls

When preparing Turkey Cheddar Bacon Sliders on Hawaiian Rolls, there are a few important cooking notes to keep in mind. These tips will help ensure that your sliders turn out perfectly every time, making them a hit at any gathering.

First, always check the internal temperature of your turkey patties. Ground turkey should reach an internal temperature of 165°F to be safe for consumption. Using a meat thermometer can help you achieve this easily. This step is crucial for both safety and flavor, as undercooked turkey can lead to dryness.

Next, consider the size of your patties. Keeping them uniform in size will help them cook evenly. If some patties are larger than others, they may take longer to cook, leading to inconsistencies in texture and doneness. Aim for patties that are about the same thickness for the best results.

Additionally, don’t skip the step of brushing melted butter on top of the rolls before baking. This not only adds flavor but also helps achieve a beautiful golden-brown color. If you prefer a little extra crunch, the optional sesame seeds can add a delightful texture and visual appeal.

Lastly, let the sliders cool for a few minutes after baking. This allows the cheese to set slightly, making it easier to slice and serve. If you cut them too soon, the cheese may ooze out, making a mess. Patience is key here!

By following these cooking notes, you’ll create Turkey Cheddar Bacon Sliders that are not only delicious but also visually appealing. Enjoy the process and the delightful results!

Serving Suggestions for Turkey Cheddar Bacon Sliders on Hawaiian Rolls

Once your Turkey Cheddar Bacon Sliders on Hawaiian Rolls are ready, it’s time to think about how to serve them! These sliders are versatile and can be paired with a variety of sides and drinks to create a complete meal. Here are some delightful serving suggestions that will complement your sliders perfectly:

  • Fresh Salad: A crisp garden salad or a refreshing coleslaw can balance the richness of the sliders. The crunch and freshness will enhance the overall meal.
  • Sweet Potato Fries: Serve your sliders with a side of sweet potato fries. Their natural sweetness pairs wonderfully with the savory flavors of the sliders.
  • Potato Chips: For a quick and easy option, offer a bowl of crunchy potato chips. They add a satisfying crunch and are always a crowd-pleaser.
  • Pickles: A side of dill pickles can add a tangy contrast to the sliders. Their acidity cuts through the richness, making each bite more enjoyable.
  • Fruit Platter: A colorful fruit platter with seasonal fruits can provide a sweet and refreshing contrast to the savory sliders.

For drinks, consider serving:

  • Iced Tea: A glass of iced tea, sweetened or unsweetened, is a refreshing choice that pairs well with the sliders.
  • Lemonade: Homemade lemonade adds a zesty and sweet touch that complements the flavors of the sliders.
  • Craft Beer: If you enjoy beer, a light craft beer can enhance the savory experience of the sliders.

These serving suggestions will not only elevate your Turkey Cheddar Bacon Sliders on Hawaiian Rolls but also create a delightful dining experience for you and your guests. Enjoy the delicious combination of flavors and textures!

Tips for Perfect Turkey Cheddar Bacon Sliders on Hawaiian Rolls

Creating the perfect Turkey Cheddar Bacon Sliders on Hawaiian Rolls is all about attention to detail. With a few simple tips, you can elevate your sliders from good to great! Here are some helpful suggestions to ensure your sliders are a hit every time:

  • Use Fresh Ingredients: Fresh ingredients make a big difference in flavor. Choose high-quality ground turkey, fresh rolls, and sharp cheddar cheese for the best results.
  • Don’t Overmix the Turkey: When mixing the ground turkey with spices, be gentle. Overmixing can lead to tough patties. Just mix until combined for a tender texture.
  • Chill the Patties: After shaping the patties, consider chilling them in the fridge for about 30 minutes. This helps them hold their shape while cooking.
  • Experiment with Seasonings: Feel free to add your favorite herbs and spices to the turkey mixture. A little smoked paprika or Italian seasoning can add a unique twist.
  • Toast the Rolls: For an extra layer of flavor, lightly toast the insides of the Hawaiian rolls before assembling the sliders. This adds a nice crunch and prevents sogginess.
  • Serve with Dipping Sauces: Offer a variety of dipping sauces like barbecue sauce, ranch dressing, or spicy aioli. This adds an interactive element to your meal.
  • Garnish Creatively: Consider garnishing your sliders with fresh herbs like parsley or cilantro for a pop of color and freshness.

By following these tips, you’ll create Turkey Cheddar Bacon Sliders that are not only delicious but also visually appealing. Enjoy the process of making these sliders, and don’t hesitate to get creative with your ingredients and presentation!

Breakdown of Time for Turkey Cheddar Bacon Sliders on Hawaiian Rolls

Understanding the time needed to prepare Turkey Cheddar Bacon Sliders on Hawaiian Rolls is essential for planning your meal. Here’s a simple breakdown of the time required for each step, so you can manage your cooking efficiently and enjoy the process!

Prep Time

The prep time for these sliders is approximately 20 minutes. This includes gathering your ingredients, mixing the turkey with spices, and shaping the patties. Taking your time during this step ensures that everything is well-prepared and organized, making the cooking process smoother.

Cooking Time

Cooking the sliders will take about 25-30 minutes. This includes:

  • Cooking the turkey patties in a skillet for about 8-10 minutes.
  • Baking the assembled sliders in the oven for 20 minutes, which allows the cheese to melt and the rolls to become golden.

Make sure to monitor the patties closely to ensure they reach the safe internal temperature of 165°F.

Total Time

In total, you can expect to spend around 45-50 minutes from start to finish. This includes both prep and cooking time. With this timeline, you can easily plan your meal and have delicious Turkey Cheddar Bacon Sliders ready to serve in no time!

Nutritional Information for Turkey Cheddar Bacon Sliders on Hawaiian Rolls

When it comes to enjoying Turkey Cheddar Bacon Sliders on Hawaiian Rolls, knowing the nutritional information can help you make informed choices. These sliders are not only delicious but also provide a good balance of nutrients. Here’s a breakdown of the key nutritional components:

Calories

Each slider contains approximately 300 calories. This makes them a satisfying option for a meal or snack without being overly heavy. The combination of turkey, cheese, and bacon contributes to the calorie count, while the sweet Hawaiian rolls add a delightful touch of sweetness.

Protein

Protein is an essential nutrient, and these sliders deliver! Each slider provides about 20 grams of protein. The ground turkey and cheddar cheese are excellent sources of protein, helping to keep you full and satisfied. This makes them a great choice for a post-workout meal or a hearty lunch.

Sodium

While enjoying these sliders, it’s important to be mindful of sodium intake. Each slider contains around 600 milligrams of sodium. This is primarily due to the bacon and the seasoning used in the turkey patties. If you’re watching your sodium levels, consider using low-sodium bacon or reducing the amount of added salt in the recipe.

Overall, Turkey Cheddar Bacon Sliders on Hawaiian Rolls can be a delicious and nutritious addition to your meal rotation. With a good balance of calories, protein, and flavor, they are sure to please everyone at the table!

FAQs about Turkey Cheddar Bacon Sliders on Hawaiian Rolls

Can I make Turkey Cheddar Bacon Sliders on Hawaiian Rolls ahead of time?

Absolutely! You can prepare the turkey patties and the zesty mayonnaise spread a day in advance. Simply store them in the refrigerator until you’re ready to assemble the sliders. When you’re ready to cook, just follow the assembly and cooking steps as usual. This makes it easy to serve delicious sliders without the last-minute rush!

What can I serve with Turkey Cheddar Bacon Sliders on Hawaiian Rolls?

These sliders pair wonderfully with a variety of sides. Consider serving them with fresh salads, sweet potato fries, or crunchy potato chips. You can also add a side of pickles for a tangy contrast. For drinks, iced tea or homemade lemonade complements the flavors perfectly. Feel free to mix and match to create a delightful meal!

How do I store leftover Turkey Cheddar Bacon Sliders on Hawaiian Rolls?

If you have any leftovers, store them in an airtight container in the refrigerator. They will stay fresh for up to 3 days. To reheat, simply place them in the oven at 350°F for about 10-15 minutes, or until heated through. This will help keep the rolls soft and the cheese melty!

Can I use different types of cheese for Turkey Cheddar Bacon Sliders on Hawaiian Rolls?

Yes, you can definitely experiment with different cheeses! While sharp cheddar is a classic choice, you can try pepper jack for a spicy kick, mozzarella for a milder flavor, or even gouda for a rich, smoky taste. Each cheese will bring its unique flavor to the sliders, so feel free to get creative!

Conclusion on Turkey Cheddar Bacon Sliders on Hawaiian Rolls

In conclusion, Turkey Cheddar Bacon Sliders on Hawaiian Rolls are a delightful and versatile dish that can elevate any meal or gathering. With their perfect blend of savory turkey, crispy bacon, and melted cheddar cheese, these sliders are sure to please everyone at the table. The sweet Hawaiian rolls add a unique touch, making each bite a delicious experience.

Whether you’re preparing them for a casual family dinner, a festive party, or simply a cozy night in, these sliders are easy to make and incredibly satisfying. The step-by-step preparation ensures that even novice cooks can whip up a batch with confidence. Plus, the variations and serving suggestions allow you to customize the sliders to suit your taste and occasion.

As you explore the world of Turkey Cheddar Bacon Sliders, remember to have fun with the ingredients and cooking methods. Don’t hesitate to experiment with different flavors and pairings. With a little creativity, you can make these sliders your own!

So, gather your ingredients, roll up your sleeves, and get ready to enjoy the deliciousness of Turkey Cheddar Bacon Sliders on Hawaiian Rolls. They are not just a meal; they are an experience that brings people together. Happy cooking!

Cheesy Turkey Sliders Recipe is a must-try delight!

Introduction to Cheesy Turkey Sliders Recipe

Cheesy Turkey Sliders Recipe is the perfect solution. These savory bites are not only packed with flavor but also offer a healthier alternative to traditional sliders. Made with ground turkey and gooey mozzarella cheese, they are sure to satisfy your cravings.

Whether you’re hosting a party, enjoying a family dinner, or simply craving a tasty treat, these sliders are versatile and fun. They are small enough to be finger food, making them ideal for gatherings. Plus, the zesty sauce adds a delightful kick that elevates the overall taste. With just a few simple ingredients, you can whip up a batch of these cheesy delights in no time!

Cheesy Turkey Sliders Recipe!

Ingredients for Cheesy Turkey Sliders Recipe

Cheesy Turkey Sliders Recipe, you’ll need a handful of simple yet flavorful ingredients. Each component plays a vital role in ensuring your sliders are delicious and satisfying. Here’s what you’ll need:

  • 1 pound ground turkey: This lean meat is the star of the dish, providing a healthy base.
  • 1 teaspoon garlic powder: Adds a savory depth to the turkey mixture.
  • 1 teaspoon onion powder: Enhances the flavor profile with a hint of sweetness.
  • 1 teaspoon smoked paprika: Brings a subtle smokiness that elevates the taste.
  • 1 teaspoon sea salt: Essential for seasoning and enhancing all the flavors.
  • ½ teaspoon freshly ground black pepper: Adds a touch of heat and complexity.
  • ½ cup grated mozzarella cheese: This melty cheese is what makes the sliders cheesy and delicious.
  • 12 mini burger buns: Perfectly sized for sliders, these buns hold everything together.
  • 2 tablespoons Greek yogurt: Provides creaminess and a tangy flavor for the sauce.
  • 2 tablespoons spicy mustard: Adds a zesty kick that complements the turkey.
  • 1 tablespoon soy sauce: Enhances the umami flavor in the sliders.
  • 1 tablespoon avocado oil: Ideal for cooking the patties, giving them a nice sear.
  • 1 tablespoon chopped chives (optional): For garnish, adding a pop of color and freshness.

Cheesy Turkey Sliders that everyone will love. The combination of flavors and textures will surely impress your guests!

Step-by-Step Preparation of Cheesy Turkey Sliders Recipe

Cheesy Turkey Sliders. Follow these simple steps to create delicious sliders that will wow your family and friends!

Step 1: Preparing the Turkey Mixture

Start by grabbing a large mixing bowl. In this bowl, combine the ground turkey with garlic powder, onion powder, smoked paprika, sea salt, and black pepper. Use your hands or a spoon to mix everything together until it’s well blended. This step is crucial because it ensures that every bite is packed with flavor. Once mixed, gently fold in the grated mozzarella cheese. This will give your sliders that cheesy goodness everyone loves!

Step 2: Shaping the Sliders

Next, it’s time to shape your turkey mixture into sliders. Take a small amount of the mixture and roll it into a ball, about the size of a golf ball. Then, flatten each ball into a small patty. Aim for a thickness of about half an inch. This size will help them cook evenly. Repeat this process until you’ve shaped all 12 patties. Make sure they are uniform in size for even cooking!

Step 3: Cooking the Sliders

Now, heat a skillet over medium heat and add the avocado oil. Once the oil is hot, carefully place the patties in the skillet. Cook them for about 5-6 minutes on each side. You want them to be golden brown and fully cooked. To ensure they are safe to eat, check that the internal temperature reaches 165°F. This step is important for both flavor and safety!

Step 4: Assembling the Cheesy Turkey Sliders

After cooking, it’s time to assemble your sliders! Start by slicing the mini burger buns in half. Spread the zesty sauce made from Greek yogurt, spicy mustard, and soy sauce on the bottom halves of the buns. Place a cooked turkey patty on each sauce-covered bun. Finally, top with the other halves of the buns. Arrange them neatly on a baking sheet, ready for a quick bake!

Cheesy Turkey Sliders. The combination of flavors and textures will surely delight everyone at your table!

Variation of Cheesy Turkey Sliders Recipe

Cheesy Turkey Sliders Recipe is delicious on its own, there are many ways to switch things up! You can easily customize the ingredients and cooking methods to suit your taste or dietary needs. Let’s explore some alternative ingredients and different cooking methods that can add a unique twist to your sliders.

Alternative Ingredients for Cheesy Turkey Sliders

Cheesy Turkey Sliders even more exciting. Here are some alternatives you might consider:

  • Ground Chicken: If you prefer a lighter option, ground chicken works well. It has a similar texture and flavor.
  • Cheddar Cheese: Swap mozzarella for sharp cheddar for a bolder cheese flavor.
  • Spices: Try adding cumin or chili powder for a spicy kick. These spices can enhance the flavor profile.
  • Whole Wheat Buns: For a healthier option, use whole wheat mini buns. They add fiber and nutrients.
  • Vegetables: Mix in finely chopped bell peppers or spinach into the turkey mixture for added nutrition and flavor.

Cheesy Turkey Sliders that fits your preferences while still being delicious!

Different Cooking Methods for Cheesy Turkey Sliders

Besides pan-frying, there are several other cooking methods you can use to prepare your sliders. Each method offers a unique taste and texture:

  • Grilling: For a smoky flavor, grill the patties on an outdoor grill or a grill pan. This method adds a nice char and enhances the taste.
  • Baking: Instead of pan-frying, you can bake the patties in the oven. Place them on a baking sheet and bake at 375°F for about 20 minutes.
  • Air Frying: If you have an air fryer, this is a great option! Cook the patties at 375°F for about 10-12 minutes for a crispy exterior.
  • Slow Cooking: For a hands-off approach, you can place the patties in a slow cooker with some sauce. Cook on low for 4-6 hours for tender sliders.

Cheesy Turkey Sliders even more enjoyable!

Cooking Note for Cheesy Turkey Sliders Recipe

Cheesy Turkey Sliders, there are a few important cooking notes to keep in mind. These tips will help ensure that your sliders turn out perfectly every time, making them a hit at any gathering!

First, always check the freshness of your ground turkey. Fresh meat not only tastes better but also ensures food safety. If you can, buy it from a trusted source or butcher. Additionally, remember to let the turkey mixture rest for a few minutes after mixing. This allows the flavors to meld together, enhancing the overall taste of your sliders.

Next, when cooking the patties, avoid overcrowding the skillet. If you place too many patties in at once, they may steam instead of sear. This can lead to a less desirable texture. Instead, cook them in batches if necessary. Also, keep an eye on the heat. If the skillet is too hot, the outside may burn while the inside remains undercooked. A medium heat is usually perfect for achieving that golden-brown crust.

Lastly, always use a meat thermometer to check the internal temperature of the patties. They should reach 165°F to ensure they are safe to eat. This step is crucial for both flavor and safety. Once cooked, let the sliders rest for a few minutes before serving. This allows the juices to redistribute, making each bite juicy and flavorful.

Cheesy Turkey Sliders that are not only delicious but also safe and satisfying. Enjoy the process and the delightful results!

Serving Suggestions for Cheesy Turkey Sliders Recipe

Cheesy Turkey Sliders are ready, it’s time to think about how to serve them! Presentation can elevate your sliders from simple snacks to a delightful feast. Here are some creative serving suggestions that will impress your guests and make your meal even more enjoyable.

  • Platter Presentation: Arrange the sliders on a large serving platter. You can add some fresh greens, like lettuce or arugula, around the sliders for a pop of color. This not only looks appealing but also adds a fresh crunch.
  • Condiment Station: Set up a condiment station with various toppings. Offer options like sliced tomatoes, pickles, jalapeños, and different sauces. This allows guests to customize their sliders to their liking.
  • Side Dishes: Pair your sliders with delicious side dishes. Consider serving them with sweet potato fries, a fresh salad, or crispy vegetable chips. These sides complement the sliders and create a well-rounded meal.
  • Mini Skewers: For a fun twist, you can serve the sliders on mini skewers. This makes them easy to grab and eat, perfect for parties or gatherings. Just slide a toothpick through each slider to hold them together.
  • Garnish: Don’t forget to garnish your sliders! A sprinkle of chopped chives or fresh herbs on top adds a touch of elegance. You can also drizzle a bit of balsamic glaze for an extra flavor boost.

Cheesy Turkey Sliders but also create a fun and interactive dining experience. Your guests will love the opportunity to customize their sliders and enjoy a variety of flavors!

Tips for Perfect Cheesy Turkey Sliders Recipe

Cheesy Turkey Sliders is all about attention to detail. With a few helpful tips, you can ensure that your sliders turn out delicious every time. Here are some expert suggestions to elevate your slider game!

  • Use Fresh Ingredients: Always opt for fresh ground turkey and high-quality cheese. Fresh ingredients enhance the flavor and texture of your sliders, making them more enjoyable.
  • Don’t Overmix: When combining the turkey with spices and cheese, mix just until combined. Overmixing can lead to tough sliders. You want them to be tender and juicy!
  • Chill the Mixture: If time allows, chill the turkey mixture for about 30 minutes before shaping the patties. This helps the flavors meld and makes the mixture easier to handle.
  • Make a Dimple: When shaping the patties, create a small dimple in the center of each one. This helps them cook evenly and prevents them from puffing up during cooking.
  • Experiment with Seasonings: Feel free to get creative with your spices! Adding herbs like parsley or basil can give your sliders a fresh twist. You can also try different types of cheese for varied flavors.
  • Keep an Eye on Cooking Time: Cooking times may vary based on your stove and skillet. Always check the internal temperature to ensure they reach 165°F for safety.
  • Let Them Rest: After cooking, let the sliders rest for a few minutes before serving. This allows the juices to redistribute, making each bite more flavorful and juicy.
  • Serve Immediately: For the best experience, serve your sliders right after baking. They are at their peak flavor and texture when warm and fresh!

Cheesy Turkey Sliders that are not only tasty but also a hit at any gathering. Enjoy the process and the delicious results!

Breakdown of Time for Cheesy Turkey Sliders Recipe

Cheesy Turkey Sliders Recipe can help you plan your cooking efficiently. Here’s a simple breakdown of the time required for preparation and cooking, so you can enjoy these delicious sliders without any stress!

Prep Time

Cheesy Turkey Sliders is approximately 15-20 minutes. This includes gathering your ingredients, mixing the turkey mixture, and shaping the patties. If you choose to chill the mixture for better flavor, add an extra 30 minutes to this time. However, chilling is optional and not necessary for delicious sliders!

Cooking Time

Cooking the sliders takes about 12-15 minutes. This includes 5-6 minutes for each side of the patties in the skillet. If you decide to bake them afterward, add another 10 minutes in the oven. If you opt for grilling or air frying, the cooking time may vary slightly, but it generally stays within this range.

Total Time

Cheesy Turkey Sliders Recipe a quick and easy option for any meal or gathering!

Nutritional Information for Cheesy Turkey Sliders Recipe

Cheesy Turkey Sliders is essential for making informed choices about your meals. These sliders are not only delicious but also provide a good balance of nutrients. Here’s a breakdown of the key nutritional information per slider:

Calories

Cheesy Turkey Slider contains approximately 150 calories. This makes them a satisfying yet light option for a snack or meal. The combination of ground turkey and cheese provides a hearty feel without excessive calories, allowing you to enjoy them guilt-free!

Protein

Cheesy Turkey Sliders a great choice for those looking to maintain a healthy diet.

Sodium

When it comes to sodium, each slider contains around 300 milligrams. While this is a reasonable amount, it’s important to be mindful of your overall sodium intake, especially if you are watching your salt consumption. You can reduce sodium by using low-sodium soy sauce or adjusting the amount of salt in the recipe.

Cheesy Turkey Sliders Recipe provides a balanced mix of calories, protein, and sodium, making them a nutritious option for any occasion. Enjoy these sliders as part of a well-rounded diet!

FAQs about Cheesy Turkey Sliders Recipe

Can I use ground chicken instead of turkey for the sliders?

Cheesy Turkey Sliders. Just keep in mind that ground chicken can be slightly leaner, so you may want to add a bit more cheese or a touch of oil to keep the sliders moist and flavorful.

What cheese works best for Cheesy Turkey Sliders?

Cheesy Turkey Sliders Recipe, you can experiment with other cheeses too! Cheddar cheese adds a sharp flavor, while pepper jack brings a spicy kick. Feel free to mix and match your favorite cheeses to create a unique flavor profile that suits your taste!

How can I make Cheesy Turkey Sliders healthier?

Cheesy Turkey Sliders healthier is easy! Start by using lean ground turkey or chicken. You can also opt for whole wheat buns instead of regular ones for added fiber. Additionally, consider reducing the amount of cheese or using low-fat cheese options. Adding vegetables like spinach or bell peppers to the turkey mixture can boost the nutritional value without sacrificing flavor!

Can I prepare the sliders in advance?

Yes, you can prepare the sliders in advance! You can mix the turkey mixture and shape the patties a day ahead. Just store them in the refrigerator until you’re ready to cook. This not only saves time but also allows the flavors to meld together, enhancing the taste. If you want to freeze them, place the uncooked patties in a single layer on a baking sheet, freeze until solid, then transfer to a freezer bag. They can be cooked straight from frozen; just add a few extra minutes to the cooking time!

Conclusion on Cheesy Turkey Sliders Recipe

Cheesy Turkey Sliders Recipe is a fantastic choice for anyone looking to enjoy a delicious and satisfying meal. These sliders are not only easy to make but also offer a healthier alternative to traditional options. With their savory turkey and gooey cheese, they are sure to please both kids and adults alike.

Throughout this article, we’ve explored various aspects of making these delightful sliders, from the ingredients to the cooking methods. You’ve learned how to prepare, cook, and serve them in a way that will impress your guests. Plus, the variations and tips provided will help you customize the recipe to fit your taste and dietary needs.

Cheesy Turkey Sliders are the perfect solution. They are versatile, flavorful, and can be made in no time. So, gather your ingredients, follow the steps, and get ready to enjoy a plateful of these scrumptious sliders!

Cheesy Turkey Sliders that is uniquely yours. Happy cooking!

Crab Stuffed Shrimp is a must-try seafood delight!

Introduction to Crab Stuffed Shrimp

Crab stuffed shrimp is a dish that brings together the best of both worlds: succulent prawns and rich, flavorful crab meat. This delightful combination creates a meal that is not only satisfying but also visually appealing. Whether you’re hosting a dinner party or enjoying a cozy family meal, crab stuffed shrimp is sure to impress your guests and loved ones alike.

What Makes Crab Stuffed Shrimp a Delightful Dish?

One of the standout features of crab stuffed shrimp is its incredible flavor profile. The sweetness of the prawns pairs perfectly with the savory, tender crab filling. Each bite offers a burst of taste that is both comforting and luxurious. Additionally, the creamy mayonnaise and zesty lemon juice in the filling add a delightful tang that elevates the dish even further.

Moreover, the texture of crab stuffed shrimp is simply irresistible. The crispy panko breadcrumbs provide a satisfying crunch, while the melted mozzarella cheese adds a gooey richness. This combination creates a delightful contrast that keeps you coming back for more.

Not only is crab stuffed shrimp delicious, but it is also a versatile dish. You can easily customize the filling to suit your taste preferences. Whether you prefer a spicier kick or a more herbaceous flavor, the possibilities are endless. Plus, it’s a great way to impress your guests with minimal effort!

In summary, crab stuffed shrimp is a delightful dish that combines flavor, texture, and versatility. It’s perfect for any occasion, making it a must-try recipe for seafood lovers. So, let’s dive into the ingredients and preparation steps to create this mouthwatering dish!

Ingredients for Crab Stuffed Shrimp

To create the perfect crab stuffed shrimp, you’ll need a selection of fresh and flavorful ingredients. Each component plays a vital role in achieving that delightful taste and texture. Here’s what you’ll need:

  • 1 pound large prawns: Make sure they are peeled and deveined for easy stuffing.
  • 8 ounces fresh crab meat: Choose high-quality crab meat for the best flavor. Ensure it is well-drained to avoid excess moisture.
  • 1/2 cup panko breadcrumbs: These breadcrumbs add a wonderful crunch to the dish.
  • 1/4 cup creamy mayonnaise: This ingredient helps bind the filling together while adding creaminess.
  • 1 tablespoon whole grain mustard: It adds a subtle tang and depth of flavor.
  • 1 tablespoon freshly squeezed lemon juice: Fresh lemon juice brightens the dish and enhances the seafood flavor.
  • 1 teaspoon seafood seasoning: This blend of spices complements the seafood beautifully.
  • 1/2 teaspoon onion powder: It adds a mild onion flavor without overpowering the dish.
  • 1/4 teaspoon cayenne pepper: For those who enjoy a little heat, this spice adds a nice kick.
  • 1/4 cup shredded mozzarella cheese: This cheese melts beautifully, adding richness to the filling.
  • 2 tablespoons fresh dill, chopped: Fresh herbs brighten the dish and add a lovely aroma.
  • 1 tablespoon melted butter: Brushing this over the prawns before baking adds richness and flavor.

With these ingredients on hand, you’re well on your way to creating a delicious crab stuffed shrimp dish that will delight your taste buds. Now, let’s move on to the preparation steps to bring this recipe to life!

Preparation of Crab Stuffed Shrimp

Now that you have gathered all the ingredients, it’s time to prepare your crab stuffed shrimp. This process is straightforward and fun! Follow these steps to create a dish that will impress everyone at your table.

Step 1: Preparing the Shrimp

Start by rinsing the large prawns under cold water. This helps remove any residual salt or debris. Next, peel the prawns, leaving the tails intact for a beautiful presentation. After peeling, devein each prawn by making a shallow cut along the back and removing the dark vein. This step is crucial for both taste and texture. Once done, pat the prawns dry with a paper towel. This ensures that the filling adheres well and prevents excess moisture during cooking.

Step 2: Making the Crab Filling

In a large mixing bowl, combine the fresh crab meat, panko breadcrumbs, creamy mayonnaise, whole grain mustard, and freshly squeezed lemon juice. Add the seafood seasoning, onion powder, and cayenne pepper for a flavor boost. Gently fold in the shredded mozzarella cheese and chopped dill. Be careful not to break up the crab meat too much; you want to keep those lovely chunks intact. Mix until everything is well combined, creating a rich and flavorful filling.

Step 3: Stuffing the Shrimp

Now comes the fun part—stuffing the prawns! Take each prepared prawn and carefully slice a small opening along its back. Make sure not to cut all the way through; you want to create a pocket for the filling. Using a spoon, fill each prawn with about a tablespoon of the crab mixture. Pack it in gently but generously, ensuring that each prawn is well-stuffed. This step is key to achieving that delicious burst of flavor in every bite!

Step 4: Cooking the Crab Stuffed Shrimp

Preheat your oven to 375°F (190°C). Line a baking dish with foil for easy cleanup. Arrange the stuffed prawns in the dish, making sure they are not overcrowded. Brush the tops of each prawn with melted butter to enhance the flavor and promote browning. Bake the prawns in the preheated oven for 15-20 minutes. You’ll know they’re ready when the prawns turn a vibrant pink and the filling is bubbly and golden. Once cooked, allow them to cool slightly before serving. This will help the flavors meld together beautifully.

With these steps, you’re well on your way to enjoying a delicious plate of crab stuffed shrimp. The preparation is simple, and the results are sure to impress!

Variation of Crab Stuffed Shrimp

While the classic crab stuffed shrimp recipe is a crowd-pleaser, there are many ways to switch things up! You can experiment with different fillings and cooking methods to create your own unique version. Let’s explore some exciting alternatives.

Alternative Fillings for Crab Stuffed Shrimp

If you want to get creative, consider these alternative fillings for your crab stuffed shrimp:

  • Cheesy Spinach Filling: Mix fresh spinach, cream cheese, and Parmesan cheese for a rich and creamy filling. This combination adds a delightful twist to the traditional recipe.
  • Garlic Butter Shrimp Filling: Use small shrimp sautéed in garlic butter, mixed with breadcrumbs and herbs. This filling offers a double shrimp experience that seafood lovers will adore.
  • Vegetable Medley Filling: For a lighter option, combine finely chopped bell peppers, zucchini, and onions with herbs and breadcrumbs. This filling is perfect for those who prefer a vegetarian twist.
  • Spicy Chorizo Filling: Add cooked chorizo sausage to your crab mixture for a spicy kick. The bold flavors of chorizo pair wonderfully with the sweetness of the prawns.

These alternative fillings not only add variety but also allow you to cater to different tastes and dietary preferences. Feel free to mix and match ingredients to create your perfect crab stuffed shrimp!

Different Cooking Methods for Crab Stuffed Shrimp

In addition to baking, there are several other cooking methods you can try for your crab stuffed shrimp:

  • Grilling: For a smoky flavor, grill the stuffed prawns over medium heat. Just be sure to use a grill basket or skewers to prevent them from falling through the grates.
  • Air Frying: If you want a crispy texture without the extra oil, try air frying the stuffed prawns. Cook them at 375°F for about 10-12 minutes, or until they are golden and cooked through.
  • Pan-Seering: Sear the stuffed prawns in a hot skillet with a little olive oil. This method gives them a nice crust while keeping the inside moist and flavorful.
  • Broiling: For a quick and delicious option, broil the stuffed prawns for 5-7 minutes. This method gives them a beautiful golden color and enhances the flavors.

By trying out these different cooking methods, you can enjoy crab stuffed shrimp in new and exciting ways. Each method brings out unique flavors and textures, making your meal even more enjoyable!

Cooking Note for Crab Stuffed Shrimp

When preparing crab stuffed shrimp, there are a few important cooking notes to keep in mind. These tips will help ensure that your dish turns out perfectly every time. Let’s dive into some key points to consider while cooking.

First, always choose fresh ingredients. Fresh prawns and crab meat will significantly enhance the flavor of your dish. If you can, buy your seafood from a reputable source to guarantee quality. Freshness is key to achieving that delightful taste that crab stuffed shrimp is known for.

Next, pay attention to the cooking time. Overcooking the prawns can lead to a rubbery texture, which is not what you want. Keep an eye on them while they bake. The prawns should turn a vibrant pink color, and the filling should be bubbly and golden. If you’re unsure, use a meat thermometer; the internal temperature should reach 145°F (63°C).

Additionally, consider the size of your prawns. Larger prawns are ideal for stuffing, as they can hold more filling and provide a satisfying bite. If you use smaller prawns, you may need to adjust the cooking time accordingly, as they will cook faster.

Lastly, let the stuffed prawns rest for a few minutes after baking. This allows the flavors to meld and makes them easier to handle. Plus, it gives you a moment to prepare your serving dishes or side items.

By following these cooking notes, you’ll be well on your way to creating delicious crab stuffed shrimp that will impress everyone at your table. Happy cooking!

Serving Suggestions for Crab Stuffed Shrimp

Once your crab stuffed shrimp are perfectly cooked and ready to serve, it’s time to think about what to pair them with. The right side dishes can elevate your meal and create a well-rounded dining experience. Here are some ideal side dishes that complement the flavors of crab stuffed shrimp beautifully.

Ideal Side Dishes to Pair with Crab Stuffed Shrimp

  • Garlic Mashed Potatoes: Creamy and buttery garlic mashed potatoes are a classic choice. Their rich texture balances the lightness of the shrimp, making for a comforting meal.
  • Crisp Garden Salad: A fresh garden salad with mixed greens, cherry tomatoes, and a light vinaigrette adds a refreshing crunch. The acidity of the dressing enhances the flavors of the shrimp.
  • Steamed Asparagus: Lightly steamed asparagus drizzled with lemon juice provides a bright and healthy side. The slight bitterness of asparagus pairs well with the sweetness of the prawns.
  • Rice Pilaf: Fluffy rice pilaf with herbs and spices is another excellent option. It absorbs the flavors of the crab stuffed shrimp, creating a harmonious dish.
  • Roasted Vegetables: A medley of roasted vegetables, such as bell peppers, zucchini, and carrots, adds color and nutrition to your plate. The caramelization from roasting enhances their natural sweetness.
  • Coleslaw: A tangy coleslaw made with cabbage and carrots offers a crunchy texture and a zesty flavor that complements the richness of the stuffed shrimp.

These side dishes not only enhance the overall meal but also provide a variety of textures and flavors. Whether you prefer something creamy, crunchy, or light, there’s a perfect pairing for your crab stuffed shrimp. Enjoy your delightful seafood feast!

Tips for Perfecting Crab Stuffed Shrimp

Creating the perfect crab stuffed shrimp is an art that can be mastered with a few helpful tips. These suggestions will ensure that your dish turns out delicious every time, impressing your family and friends. Let’s explore some essential tips for perfecting your crab stuffed shrimp!

First, always use fresh ingredients. Fresh prawns and crab meat make a significant difference in flavor. If possible, buy your seafood from a trusted market. Freshness enhances the overall taste and texture of your dish.

Next, be gentle when mixing the filling. You want to keep the crab meat in chunks for a delightful texture. Over-mixing can break it down, resulting in a less appealing filling. Fold the ingredients together carefully to maintain those lovely crab pieces.

When stuffing the prawns, don’t overfill them. While it’s tempting to pack in as much filling as possible, overstuffing can lead to spills during cooking. A tablespoon of filling per prawn is usually just right. This way, the filling stays intact and doesn’t overflow.

Consider seasoning your prawns before stuffing them. A light sprinkle of salt and pepper on the prawns can enhance their natural flavor. Just be cautious not to overdo it, as the filling already contains seasoning.

For an extra touch of flavor, try adding a squeeze of lemon juice over the stuffed prawns before baking. This brightens the dish and complements the seafood beautifully. A sprinkle of fresh herbs, like parsley or chives, can also add a pop of color and freshness.

Lastly, let the stuffed prawns rest for a few minutes after baking. This allows the flavors to meld together and makes them easier to handle. Plus, it gives you a moment to prepare your serving dishes or side items.

By following these tips, you’ll be well on your way to creating crab stuffed shrimp that are not only delicious but also visually stunning. Enjoy the process and the delightful results!

Breakdown of Time for Crab Stuffed Shrimp

Understanding the time required for each step in preparing crab stuffed shrimp can help you plan your cooking efficiently. Here’s a breakdown of the time you’ll need for preparation and cooking.

Prep Time

The prep time for crab stuffed shrimp is approximately 20-25 minutes. This includes gathering your ingredients, rinsing and peeling the prawns, and preparing the crab filling. Taking your time during this stage ensures that everything is ready for the next steps. Remember, a well-prepared dish starts with organized ingredients!

Cooking Time

Once your stuffed prawns are ready, the cooking time is about 15-20 minutes. Preheat your oven to 375°F (190°C) and bake the prawns until they turn a vibrant pink and the filling is bubbly and golden. Keep an eye on them to avoid overcooking, as this can lead to a rubbery texture.

Total Time

In total, you can expect to spend around 35-45 minutes from start to finish. This includes both prep and cooking time. With this efficient timeline, you can enjoy a delicious seafood dish without spending all day in the kitchen. Plus, the delightful aroma of crab stuffed shrimp will surely make your efforts worthwhile!

Nutritional Information for Crab Stuffed Shrimp

Understanding the nutritional content of crab stuffed shrimp is essential for those who are health-conscious or following specific dietary plans. This dish not only offers a delightful taste but also provides a good balance of nutrients. Let’s break down the nutritional information for crab stuffed shrimp.

Calories

Each serving of crab stuffed shrimp contains approximately 330 calories. This makes it a satisfying yet moderate option for a meal. The calorie count comes from the combination of prawns, crab meat, and the creamy filling, which includes mayonnaise and cheese. If you’re looking to reduce calories, consider using less mayonnaise or opting for a lighter version.

Protein Content

One of the standout features of crab stuffed shrimp is its high protein content. Each serving provides about 30 grams of protein. This is excellent for those looking to increase their protein intake, whether for muscle building or overall health. The prawns and crab meat are both excellent sources of lean protein, making this dish a nutritious choice.

Sodium Levels

When it comes to sodium, crab stuffed shrimp contains around 600 milligrams per serving. This level is moderate, but it’s important to be mindful if you are watching your sodium intake. You can reduce sodium levels by using low-sodium seafood seasoning and mayonnaise. Always check the labels of your ingredients to make informed choices.

In summary, crab stuffed shrimp is a delicious dish that offers a good balance of calories, protein, and sodium. It’s a great option for a satisfying meal that doesn’t compromise on nutrition. Enjoy this delightful seafood dish while being mindful of your dietary needs!

FAQs about Crab Stuffed Shrimp

Can I use frozen shrimp for Crab Stuffed Shrimp?

Yes, you can use frozen shrimp for crab stuffed shrimp! Just make sure to thaw them properly before cooking. To do this, place the frozen shrimp in the refrigerator overnight or run them under cold water for about 10-15 minutes. Once thawed, rinse and prepare them as you would with fresh shrimp. Keep in mind that frozen shrimp may release more moisture, so pat them dry before stuffing to ensure the filling adheres well.

What type of crab meat is best for Crab Stuffed Shrimp?

When it comes to crab meat, the best options for crab stuffed shrimp are lump crab meat or backfin crab meat. Lump crab meat consists of large, tender pieces that provide a delightful texture and flavor. Backfin crab meat is a mix of smaller pieces and is often more affordable. Both types work well in this recipe, so choose based on your preference and budget. Always opt for high-quality crab meat for the best results!

How can I make Crab Stuffed Shrimp ahead of time?

Making crab stuffed shrimp ahead of time is a great way to save time on busy days. You can prepare the stuffed prawns and place them in a baking dish, then cover and refrigerate them for up to 24 hours before cooking. When you’re ready to bake, simply preheat the oven and cook as directed. If you prefer, you can also freeze the stuffed prawns. Just make sure to wrap them tightly in plastic wrap and place them in an airtight container. When ready to cook, thaw them in the refrigerator overnight and bake as usual.

What are some common mistakes to avoid when making Crab Stuffed Shrimp?

A few common mistakes can affect the outcome of your crab stuffed shrimp. First, avoid overcooking the prawns, as this can lead to a rubbery texture. Keep an eye on them while baking and remove them once they turn pink and the filling is bubbly. Second, be gentle when mixing the filling; over-mixing can break down the crab meat, resulting in a less appealing texture. Lastly, don’t overstuff the prawns. A tablespoon of filling per prawn is usually just right. Following these tips will help you create delicious crab stuffed shrimp every time!

Conclusion on Crab Stuffed Shrimp

In conclusion, crab stuffed shrimp is a delightful dish that combines the best of seafood flavors with a satisfying texture. This recipe is not only easy to prepare but also offers a wonderful opportunity to impress your family and friends. With its rich filling and succulent prawns, it’s a meal that can elevate any dining experience.

Throughout this article, we’ve explored the ingredients, preparation steps, and various ways to customize this dish. Whether you choose to stick with the classic recipe or experiment with alternative fillings, the possibilities are endless. The versatility of crab stuffed shrimp makes it suitable for any occasion, from casual family dinners to elegant gatherings.

Moreover, the nutritional benefits of this dish, including its high protein content and moderate calorie count, make it a smart choice for those looking to enjoy a delicious meal without compromising on health. By following the tips and cooking notes provided, you can ensure that your crab stuffed shrimp turns out perfectly every time.

So, gather your ingredients, roll up your sleeves, and get ready to create a dish that is sure to delight your taste buds. Whether served with garlic mashed potatoes, a crisp garden salad, or your favorite side, crab stuffed shrimp is bound to become a favorite in your household. Enjoy the process, savor each bite, and share this delightful seafood dish with those you love!

Crispy Shrimp Egg Rolls Recipe for a Delicious Snack!

Introduction to Crispy Shrimp Egg Rolls Recipe

Welcome to the delightful world of crispy shrimp egg rolls! This recipe is not just a treat for your taste buds; it’s a celebration of flavors and textures. Imagine biting into a perfectly crispy exterior, only to discover a savory filling of shrimp and fresh vegetables. It’s a dish that brings joy to any meal, whether it’s a casual family dinner or a festive gathering with friends.

What Makes This Recipe Special?

What sets this crispy shrimp egg rolls recipe apart is its unique combination of ingredients. The shrimp adds a rich, savory flavor, while the fresh vegetables provide a satisfying crunch. The use of tamari or soy sauce enhances the umami taste, making each bite a burst of flavor. Plus, the option to fry or bake these rolls means you can enjoy them just the way you like! Whether you prefer them golden and crispy or a bit lighter, this recipe has you covered.

Another special aspect is the versatility of the filling. You can easily customize it to suit your taste. Want a bit of heat? Toss in some chili peppers! Prefer a vegetarian option? Swap the shrimp for tofu or mushrooms. This recipe encourages creativity, allowing you to make it your own.

A Brief History of Egg Rolls

Egg rolls have a fascinating history that dates back to ancient China. Originally, they were made with a thin wheat flour wrapper filled with a variety of ingredients. Over time, they evolved into the crispy rolls we know today. The name “egg roll” likely comes from the use of egg in the dough, which gives it that delightful golden color.

In the United States, egg rolls became popular in Chinese-American cuisine, often filled with meats and vegetables. They are typically served as appetizers or snacks, making them a favorite at parties and gatherings. Today, you can find many variations, including our delicious shrimp version. This recipe pays homage to the traditional egg roll while adding a modern twist that everyone will love!

Ingredients for Crispy Shrimp Egg Rolls Recipe

Essential Ingredients

To create the perfect crispy shrimp egg rolls, you’ll need a few essential ingredients. These components work together to deliver that delightful crunch and savory flavor. Here’s what you’ll need:

  • 1 cup cooked shrimp, diced
  • 1 cup shredded cabbage
  • 1/2 cup scallions, sliced
  • 1/4 cup grated carrots
  • 2 cloves garlic, minced
  • 1 tablespoon tamari or soy sauce
  • 1 teaspoon peanut oil
  • 1 package (14 oz) rice paper wrappers
  • Oil for frying
  • Spicy peanut sauce for dipping

These ingredients are not only easy to find but also come together to create a delicious filling. The shrimp provides protein, while the vegetables add freshness and crunch. The tamari or soy sauce brings a savory depth, making each bite irresistible.

Optional Ingredients for Extra Flavor

If you want to elevate your crispy shrimp egg rolls, consider adding some optional ingredients. These can enhance the flavor and make your dish even more exciting:

  • Chili peppers or hot sauce for a spicy kick
  • Fresh herbs like cilantro or basil for added freshness
  • Sesame oil for a nutty flavor
  • Bean sprouts for extra crunch
  • Water chestnuts for a delightful texture

Feel free to mix and match these optional ingredients based on your preferences. The beauty of this recipe lies in its versatility. You can create a unique version of crispy shrimp egg rolls that suits your taste perfectly!

Step-by-Step Preparation of Crispy Shrimp Egg Rolls Recipe

Step 1: Preparing the Shrimp Filling

To kick off your crispy shrimp egg rolls, start by preparing the shrimp filling. In a mixing bowl, combine the diced shrimp, shredded cabbage, sliced scallions, grated carrots, and minced garlic. These ingredients create a colorful and flavorful mix. Next, drizzle in the tamari or soy sauce and peanut oil. Stir everything together until the shrimp and veggies are well coated. This step is crucial as it ensures that every bite is packed with flavor!

Step 2: Assembling the Egg Rolls

Now that your filling is ready, it’s time to assemble the egg rolls. Begin by soaking a rice paper wrapper in warm water for about 10 seconds. You want it to be pliable but not too soft. Once it’s ready, lay the wrapper flat on a clean surface. Spoon about 2 tablespoons of the shrimp mixture onto the center of the wrapper. Fold the bottom edge over the filling, then tuck in the sides. Finally, roll it tightly to enclose the filling. Use a little water to seal the edge securely. Repeat this process until all your filling is wrapped up. It’s like a fun little gift you’re preparing!

Step 3: Frying the Egg Rolls

With your egg rolls assembled, it’s time to fry them to golden perfection! Heat about 2 inches of oil in a deep pan over medium heat. You’ll know it’s ready when the oil starts to shimmer. Carefully add a few egg rolls at a time, making sure not to overcrowd the pan. Fry them for about 3-4 minutes on each side, or until they turn a deep golden brown and become crispy. This step is where the magic happens, transforming your rolls into a crunchy delight!

Step 4: Draining and Cooling

Once your egg rolls are perfectly fried, it’s important to drain them. Use a slotted spoon to transfer the crispy rolls to a plate lined with paper towels. This will help absorb any excess oil, keeping your egg rolls light and crispy. Allow them to cool for a few minutes before serving. This step is essential, as it prevents you from burning your mouth on the hot filling. Plus, it gives you a moment to prepare your favorite dipping sauce!

Variation of Crispy Shrimp Egg Rolls Recipe

Vegetarian Alternatives

If you’re looking for a vegetarian twist on the crispy shrimp egg rolls, you’re in luck! There are plenty of delicious alternatives that maintain the same satisfying crunch and flavor. Instead of shrimp, consider using:

  • Tofu: Firm tofu works great. Just cube it and sauté it with your favorite seasonings.
  • Mushrooms: Chopped shiitake or button mushrooms add a savory depth. Sauté them until they’re tender.
  • Mixed Vegetables: A combination of bell peppers, zucchini, and bean sprouts can create a colorful filling.
  • Tempeh: This fermented soy product adds a nutty flavor and is packed with protein.

To prepare the filling, follow the same steps as with the shrimp. Mix your chosen ingredients with tamari or soy sauce, and you’ll have a delightful vegetarian filling. These alternatives are not only tasty but also provide a healthy option for those who prefer plant-based meals.

Spicy Shrimp Egg Rolls

If you love a bit of heat, why not spice up your crispy shrimp egg rolls? Adding a kick can elevate the flavor profile and make your dish even more exciting. Here are some ideas to turn up the heat:

  • Chili Peppers: Finely chop fresh chili peppers and mix them into the shrimp filling. Jalapeños or serranos work well!
  • Hot Sauce: A splash of your favorite hot sauce can add a zesty flavor. Mix it in with the shrimp and veggies.
  • Red Pepper Flakes: Sprinkle some red pepper flakes into the filling for a subtle heat that builds with each bite.
  • Spicy Peanut Sauce: Serve your egg rolls with a spicy peanut sauce for dipping. This adds both flavor and heat!

These spicy variations will surely please those who enjoy a little extra zing in their meals. Just remember to adjust the spice level according to your taste. Enjoy experimenting with these variations to create your perfect crispy shrimp egg rolls!

Cooking Note for Crispy Shrimp Egg Rolls Recipe

Tips for Perfectly Crispy Egg Rolls

Achieving that perfect crunch in your crispy shrimp egg rolls is all about technique and attention to detail. Here are some handy tips to ensure your egg rolls turn out crispy and delicious:

  • Use Fresh Ingredients: Fresh vegetables and shrimp make a big difference in flavor and texture. Always opt for the freshest ingredients available.
  • Don’t Overcrowd the Pan: Frying too many egg rolls at once can lower the oil temperature, resulting in soggy rolls. Fry in small batches for the best results.
  • Maintain Oil Temperature: Keep the oil at a steady temperature of around 350°F (175°C). Use a thermometer if you have one. If the oil is too hot, the egg rolls will burn; if it’s too cool, they’ll absorb too much oil.
  • Seal Well: Make sure to seal the edges of the egg rolls tightly. This prevents the filling from leaking out during frying.
  • Drain Properly: After frying, place the egg rolls on paper towels to absorb excess oil. This keeps them crispy and not greasy.

Common Mistakes to Avoid

Even the best cooks can make mistakes! Here are some common pitfalls to watch out for when making crispy shrimp egg rolls:

  • Skipping the Soaking Step: Don’t skip soaking the rice paper wrappers. If they’re not pliable, they can crack when you try to roll them.
  • Using Cold Oil: Always heat the oil before adding the egg rolls. Cold oil can lead to soggy rolls that lack that desired crunch.
  • Overfilling the Wrappers: It’s tempting to add more filling, but overstuffing can make it hard to seal the rolls properly. Stick to about 2 tablespoons of filling.
  • Not Letting Them Cool: Allowing the egg rolls to cool on paper towels is crucial. If you serve them too hot, the filling can be scalding!
  • Ignoring Flavor Balance: Make sure to balance flavors in your filling. Too much salt or spice can overpower the dish. Taste as you go!

By following these tips and avoiding common mistakes, you’ll be well on your way to creating crispy shrimp egg rolls that are sure to impress your family and friends!

Serving Suggestions for Crispy Shrimp Egg Rolls Recipe

Dipping Sauces

No crispy shrimp egg roll is complete without a delicious dipping sauce! The right sauce can elevate the flavors and add an extra layer of enjoyment. Here are some fantastic options to consider:

  • Spicy Peanut Sauce: This creamy sauce is a classic choice. Its nutty flavor pairs perfectly with the shrimp and veggies. To make it, simply mix peanut butter, soy sauce, lime juice, and a touch of honey. Add chili flakes for extra heat!
  • Sweet and Sour Sauce: A tangy sweet and sour sauce can balance the savory flavors of the egg rolls. You can find this sauce in stores or make your own with vinegar, sugar, and ketchup.
  • Soy Sauce with Ginger: For a simple yet flavorful option, mix soy sauce with freshly grated ginger. This adds a zesty kick that complements the shrimp beautifully.
  • Chili Garlic Sauce: If you love heat, try a chili garlic sauce. It’s spicy and flavorful, making it a great match for crispy shrimp egg rolls.

Feel free to experiment with different sauces to find your favorite combination. Each sauce brings its own unique flavor, making your egg roll experience even more delightful!

Pairing with Side Dishes

To create a well-rounded meal, consider pairing your crispy shrimp egg rolls with some tasty side dishes. Here are a few ideas that complement the flavors of the egg rolls:

  • Asian Slaw: A refreshing slaw made with cabbage, carrots, and a tangy dressing can provide a crunchy contrast to the egg rolls. It’s light and full of flavor!
  • Fried Rice: Serve your egg rolls alongside a bowl of fried rice. The savory rice pairs well with the crispy rolls, making for a satisfying meal.
  • Spring Salad: A light salad with mixed greens, cucumbers, and a sesame dressing can balance the richness of the egg rolls. It adds freshness to your plate.
  • Steamed Vegetables: For a healthy option, consider serving steamed broccoli, snap peas, or bok choy. These veggies add color and nutrition to your meal.

By pairing your crispy shrimp egg rolls with these delicious side dishes, you’ll create a meal that’s not only satisfying but also bursting with flavor. Enjoy your culinary adventure!

Tips for Making the Best Crispy Shrimp Egg Rolls Recipe

Storage Tips

Storing your crispy shrimp egg rolls properly is key to maintaining their deliciousness. Here are some helpful tips:

  • Cool Before Storing: Allow the egg rolls to cool completely before storing. This prevents condensation, which can make them soggy.
  • Use Airtight Containers: Place the cooled egg rolls in an airtight container. This helps keep them fresh and prevents them from absorbing odors from the fridge.
  • Separate Layers: If you have multiple layers of egg rolls, place parchment paper between them. This prevents sticking and keeps them intact.
  • Refrigerate or Freeze: Store the egg rolls in the refrigerator for up to 3 days. For longer storage, freeze them for up to 2 months. Just make sure to wrap them tightly in plastic wrap or foil before freezing.

Reheating Instructions

When it’s time to enjoy your leftover crispy shrimp egg rolls, reheating them properly is essential to regain that delightful crunch. Here’s how to do it:

  • Oven Method: Preheat your oven to 375°F (190°C). Place the egg rolls on a baking sheet lined with parchment paper. Bake for about 10-15 minutes, flipping halfway through, until they are heated through and crispy.
  • Air Fryer Method: If you have an air fryer, this is a great option! Preheat the air fryer to 350°F (175°C). Place the egg rolls in a single layer and cook for about 5-7 minutes, or until they are hot and crispy.
  • Skillet Method: Heat a little oil in a skillet over medium heat. Add the egg rolls and cook for about 3-4 minutes on each side, until they are heated through and crispy.
  • Microwave Method: If you’re in a hurry, you can use the microwave. However, this method may not keep them crispy. Place the egg rolls on a microwave-safe plate and cover with a damp paper towel. Heat in 30-second intervals until warm.

By following these storage and reheating tips, you can enjoy your crispy shrimp egg rolls even after the first serving. They’ll taste just as delicious, making them a perfect snack or meal anytime!

Breakdown of Time for Crispy Shrimp Egg Rolls Recipe

Prep Time

Getting everything ready for your crispy shrimp egg rolls is a breeze! The prep time usually takes about 20-30 minutes. This includes gathering your ingredients, chopping the vegetables, and mixing the shrimp filling. If you’re quick in the kitchen, you might even finish in under 20 minutes! Just remember to take your time to ensure everything is well-prepared for the best results.

Cooking Time

Once your egg rolls are assembled, the cooking time is relatively short. Frying the egg rolls takes about 10-15 minutes. You’ll want to fry them in batches to keep the oil temperature steady. Each batch will take around 3-4 minutes per side to achieve that perfect golden brown color. So, if you have a lot of egg rolls, plan for a little extra time to fry them all!

Total Time

In total, you can expect to spend about 30-45 minutes from start to finish. This includes both prep and cooking time. It’s a quick and rewarding process that results in delicious crispy shrimp egg rolls. Whether you’re making them for a family dinner or a gathering with friends, the time spent is well worth it!

Nutritional Information for Crispy Shrimp Egg Rolls Recipe

Calories and Macronutrients

Understanding the nutritional content of your crispy shrimp egg rolls can help you enjoy them guilt-free. Each serving of this delightful dish contains approximately 250 calories. Here’s a breakdown of the macronutrients:

  • Calories: 250
  • Net Carbohydrates: 15g
  • Protein: 12g
  • Fat: 15g

This balance of macronutrients makes crispy shrimp egg rolls a satisfying option. The protein from the shrimp helps keep you full, while the healthy fats contribute to a well-rounded meal. Plus, the vegetables add fiber, which is essential for digestion.

Health Benefits of Shrimp

Shrimp is not only delicious but also packed with health benefits. Here are some reasons why including shrimp in your diet can be beneficial:

  • High in Protein: Shrimp is an excellent source of high-quality protein, which is essential for muscle growth and repair.
  • Low in Calories: With low calorie content, shrimp is a great option for those looking to maintain or lose weight while still enjoying flavorful meals.
  • Rich in Nutrients: Shrimp contains important nutrients like selenium, vitamin B12, and iodine, which support overall health.
  • Omega-3 Fatty Acids: Shrimp provides omega-3 fatty acids, which are known for their heart health benefits and anti-inflammatory properties.
  • Antioxidant Properties: The antioxidant astaxanthin found in shrimp may help protect your cells from damage and support skin health.

Incorporating shrimp into your crispy egg rolls not only enhances the flavor but also adds a nutritious element to your meal. Enjoying these egg rolls can be a delicious way to boost your health while satisfying your cravings!

FAQs about Crispy Shrimp Egg Rolls Recipe

Can I make Crispy Shrimp Egg Rolls ahead of time?

Absolutely! You can prepare the filling for your crispy shrimp egg rolls ahead of time. Just store it in an airtight container in the refrigerator for up to 24 hours. When you’re ready to enjoy them, simply assemble and fry the egg rolls. If you want to make the egg rolls in advance, you can also wrap them and freeze them. Just remember to separate layers with parchment paper to prevent sticking. When you’re ready to cook, fry them straight from the freezer, adding a couple of extra minutes to the cooking time.

What type of shrimp is best for this recipe?

For the best results, use medium to large shrimp for your crispy shrimp egg rolls. Fresh or frozen shrimp works well, but make sure to thaw frozen shrimp completely before cooking. You can choose shrimp that is peeled and deveined for convenience. If you prefer, you can also use shrimp with the shell on for added flavor, but be sure to remove the shells before mixing them into the filling. The key is to use shrimp that is firm and has a sweet, briny flavor.

Can I bake the egg rolls instead of frying them?

Yes, you can definitely bake your crispy shrimp egg rolls for a healthier option! Preheat your oven to 400°F (200°C). Place the assembled egg rolls on a baking sheet lined with parchment paper. Lightly brush or spray them with oil to help them crisp up. Bake for about 20-25 minutes, flipping them halfway through for even browning. While they may not be as crispy as fried egg rolls, baking is a great alternative that still delivers delicious results!

How do I store leftover egg rolls?

To store leftover crispy shrimp egg rolls, allow them to cool completely first. Then, place them in an airtight container. You can keep them in the refrigerator for up to 3 days. If you want to store them for a longer period, consider freezing them. Wrap each egg roll tightly in plastic wrap or foil, then place them in a freezer-safe bag. They can be frozen for up to 2 months. When you’re ready to enjoy them, simply reheat using your preferred method for the best results!

Conclusion on Crispy Shrimp Egg Rolls Recipe

Final Thoughts and Recommendations

In conclusion, the crispy shrimp egg rolls recipe is a delightful dish that brings together flavor, texture, and creativity. Whether you’re preparing them for a family dinner or a festive gathering, these egg rolls are sure to impress. The combination of savory shrimp and fresh vegetables wrapped in a crispy shell creates a satisfying experience that everyone will love.

As you embark on your culinary journey with this recipe, remember that the beauty of cooking lies in experimentation. Feel free to adjust the ingredients to suit your taste. Whether you prefer a spicy kick or a vegetarian alternative, the possibilities are endless. Don’t hesitate to try different dipping sauces or side dishes to enhance your meal further.

Moreover, the nutritional benefits of shrimp make these egg rolls not only delicious but also a healthy choice. With their high protein content and essential nutrients, you can enjoy them guilt-free. So, gather your ingredients, roll up your sleeves, and get ready to create a dish that will become a favorite in your household.

Happy cooking, and enjoy every crispy bite of your shrimp egg rolls!

Cheesy Dorito Casserole is the ultimate comfort food!

Introduction to Cheesy Dorito Casserole Recipe

Are you looking for a dish that combines comfort and flavor? Look no further than the Cheesy Dorito Casserole Recipe! This delightful meal is not only easy to prepare but also packed with delicious ingredients that everyone will love. Whether you’re hosting a family gathering or just want a cozy night in, this casserole is sure to impress.

What Makes Cheesy Dorito Casserole Special?

What sets the Cheesy Dorito Casserole apart is its unique blend of textures and flavors. The crunchy Doritos provide a satisfying crunch, while the creamy cheese and savory turkey create a rich, hearty filling. The addition of beans and vegetables adds nutrition, making it a well-rounded meal. Plus, the versatility of this recipe allows you to customize it to your taste. Want it spicier? Toss in some jalapeños! Prefer a vegetarian option? Swap the turkey for beans. The possibilities are endless!

The Perfect Comfort Food for Any Occasion

Comfort food is all about warmth and satisfaction, and this casserole delivers just that. It’s perfect for chilly evenings, potlucks, or even game day gatherings. The Cheesy Dorito Casserole is not only filling but also visually appealing, making it a great centerpiece for any table. With its vibrant colors and mouthwatering aroma, it’s hard to resist diving in. Plus, it serves a crowd, making it an ideal choice for feeding family and friends.

In the following sections, we will explore the ingredients, preparation steps, and variations of this delightful dish. Get ready to create a meal that will become a family favorite!

Ingredients for Cheesy Dorito Casserole Recipe

To create the mouthwatering Cheesy Dorito Casserole, you’ll need a variety of ingredients that come together to form a delicious and satisfying dish. Here’s what you’ll need:

  • 1 pound ground turkey
  • 1 medium bell pepper, chopped
  • 1 can (15 ounces) kidney beans, drained and rinsed
  • 1 can (15 ounces) sweet peas, drained
  • 1 can (10 ounces) fire-roasted diced tomatoes
  • 1 packet (1 ounce) chili seasoning
  • 1 cup Greek yogurt
  • 2 cups Monterey Jack cheese, shredded
  • 8 cups tortilla chips, crushed (approximately 1 large bag)
  • 1/4 cup sliced green onions (optional for garnish)

These ingredients combine to create a flavorful and hearty casserole. The ground turkey provides lean protein, while the beans and vegetables add fiber and nutrients. The Greek yogurt gives a creamy texture, and the cheese brings that irresistible cheesy goodness. Don’t forget the tortilla chips, which add a delightful crunch to every bite!

Feel free to adjust the ingredients based on your preferences. For instance, you can use different types of beans or even add more vegetables. The key is to have fun and make this recipe your own!

Step-by-Step Preparation of Cheesy Dorito Casserole Recipe

Now that you have all your ingredients ready, it’s time to dive into the preparation of your Cheesy Dorito Casserole. This step-by-step guide will help you create a delicious dish that everyone will love. Let’s get started!

Step 1: Preheat Your Oven

First things first, preheat your oven to 375°F. This ensures that your casserole cooks evenly and the cheese melts perfectly. While the oven is heating up, you can prepare the other ingredients.

Step 2: Prepare the Base Ingredients

In a large skillet, over medium heat, brown the ground turkey. Add the chopped bell pepper to the skillet. Cook for about 6-8 minutes, stirring occasionally. You want the turkey to be fully cooked and the bell pepper to be tender. Once done, drain any excess grease from the skillet.

Next, add the kidney beans, sweet peas, fire-roasted diced tomatoes, and chili seasoning to the skillet. Stir everything together and let it simmer for about 5 minutes. This allows the flavors to meld beautifully.

Step 3: Layering the Casserole

In a separate bowl, mix the turkey mixture with Greek yogurt and half of the shredded Monterey Jack cheese. Gently fold in half of the crushed tortilla chips. This creates a hearty filling that’s packed with flavor.

Now, transfer this mixture into a greased 9×13-inch baking dish. Spread it evenly across the bottom. Then, top it with the remaining crushed tortilla chips. Finally, sprinkle the rest of the Monterey Jack cheese on top. This will create a deliciously cheesy crust when baked.

Step 4: Baking the Casserole

Place the baking dish in the preheated oven. Bake for 30-35 minutes, or until the cheese is melted and slightly golden. The aroma will fill your kitchen, making it hard to wait!

Step 5: Letting It Rest Before Serving

Once the casserole is out of the oven, let it cool for a few minutes. This helps the layers set, making it easier to serve. If you like, garnish with sliced green onions for a fresh touch. Now, you’re ready to enjoy your Cheesy Dorito Casserole!

Variations of Cheesy Dorito Casserole Recipe

The Cheesy Dorito Casserole is a versatile dish that can be easily adapted to suit different tastes and dietary preferences. Here are some exciting variations to consider, ensuring that everyone can enjoy this delicious meal!

Vegetarian Options

If you’re looking for a vegetarian twist, you can easily replace the ground turkey with a mix of your favorite beans or lentils. Black beans, pinto beans, or chickpeas work wonderfully. You can also add more vegetables like corn, zucchini, or mushrooms to enhance the flavor and nutrition. This way, you still get a hearty and satisfying casserole without any meat!

Adding Protein: Chicken or Beef

For those who prefer chicken or beef, simply swap out the ground turkey for cooked, shredded chicken or ground beef. If using chicken, rotisserie chicken is a great time-saver. Just shred it and mix it into the casserole. For beef, make sure to drain any excess fat after browning it. Both options will add a different flavor profile while keeping the dish deliciously filling.

Spicy Twist: Incorporating Jalapeños

If you love a bit of heat, consider adding diced jalapeños to the turkey mixture. You can use fresh jalapeños for a milder spice or pickled jalapeños for a tangy kick. Just mix them in with the other ingredients before layering the casserole. This spicy twist will elevate the flavor and make your Cheesy Dorito Casserole even more exciting!

Feel free to experiment with these variations or create your own! The Cheesy Dorito Casserole is all about making it your own while enjoying the delightful combination of flavors and textures.

Cooking Note for Cheesy Dorito Casserole Recipe

When preparing your Cheesy Dorito Casserole, there are a few cooking notes to keep in mind. These tips will help ensure that your dish turns out perfectly every time!

First, make sure to use a large skillet for browning the turkey and vegetables. This allows for even cooking and prevents overcrowding, which can lead to steaming instead of browning. Browning the turkey well adds depth to the flavor of the casserole.

Next, when mixing in the Greek yogurt, do so gently. This helps maintain a creamy texture without breaking down the mixture too much. You want to keep the filling hearty and cohesive.

Also, consider the type of tortilla chips you use. While traditional tortilla chips work great, using flavored chips can add an extra layer of taste. For example, cheese-flavored or spicy tortilla chips can enhance the overall flavor profile of your casserole.

Lastly, keep an eye on the baking time. Ovens can vary, so check your casserole a few minutes before the recommended time. You want the cheese to be melted and bubbly, with a slight golden color on top. If it’s browning too quickly, you can cover it loosely with aluminum foil to prevent burning.

By following these cooking notes, you’ll create a Cheesy Dorito Casserole that’s not only delicious but also visually appealing. Enjoy the process and the delightful results!

Serving Suggestions for Cheesy Dorito Casserole Recipe

Once your Cheesy Dorito Casserole is ready, it’s time to think about how to serve it. This dish is hearty and flavorful on its own, but pairing it with the right sides and beverages can elevate your meal even further. Here are some great suggestions to consider!

Pairing with Sides

To complement the rich flavors of the Cheesy Dorito Casserole, consider serving it with light and refreshing sides. Here are a few ideas:

  • Simple Green Salad: A fresh salad with mixed greens, cherry tomatoes, and a light vinaigrette can balance the richness of the casserole. The crispness of the vegetables adds a nice contrast.
  • Guacamole and Salsa: Serve some homemade guacamole and salsa on the side. These dips add a zesty flavor and are perfect for scooping with extra tortilla chips.
  • Steamed Vegetables: Lightly steamed broccoli or green beans can provide a nutritious side that complements the casserole without overpowering it.
  • Coleslaw: A tangy coleslaw can add crunch and a refreshing taste, making it a great pairing with the cheesy dish.

These sides not only enhance the meal but also add variety to your dining experience. Feel free to mix and match based on your preferences!

Ideal Beverages to Complement the Dish

Choosing the right beverages can make your meal even more enjoyable. Here are some drink options that pair well with Cheesy Dorito Casserole:

  • Soft Drinks: Classic sodas like cola or lemon-lime soda can be a fun and refreshing choice, especially for family gatherings.
  • Iced Tea: A glass of sweetened or unsweetened iced tea can provide a nice balance to the flavors of the casserole.
  • Beer: If you enjoy beer, a light lager or a pale ale can complement the dish well. The carbonation can help cut through the richness of the cheese.
  • Margaritas: For a festive touch, consider serving margaritas. Their citrusy flavor pairs wonderfully with the savory casserole.

With these serving suggestions, your Cheesy Dorito Casserole will be a hit at any gathering. Enjoy the delicious flavors and the company of your loved ones!

Tips for Perfecting Your Cheesy Dorito Casserole Recipe

To ensure your Cheesy Dorito Casserole turns out perfectly every time, here are some helpful tips. These suggestions will help you store leftovers properly and reheat them for the best taste and texture.

Storage Tips for Leftovers

After enjoying your Cheesy Dorito Casserole, you might have some leftovers. Storing them correctly is key to maintaining their flavor and texture. Here’s how to do it:

  • Cool Before Storing: Allow the casserole to cool completely at room temperature. This prevents condensation from forming in the storage container, which can make the dish soggy.
  • Use Airtight Containers: Transfer the leftovers into airtight containers. This helps keep the casserole fresh and prevents it from absorbing other odors in the fridge.
  • Refrigerate Promptly: Store the casserole in the refrigerator within two hours of cooking. It can last for about 3-4 days when stored properly.
  • Freezing Option: If you want to keep it longer, consider freezing the casserole. Wrap it tightly in plastic wrap and then in aluminum foil. It can last up to 2-3 months in the freezer.

Reheating Instructions

When it’s time to enjoy your leftovers, reheating them properly is essential to keep the flavors intact. Here’s how to do it:

  • Oven Method: Preheat your oven to 350°F. Place the casserole in an oven-safe dish and cover it with aluminum foil. Bake for about 20-25 minutes, or until heated through. Remove the foil for the last 5 minutes to crisp up the top.
  • Microwave Method: For a quicker option, you can use the microwave. Place a portion on a microwave-safe plate and cover it with a microwave-safe lid or wrap. Heat on medium power for 2-3 minutes, stirring halfway through. Make sure it’s heated evenly.
  • Stovetop Method: If you prefer, you can reheat on the stovetop. Place the casserole in a skillet over low heat. Stir occasionally until warmed through. You may want to add a splash of water or broth to keep it moist.

By following these storage and reheating tips, you can enjoy your Cheesy Dorito Casserole even after the first serving. It’s a great way to savor the delicious flavors all over again!

Breakdown of Time for Cheesy Dorito Casserole Recipe

Understanding the time needed for each step of the Cheesy Dorito Casserole recipe can help you plan your cooking efficiently. Here’s a breakdown of the time required for preparation and cooking, so you can enjoy this delicious dish without any stress!

Prep Time

The prep time for the Cheesy Dorito Casserole is approximately 20-25 minutes. This includes gathering all your ingredients, chopping the bell pepper, and browning the ground turkey. Taking your time during this step ensures that everything is ready for a smooth cooking process. Remember, a little organization goes a long way!

Cooking Time

Once you have everything prepped, the cooking time is about 30-35 minutes. This includes the time it takes to bake the casserole in the oven until the cheese is melted and bubbly. Keep an eye on it during the last few minutes to achieve that perfect golden color on top!

Total Time

In total, you can expect the Cheesy Dorito Casserole to take around 50-60 minutes from start to finish. This includes both prep and cooking time. With this timeline, you can easily plan your meal and have everything ready to serve in no time!

Now that you know the time breakdown, you can confidently prepare your Cheesy Dorito Casserole. Enjoy the process and the delightful flavors that await!

Nutritional Information for Cheesy Dorito Casserole Recipe

Understanding the nutritional content of your Cheesy Dorito Casserole is important for making informed choices. This dish is not only delicious but also provides a good balance of nutrients. Here’s a breakdown of the key nutritional information per serving:

Calories

Each serving of Cheesy Dorito Casserole contains approximately 460 calories. This makes it a satisfying meal that can keep you full without going overboard. The combination of protein, healthy fats, and carbohydrates contributes to the overall calorie count, ensuring you have the energy you need for the day.

Protein

With about 30 grams of protein per serving, this casserole is a great source of lean protein. The ground turkey and Greek yogurt provide high-quality protein, which is essential for muscle repair and growth. Including protein in your meals can also help you feel fuller for longer, making it a smart choice for those watching their appetite.

Sodium

Each serving contains around 800 milligrams of sodium. While sodium is necessary for bodily functions, it’s important to monitor your intake. If you’re watching your sodium levels, consider using low-sodium beans and tomatoes. This small adjustment can help reduce the overall sodium content without sacrificing flavor.

By keeping these nutritional facts in mind, you can enjoy your Cheesy Dorito Casserole while being aware of its health benefits. It’s a delicious way to nourish your body and satisfy your taste buds!

FAQs about Cheesy Dorito Casserole Recipe

Can I make Cheesy Dorito Casserole ahead of time?

Absolutely! You can prepare the Cheesy Dorito Casserole ahead of time. Simply follow the recipe up to the baking step. After layering the casserole, cover it tightly with plastic wrap or aluminum foil and store it in the refrigerator. When you’re ready to bake, just remove the cover and pop it in the oven. You may need to add a few extra minutes to the baking time if it’s cold from the fridge.

What can I substitute for Doritos in the recipe?

If you don’t have Doritos on hand or prefer a healthier option, there are several substitutes you can use. Tortilla chips are a great alternative, providing a similar crunch. You can also use crushed corn chips or even homemade tortilla chips for a fresher taste. If you want to avoid chips altogether, consider using crushed crackers or even a layer of cooked quinoa for a unique twist!

How do I make Cheesy Dorito Casserole spicier?

To add some heat to your Cheesy Dorito Casserole, consider incorporating diced jalapeños into the turkey mixture. You can also use spicy flavored tortilla chips for an extra kick. Another option is to add a dash of hot sauce or cayenne pepper to the mixture. Adjust the spice level to your liking, and enjoy the fiery flavor!

Can I freeze Cheesy Dorito Casserole?

Yes, you can freeze Cheesy Dorito Casserole! To do this, prepare the casserole as directed but do not bake it. Instead, cover it tightly with plastic wrap and then with aluminum foil. It can be stored in the freezer for up to 2-3 months. When you’re ready to enjoy it, thaw it in the refrigerator overnight and then bake as usual. This makes for a convenient meal option on busy days!

Conclusion on Cheesy Dorito Casserole Recipe

In conclusion, the Cheesy Dorito Casserole is a delightful dish that brings together comfort, flavor, and versatility. Whether you’re preparing it for a family dinner, a potluck, or just a cozy night at home, this casserole is sure to please everyone at the table. Its combination of crunchy tortilla chips, savory turkey, and creamy cheese creates a satisfying meal that is both hearty and delicious.

Moreover, the recipe allows for endless customization. You can easily adapt it to suit your dietary preferences, whether you choose to go vegetarian, add different proteins, or spice it up with jalapeños. This flexibility makes it a go-to recipe for any occasion, ensuring that you can cater to various tastes and preferences.

As you prepare your Cheesy Dorito Casserole, remember to enjoy the process. Cooking is not just about the end result; it’s also about the joy of creating something delicious. With each layer you build, you’re crafting a meal that will bring smiles and satisfaction to those you share it with.

So, gather your ingredients, follow the steps, and get ready to serve up a dish that will become a family favorite. The Cheesy Dorito Casserole is more than just a meal; it’s an experience filled with flavor, warmth, and togetherness. Happy cooking!