


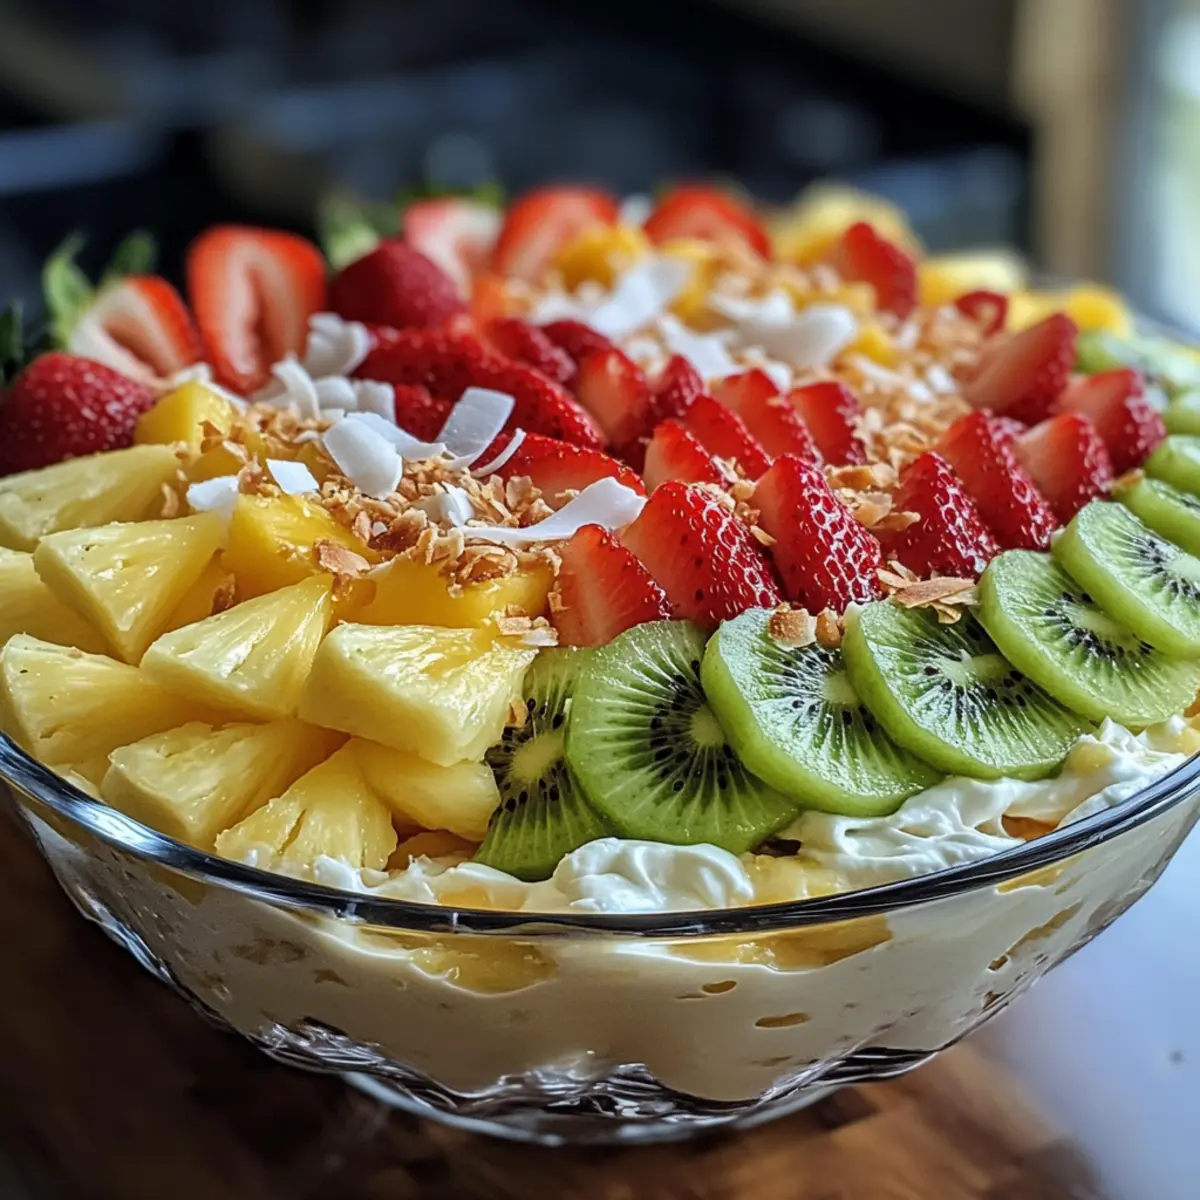
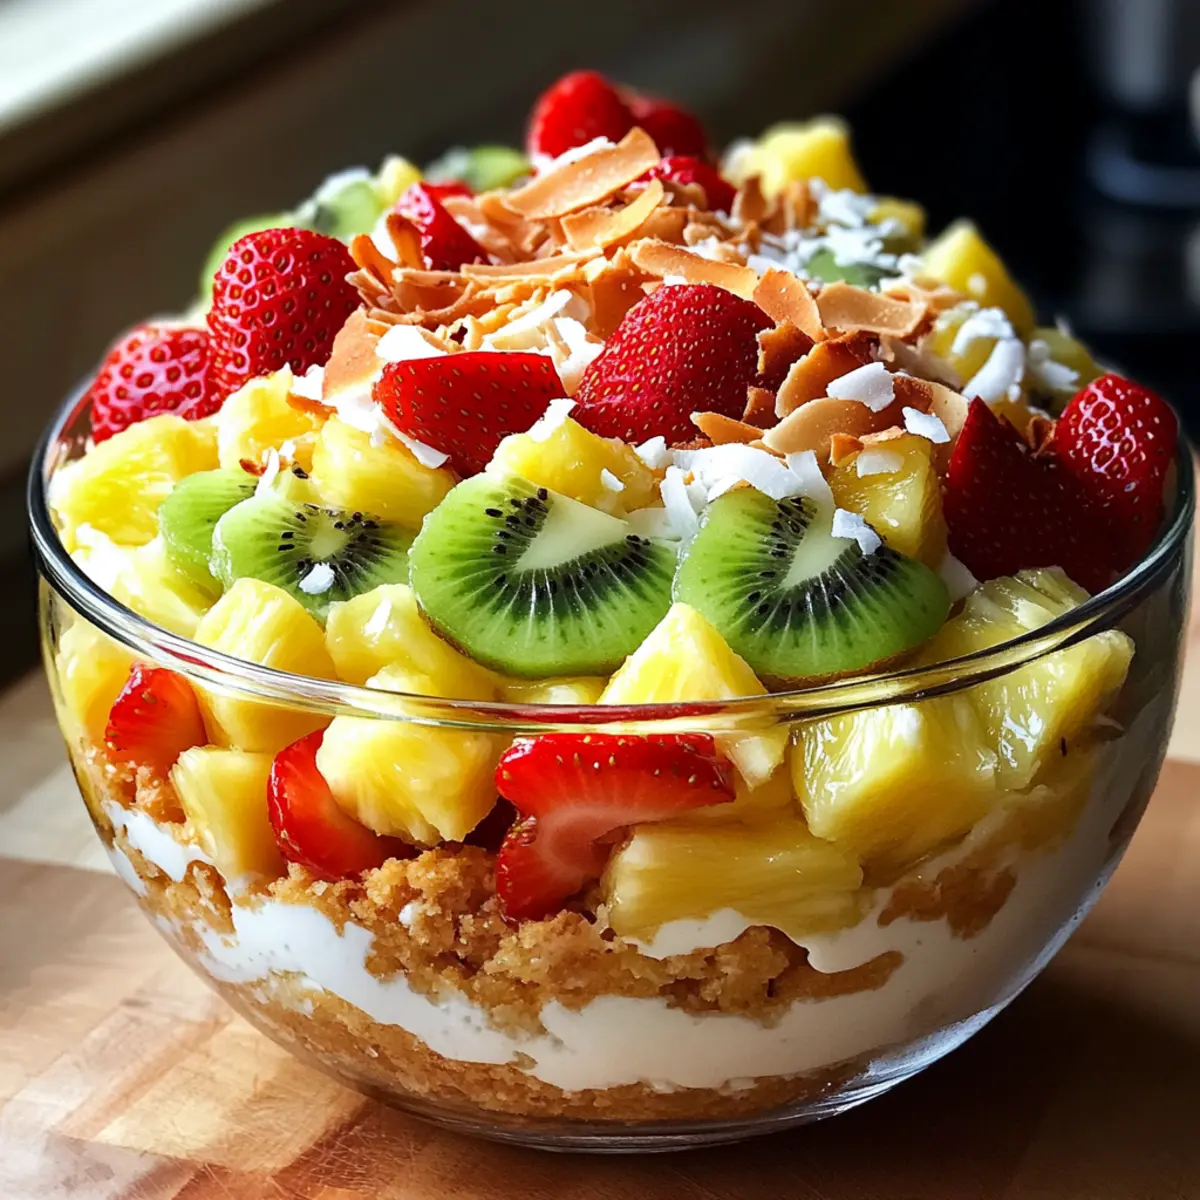
While enjoying a sun-kissed day, I stumbled upon a delightful blend of tropics and sweetness – the Hawaiian Cheesecake Salad. This vibrant, no-bake treat combines a creamy cheesecake base with a medley of juicy fruits like fresh strawberries and luscious pineapples. Not only is it impossibly quick to whip up, but it also allows for limitless customization, making it the perfect addition to any summer gathering or a refreshing weeknight dessert. Trust me, each bite feels like a mini-vacation in your mouth! Who can resist a colorful, fruity indulgence that not only pleases the palate but brings smiles all around? Are you ready to dive into a tropical escape?

What makes this salad a tropical delight?
Irresistible Creaminess: The combination of cream cheese and whipped topping creates a rich, velvety texture that gently envelops each fruit piece.
No-Bake Convenience: This easy recipe requires minimal time and effort, making it a go-to dessert for last-minute gatherings.
Customizable Fun: Feel free to swap out fruits according to season or personal preference. How about adding blueberries or mango chunks for extra flair?
Crowd-Pleasing Appeal: With its vibrant colors and tropical flavors, this salad dazzles at parties, BBQs, or family dinners.
Refreshing Adventure: Each bite provides a burst of fresh fruit flavor, transporting you straight to a beach paradise, perfect for light summer treat cravings!
Hawaiian Cheesecake Salad Ingredients
For the Creamy Base
- 8 oz Cream Cheese – Provides the creamy base and richness; ensure it’s softened for easy mixing.
- 8 oz Whipped Topping – Lightens the mixture and adds airiness; store-bought is best for stability.
- 1/4 cup Powdered Sugar – Adds sweetness and smoothness; adjust according to taste as the natural sweetness from fruits can reduce sugar needs.
- 1 tsp Vanilla Extract – Enhances flavor depth in the cheesecake base.
For the Fruit Medley
- 2 cups Fresh Strawberries – Adds sweetness and color; hull and halve for even mixing.
- 1 cup Pineapple Chunks – Provides tropical flavor and juiciness; ensure well-drained if using canned.
- 2 Kiwi – Offers tanginess and vibrant color; peeled and sliced into rounds.
- 1 cup Raspberries – Adds tartness and softness.
- Optional: Banana slices, blueberries, mango chunks – Additional fruits to customize flavors; add bananas just before serving to prevent browning.
For the Topping
- 1/2 cup Shredded Sweetened Coconut (toasted) – For topping, adds texture and tropical flair; toast until golden before use.
Embrace the tropical goodness with this Hawaiian Cheesecake Salad that truly shines with its fresh, fruity fillings!
Step‑by‑Step Instructions for Hawaiian Cheesecake Salad
Step 1: Beat the Cream Cheese
In a large mixing bowl, use an electric mixer to beat 8 oz of softened cream cheese on medium speed for about 2-3 minutes, until it’s smooth and fluffy. This creates the perfect creamy base for your Hawaiian Cheesecake Salad. Make sure there are no lumps for the best texture.
Step 2: Add Sugar and Vanilla
Sprinkle in 1/4 cup of powdered sugar and add 1 tsp of vanilla extract into the cream cheese mixture. Continue to mix on medium speed for another minute until fully incorporated and creamy. The sweetness and vanilla will enhance the overall flavor of your tropical delight.
Step 3: Fold in Whipped Topping
Gently fold in 8 oz of whipped topping into the cream cheese mixture using a spatula. Be careful not to deflate the mixture; you want to maintain that light and airy texture. This no-bake cheesecake base will be the heart of your delicious Hawaiian Cheesecake Salad.
Step 4: Prep the Fruits
Rinse and dry all your fruits thoroughly to prevent excess moisture. Hull and halve 2 cups of fresh strawberries, peel and slice 2 kiwi into rounds, and chop 1 cup of pineapple into bite-sized pieces. This vibrant fruit medley adds color and flavor to the salad.
Step 5: Combine Fruits with Mixture
Gently fold the prepared strawberries, kiwi, raspberries, and pineapple into the cheesecake mixture, ensuring each piece of fruit is well-coated. Aim for a mix that showcases the beautifully vivid colors of the fruits among the creamy base of the Hawaiian Cheesecake Salad.
Step 6: Chill and Meld Flavors
Cover the bowl with plastic wrap and refrigerate the Hawaiian Cheesecake Salad for at least 1 hour. This allows the flavors to meld beautifully together, creating a luscious, refreshing dessert that’s perfect for warm days.
Step 7: Toast the Coconut
While the salad is chilling, toast 1/2 cup of shredded sweetened coconut in a dry skillet over medium heat for 3-5 minutes. Stir constantly until golden brown and fragrant. This step adds an extra layer of flavor and texture as a topping for your salad!
Step 8: Serve and Enjoy
Before serving, gently stir the chilled salad to redistribute the fruit, then sprinkle the toasted coconut on top for a crunchy, tropical finish. Serve in individual bowls or a large dish at your next gathering, and watch as everyone delights in this Hawaiian Cheesecake Salad!

How to Store and Freeze Hawaiian Cheesecake Salad
Refrigerator: Store the salad in an airtight container in the fridge for up to 24 hours to maintain its freshness and creamy texture.
Freezer: It is not recommended to freeze Hawaiian Cheesecake Salad, as freezing may alter the texture of the creamy base and fruits, resulting in a watery mix upon thawing.
Make-Ahead Tip: For best results, prepare the components separately and mix them just before serving to preserve the salad’s vibrant colors and distinct textures.
Leftovers: If you have any leftovers, keep them covered in the fridge and enjoy within a day for a delightful snack!
Hawaiian Cheesecake Salad: Creative Twists
Feel free to personalize this luscious dessert and explore delightful variations for your Hawaiian Cheesecake Salad!
- Dairy-Free: Substitute cream cheese with a non-dairy alternative and use coconut whipped topping to create a vegan-friendly version. It’s just as creamy and indulgent, but with plant-based goodness!
- Tropical Fruit Mix: Experiment with seasonal fruits like ripe mango or sweet blueberries, both of which will add an extra layer of flavor. Just imagine those juicy flavors dancing on your palate!
- Nutty Crunch: Add chopped macadamia nuts or almonds for a tantalizing crunchy texture. They provide an unexpected twist that complements the creamy base perfectly.
- Spicy Kick: For a daring change, incorporate finely chopped jalapeños to the fruit mix. They create a balanced heat that brings out the sweetness of the fruits in a surprising way!
- Chocolate Lover’s Delight: Drizzle melted dark chocolate over the top before serving for a decadent chocolatey touch. Creamy chocolate and tropical fruits create an irresistible matchup!
- Coconut Lovers: Replace plain shredded coconut with toasted unsweetened coconut chips for an even more intense coconut flavor. The delightful texture and aroma will transport you to a sandy beach!
- Berry Blast: Swap out raspberries for tart blackberries or use a mix of various berries for a medley that bursts with flavor. It’s a beautiful display that’s just as enjoyable to eat!
- Fun Layered Parfaits: Layer the Hawaiian Cheesecake Salad in cups with crushed graham crackers for a beautiful presentation and an added crunch. Perfect for party serving and guaranteed to impress!
For more fruity inspirations, check out our recipes for Grinder Salad Bold and Italian Grinder Salad. These salads showcase the joy of fresh ingredients just like our Hawaiian Cheesecake Salad!
What to Serve with Hawaiian Cheesecake Salad?
Transform any gathering into a tropical paradise with delightful pairings that complement this creamy, vibrant dessert.
- Grilled Chicken Skewers: Juicy and smoky, these skewers enhance the fresh fruitiness while providing a savory contrast. Perfect for summer BBQs!
- Coconut Rice: Fluffy and subtly sweet, coconut rice enhances the tropical theme, making each bite more exotic and fun.
- Fresh Mint Salad: This light and refreshing salad with a zesty dressing offers a cool palate cleanser alongside the rich cheesecake salad.
- Pineapple-Mango Salsa: Bursting with fruity flavor, this zesty salsa complements the Hawaiian theme and adds a delightful kick.
- Sparkling Lemonade: A fizzy, refreshing drink that balances the creamy richness of the cheesecake salad, keeping your guests cool and refreshed.
- Chocolate-Covered Strawberries: Rich and sweet, these decadent treats provide a luxurious pairing that elevates your dessert spread.
These perfect pairings will not only elevate your Hawaiian Cheesecake Salad experience but also create a joyful feast that everyone will love!
Make Ahead Options
These Hawaiian Cheesecake Salad preparations are a lifesaver for busy weeknights or last-minute gatherings! You can prepare the creamy cheesecake base (cream cheese, powdered sugar, and whipped topping) up to 24 hours in advance; just store it in an airtight container in the refrigerator to keep it fresh and fluffy. Additionally, you can chop the pineapple, strawberries, and kiwi ahead of time and refrigerate them separately, ideally consumed within 2-3 days for the best texture. Avoid mixing the fruits into the cream until just before serving to prevent unwanted moisture. When ready to enjoy, simply fold the fruits into the mixture, chill, and top with toasted coconut for that delightful finish!
Expert Tips for Hawaiian Cheesecake Salad
Chill Ingredients: Ensure cream cheese and whipped topping are well-chilled before mixing for the best texture in your Hawaiian Cheesecake Salad.
Dry Fruits Thoroughly: Always rinse and dry each fruit to prevent excess moisture, which can make the salad watery. This is a common mistake that’s easy to avoid!
Mix Just Before Serving: For maximum freshness, combine the fruit and cream mixture right before serving if making ahead. This preserves the vibrant colors and flavors.
Customize Wisely: Feel free to swap fruits based on personal preference, but remember that very ripe fruits may release excess juice and alter the texture.
Toast Coconut Carefully: Keep an eye on the shredded coconut while toasting; it can go from golden to burnt quickly. This topping adds delightful texture and flavor!
Hawaiian Cheesecake Salad Recipe FAQs
What fruits are best for Hawaiian Cheesecake Salad?
Absolutely! While strawberries, pineapples, kiwis, and raspberries are traditional, feel free to swap in seasonal fruits. Mango chunks, blueberries, or even mandarin oranges can add a delightful twist while maintaining that tropical vibe.
How should I store Hawaiian Cheesecake Salad?
Store the salad in an airtight container in the refrigerator for up to 24 hours. This ensures it stays fresh and retains its creamy texture. For the best experience, mix the fruit and cream base just before serving if you’ve prepared them ahead of time.
Can I freeze Hawaiian Cheesecake Salad?
I wouldn’t recommend freezing this salad. Freezing alters the texture of the creamy base and fruits, leading to a less pleasant meal upon thawing. It’s best enjoyed fresh!
What if my fruits are too ripe?
Very! Overripe fruits can release excess juice, which might make the salad watery. Stick to firm, fresh fruits for the best results, and aim to prepare them right before mixing to maintain their sweetness and texture.
Can pets eat this salad?
No, while the fruits in this salad like strawberries and kiwi can be safe in moderation for pets, the cream cheese and whipped topping are not suitable for animals. Always keep treats meant for humans out of reach from furry friends!
Are there any allergy considerations for Hawaiian Cheesecake Salad?
Definitely! This salad contains dairy, which is common for allergies. If serving to guests with allergies, consider using dairy-free cream cheese and whipped topping alternatives, ensuring everyone can enjoy this tropical delight safely!
Hawaiian Cheesecake Salad: A Dreamy Tropical Treat
Ingredients
Equipment
Method
- In a large mixing bowl, beat 8 oz of softened cream cheese on medium speed for 2-3 minutes until smooth and fluffy.
- Sprinkle in 1/4 cup of powdered sugar and add 1 tsp of vanilla extract into the cream cheese mixture. Mix on medium speed for another minute.
- Gently fold in 8 oz of whipped topping using a spatula.
- Rinse and dry all your fruits thoroughly. Hull and halve 2 cups of fresh strawberries, peel and slice 2 kiwi, and chop 1 cup of pineapple.
- Fold prepared strawberries, kiwi, raspberries, and pineapple into the cheesecake mixture.
- Cover with plastic wrap and refrigerate for at least 1 hour.
- Toast 1/2 cup of shredded sweetened coconut in a dry skillet over medium heat for 3-5 minutes.
- Before serving, gently stir the chilled salad and sprinkle the toasted coconut on top.