


Have you ever found yourself dreaming of a dessert that combines the elegance of Italian tradition with a playful twist? Enter the Chocolate Chip Cannoli Cones! This delightful no-bake dessert takes the luscious, creamy filling of classic cannoli and snugly fits it into the crispy embrace of waffle cones. Perfect for those of us who yearn for a quick and easy treat, these cones are not only a feast for the eyes but also a crowd-pleaser at any gathering. Imagine serving these beauties at your next get-together, where every bite offers a satisfying crunch paired with velvety sweetness. Ready to dive into the world of homemade indulgence? Let’s bring this irresistible dessert to life!

Why are Chocolate Chip Cannoli Cones irresistible?
Decadent Flavors: Rich ricotta and mascarpone cheese create a heavenly filling that melts in your mouth. The subtle sweetness from powdered sugar and vanilla elevates each bite.
Quick & Easy: No-bake means you can whip these up in no time! Perfect for those who want a gourmet dessert without hours in the kitchen.
Versatile Delight: Customize your cones with different chocolate types or nuts for a unique spin that suits your taste. The option to add orange zest or cocoa powder allows for endless creativity.
Ultimate Crowd-Pleaser: Ideal for parties and gatherings, these cones add a touch of elegance to your dessert table alongside tasty options like Elegant White Chocolate or Honey Chipotle Chicken!
Eye-Catching Presentation: Gorgeous and fun, these cones are sure to impress your guests. They look beautiful arranged on a platter, making them a guaranteed conversation starter!
Chocolate Chip Cannoli Cones Ingredients
For those ready to create an indulgent treat!
For the Filling
- Ricotta Cheese – Use whole milk ricotta for the creamiest base possible.
- Mascarpone Cheese – Adds richness; can be substituted with cream cheese in a pinch.
- Powdered Sugar – Sweetens the filling and ensures a smooth texture; granulated sugar is an alternative but may alter the texture.
- Vanilla Extract – Enhances the overall flavor; opt for pure vanilla for the best results.
- Mini Chocolate Chips – Provides sweetness and texture; try substituting with chopped dark or white chocolate for a new flavor experience.
For the Cones
- Waffle Cones – Perfect crunchy vessel for the filling; sugar cones or mini ice cream cones work as alternatives.
- Crushed Pistachios – For decoration and a delightful crunch; finely chopped almonds or hazelnuts can be used as substitutes.
- Melted Chocolate (for dipping) – Adds a rich decorative touch; any chocolate variety can elevate the flavor.
Let’s get mixing and make those delicious Chocolate Chip Cannoli Cones come to life!
Step‑by‑Step Instructions for Chocolate Chip Cannoli Cones
Step 1: Prepare Cannoli Filling
Begin by combining 1 cup of ricotta cheese, 1 cup of mascarpone cheese, 1/2 cup of powdered sugar, and 1 teaspoon of vanilla extract in a medium mixing bowl. Use a hand mixer or whisk to blend until smooth and creamy, ensuring no lumps remain. Once combined, gently fold in 1/2 cup of mini chocolate chips for a delightful texture that complements the filling.
Step 2: Chill the Filling
To enhance the flavors and make piping easier, cover the filling with plastic wrap and refrigerate it for about 30 minutes. Chilling allows the mixture to thicken slightly, providing a perfect consistency for filling the cones while ensuring the Chocolate Chip Cannoli Cones have a rich, creamy texture when served.
Step 3: Fill the Cones
Once chilled, transfer the cannoli filling into a piping bag fitted with a large round tip. Start from the bottom of each waffle cone and fill them generously, creating a smooth layer of filling that rises slightly at the top. This process ensures that every bite of your Chocolate Chip Cannoli Cones is bursting with sweet goodness and creamy delight.
Step 4: Dip and Decorate
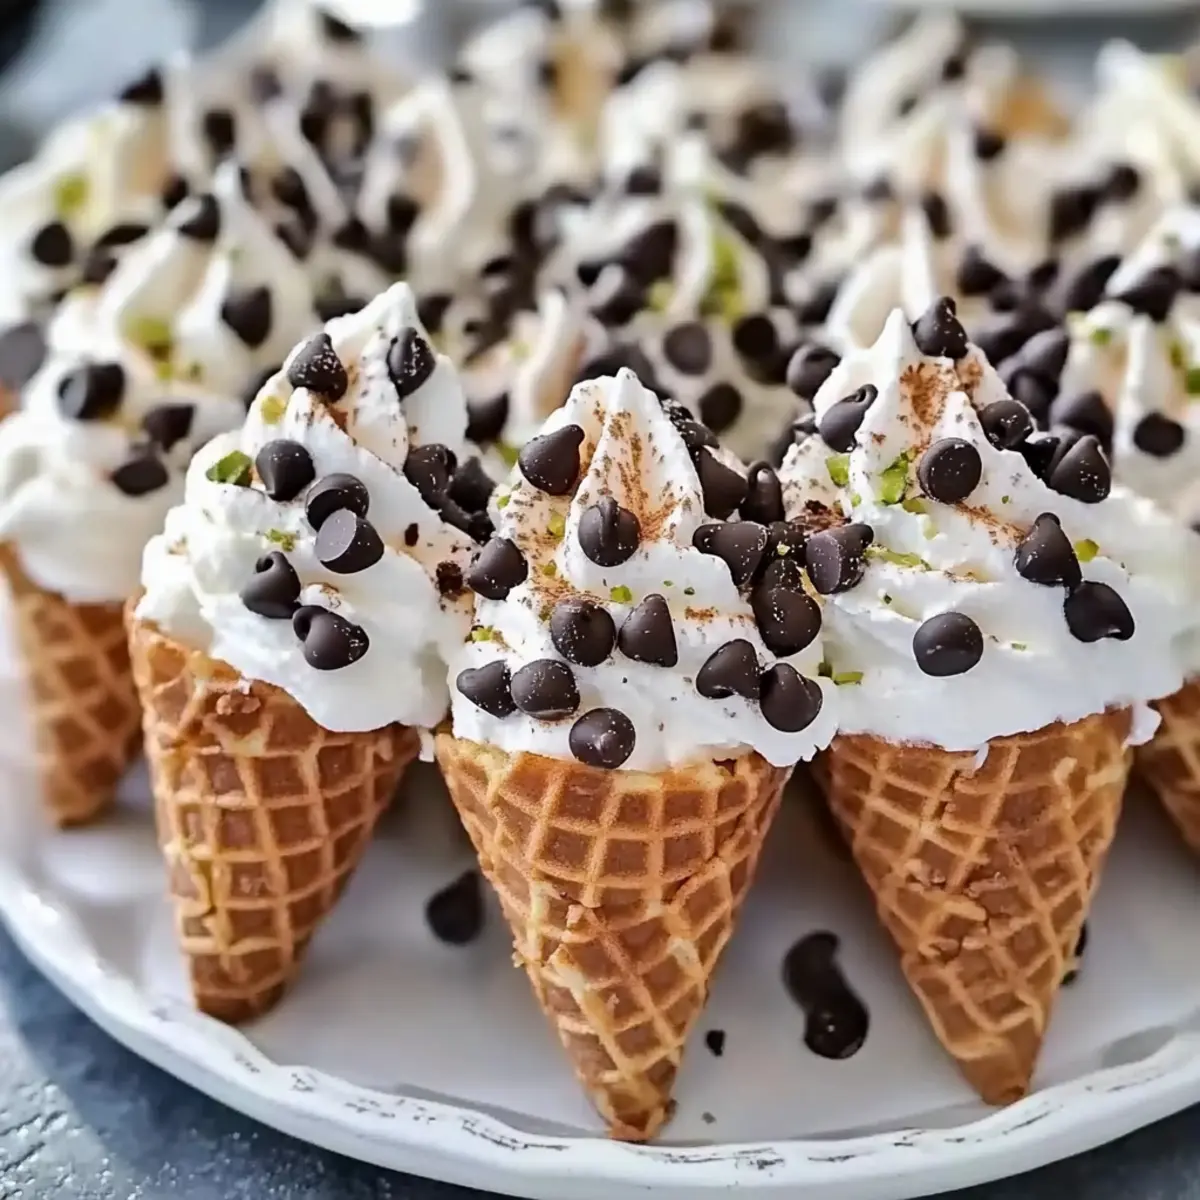
Melt about 1/2 cup of mini chocolate chips in a microwave-safe bowl, heating in 30-second intervals until fully melted and smooth. Dip the rim of each filled cone into the melted chocolate, then roll the edge in crushed pistachios for added crunch and color. Allow the chocolate to set for a few minutes, giving your cones that beautiful finishing touch.
Step 5: Serve with a Touch of Elegance
Arrange your prepared Chocolate Chip Cannoli Cones on a decorative platter. For an extra special presentation, dust the tops with a light sprinkle of powdered sugar just before serving. This not only enhances the visual appeal but also adds a touch of sweetness, making your dessert an irresistible treat for every occasion.

How to Store and Freeze Chocolate Chip Cannoli Cones
Fridge: Store filled Chocolate Chip Cannoli Cones in an airtight container in the refrigerator for up to 2 days. This helps preserve the filling’s freshness, but the cones may lose their crispness.
Freezer: For longer storage, you can freeze just the filling in a sealed container for up to 1 month. When ready to enjoy, let it thaw in the fridge overnight, then fill fresh cones.
Prevent Sogginess: If you need to fill the cones ahead of time, brush the insides with melted chocolate to create a barrier and help maintain their crunch.
Reheating: If you’re serving leftovers, please note that the filled cones are best enjoyed cold or at room temperature. Avoid reheating, as it can affect the texture and flavor.
Tips for the Best Chocolate Chip Cannoli Cones
-
Cheese Consistency: Use whole milk ricotta and mascarpone for the richest and creamiest filling. Low-fat options may compromise texture and flavor.
-
Chill Thoroughly: Allow the filling to chill for at least 30 minutes. This step thickens the mixture, making it much easier to pipe into the cones.
-
Fill Just Before Serving: To maintain that perfect crunch, fill the cones right before serving. If preparing in advance, coat the insides with melted chocolate to prevent sogginess.
-
Piping Technique: Start filling from the bottom of the cone to ensure an even distribution of the decadent filling throughout, guaranteeing each bite is delightful!
-
Custom Decoration: Get creative! Experiment with different toppings like crushed nuts or drizzled chocolate to personalize your Chocolate Chip Cannoli Cones and impress your guests.
Make Ahead Options
These Chocolate Chip Cannoli Cones are perfect for meal prep, making your dessert planning easier and more efficient! You can prepare the creamy filling up to 24 hours in advance. Simply combine the ricotta, mascarpone, powdered sugar, and vanilla, then refrigerate the mixture in an airtight container. To maintain the cones’ crisp texture, keep the waffle cones separate and fill them just before serving. If you’re concerned about sogginess, brush the insides of the cones with melted chocolate to create a barrier. When it’s time to indulge, fill the cones with the chilled cannoli filling, dip them in chocolate, and decorate with pistachios for that beautifully polished finish! Enjoy the joy of a homemade dessert with minimal last-minute effort!
Chocolate Chip Cannoli Cones Variations
Feel free to play around and make these delicious Chocolate Chip Cannoli Cones your own!
- Dark Chocolate: Substitute mini chocolate chips with finely chopped dark chocolate for a richer flavor that pairs beautifully with the creamy filling.
- Nut-Free: Skip the nuts completely for a nut-free version! Your cones will still be delightful without losing their charm.
- Dairy-Free: Use non-dairy ricotta and cream cheese to create a lactose-free alternative that everyone can enjoy. The end result will still be creamy and satisfying.
- Citrus Flare: Add a teaspoon of lemon or orange zest for a bright and zesty twist that enhances the flavors of the filling. This citrus kick will surprise your taste buds!
- Chocolate Drizzle: Instead of dipping, drizzle melted chocolate over the filled cones for a decorative touch and an extra hint of sweetness. Elevating the presentation has never been easier!
- Spicy Kick: For a bit of heat, include a pinch of cayenne pepper into the filling. This surprising twist adds a unique and compelling flavor contrast.
- Fill and Freeze: Fill the cones with the mixture and freeze them for a frozen treat. Serve chilled on hot summer days for a nostalgic twist to ice cream!
- Choco-Pistachio Delight: Replace the crushed pistachios with crushed Oreos for a chocolatey crunch that will take your cones in a completely different direction.
These variations not only add exciting flavors but also cater to different dietary needs! Try serving them alongside a platter of delectable desserts like Honey Chipotle Chicken for a perfect balanced feast. Enjoy experimenting!
What to Serve with Chocolate Chip Cannoli Cones
These delightful cones deserve a delicious spread that complements their sweet, creamy goodness.
-
Fresh Berries: Beautifully vibrant, a mix of strawberries, blueberries, and raspberries adds a refreshing contrast that balances the sweetness of the cannoli. Their juiciness also cleanses the palate.
-
Decadent Espresso: A rich cup of espresso enhances the chocolate flavors while giving a delightful pick-me-up after a sweet treat. The warmth of coffee pairs wonderfully with the cool, creamy filling.
-
Vanilla Ice Cream: Creamy vanilla ice cream creates a luscious combination with the crunchy cones. The melt-in-your-mouth richness is perfect for a summer night dessert or cozy evening treat.
-
Chocolate Drizzle: Enhance your cones by drizzling warm chocolate sauce over the top for an extra dose of indulgence. This can also double down on the texture, adding a delightful stickiness.
-
Mint Tea: A soothing mint tea brings a refreshing touch to balance the rich dessert. It’s the perfect drink to sip while enjoying your cannoli cones.
-
Coconut Macaroons: For a sweet nibble that echoes your cannoli flavors, serve crispy coconut macaroons on the side. The tropical bite complements the rich, creamy taste of the filling.
These suggestions will elevate your dessert experience and leave everyone reaching for seconds!

Chocolate Chip Cannoli Cones Recipe FAQs
What type of ricotta cheese should I use for the filling?
Absolutely! For the best flavor and texture, I recommend using whole milk ricotta cheese. It creates a creamy base that enhances the overall richness of your Chocolate Chip Cannoli Cones. Low-fat ricotta can lead to a grainy filling that won’t have the same delightful mouthfeel.
How should I store leftover filled Chocolate Chip Cannoli Cones?
I often suggest storing any filled Chocolate Chip Cannoli Cones in an airtight container in the refrigerator for up to 2 days. However, be mindful that while the filling may stay fresh, the waffle cones could lose their delightful crunch over time.
Can I freeze the filling for later use? How?
Very! You can freeze the cannoli filling for up to 1 month. Simply place it in a sealed container or a freezer bag, making sure to remove as much air as possible. When you’re ready to enjoy, let it thaw in the refrigerator overnight, and then fill fresh waffle cones just before serving for the best texture!
What can I do if the cones become soggy after filling?
A great tip to prevent sogginess is to brush the insides of the waffle cones with melted chocolate before filling them. This creates a barrier that helps keep the filling separate from the cone, maintaining that perfect crunch for longer. Additionally, only fill the cones right before serving for optimal freshness.
Are there any dietary considerations I should keep in mind?
Definitely! If you’re preparing these Chocolate Chip Cannoli Cones for guests, make sure to check for allergies, especially regarding dairy and nuts. If someone is lactose intolerant, consider using lactose-free versions of ricotta and mascarpone. You can also offer alternative toppings like coconut flakes or avoid nuts altogether if there’s a concern.
How can I make the filling thicker for easier piping?
If you find your filling isn’t thick enough for piping, I recommend chilling it in the refrigerator for about 30 minutes. This allows the mixture to thicken nicely, making it easier to transfer to a piping bag. Alternatively, if you want a denser filling, you can mix in a small amount of mascarpone cheese or even a spoonful of cocoa powder for a delightful twist!
Delicious Chocolate Chip Cannoli Cones for Easy Indulgence
Ingredients
Equipment
Method
- Combine ricotta cheese, mascarpone cheese, powdered sugar, and vanilla extract in a medium mixing bowl. Blend until smooth and creamy.
- Gently fold in mini chocolate chips.
- Cover and refrigerate the filling for about 30 minutes.
- Transfer filling to a piping bag and fill the waffle cones.
- Melt mini chocolate chips and dip the rims of each cone, rolling in crushed pistachios.
- Arrange the cones on a platter and dust with powdered sugar before serving.