There’s something magical about a Strawberry Shortcake Layer Cake that brings back memories of summer picnics and family gatherings.
This delightful dessert is not just a treat; it’s a celebration on a plate.
Whether you’re looking to impress your loved ones or simply want a quick solution for a busy day, this cake fits the bill perfectly.
With its light, fluffy layers and fresh strawberries, it’s a sweet escape that’s easy to whip up.
Let’s dive into this recipe that promises to bring joy to your kitchen and smiles to your table!
Why You’ll Love This Strawberry Shortcake Layer Cake
This Strawberry Shortcake Layer Cake is a game-changer for any dessert lover.
It’s incredibly easy to make, even for those who might feel intimidated in the kitchen.
With just a handful of ingredients, you can create a stunning cake that tastes like a slice of heaven.
Plus, it’s perfect for any occasion, from birthdays to casual get-togethers.
Trust me, your friends and family will be begging for seconds!
Ingredients for Strawberry Shortcake Layer Cake
Creating a Strawberry Shortcake Layer Cake is all about using fresh, quality ingredients that come together to create a delightful experience.
Here’s what you’ll need:
All-purpose flour: The backbone of your cake, providing structure and a light texture.
Granulated sugar: Sweetens the cake and helps achieve that lovely golden color.
Unsalted butter: Adds richness and moisture; make sure it’s softened for easy creaming.
Whole milk: Keeps the cake moist and tender; you can substitute with almond or oat milk for a dairy-free option.
Baking powder: The leavening agent that gives your cake its fluffy rise.
Vanilla extract: A must for flavor; it enhances the sweetness and aroma of the cake.
Salt: Just a pinch to balance the sweetness and enhance the flavors.
Large eggs: They bind the ingredients together and add moisture; room temperature eggs work best.
Fresh strawberries: The star of the show! Use ripe, juicy strawberries for the best flavor.
Heavy whipping cream: Essential for making that luscious whipped cream topping; you can swap half with Greek yogurt for a lighter version.
Powdered sugar: Sweetens the whipped cream and helps stabilize it.
Additional vanilla extract: For the whipped cream, it adds a lovely flavor boost.
For exact measurements, check the bottom of the article where you can find everything listed for easy printing.
With these ingredients, you’re well on your way to creating a cake that’s not just a dessert, but a memory in the making!
How to Make Strawberry Shortcake Layer Cake
Making a Strawberry Shortcake Layer Cake is a delightful journey that fills your kitchen with sweet aromas and your heart with joy.
Let’s break it down step by step, ensuring you have all the tips you need for a perfect cake.
Step 1: Preheat and Prepare
Start by preheating your oven to 350°F (175°C).
This step is crucial for even baking, ensuring your cake rises beautifully.
While the oven warms up, grease and flour two 9-inch round cake pans.
This will help the cakes release easily once they’re baked.
Step 2: Cream the Butter and Sugar
In a large mixing bowl, cream together the softened butter and granulated sugar until the mixture is light and fluffy.
This process is key to achieving a light texture in your cake.
The air you incorporate during creaming will help the cake rise, giving it that delightful fluffiness.
Step 3: Add Eggs and Vanilla
Next, add the eggs one at a time, mixing well after each addition.
This ensures that each egg is fully incorporated, which is vital for the cake’s structure.
Don’t forget to stir in the vanilla extract; it adds a warm, inviting flavor that complements the strawberries perfectly.
Step 4: Combine Dry Ingredients
In another bowl, whisk together the all-purpose flour, baking powder, and salt.
Gradually add this dry mixture to the wet ingredients, alternating with the whole milk.
This method prevents clumping and ensures a smooth batter.
Mix until just combined; overmixing can lead to a dense cake.
Step 5: Bake the Cakes
Divide the batter evenly between the prepared cake pans.
Smooth the tops with a spatula for an even bake.
Bake in the preheated oven for 25-30 minutes.
To check for doneness, insert a toothpick into the center; it should come out clean.
Step 6: Cool the Cakes
Once baked, allow the cakes to cool in the pans for about 10 minutes.
This helps them set before transferring them to wire racks.
Cooling completely is crucial before frosting; otherwise, the whipped cream will melt.
Step 7: Prepare the Whipped Cream
While the cakes cool, it’s time to whip up the cream.
In a mixing bowl, beat the heavy whipping cream, powdered sugar, and additional vanilla extract until soft peaks form.
For the best results, ensure your bowl and beaters are cold; this helps the cream whip up nicely.
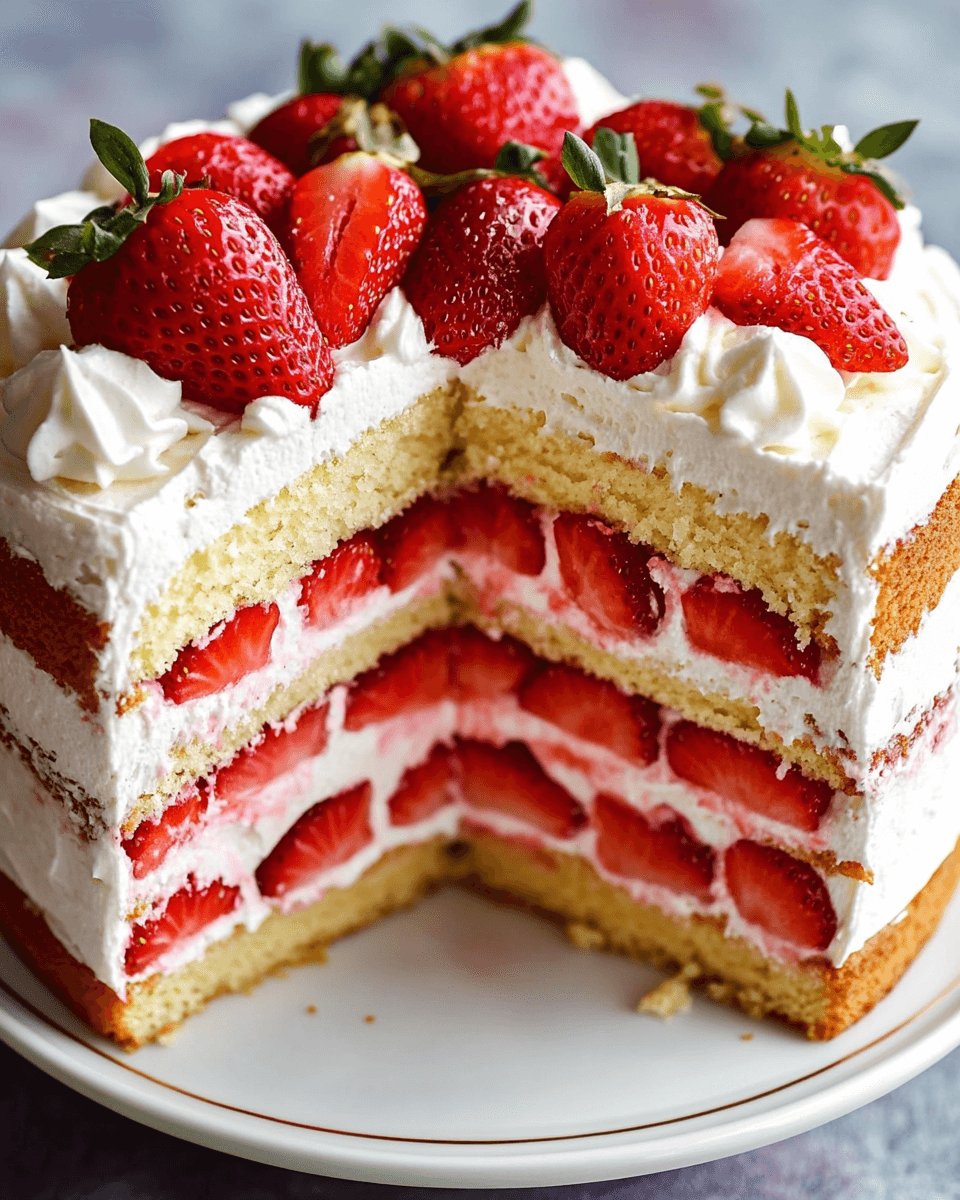
Step 8: Assemble the Cake
Once the cakes are completely cool, place one layer on a serving plate.
Spread a generous layer of whipped cream over the top, then add half of the sliced strawberries.
Top with the second cake layer and repeat the process with the remaining whipped cream and strawberries.
Step 9: Decorate
For the finishing touch, decorate the top of the cake with any remaining strawberries and a dollop of whipped cream.
Feel free to get creative! A sprinkle of mint leaves or a drizzle of chocolate can elevate your cake to a whole new level.
Now, step back and admire your beautiful creation before diving in!
Tips for Success
Use room temperature ingredients for better mixing and a smoother batter.
Don’t overmix the batter; stop as soon as you see no dry flour.
For extra flavor, macerate the strawberries with a bit of sugar before layering.
Chill your mixing bowl and beaters before whipping cream for better volume.
Let the cake cool completely to prevent the whipped cream from melting.
Equipment Needed
Mixing bowls: A set of various sizes is ideal; you can use any large bowl if needed.
Electric mixer: A hand mixer works great; a whisk can be used for a workout!
Measuring cups and spoons: Essential for accuracy; you can use a kitchen scale for precision.
Spatula: A rubber spatula is perfect for scraping down the sides of the bowl.
9-inch round cake pans: If you don’t have these, any similar-sized pans will do.
Variations
Chocolate Strawberry Shortcake: Add cocoa powder to the cake batter for a rich chocolate flavor that pairs beautifully with strawberries.
Gluten-Free Option: Substitute all-purpose flour with a gluten-free flour blend to make this cake suitable for those with gluten sensitivities.
Vegan Version: Replace eggs with flaxseed meal and use plant-based butter and milk for a delicious vegan treat.
Lemon Zest: Incorporate lemon zest into the batter for a refreshing citrus twist that complements the strawberries.
Berry Medley: Mix in other berries like blueberries or raspberries for a colorful and flavorful cake.
Serving Suggestions
Pair your Strawberry Shortcake Layer Cake with a scoop of vanilla ice cream for a delightful contrast.
Serve with a side of fresh mint leaves to enhance the cake’s flavor.
A glass of chilled lemonade or iced tea complements the sweetness perfectly.
For presentation, dust the top with powdered sugar for an elegant touch.
FAQs about Strawberry Shortcake Layer Cake
Can I make the Strawberry Shortcake Layer Cake ahead of time?
Absolutely! You can bake the cake layers a day in advance. Just wrap them tightly in plastic wrap and store them in the fridge. Assemble the cake with whipped cream and strawberries on the day you plan to serve it for the best freshness.
What can I use instead of heavy whipping cream?
If you’re looking for a lighter option, you can substitute half of the heavy cream with Greek yogurt. This will still give you a creamy texture while cutting down on calories. Alternatively, coconut cream works well for a dairy-free version.
How do I store leftover cake?
Store any leftover Strawberry Shortcake Layer Cake in an airtight container in the refrigerator. It’s best enjoyed within 2-3 days, as the whipped cream may start to soften over time.
Can I freeze the cake?
Yes, you can freeze the cake layers before frosting. Wrap them tightly in plastic wrap and then in aluminum foil. When you’re ready to enjoy, let them thaw in the fridge overnight before assembling with whipped cream and strawberries.
What other fruits can I use in this cake?
While strawberries are the star, you can mix in other fruits like blueberries, raspberries, or even peaches for a delightful twist. Just make sure to adjust the sweetness based on the fruit you choose!
Final Thoughts
Baking a Strawberry Shortcake Layer Cake is more than just following a recipe; it’s about creating moments that linger long after the last slice is gone.
The joy of layering fluffy cake with fresh strawberries and whipped cream is a celebration of flavors and memories.
Each bite transports you to sunny days and laughter shared with loved ones.
Whether it’s a special occasion or a simple weeknight treat, this cake brings happiness to the table.
So, roll up your sleeves, gather your ingredients, and let this delightful dessert become a cherished part of your culinary adventures!
A delicious and light Strawberry Shortcake Layer Cake perfect for any occasion.
Ingredients
Scale
2 cups all-purpose flour
1 ½ cups granulated sugar
½ cup unsalted butter, softened
1 cup whole milk
3 ½ teaspoons baking powder
1 teaspoon vanilla extract
½ teaspoon salt
4 large eggs
2 cups fresh strawberries, hulled and sliced
1 cup heavy whipping cream
2 tablespoons powdered sugar
1 teaspoon vanilla extract (for whipped cream)
Instructions
Preheat the oven to 350°F (175°C). Grease and flour two 9-inch round cake pans.
In a large mixing bowl, cream together the softened butter and granulated sugar until light and fluffy.
Add the eggs one at a time, mixing well after each addition. Stir in the vanilla extract.
In another bowl, whisk together the flour, baking powder, and salt. Gradually add this dry mixture to the wet ingredients, alternating with the milk. Mix until just combined.
Divide the batter evenly between the prepared cake pans. Smooth the tops with a spatula.
Bake in the preheated oven for 25-30 minutes, or until a toothpick inserted into the center comes out clean.
Allow the cakes to cool in the pans for 10 minutes, then turn them out onto wire racks to cool completely.
While the cakes are cooling, prepare the whipped cream. In a mixing bowl, beat the heavy whipping cream, powdered sugar, and vanilla extract until soft peaks form.
Once the cakes are completely cool, place one layer on a serving plate. Spread a layer of whipped cream over the top and add half of the sliced strawberries.
Place the second cake layer on top and repeat the process with the remaining whipped cream and strawberries.
Decorate the top with any remaining strawberries and a dollop of whipped cream if desired.
Notes
For a lighter version, substitute half of the heavy cream with Greek yogurt.
You can also add a layer of lemon curd between the cake layers for a zesty twist.