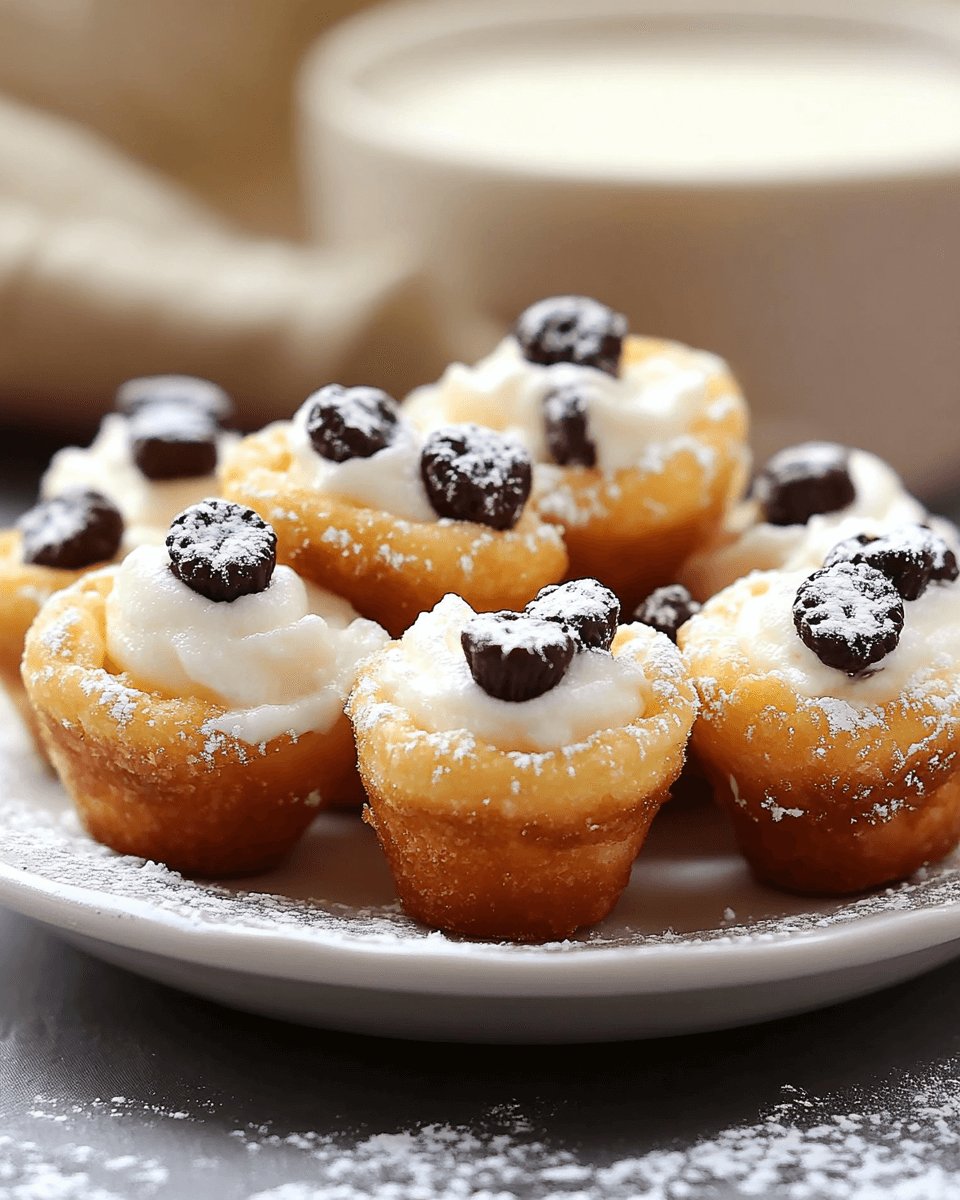
There’s something magical about desserts that bring a smile to your face, and Mini Cannoli Cups do just that. These delightful little treats are perfect for any occasion, whether you’re hosting a gathering or simply craving something sweet after a long day. With their creamy filling nestled in crispy phyllo pastry, they offer a taste of Italy right in your kitchen. Plus, they’re a quick solution for busy days when you want to impress your loved ones without spending hours in the kitchen. Trust me, once you try these, they’ll become a go-to dessert!
Why You’ll Love This Mini Cannoli Cups
Mini Cannoli Cups are a game-changer in the dessert world. They’re incredibly easy to whip up, making them perfect for those last-minute gatherings or a sweet treat after dinner. The combination of creamy filling and crispy pastry is simply irresistible. Plus, they look stunning on any table, impressing your guests without the fuss. With just a handful of ingredients, you’ll have a delightful dessert that’s sure to please everyone!
Ingredients for Mini Cannoli Cups
Gathering the right ingredients is the first step to creating these delightful Mini Cannoli Cups. Here’s what you’ll need:
Ricotta cheese: This creamy cheese forms the base of the filling, giving it a rich texture.
Mascarpone cheese: Adds a luxurious creaminess that elevates the flavor profile.
Powdered sugar: Sweetens the filling without the graininess of granulated sugar.
Vanilla extract: A splash of this enhances the overall flavor, making it more aromatic.
Ground cinnamon: Just a hint of spice that complements the sweetness beautifully.
Mini chocolate chips: These little gems add a delightful crunch and chocolatey goodness.
Mini phyllo pastry cups: The crispy vessel for your filling; store-bought makes it super easy!
Pistachios, chopped: A colorful and crunchy garnish that adds a touch of elegance.
For those looking to mix things up, consider these optional ingredients:
Cocoa powder: For a chocolate twist, add a couple of tablespoons to the filling.
Dried fruit: Swap chocolate chips for raisins or cherries for a fruity flavor.
Exact measurements for these ingredients can be found at the bottom of the article, ready for printing. Happy cooking!
How to Make Mini Cannoli Cups
Creating Mini Cannoli Cups is a breeze, and I’m here to guide you through each step. With just a few simple actions, you’ll have a dessert that’s not only delicious but also visually stunning. Let’s dive in!
Step 1: Preheat the Oven
First things first, preheat your oven to 350°F. This step is crucial if you’re using phyllo cups that need crisping. A hot oven ensures that the cups turn golden and crunchy, providing the perfect contrast to the creamy filling. Trust me, you want that delightful crunch!
Step 2: Prepare the Filling
In a mixing bowl, combine the ricotta cheese and mascarpone cheese. Add the powdered sugar, vanilla extract, and ground cinnamon. Mix everything together until it’s smooth and creamy. This filling is the heart of your Mini Cannoli Cups, so take your time to get it just right. The flavors will meld beautifully!
Step 3: Fold in Chocolate Chips
Now, it’s time to add the mini chocolate chips. Gently fold them into the filling using a spatula. Folding is key here; it keeps the mixture light and airy. You want those little chocolate morsels to be evenly distributed without deflating your creamy concoction. It’s like a dance—gentle and precise!
Step 4: Crisp the Phyllo Cups
If you’re using store-bought phyllo cups, you can skip this step. But if you’re baking them, place the cups on a baking sheet and pop them in the oven for about 5-7 minutes. Keep an eye on them! You want them lightly golden and crisp, not burnt. The aroma will fill your kitchen, and you’ll know they’re ready!
Step 5: Fill the Cups
Once the phyllo cups have cooled, it’s time to fill them. Spoon the creamy filling generously into each cup. Don’t be shy! Just be careful not to overfill them, as you want to avoid any spillage. A heaping spoonful in each cup will create a delightful surprise for your guests!
Step 6: Garnish and Serve
Finally, it’s time to make your Mini Cannoli Cups look as good as they taste. Sprinkle chopped pistachios on top for a pop of color and crunch. You can also dust them with a little extra powdered sugar for that professional touch. Serve them immediately for the best experience, or refrigerate for up to two hours for a chilled treat!
Tips for Success
Use room temperature ingredients for a smoother filling.
Don’t skip the folding technique; it keeps the filling light and fluffy.
Experiment with different toppings like crushed almonds or a drizzle of chocolate.
Make the filling ahead of time and store it in the fridge for up to 24 hours.
For a fun twist, try adding a splash of orange zest to the filling!
Equipment Needed
Mixing bowl: A medium-sized bowl works best; a large one can be used if you’re making a double batch.
Spatula: A rubber spatula is ideal for folding in ingredients gently.
Baking sheet: Any flat baking tray will do for crisping the phyllo cups.
Spoon: Use a regular spoon or a small ice cream scoop for filling.
Variations
Chocolate Cannoli Cups: Add cocoa powder to the filling for a rich chocolate flavor.
Fruit-Infused Cups: Substitute mini chocolate chips with dried fruits like cherries or apricots for a fruity twist.
Nutty Delight: Mix in crushed hazelnuts or almonds for an extra crunch and nutty flavor.
Gluten-Free Option: Use gluten-free phyllo cups to make this dessert suitable for gluten-sensitive guests.
Vegan Version: Replace dairy cheeses with vegan alternatives like cashew cream and use maple syrup instead of powdered sugar.
Serving Suggestions
Pair Mini Cannoli Cups with a rich espresso or a sweet dessert wine for a delightful finish.
Serve alongside fresh berries for a burst of color and flavor.
Present them on a decorative platter, dusted with powdered sugar for an elegant touch.
Consider adding a scoop of vanilla ice cream for an indulgent treat.
FAQs about Mini Cannoli Cups
As you embark on your journey to create these delightful Mini Cannoli Cups, you might have a few questions. Here are some common queries that can help you along the way:
Can I make the filling ahead of time?
Absolutely! You can prepare the filling a day in advance. Just store it in an airtight container in the fridge. This way, you can save time when you’re ready to assemble your Mini Cannoli Cups.
What can I use instead of phyllo cups?
If you can’t find phyllo cups, consider using mini tart shells or even graham cracker crusts. They’ll provide a different texture but still deliver a delicious dessert experience.
How do I store leftover Mini Cannoli Cups?
Store any leftovers in an airtight container in the fridge. They’re best enjoyed within a day or two, as the phyllo cups can become soggy over time.
Can I freeze Mini Cannoli Cups?
While it’s not recommended to freeze the filled cups, you can freeze the filling separately. Just thaw it in the fridge before filling fresh phyllo cups when you’re ready to enjoy them again.
What other toppings can I use for Mini Cannoli Cups?
Get creative! You can top them with crushed nuts, a drizzle of chocolate, or even fresh fruit. Each topping adds a unique twist to your Mini Cannoli Cups!
Final Thoughts
Making Mini Cannoli Cups is more than just whipping up a dessert; it’s about creating moments of joy. Each bite offers a delightful crunch paired with a creamy filling that dances on your taste buds. Whether you’re sharing them with friends or savoring them solo, these little treats bring a taste of Italy right to your home. Plus, the ease of preparation means you can focus on what truly matters—enjoying the experience. So, roll up your sleeves, gather your ingredients, and let the magic of Mini Cannoli Cups brighten your day!
Mini Cannoli Cups are a delightful and easy dessert made with a creamy filling and crispy phyllo pastry cups.
Ingredients
Scale
1 cup ricotta cheese
1 cup mascarpone cheese
1/2 cup powdered sugar
1 teaspoon vanilla extract
1/2 teaspoon ground cinnamon
1/4 cup mini chocolate chips
12 mini phyllo pastry cups (store-bought)
Pistachios, chopped (for garnish)
Instructions
Preheat your oven to 350°F if you need to crisp the phyllo cups. If using store-bought, you can skip this step.
In a mixing bowl, combine the ricotta cheese, mascarpone cheese, powdered sugar, vanilla extract, and ground cinnamon. Mix until smooth and well combined.
Gently fold in the mini chocolate chips.
If using phyllo cups, place them on a baking sheet and bake for 5-7 minutes until lightly golden and crisp. Allow to cool.
Spoon the cannoli filling into each mini phyllo cup, filling them generously.
Garnish with chopped pistachios on top of each filled cup.
Serve immediately or refrigerate for up to 2 hours before serving for a chilled treat.
Notes
For a chocolate twist, add 2 tablespoons of cocoa powder to the filling mixture.
Substitute the chocolate chips with dried fruit like raisins or cherries for a different flavor profile.