


As I unrolled the colorful creation before me, I was instantly taken back to carefree childhood mornings filled with laughter and crunching cereal. Fruity Pebbles Sushi is not just a playful dessert; it’s a delightful no-bake treat that anyone can whip up in no time. The best part? It’s a fantastic way to transform a simple breakfast staple into a fun and visually stunning dish that’s sure to impress at any gathering. With its easy preparation and versatile fillings, you can customize each roll to suit your taste, whether you prefer a burst of colorful gummies or decadent Nutella. This playful twist on sushi will not only spark joy in your kitchen but also create sweet memories for all who share it. Who wouldn’t want to try making these whimsical sushi rolls together?
Why Is Fruity Pebbles Sushi So Irresistible?
Colorful Creativity: The vibrant hues of Fruity Pebbles make this dessert eye-catching and fun for all ages. Easy No-Bake Delight: This no-bake treat requires minimal effort, making it perfect for both beginner cooks and busy chefs alike. Customizable Flavors: You can easily switch out cereals or fillings, allowing for endless variations; try Pistachio Raspberry Perfection for a different spin! Nostalgic Treat: It taps into childhood memories, bringing joy to both kids and adults during gatherings or parties. Quick Assembly: With just a few steps and only a short wait time, you can have a delightful dessert ready to impress family and friends! Don’t forget to pair it with a colorful platter presentation for an extra pop!
Fruity Pebbles Sushi Ingredients
Get ready to create a delightful no-bake treat!
For the Sushi Mixture
- Fruity Pebbles Cereal – Provides the colorful, crunchy texture; substitute with Cocoa Pebbles for a chocolate twist.
- Marshmallows – Acts as the binding agent, creating a chewy base; use fresh marshmallows for the best results.
- Butter – Grease your hands and pan to prevent sticking.
For Optional Fillings
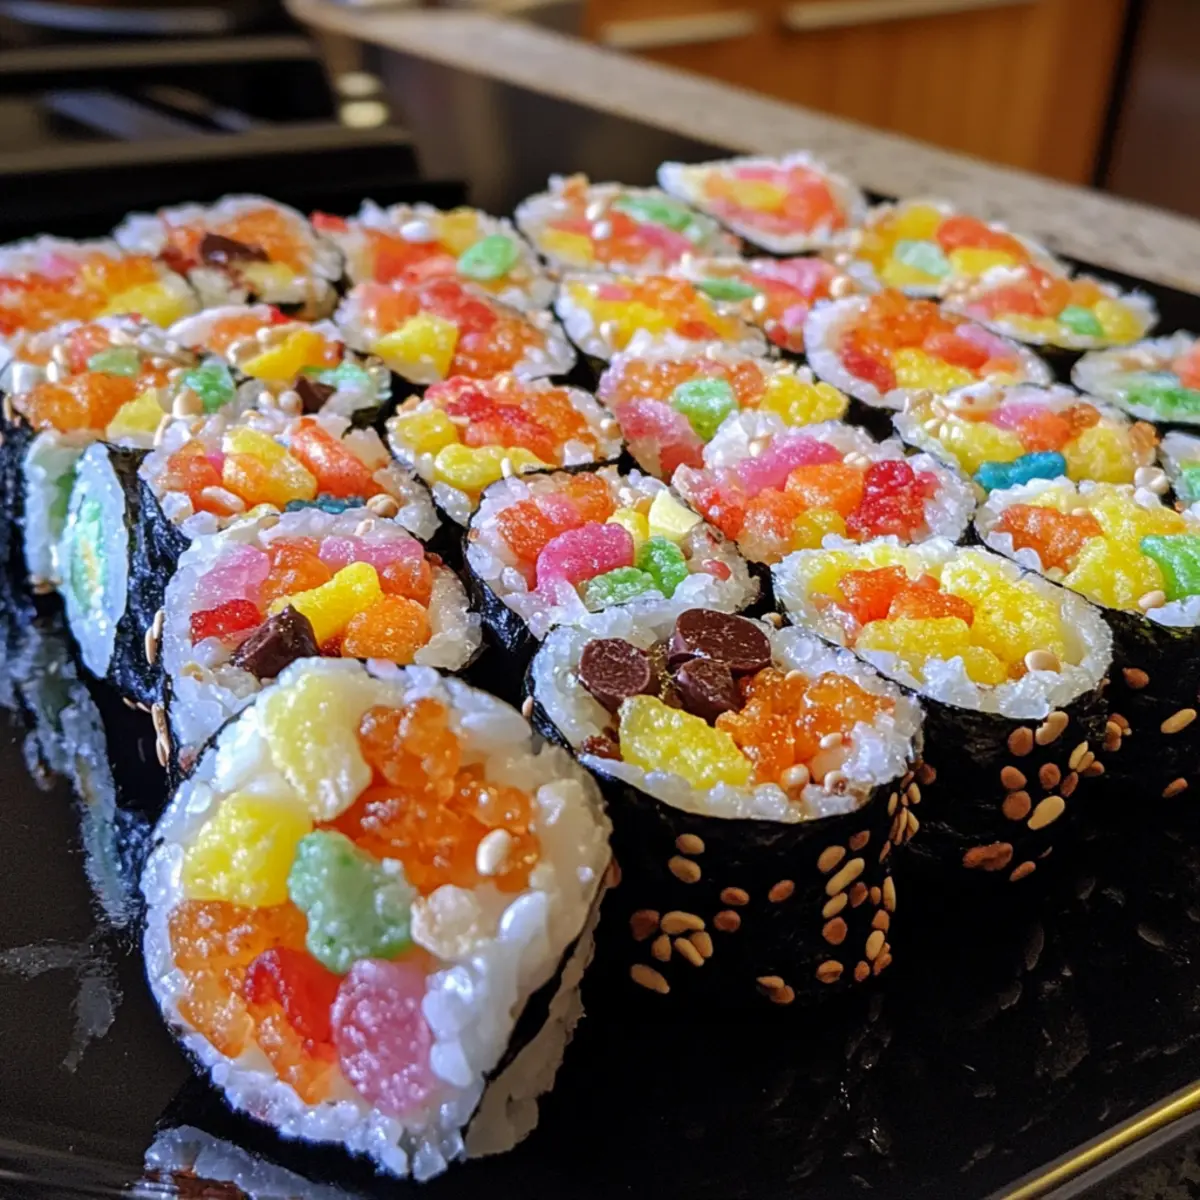
- Gummy Sweets – Add a fun, chewy surprise to your sushi rolls; choose your favorites for a colorful mix.
- Nutella – Provides a rich, creamy sweetness to contrast with the crunch of the cereal.
- Chocolate Chips – Melt-in-your-mouth goodness that adds extra layers of flavor; dark or milk chocolate both work well.
Step‑by‑Step Instructions for Fruity Pebbles Sushi
Step 1: Prepare Ingredients
Begin by gathering all your ingredients for the Fruity Pebbles Sushi. Grease your hands with a little butter to prevent sticking later, and set aside a large baking sheet lined with parchment paper for easy cleanup. This will be your workspace, so ensure it’s spacious enough to spread out the mixture comfortably.
Step 2: Melt Marshmallows
In a medium pot over low heat, add your marshmallows and stir continuously for about 4-5 minutes until they melt into a smooth, gooey consistency. It’s important to keep an eye on them to prevent scorching, so stir steadily. Once melted, remove the pot from heat and prepare for the next step.
Step 3: Mix with Cereal
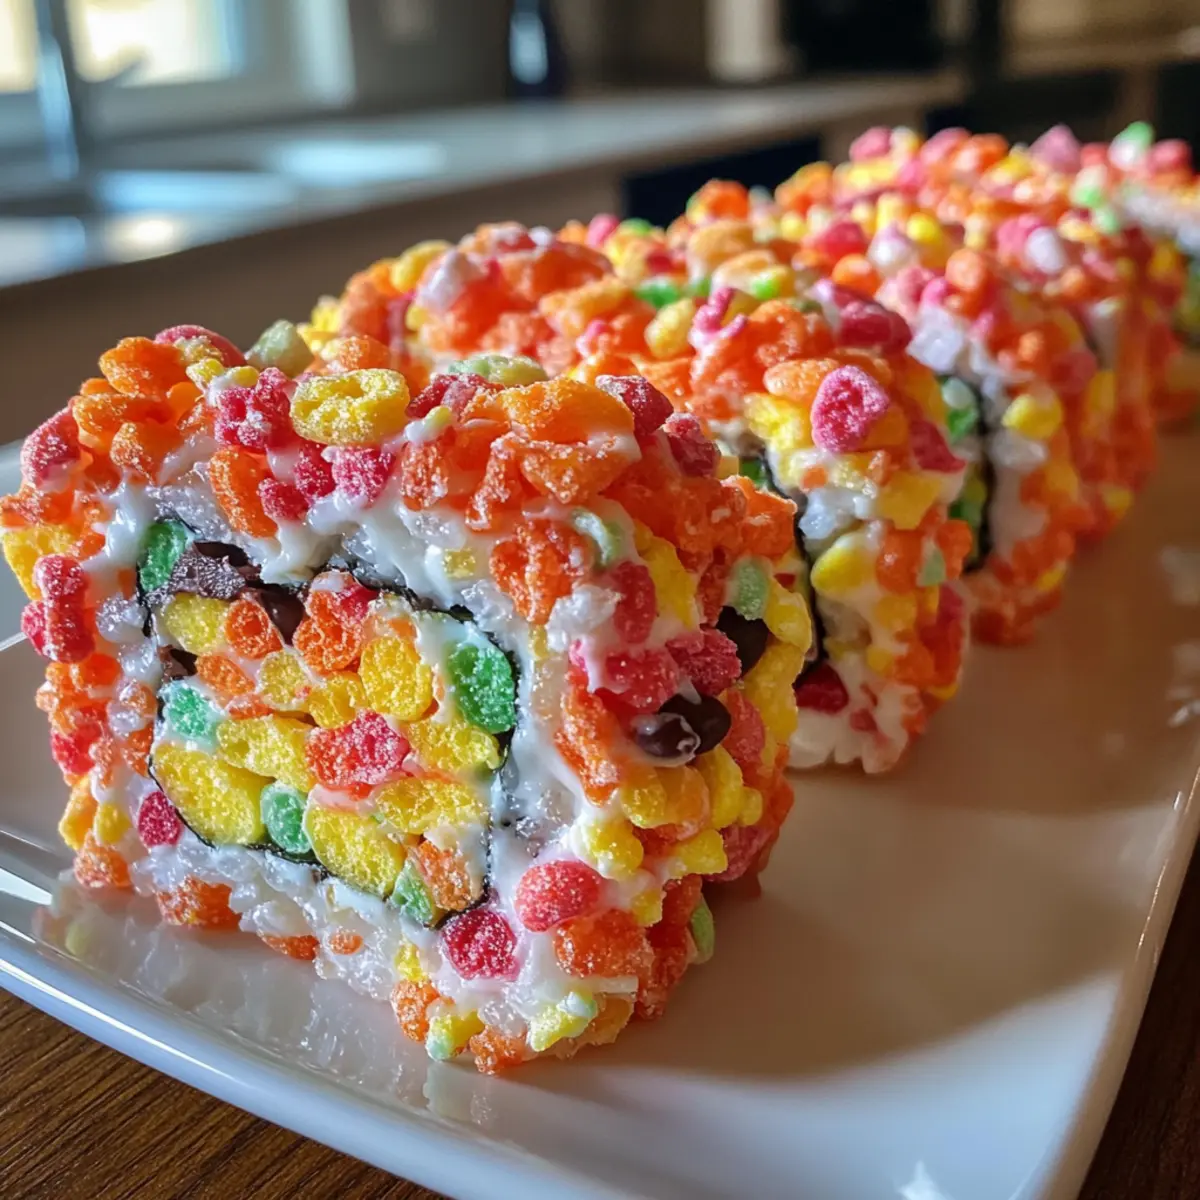
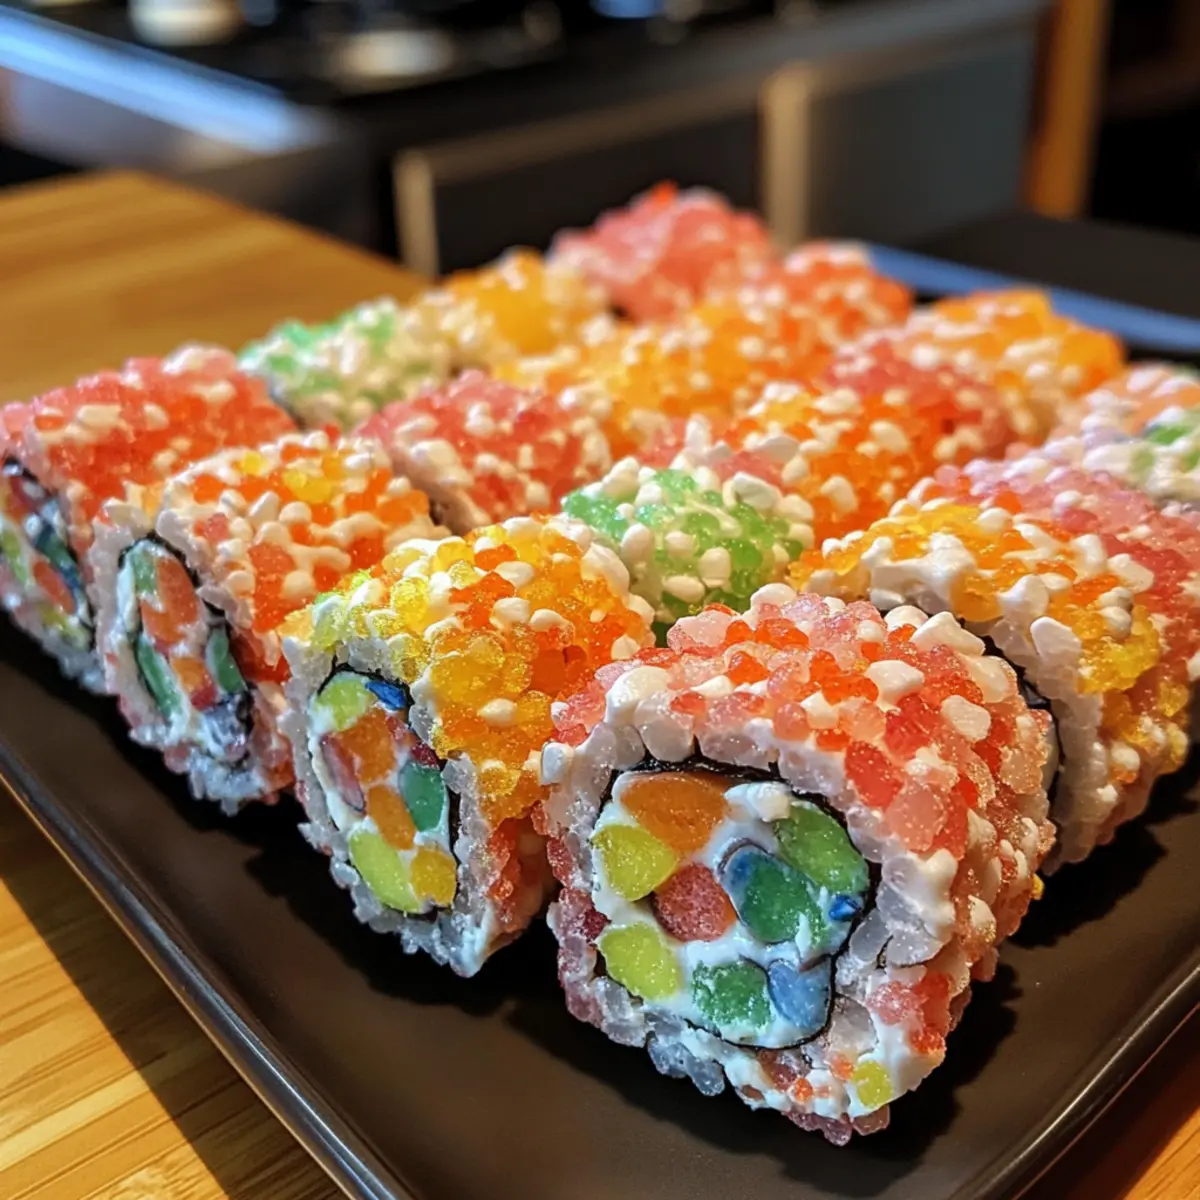
Immediately add the Fruity Pebbles cereal into the melted marshmallow mixture. Stir gently but thoroughly for about 1-2 minutes until every piece of cereal is well coated. The vibrant colors of the Fruity Pebbles will mix beautifully with the gooey marshmallow, creating a delightful texture that you can see and feel.
Step 4: Shape Sushi
Transfer the colorful mixture onto your prepared baking sheet. With greased hands, press and flatten the mixture into a rectangle, approximately ½ inch thick. The key here is to work quickly before the mixture sets. If you wish to add any optional fillings, sprinkle them evenly across the flattened mixture before rolling.
Step 5: Roll and Slice
Carefully lift one edge of the parchment paper to start rolling the sushi mixture into a tight log shape. Roll it slowly, ensuring a firm and compact form, then press the seam to seal the log. Once rolled, use a sharp knife to slice the log into bite-sized pieces, resembling traditional sushi rolls.
Step 6: Store
Finally, place the sliced Fruity Pebbles Sushi in an airtight container at room temperature. It’s best to store them in a single layer to avoid sticking, or you can use parchment paper between layers. This colorful treat can stay fresh and ready to enjoy for up to three days, perfect for gatherings or a fun snack!
What to Serve with Fruity Pebbles Sushi
Elevate your fruity delight into a full feast with these delightful pairings!
-
Creamy Vanilla Ice Cream: The rich creaminess of vanilla ice cream balances the sweetness of the sushi, creating a delightful contrast. A scoop alongside your sushi adds a cool, velvety touch.
-
Fresh Fruit Skewers: The juicy freshness of mixed fruits like strawberries, bananas, and grapes enhances the flavor spectrum, offering a refreshing bite between sweets. They’re colorful and fun, just like the sushi!
-
Chocolate Dipping Sauce: A drizzle of warm chocolate sauce provides a luscious, indulgent finishing touch. This pairing tempts both the young and the young-at-heart, bringing extra joy to your dessert platter.
-
Sparkling Lemonade: This zesty, fizzy drink is perfect for washing down the sugary treat. Its bright citrus notes add a fun twist, making it a bubbly companion for any celebration!
-
Fluffy Marshmallow Dip: For a fun, interactive twist, serve your sushi with a fluffy dip made from whipped marshmallows. It mirrors the marshmallow core of the sushi and is a hit for dipping!
-
Rainbow Jello Cups: Colorful, wobbly jello cups add a playful element! The combination of textures and flavors keeps guests intrigued and excited throughout the gathering.
-
Chocolate Milkshake: Indulging in a rich, chocolate milkshake alongside the sushi brings out nostalgia while indulging the sweet tooth, creating a dessert experience that’s hard to resist.
-
Peanut Butter Cookies: Complement the playful sushi with classic peanut butter cookies for a crunchy contrast. Each bite offers different flavors that leave everyone wanting more!
Make Ahead Options
These Fruity Pebbles Sushi are perfect for busy home cooks looking to save time during hectic weeks! You can prepare the sushi mixture up to 24 hours in advance by melting the marshmallows and mixing them with the Fruity Pebbles, then shaping the mixture into a rectangle and rolling it. Simply wrap it tightly in plastic wrap or store in an airtight container at room temperature. To maintain the delightful texture, avoid cutting the sushi until closer to serving. When ready to enjoy, slice the roll into bite-sized pieces and serve. This no-bake treat is just as delicious and visually appealing even after being prepped the day before!
Storage Tips for Fruity Pebbles Sushi
- Room Temperature: Store the Fruity Pebbles Sushi in an airtight container at room temperature for up to 3 days to maintain its freshness and delightful crunch.
- Layering: If you need to stack the pieces, use parchment paper in between layers to prevent them from sticking together and losing their shape.
- Reheating: This treat is best enjoyed fresh, but if needed, you can briefly microwave it for about 10 seconds to slightly soften any firm edges. Avoid overheating.
- Make-Ahead Option: Feel free to prepare the Fruity Pebbles Sushi a day in advance; simply slice and store until you’re ready to serve. This makes for an effortless dessert solution for any gathering!
Expert Tips for Fruity Pebbles Sushi
-
Work Quickly: The marshmallow mixture firms up fast; make sure to roll it into sushi as soon as the cereal is added to avoid difficulty handling it.
-
Minimize Stickiness: Greasing your hands with butter or using cooking spray can significantly reduce sticking while rolling the Fruity Pebbles Sushi, making the process smoother.
-
Check Labels: Always double-check that your Fruity Pebbles and marshmallows are gluten-free if necessary, as ingredients can vary by brand and region.
-
Experiment with Fillings: Don’t hesitate to get creative! Trying out different fillings like peanut butter, dried fruits, or even sprinkles can enhance the flavor profile of your sushi rolls.
-
Presentation Matters: For a fun serving touch, arrange the sliced sushi on a colorful platter. This not only improves the visual appeal but also entices your guests to dig in!
Fruity Pebbles Sushi Variations & Substitutions
Get ready to unleash your creativity in the kitchen with these fun twists!
- Gluten-Free: Use certified gluten-free marshmallows and cereals like Cheerios for a safe alternative.
- Chocolate Twist: Substitute Fruity Pebbles with Cocoa Pebbles for a deliciously chocolatey sushi variation.
- Nutty Crunch: Add crushed nuts like almonds or peanuts to the cereal mixture for an extra crunchy texture.
- Seasonal Flavors: Incorporate crushed freeze-dried strawberries or pumpkin spice for a seasonal flair, transforming your sushi into a festive treat.
- Rolled in Sprinkles: Roll the sushi log in colorful sprinkles for a festive touch that makes this treat even more enticing.
- Fruity Fillers: Experiment with fresh fruit slices like banana or strawberries in the center for a juicy contrast.
- Sticky Honey Drizzle: Drizzle honey or maple syrup on top before serving for a sweet finishing touch.
- Tropical Twist: Add shredded coconut and dried pineapple pieces for a fun, tropical vibe that brightens any gathering.
The possibilities are endless! Why not pair your creations with delightful treats like Blackberry Tiramisu Fruity or explore a sweet cake like the Best Strawberry Cake Ever? Happy cooking!

Fruity Pebbles Sushi Recipe FAQs
How do I choose the right ripeness for ingredients?
Absolutely! For the best texture and taste, use fresh marshmallows, as they create a more pliable and chewy base. When selecting Fruity Pebbles, check the packaging for any signs of moisture or dark spots indicating stale cereal.
How should I store my Fruity Pebbles Sushi, and how long will it last?
To keep your Fruity Pebbles Sushi fresh, store it in an airtight container at room temperature for up to 3 days. If stacking slices, place parchment paper between layers to prevent sticking, ensuring each colorful piece retains its shape.
Can I freeze Fruity Pebbles Sushi?
Yes, you can freeze Fruity Pebbles Sushi for later enjoyment! To do this, wrap individual slices tightly in plastic wrap, then place them in a freezer-safe bag or container. They can be stored in the freezer for up to 3 months. When ready to eat, let them thaw at room temperature for a few minutes.
What if my marshmallows are too sticky while mixing?
Very! If you find the marshmallow mixture sticking too much, consider greasing your hands with butter or using a little cooking spray. Working swiftly can also help, as the mixture firms up quickly; if it’s too tough, simply give it a few seconds in the microwave for easier handling.
Are there any dietary concerns with Fruity Pebbles Sushi for allergies?
Definitely! If you’re making Fruity Pebbles Sushi for someone with dietary restrictions, always check labels for gluten-free certification, as both Fruity Pebbles and marshmallows can vary by brand. Additionally, if you’re incorporating optional fillings like Nutella or gummy candies, be sure to verify that they are free from allergens such as nuts or gluten as well.
Can I customize the fillings for my Fruity Pebbles Sushi?
The more the merrier! Feel free to get creative with your fillings. You can use gummy candies, chocolate chips, or nut butters. Just ensure to layer them evenly across the flattened cereal mixture before rolling for a delicious surprise in every bite!
Fruity Pebbles Sushi: Colorful No-Bake Fun for Everyone
Ingredients
Equipment
Method
- Prepare Ingredients: Begin by gathering all your ingredients for the Fruity Pebbles Sushi. Grease your hands with a little butter to prevent sticking later, and set aside a large baking sheet lined with parchment paper for easy cleanup.
- Melt Marshmallows: In a medium pot over low heat, add your marshmallows and stir continuously for about 4-5 minutes until they melt into a smooth, gooey consistency. Remove from heat when melted.
- Mix with Cereal: Immediately add the Fruity Pebbles cereal into the melted marshmallow mixture. Stir gently for about 1-2 minutes until well coated.
- Shape Sushi: Transfer the colorful mixture onto your prepared baking sheet. With greased hands, press and flatten the mixture into a rectangle, approximately ½ inch thick. Sprinkle optional fillings if desired.
- Roll and Slice: Carefully lift one edge of the parchment paper to start rolling the sushi mixture into a tight log shape. Slice into bite-sized pieces resembling traditional sushi rolls.
- Store: Place the sliced Fruity Pebbles Sushi in an airtight container at room temperature. Store in a single layer or use parchment paper between layers to maintain freshness.