There’s something magical about the aroma of freshly baked pastries wafting through the kitchen. It takes me back to my childhood, where my grandmother would whip up delightful treats that brought the whole family together. Today, I’m excited to share my recipe for Cream and Berry Pastry Balls. These little gems are not just a feast for the eyes; they’re a quick solution for a busy day or a sweet way to impress your loved ones. With a flaky crust and a burst of berry goodness, they’re sure to become a favorite in your home!
Why You’ll Love This Cream and Berry Pastry Balls
These Cream and Berry Pastry Balls are a delightful blend of simplicity and flavor. They come together quickly, making them perfect for those hectic weeknights or last-minute gatherings. The flaky pastry envelops a sweet, juicy berry filling, creating a treat that’s both comforting and impressive. Plus, who can resist a dollop of whipped cream on top? Trust me, these pastries will have everyone asking for seconds!
Ingredients for Cream and Berry Pastry Balls
Gathering the right ingredients is the first step to creating these delightful Cream and Berry Pastry Balls. Here’s what you’ll need:
All-purpose flour: The backbone of your pastry, providing structure and a flaky texture.
Baking powder: This leavening agent helps the pastry rise, giving it that light, airy quality.
Salt: Just a pinch enhances the flavors, balancing the sweetness of the berries.
Unsalted butter: Cold and cubed, it adds richness and flakiness to the dough.
Granulated sugar: A touch of sweetness in the dough, complementing the berry filling.
Cold water: Helps bring the dough together without melting the butter, keeping it flaky.
Heavy cream: The star of the show for your whipped topping, adding a luscious creaminess.
Powdered sugar: Sweetens the whipped cream and gives it a smooth texture.
Vanilla extract: A splash of this adds depth and warmth to the whipped cream.
Mixed berries: A combination of strawberries, blueberries, and raspberries brings vibrant flavor and color.
Lemon juice: Just a bit brightens the berries, enhancing their natural sweetness.
Powdered sugar for dusting: A final touch that makes these pastries look as good as they taste.
For those looking to mix things up, consider adding chocolate chips or diced peaches instead of berries. You can find the exact measurements for each ingredient at the bottom of the article, ready for printing!
How to Make Cream and Berry Pastry Balls
Creating these Cream and Berry Pastry Balls is a delightful journey that’s easier than you might think. Follow these simple steps, and you’ll have a batch of warm, flaky pastries ready to impress!
Step 1: Preheat and Prepare
Start by preheating your oven to 400°F (200°C). This step is crucial for achieving that perfect golden-brown crust. While the oven heats up, line a baking sheet with parchment paper. This will prevent sticking and make cleanup a breeze.
Step 2: Mix Dry Ingredients
In a large bowl, whisk together the all-purpose flour, baking powder, and salt. The flour provides structure, while the baking powder helps the pastry rise. A pinch of salt enhances the flavors, balancing the sweetness of the berries. This mixture is the foundation of your pastry.
Step 3: Incorporate Butter
Add the cold, cubed butter to the flour mixture. Using a pastry cutter or your fingers, mix until the mixture resembles coarse crumbs. You want to see small bits of butter throughout; this is what creates that flaky texture we all love.
Step 4: Form the Dough
Gradually add the cold water, stirring gently until the dough comes together. Be careful not to overmix; you want a cohesive dough without toughening it. If it feels too dry, add a splash more water, but just a little!
Step 5: Roll and Cut
Turn the dough out onto a lightly floured surface. Roll it out to about 1/4 inch thick. Use a cookie cutter or a glass to cut out circles, about 3 inches in diameter. Keep the thickness even for uniform baking. If the dough sticks, sprinkle a bit more flour on your surface.
Step 6: Fill and Seal
Place a small spoonful of mixed berries, tossed with lemon juice, in the center of each circle. Fold the dough over to create a half-moon shape. Pinch the edges firmly to seal. This step is vital; a good seal keeps the delicious filling from leaking out during baking.
Step 7: Bake
Arrange the pastry balls on your prepared baking sheet. Bake them for 15-20 minutes, or until they turn golden brown. Keep an eye on them; every oven is a little different, and you want that perfect color!
Step 8: Whip Cream
While the pastries are baking, whip the heavy cream with powdered sugar and vanilla extract until soft peaks form. This means when you lift the whisk, the cream holds its shape but isn’t too stiff. It’s the perfect topping for your warm pastries!
Step 9: Serve
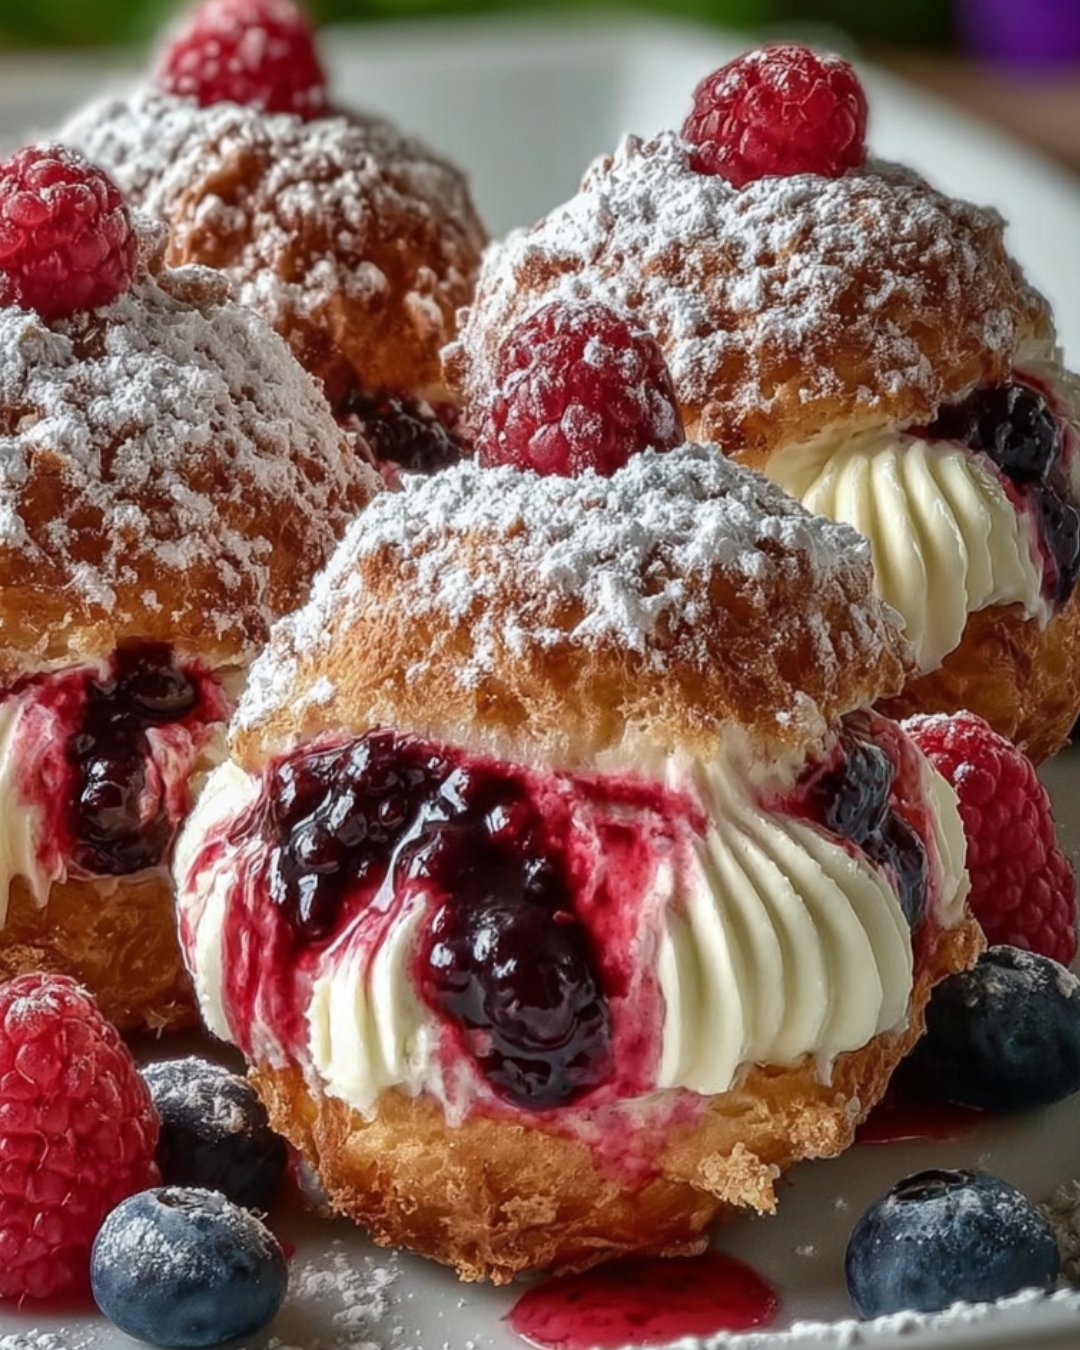
Once the pastry balls are done, let them cool slightly before serving. Top each one with a generous dollop of whipped cream and a dusting of powdered sugar. The contrast of the warm pastry and cool cream is simply irresistible!
Tips for Success
Use cold ingredients for a flakier pastry; it helps keep the butter solid.
Don’t skip the lemon juice; it brightens the berry flavor beautifully.
Experiment with different berries or fillings for a unique twist.
Make sure to seal the edges well to prevent leaks during baking.
Let the pastries cool slightly before serving for the best texture.
Equipment Needed
Baking sheet: A standard one works, but a rimmed sheet can catch any drips.
Parchment paper: Use it for easy cleanup; aluminum foil is a good alternative.
Mixing bowls: A set of various sizes is handy for different steps.
Pastry cutter: If you don’t have one, your fingers will do just fine!
Rolling pin: A wine bottle can work in a pinch if you’re in a bind.
Variations
Chocolate Delight: Swap out the mixed berries for chocolate chips for a rich, indulgent treat.
Peachy Keen: Use diced peaches instead of berries for a sweet, summery twist.
Nutty Addition: Add chopped nuts like almonds or walnuts to the berry filling for extra crunch.
Gluten-Free Option: Substitute all-purpose flour with a gluten-free blend to accommodate dietary needs.
Vegan Version: Use plant-based butter and coconut cream for a dairy-free alternative.
Serving Suggestions
Pair with Coffee: A hot cup of coffee or espresso complements the sweetness perfectly.
Fresh Fruit Salad: Serve alongside a light fruit salad for a refreshing contrast.
Elegant Plating: Arrange pastries on a beautiful platter, garnished with mint leaves.
Ice Cream Scoop: Add a scoop of vanilla ice cream for an indulgent dessert.
FAQs about Cream and Berry Pastry Balls
Can I make Cream and Berry Pastry Balls ahead of time?
Absolutely! You can prepare the pastry balls and freeze them before baking. Just pop them in the oven straight from the freezer, adding a few extra minutes to the baking time. This way, you’ll have a delicious treat ready whenever you need it!
What can I substitute for mixed berries?
If mixed berries aren’t your thing, feel free to get creative! Chocolate chips, diced peaches, or even a mix of dried fruits can work beautifully. Just remember to adjust the sweetness based on your filling choice.
How do I store leftover pastry balls?
Store any leftover Cream and Berry Pastry Balls in an airtight container at room temperature for up to two days. If you want to keep them longer, refrigerate them, but they’re best enjoyed fresh!
Can I use a different type of cream for the topping?
Sure! While heavy cream is ideal for whipping, you can use coconut cream for a dairy-free option. Just chill it beforehand for the best results. It adds a unique flavor that pairs well with the berries!
What’s the best way to serve these pastries?
Serve them warm with a generous dollop of whipped cream and a dusting of powdered sugar. For an extra touch, add a few fresh berries on top for a beautiful presentation. Enjoy!
Final Thoughts
Creating Cream and Berry Pastry Balls is more than just baking; it’s about crafting memories. The joy of pulling a tray of golden pastries from the oven, the sweet aroma filling your kitchen, and the smiles they bring to your loved ones are priceless. Each bite is a delightful combination of flaky pastry and juicy berries, topped with a cloud of whipped cream. Whether it’s a casual family gathering or a special occasion, these pastries are sure to impress. So roll up your sleeves, embrace the process, and enjoy the delicious rewards of your efforts!