


Peeking into the fridge, I stumbled upon a humble package of rice paper, and my culinary wheels began to spin. Have you ever craved that crispy, flaky texture of traditional spanakopita, only to feel daunted by the thought of using finicky phyllo dough? With this Quick Crispy Rice Paper Spanakopita, I’ve transformed a classic Greek favorite into a delightful, no-bake version that’s not only easier but also vegetarian and gluten-free. Imagine warm, savory spinach dancing with the creaminess of feta, all wrapped in a golden, crispy rice paper shell. It’s perfect for a light lunch or as an irresistible appetizer at your next gathering! Curious how this quick and easy recipe turns out? Let’s dive in!

Why Choose Rice Paper Spanakopita?
Unique Twist: This recipe flips the traditional spanakopita on its head, using rice paper for a light, gluten-free alternative that’s much simpler to handle than phyllo dough.
Quick & Easy: With just a handful of ingredients and minimal prep time, you can whip up this delicious dish in no time—no baking skills required!
Irresistible Flavor: The combination of savory spinach and creamy feta creates a rich flavor that will please even the pickiest eaters.
Versatile Options: Feel free to experiment with different fillings! Try adding sautéed leeks or herbs, or for a nutrient boost, use cooked chard for a spin on your favorite fillings.
Crowd-Pleasing Appeal: Perfect for any gathering, serve these crispy bites with a refreshing cucumber-tomato salad or a zesty yogurt dip. Whether it’s an appetizer or a light meal, they are sure to be a hit!
Rice Paper Spanakopita Ingredients
For the Wrapper
• Rice Paper – A fantastic base for the dish; this unique option simplifies assembly, making traditional spanakopita feel fresh and easy.
• Egg – Used for egg wash; it acts as a sealant, ensuring your wraps stay intact, but can be swapped with a plant-based alternative for a vegan option.
For the Filling
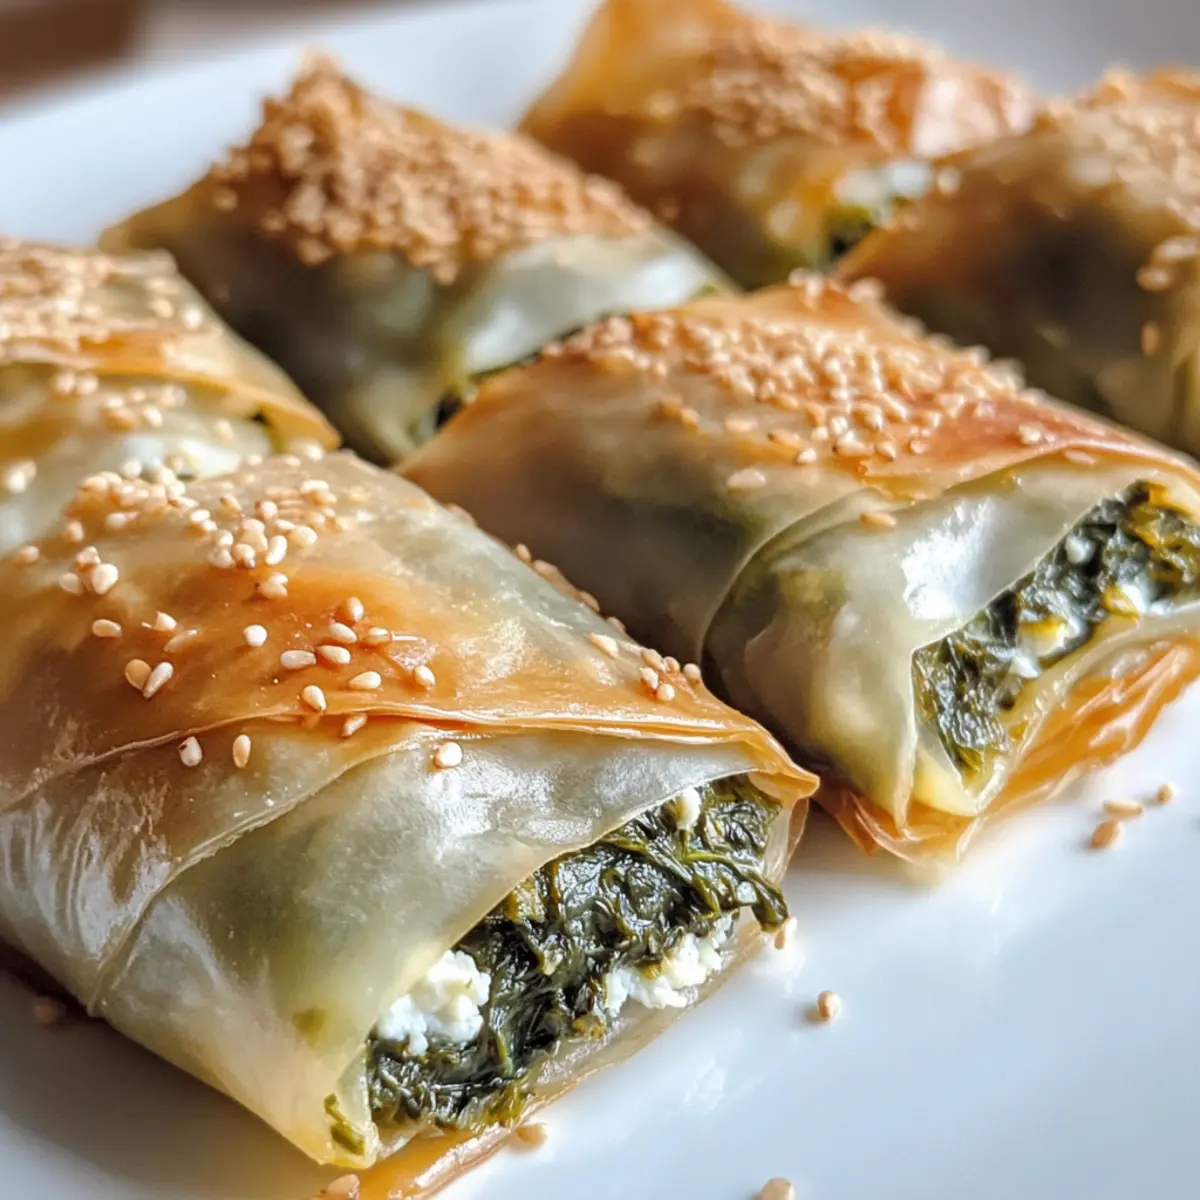
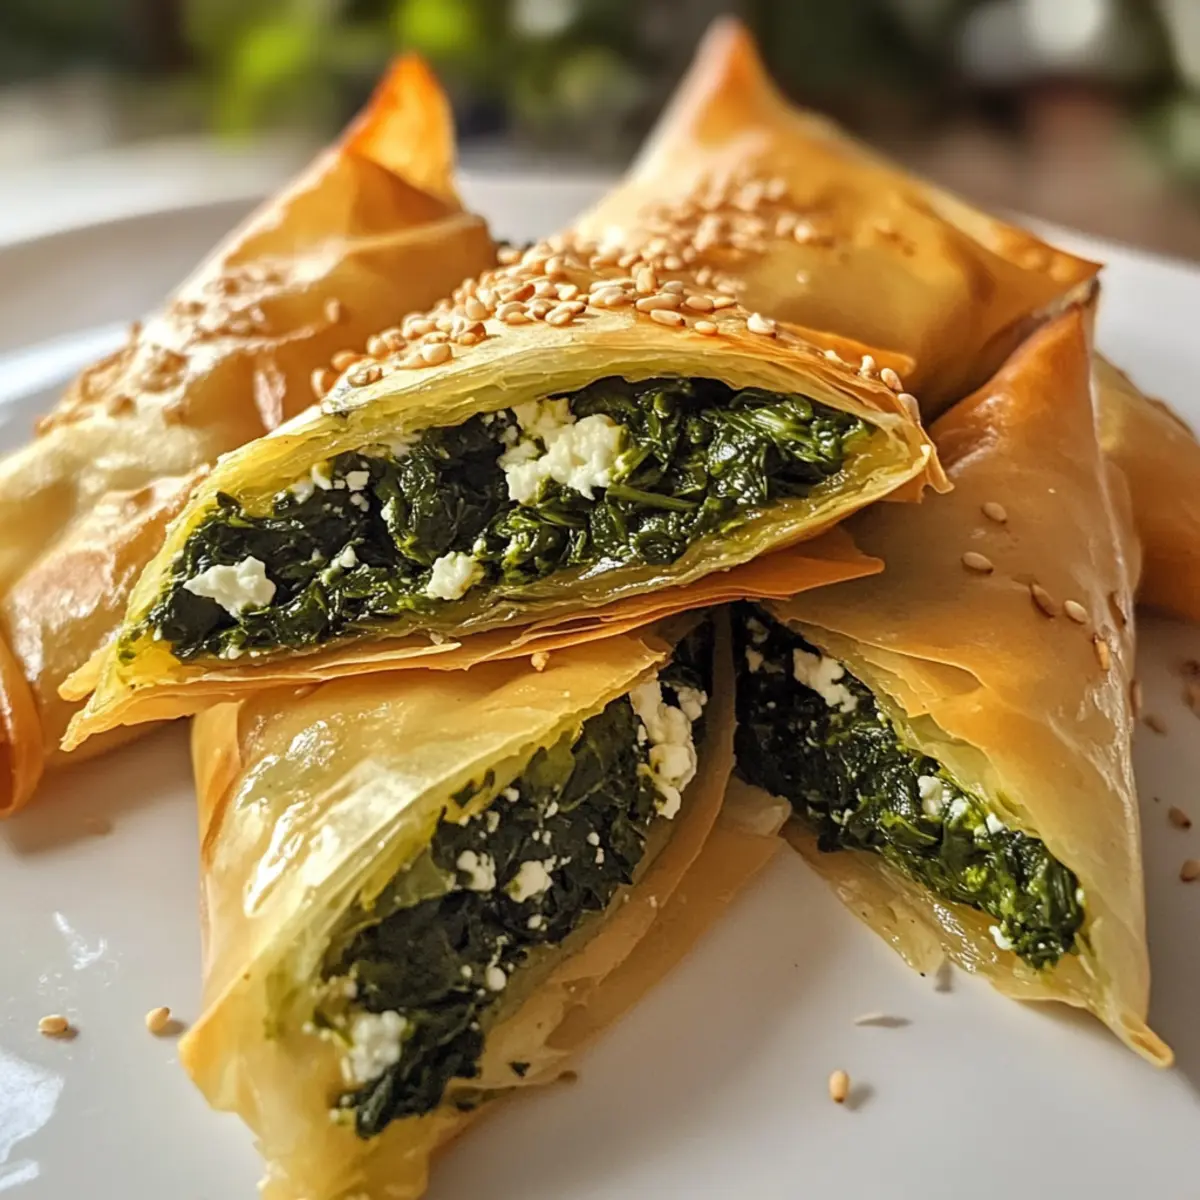
• Cooked Spinach – The heart of the flavor profile; be sure to drain excess moisture to keep your rice paper crisp!
• Feta Cheese – Adds a creamy, tangy taste; for a different flavor, try using goat cheese or a blend of cream cheese and parmesan.
For the Topping
• Sesame Seeds – Perfect for a delightful crunch on top; consider alternatives like dried oregano or za’atar for a twist.
This easy Rice Paper Spanakopita combines simple ingredients to create a dish that’s both satisfying and savory!
Step‑by‑Step Instructions for Rice Paper Spanakopita
Step 1: Prepare Egg Wash
Start by cracking an egg into a small bowl and beat it well until combined. This egg wash will serve as a sealant for your Rice Paper Spanakopita, ensuring the edges stick together. Set the bowl aside, ready for dipping the rice paper sheets.
Step 2: Dip Rice Paper
Take a shallow dish filled with warm water and immerse one rice paper sheet for about 10-15 seconds, until it softens but remains firm. Lay two softened sheets slightly overlapping on a clean surface. This creates a wider base for wrapping, making your spanakopita easier to fill and roll.
Step 3: Mix Filling
In a mixing bowl, combine your cooked spinach and crumbled feta cheese, stirring until evenly mixed. Make sure the spinach is well-drained to avoid sogginess in your Rice Paper Spanakopita. This flavorful filling will be the heart of your dish, providing a delicious savory taste.
Step 4: Assemble
Spoon a generous portion of the spinach and feta filling onto the middle of the rice paper sheets, shaping it into a neat rectangle. Carefully fold the sides over the filling, then roll tightly from the bottom to the top. Make sure the edges are sealed well with the egg wash to keep all that scrumptious filling inside.
Step 5: Bake
Preheat your oven to 350°F (175°C) and line a baking sheet with parchment paper. Place your assembled Rice Paper Spanakopita on the sheet, brush the exterior lightly with the remaining egg wash, and sprinkle sesame seeds on top for extra crunch. Bake in the oven for about 30 minutes until golden and crisp.
Step 6: Grill for Crispiness
Once baked, switch your oven to grill mode, keeping the temperature the same. Grill each side of the Rice Paper Spanakopita for an additional 5 minutes, monitoring closely to prevent any burning. This step will help achieve that irresistible, extra crispy texture that you crave!
Step 7: Serve
Remove the Rice Paper Spanakopita from the oven and let it cool slightly before serving. These crispy delights are best enjoyed hot, paired with a refreshing dip or salad. Slice them into wedges for easy sharing, and watch everyone enjoy this delightful twist on a classic!

What to Serve with Quick Crispy Rice Paper Spanakopita?
Pair your delightful spanakopita with these vibrant sides and refreshing dips that elevate your meal.
-
Cucumber-Tomato Salad: A light and fresh salad that contrasts beautifully with the crispy texture, adding a burst of flavor with every bite.
-
Lemony Yogurt Dip: This creamy dip enhances the savory filling, offering a tangy complement that cuts through richness and adds a zing.
-
Roasted Red Pepper Hummus: The earthy flavors of hummus provide a satisfying contrast, perfect for dipping and adding a Mediterranean flair.
-
Chickpea Salad: Tossed with lemon and herbs, this salad brings a delightful protein punch while brightening up the dish with its colorful presentation.
-
Zaatar Pita Chips: Crunchy and seasoned with Middle Eastern spices, these chips deepen the cultural experience and offer additional texture to the meal.
-
Minted Quinoa: Fluffy quinoa with fresh mint and lemon works wonderfully as a refreshing base, harmonizing well with the creamy feta in the spanakopita.
-
Chilled Rosé: A glass of chilled rosé wine perfectly complements the flavors, bringing a refreshing note that uplifts the palate, especially in warmer months.
Make Ahead Options
These Rice Paper Spanakopita are perfect for busy home cooks looking to save time! You can prep the filling (cooked spinach and feta mixture) up to 3 days in advance. Simply store it in an airtight container in the refrigerator to keep it fresh. To assemble, dip your rice paper sheets in warm water and roll them with the filling just before baking. This ensures that the rice paper stays crisp and delectable. If you prefer even more convenience, you can assemble the rolled spanakopita and keep them in the fridge for up to 24 hours before baking. Just remember to brush them with egg wash and sprinkle sesame seeds before popping them in the oven for a delightful, homemade treat with minimal effort!
Rice Paper Spanakopita Variations
Feel free to get creative with this delicious recipe and make it truly yours!
-
Mini Bites: Transform your spanakopita into delightful mini versions for bite-sized snacks. Perfect for parties and easy to handle—just reduce the filling and cut the rice paper into smaller squares.
-
Herb-Infused: Add fresh herbs like dill or parsley for a flavor boost. These aromatic additions will elevate your filling and bring a lovely freshness to each bite.
-
Spicy Twist: Incorporate a pinch of red pepper flakes or a splash of hot sauce to the spinach filling for a kick of heat. This spirited addition may just ignite your taste buds and keep things interesting!
-
Cheesy Delights: Swap feta for a creamy ricotta or a blend of mozzarella and parmesan. Each cheese variation transforms the spanakopita into a different creamy delight, adding a fun twist to the traditional flavor.
-
Plant-Based: For a vegan option, replace the egg wash with a mixture of almond milk and cornstarch. The liquid will help seal your wraps without sacrificing any texture or flavor.
-
Nutty Crunch: Sprinkle in some chopped walnuts or pistachios into the filling for an exciting crunch. The added texture pairs beautifully with the soft spinach and creamy cheese.
-
Mediterranean Vibes: Swap spinach for cooked and seasoned eggplant. This unexpected ingredient brings a Mediterranean flair and a unique flavor that complements the rice paper nicely.
-
Stuffed with Sweetness: For a dessert twist, how about using sweetened cream cheese or mascarpone with fruits like berries or apple cinnamon? This creative variation offers a delightful sweet conclusion to your meal.
By exploring these variations, your Rice Paper Spanakopita can transform into an array of enticing flavors, perfectly suited to any occasion! And if you’re looking for more delicious rice-based ideas, consider trying out our Chicken Rice Taco for a quick meal or our Chipotle Chicken Rice for a smokey flavor. Enjoy your culinary adventure!
Expert Tips for Rice Paper Spanakopita
-
Moisture Management: Draining spinach well is key: Excess moisture can make rice paper soggy; ensure your spinach is thoroughly dried before mixing.
-
Watch Your Temperature: Keep a close eye while grilling: Rice paper can brown quickly; stay nearby to prevent burning and achieve that perfect crisp.
-
Reheat with Care: Best reheated in the oven: To regain crunch, avoid microwaving leftovers; reheat in the oven or air fryer for best results.
-
Experiment with Fillings: Customize your fillings: Feel free to substitute spinach with cooked chard or kale, and experiment with different cheeses for varied flavors.
-
Sealing the Edges: Don’t skip the egg wash: It’s essential for sealing edges tightly, preventing your delicious filling from spilling out during baking.
Storage Tips for Rice Paper Spanakopita
Fridge: Store leftovers in an airtight container for up to 2 days. To regain their crunch, reheat in the oven rather than microwaving.
Freezer: Freeze unbaked rice paper rolls for future use. Place them in an airtight container or zip-lock bags, and bake directly from frozen, adjusting the bake time as needed.
Room Temperature: Best enjoyed fresh, but if you need to leave them out, consume within 1-2 hours to maintain their delicious texture.
Reheating: For optimal crispiness, reheat leftover baked Rice Paper Spanakopita in an oven or air fryer. Aim for 10-15 minutes at 350°F for that lovely crunch!
Rice Paper Spanakopita Recipe FAQs
What type of rice paper should I use?
Absolutely! Look for rice paper that’s specifically labeled for fresh rolls or spring rolls, as they tend to be thicker and more pliable, making your assembly easier. You’ll find these in most Asian grocery stores or the international aisle in larger supermarkets.
How should I store leftovers?
Store any leftover Rice Paper Spanakopita in an airtight container in the refrigerator for up to 2 days. To maintain the crispy texture, I suggest reheating them in the oven at 350°F for about 10-15 minutes, avoiding the microwave which can make them soggy.
How do I freeze unbaked rice paper spanakopita?
Freezing is a great option for meal prep! To freeze, simply assemble your Rice Paper Spanakopita but don’t bake them. Place the unbaked rolls in a single layer on a baking sheet, freeze until solid, then transfer them to a zip-lock bag or airtight container. They can be stored for up to 3 months. Bake directly from frozen at 350°F for about 40-45 minutes, adding additional grilling time as needed for crispiness.
What if my filling is too wet?
Very important! If your filling is too wet, it can soak through the rice paper, making it soggy. Make sure to drain your spinach well before mixing it with the feta. If it feels too moist after mixing, consider adding a bit of breadcrumbs or gluten-free breadcrumbs to absorb excess moisture.
Can I make these dairy-free?
Definitely! You can easily make this Rice Paper Spanakopita dairy-free by replacing the feta cheese with a vegan cheese alternative or by using a mix of silken tofu and nutritional yeast for a similar creamy flavor without the dairy.
Could I include other vegetables in the filling?
The more the merrier! Feel free to add sautéed leeks, or other greens like kale or chard for diversification. Just be sure to squeeze out any excess moisture to keep the filling firm and prevent sogginess in your rice paper.
Crispy Rice Paper Spanakopita: A Quick, Gluten-Free Delight
Ingredients
Equipment
Method
- Prepare Egg Wash: Crack the egg into a bowl, beat until combined.
- Dip Rice Paper: Soak one rice paper sheet in warm water for 10-15 seconds, then lay two overlapping sheets on a clean surface.
- Mix Filling: In a bowl, combine cooked spinach and crumbled feta until even.
- Assemble: Spoon filling onto the rice paper, fold sides, and roll tightly, sealing with egg wash.
- Bake: Preheat oven to 350°F (175°C), line baking sheet, brush assembled spanakopita with egg wash, sprinkle sesame seeds, and bake for 30 minutes until golden.
- Grill for Crispiness: Switch oven to grill mode, grill each side for 5 minutes, monitoring closely.
- Serve: Let cool slightly, slice into wedges, and enjoy with a dip or salad.