


A Slice of Memories: How This Cake Became a Family Tradition
Every year, as St. Patrick’s Day approaches, I find myself in the kitchen, sifting flour, whipping cream cheese, and carefully measuring out vibrant green food coloring. The ritual of baking has always been more than just about food—it’s about the stories, the laughter, and the nostalgia that each recipe carries.
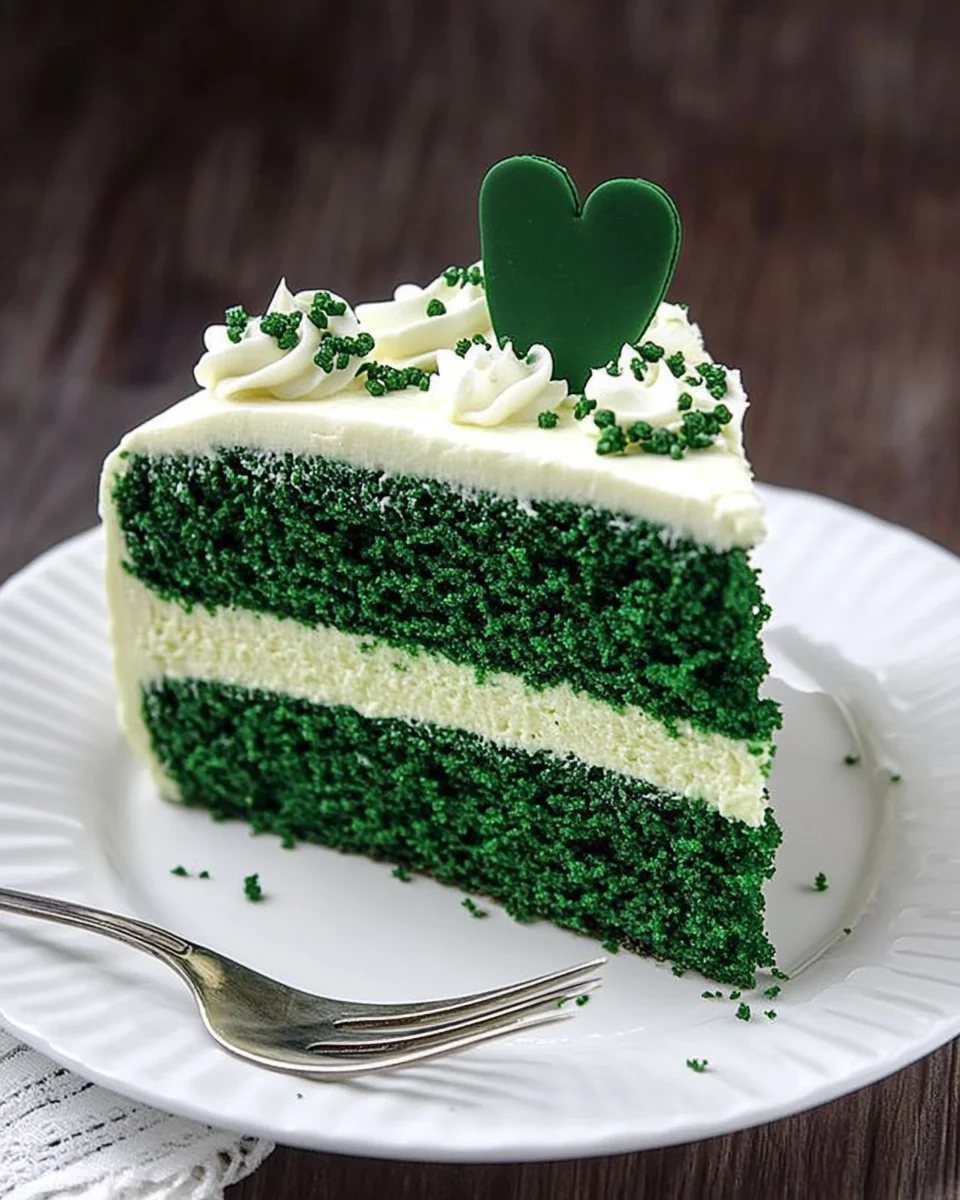
This Green Velvet Cheesecake Cake, in particular, holds a special place in my heart. It all started a few years ago when I wanted to surprise my husband, who comes from a proud Irish lineage, with something unique for St. Patrick’s Day. He’s a lover of both red velvet cake and cheesecake, so I thought, why not combine them with a festive twist? The result was pure magic—layers of rich green velvet cake sandwiching a creamy cheesecake center, all wrapped in a luscious marshmallow cream cheese frosting.
The moment I sliced into the cake, revealing the perfect layers, I knew it was a success. But the real joy came when I saw my husband’s face light up as he took the first bite. “This tastes like a celebration,” he said with a grin, and from that moment on, this cake became a cherished tradition in our household. Whether it’s for a holiday, a family gathering, or simply a day when we crave something decadent, this cake has a way of bringing people together.
Now, I’m thrilled to share this recipe and the story behind it, hoping it finds a place in your kitchen and creates as many sweet memories for you as it has for us.
What Makes This Cake Special?
At first glance, Green Velvet Cheesecake Cake might look like a simple variation of red velvet, but it’s so much more than that. The combination of textures and flavors makes this cake stand out in ways that few desserts can.
A Celebration of Layers
This cake is not just about flavor—it’s about texture. The softness of the green velvet cake layers contrasts beautifully with the rich, creamy cheesecake in the center. Unlike traditional cakes, which rely solely on frosting for a creamy element, this cake builds an indulgent experience by incorporating an entire cheesecake as a filling.
The Perfect Fusion of Two Classics
While red velvet cake is known for its slight cocoa flavor and signature buttermilk tang, green velvet carries the same delightful notes but with an added festive charm. Meanwhile, the cheesecake adds a smooth, melt-in-your-mouth element that complements the cake layers perfectly.
A Frosting That Steals the Show
Most velvet cakes are paired with classic cream cheese frosting, but this one takes it a step further with a marshmallow cream cheese frosting. The marshmallow fluff gives it a light, airy texture that spreads beautifully over the cake while adding a subtle sweetness that balances the tangy elements of the cream cheese.
A St. Patrick’s Day Essential (Or Any Occasion Treat!)
This cake may have been inspired by St. Patrick’s Day, but it’s perfect for any time of year. Whether you’re celebrating a birthday, a special occasion, or just want an eye-catching dessert, this cake is bound to impress. Plus, you can customize it with different colors for other holidays—imagine a blue velvet version for a winter wonderland theme!
Ingredients: The Magic Behind the Layers
Cheesecake Layer
- 16 oz cream cheese (room temperature)
- 2/3 cup granulated sugar
- Pinch of salt
- 2 large eggs
- 1/3 cup sour cream
- 1/3 cup heavy whipping cream
- 1 tsp vanilla extract
- A few drops of green food coloring (optional)
Green Velvet Cake Layers
- 2 ½ cups all-purpose flour
- 2 tbsp unsweetened cocoa powder
- ½ tsp salt
- 1 ½ cups canola or vegetable oil
- 1 ½ cups granulated sugar
- 2 large eggs
- 1 tsp vanilla extract
- 1 tsp white vinegar
- 1 tsp baking soda
- 1 cup buttermilk
- 2 tbsp (1 oz bottle) green food coloring (or gel paste)
Marshmallow Cream Cheese Frosting
- 16 oz cream cheese (room temperature)
- ½ cup (1 stick) unsalted butter (room temperature)
- 7 oz marshmallow creme
- 1 cup powdered sugar
- A few drops of green food coloring (optional)
Directions: Building the Layers of Deliciousness
Step 1: Prepare the Cheesecake Layer
- Preheat oven to 325°F. Place a large roasting pan on the lower third rack. Boil water in a kettle.
- Grease a 9-inch springform pan and line the bottom with parchment paper. Wrap the pan in heavy-duty foil to prevent leaks.
- In a bowl, beat cream cheese until smooth. Add sugar and salt, blending well.
- Add eggs one at a time, mixing in between. Stir in sour cream, whipping cream, vanilla, and food coloring (if using).
- Pour batter into the prepared pan. Set the pan in the roasting pan and pour hot water into the roasting pan (about 1 inch up the sides).
- Bake for 45 minutes, until set. Let cool for 1 hour, then freeze for 4-5 hours (or overnight).
Step 2: Bake the Cake Layers
- Preheat oven to 350°F. Grease two 9-inch round cake pans and line with parchment paper.
- In a bowl, sift together flour, cocoa powder, and salt.
- In another bowl, beat oil and sugar for 2 minutes. Add eggs and vanilla, beating for 2 more minutes.
- In a small bowl, mix vinegar and baking soda, then add to the batter along with buttermilk and food coloring.
- Gradually add dry ingredients, mixing until smooth.
- Divide batter between the pans and bake for 30-35 minutes. Let cool for 20 minutes before removing from pans.
Step 3: Whip Up the Frosting
- Beat cream cheese and butter until smooth. Add marshmallow creme and mix well.
- Add powdered sugar and food coloring (if using), beating until creamy.
Step 4: Assemble the Cake
- Place one cake layer on a serving plate.
- Remove cheesecake from freezer, peel off parchment, and trim if needed to match cake size. Place on top of the first cake layer.
- Add the second cake layer on top of the cheesecake.
Step 5: Frost and Decorate
- Apply a thin crumb coat of frosting and refrigerate for 30 minutes.
- Spread a final layer of frosting over the cake.
- Decorate as desired with festive sprinkles or green chocolate designs.
Nutritional Breakdown: A Slice of Indulgence
- Calories: 646
- Carbohydrates: 72g
- Protein: 9g
- Fat: 36g
- Saturated Fat: 19g
- Cholesterol: 161mg
- Sodium: 418mg
- Sugar: 51g

FAQs: Everything You Need to Know About Green Velvet Cheesecake Cake
Can I Make This Cake Ahead of Time?
Absolutely! In fact, making it ahead of time can enhance the flavors. The cheesecake needs time to freeze, so you can prepare it a day in advance. The cake layers can also be baked and stored in an airtight container for up to two days before assembling. Once the cake is fully frosted, it keeps well in the refrigerator for up to five days.
Do I Have to Use a Water Bath for the Cheesecake?
While you can technically bake the cheesecake without a water bath, it’s highly recommended to prevent cracking. The water bath ensures gentle, even heat, which keeps the cheesecake smooth and creamy. If you skip the water bath, your cheesecake may still taste great, but it might not have the same flawless texture.
What’s the Best Way to Get Vibrant Green Cake Layers?
Using liquid green food coloring works fine, but gel food coloring is even better. Gel food coloring is more concentrated, so you need less of it, which means it won’t alter the consistency of your batter. If you’re looking for a natural alternative, try using matcha powder or spinach juice, though the color may not be as vibrant.
Can I Use Store-Bought Cheesecake Instead?
If you’re in a pinch, you can use a pre-made cheesecake, but homemade always delivers the best results. Store-bought cheesecakes are often slightly firmer and may not have the same smooth, creamy texture that blends seamlessly into the cake layers.
What’s the Best Way to Frost This Cake Without Making a Mess?
Applying a crumb coat is the key! A crumb coat is a thin layer of frosting that seals in any loose cake crumbs. After applying this layer, refrigerate the cake for about 30 minutes before adding the final coat of frosting. This ensures a smooth, professional-looking finish.
How Do I Store Leftovers?
Store any leftover slices in an airtight container in the refrigerator for up to five days. If you’d like to keep it longer, wrap slices individually in plastic wrap and freeze them. When you’re ready to enjoy, simply thaw a slice in the refrigerator overnight.
Can I Make This Cake Gluten-Free?
Yes! Simply swap out the all-purpose flour for a high-quality gluten-free flour blend that contains xanthan gum. Make sure all other ingredients, including cocoa powder and food coloring, are gluten-free.
What Other Frosting Options Work Well with This Cake?
If you’re not a fan of marshmallow cream cheese frosting, you can opt for a classic cream cheese frosting, white chocolate buttercream, or even a whipped cream frosting for a lighter touch.
A Cake Worth Celebrating
There’s something truly magical about a dessert that brings people together, and this Green Velvet Cheesecake Cake does just that. It’s not just a cake—it’s an experience. Every bite is a harmony of textures and flavors, from the soft, cocoa-infused cake to the rich, velvety cheesecake, all tied together with a dreamy frosting.
More than anything, this cake represents the joy of baking and sharing. Whether you’re making it for a special holiday, a family gathering, or just to treat yourself, it’s a dessert that invites celebration.
I still remember the first time I made this cake, the excitement of slicing into it, and the happiness it brought to my family. Now, it’s your turn. Bake it, share it, and create your own sweet memories—because some cakes are more than just dessert. They’re a tradition in the making.