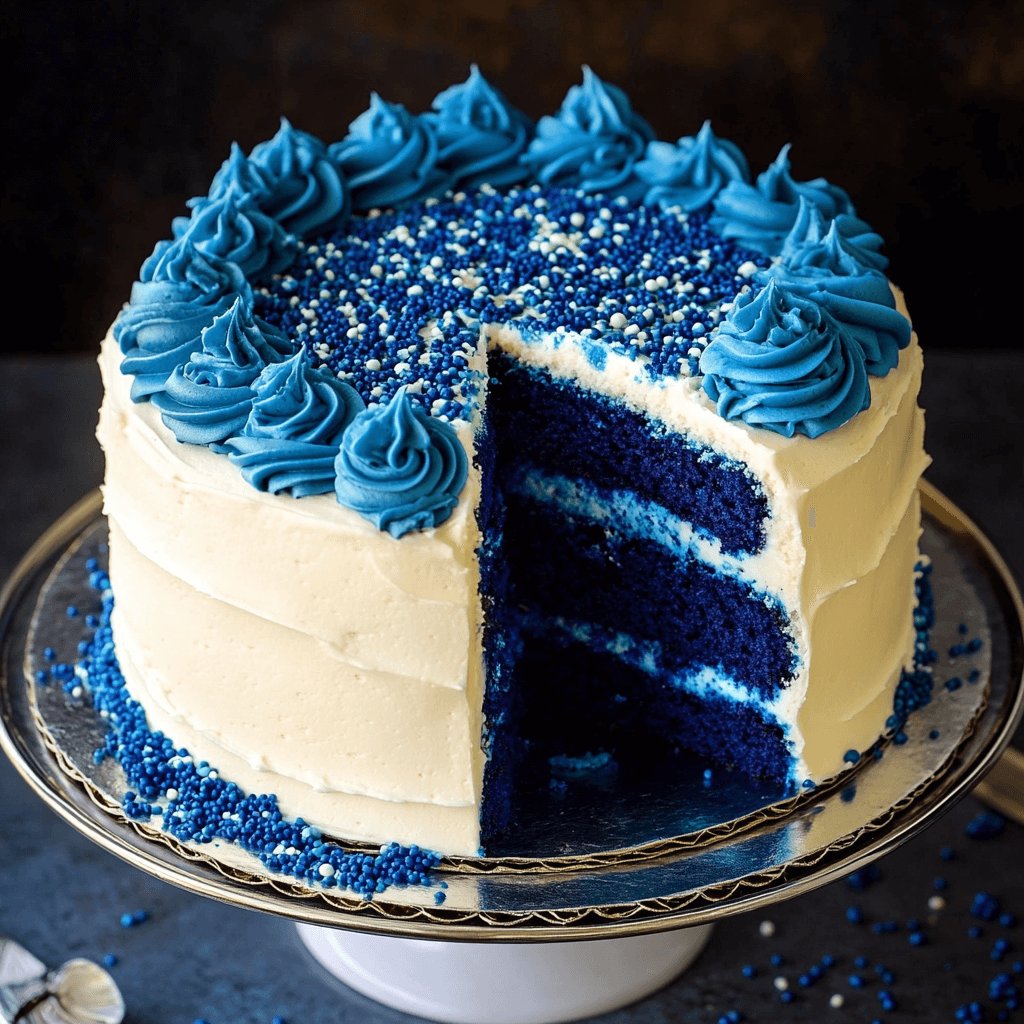
There’s something magical about a cake that not only tastes incredible but also looks like a work of art. The Blue Velvet Cake is just that—a stunning centerpiece for any gathering. I remember the first time I laid eyes on one; it was at a friend’s birthday party, and I was instantly captivated by its vibrant hue. This recipe is perfect for impressing your loved ones or simply treating yourself after a long day. With its rich flavor and creamy frosting, this cake is sure to become a favorite in your home, making every occasion feel special.
Why You’ll Love This Blue Velvet Cake
This Blue Velvet Cake is a delightful blend of flavor and visual appeal. It’s surprisingly easy to whip up, making it perfect for both novice and seasoned bakers. The moist, tender crumb paired with the luscious cream cheese frosting creates a taste sensation that’s hard to resist. Plus, it’s a showstopper at any gathering, ensuring you’ll be the star of the dessert table. Who wouldn’t love that?
Ingredients for Blue Velvet Cake
Gathering the right ingredients is the first step to creating your Blue Velvet Cake masterpiece. Here’s what you’ll need:
All-purpose flour: The backbone of your cake, providing structure and a tender crumb.
Granulated sugar: Sweetens the cake and helps create that delightful moist texture.
Baking soda and baking powder: These leavening agents work together to give your cake a light, airy lift.
Salt: Enhances the flavors, balancing the sweetness beautifully.
Vegetable oil: Keeps the cake moist and adds richness without overpowering flavors.
Buttermilk: Adds a tangy flavor and helps tenderize the cake, making it super soft.
Eggs: Provide structure and stability, while also enriching the flavor.
Blue food coloring: The star of the show! It gives the cake its signature vibrant hue.
Vanilla extract: A classic flavor enhancer that adds warmth and depth.
White vinegar: Reacts with the baking soda to create a fluffy texture and enhances the cake’s color.
For the frosting:
Cream cheese: The creamy base of your frosting, providing a tangy flavor that pairs perfectly with the cake.
Unsalted butter: Adds richness and helps create a smooth, spreadable frosting.
Powdered sugar: Sweetens the frosting and gives it that perfect creamy consistency.
Milk: Adjusts the frosting’s consistency to your liking, making it easy to spread.
For those looking to get creative, consider adding a layer of blueberry compote between the cake layers for an extra burst of flavor. And if you’re feeling adventurous, swap the blue food coloring for red to make a stunning red velvet cake instead! You can find the exact quantities for each ingredient at the bottom of the article, ready for printing.
How to Make Blue Velvet Cake
Creating a Blue Velvet Cake is a delightful journey that combines simple steps with a touch of creativity. Let’s dive into the process, ensuring you have all the tips you need for a successful bake!
Step 1: Preheat and Prepare
Start by preheating your oven to 350°F (175°C). This ensures your cake bakes evenly. While the oven warms up, grease and flour two 9-inch round cake pans. This step is crucial; it prevents your cake from sticking and makes for an easy release once baked.
Step 2: Mix Dry Ingredients
In a large mixing bowl, whisk together the all-purpose flour, granulated sugar, baking soda, baking powder, and salt. This blend is the foundation of your cake. Whisking well ensures that the leavening agents are evenly distributed, which is key for a fluffy texture.
Step 3: Combine Wet Ingredients
In another bowl, mix the vegetable oil, buttermilk, eggs, blue food coloring, vanilla extract, and white vinegar. Stir until smooth. The blue food coloring is what gives this cake its signature look, so don’t be shy with it! The vinegar reacts with the baking soda later, creating that light, airy crumb.
Step 4: Combine Wet and Dry Mixtures
Gradually add the wet ingredients to the dry ingredients. Mix gently until just combined. Be careful not to overmix; a few lumps are perfectly fine. This step is where the magic happens, transforming your ingredients into a beautiful batter.
Step 5: Bake the Cakes
Divide the batter evenly between the prepared cake pans. Bake for 25-30 minutes, or until a toothpick inserted into the center comes out clean. Keep an eye on them; every oven is a little different. The aroma wafting through your kitchen will be irresistible!
Step 6: Cool the Cakes
Once baked, allow the cakes to cool in the pans for about 10 minutes. Then, transfer them to wire racks to cool completely. This cooling time is essential; frosting a warm cake can lead to a melty mess!
Step 7: Make the Cream Cheese Frosting
While the cakes cool, prepare the cream cheese frosting. In a mixing bowl, beat the softened cream cheese and unsalted butter together until creamy and smooth. Gradually add the powdered sugar and vanilla extract, mixing until well combined. If the frosting is too thick, add milk one tablespoon at a time until you reach your desired consistency.
Step 8: Assemble the Cake
Once the cakes are completely cool, place one layer on a serving plate. Spread a generous layer of cream cheese frosting on top, then gently place the second layer on top. Frost the top and sides of the cake, making it as smooth or textured as you like. Don’t forget to add some decorative touches if you’re feeling fancy!
Tips for Success
Always use room temperature ingredients for a smoother batter.
Don’t skip the cooling time; it prevents frosting from melting.
For even layers, weigh your batter before pouring into pans.
Experiment with flavors by adding lemon zest or almond extract.
Store leftovers in an airtight container to keep the cake moist.
Equipment Needed
Mixing bowls: Use any size, but a large one is best for mixing batter.
Whisk: A hand whisk works great, but an electric mixer speeds things up.
Measuring cups and spoons: Essential for accuracy; consider a kitchen scale for precision.
Cake pans: Two 9-inch round pans are ideal; you can use square pans if needed.
Cooling racks: These help cakes cool evenly; a plate can work in a pinch.
Variations
Blueberry Compote Layer: Add a layer of homemade blueberry compote between the cake layers for a fruity twist.
Red Velvet Twist: Swap the blue food coloring for red to create a classic red velvet cake.
Gluten-Free Option: Use a gluten-free all-purpose flour blend to make this cake gluten-free without sacrificing flavor.
Vegan Version: Substitute eggs with flaxseed meal and use plant-based butter and milk for a vegan-friendly cake.
Chocolate Blue Velvet: Add cocoa powder to the batter for a chocolatey version of this vibrant cake.
Serving Suggestions
Fresh Berries: Serve with a side of fresh blueberries or raspberries for a pop of color and flavor.
Whipped Cream: A dollop of whipped cream adds a light, airy touch to each slice.
Pair with Coffee: Enjoy with a cup of coffee or tea for a delightful afternoon treat.
Elegant Presentation: Garnish with edible flowers or a sprinkle of powdered sugar for a stunning finish.
FAQs about Blue Velvet Cake
As you embark on your Blue Velvet Cake adventure, you might have a few questions. Here are some common queries that can help you along the way:
Can I use a different type of food coloring?
Absolutely! While blue food coloring gives this cake its signature look, you can experiment with other colors. Red food coloring will transform it into a classic red velvet cake, while green or purple can add a fun twist.
How do I store leftover Blue Velvet Cake?
To keep your cake fresh, store it in an airtight container at room temperature for up to three days. If you want to keep it longer, refrigerate it for up to a week. Just remember to let it come to room temperature before serving for the best flavor!
Can I make this cake ahead of time?
Yes! You can bake the cake layers a day in advance. Just wrap them tightly in plastic wrap and store them at room temperature. Frost the cake on the day you plan to serve it for the best texture and flavor.
What can I substitute for buttermilk?
If you don’t have buttermilk on hand, you can make a quick substitute. Mix one cup of milk with one tablespoon of vinegar or lemon juice. Let it sit for about five minutes, and you’ll have a perfect buttermilk replacement!
Can I freeze Blue Velvet Cake?
Yes, you can freeze the cake! Wrap the cooled layers tightly in plastic wrap and then in aluminum foil. They can be frozen for up to three months. Just thaw them in the fridge overnight before frosting and serving.
Final Thoughts
Creating a Blue Velvet Cake is more than just baking; it’s about crafting memories. The vibrant color and rich flavor bring joy to any occasion, whether it’s a birthday, anniversary, or just a Tuesday that needs a little sparkle. Each slice is a reminder that life is meant to be celebrated, and this cake does just that. As you share it with friends and family, you’ll find that the laughter and smiles it brings are the true icing on the cake. So, roll up your sleeves and dive into this delightful recipe—you won’t regret it!
A delicious and visually stunning Blue Velvet Cake, perfect for any celebration.
Ingredients
Scale
2 ½ cups all-purpose flour
1 ½ cups granulated sugar
1 teaspoon baking soda
1 teaspoon baking powder
1 teaspoon salt
1 cup vegetable oil
1 cup buttermilk, room temperature
2 large eggs, room temperature
2 tablespoons blue food coloring
1 teaspoon vanilla extract
1 teaspoon white vinegar
8 ounces cream cheese, softened
½ cup unsalted butter, softened
4 cups powdered sugar
1 teaspoon vanilla extract
2–3 tablespoons milk (as needed for consistency)
Instructions
Preheat your oven to 350°F (175°C). Grease and flour two 9-inch round cake pans.
In a large mixing bowl, whisk together the flour, sugar, baking soda, baking powder, and salt until well combined.
In another bowl, mix the vegetable oil, buttermilk, eggs, blue food coloring, vanilla extract, and vinegar until smooth.
Gradually add the wet ingredients to the dry ingredients, mixing until just combined and no lumps remain.
Divide the batter evenly between the prepared cake pans. Bake for 25-30 minutes, or until a toothpick inserted into the center comes out clean.
Allow the cakes to cool in the pans for 10 minutes, then transfer to wire racks to cool completely.
While the cakes cool, prepare the cream cheese frosting. In a mixing bowl, beat the softened cream cheese and butter together until creamy and smooth.
Gradually add the powdered sugar and vanilla extract, mixing until well combined. If the frosting is too thick, add milk one tablespoon at a time until desired consistency is reached.
Once the cakes are completely cool, place one layer on a serving plate. Spread a layer of cream cheese frosting on top, then place the second layer on top and frost the top and sides of the cake.
Notes
For a fun twist, try adding a layer of blueberry compote between the cake layers for added flavor.
You can also substitute the blue food coloring with red for a red velvet cake variation.