Introduction to Vanilla Cream Tarts with Fresh Raspberries
There’s something magical about dessert that brings us back to simpler times. These Vanilla Cream Tarts with Fresh Raspberries are not just a treat; they’re a sweet escape from the daily grind. Whether you’re looking to impress guests or simply indulge after a long day, this recipe is your go-to. With a creamy filling and a burst of fresh raspberries, it’s a delightful way to celebrate life’s little moments. Plus, they’re surprisingly easy to whip up, making them perfect for both novice and seasoned cooks alike. Let’s dive into this delicious adventure!
Why You’ll Love This Vanilla Cream Tarts with Fresh Raspberries
These Vanilla Cream Tarts with Fresh Raspberries are a dream come true for anyone craving a quick yet impressive dessert. They come together in just 40 minutes, making them perfect for busy weeknights or last-minute gatherings. The creamy vanilla filling paired with the tartness of fresh raspberries creates a flavor explosion that will leave your taste buds dancing. Plus, they look stunning on any table, making you the star of the show!
Ingredients for Vanilla Cream Tarts with Fresh Raspberries
Gathering the right ingredients is the first step to creating these delightful Vanilla Cream Tarts with Fresh Raspberries. Each component plays a crucial role in achieving that perfect balance of flavor and texture. Here’s what you’ll need:
All-purpose flour: The backbone of your tart shell, providing structure and a tender bite.
Unsalted butter: Adds richness and flavor; using unsalted allows you to control the saltiness.
Granulated sugar: Sweetens the dough, giving it a lovely flavor and helping with browning.
Egg yolk: This adds moisture and richness to the dough, making it more pliable.
Ice-cold water: Helps bind the dough without melting the butter, keeping your tart shells flaky.
Heavy whipping cream: The star of the filling, creating a luscious, creamy texture.
Confectioners’ sugar: Sweetens the whipped cream while keeping it light and airy.
Pure vanilla extract: Infuses the cream with a warm, aromatic flavor that elevates the entire dessert.
Fresh raspberries: These juicy gems add a burst of tartness and a pop of color, making your tarts visually stunning.
For those looking to mix things up, consider adding a tablespoon of lemon zest to the whipped cream for a refreshing twist. You can also swap out the raspberries for strawberries or blueberries, depending on your preference. The exact measurements for these ingredients can be found at the bottom of the article, ready for printing!
How to Make Vanilla Cream Tarts with Fresh Raspberries
Creating these Vanilla Cream Tarts with Fresh Raspberries is a delightful journey that’s easier than you might think. Follow these simple steps, and you’ll have a stunning dessert that’s sure to impress.
Step 1: Preheat the Oven
Start by preheating your oven to 350°F (175°C). This step is crucial because it ensures that your tartlet shells bake evenly. A hot oven helps achieve that perfect golden color and flaky texture.
Step 2: Prepare the Tart Dough
In a large bowl, combine the all-purpose flour, softened butter, and granulated sugar. Mix until the mixture resembles coarse crumbs. Then, add the egg yolk and 2 tablespoons of ice-cold water. Stir until a dough forms. If it feels too crumbly, add a bit more water until it holds together nicely. This dough is the foundation of your tarts, so take your time to get it just right!
Step 3: Shape the Tartlet Shells
On a floured surface, roll out the dough to about ¼ inch thick. Use a round cutter to create circles that fit your tartlet pans. Gently press the dough into the pans, ensuring there are no air pockets. Don’t forget to poke holes in the bottoms with a fork; this prevents the shells from puffing up while baking.
Step 4: Bake the Tartlet Shells
Place the tartlet shells in the preheated oven and bake for 15-20 minutes. Keep an eye on them! You want them to turn a light golden color. To check for doneness, gently press the edges; they should feel firm to the touch. Once baked, let them cool completely on a wire rack.
Step 5: Whip the Cream
In a separate bowl, whip the heavy cream until it starts to thicken. Gradually add the confectioners’ sugar and pure vanilla extract. Continue whipping until you achieve stiff peaks. This creamy filling is what makes your tarts so indulgent, so don’t rush this step!
Step 6: Assemble the Tarts
Once the tartlet shells have cooled, it’s time to fill them! Generously spoon the whipped cream into each shell, creating a lovely mound. Then, arrange the fresh raspberries on top. Feel free to get creative with the presentation; a little artistry goes a long way!
Step 7: Chill Before Serving
For the best flavor, refrigerate the assembled tarts for at least 30 minutes. This chilling time allows the cream to set and the flavors to meld beautifully. Trust me, the wait will be worth it when you take that first bite!
Tips for Success
Use cold ingredients for the dough; it helps create a flaky texture.
Don’t overwork the dough; mix just until combined for tender tart shells.
Chill the tartlet shells before baking for a better shape.
Experiment with different fruits; seasonal berries can elevate the flavor.
For a sweeter touch, drizzle honey over the raspberries before serving.
Equipment Needed
Tartlet pans: If you don’t have these, muffin tins work in a pinch.
Mixing bowls: A large bowl for the dough and a medium bowl for whipping cream.
Rolling pin: A wine bottle can substitute if you’re in a bind.
Whisk or electric mixer: Both will do the job for whipping cream.
Round cutter: A glass or jar can serve as a makeshift cutter.
Variations
For a citrus twist, add lemon or orange zest to the whipped cream for a refreshing flavor boost.
Swap out the raspberries for strawberries, blueberries, or blackberries for a colorful berry medley.
Try a chocolate version by folding in cocoa powder into the whipped cream for a rich chocolate cream tart.
For a gluten-free option, substitute all-purpose flour with a gluten-free flour blend.
Make it vegan by using coconut cream instead of heavy cream and a plant-based butter alternative for the dough.
Serving Suggestions
Pair these tarts with a scoop of vanilla ice cream for an extra indulgent treat.
Serve alongside a refreshing mint tea or a glass of sparkling lemonade.
Garnish with a sprig of mint for a pop of color and freshness.
Present on a beautiful platter to impress your guests.
FAQs about Vanilla Cream Tarts with Fresh Raspberries
Can I make the tart shells ahead of time?
Absolutely! You can prepare the tart shells a day in advance. Just store them in an airtight container at room temperature. This way, you can whip up the filling and assemble the tarts when you’re ready to serve.
What can I substitute for heavy cream?
If you’re looking for a lighter option, you can use half-and-half or a non-dairy alternative like coconut cream. Just keep in mind that the texture and flavor may vary slightly.
How do I store leftover tarts?
Store any leftover Vanilla Cream Tarts with Fresh Raspberries in the refrigerator. They’re best enjoyed within a day or two, as the tart shells may become soggy over time.
Can I use frozen raspberries instead of fresh?
Yes, you can use frozen raspberries! Just make sure to thaw and drain them well before using. They may be a bit softer, but they’ll still add that delicious tart flavor.
What’s the best way to serve these tarts?
For a stunning presentation, serve the tarts on a beautiful platter. You can also drizzle a bit of chocolate sauce or sprinkle some powdered sugar on top for an extra touch of elegance!
Final Thoughts
Creating these Vanilla Cream Tarts with Fresh Raspberries is more than just baking; it’s about crafting sweet memories. Each bite transports you to a place of joy, where the creamy filling and tart raspberries dance on your palate. Whether you’re sharing them with loved ones or savoring them solo, these tarts bring a sense of accomplishment and delight. They’re a reminder that even the simplest recipes can create moments of happiness. So, roll up your sleeves, embrace the process, and enjoy the sweet rewards of your culinary adventure!
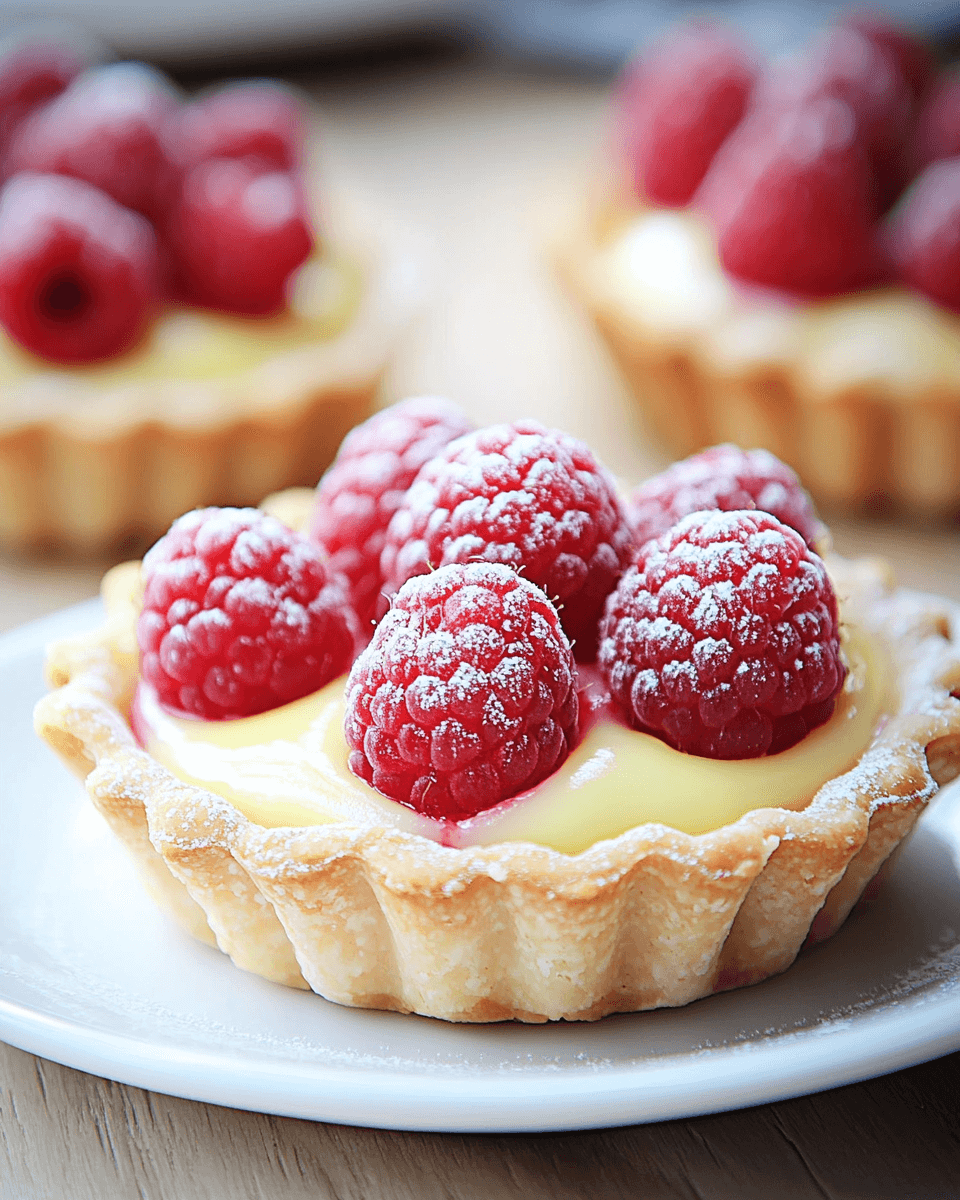
Delightful Vanilla Cream Tarts topped with fresh raspberries, perfect for a sweet treat.
Ingredients
Scale
1 ½ cups all-purpose flour
½ cup unsalted butter, softened
¼ cup granulated sugar
1 large egg yolk
2–3 tablespoons ice-cold water
1 cup heavy whipping cream
½ cup confectioners’ sugar
1 teaspoon pure vanilla extract
1 cup fresh raspberries
Instructions
Preheat your oven to 350°F (175°C).
In a large bowl, mix together the flour, softened butter, and granulated sugar until the mixture resembles coarse crumbs.
Incorporate the egg yolk and 2 tablespoons of ice-cold water into the mixture, stirring until a dough forms. If the dough feels too crumbly, add the remaining tablespoon of water gradually until it holds together.
On a floured surface, roll the dough out to about ¼ inch thick. Use a round cutter to create circles that will fit your tartlet pans. Gently press the dough into the pans and use a fork to poke holes in the bottoms.
Place the tartlet shells in the oven and bake for 15-20 minutes, or until they turn a light golden color. Once baked, allow them to cool completely on a wire rack.
In a separate bowl, whip the heavy cream until it begins to thicken. Gradually add the confectioners’ sugar and vanilla extract, continuing to whip until the cream forms stiff peaks.
Once the tartlet shells have cooled, generously spoon the whipped cream into each shell. Arrange the fresh raspberries on top, creating a beautiful presentation.
For the best flavor, refrigerate the tartlets for at least 30 minutes before serving, allowing the cream to set and the flavors to blend beautifully.
Notes
For an extra zing, mix in a tablespoon of lemon zest into the whipped cream.
You can also switch out the raspberries for strawberries or blueberries for a delightful variation.