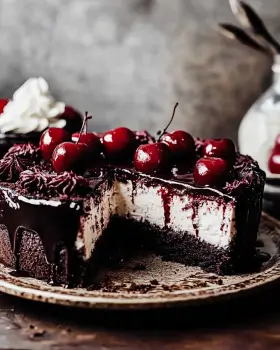
There’s something magical about desserts that bring back memories, isn’t there? I remember the first time I tasted a Black Forest Cheesecake at a family gathering. The rich chocolate and sweet cherries danced on my palate, and I was hooked! This delightful Black Forest Cheesecake is not just a treat; it’s a celebration of flavors that can brighten any occasion. Whether you’re hosting a special dinner or simply want to indulge yourself, this recipe is a quick solution that will impress your loved ones. Let’s dive into this delicious journey together!
Why You’ll Love This Black Forest Cheesecake
This Black Forest Cheesecake is a delightful blend of flavors that’s as easy to make as it is to enjoy. With just a few simple steps, you can create a dessert that looks and tastes like it came from a fancy bakery. The combination of rich chocolate and tart cherries is simply irresistible. Plus, it’s perfect for any occasion, whether it’s a family gathering or a cozy night in. You’ll love how quickly it comes together!
Ingredients for Black Forest Cheesecake
Gathering the right ingredients is the first step to creating your Black Forest Cheesecake masterpiece. Here’s what you’ll need:
Crushed chocolate wafers: These form the base of your cheesecake, providing a rich, chocolatey crust.
Melted unsalted butter: This binds the crust together, adding a lovely richness.
Softened cream cheese: The star of the show! It gives the cheesecake its creamy texture.
Sugar: Sweetens the filling, balancing the tartness of the cherries.
Pure vanilla extract: A splash of this adds depth and warmth to the flavor.
Large eggs: These help set the cheesecake, giving it structure.
Thick sour cream: Adds a tangy flavor and creaminess to the filling.
Cherry pie filling: The fruity layer that brings the classic Black Forest flavor to life.
Unsweetened cocoa powder: Enhances the chocolate flavor, making it even richer.
Heavy whipping cream: For the luscious whipped topping that crowns your cheesecake.
Confectioners’ sugar: Sweetens the whipped cream, making it light and fluffy.
Shaved chocolate: A decorative touch that adds elegance and extra chocolatey goodness.
For those who prefer a fresher taste, feel free to swap the cherry pie filling for fresh cherries. Just remember, all ingredients should be at room temperature for the best mixing results. You can find the exact quantities at the bottom of the article, ready for printing!
How to Make Black Forest Cheesecake
Now that you have all your ingredients ready, let’s get started on making this delightful Black Forest Cheesecake! Follow these simple steps, and you’ll be on your way to a dessert that will have everyone asking for seconds.
Step 1: Preheat and Prepare
First things first, preheat your oven to 325°F (163°C). This ensures your cheesecake bakes evenly. While the oven warms up, grab a 9-inch springform pan and lightly grease it. This will help your cheesecake release easily once it’s baked.
Step 2: Make the Crust
In a mixing bowl, combine your crushed chocolate wafers with the melted unsalted butter. Stir until the mixture resembles wet sand. This is the foundation of your cheesecake, so make sure it’s well mixed! Press this mixture firmly into the bottom of your prepared springform pan. You want a solid crust that holds together beautifully.
Step 3: Prepare the Cheesecake Filling
In a large bowl, use an electric mixer to beat the softened cream cheese until it’s creamy and smooth. Gradually add in the sugar, mixing until fully combined. Next, add the pure vanilla extract and the eggs, one at a time. Make sure each egg is well mixed before adding the next. Scrape down the sides of the bowl as needed. Finally, gently fold in the thick sour cream and unsweetened cocoa powder until everything is uniform and velvety.
Step 4: Layer the Cheesecake
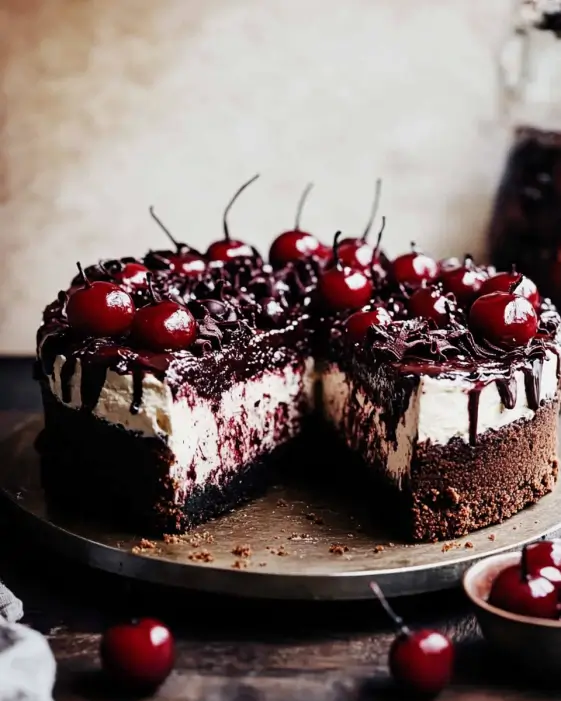
Now it’s time to assemble! Pour half of the cheesecake mixture over the crust. Then, dollop half of the cherry pie filling on top. Carefully layer the remaining cheesecake batter over this, followed by the rest of the cherry filling. This layering creates a beautiful marbled effect that’s as pleasing to the eye as it is to the taste buds!
Step 5: Bake the Cheesecake
Place your cheesecake in the preheated oven and bake for 55-60 minutes. You want the edges to be firm, but the center should still have a slight wobble. Once done, turn off the oven and let the cheesecake sit inside for an additional hour. This gentle cooling helps set the texture perfectly.
Step 6: Chill and Serve
After the cheesecake has cooled to room temperature, transfer it to the refrigerator. Chill for at least 4 hours, or overnight for the best results. Just before serving, whip the heavy cream with confectioners’ sugar until soft peaks form. Spread or pipe this luscious whipped cream atop your cheesecake and finish with a sprinkle of shaved chocolate for that elegant touch!
Tips for Success
Always use room temperature ingredients for a smoother batter.
Don’t skip the chilling time; it enhances the flavor and texture.
For a richer taste, use high-quality chocolate wafers.
Experiment with fresh cherries for a delightful twist.
Keep an eye on the baking time; every oven is different!
Equipment Needed
9-inch springform pan: Essential for easy removal; a regular cake pan works too, but it may be harder to serve.
Mixing bowls: Use a large bowl for the filling and a smaller one for the crust.
Electric mixer: A hand mixer is perfect; a whisk can work, but it’ll take longer.
Spatula: Great for folding and scraping down the sides of the bowl.
Measuring cups and spoons: Accurate measurements ensure the best results.
Variations
Gluten-Free Option: Substitute crushed gluten-free chocolate cookies for the crust to make this cheesecake gluten-free.
Low-Sugar Version: Use a sugar substitute like Stevia or erythritol to reduce the sugar content without sacrificing flavor.
Chocolate Ganache Topping: Drizzle a rich chocolate ganache over the whipped cream for an extra layer of indulgence.
Fruit Variations: Swap out the cherry pie filling for other fruits like raspberries or strawberries for a different twist.
Vegan Adaptation: Use vegan cream cheese and coconut cream for the whipped topping to create a dairy-free version.
Serving Suggestions
Pair with Coffee: A warm cup of coffee complements the rich flavors beautifully.
Fresh Berries: Serve with a side of fresh berries for a pop of color and freshness.
Elegant Plating: Use a cake stand for a stunning presentation at gatherings.
Chocolate Sauce: Drizzle chocolate sauce over each slice for added indulgence.
Mint Leaves: Garnish with mint leaves for a refreshing touch.
FAQs about Black Forest Cheesecake
As you embark on your Black Forest Cheesecake adventure, you might have a few questions. Here are some common queries that can help guide you through the process:
Can I use fresh cherries instead of cherry pie filling?
Absolutely! Fresh cherries can add a delightful burst of flavor. Just pit and slice them before layering them into your cheesecake.
How do I store leftover cheesecake?
Store any leftovers in an airtight container in the refrigerator. It should stay fresh for up to five days, but I doubt it will last that long!
Can I freeze Black Forest Cheesecake?
Yes, you can freeze it! Wrap the cheesecake tightly in plastic wrap and then in aluminum foil. It can be frozen for up to three months. Just remember to thaw it in the fridge before serving.
What can I substitute for cream cheese?
If you’re looking for a lighter option, you can use Greek yogurt or ricotta cheese. They’ll change the texture slightly but still taste delicious!
How can I make my cheesecake less sweet?
To reduce sweetness, simply cut back on the sugar in the filling. You can also balance it with a bit more cocoa powder for a richer chocolate flavor.
Final Thoughts
Creating this Black Forest Cheesecake is more than just baking; it’s about crafting a moment of joy. Each slice is a celebration of rich chocolate and sweet cherries, bringing smiles to faces young and old. Whether you’re sharing it at a family gathering or enjoying a quiet evening at home, this dessert has a way of making any occasion feel special. I hope you find as much happiness in making it as I do. So, roll up your sleeves, gather your loved ones, and let the delightful flavors of this cheesecake create lasting memories in your kitchen!
A delightful Black Forest Cheesecake that combines rich chocolate and cherry flavors, perfect for any occasion.
Ingredients
Scale
1 ½ cups crushed chocolate wafers
½ cup melted unsalted butter
2 cups softened cream cheese
1 cup sugar
1 teaspoon pure vanilla extract
3 large eggs
1 cup thick sour cream
1 cup cherry pie filling
¼ cup unsweetened cocoa powder
½ cup heavy whipping cream
2 tablespoons confectioners’ sugar
Shaved chocolate, for decoration
Instructions
Begin by preheating your oven to 325°F (163°C) and prepare a 9-inch springform pan by greasing it lightly.
In a mixing bowl, combine the crushed chocolate wafers with the melted butter, stirring until the mixture resembles wet sand. Press this mixture firmly into the base of the prepared springform pan to create a solid crust.
In a separate large bowl, use an electric mixer to beat the softened cream cheese until it’s creamy and smooth. Gradually incorporate the sugar, mixing until fully combined.
Add the vanilla extract and introduce the eggs one at a time, ensuring each is well mixed before adding the next. Scrape the bowl’s sides as necessary to ensure even blending.
Gently fold in the sour cream and cocoa powder until the mixture is uniform and velvety.
Pour half of the cheesecake mixture over the crust, then dollop half of the cherry pie filling on top. Carefully layer the remaining cheesecake batter, followed by the rest of the cherry filling.
Bake for 55-60 minutes, until the edges are firm yet the center has a slight wobble. Turn off the oven and let the cheesecake sit inside for an additional hour to set.
Once cooled to room temperature, transfer the cheesecake to the refrigerator and chill for at least 4 hours, or overnight for best results.
Just before serving, whip the heavy cream with confectioners’ sugar until soft peaks form. Spread or pipe the whipped cream atop the cheesecake and finish with a sprinkle of chocolate shavings for an elegant touch.
Notes
For best results, chill the cheesecake overnight.
Feel free to use fresh cherries instead of cherry pie filling for a fresher taste.
Ensure all ingredients are at room temperature for better mixing.