


Few things compare to the warm, buttery goodness of freshly baked garlic breadsticks. Whether served alongside a comforting bowl of pasta, a hearty soup, or simply enjoyed on their own, these breadsticks are a staple in Italian-American dining. Inspired by the famous Olive Garden breadsticks, this homemade version delivers the same soft, fluffy texture, golden crust, and irresistible garlic-butter topping—all in just one hour.
This recipe is designed for both novice bakers and seasoned cooks looking for a quick and foolproof way to create restaurant-quality breadsticks at home. The best part? They require minimal ingredients, making them a fantastic addition to any meal without the need for an all-day baking commitment.
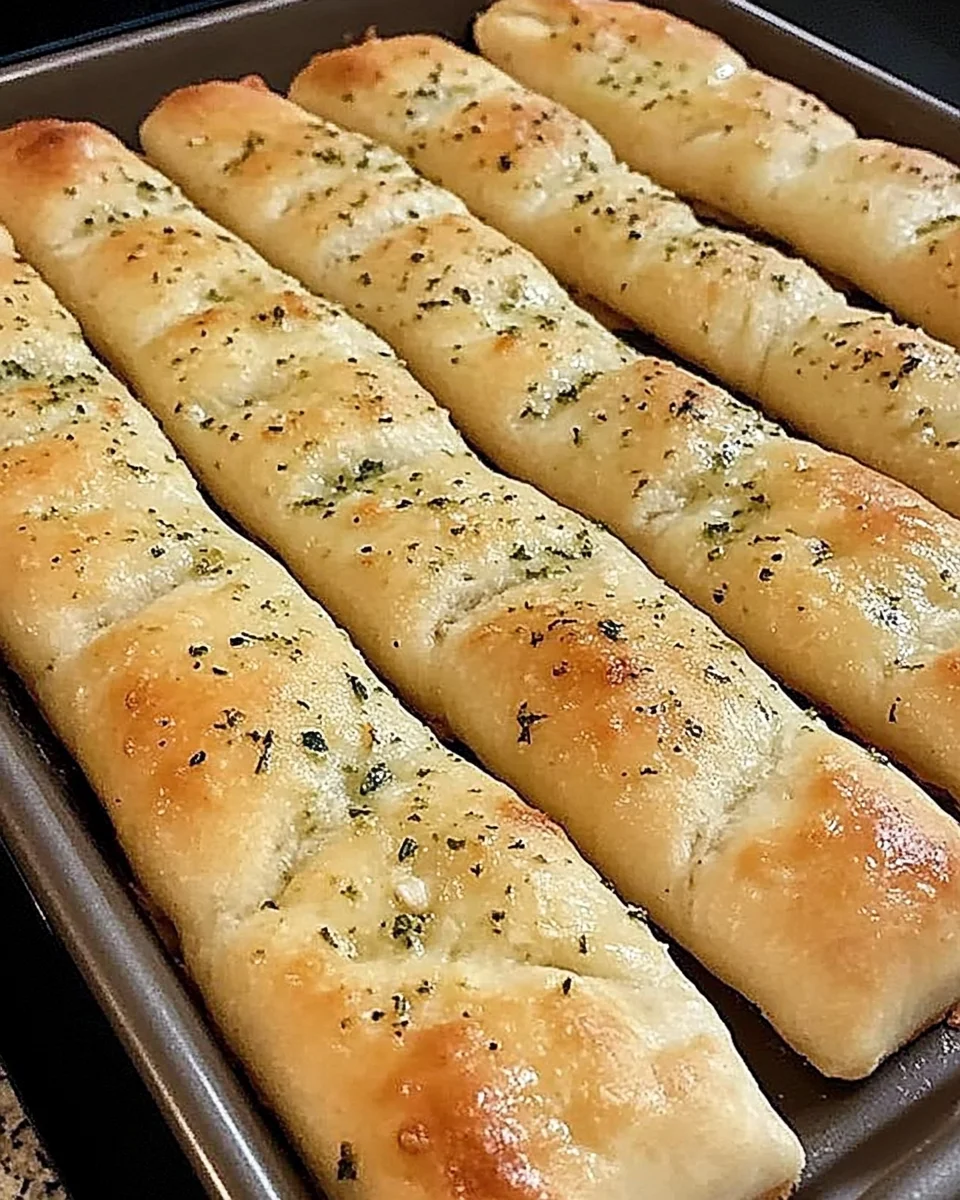
The Magic Behind Perfect Breadsticks
1. The Secret to Soft and Fluffy Breadsticks
The key to achieving the light, airy texture of these breadsticks lies in the dough preparation. Yeast activation, proper kneading, and a short but effective rise time all contribute to the bread’s final texture. Using instant yeast helps speed up the process, allowing you to enjoy fresh breadsticks without waiting hours for proofing.
Additionally, the dough’s hydration level (the balance between flour and liquid) ensures the perfect chewiness without becoming too dense. Kneading develops the gluten, which gives the breadsticks their signature elasticity, while resting allows the dough to relax and expand for that pillowy softness.
2. The Buttery Garlic Finish
While the dough provides the foundation, the buttery garlic topping is what makes these breadsticks truly irresistible. A simple combination of melted butter, garlic salt, and dried parsley adds layers of flavor, ensuring that each bite is packed with garlicky goodness. Brushing this mixture on the breadsticks right after baking allows it to seep into the warm bread, creating the perfect finish.
3. Achieving the Golden Brown Crust
A 400°F oven temperature is the sweet spot for baking breadsticks—hot enough to develop a golden crust while keeping the interior soft and fluffy. The even distribution of heat ensures that the breadsticks bake uniformly, preventing them from becoming too dry or undercooked.
Why You’ll Love This Recipe
1. Fast and Easy:
Unlike traditional bread recipes that require multiple proofing stages and hours of rising time, this recipe delivers perfectly soft breadsticks in just one hour. It’s an excellent choice for busy weeknights or last-minute dinner plans.
2. Budget-Friendly:
With just a handful of pantry staples, you can make a batch of 12 breadsticks for a fraction of the cost of store-bought or restaurant versions. Plus, homemade always tastes better!
3. Versatile and Customizable:
This base recipe can be easily modified to suit different flavors and preferences. Whether you want cheesy, herbed, or even spicy breadsticks, the possibilities are endless.
4. Pairs Well with Everything:
These breadsticks complement a wide range of dishes, from creamy pasta and rich soups to fresh salads and hearty main courses. They’re also delicious on their own with a side of marinara sauce for dipping.
Ingredients – The Secret to Soft, Buttery Perfection
For the Dough:
- 1 ½ cups warm water
- 2 teaspoons instant yeast
- 2 tablespoons sugar
- 4 – 4 ½ cups all-purpose flour
- 1 tablespoon salt
- 2 tablespoons melted butter
For the Topping:
- 2 tablespoons melted butter
- ½ teaspoon garlic salt
- ½ teaspoon dried parsley
Directions – From Dough to Delicious in No Time
- Activate the Yeast: In a small bowl, stir together warm water, yeast, and sugar. If using active dry yeast, let the mixture sit for 5 minutes until foamy.
- Make the Dough: In a large bowl, mix 4 cups of flour with salt. Add the yeast mixture and melted butter. Stir until a dough forms.
- Knead to Perfection: Transfer the dough to a floured surface and knead for 5 minutes until smooth. If sticky, gradually add more flour.
- Shape the Breadsticks: Roll the dough into a large rectangle and divide into 12 equal pieces. Roll each piece into a breadstick shape and place on a prepared baking sheet.
- Let it Rise: Cover with a towel and allow the dough to rise for 30-45 minutes until puffy.
- Bake Until Golden: Preheat the oven to 400°F (200°C). Bake for 12-14 minutes or until lightly browned.
- Add the Buttery Finish: Mix melted butter with garlic salt and parsley. Brush over the warm breadsticks before serving.
Nutritional Breakdown – Indulgence in Every Bite (Per breadstick, approximate values)
- Calories: ~150 kcal
- Carbohydrates: ~24g
- Protein: ~4g
- Fats: ~4g
- Fiber: ~1g
Ways to Customize Your Breadsticks
One of the best things about this recipe is how versatile it is. Here are some ideas to take these breadsticks to the next level:
1. Cheese Lovers’ Breadsticks
For an extra indulgent touch, sprinkle shredded mozzarella, Parmesan, or cheddar cheese over the breadsticks just before baking. The cheese will melt into a gooey, golden topping that pairs perfectly with the buttery garlic base.
2. Herb-Infused Breadsticks
Enhance the flavor with fresh or dried herbs. Try adding:
- Italian seasoning for a classic touch
- Rosemary and thyme for an earthy, aromatic twist
- Basil and oregano for a Mediterranean feel
3. Spicy Kick Breadsticks
If you love a little heat, mix red pepper flakes or cayenne pepper into the garlic butter topping. This adds a subtle spice that enhances the breadsticks without overpowering their classic flavor.
4. Whole Wheat Variation
For a healthier alternative, substitute half of the all-purpose flour with whole wheat flour. This gives the breadsticks a nuttier flavor and a slightly denser texture while still maintaining softness.
5. Sweet Cinnamon Sugar Breadsticks
For a dessert twist, skip the garlic and brush the breadsticks with melted butter, then sprinkle with a mixture of cinnamon and sugar. Serve with a vanilla glaze or honey for dipping.
Serving Suggestions
1. Classic Italian Pairings
These breadsticks are the perfect side dish for Italian-inspired meals. Serve them with:
- Creamy Fettuccine Alfredo
- Spaghetti with Marinara or Bolognese Sauce
- Lasagna or Stuffed Shells
- Minestrone or Tomato Basil Soup
2. Dipping Sauces
Make your breadsticks even more enjoyable with these delicious dipping options:
- Marinara sauce for a tangy, tomato-based dip
- Garlic butter sauce for extra richness
- Ranch dressing for a creamy contrast
- Cheese sauce for a gooey, decadent touch
3. Light and Fresh Complements
For a well-balanced meal, pair the breadsticks with a crisp garden salad, Caesar salad, or roasted vegetables. Their rich, buttery flavor contrasts beautifully with fresh, bright ingredients.
Frequently Asked Questions (FAQs)
1. Can I make these breadsticks ahead of time?
Yes! You can prepare the dough and shape the breadsticks up to a day in advance. Cover them tightly and refrigerate until ready to bake. Let them come to room temperature before baking for best results.
2. How do I store leftover breadsticks?
Store any leftover breadsticks in an airtight container at room temperature for up to 2 days. For longer storage, keep them in the refrigerator for up to 5 days.
3. How do I reheat breadsticks to keep them soft?
To reheat, wrap the breadsticks in foil and warm them in a 350°F oven for 5-7 minutes. You can also microwave them for 15-20 seconds, though this may slightly change their texture.
4. Can I freeze these breadsticks?
Absolutely! Let the breadsticks cool completely, then wrap them tightly in plastic wrap or aluminum foil. Freeze for up to 3 months. To reheat, bake at 350°F for 10-12 minutes until warmed through.
5. Can I use active dry yeast instead of instant yeast?
Yes, but you’ll need to let the yeast activate in warm water with sugar for about 5-10 minutes before adding it to the dough. This will ensure proper rising.
6. What if I don’t have garlic salt?
You can make your own by combining 1/2 teaspoon of garlic powder with a pinch of salt. Alternatively, fresh minced garlic mixed with melted butter works just as well.
Final Thoughts: The Ultimate Homemade Breadstick Experience
There’s something truly special about making warm, fresh breadsticks from scratch. This 1-hour garlic breadstick recipe brings all the fluffy, buttery, garlicky goodness of restaurant-quality breadsticks into your own kitchen—without the wait.
With a simple yeast dough, quick rise time, and a rich garlic butter finish, these breadsticks are guaranteed to become a staple in your home. Whether you’re serving them alongside a family dinner, impressing guests, or simply indulging in a batch on their own, they deliver warmth, comfort, and incredible flavor in every bite.
Once you try these homemade breadsticks, you’ll never look at store-bought versions the same way again. Happy baking!